
BONUS CHAPTER 15
Quick Start—3ds Max 8 Bible: Creating a Furry Creature
Introducing and planning the Quick Start project
Extruding limb stubs
Creating a head with Booleans
Deforming a body to look organic
Using a Multi/Sub-object material
Adding fur
When you first got your hands on 3ds Max, you were probably focused on one goal—creating cool 3D images and animations. I know that many of you bought Max to make money, claim a tax write-off, earn a way to Hollywood, or impress your girlfriend or boyfriend, but I'll just ignore those reasons for now. The goal is to create something cool.
If you've perused this book's Table of Contents or thumbed through its many pages, you've seen sections on modeling, materials, dynamics, and other topics. But if you're like me, you don't want to wade through tons of material before you have something to show off to Mom. (Actually, if you're like me, then you've opened straight to the special effects section, in which case you won't be reading this.)
The purpose of this Quick Start is to give you a taste of what Max can do. This soaring view of the software from 20,000 feet is intended to show you the big picture before you delve into the details. It exposes you to the most common features—including many new features—and whets your appetite for the more in-depth chapters to follow.
This part of the book is intended for those new to the software. If you're an experienced user, then your mom no doubt is already impressed with your work, so you can happily advance to whichever chapter appeals to you. (Forgive me for catering to the newbie, but we were all beginners once.)
Visiting the Forest—Planning the Production
For this Quick Start, let's focus on something cute, fuzzy, and furry. This provides a good example and a way to test out the new Hair and Fur features.
The furry creature is going to take some thought. Before diving into the modeling, the proper method is to start with a plan, including a simple sketch. My simple sketch shows a funny-looking character with a large portly belly and big googly eyes. Because the character is more organic and because I want to keep the detail minimal, we want to smooth the character.
The fur on the character will be thick and heavy and will hide most of the details of the character, making the modeling task much easier. As the personality of this character comes alive, I feel it needs a name, so I'll call it a Rascoon.
With a definite plan, we're ready to begin. This Quick Start is divided into separate tutorials, with each tutorial containing a series of easy-to-follow steps. These steps are intended to show you the results of performing certain Max operations, but feel free to deviate from these steps to create your own results. Being creative and exploring the software is the best way to learn.
On the CD-ROM
After each of the following tutorials, I saved the scene file. You can find these files in the Bonus Chapter 15 directory on the book's CD.
Modeling the Character
The first step in the production is to model the main furry Rascoon character. The modeling process is divided into several simple tutorials. In the first one, you create the head and body objects by modifying primitive objects. The second tutorial focuses on creating the animal's head. The third tutorial focuses on the iterative process of editing the model.
The following tutorials show one character modeling technique, but many others exist. As you explore the various modeling techniques, find and develop methods that work well for you.
Tutorial: Creating the Rascoon's body and extruding limbs
Our first step begins the task of modeling the main character. We start with the major elements of the character: the body. The details and smoothing come later; for now, we only want to get the basic shape.
To create the Rascoon's body and head, follow these steps:
- Select Create
 Standard Primitives GeoSphere, and drag in the Top viewport to create a GeoSphere object with a Radius of about 60. In the Name and Color rollout of the command panel, name this object body.
Note
This chapter uses Generic Units. You can change the units using the Units Setup dialog box opened using the Customize
Units Setup menu command. - Right-click the GeoSphere object, and select the Convert To Convert to Editable Poly menu command from the pop-up quadmenu.
- In the Modifier Stack, select the Polygon subobject mode. Enable the Ignore Backfacing option in the Selection rollout to make sure the polygons on the reverse side of the sphere aren't selected. Then drag over the five topmost polygons in the Top viewport. The polygons turn red when selected.
- Select the Extrude tool in the Edit Polygons rollout, and drag upward in the Left viewport a short distance to create the character's neck. Then click the Extrude button to exit Edit mode.
- Press and hold the Ctrl key, and click to select two polygons on the front of the sphere in the Front viewport where the arms are located. Then use the Extrude tool to drag out some arm stubs.
- Repeat the select and extrude steps to extrude stubs for both legs and a tail. The leg selections should consist of five polygons, and the tail only one.
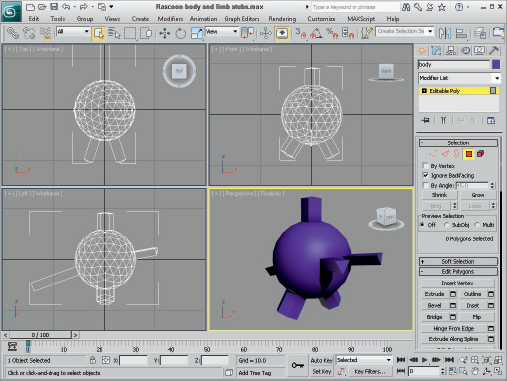
The result of this tutorial, shown in Figure 1, doesn't look like a valid character, but it provides a good starting point that you can enhance with details like a face, arms, and legs. This tutorial is saved on the CD as Rascoon body and limb stubs.max.
FIGURE 1 The body of the Rascoon character is a simple GeoSphere with extruded limb stubs.
Tutorial: Adding the Rascoon's head
From the sketch I made, the Rascoon has a head that consists of two puffy cheeks and large ellipsoid eyes. I created these general shapes by attaching several primitive objects together.
To create and attach the Rascoon's head, follow these steps:
- Select Create Extended Primitives Capsule, and drag in the Left viewport to the left to create a Capsule object with a Radius of about 18 and a Height of around 80.
- Select Create Standard Primitives GeoSphere, and drag in the Left viewport above the Capsule object to create a GeoSphere object with a Radius of about 15. Select the Scale tool from the main toolbar, and drag the GeoSphere object's Y-axis to elongate the GeoSphere object.
- Select the Move tool from the main toolbar, press and hold the Shift key, and drag the new GeoSphere to the left in the Left viewport to create a copy of the GeoSphere. In the Clone Options dialog box, select Copy and click the OK button.
- Use the Create Standard Primitives GeoSphere menu command to create a third GeoSphere in front of the Capsule and the existing GeoSphere objects. The two elongated GeoSpheres form the eyes, the newest GeoSphere is the nose, and the Capsule object forms both cheeks.
- Select the nose GeoSphere. Open the Create panel, and choose Compound Objects from the drop-down list at the top of the panel. Click the Boolean button, choose the Pick Operand B button in the Pick Boolean rollout, and click the Capsule object. Make sure the Move option is selected, and choose the Union option in the Operation section of the Parameters rollout. This combines the two objects into one and removes the interior polygons.
- Click the Select button in the main toolbar, click the Boolean button again, select the Pick Operand B button, and choose the eye GeoSphere. Then repeat this step for the other eye.
- With the Move tool, position the head over the neck stub and repeat the Boolean union step to attach the head to the body object.
We still need to work on the arms, feet, and tail, but for now we seem to be getting ahead. The result of this tutorial is shown in Figure 2. This tutorial is saved on the CD as Rascoon attached head.max.
FIGURE 2 The Rascoon character with an attached head

Tutorial: Editing the body
Now that the head is in good shape, we return our attention to the body, which needs some help. The body is still too spherical, and the limbs are too blocky. Some deformation of the body is in order and the MeshSmooth modifier can help the blockiness. To edit the Rascoon's body, follow these steps:
- Right-click the body, and convert it to an Editable Poly object. Then select the Polygon subobject mode and select all the body polygons below the neck. Use the Scale and Move tools to scale the body in the Y- and Z-axes.
- Open the Soft Selection rollout, and enable the Use Soft Selection option. Set the Falloff value to 35. Drag over the arms in the Left viewport, and then scale, rotate, and move them to pull the body out away from the rest of the body. Repeat this for the tail and legs, adding more deformation to the body.
- In Polygon subobject mode, drag over each front arm independently and rotate the arms downward to act more like front feet. Moving the front arms down causes some polygons in the front of the body to overlap. To fix this problem, select the problem areas and click the Relax button in the Edit Geometry rollout several times.
- With the deformation looking much better and not so spherical, you can apply an MSmooth to smooth some areas. Click the MSmooth button to apply a mesh smooth over the entire character.
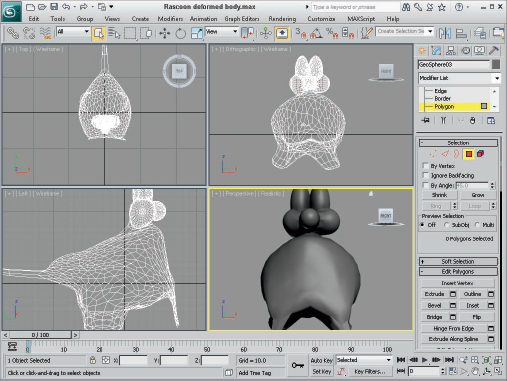
With the body deformed and looking more organic and animal-like, the character is starting to look like a critter you'd find in the deep woods, as shown in Figure 3. This tutorial is saved on the CD as Rascoon deformed body.max.
FIGURE 3 The process of deforming the body gives the creature an organic look.
Tutorial: Adding materials
The next simple tutorial before the Rascoon is complete is to add materials that complete the coloring of the Rascoon's nose, eyes, and feet. For this, we use the Multi/Sub-Object material.
To add materials to the Rascoon's features, follow these steps:
- Select the Rendering Material Editor menu command (or press the M key) to open the Material Editor. Click the Standard material button, select the Multi/Sub-Object material from the Material/Map Browser, and click the OK button. Select to Replace the old material, and click OK.
- In the Multi/Sub-Object Basic Parameters rollout, click the Set Number button and set the number to 4. Then click the first Sub-Material.
- Change the Diffuse color to white, and increase the Specular Level to 90 with a Glossiness value of 10. Then set the Material ID Channel to 1. Click the Go Forward to Sibling button to access the second sub-material.
- Change the Diffuse color to black, set the Specular Level to 94, the Glossiness value to 70, and the Material ID Channel to 2. Then click the Go Forward to Sibling button again to access the third sub-material.
- Change the Diffuse color to black, the Specular Level to 76, the Glossiness value to 20, and the Material ID Channel to 3. Then click the Go Forward to Sibling button again to access the third sub-material.
- Change the Diffuse color to light brown and the Material ID Channel to 4. Click the Go to Parent button, and drag the material from its sample slot onto the Rascoon character. Then close the Material Editor.
- Select the Polygons subobject mode, select all the character polygons, and set the Material ID to 4 in the Polygon Properties rollout. Then select the polygons that make up the eyes, and set the Material ID to 1. Select the front feet, and set the Material ID to 2. Finally, select the nose, and set the Material ID to 3.
- In the Soft Selection rollout, disable Soft Selection. Choose the Circular Selection Region from the flyout under the Rectangular Selection Region button on the main toolbar. In Polygon subobject mode, select a group of polygons in the center of each eyeball, and set the Material ID to 3.
Adding materials helps to define the various character parts, as shown in Figure 4. This tutorial is saved on the CD as Rascoon with materials.max.
Tutorial: Adding fur
Now to give it some life, we add the fur using the Hair and Fur modifier. The benefit of fur is that it covers lots of the details we don't need to paint.
To add fur to the Rascoon character, follow these steps:
- Select the body object, and choose the Modifiers Hair and Fur Hair and Fur WSM menu command to apply the Hair and Fur modifier. After it is applied, several display hairs are displayed in the viewports.
- Select the Polygon subobject in the Selection rollout, and drag over the entire Rascoon body, leaving out the head, the front feet, and the soles of the back feet. Then click the Update Selection button in the Selection rollout. This removes the hair from the unselected areas.
FIGURE 4 Adding materials to the Rascoon character better differentiates the various body parts.

Tip
After selecting all the areas that have fur applied, create a named selection for the selected fur area by typing the name fur area in the Named Selection field on the main toolbar.
- In the Tools rollout, click the Load button to open the Hair and Fur Presets dialog box, and double-click the Fuzzybrown.shp thumbnail.
- In the General Parameters rollout, set the Hair Count to 300000, the Scale value to 20, the Root Thickness to 1.0, and the Tip Thickness to 0.3.
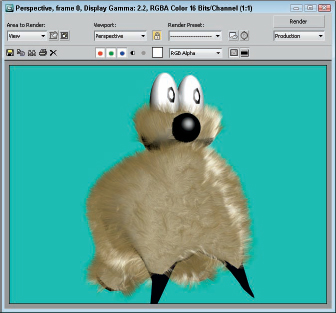
Although the hair has been added to the character, it isn't visible until the scene is rendered. If you want to see a test render, select Rendering ![]() Render and click the Render button in the Render dialog box. Be warned that rendering the figure with hair takes much longer than a figure without. Figure 5 shows a rendered look at the Rascoon with hair. This tutorial is saved on the CD as Hairy Rascoon.max.
Render and click the Render button in the Render dialog box. Be warned that rendering the figure with hair takes much longer than a figure without. Figure 5 shows a rendered look at the Rascoon with hair. This tutorial is saved on the CD as Hairy Rascoon.max.
FIGURE 5 Adding hair to the Rascoon character hides lots of detail so we don't have to model or texture.
Tutorial: Creating a forest backdrop
For the final step, we add a scenic forest backdrop to make the Rascoon feel more at home.
To add a scenic backdrop, follow these steps:
- Open the Environment & Effects dialog box by choosing Rendering Environment (or by pressing the 8 key). Enable the Use Map check box, and click the Environment Map button labeled None. The Material/Map Browser dialog box appears.
- In the right pane of the Material/Map Browser is a list of materials and maps. Double-click the Bitmap item within the Maps rollout. The Select Bitmap Image File dialog box opens.
- Locate the background image named Forest scene.tif in the Bonus Chapter 15 directory on the CD, and click it to select it.
- Click Open to load the background image. When loaded, the image's filename appears on the button in the Environment panel. Click the close icon in the upper-right corner of the Environment dialog box to close it.
- To see the background image in a test render, rotate the Perspective viewport until the Rascoon is at the bottom of the viewport, and then select the Rendering Render menu command. Make sure that the Perspective viewport is selected from the bottom of the Render dialog box, and click the Render button.
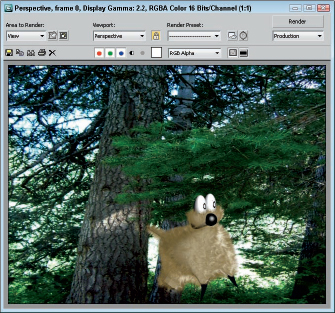
Figure 6 shows the test render in the Rendered Frame window with the forest background. This tutorial is saved on the CD as Rascoon with background.max.
FIGURE 6 The background image adds to the forest scene.
Summary
I hope you're happy with your first footsteps into Max. This chapter exposed you to a number of important aspects of Max, including the following:
- An approach to modeling characters
- Basic modeling features including extrude, smooth, and relax
- Applying materials to a character to define body parts
- Adding fur to a character
- Adding a background image and rendering the scene
But hold onto your seats, because so much of the software lies ahead. In Chapter 1, you start easily with an in-depth look at the Max interface. If you feel ready for more advanced challenges, review the Table of Contents and dive into any topic that looks good.