
Chapter 10
The Document Object Model
WHAT’S IN THIS CHAPTER?
- Understanding the DOM as a hierarchy of nodes
- Working with the various node types
- Coding the DOM around browser incompatibilities and gotchas
The Document Object Model (DOM) is an application programming interface (API) for HTML and XML documents. The DOM represents a document as a hierarchical tree of nodes, allowing developers to add, remove, and modify individual parts of the page. Evolving out of early Dynamic HTML (DHTML) innovations from Netscape and Microsoft, the DOM is now a truly cross-platform, language-independent way of representing and manipulating pages for markup.
DOM Level 1 became a W3C recommendation in October 1998, providing interfaces for basic document structure and querying. This chapter focuses on the features and uses of DOM Level 1 as it relates to HTML pages in the browser and its implementation in JavaScript. The most recent versions of Internet Explorer, Firefox, Safari, Chrome, and Opera all have excellent DOM implementations.
Note that all DOM objects are represented by COM objects in Internet Explorer 8 and earlier. This means that the objects don’t behave or function the same way as native JavaScript objects. These differences are highlighted throughout the chapter.
Any HTML or XML document can be represented as a hierarchy of nodes using the DOM. There are several node types, each representing different information and/or markup in the document. Each node type has different characteristics, data, and methods, and each may have relationships with other nodes. These relationships create a hierarchy that allows markup to be represented as a tree, rooted at a particular node. For instance, consider the following HTML:
<html>
    <head>
        <title>Sample Page</title>
    </head>
    <body>
        <p>Hello World!</p>
    </body>
</html>
This simple HTML document can be represented in a hierarchy, as illustrated in Figure 10-1.
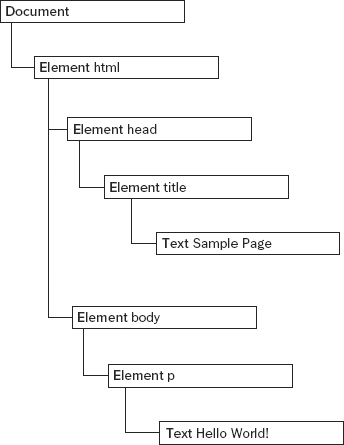
A document node represents every document as the root. In this example, the only child of the document node is the <html> element, which is called the document element. The document element is the outermost element in the document within which all other elements exist. There can be only one document element per document. In HTML pages, the document element is always the <html> element. In XML, where there are no predefined elements, any element may be the document element.
Every piece of markup can be represented by a node in the tree: HTML elements are represented by element nodes, attributes are represented by attribute nodes, the document type is represented by a document type node, and comments are represented by comment nodes. In total, there are 12 node types, all of which inherit from a base type.
The Node Type
DOM Level 1 describes an interface called Node that is to be implemented by all node types in the DOM. The Node interface is implemented in JavaScript as the Node type, which is accessible in all browsers except Internet Explorer. All node types inherit from Node in JavaScript, so all node types share the same basic properties and methods.
Every node has a nodeType property that indicates the type of node that it is. Node types are represented by one of the following 12 numeric constants on the Node type:
- Node.ELEMENT_NODE (1)
- Node.ATTRIBUTE_NODE (2)
- Node.TEXT_NODE (3)
- Node.CDATA_SECTION_NODE (4)
- Node.ENTITY_REFERENCE_NODE (5)
- Node.ENTITY_NODE (6)
- Node.PROCESSING_INSTRUCTION_NODE (7)
- Node.COMMENT_NODE (8)
- Node.DOCUMENT_NODE (9)
- Node.DOCUMENT_TYPE_NODE (10)
- Node.DOCUMENT_FRAGMENT_NODE (11)
- Node.NOTATION_NODE (12)
A node’s type is easy to determine by comparing against one of these constants, as shown here:
if (someNode.nodeType == Node.ELEMENT_NODE){   //won't work in IE < 9
    alert("Node is an element.");
}
This example compares the someNode.nodeType to the Node.ELEMENT_NODE constant. If they’re equal, it means someNode is actually an element. Unfortunately, since Internet Explorer 8 and earlier doesn’t expose the Node type constructor, this code will cause an error. For cross-browser compatibility, it’s best to compare the nodeType property against a numeric value, as in the following:
if (someNode.nodeType == 1){   //works in all browsers
    alert("Node is an element.");
}
Not all node types are supported in web browsers. Developers most often work with element and text nodes. The support level and usage of each node type is discussed later in the chapter.
The nodeName and nodeValue Properties
Two properties, nodeName and nodeValue, give specific information about the node. The values of these properties are completely dependent on the node type. It’s always best to test the node type before using one of these values, as the following code shows:
if (someNode.nodeType == 1){
    value = someNode.nodeName;   //will be the element's tag name
}
In this example, the node type is checked to see if the node is an element. If so, the nodeName value is assigned to a variable. For elements, nodeName is always equal to the element’s tag name, and nodeValue is always null.
Node Relationships
All nodes in a document have relationships to other nodes. These relationships are described in terms of traditional family relationships as if the document tree were a family tree. In HTML, the <body> element is considered a child of the <html> element; likewise the <html> element is considered the parent of the <body> element. The <head> element is considered a sibling of the <body> element, because they both share the same immediate parent, the <html> element.
Each node has a childNodes property containing a NodeList. A NodeList is an array-like object used to store an ordered list of nodes that are accessible by position. Keep in mind that a NodeList is not an instance of Array even though its values can be accessed using bracket notation and the length property is present. NodeList objects are unique in that they are actually queries being run against the DOM structure, so changes will be reflected in NodeList objects automatically. It is often said that a NodeList is a living, breathing object rather than a snapshot of what happened at the time it was first accessed.
The following example shows how nodes stored in a NodeList may be accessed via bracket notation or by using the item() method:
var firstChild = someNode.childNodes[0];
var secondChild = someNode.childNodes.item(1);
var count = someNode.childNodes.length;
Note that using bracket notation and using the item() method are both acceptable practices, although most developers use bracket notation because of its similarity to arrays. Also note that the length property indicates the number of nodes in the NodeList at that time. It’s possible to convert NodeList objects into arrays using Array.prototype.slice() as was discussed earlier for the arguments object. Consider the following example:
//won't work in IE8 and earlier
var arrayOfNodes = Array.prototype.slice.call(someNode.childNodes,0);
This works in all browsers except Internet Explorer 8 and earlier versions, which throw an error because a NodeList is implemented as a COM object and thus cannot be used where a JScript object is necessary. To convert a NodeList to an array in Internet Explorer, you must manually iterate over the members. The following function works in all browsers:
function convertToArray(nodes){
    var array = null;
    try {
        array = Array.prototype.slice.call(nodes, 0);  //non-IE and IE9+
    } catch (ex) {
        array = new Array();
        for (var i=0, len=nodes.length; i < len; i++){
            array.push(nodes[i]);
        }
    }

    return array;
}
The convertToArray() function first attempts to use the easiest manner of creating an array. If that throws an error (which it will in Internet Explorer through version 8), the error is caught by the try-catch block and the array is created manually. This is another form of quirks detection.
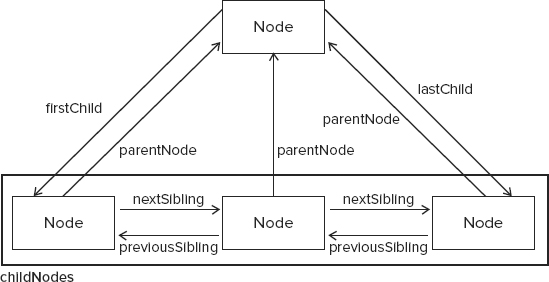
Each node has a parentNode property pointing to its parent in the document tree. All nodes contained within a childNodes list have the same parent, so each of their parentNode properties points to the same node. Additionally, each node within a childNodes list is considered to be a sibling of the other nodes in the same list. It’s possible to navigate from one node in the list to another by using the previousSibling and nextSibling properties. The first node in the list has null for the value of its previousSibling property, and the last node in the list has null for the value of its nextSibling property, as shown in the following example:
if (someNode.nextSibling === null){
    alert("Last node in the parent's childNodes list.");
} else if (someNode.previousSibling === null){
    alert("First node in the parent's childNodes list.");
}
Note that if there’s only one child node, both nextSibling and previousSibling will be null.
Another relationship exists between a parent node and its first and last child nodes. The firstChild and lastChild properties point to the first and last node in the childNodes list, respectively. The value of someNode.firstChild is always equal to someNode.childNodes[0], and the value of someNode.lastChild is always equal to someNode.childNodes[someNode.childNodes.length-1]. If there is only one child node, firstChild and lastChild point to the same node; if there are no children, then firstChild and lastChild are both null. All of these relationships help to navigate easily between nodes in a document structure. Figure 10-2 illustrates these relationships.
With all of these relationships, the childNodes property is really more of a convenience than a necessity, since it’s possible to reach any node in a document tree by simply using the relationship pointers. Another convenience method is hasChildNodes(), which returns true if the node has one or more child nodes and is more efficient than querying the length of the childNodes list.
One final relationship is shared by every node. The ownerDocument property is a pointer to the document node that represents the entire document. Nodes are considered to be owned by the document in which they were created (typically the same in which they reside), because nodes cannot exist simultaneously in two or more documents. This property provides a quick way to access the document node without needing to traverse the node hierarchy back up to the top.
Not all node types can have child nodes even though all node types inherit from Node. The differences among node types are discussed later in this chapter.
Manipulating Nodes
Because all relationship pointers are read-only, several methods are available to manipulate nodes. The most often-used method is appendChild(), which adds a node to the end of the childNodes list. Doing so updates all of the relationship pointers in the newly added node, the parent node, and the previous last child in the childNodes list. When complete, appendChild() returns the newly added node. Here is an example:
var returnedNode = someNode.appendChild(newNode);
alert(returnedNode == newNode);         //true
alert(someNode.lastChild == newNode);   //true
If the node passed into appendChild() is already part of the document, it is removed from its previous location and placed at the new location. Even though the DOM tree is connected by a series of pointers, no DOM node may exist in more than one location in a document. So if you call appendChild()and pass in the first child of a parent, as the following example shows, it will end up as the last child:
//assume multiple children for someNode
var returnedNode = someNode.appendChild(someNode.firstChild);
alert(returnedNode == someNode.firstChild);  //false
alert(returnedNode == someNode.lastChild);   //true
When a node needs to be placed in a specific location within the childNodes list, instead of just at the end, the insertBefore() method may be used. The insertBefore() method accepts two arguments: the node to insert and a reference node. The node to insert becomes the previous sibling of the reference node and is ultimately returned by the method. If the reference node is null, then insertBefore() acts the same as appendChild(), as this example shows:
//insert as last child
returnedNode = someNode.insertBefore(newNode, null);
alert(newNode == someNode.lastChild);  //true

//insert as the new first child
returnedNode = someNode.insertBefore(newNode, someNode.firstChild);
alert(returnedNode == newNode);         //true
alert(newNode == someNode.firstChild);  //true

//insert before last child
returnedNode = someNode.insertBefore(newNode, someNode.lastChild);
alert(newNode == someNode.childNodes[someNode.childNodes.length-2]);  //true
Both appendChild() and insertBefore() insert nodes without removing any. The replaceChild() method accepts two arguments: the node to insert and the node to replace. The node to replace is returned by the function and is removed from the document tree completely while the inserted node takes its place. Here is an example:
//replace first child
var returnedNode = someNode.replaceChild(newNode, someNode.firstChild);

//replace last child
returnedNode = someNode.replaceChild(newNode, someNode.lastChild);
When a node is inserted using replaceChild(), all of its relationship pointers are duplicated from the node it is replacing. Even though the replaced node is technically still owned by the same document, it no longer has a specific location in the document.
To remove a node without replacing it, you can use the removeChild() method. This method accepts a single argument, which is the node to remove. The removed node is then returned as the function value, as this example shows:
//remove first child
var formerFirstChild = someNode.removeChild(someNode.firstChild);

//remove last child
var formerLastChild = someNode.removeChild(someNode.lastChild);
As with replaceChild(), a node removed via removeChild() is still owned by the document but doesn’t have a specific location in the document.
All four of these methods work on the immediate children of a specific node, meaning that to use them you must know the immediate parent node (which is accessible via the previously mentioned parentNode property). Not all node types can have child nodes, and these methods will throw errors if you attempt to use them on nodes that don’t support children.
Other Methods
Two other methods are shared by all node types. The first is cloneNode(), which creates an exact clone of the node on which it’s called. The cloneNode() method accepts a single Boolean argument indicating whether to do a deep copy. When the argument is true, a deep copy is used, cloning the node and its entire subtree; when false, only the initial node is cloned. The cloned node that is returned is owned by the document but has no parent node assigned. As such, the cloned node is an orphan and doesn’t exist in the document until added via appendChild(), insertBefore(), or replaceChild(). For example, consider the following HTML:
<ul>
    <li>item 1</li>
    <li>item 2</li>
    <li>item 3</li>
</ul>
If a reference to this <ul> element is stored in a variable named myList, the following code shows the two modes of the cloneNode() method:
var deepList = myList.cloneNode(true);
alert(deepList.childNodes.length);     //3 (IE < 9) or 7 (others)

var shallowList = myList.cloneNode(false);
alert(shallowList.childNodes.length);  //0
In this example, deepList is filled with a deep copy of myList. This means deepList has three list items, each of which contains text. The variable shallowList contains a shallow copy of myList, so it has no child nodes. The difference in deepList.childNodes.length is due to the different ways that white space is handled in Internet Explorer 8 and earlier as compared to other browsers. Internet Explorer prior to version 9 did not create nodes for white space.
The cloneNode() method doesn’t copy JavaScript properties that you add to DOM nodes, such as event handlers. This method copies only attributes and, optionally, child nodes. Everything else is lost. Internet Explorer has a bug where event handlers are also cloned, so removing event handlers before cloning is recommended.
The last remaining method is normalize(). Its sole job is to deal with text nodes in a document subtree. Because of parser implementations or DOM manipulations, it’s possible to end up with text nodes that contain no text or text nodes that are siblings. When normalize() is called on a node, that node’s descendants are searched for both of these circumstances. If an empty text node is found, it is removed; if text nodes are immediate siblings, they are joined into a single text node. This method is discussed further later on in this chapter.
The Document Type
JavaScript represents document nodes via the Document type. In browsers, the document object is an instance of HTMLDocument (which inherits from Document) and represents the entire HTML page. The document object is a property of window and so is accessible globally. A Document node has the following characteristics:
- nodeType is 9.
- nodeName is "#document".
- nodeValue is null.
- parentNode is null.
- ownerDocument is null.
- Child nodes may be a DocumentType (maximum of one), Element (maximum of one), ProcessingInstruction, or Comment.
The Document type can represent HTML pages or other XML-based documents, though the most common use is through an instance of HTMLDocument through the document object. The document object can be used to get information about the page and to manipulate both its appearance and the underlying structure.
The Document type constructor and prototype are accessible in script for Firefox, Safari, Chrome, and Opera. Internet Explorer through version 9 still does not expose Document. The HTMLDocument type constructor and prototype are accessible in all browsers, including Internet Explorer beginning with version 8.
Document Children
Though the DOM specification states that the children of a Document node can be a DocumentType, Element, ProcessingInstruction, or Comment, there are two built-in shortcuts to child nodes. The first is the documentElement property, which always points to the <html> element in an HTML page. The document element is always represented in the childNodes list as well, but the documentElement property gives faster and more direct access to that element. Consider the following simple page:
<html>
    <body>

    </body>
</html>
When this page is parsed by a browser, the document has only one child node, which is the <html> element. This element is accessible from both documentElement and the childNodes list, as shown here:
var html = document.documentElement;      //get reference to <html>
alert(html === document.childNodes[0]);   //true
alert(html === document.firstChild);      //true
This example shows that the values of documentElement, firstChild, and childNodes[0] are all the same — all three point to the <html> element.
As an instance of HTMLDocument, the document object also has a body property that points to the <body> element directly. Since this is the element most often used by developers, document.body tends to be used quite frequently in JavaScript, as this example shows:
var body = document.body; //get reference to <body>
Both document.documentElement and document.body are supported in all major browsers.
Another possible child node of a Document is a DocumentType. The <!DOCTYPE> tag is considered to be a separate entity from other parts of the document, and its information is accessible through the doctype property (document.doctype in browsers), as shown here:
var doctype = document.doctype; //get reference to <!DOCTYPE>
Browser support for document.doctype varies considerably, as described here:
- Internet Explorer 8 and earlier — A document type, if present, is misinterpreted as a comment and treated as a Comment node. document.doctype is always null.
- Internet Explorer 9+ and Firefox — A document type, if present, is the first child node of the document. document.doctype is a DocumentType node, and the same node is accessible via document.firstChild or document.childNodes[0].
- Safari, Chrome, and Opera — A document type, if present, is parsed but is not considered a child node of the document. document.doctype is a DocumentType node, but the node does not appear in document.childNodes.
Because of the inconsistent browser support for document.doctype, it is of limited usefulness.
Comments that appear outside of the <html> element are, technically, child nodes of the document. Once again, browser support varies greatly as to whether these comments will be recognized and represented appropriately. Consider the following HTML page:
<!-- first comment -->
<html>
    <body>

    </body>
</html>
<!-- second comment -->
This page seems to have three child nodes: a comment, the <html> element, and another comment. Logically, you would expect document.childNodes to have three items corresponding to what appears in the code. In practice, however, browsers handle comments outside of the <html> element in the following very different ways:
- Internet Explorer 8 and earlier, Safari 3.1 and later, Opera, and Chrome create a comment node for the first comment but not for the second. The first comment becomes the first node in document.childNodes.
- Internet Explorer 9 and later create a comment node for the first comment as part of document.childNodes. They also create a comment node for the second comment as part of document.body.childNodes.
- Firefox and Safari prior to version 3.1 ignore both comments.
Once again, the inconsistent behavior makes accessing comments outside the <html> element essentially useless.
For the most part, the appendChild(), removeChild(), and replaceChild() methods aren’t used on document, since the document type (if present) is read-only and there can be only one element child node (which is already present).
Document Information
The document object, as an instance of HTMLDocument, has several additional properties that standard Document objects do not have. These properties provide information about the web page that is loaded. The first such property is title, which contains the text in the <title> element and is displayed in the title bar or tab of the browser window. This property can be used to retrieve the current page title and to change the page title such that the changes are reflected in the browser title bar. Changing the value of the title property does not change the <title> element at all. Here is an example:
//get the document title
var originalTitle = document.title;

//set the document title
document.title = "New page title";
The next three properties are all related to the request for the web page: URL, domain, and referrer. The URL property contains the complete URL of the page (the URL in the address bar), the domain property contains just the domain name of the page, and the referrer property gives the URL of the page that linked to this page. The referrer property may be an empty string if there is no referrer to the page. All of this information is available in the HTTP header of the request and is simply made available in JavaScript via these properties, as shown in the following example:
//get the complete URL
var url = document.URL;

//get the domain
var domain = document.domain;

//get the referrer
var referrer = document.referrer;
The URL and domain properties are related. For example, if document.URL is http://www.wrox.com/WileyCDA/, then document.domain will be www.wrox.com.
Of these three properties, the domain property is the only one that can be set. There are some restrictions as to what the value of domain can be set to because of security issues. If the URL contains a subdomain, such as p2p.wrox.com, the domain may be set only to “wrox.com” (the same is true when the URL contains “www,” such as www.wrox.com). The property can never be set to a domain that the URL doesn’t contain, as this example demonstrates:
//page from p2p.wrox.com

document.domain = "wrox.com";        //succeeds

document.domain = "nczonline.net";   //error!
The ability to set document.domain is useful when there is a frame or iframe on the page from a different subdomain. Pages from different subdomains can’t communicate with one another via JavaScript because of cross-domain security restrictions. By setting document.domain in each page to the same value, the pages can access JavaScript objects from each other. For example, if a page is loaded from www.wrox.com and it has an iframe with a page loaded from p2p.wrox.com, each page’s document.domain string will be different, and the outer page and the inner page are restricted from accessing each other’s JavaScript objects. If the document.domain value in each page is set to “wrox.com”, the pages can then communicate.
A further restriction in the browser disallows tightening of the domain property once it has been loosened. This means you cannot set document.domain to “wrox.com” and then try to set it back to “p2p.wrox.com”, because the latter would cause an error, as shown here:
//page from p2p.wrox.com

document.domain = "wrox.com";        //loosen - succeeds

document.domain = "p2p.wrox.com";    //tighten - error!
This restriction exists in all browsers but was implemented in Internet Explorer beginning with version 8.
Locating Elements
Perhaps the most common DOM activity is to retrieve references to a specific element or sets of elements to perform certain operations. This capability is provided via a number of methods on the document object. The Document type provides two methods to this end: getElementById() and getElementsByTagName().
The getElementById() method accepts a single argument — the ID of an element to retrieve — and returns the element if found, or null if an element with that ID doesn’t exist. The ID must be an exact match, including character case, to the id attribute of an element on the page. Consider the following element:
<div id="myDiv">Some text</div>
This element can be retrieved using the following code:
var div = document.getElementById("myDiv"); //retrieve reference to the <div>
The following code, however, would return null in all browsers except Internet Explorer 7 and earlier:
var div = document.getElementById("mydiv"); //won't work (except in IE <= 7)
Internet Explorer prior to version 8 considered IDs to be case-insensitive, so "myDiv" and "mydiv" are considered to be the same element ID.
If there is more than one element with the same ID in a page, getElementById() returns the element that appears first in the document. Internet Explorer 7 and earlier add an interesting quirk to this, also returning form elements (<input>, <textarea>, <button>, and <select>) that have a name attribute matching the given ID. If one of these form elements has a name attribute equal to the specified ID, and it appears before an element with the given ID in the document, Internet Explorer returns the form element. Here’s an example:
<input type="text" name="myElement" value="Text field">
<div id="myElement">A div</div>
Using this HTML, a call to document.getElementById() in Internet Explorer 7 returns a reference to the <input> element, whereas the same call returns a reference to the <div> element in all other browsers. To avoid this issue in Internet Explorer, you should ensure that form fields don’t have name attributes that are equivalent to other element IDs.
The getElementsByTagName() method is another commonly used method for retrieving element references. It accepts a single argument — the tag name of the elements to retrieve — and returns a NodeList containing zero or more elements. In HTML documents, this method returns an HTMLCollection object, which is very similar to a NodeList in that it is considered a “live” collection. For example, the following code retrieves all <img> elements in the page and returns an HTMLCollection:
var images = document.getElementsByTagName("img");
This code stores an HTMLCollection object in the images variable. As with NodeList objects, items in HTMLCollection objects can be accessed using bracket notation or the item() method. The number of elements in the object can be retrieved via the length property, as this example demonstrates:
alert(images.length);        //output the number of images
alert(images[0].src);        //output the src attribute of the first image
alert(images.item(0).src);   //output the src attribute of the first image
The HTMLCollection object has an additional method, namedItem(), that lets you reference an item in the collection via its name attribute. For example, suppose you had the following <img> element in a page:
<img src="myimage.gif" name="myImage">
A reference to this <img> element can be retrieved from the images variable like this:
var myImage = images.namedItem("myImage");
In this way, an HTMLCollection gives you access to named items in addition to indexed items, making it easier to get exactly the elements you want. You can also access named items by using bracket notation, as shown in the following example:
var myImage = images["myImage"];
For HTMLCollection objects, bracket notation can be used with either numeric or string indices. Behind the scenes, a numeric index calls item() and a string index calls namedItem().
To retrieve all elements in the document, pass in “*” to getElementsByTagName(). The asterisk is generally understood to mean “all” in JavaScript and Cascading Style Sheets (CSS). Here’s an example:
var allElements = document.getElementsByTagName("*");
This single line of code returns an HTMLCollection containing all of the elements in the order in which they appear. So the first item is the <html> element, the second is the <head> element, and so on. The Internet Explorer 8 and earlier implementation of comments actually makes them into elements, so the browser will return comment nodes when getElementsByTagName("*") is called. Internet Explorer 9 does not treat comments as elements and so does not return them.
Even though the specification states that tag names are case-sensitive, the getElementsByTagName() method is case-insensitive for maximum compatibility with existing HTML pages. When used in XML pages, including XHTML, getElementsByTagName() switches to case-sensitive mode.
A third method, which is defined on the HTMLDocument type only, is getElementsByName(). As its name suggests, this method returns all elements that have a given name attribute. The getElementsByName() method is most often used with radio buttons, all of which must have the same name to ensure the correct value gets sent to the server, as the following example shows:
<fieldset>
    <legend>Which color do you prefer?</legend>
    <ul>
        <li><input type="radio" value="red" name="color" id="colorRed">
            <label for="colorRed">Red</label></li>
        <li><input type="radio" value="green" name="color" id="colorGreen">
            <label for="colorGreen">Green</label></li>
        <li><input type="radio" value="blue" name="color" id="colorBlue">
            <label for="colorBlue">Blue</label></li>
    </ul>
</fieldset>
In this code, the radio buttons all have a name attribute of "color" even though their IDs are different. The IDs allow the <label> elements to be applied to the radio buttons, and the name attribute ensures that only one of the three values will be sent to the server. These radio buttons can all then be retrieved using the following line of code:
var radios = document.getElementsByName("color");
As with getElementsByTagName(), the getElementsByName() method returns an HTMLCollection. In this context, however, the namedItem() method always retrieves the first item (since all items have the same name).
Special Collections
The document object has several special collections. Each of these collections is an HTMLCollection object and provides faster access to common parts of the document, as described here:
- document.anchors — Contains all <a> elements with a name attribute in the document.
- document.applets — Contains all <applet> elements in the document. This collection is deprecated, because the <applet> element is no longer recommended for use.
- document.forms — Contains all <form> elements in the document. The same as document.getElementsByTagName("form").
- document.images — Contains all <img> elements in the document. The same as document.getElementsByTagName("img").
- document.links — Contains all <a> elements with an href attribute in the document.
These special collections are always available on HTMLDocument objects and, like all HTMLCollection objects, are constantly updated to match the contents of the current document.
DOM Conformance Detection
Because there are multiple levels and multiple parts of the DOM, it became necessary to determine exactly what parts of the DOM a browser has implemented. The document.implementation property is an object containing information and functionality tied directly to the browser’s implementation of the DOM. DOM Level 1 specifies only one method on document.implementation, which is hasFeature(). The hasFeature() method accepts two arguments: the name and version of the DOM feature to check for. If the browser supports the named feature and version, this method returns true, as with this example:
var hasXmlDom = document.implementation.hasFeature("XML", "1.0");
The various values that can be tested are listed in the following table.
| FEATURE | SUPPORTED VERSIONS | DESCRIPTION |
| Core | 1.0, 2.0, 3.0 | Basic DOM that spells out the use of a hierarchical tree to represent documents |
| XML | 1.0, 2.0, 3.0 | XML extension of the Core that adds support for CDATA sections, processing instructions, and entities |
| HTML | 1.0, 2.0 | HTML extension of XML that adds support for HTML-specific elements and entities |
| Views | 2.0 | Accomplishes formatting of a document based on certain styles |
| StyleSheets | 2.0 | Relates style sheets to documents |
| CSS | 2.0 | Support for Cascading Style Sheets Level 1 |
| CSS2 | 2.0 | Support for Cascading Style Sheets Level 2 |
| Events | 2.0, 3.0 | Generic DOM events |
| UIEvents | 2.0, 3.0 | User interface events |
| MouseEvents | 2.0, 3.0 | Events caused by the mouse (click, mouseover, and so on) |
| MutationEvents | 2.0, 3.0 | Events fired when the DOM tree is changed |
| HTMLEvents | 2.0 | HTML 4.01 events |
| Range | 2.0 | Objects and methods for manipulating a range in a DOM tree |
| Traversal | 2.0 | Methods for traversing a DOM tree |
| LS | 3.0 | Loading and saving between files and DOM trees synchronously |
| LS-Async | 3.0 | Loading and saving between files and DOM trees asynchronously |
| Validation | 3.0 | Methods to modify a DOM tree and still make it valid |
Although it is a nice convenience, the drawback of using hasFeature() is that the implementer gets to decide if the implementation is indeed conformant with the various parts of the DOM specification. It’s very easy to make this method return true for any and all values, but that doesn’t necessarily mean that the implementation conforms to all the specifications it claims to. Safari 2.x and earlier, for example, return true for some features that aren’t fully implemented. In most cases, it’s a good idea to use capability detection in addition to hasFeature() before using specific parts of the DOM.
Document Writing
One of the older capabilities of the document object is the ability to write to the output stream of a web page. This capability comes in the form of four methods: write(), writeln(), open(), and close(). The write() and writeln() methods each accept a string argument to write to the output stream. write() simply adds the text as is, whereas writeln() appends a new-line character ( ) to the end of the string. These two methods can be used as a page is being loaded to dynamically add content to the page, as shown in the following example:
<html>
<head>
    <title>document.write() Example</title>
</head>
<body>
    <p>The current date and time is:
    <script type="text/javascript">
        document.write("<strong>" + (new Date()).toString() + "</strong>");
    </script>
    </p>
</body>
</html>
DocumentWriteExample01.htm
This example outputs the current date and time as the page is being loaded. The date is enclosed by a <strong> element, which is treated the same as if it were included in the HTML portion of the page, meaning that a DOM element is created and can later be accessed. Any HTML that is output via write() or writeln() is treated this way.
The write() and writeln() methods are often used to dynamically include external resources such as JavaScript files. When including JavaScript files, you must be sure not to include the string "</script>" directly, as the following example demonstrates, because it will be interpreted as the end of a script block and the rest of the code won’t execute.
<html>
<head>
    <title>document.write() Example</title>
</head>
<body>
    <script type="text/javascript">
        document.write("<script type="text/javascript" src="file.js">" +
            "</script>");
    </script>
</body>
</html>
DocumentWriteExample02.htm
Even though this file looks correct, the closing "</script>" string is interpreted as matching the outermost <script> tag, meaning that the text "); will appear on the page. To avoid this, you simply need to change the string, as mentioned in Chapter 2 and shown here:
<html>
<head>
    <title>document.write() Example</title>
</head>
<body>
    <script type="text/javascript">
        document.write("<script type="text/javascript" src="file.js">" +
            "</script>");
    </script>
</body>
</html>
DocumentWriteExample03.htm
The string "</script>" no longer registers as a closing tag for the outermost <script> tag, so there is no extra content output to the page.
The previous examples use document.write() to output content directly into the page as it’s being rendered. If document.write() is called after the page has been completely loaded, the content overwrites the entire page, as shown in the following example:
<html>
<head>
    <title>document.write() Example</title>
</head>
<body>
    <p>This is some content that you won't get to see because it will be
    overwritten.</p>
    <script type="text/javascript">
        window.onload = function(){
            document.write("Hello world!");
        };
    </script>
</body>
</html>
DocumentWriteExample04.htm
In this example, the window.onload event handler is used to delay the execution of the function until the page is completely loaded (events are discussed in Chapter 13). When that happens, the string "Hello world!" overwrites the entire page content.
The open() and close() methods are used to open and close the web page output stream, respectively. Neither method is required to be used when write() or writeln() is used during the course of page loading.
Document writing is not supported in strict XHTML documents. For pages that are served with the application/xml+xhtml content type, these methods will not work.
The Element Type
Next to the Document type, the Element type is most often used in web programming. The Element type represents an XML or HTML element, providing access to information such as its tag name, children, and attributes. An Element node has the following characteristics:
- nodeType is 1.
- nodeName is the element’s tag name.
- nodeValue is null.
- parentNode may be a Document or Element.
- Child nodes may be Element, Text, Comment, ProcessingInstruction, CDATASection, or EntityReference.
An element’s tag name is accessed via the nodeName property or by using the tagName property; both properties return the same value (the latter is typically used for clarity). Consider the following element:
<div id="myDiv"></div>
This element can be retrieved and its tag name accessed in the following way:
var div = document.getElementById("myDiv");
alert(div.tagName);    //"DIV"
alert(div.tagName == div.nodeName);   //true
The element in question has a tag name of div and an ID of "myDiv". Note, however, that div.tagName actually outputs "DIV" instead of "div". When used with HTML, the tag name is always represented in all uppercase; when used with XML (including XHTML), the tag name always matches the case of the source code. If you aren’t sure whether your script will be on an HTML or XML document, it’s best to convert tag names to a common case before comparison, as this example shows:
if (element.tagName == "div"){  //AVOID! Error prone!
    //do something here
}

if (element.tagName.toLowerCase() == "div"){ //Preferred - works in all documents
    //do something here
}
This example shows two comparisons against a tagName property. The first is quite error prone because it won’t work in HTML documents. The second approach, converting the tag name to all lowercase, is preferred because it will work for both HTML and XML documents.
The Element type constructor and prototype are accessible in script in all modern browsers, including Internet Explorer as of version 8. Older browsers, such as Safari prior to version 2 and Opera prior to version 8, do not expose the Element type constructor.
HTML Elements
All HTML elements are represented by the HTMLElement type, either directly or through subtyping. The HTMLElement inherits directly from Element and adds several properties. Each property represents one of the following standard attributes that are available on every HTML element:
- id — A unique identifier for the element in the document.
- title — Additional information about the element, typically represented as a tooltip.
- lang — The language code for the contents of the element (rarely used).
- dir — The direction of the language, "ltr" (left-to-right) or "rtl" (right-to-left); also rarely used.
- className — The equivalent of the class attribute, which is used to specify CSS classes on an element. The property could not be named class because class is an ECMAScript reserved word (see Chapter 1 for information about reserved words).
Each of these properties can be used both to retrieve the corresponding attribute value and to change the value. Consider the following HTML element:
<div id="myDiv" class="bd" title="Body text" lang="en" dir="ltr"></div>
HTMLElementsExample01.htm
All of the information specified by this element may be retrieved using the following JavaScript code:
var div = document.getElementById("myDiv");
alert(div.id);         //"myDiv"
alert(div.className);  //"bd"
alert(div.title);      //"Body text"
alert(div.lang);       //"en"
alert(div.dir);        //"ltr"
It’s also possible to use the following code to change each of the attributes by assigning new values to the properties:
div.id = "someOtherId";
div.className = "ft";
div.title = "Some other text";
div.lang = "fr";
div.dir ="rtl";
HTMLElementsExample01.htm
Not all of the properties effect changes on the page when overwritten. Changes to id or lang will be transparent to the user (assuming no CSS styles are based on these values), whereas changes to title will be apparent only when the mouse is moved over the element. Changes to dir will cause the text on the page to be aligned to either the left or the right as soon as the property is written. Changes to className may appear immediately if the class has different CSS style information than the previous one.
As mentioned previously, all HTML elements are represented by an instance of HTMLElement or a more specific subtype. The following table lists each HTML element and its associated type (italicized elements are deprecated). Note that these types are accessible in Opera, Safari, Chrome, and Firefox via JavaScript but not in Internet Explorer prior to version 8.
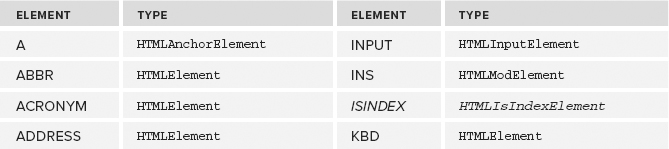
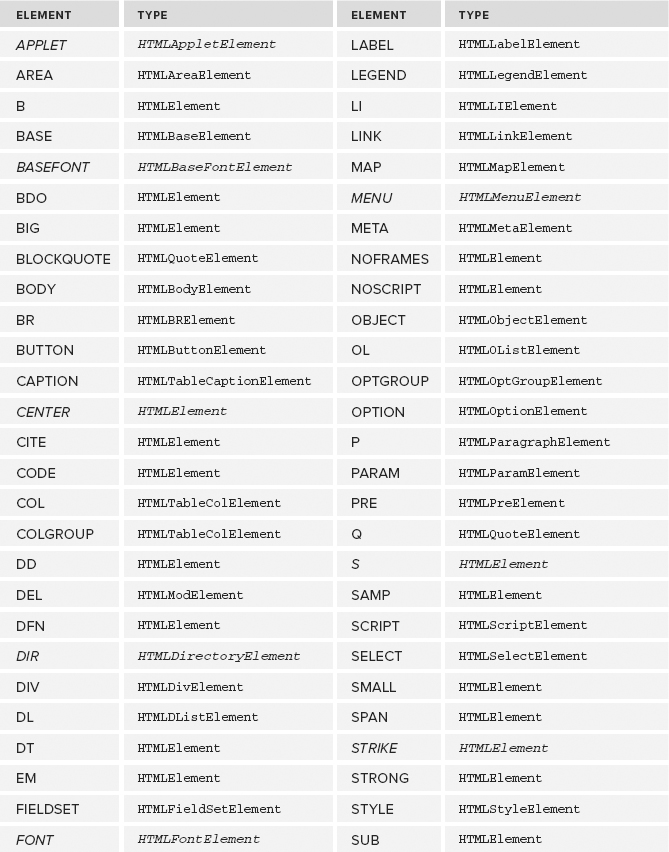
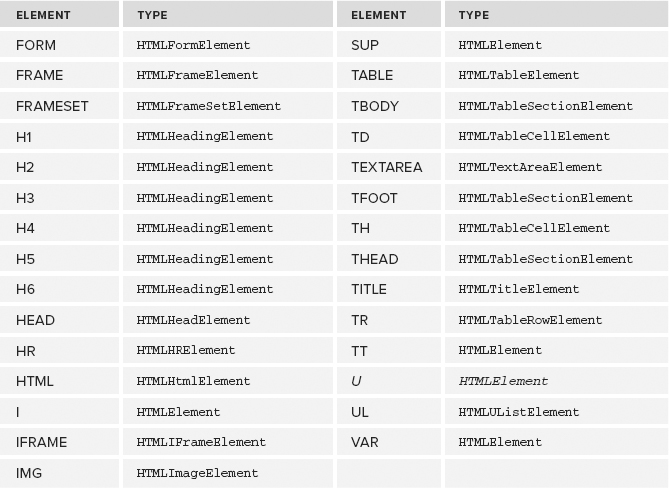
Each of these types has attributes and methods associated with it. Many of these types are discussed throughout this book.
Getting Attributes
Each element may have zero or more attributes, which are typically used to give extra information about the particular element or its contents. The three primary DOM methods for working with attributes are getAttribute(), setAttribute(), and removeAttribute(). These methods are intended to work on any attribute, including those defined as properties on the HTMLElement type. Here’s an example:
var div = document.getElementById("myDiv");
alert(div.getAttribute("id"));         //"myDiv"
alert(div.getAttribute("class"));      //"bd"
alert(div.getAttribute("title"));      //"Body text"
alert(div.getAttribute("lang"));       //"en"
alert(div.getAttribute("dir"));        //"ltr"
Note that the attribute name passed into getAttribute() is exactly the same as the actual attribute name, so you pass in "class" to get the value of the class attribute (not className, which is necessary when the attribute is accessed as an object property). If the attribute with the given name doesn’t exist, getAttribute() always returns null.
The getAttribute() method can also retrieve the value of custom attributes that aren’t part of the formal HTML language. Consider the following element:
<div id="myDiv" my_special_attribute="hello!"></div>
In this element, a custom attribute named my_special_attribute is defined to have a value of "hello!". This value can be retrieved using getAttribute() just like any other attribute, as shown here:
var value = div.getAttribute("my_special_attribute");
Note that attribute names are case-insensitive, so "ID" and "id" are considered the same attribute. Also note that, according to HTML5, custom attributes should be prepended with data- in order to validate.
All attributes on an element are also accessible as properties of the DOM element object itself. There are, of course, the five properties defined on HTMLElement that map directly to corresponding attributes, but all recognized (noncustom) attributes get added to the object as properties. Consider the following element:
<div id="myDiv" align="left" my_special_attribute="hello"></div>
Since id and align are recognized attributes for the <div> element in HTML, they will be represented by properties on the element object. The my_special_attribute attribute is custom and so won’t show up as a property on the element in Safari, Opera, Chrome, or Firefox. Internet Explorer through version 8 creates properties for custom attributes as well, as this example demonstrates:
alert(div.id);                    //"myDiv"
alert(div.my_special_attribute);  //undefined (except in IE)
alert(div.align);                 //"left"
ElementAttributesExample02.htm
Two types of attributes have property names that don’t map directly to the same value returned by getAttribute(). The first attribute is style, which is used to specify stylistic information about the element using CSS. When accessed via getAttribute(), the style attribute contains CSS text while accessing it via a property that returns an object. The style property is used to programmatically access the styling of the element (discussed in Chapter 12) and so does not map directly to the style attribute.
The second category of attribute that behaves differently is event-handler attributes such as onclick. When used on an element, the onclick attribute contains JavaScript code, and that code string is returned when using getAttribute(). When the onclick property is accessed, however, it returns a JavaScript function (or null if the attribute isn’t specified). This is because onclick and other event-handling properties are provided such that functions can be assigned to them.
Because of these differences, developers tend to forego getAttribute() when programming the DOM in JavaScript and instead use the object properties exclusively. The getAttribute() method is used primarily to retrieve the value of a custom attribute.
In Internet Explorer versions 7 and earlier, the getAttribute() method for the style attribute and event-handling attributes such as onclick always return the same value as if they were accessed via a property. So, getAttribute("style") returns an object and getAttribute("onclick") returns a function. Though fixed in Internet Explorer 8, this inconsistency is another reason to avoid using getAttribute() for HTML attributes.
Setting Attributes
The sibling method to getAttribute() is setAttribute(), which accepts two arguments: the name of the attribute to set and the value to set it to. If the attribute already exists, setAttribute() replaces its value with the one specified; if the attribute doesn’t exist, setAttribute() creates it and sets its value. Here is an example:
div.setAttribute("id", "someOtherId");
div.setAttribute("class", "ft");
div.setAttribute("title", "Some other text");
div.setAttribute("lang","fr");
div.setAttribute("dir", "rtl");
ElementAttributesExample01.htm
The setAttribute() method works with both HTML attributes and custom attributes in the same way. Attribute names get normalized to lowercase when set using this method, so "ID" ends up as "id".
Because all attributes are properties, assigning directly to the property can set the attribute values, as shown here:
div.id = "someOtherId";
div.align = "left";
Note that adding a custom property to a DOM element, as the following example shows, does not automatically make it an attribute of the element:
div.mycolor = "red";
alert(div.getAttribute("mycolor"));   //null (except in Internet Explorer)
This example adds a custom property named mycolor and sets its value to "red". In most browsers, this property does not automatically become an attribute on the element, so calling getAttribute() to retrieve an attribute with the same name returns null. In Internet Explorer, however, custom properties are considered to be attributes of the element and vice versa.
Internet Explorer versions 7 and earlier had some abnormal behavior regarding setAttribute(). Attempting to set the class or style attributes has no effect, similar to setting an event-handler property using setAttribute(). Even though these issues were resolved in Internet Explorer 8, it’s always best to set these attributes using properties.
The last method is removeAttribute(), which removes the attribute from the element altogether. This does more than just clear the attribute’s value; it completely removes the attribute from the element, as shown here:
div.removeAttribute("class");
This method isn’t used very frequently, but it can be useful for specifying exactly which attributes to include when serializing a DOM element.
Internet Explorer versions 6 and earlier don’t support removeAttribute().
The attributes Property
The Element type is the only DOM node type that uses the attributes property. The attributes property contains a NamedNodeMap, which is a “live” collection similar to a NodeList. Every attribute on an element is represented by an Attr node, each of which is stored in the NamedNodeMap object. A NamedNodeMap object has the following methods:
- getNamedItem(name) — Returns the node whose nodeName property is equal to name.
- removeNamedItem(name) — Removes the node whose nodeName property is equal to name from the list.
- setNamedItem(node) — Adds the node to the list, indexing it by its nodeName property.
- item(pos) — Returns the node in the numerical position pos.
Each node in the attributes property is a node whose nodeName is the attribute name and whose nodeValue is the attribute’s value. To retrieve the id attribute of an element, you can use the following code:
var id = element.attributes.getNamedItem("id").nodeValue;
Following is a shorthand notation for accessing attributes by name using bracket notation:
var id = element.attributes["id"].nodeValue;
It’s possible to use this notation to set attribute values as well, retrieving the attribute node and then setting the nodeValue to a new value, as this example shows:
element.attributes["id"].nodeValue = "someOtherId";
The removeNamedItem() method functions the same as the removeAttribute() method on the element — it simply removes the attribute with the given name. The following example shows how the sole difference is that removeNamedItem() returns the Attr node that represented the attribute:
var oldAttr = element.attributes.removeNamedItem("id");
The setNamedItem() is a rarely used method that allows you to add a new attribute to the element by passing in an attribute node, as shown in this example:
element.attributes.setNamedItem(newAttr);
Generally speaking, because of their simplicity, the getAttribute(), removeAttribute(), and setAttribute() methods are preferred to using any of the preceding attributes methods.
The one area where the attributes property is useful is to iterate over the attributes on an element. This is done most often when serializing a DOM structure into an XML or HTML string. The following code iterates over each attribute on an element and constructs a string in the format name=“value” name=“value”:
function outputAttributes(element){
    var pairs = new Array(),
        attrName,
        attrValue,
        i,
        len;

    for (i=0, len=element.attributes.length; i < len; i++){
        attrName = element.attributes[i].nodeName;
        attrValue = element.attributes[i].nodeValue;
        pairs.push(attrName + "="" + attrValue + """);
    }
    return pairs.join(" ");
}
ElementAttributesExample03.htm
This function uses an array to store the name-value pairs until the end, concatenating them with a space in between. (This technique is frequently used when serializing into long strings.) Using the attributes.length property, the for loop iterates over each attribute, outputting the name and value into a string. Here are a couple of important things to note about the way this code works:
- Browsers differ on the order in which they return attributes in the attributes object. The order in which the attributes appear in the HTML or XML code may not necessarily be the order in which they appear in the attributes object.
- Internet Explorer 7 and earlier versions return all possible attributes on an HTML element, even if they aren’t specified. This means often returning more than 100 attributes.
The previous function can be augmented to ensure that only specified attributes are included to provide for the issue with Internet Explorer versions 7 and earlier. Each attribute node has a property called specified that is set to true when the attribute is specified either as an HTML attribute or via the setAttribute() method. For Internet Explorer, this value is false for the extra attributes, whereas the extra attributes aren’t present in other browsers (thus, specified is always true for any attribute node). The code can then be augmented as follows:
function outputAttributes(element){
    var pairs = new Array(),
        attrName,
        attrValue,
        i,
        len;

    for (i=0, len=element.attributes.length; i < len; i++){
        attrName = element.attributes[i].nodeName;
        attrValue = element.attributes[i].nodeValue;
        if (element.attributes[i].specified){
            pairs.push(attrName + "="" + attrValue + """);
        }
    }
    return pairs.join(" ");
}
ElementAttributesExample04.htm
This revised function ensures that only specified attributes are returned for Internet Explorer 7 and earlier.
Creating Elements
New elements can be created by using the document.createElement() method. This method accepts a single argument, which is the tag name of the element to create. In HTML documents, the tag name is case-insensitive, whereas it is case-sensitive in XML documents (including XHTML). To create a <div> element, the following code can be used:
var div = document.createElement("div");
Using the createElement() method creates a new element and sets its ownerDocument property. At this point, you can manipulate the element’s attributes, add more children to it, and so on. Consider the following example:
div.id = "myNewDiv";
div.className = "box";
Setting these attributes on the new element assigns information only. Since the element is not part of the document tree, it doesn’t affect the browser’s display. The element can be added to the document tree using appendChild(), insertBefore(), or replaceChild(). The following code adds the newly created element to the document’s <body> element:
document.body.appendChild(div);
CreateElementExample01.htm
Once the element has been added to the document tree, the browser renders it immediately. Any changes to the element after this point are immediately reflected by the browser.
Internet Explorer allows an alternate use of createElement(), allowing you to specify a full element, including attributes, as this example shows:
var div = document.createElement("<div id="myNewDiv" class="box"></div>");
This usage is helpful to work around some issues regarding dynamically created elements in Internet Explorer 7 and earlier. The known issues are as follows:
- Dynamically created <iframe> elements can’t have their name attribute set.
- Dynamically created <input> elements won’t get reset via the form’s reset() method (discussed in Chapter 14).
- Dynamically created <button> elements with a type attribute of "reset" won’t reset the form.
- Dynamically created radio buttons with the same name have no relation to one another. Radio buttons with the same name are supposed to be different values for the same option, but dynamically created ones lose this relationship.
Each of these issues can be addressed by specifying the complete HTML for the tag in createElement(), as follows:
if (client.browser.ie && client.browser.ie <= 7){

    //create iframe with a name
    var iframe = document.createElement("<iframe name="myframe"></iframe>");

    //create input element
    var input = document.createElement("<input type="checkbox">");

    //create button
    var button = document.createElement("<button type="reset"></button>");

    //create radio buttons
    var radio1 = document.createElement("<input type="radio" name="choice"" +
        " value="1">");
    var radio2 = document.createElement("<input type="radio" name="choice"" +
        " value="2">");

}
Just as with the traditional way of using createElement(), using it in this way returns a DOM element reference that can be added into the document and otherwise augmented. This usage is recommended only when dealing with one of these specific issues in Internet Explorer 7 and earlier, because it requires browser detection. Note that no other browser supports this usage.
Element Children
Elements may have any number of children and descendants since elements may be children of elements. The childNodes property contains all of the immediate children of the element, which may be other elements, text nodes, comments, or processing instructions. There is a significant difference between browsers regarding the identification of these nodes. For example, consider the following code:
<ul id="myList">
    <li>Item 1</li>
    <li>Item 2</li>
    <li>Item 3</li>
</ul>
When this code is parsed in Internet Explorer 8 and earlier, the <ul> element has three child nodes, one for each of the <li> elements. In all other browsers, the <ul> element has seven elements: three <li> elements and four text nodes representing the white space between <li> elements. If the white space between elements is removed, as the following example demonstrates, all browsers return the same number of child nodes:
<ul id="myList"><li>Item 1</li><li>Item 2</li><li>Item 3</li></ul>
Using this code, all browsers return three child nodes for the <ul> element. It’s important to keep these browser differences in mind when navigating children using the childNodes property. Oftentimes, it’s necessary to check the nodeType before performing an action, as the following example shows:
for (var i=0, len=element.childNodes.length; i < len; i++){
    if (element.childNodes[i].nodeType == 1){
        //do processing
    }
}
This code loops through each child node of a particular element and performs an operation only if nodeType is equal to 1 (the element node type identified).
To get child nodes and other descendants with a particular tag name, elements also support the getElementsByTagName() method. When used on an element, this method works exactly the same as the document version except that the search is rooted on the element, so only descendants of that element are returned. In the <ul> code earlier in this section, all <li> elements can be retrieved using the following code:
var ul = document.getElementById("myList");
var items = ul.getElementsByTagName("li");
Keep in mind that this works because the <ul> element has only one level of descendants. If there were more levels, all <li> elements contained in all levels would be returned.
The Text Type
Text nodes are represented by the Text type and contain plain text that is interpreted literally and may contain escaped HTML characters but no HTML code. A Text node has the following characteristics:
- nodeType is 3.
- nodeName is "#text".
- nodeValue is text contained in the node.
- parentNode is an Element.
- Child nodes are not supported.
The text contained in a Text node may be accessed via either the nodeValue property or the data property, both of which contain the same value. Changes to either nodeValue or data are reflected in the other as well. The following methods allow for manipulation of the text in the node:
- appendData(text) — Appends text to the end of the node.
- deleteData(offset, count) — Deletes count number of characters starting at position offset.
- insertData(offset, text) — Inserts text at position offset.
- replaceData(offset, count, text) — Replaces the text starting at offset through offset + count with text.
- splitText(offset) — Splits the text node into two text nodes separated at position offset.
- substringData(offset, count) — Extracts a string from the text beginning at position offset and continuing until offset + count.
In addition to these methods, the length property returns the number of characters in the node. This value is the same as using nodeValue.length or data.length.
By default, every element that may contain content will have at most one text node when content is present. Here is an example:
<!-- no content, so no text node -->
<div></div>

<!-- white space content, so one text node -->
<div> </div>

<!-- content, so one text node -->
<div>Hello World!</div>
The first <div> element in this code has no content, so there is no text node. Any content between the opening and closing tags means that a text node must be created, so the second <div> element has a single text node as a child even though its content is white space. The text node’s nodeValue is a single space. The third <div> also has a single text node whose nodeValue is "Hello World!". The following code lets you access this node:
var textNode = div.firstChild; //or div.childNodes[0]
Once a reference to the text node is retrieved, it can be changed like this:
div.firstChild.nodeValue = "Some other message";
TextNodeExample01.htm
As long as the node is currently in the document tree, the changes to the text node will be reflected immediately. Another note about changing the value of a text node is that the string is HTML- or XML-encoded (depending on the type of document), meaning that any less-than symbols, greater-than symbols, or quotation marks are escaped, as shown in this example:
//outputs as "Some <strong>other</strong> message"
div.firstChild.nodeValue = "Some <strong>other</strong> message";
TextNodeExample02.htm
This is an effective way of HTML-encoding a string before inserting it into the DOM document.
The Text type constructor and prototype are accessible in script in Internet Explorer 8, Firefox, Safari, Chrome, and Opera.
Creating Text Nodes
New text nodes can be created using the document.createTextNode() method, which accepts a single argument — the text to be inserted into the node. As with setting the value of an existing text node, the text will be HTML- or XML-encoded, as shown in this example:
var textNode = document.createTextNode("<strong>Hello</strong> world!");
When a new text node is created, its ownerDocument property is set, but it does not appear in the browser window until it is added to a node in the document tree. The following code creates a new <div> element and adds a message to it:
var element = document.createElement("div");
element.className = "message";

var textNode = document.createTextNode("Hello world!");
element.appendChild(textNode);

document.body.appendChild(element);
TextNodeExample03.htm
This example creates a new <div> element and assigns it a class of "message". Then a text node is created and added to that element. The last step is to add the element to the document’s body, which makes both the element and the text node appear in the browser.
Typically elements have only one text node as a child. However, it is possible to have multiple text nodes as children, as this example demonstrates:
var element = document.createElement("div");
element.className = "message";

var textNode = document.createTextNode("Hello world!");
element.appendChild(textNode);

var anotherTextNode = document.createTextNode("Yippee!");
element.appendChild(anotherTextNode);

document.body.appendChild(element);
TextNodeExample04.htm
When a text node is added as a sibling of another text node, the text in those nodes is displayed without any space between them.
Normalizing Text Nodes
Sibling text nodes can be confusing in DOM documents since there is no simple text string that can’t be represented in a single text node. Still, it is not uncommon to come across sibling text nodes in DOM documents, so there is a method to join sibling text nodes together. This method is called normalize(), and it exists on the Node type (and thus is available on all node types). When normalize() is called on a parent of two or more text nodes, those nodes are merged into one text node whose nodeValue is equal to the concatenation of the nodeValue properties of each text node. Here’s an example:
var element = document.createElement("div");
element.className = "message";

var textNode = document.createTextNode("Hello world!");
element.appendChild(textNode);

var anotherTextNode = document.createTextNode("Yippee!");
element.appendChild(anotherTextNode);

document.body.appendChild(element);

alert(element.childNodes.length);  //2

element.normalize();
alert(element.childNodes.length);  //1
alert(element.firstChild.nodeValue);  //"Hello world!Yippee!"
TextNodeExample05.htm
When the browser parses a document, it will never create sibling text nodes. Sibling text nodes can appear only by programmatic DOM manipulation.
The normalize() method causes Internet Explorer 6 to crash in certain circumstances. Though unconfirmed, this may have been fixed in later patches to Internet Explorer 6. This problem doesn’t occur in Internet Explorer 7 or later.
Splitting Text Nodes
The Text type has a method that does the opposite of normalize(): the splitText() method splits a text node into two text nodes, separating the nodeValue at a given offset. The original text node contains the text up to the specified offset, and the new text node contains the rest of the text. The method returns the new text node, which has the same parentNode as the original. Consider the following example:
var element = document.createElement("div");
element.className = "message";

var textNode = document.createTextNode("Hello world!");
element.appendChild(textNode);

document.body.appendChild(element);

var newNode = element.firstChild.splitText(5);
alert(element.firstChild.nodeValue);  //"Hello"
alert(newNode.nodeValue);             //" world!"
alert(element.childNodes.length);     //2
TextNodeExample06.htm
In this example, the text node containing the text "Hello world!" is split into two text nodes at position 5. Position 5 contains the space between "Hello" and "world!", so the original text node has the string "Hello" and the new one has the text " world!" (including the space).
Splitting text nodes is used most often with DOM parsing techniques for extracting data from text nodes.
The Comment Type
Comments are represented in the DOM by the Comment type. A Comment node has the following characteristics:
- nodeType is 8.
- nodeName is "#comment".
- nodeValue is the content of the comment.
- parentNode is a Document or Element.
- Child nodes are not supported.
The Comment type inherits from the same base as the Text type, so it has all of the same string-manipulation methods except splitText(). Also similar to the Text type, the actual content of the comment may be retrieved using either nodeValue or the data property.
A comment node can be accessed as a child node from its parent. Consider the following HTML code:
<div id="myDiv"><!-- A comment --></div>
In this case, the comment is a child node of the <div> element, which means it can be accessed like this:
var div = document.getElementById("myDiv");
var comment = div.firstChild;
alert(comment.data);    //"A comment"
CommentNodeExample01.htm
Comment nodes can also be created using the document.createComment() method and passing in the comment text, as shown in the following code:
var comment = document.createComment("A comment");
Not surprisingly, comment nodes are rarely accessed or created, because they serve very little purpose algorithmically. Additionally, browsers don’t recognize comments that exist after the closing </html> tag. If you need to access comment nodes, make sure they appear as descendants of the <html> element.
The Comment type constructor and prototype are accessible in Firefox, Safari, Chrome, and Opera. The Internet Explorer 8 comment nodes are considered to be elements with a tag name of "!". This means comment nodes can be returned by getElementsByTagName(). Internet Explorer 9 represents comments via a custom constructor called HTMLCommentElement even though it doesn’t treat comments as elements.
The CDATASection Type
CDATA sections are specific to XML-based documents and are represented by the CDATASection type. Similar to Comment, the CDATASection type inherits from the base Text type, so it has all of the same string manipulation methods except for splitText(). A CDATASection node has the following characteristics:
- nodeType is 4.
- nodeName is "#cdata-section".
- nodeValue is the contents of the CDATA section.
- parentNode is a Document or Element.
- Child nodes are not supported.
CDATA sections are valid only in XML documents, so most browsers will incorrectly parse a CDATA section into either a Comment or an Element. Consider the following:
<div id="myDiv"><![CDATA[This is some content.]]></div>
In this example, a CDATASection node should exist as the first child of the <div>; however, none of the four major browsers interpret it as such. Even in valid XHTML pages, the browsers don’t properly support embedded CDATA sections.
True XML documents allow the creation of CDATA sections using document.createCDataSection() and pass in the node’s content.
The CDATASection type constructor and prototype are accessible in Firefox, Safari, Chrome, and Opera. Internet Explorer through version 9 still does not support this type.
The DocumentType Type
The DocumentType type is not used very often in web browsers and is supported in only Firefox, Safari, and Opera. A DocumentType object contains all of the information about the document’s doctype and has the following characteristics:
- nodeType is 10.
- nodeName is the name of the doctype.
- nodeValue is null.
- parentNode is a Document.
- Child nodes are not supported.
DocumentType objects cannot be created dynamically in DOM Level 1; they are created only as the document’s code is being parsed. For browsers that support it, the DocumentType object is stored in document.doctype. DOM Level 1 describes three properties for DocumentType objects: name, which is the name of the doctype; entities, which is a NamedNodeMap of entities described by the doctype; and notations, which is a NamedNodeMap of notations described by the doctype. Because documents in browsers typically use an HTML or XHTML doctype, the entities and notations lists are typically empty. (They are filled only with inline doctypes.) For all intents and purposes, the name property is the only useful one available. This property is filled with the name of the doctype, which is the text that appears immediately after <!DOCTYPE. Consider the following HTML 4.01 strict doctype:
<!DOCTYPE HTML PUBLIC "-//W3C//DTD HTML 4.01//EN"
  "http://www.w3.org/TR/html4/strict.dtd">
For this doctype, the name property is "HTML":
alert(document.doctype.name); //"HTML"
Internet Explorer 8 and earlier did not support the DocumentType type, so document.doctype is always null. Furthermore, these browsers misinterpret the doctype as a comment and actually create a comment node for it. Internet Explorer 9 properly assigns an object to document.doctype but still does not expose the DocumentType type.
The DocumentFragment Type
Of all the node types, the DocumentFragment type is the only one that has no representation in markup. The DOM defines a document fragment as a “lightweight” document, capable of containing and manipulating nodes without all of the additional overhead of a complete document. DocumentFragment nodes have the following characteristics:
- nodeType is 11.
- nodeName is "#document-fragment".
- nodeValue is null.
- parentNode is null.
- Child nodes may be Element, ProcessingInstruction, Comment, Text, CDATASection, or EntityReference.
A document fragment cannot be added to a document directly. Instead, it acts as a repository for other nodes that may need to be added to the document. Document fragments are created using the document.createDocumentFragment() method, shown here:
var fragment = document.createDocumentFragment();
Document fragments inherit all methods from Node and are typically used to perform DOM manipulations that are to be applied to a document. If a node from the document is added to a document fragment, that node is removed from the document tree and won’t be rendered by the browser. New nodes that are added to a document fragment are also not part of the document tree. The contents of a document fragment can be added to a document via appendChild() or insertBefore(). When a document fragment is passed in as an argument to either of these methods, all of the document fragment’s child nodes are added in that spot; the document fragment itself is never added to the document tree. For example, consider the following HTML:
<ul id="myList"></ul>
Suppose you would like to add three list items to this <ul> element. Adding each item directly to the element causes the browser to rerender the page with the new information. To avoid this, the following code example uses a document fragment to create the list items and then add them all at the same time:
var fragment = document.createDocumentFragment();
var ul = document.getElementById("myList");
var li = null;

for (var i=0; i < 3; i++){
    li = document.createElement("li");
    li.appendChild(document.createTextNode("Item " + (i+1)));
    fragment.appendChild(li);
}

ul.appendChild(fragment);
DocumentFragmentExample01.htm
This example begins by creating a document fragment and retrieving a reference to the <ul> element. The for loop creates three list items, each with text indicating which item they are. To do this, an <li> element is created and then a text node is created and added to that element. The <li> element is then added to the document fragment using appendChild(). When the loop is complete, all of the items are added to the <ul> element by calling appendChild() and passing in the document fragment. At that point, the document fragment’s child nodes are all removed and placed onto the <ul> element.
The Attr Type
Element attributes are represented by the Attr type in the DOM. The Attr type constructor and prototype are accessible in all browsers, including Internet Explorer beginning with version 8. Technically, attributes are nodes that exist in an element’s attributes property. Attribute nodes have the following characteristics:
- nodeType is 11.
- nodeName is the attribute name.
- nodeValue is the attribute value.
- parentNode is null.
- Child nodes are not supported in HTML.
- Child nodes may be Text or EntityReference in XML.
Even though they are nodes, attributes are not considered part of the DOM document tree. Attribute nodes are rarely referenced directly, with most developers favoring the use of getAttribute(), setAttribute(), and removeAttribute().
There are three properties on an Attr object: name, which is the attribute name (same as nodeName); value, which is the attribute value (same as nodeValue); and specified, which is a Boolean value indicating if the attribute was specified in code or if it is a default value.
New attribute nodes can be created by using document.createAttribute() and passing in the name of the attribute. For example, to add an align attribute to an element, the following code can be used:
var attr = document.createAttribute("align");
attr.value = "left";
element.setAttributeNode(attr);

alert(element.attributes["align"].value);       //"left"
alert(element.getAttributeNode("align").value); //"left"
alert(element.getAttribute("align"));           //"left"
AttrExample01.htm
In this example, a new attribute node is created. The name property is assigned by the call to createAttribute(), so there is no need to assign it directly afterward. The value property is then assigned to "left". To add the newly created attribute to an element, you can use the element’s setAttributeNode() method. Once the attribute is added, it can be accessed in any number of ways: via the attributes property, using getAttributeNode(), or using getAttribute(). Both attributes and getAttributeNode() return the actual Attr node for the attribute, whereas getAttribute() returns only the attribute value.
There is really not a good reason to access attribute nodes directly. The get Attribute(), setAttribute(), and removeAttribute() methods are preferable over manipulating attribute nodes.
In many cases, working with the DOM is fairly straightforward, making it easy to re-create with JavaScript what normally would be created using HTML code. There are, however, times when using the DOM is not as simple as it may appear. Browsers are filled with hidden gotchas and incompatibilities that make coding certain parts of the DOM more complicated than coding its other parts.
Dynamic Scripts
The <script> element is used to insert JavaScript code into the page, either using by the src attribute to include an external file or by including text inside the element itself. Dynamic scripts are those that don’t exist when the page is loaded but are included later by using the DOM. As with the HTML element, there are two ways to do this: pulling in an external file or inserting text directly.
Dynamically loading an external JavaScript file works as you would expect. Consider the following <script> element:
<script type="text/javascript" src="client.js"></script>
This <script> element includes the text for the Chapter 9 client-detection script. The DOM code to create this node is as follows:
var script = document.createElement("script");
script.type = "text/javascript";
script.src = "client.js";
document.body.appendChild(script);
As you can see, the DOM code exactly mirrors the HTML code that it represents. Note that the external file is not downloaded until the <script> element is added to the page on the last line. The element could be added to the <head> element as well, though this has the same effect. This process can be generalized into the following function:
function loadScript(url){
    var script = document.createElement("script");
    script.type = "text/javascript";
    script.src = url;
    document.body.appendChild(script);
}
This function can now be used to load external JavaScript files via the following call:
loadScript("client.js");
Once loaded, the script is fully available to the rest of the page. This leaves only one problem: how do you know when the script has been fully loaded? Unfortunately, there is no standard way to handle this. Some events are available depending on the browser being used, as discussed in Chapter 13.
The other way to specify JavaScript code is inline, as in this example:
<script type="text/javascript">
    function sayHi(){
        alert("hi");
    }
</script>
Using the DOM, it would be logical for the following to work:
var script = document.createElement("script");
script.type = "text/javascript";
script.appendChild(document.createTextNode("function sayHi(){alert('hi'),}"));
document.body.appendChild(script);
This works in Firefox, Safari, Chrome, and Opera. In Internet Explorer, however, this causes an error. Internet Explorer treats <script> elements as special and won’t allow regular DOM access to child nodes. A property called text exists on all <script> elements that can be used specifically to assign JavaScript code to, as in the following example:
var script = document.createElement("script");
script.type = "text/javascript";
script.text = "function sayHi(){alert('hi'),}";
document.body.appendChild(script);
DynamicScriptExample01.htm
This updated code works in Internet Explorer, Firefox, Opera, and Safari 3 and later. Safari versions prior to 3 don’t support the text property correctly; however, it will allow the assignment of code using the text-node technique. If you need to do this in an earlier Safari version, the following code can be used:
var script = document.createElement("script");
script.type = "text/javascript";
var code = "function sayHi(){alert('hi'),}";
try {
    script.appendChild(document.createTextNode("code"));
} catch (ex){
    script.text = "code";
}
document.body.appendChild(script);
Here, the standard DOM text-node method is attempted first, because it works in everything but Internet Explorer, which will throw an error. If that line causes an error, that means it is Internet Explorer, and the text property must be used. This can be generalized into the following function:
function loadScriptString(code){
    var script = document.createElement("script");
    script.type = "text/javascript";
    try {
        script.appendChild(document.createTextNode(code));
    } catch (ex){
        script.text = code;
    }
    document.body.appendChild(script);
}
The function is called as follows:
loadScriptString("function sayHi(){alert('hi'),}");
DynamicScriptExample02.htm
Code loaded in this manner is executed in the global scope and is available immediately after the script finishes executing. This is essentially the same as passing the string into eval() in the global scope.
Dynamic Styles
CSS styles are included in HTML pages using one of two elements. The <link> element is used to include CSS from an external file, whereas the <style> element is used to specify inline styles. Similar to dynamic scripts, dynamic styles don’t exist on the page when it is loaded initially; rather, they are added after the page has been loaded.
Consider this typical <link> element:
<link rel="stylesheet" type="text/css" href="styles.css">
This element can just as easily be created using the following DOM code:
var link = document.createElement("link");
link.rel = "stylesheet";
link.type = "text/css";
link.href = "styles.css";
var head = document.getElementsByTagName("head")[0];
head.appendChild(link);
This code works in all major browsers without any issue. Note that <link> elements should be added to the <head> instead of the body for this to work properly in all browsers. The technique can be generalized into the following function:
function loadStyles(url){
    var link = document.createElement("link");
    link.rel = "stylesheet";
    link.type = "text/css";
    link.href = url;
    var head = document.getElementsByTagName("head")[0];
    head.appendChild(link);
}
The loadStyles() function can then be called like this:
loadStyles("styles.css");
Loading styles via an external file is asynchronous, so the styles will load out of order with the JavaScript code being executed. Typically it’s not necessary to know when the styles have been fully loaded; however, there are some techniques (events, discussed in Chapter 13) that can be used to accomplish this.
The other way to define styles is using the <style> element and including inline CSS, such as this:
<style type="text/css">
body {
    background-color: red;
}
</style>
Logically, the following DOM code should work:
var style = document.createElement("style");
style.type = "text/css";
style.appendChild(document.createTextNode("body{background-color:red}"));
var head = document.getElementsByTagName("head")[0];
head.appendChild(style);
DynamicStyleExample01.htm
This code works in Firefox, Safari, Chrome, and Opera but not in Internet Explorer. Internet Explorer treats <style> nodes as special, similar to <script> nodes, and so won’t allow access to its child nodes. In fact, Internet Explorer throws the same error as when you try to add a child node to a <script> element. The workaround for Internet Explorer is to access the element’s styleSheet property, which in turn has a property called cssText that may be set to CSS code (both of these properties are discussed further in Chapter 12), as this code sample shows:
var style = document.createElement("style");
style.type = "text/css";
try{
    style.appendChild(document.createTextNode("body{background-color:red}"));
} catch (ex){
    style.styleSheet.cssText = "body{background-color:red}";
}
var head = document.getElementsByTagName("head")[0];
head.appendChild(style);
Similar to the code for adding inline scripts dynamically, this new code uses a try-catch statement to catch the error that Internet Explorer throws and then responds by using the Internet Explorer–specific way of setting styles. The generic solution is as follows:
function loadStyleString(css){
    var style = document.createElement("style");
    style.type = "text/css";
    try{
        style.appendChild(document.createTextNode(css));
    } catch (ex){
        style.styleSheet.cssText = css;
    }
    var head = document.getElementsByTagName("head")[0];
    head.appendChild(style);
}
DynamicStyleExample02.htm
The function can be called as follows:
loadStyleString("body{background-color:red}");
Styles specified in this way are added to the page instantly, so changes should be seen immediately.
If you’re coding for Internet Explorer specifically, be careful using styleSheet.cssText. If you reuse the same <style> element and try to set this property more than once, it has a tendency to crash the browser. Also, setting cssText to the empty string has the potential to crash the browser as well. This is a bug in the browser that hopefully will be fixed in the future.
Manipulating Tables
One of the most complex structures in HTML is the <table> element. Creating new tables typically means numerous tags for table rows, table cells, table headers, and so forth. Because of this complexity, using the core DOM methods to create and change tables can require a large amount of code. Suppose you want to create the following HTML table using the DOM:
<table border="1" width="100%">
    <tbody>
        <tr>
            <td>Cell 1,1</td>
            <td>Cell 2,1</td>
        </tr>
        <tr>
            <td>Cell 1,2</td>
            <td>Cell 2,2</td>
        </tr>
    </tbody>
</table>
To accomplish this with the core DOM methods, the code would look something like this:
//create the table
var table = document.createElement("table");
table.border = 1;
table.width = "100%";

//create the tbody
var tbody = document.createElement("tbody");
table.appendChild(tbody);

//create the first row
var row1 = document.createElement("tr");
tbody.appendChild(row1);
var cell1_1 = document.createElement("td");
cell1_1.appendChild(document.createTextNode("Cell 1,1"));
row1.appendChild(cell1_1);
var cell2_1 = document.createElement("td");
cell2_1.appendChild(document.createTextNode("Cell 2,1"));
row1.appendChild(cell2_1);

//create the second row
var row2 = document.createElement("tr");
tbody.appendChild(row2);
var cell1_2 = document.createElement("td");
cell1_2.appendChild(document.createTextNode("Cell 1,2"));
row2.appendChild(cell1_2);
var cell2_2= document.createElement("td");
cell2_2.appendChild(document.createTextNode("Cell 2,2"));
row2.appendChild(cell2_2);

//add the table to the document body
document.body.appendChild(table);
This code is quite verbose and a little hard to follow. To facilitate building tables, the HTML DOM adds several properties and methods to the <table>, <tbody>, and <tr> elements.
The <table> element adds the following:
- caption — Pointer to the <caption> element (if it exists).
- tBodies — An HTMLCollection of <tbody> elements.
- tFoot — Pointer to the <tfoot> element (if it exists).
- tHead — Pointer to the <thead> element (if it exists).
- rows — An HTMLCollection of all rows in the table.
- createTHead() — Creates a <thead> element, places it into the table, and returns a reference.
- createTFoot() — Creates a <tfoot> element, places it into the table, and returns a reference.
- createCaption() — Creates a <caption> element, places it into the table, and returns a reference.
- deleteTHead() — Deletes the <thead> element.
- deleteTFoot() — Deletes the <tfoot> element.
- deleteCaption() — Deletes the <caption> element.
- deleteRow(pos) — Deletes the row in the given position.
- insertRow(pos) — Inserts a row in the given position in the rows collection.
The <tbody> element adds the following:
- rows — An HTMLCollection of rows in the <tbody> element.
- deleteRow(pos) — Deletes the row in the given position.
- insertRow(pos) — Inserts a row in the given position in the rows collection and returns a reference to the new row.
The <tr> element adds the following:
- cells — An HTMLCollection of cells in the <tr> element.
- deleteCell(pos) — Deletes the cell in the given position.
- insertCell(pos) — Inserts a cell in the given position in the cells collection and returns a reference to the new cell.
These properties and methods can greatly reduce the amount of code necessary to create a table. For example, the previous code can be rewritten using these methods as follows (the highlighted code is updated):
//create the table
var table = document.createElement("table");
table.border = 1;
table.width = "100%";

//create the tbody
var tbody = document.createElement("tbody");
table.appendChild(tbody);

//create the first row
tbody.insertRow(0);
tbody.rows[0].insertCell(0);
tbody.rows[0].cells[0].appendChild(document.createTextNode("Cell 1,1"));
tbody.rows[0].insertCell(1);
tbody.rows[0].cells[1].appendChild(document.createTextNode("Cell 2,1"));

//create the second row
tbody.insertRow(1);
tbody.rows[1].insertCell(0);
tbody.rows[1].cells[0].appendChild(document.createTextNode("Cell 1,2"));
tbody.rows[1].insertCell(1);
tbody.rows[1].cells[1].appendChild(document.createTextNode("Cell 2,2"));

//add the table to the document body
document.body.appendChild(table);
In this code, the creation of the <table> and <tbody> elements remains the same. What has changed is the section creating the two rows, which now makes use of the HTML DOM table properties and methods. To create the first row, the insertRow() method is called on the <tbody> element with an argument of 0, which indicates the position in which the row should be placed. After that point, the row can be referenced by tbody.rows[0] because it is automatically created and added into the <tbody> element in position 0.
Creating a cell is done in a similar way — by calling insertCell() on the <tr> element and passing in the position in which the cell should be placed. The cell can then be referenced by tbody.rows[0].cells[0], because the cell has been created and inserted into the row in position 0.
Using these properties and methods to create a table makes the code much more logical and readable, although technically both sets of code are correct.
Using NodeLists
Understanding a NodeList object and its relatives, NamedNodeMap and HTMLCollection, is critical to a good understanding of the DOM as a whole. Each of these collections is considered “live,” which is to say that they are updated when the document structure changes such that they are always current with the most accurate information. In reality, all NodeList objects are queries that are run against the DOM document whenever they are accessed. For instance, the following results in an infinite loop:
var divs = document.getElementsByTagName("div"),
    i,
    div;

for (i=0; i < divs.length; i++){
    div = document.createElement("div");
    document.body.appendChild(div);
}
The first part of this code gets an HTMLCollection of all <div> elements in the document. Since that collection is “live,” any time a new <div> element is added to the page, it gets added into the collection. Since the browser doesn’t want to keep a list of all the collections that were created, the collection is updated only when it is accessed again. This creates an interesting problem in terms of a loop such as the one in this example. Each time through the loop, the condition i < divs.length is being evaluated. That means the query to get all <div> elements is being run. Because the body of the loop creates a new <div> element and adds it to the document, the value of divs.length increments each time through the loop; thus i will never equal divs.length since both are being incremented.
Any time you want to iterate over a NodeList, it’s best to initialize a second variable with the length and then compare the iterator to that variable, as shown in the following example:
var divs = document.getElementsByTagName("div"),
    i,
    len,
    div;

for (i=0, len=divs.length; i < len; i++){
    div = document.createElement("div");
    document.body.appendChild(div);
}
In this example, a second variable, len, is initialized. Since len contains a snapshot of divs.length at the time the loop began, it prevents the infinite loop that was experienced in the previous example. This technique has been used through this chapter to demonstrate the preferred way of iterating over NodeList objects.
Generally speaking, it is best to limit the number of times you interact with a NodeList. Since a query is run against the document each time, try to cache frequently used values retrieved from a NodeList.
The Document Object Model (DOM) is a language-independent API for accessing and manipulating HTML and XML documents. DOM Level 1 deals with representing HTML and XML documents as a hierarchy of nodes that can be manipulated to change the appearance and structure of the underlying documents using JavaScript.
The DOM is made up of a series of node types, as described here:
- The base node type is Node, which is an abstract representation of an individual part of a document; all other types inherit from Node.
- The Document type represents an entire document and is the root node of a hierarchy. In JavaScript, the document object is an instance of Document, which allows for querying and retrieval of nodes in a number of different ways.
- An Element node represents all HTML or XML elements in a document and can be used to manipulate their contents and attributes.
- Other node types exist for text contents, comments, document types, the CDATA section, and document fragments.
DOM access works as expected in most cases, although there are often complications when working with <script> and <style> elements. Since these elements contain scripting and stylistic information, respectively, they are often treated differently in browsers than other elements.
Perhaps the most important thing to understand about the DOM is how it affects overall performance. DOM manipulations are some of the most expensive operations that can be done in JavaScript, with NodeList objects being particularly troublesome. NodeList objects are “live,” meaning that a query is run every time the object is accessed. Because of these issues, it is best to minimize the number of DOM manipulations.