
Done in 60 Minutes: Building a Custom DotNetNuke Membership Provider
Prior to Microsoft’s release of the .NET 2.0 Framework, DotNetNuke handled authentication, authorization, and membership deep inside the core code, through its own custom implementation. While this functionality worked just fine, as far as the Framework’s membership requirements were concerned, it did not take into account use cases where the developer wished to replace the default implementation with external membership data stores through other APIs; at least not without forking the code and therefore making it more difficult to keep up with future framework upgrades.
One of ASP.NET 2.0’s many new features, the Provider Model, enabled DotNetNuke to abstract several of its custom base implementations, such as Data, Logging, Navigation, Scheduling, Membership, Profile, and more, thus giving more options to those wishing to integrate DotNetNuke with enterprise applications.
In this Wrox Blox, I will discuss and demonstrate how DotNetNuke takes advantage of ASP.NET 2.0’s Provider Model and how it implements the ASP.NET Membership Provider. Replacing the custom membership model did not come with a shortage of challenges. I will talk about the compromises and the creative thinking that went into accomplishing this task.
With the release of the .NET 2.0 Framework, Microsoft unveiled a new pattern designed to provide a simple way to extend base functionality. The .NET Provider Model was born.
Since the release of the .NET 2.0 Framework, the Provider Model has been widely adopted and implemented by several software organizations and component developers wishing to provide greater extensibility for their products. You will find that the most common scenario and Provider Model implementation today is the data access layer (DAL).
DotNetNuke implements this pattern in order to allow the flexibility to replace core functionality with custom business logic and without requiring any modification to the core codebase. DotNetNuke implements the Provider Model for the following core components:
- The Data Access Layer
- The HTML/TEXT Editor
- Caching
- Application Logging
- Scheduler
- Search
- Friendly URLs
- Navigation
- Membership
- Profile
ASP.NET Membership Provider and DotNetNuke
ASP.NET 2.0 also introduced a new membership system, the ASP.NET Membership Provider. This new subsystem provides pre-built functions to validate and store user membership and profile information, and by default has support for SQL Server and Active Directory. The idea is, of course, that you can extend this to any other type of data store. The ASP.NET Membership Provider also provides a complete API to manage user security for your web sites.
Figure 1 outlines the components and members of the ASP.NET Membership Provider. As you can see, a set of pre-built user controls is included out-of-the-box to perform common functions such as Login, providing user authentication feedback, navigation, and more. They are readily available to you within the Visual Studio development environment in the toolbox window.
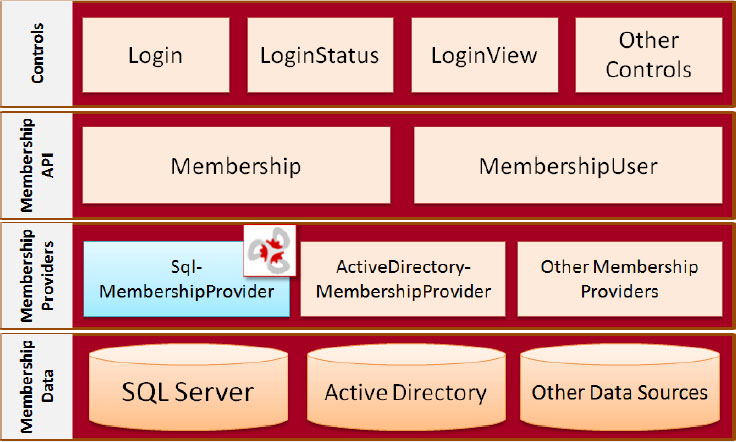
By default, DotNetNuke implements the SqlMembershipProvider since it already uses SQL Server to store all of its metadata, as highlighted in Figure 1.
DotNetNuke adopted the ASP.NET Membership as soon as the Beta (Whidbey) version of .NET Framework 2.0 was released. Before then, DotNetNuke implemented membership, profile, and authentication using its own custom membership subsystem.
The original intent was to completely replace the custom membership subsystem with the new Provider, but it did not prove to be quite that easy nor entirely possible. As is turned out, implementing the new ASP.NET Membership Provider presented some challenges.
The biggest challenge was related to the fact that DotNetNuke allows for the creation of multiple portals from one single instance of the application. Each portal it creates is identified by its own unique key, the PortalId. This capability is a primary reason why many chose to adopt DotNetNuke, and removing this feature was never a viable option.
The main issue with completely ripping out the core authentication model had to do with the fact that the ASP.NET Membership Provider is a generic component, and it does not take into account the fact that it might have to support multiple logical memberships for each DotNetNuke portal. The PortalId consequently relates to several core tables, and many commercial modules use this very field to create relationships between the portal and their data. As if that alone were not enough, users and their roles are also related to a portal.
From an implementation standpoint, in order to support the multi-portal nature of DotNetNuke, instead of simply implementing the SqlMemberShipProvider interface, which is what you would do in normal circumstances, the DotNetNuke.Security.Membership.MembershipProvider class wraps the ASP.NET Membership Provider functionality inside its own custom MembershipProvider implementation.
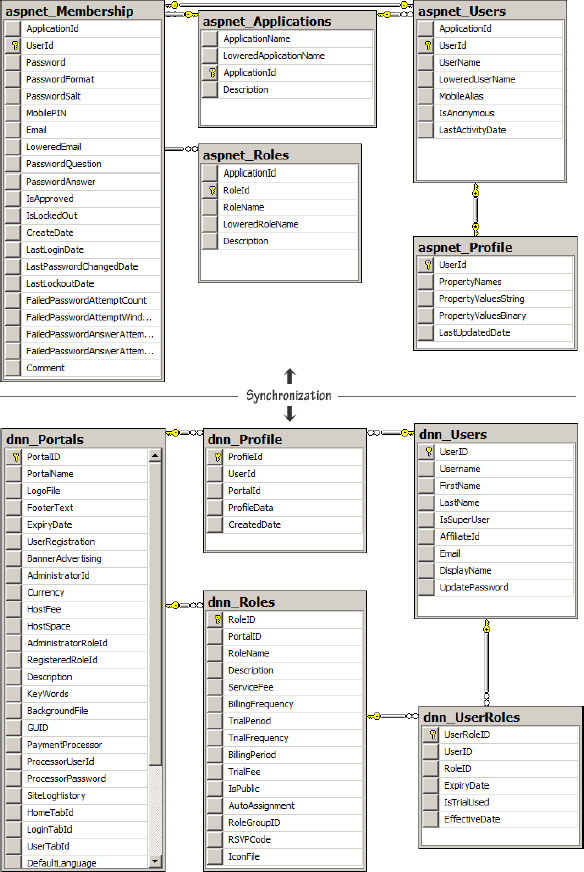
In short, to overcome this challenge and to avoid massive application and schema changes, DotNetNuke uses both the legacy user data store and the ASP.NET Membership data store; however, as you will notice from Figure 2, the two data stores have no concrete relationship. The ASP.NET Membership Provider and the custom DotNetNuke Membership data store are glued together by the application’s business logic layer.
Now, when you want to write your custom Membership Provider in DotNetNuke, your class would inherit from DotNetNuke.Security.Membership.MembershipProvider instead of System.Web.Security.SqlMembershipProvider.
For more detailed information on the ASP.NET 2.0 Membership API, I recommend Stefan Schackow’s book, ASP.NET 2.0 Security, Membership, and Role Management (Wrox Press, 2006).
Why Build a Custom Membership Provider?
If you are reading this Wrox Blox, chances are that you already have good reasons for wanting to develop a custom Membership Provider. In most cases, this decision requires careful consideration, especially since DotNetNuke provides solid profile and membership extensibility out-of-the-box. If you are still unsure whether or not you need a custom Membership Provider, here’s a list of a few reasons based on real life use cases that I have run across:
- You already, or need to, store Membership and/or Authentication information in an alternate location.
- You need to integrate with an external Customer Relationship Management/Enterprise Resource Planning system (CRM/ERP) or third-party application.
- The current default Membership Provider, while extensible, is not performing well for member profile searches when user profiles are well extended (lots and lots of properties). This is the case in systems in which profiles can be in the hundreds of thousands, or even millions, such as social networks.
- You need to change business logic within the current implementation, such as requiring a username to always be an e-mail address.
In addition, you also need to bear in mind other considerations not covered in this Wrox Blox, such as role mapping, whether or not the system you intend to replace the default Provider with provides methods that match the ASP.NET Membership Provider. Also, in the cases in which you will be synchronizing user information with the base DotNetNuke user tables, you will need to define which system is the Master Record.
The example in this Wrox Blox assumes that you need to integrate with an external CRM/ERP or third-party application.
The example in this Wrox Blox will implement three main functions of the API: CreateUser, UpdateUser, and DeleteUser. The targeted functionality in this case will be to synchronize the external user profile data store with the core DotNetNuke User Store, including the ASP.NET Membership Provider’s data store. In simple terms, you will be maintaining the DotNetNuke User Membership and Profile as is, while publishing any user changes over to the external database.
Building the Custom Membership Provider
To build the example project in this Wrox Blox, you will need a web server such as IIS 7, a version of DotNetNuke, a development IDE, and a version of SQL Server, along with some sample databases. My own environment is set up as follows:
| Operating System | Windows Vista |
| Web Server | IIS 7 |
| DotNetNuke | 04.09.00 Source Version (Source Version is not required) |
| Development IDE | Visual Studio 2008 Professional |
| SQL Server | SQL Server 2005 Standard |
| Databases | DotNetNuke Core Database (Unmodified) CRM System Simulation Database (INSPECTORIT_CRM) |
Setting Up DotNetNuke
Although the full source version of DotNetNuke is not required in order to successfully build a custom Membership Provider, it is an excellent place to start, for both the newbie and expert alike. In my setup I am going to install the source version of DotNetNuke, locate the default Membership Provider project, and make a copy of it to use as my starting point.
If you have never used DotNetNuke before, I strongly suggest you use the DotNetNuke Starter Kit to install DotNetNuke instead of the raw source version. The Starter Kit is a collection of Visual Studio project templates that is intended to enable a developer to configure fully functional DotNetNuke development projects such as Compiled Modules, Skins, and, of course, DotNetNuke itself.
The installation of the Starter Kit and the setup of the source version of DotNetNuke are not described in detail here. I assume that you already have DotNetNuke installed, or that you already know how to do that. If you do need more information on usage of the DotNetNuke Starter Kit, visit www.dotnetnuke.com and go to the download (www.dotnetnuke.com/tabid/125/default.aspx), documentation, and/or forum areas.
If you use the DotNetNuke Starter Kit to install your DotNetNuke web site from Visual Studio, make sure that you run the project (press Ctrl+[F5]) and follow the Web Installation Wizard to complete the installation steps as prompted in your browser. Once you have finished the Installation Wizard, your web site’s URL will most likely be as follows: http://localhost/DotNetNuke_2.
You should ensure that your DotNetNuke instance is correctly installed before continuing with the CRM System Simulation Database set-up step outlined in the next section.
Setting Up the Sample CRM Database
A probable scenario would be one in which you would already have the alternate Membership Data store tucked away on a SQL Server in your server farm. However, for the purpose of this demonstration, you will have to create one from scratch.
For the example, assume that you have an external database called INSPECTORIT_CRM storing your customer information. This will be your CRM simulation data store. You will create this database using SQL Management Studio (or Express). If you do not already have SQL Server installed, now is a good time to set it up. If you do not own a full SQL Server license, an Express version will work just fine. You can download the free SQL Express version from www.microsoft.com/Sqlserver/2005/en/us/express.aspx.
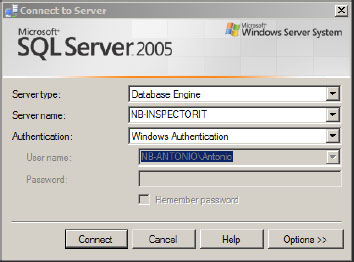
1. Once fired up, SQL Server Management Studio will ask you for your authentication information. The Authentication screen will prompt you to log in to your SQL Server. The authentication details needed here are the ones that you specified during the install of SQL Server. The screen should look similar to the one shown in Figure 3.
2. Once you have logged into SQL Server, the next step is to create the database. Select the Databases folder from the Object Explorer window with your cursor, right-click, and select the “New Database” option. You will be prompted with a screen similar to the one in Figure 4.
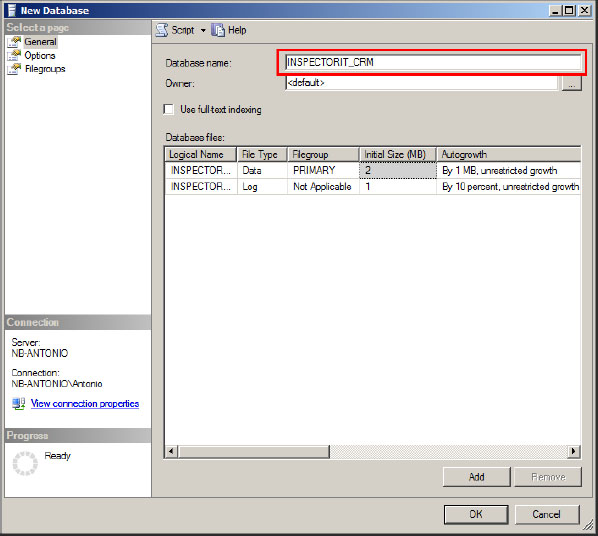
3. Enter INSPECTORIT_CRM in the Database name field, and then click OK. (You many enter any other name you wish. Just remember to update the connection string information to reflect this change.)
4. The next step is to create a database user object (at the server level), which we will then make the owner of this database in Step 6 below. Select the Security⇒Logins folder with your cursor, right-click, and select the “New Login” option.
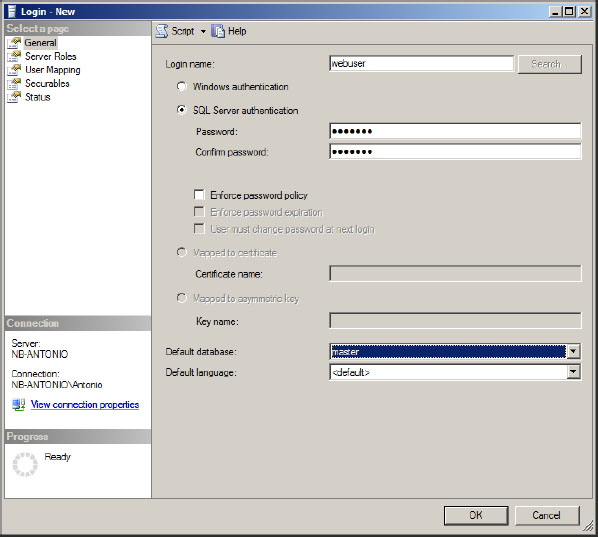
5. Here you create a new login that you will use to connect to your database, so be sure you remember the login information as you will need to provide it in your Web.Config file. In my example, I used webuser for both the username and password options. (You can use the same password, but make sure you uncheck the “Enforce Password Policy” option; otherwise, SQL Server will not allow you to provide a password that matches the username. For security purposes, ensure that this is avoided in a production environment). Figure 5 shows the new login creation screen.
6. The next step is to assign this newly created user ownership of the database.
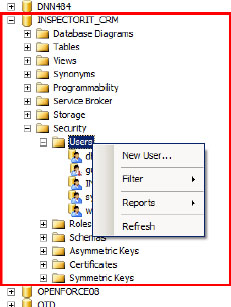
Navigate to the INSPECTORIT_CRM database, and expand the Security⇒Users tree. Right-click and select the “New User” option as shown in Figure 6.
7. Now assign the user to the database as shown in Figure 7.

You have now completed the manual creation of the CRM simulation database. The next steps are automated, as I have created and included the SQL scripts to create the tables and associated stored procedures below. You can download the code from www.wrox.com. Follow the instructions below to complete the CRM simulation database setup.
Creating the CRM Customers Table
Select the New Query option from SQL Management Studio. Paste the 1.0 Create INSPECTORIT_ CRM DB Objects.sql script in the text editor, and press [F5] to execute it. (Remember to change the database name right after the USE directive if you have used a different database name during Step 3 of the database set-up process.)
This will create a CUSTOMERS table.
USE INSPECTORIT_CRM
GO
SET ANSI_NULLS ON
GO
SET QUOTED_IDENTIFIER ON
GO
CREATE TABLE [dbo].[CUSTOMERS](
[UserID] [int] IDENTITY(1,1) NOT NULL,
[DNNUserID] [int] NOT NULL,
[Username] [nvarchar](100) NOT NULL,
[FirstName] [nvarchar](50) NOT NULL,
[LastName] [nvarchar](50) NOT NULL,
[IsSuperUser] [bit] NOT NULL CONSTRAINT
[DF_CUSTOMERS_IsSuperUser] DEFAULT ((0)),
[AffiliateId] [int] NULL,
[Email] [nvarchar](256) NULL,
[DisplayName] [nvarchar](128) NOT NULL CONSTRAINT
[DF_CUSTOMERS_DisplayName] DEFAULT (''),
[UpdatePassword] [bit] NOT NULL CONSTRAINT
[DF_CUSTOMERS_UpdatePassword] DEFAULT ((0)),
CONSTRAINT [PK_CUSTOMERS] PRIMARY KEY CLUSTERED
(
[UserID] ASC
)WITH (PAD_INDEX = OFF, STATISTICS_NORECOMPUTE = OFF, IGNORE_DUP_KEY
= OFF, ALLOW_ROW_LOCKS = ON, ALLOW_PAGE_LOCKS = ON) ON [PRIMARY],
CONSTRAINT [IX_CUSTOMERS] UNIQUE NONCLUSTERED
(
[Username] ASC
)WITH (PAD_INDEX = OFF, STATISTICS_NORECOMPUTE = OFF, IGNORE_DUP_KEY
= OFF, ALLOW_ROW_LOCKS = ON, ALLOW_PAGE_LOCKS = ON) ON [PRIMARY]
) ON [PRIMARY]
GO
Creating the CRM Database Stored Procedures
Select the New Query option from SQL Management Studio, paste the following script: 1.0 Create INSPECTORIT_CRM DB Objects.sql in the text editor, and press [F5] to execute it. This script will create the stored procedures you will need to interact with your user information.
SET ANSI_NULLS ON
GO
SET QUOTED_IDENTIFIER ON
GO
CREATE PROCEDURE [dbo].[INSPECTORIT_CRM_DeleteUser]
@UserID int
AS
DELETE
FROM dbo.CUSTOMERS
WHERE DNNUserId = @UserID
GO
SET ANSI_NULLS ON
GO
SET QUOTED_IDENTIFIER ON
GO
CREATE PROCEDURE [dbo].[INSPECTORIT_CRM_AddUser]
@UserID int
AS
DELETE
FROM dbo.CUSTOMERS
WHERE DNNUserId = @UserID
GO
SET ANSI_NULLS ON
GO
SET QUOTED_IDENTIFIER ON
GO
CREATE PROCEDURE [dbo].[INSPECTORIT_CRM_AddUser]
@DNNUserId int,
@PortalID int,
@Username nvarchar(100),
@FirstName nvarchar(50),
@LastName nvarchar(50),
@AffiliateId int,
@IsSuperUser bit,
@Email nvarchar(256),
@DisplayName nvarchar(100),
@UpdatePassword bit,
@Authorised bit
AS
DECLARE @UserID int
SELECT @UserID = UserID
FROM dbo.CUSTOMERS
WHERE Username = @Username
IF @UserID is null
BEGIN
INSERT INTO dbo.CUSTOMERS (
DNNUserId,
Username,
FirstName,
LastName,
AffiliateId,
IsSuperUser,
Email,
DisplayName,
UpdatePassword
)
VALUES (
@DNNUserId,
@Username,
@FirstName,
@LastName,
@AffiliateId,
@IsSuperUser,
@Email,
@DisplayName,
@UpdatePassword
)
SELECT @DNNUserId = SCOPE_IDENTITY()
END
GO
SET ANSI_NULLS ON
GO
SET QUOTED_IDENTIFIER ON
GO
CREATE PROCEDURE [dbo].[INSPECTORIT_CRM_UpdateUser]
@UserID int,
@PortalID int,
@FirstName nvarchar(50),
@LastName nvarchar(50),
@Email nvarchar(256),
@DisplayName nvarchar(100),
@UpdatePassword bit,
@Authorised bit
AS
UPDATE dbo.CUSTOMERS
SET
FirstName = @FirstName,
LastName = @LastName,
Email = @Email,
DisplayName = @DisplayName,
UpdatePassword = @UpdatePassword
WHERE DNNUserId = @UserID
Your CRM System simulation database, tables, and stored procedures are now set up. Next, you will tell DotNetNuke how to connect to your CRM database by opening up your Visual Studio IDE and modifying the DotNetNuke Web.Config file. Add the following Connection String entry into the ConnectionStrings node collection:
<add name="CRMSqlServer" connectionString="Data Source=(local);Initial
Catalog=INSPECTORIT_CRM;User ID=webuser;Password=webuser"
providerName="System.Data.SqlClient" />
Putting It All Together
Now that you have your database objects created and ready to go, and DotNetNuke knows to connect to and interact with the membership data in it, you can go ahead and start writing some code.
The best place to start at this point is your data layer. You will define the data access methods that you will use in your main Provider class.
In the example below you are creating an entirely new Data Provider project. This is because the example simulates a CRM system having its membership data stored externally in a physically different database. This example also helps you understand how you would create a Data Provider that connects to an entirely different database for your custom module development needs. The Data Provider you are creating here matches the data access layer techniques used throughout DotNetNuke.
1. In order to get a head start, I suggest that you simply make a copy of the core Membership Data Provider project, and rename the folder so that it does not conflict with the existing one. Also make sure that you change the name of the vbproj file, as the next step in this process is to add it your solution. The only other required step is to change the output assembly name from the Project Properties window in Visual Studio. Now you have a good template to start from.
Please note that the accompanying code download includes the entire Data Provider sample project, OpenForceMembershipProvider.Dataprovider.
2. Locate and open the DataProvider.vb file. Here, you will be defining the methods that you will override in the SqlDataProvider class. These are essentially the signatures of the methods that you will be using in the example.
Private Const ProviderNamespace As String =
"DotNetNuke.Security.Membership.OpenForceProvider.Data"
Public MustOverride Function AddUser(ByVal DnnUserid As Integer, ByVal PortalID As
Integer, ByVal Username As String, ByVal FirstName As String, ByVal LastName As
String, ByVal AffiliateId As Integer, ByVal IsSuperUser As Boolean, ByVal Email As
String, ByVal DisplayName As String, ByVal UpdatePassword As Boolean,
ByValIsApproved As Boolean) As Integer
Public MustOverride Sub DeleteUser(ByVal UserId As Integer)
Public MustOverride Sub UpdateUser(ByVal UserId As Integer, ByVal PortalID As
Integer, ByVal FirstName As String, ByVal LastName As String, ByVal Email As
String, ByVal DisplayName As String, ByVal UpdatePassword As Boolean, ByVal
IsApproved As Boolean)
3. Next, locate the SqlDataProvider.vb file. The first thing you will need to modify in this class is how you set the ConnectionString property in the constructor. The reason you are doing this is because you are attempting to connect to an entirely different database from DotNetNuke’s, and therefore you will need to establish the database connection. The code below demonstrates that you are directly calling the ConfigurationManager class to give you the connection string with the key "CRMSqlServer" — the very same one you added earlier to your Web.Config file. Note that you will need to add a project reference to the System.Configuration assembly and add the following imports directive at the top of your SqlDataProvider.vb file: Imports System.Configuration.
If _connectionString = "" Then
_connectionString =
ConfigurationManager.ConnectionStrings("CRMSqlServer").ToString()
End If
4. Next, you will create the methods that ultimately override the DataProvider class. As mentioned earlier, the three methods are:
- CreateUser
- UpdateUser
- DeleteUser
These three methods are wired to call the three stored procedures that you created previously during the database creation step. The stored procedures are called by your data access layer to interact with your membership data. They will receive their inputs from the Membership Provider code that you will code together later on in this example.
Public Overrides Sub DeleteUser(ByVal UserId As Integer)
SqlHelper.ExecuteNonQuery(ConnectionString,
GetFullyQualifiedName("DeleteUser"), UserId)
End Sub
Public Overrides Function AddUser(ByVal DnnUserid As Integer,
ByVal PortalID As Integer, ByVal Username As String, ByVal FirstName As
String, ByVal LastName As String, ByVal AffiliateId As Integer, ByVal
IsSuperUser As Boolean, ByVal Email As String, ByVal DisplayName As
String, ByVal UpdatePassword As Boolean, ByVal IsApproved As Boolean)
As Integer
Try
Return CType(SqlHelper.ExecuteScalar(ConnectionString,
DatabaseOwner & ObjectQualifier & "AddUser", DnnUserid, PortalID,
Username, FirstName, LastName, GetNull(AffiliateId), IsSuperUser,
Email, DisplayName, UpdatePassword, IsApproved), Integer)
Catch ex As Exception ‘ duplicate
Return -1
End Try
End Function
Public Overrides Sub UpdateUser(ByVal UserId As Integer, ByVal
PortalID As Integer, ByVal FirstName As String, ByVal LastName As
String, ByVal Email As String, ByVal DisplayName As String, ByVal
UpdatePassword As Boolean, ByVal IsApproved As Boolean)
SqlHelper.ExecuteNonQuery(ConnectionString,
GetFullyQualifiedName("UpdateUser"), UserId, PortalID, FirstName,
LastName, Email, DisplayName, UpdatePassword, IsApproved)
End Sub
At this stage your Data Provider part of the project is complete. You have defined your methods and wired them to interact with your database through the appropriate stored procedures. Now you are going to call these methods from the corresponding functions in your custom Membership Provider.
Once again, I suggest you simply make a copy of the default AspNetMembership project, rename the folder, rename the vbproj project file, add it to your solution, and rename the output assembly from the Project Properties page. This step will save you quite a bit of time that you will otherwise need to spend setting up the project from scratch. Although you do start with a bunch of core code and Membership functionality, you can easily clear the business logic under each function, while maintaining all the signatures that you will need to implement based on your specific requirements.
In the provided example, you have not modified the class namespace; you have just modified the class name for simplicity’s sake. While I suggest you get up and running this way for the purpose of learning this process, you can, of course later modify the namespace to suite your own standards and methodologies. But be sure to change this in both the Provider and Data Provider project as well as making the right corrections to the assembly name and type settings in your web.config file.
Now open up your Membership Provider class in Visual Studio and let’s start writing some code.
1. The first thing that you will need to do is to provide a private member to your own custom DataProvider class. You will use this member to access the data layer functions that you created earlier.
Private Shared CRMDataProvider As OpenForceProvider.Data.DataProvider =
OpenForceProvider.Data.DataProvider.Instance
Please note that you are adding this reference while leaving the reference to the default DotNetNuke Data Provider. This is because for the purpose of this Wrox Blox, we are only implementing three shadow methods, and they still, along with the other methods, continue to interact with the default DotNetNuke implementation.
2. Now you will need to locate all the methods that you wish to implement your own functionality in, and then add your code. In your scenario, those will most likely be more than the three methods you are modifying for the purpose of this Wrox Blox.
The modified parts of the code are highlighted below. The rest of the un-highlighted code is of the original DotNetNuke Membership Provider. Since you are syncing with DotNetNuke this code is still relevant and useful to you.
Public Overrides Function CreateUser(ByRef user As UserInfo) As UserCreateStatus
Dim createStatus As UserCreateStatus
Try
' check if username exists in database for any portal
Dim objVerifyUser As UserInfo = GetUserByUserName(Null.NullInteger, user.Username, False)
If Not objVerifyUser Is Nothing Then
If objVerifyUser.IsSuperUser Then
' the username belongs to an existing super user
createStatus = UserCreateStatus.UserAlreadyRegistered
Else
' the username exists so we should now verify the password
If ValidateUser(objVerifyUser.PortalID, user.Username, user .Membership.Password) Then
' check if user exists for the portal specified
objVerifyUser = GetUserByUserName(user.PortalID,
user.Username, False)
If Not objVerifyUser Is Nothing Then
' the user is already registered for this portal
createStatus =
UserCreateStatus.UserAlreadyRegistered
Else
' the user does not exist in this portal - add them
createStatus = UserCreateStatus.AddUserToPortal
End If
Else
' not the same person - prevent registration
createStatus = UserCreateStatus.UsernameAlreadyExists
End If
End If
Else
' the user does not exist
createStatus = UserRegistrationStatus.AddUser
End If
'If new user - add to aspnet membership
If createStatus = UserRegistrationStatus.AddUser Then
createStatus = CreateMemberhipUser(user)
End If
'If asp user has been successfully created or we are adding an
existing user
'to a new portal
If createStatus = UserCreateStatus.Success OrElse createStatus =
UserCreateStatus.AddUserToPortal Then
'Create the DNN User Record
createStatus = CreateDNNUser(user)
If createStatus = UserCreateStatus.Success Then
createStatus = CreateCRMUser(user)
If createStatus = UserCreateStatus.Success Then
'Persist the Profile to the Data Store
ProfileController.UpdateUserProfile(user)
End If
End If
End If
Catch exc As Exception ' an unexpected error occurred
'LogException(exc)
createStatus = UserCreateStatus.UnexpectedError
End Try
Return createStatus
End Function
3. The CreateCRMUser function below is a private method created to validate user inputs prior to adding users to your database. If the input does not pass the validation logic, the user will not be created. This example is meant to demonstrate that you can place your own custom functionality and business logic in this class.
Additionally, in your custom membership database, you will need to maintain a reference to the user’s record in DotNetNuke. If you look closely, the custom CUSTOMER table contains a field called DNNUserID that is used to maintain the reference between the user records (so that you can, e.g., delete and update users across the multiple data stores). You will fill this field with the UserId returned from DotNetNuke’s CreateUser method, which is called first in the transaction. In your class you will then create a private variable in which you will store the User’s ID when created, and you will use its value when it is your turn to add the user through the CreateCRM method:
Private _CreatedDnnUserId as Integer
Private Function CreateCRMUser(ByRef user As UserInfo) As UserCreateStatus
Dim objSecurity As PortalSecurity
Dim userName As String
Dim email As String
Dim lastName As String
Dim firstName As String
Dim createStatus As UserCreateStatus
Dim displayName As String
Dim updatePassword As Boolean
Dim isApproved As Boolean
objSecurity = New PortalSecurity
userName = objSecurity.InputFilter(user.Username,
PortalSecurity.FilterFlag.NoScripting Or PortalSecurity.FilterFlag.NoAngleBrackets
Or PortalSecurity.FilterFlag.NoMarkup)
email = objSecurity.InputFilter(user.Email, PortalSecurity.FilterFlag.NoScripting
Or PortalSecurity.FilterFlag.NoAngleBrackets Or PortalSecurity.FilterFlag.NoMarkup)
lastName = objSecurity.InputFilter(user.LastName,
PortalSecurity.FilterFlag.NoScripting Or PortalSecurity.FilterFlag.NoAngleBrackets
Or PortalSecurity.FilterFlag.NoMarkup)
firstName = objSecurity.InputFilter(user.FirstName,
PortalSecurity.FilterFlag.NoScripting Or PortalSecurity.FilterFlag.NoAngleBrackets
Or PortalSecurity.FilterFlag.NoMarkup)
createStatus = UserCreateStatus.Success
displayName = objSecurity.InputFilter(user.DisplayName,
PortalSecurity.FilterFlag.NoScripting Or PortalSecurity.FilterFlag.NoAngleBrackets
Or PortalSecurity.FilterFlag.NoMarkup)
updatePassword = user.Membership.UpdatePassword
isApproved = user.Membership.Approved
Try
Dim NewUserId As Integer = CType(CRMDataProvider.AddUser(_CreatedDnnUserId,
user.PortalID, userName, firstName, lastName, user.AffiliateID, user.IsSuperUser,
email, displayName, updatePassword, isApproved), Integer)
Catch ex As Exception
‘Clear User (duplicate User information)
user = Nothing
createStatus = UserCreateStatus.ProviderError
End Try
Return createStatus
End Function
Public Overrides Sub UpdateUser(ByVal user As UserInfo)
Dim objSecurity As New PortalSecurity
Dim firstName As String =
objSecurity.InputFilter(user.FirstName,PortalSecurity.FilterFlag.NoScripting Or
PortalSecurity.FilterFlag.NoAngleBrackets Or PortalSecurity.FilterFlag.NoMarkup)
Dim lastName As String = objSecurity.InputFilter(user.LastName,
PortalSecurity.FilterFlag.NoScripting Or PortalSecurity.FilterFlag.NoAngleBrackets
Or PortalSecurity.FilterFlag.NoMarkup)
Dim email As String = objSecurity.InputFilter(user.Email,
PortalSecurity.FilterFlag.NoScripting Or PortalSecurity.FilterFlag.NoAngleBrackets
Or PortalSecurity.FilterFlag.NoMarkup)
Dim displayName As String = objSecurity.InputFilter(user.DisplayName,
PortalSecurity.FilterFlag.NoScripting Or PortalSecurity.FilterFlag.NoAngleBrackets
Or PortalSecurity.FilterFlag.NoMarkup)
Dim updatePassword As Boolean = user.Membership.UpdatePassword
Dim isApproved As Boolean = user.Membership.Approved
If displayName = "" Then
displayName = firstName + " " + lastName
End If
‘Persist the Membership to the Data Store
UpdateUserMembership(user)
‘Persist the DNN User to the Database
dataProvider.UpdateUser(user.UserID, user.PortalID, firstName, lastName, email,
displayName, updatePassword, isApproved)
‘Persist the Profile to the Data Store
ProfileController.UpdateUserProfile(user)
‘Update/persist the user in the Inspector IT CRM external database
CRMDataProvider.UpdateUser(user.UserID, user.PortalID, firstName, lastName, email,
displayName, updatePassword, isApproved)
End Sub
Public Overrides Function DeleteUser(ByVal user As UserInfo) As Boolean
Dim retValue As Boolean = True
Dim dr As IDataReader
Try
dr = dataProvider.GetRolesByUser(user.UserID, user.PortalID)
While dr.Read
dataProvider.DeleteUserRole(user.UserID, Convert.ToInt32(dr("RoleId")))
End While
dr.Close()
‘check if user exists in any other portal
dr = dataProvider.GetUserByUsername(-1, user.Username)
dr.Read()
If Not dr.Read Then
‘Antonio Chagoury
‘NOTE: In order to avoid un-synchronized data, the following
‘3 functions should be wrapped in a transaction
‘Delete the DNN User
dataProvider.DeleteUser(user.UserID)
‘Delete AspNet Memrship User
retValue = DeleteMembershipUser(user)
‘Delete the CRM Membership User
CRMDataProvider.DeleteUser(user.UserID)
Else
dataProvider.DeleteUserPortal(user.UserID, user.PortalID)
End If
dr.Close()
Catch ex As Exception
retValue = False
End Try
Return retValue
End Function
4. Once you have modified your Membership’s Data Provider and main Membership Provider classes with your custom logic, you will be left with only one more task to do, which is to instruct DotNetNuke on which Membership Provider it should use. This is where the whole Provider concept is put to practice with a simple configuration change.
Find your DotNetNuke Web.Config file, and locate the members configuration node. You will first need to add your custom Membership Provider in the list of providers and then change the defaultProvider attribute of the top-level members configuration node to the name that you defined in the name attribute of your Provider entry, as follows:
<members defaultProvider="OpenForceMembershipProvider">
<providers>
<clear />
<add name="OpenForceMembershipProvider"
type="DotNetNuke.Security.Membership.OpenForceMembershipProvider,
DotNetNuke.Provider.OpenForceProvider, Culture=neutral"
providerPath="~ProvidersMembershipProvidersOpenForceMembershipProvider" />
<add name="AspNetMembershipProvider"
type="DotNetNuke.Security.Membership.AspNetMembershipProvider,
DotNetNuke.Provider.AspNetProvider"
providerPath="~ProvidersMembershipProvidersAspNetMembershipProvider" />
</providers>
</members>
5. Finally, build your projects and deploy the generated assemblies into the application’s bin folder.
The resulting functionality is that when you create or update a user using the default DotNetNuke user management interfaces, the user is added and modified in your CRM’s Customer table as well as the core DotNetNuke Membership data stores, respectively. Additionally, if you accessed the user management screen as the portal administrator, you would also be able to delete the user from all the tables.
In this demonstration, I customized only three of the 26 available methods in the Membership Provider class. Naturally, a considerable amount of work would still be required to complete the entire loop and replace the entire Membership subsystem with our custom implementation, but it demonstrates that, with a proper plan in place, writing a Custom Membership Provider is simple and within your sight. All code samples accompanying this Wrox Blox are written in VB.NET, although a C# translation of the same code will yield the same functional results.
The DotNetNuke Core team continues to keep up with the pace of technology, and as the .NET Framework continues to evolve, I am certain, so will the DotNetNuke Framework. I am especially proud, honored, and grateful to be a part of this great group of technology professionals.
Antonio Chagoury is the CEO and Chief Software Architect of Inspector IT Inc. (www.inspectorit.com), a .NET and DotNetNuke solutions provider based in the Washington DC metro area. As a member of the DotNetNuke Core team and project leader of the Blog module as well as the Installer utility, he is an active contributor and supporter of DotNetNuke and Open Source. He is also the Co-Founder and President of the Capital DotNetNuke User Group (www.capitaldug.org), an effort intended to get DotNetNuke enthusiasts in one room once a month to discuss a wide range of topics as well as share ideas, knowledge, and experience on the platform.
Antonio’s technical specialties range across Enterprise Software Architecture and Engineering, Business Systems Integrations, SOA, and, of course, all development based on the .NET framework. He considers DotNetNuke software development and consulting, Web 2.0, Office 2.0, and Enterprise 2.0 his hobbies.
Antonio has lived and traveled extensively in Europe, Africa, and the Middle East, and settled in the Washington, DC area in 1999. He speaks English, Italian, French, Spanish, Portuguese, and Arabic. He blogs (in English) regularly at www.cto20.com.