
When you turn on the visibility of the Sky comp, it appears in the middle of the ground plane. Select Sky, and move it away from the camera on the Z-axis. Move Sky back so it intersects the ground plane at the horizon but doesn’t show any white from the ground plane where the two meet (Figure 15-37).
Figure 15-37: Sky precomp positioned
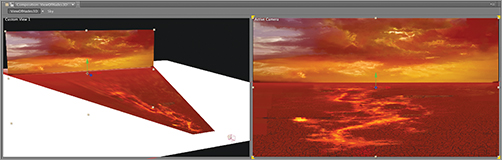
As it moves back, it becomes smaller in the Active Camera view. If you’re careful to select only the Z-axis, and don’t change the X and Y coordinates, Sky will stay in the correct relative position to the rest of the composition, and you can uniformly scale it up to fill the Active Camera view. If Sky has moved on either the X-axis or Y-axis, you’ll need to do repositioning after scaling.
Scale up Sky so it matches its original position in the ViewOfHadesForAE comp. Remember, the original painting was created at double the size of the comp in which you’re working. By setting the size of the ViewOfHadesForAE comp to 25% and the size of the ViewOfHades3D comp to 50%, you can click back and forth between the tabs at the top of the Timeline panel to compare the positioning of elements in the two comps.
Turning Off the Projection on Other Layers
You’ll notice that Sky is slightly darkened at the horizon, because it’s receiving the projection of the ground plane from the spotlight. You don’t want this, because only the original painting should show on all the other layers and precomps in the composition. Select all the layers and precomps in the Timeline except White Solid 1, GroundPlaneProjection, and Ground Plane Reference. Under Material Options, set Accepts Shadows to Off and Accepts Lights to Off (Figure 15-38). Because you had all the layers selected when you changed the Material Options on one layer, all the layers are affected. Now only the White Solid 1 layer will accept the projection; the other layers will remain unchanged.
Figure 15-38: Material Options for the layers and precomps not receiving the projection
Projection Plane Checklist
To set up a projection in After Effects, do the following:
1. Copy the position of the camera.
2. Paste the camera position onto the spotlight that will be projecting the texture, and onto the projection layer.
3. Move the position of the projection layer slightly ahead of the light.
4. Scale the projection layer to match the 2D reference layer in the Active Camera view.
Then, change the following parameters:
- Set the spotlight to:
- Color: White
- Casts Shadows: On
- Shadow Darkness: 100%
- Remaining settings: defaults
- Set the White Solid’s Material Options to:
- Casts Shadows: Off
- Light Transmission: 0%
- Accepts Shadows: On
- Accepts Lights: Off
- Remaining settings: defaults
- Set the projection layer’s Material Options to:
- Casts Shadows: Only
- Light Transmission 100%
- Remaining settings: defaults
- Set the Material Options on all the other layers in the composition, except the Solid that is receiving the projection and the projection layer, to:
- Accepts Shadows: Off
- Accepts Lights: Off
- Remaining settings: defaults
- Set the projection resolution in the Composition Setting to 4000.
I know that this is a lot of steps, so you may want to bookmark this checklist for help if your projection isn’t working. If for any reason you’ve gotten lost, open ViewOfHadesProjectionPlane.aep on the DVD materials to examine and compare the projection setup to what you have created.