
Chapter 4: Easing Device Discovery with CDP
In This Chapter
![]() Learning what CDP is and how it operates
Learning what CDP is and how it operates
![]() Configuring CDP settings for your network devices
Configuring CDP settings for your network devices
![]() Building a network diagram from CDP information
Building a network diagram from CDP information
Cisco Discovery Protocol (CDP) is data link layer protocol that allows you to find information about the connections between devices. This chapter provides the basic information on how the protocol works and how to enable it on your devices. You also find out how to get information from your devices, including how they are connected to each other, how to view the debugging information, what you need to do if you encounter devices on which CDP is not running, and how to retrieve information from the system.
CDP is useful and easy to use, so you should start exploring a bit of your network using this default tool from Cisco. Because CDP runs on all modern Cisco equipment, you may as well work with this tool or at least know what it is doing over your network, even if you do not use the information it generates.
Discovering How CDP Operates
Cisco Discovery Protocol (CDP) is a nifty tool from Cisco that gives you a boost if your network is primarily made of Cisco devices because Cisco devices use this communication protocol to identify other Cisco devices. Most Cisco Enterprise devices support CDP. CDP essentially allows you to identify Cisco devices on your network and see how they are connected.
![]() CDP becomes very useful if you have inherited or been brought in to work with an unfamiliar network. Within a few minutes, you have a picture of the network with a level of clarity that the previous administrator who did not use CDP would have had because many network administrators make connections to devices at the spur of a moment and then forget that those connected devices exist.
CDP becomes very useful if you have inherited or been brought in to work with an unfamiliar network. Within a few minutes, you have a picture of the network with a level of clarity that the previous administrator who did not use CDP would have had because many network administrators make connections to devices at the spur of a moment and then forget that those connected devices exist.
![]() CDP has been enabled by default on Cisco routers and switches since IOS 10.0 (circa 1996), so unless you have turned it off, it should be running on your network devices. At periodic intervals, the CDP device sends out a packet on all of its interfaces. By default, the CDP packets are sent to a multicast address every 60 seconds. The receiving device’s holdtime (the amount of time which it retains the data) is 180 seconds by default. The size of these packets is less than 500 bytes, which means that although they are on your network often, they do not amass a large amount of data — no more bandwidth is consumed with CDP than with Spanning Tree Protocol (STP) management packets (see Chapter 6 in this minibook for more information on STP).
CDP has been enabled by default on Cisco routers and switches since IOS 10.0 (circa 1996), so unless you have turned it off, it should be running on your network devices. At periodic intervals, the CDP device sends out a packet on all of its interfaces. By default, the CDP packets are sent to a multicast address every 60 seconds. The receiving device’s holdtime (the amount of time which it retains the data) is 180 seconds by default. The size of these packets is less than 500 bytes, which means that although they are on your network often, they do not amass a large amount of data — no more bandwidth is consumed with CDP than with Spanning Tree Protocol (STP) management packets (see Chapter 6 in this minibook for more information on STP).
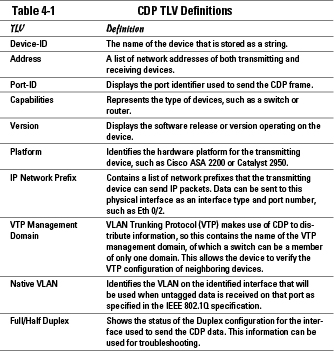
Table 4-1 shows the type of information found in the Type Length Value (TLV) definitions, which is the main data found in the CDP frame. TLV is a standard data storage structure designed to encode data inside of protocol frames.
The data being passed around the network allows you to build a topological map of the connected devices, and if you move from node to node of that map (by connecting to the CLI on each switch or router you discover), you can build an entire map of the network. Therefore, if you are in the middle of troubleshooting and need to know how a few of the devices on your network are connected (or if you are documenting your entire network design), CDP is for you.
Working with CDP
Basic CDP commands are easy to work with. From Global Configuration mode, there are only a few CDP options to set, which you see shortly in the section “Enabling CDP”. With very little configuration, you can have the entire system in operation. In fact, the biggest CDP configuration requirement is disabling CDP where you do not want it.
Seeing whether CDP is operating on a device
You can use the show command to see whether CDP is currently operating on your device. The following output shows the currently configured CDP settings on Switch1, which are actually the default settings. The default settings send CDP packets every 60 seconds, using CDPv2 as the protocol version, and the receiving device retains that information for 180 seconds.
Switch1>enable
Switch1#configure terminal
Enter configuration commands, one per line. End with CNTL/Z.
Switch1#show cdp
Global CDP information:
Sending CDP packets every 60 seconds
Sending a holdtime value of 180 seconds
Sending CDPv2 advertisements is enabled
If you want to change from the default values, you can set CDP packets to send every 5 to 254 seconds (Book I, Chapter 3 deals with the pesky binary number limits that show up). The CDP hold timer can be configured from 10 seconds to 255 seconds, with the holdtime always larger than the CDP packet timer; otherwise, other devices could remove the information about their neighbor right before getting the second CDP packet, which does not make much sense.
![]() The standard recommendation is that the holdtime be at least three times the value of the CDP time. That way, information about neighboring devices will remain in your CDP data even if you fail to receive two out of the three CDP data frames that are sent.
The standard recommendation is that the holdtime be at least three times the value of the CDP time. That way, information about neighboring devices will remain in your CDP data even if you fail to receive two out of the three CDP data frames that are sent.
Enabling CDP
Even though CDP is enabled by default on your Cisco devices, you might inherit a network where the previous administrator had disabled CDP because he disliked three letter protocols (or for some other equally valid reason).
If you find that CDP is not running on your device, you can enable CDP using the cdp run command as follows:
Switch1>enable
Switch1#configure terminal
Enter configuration commands, one per line. End with CNTL/Z.
Switch1(config)#cdp ?
advertise-v2 CDP sends version-2 advertisements
holdtime Specify the holdtime (in sec) to be sent in packets
run Enable CDP
timer Specify the rate at which CDP packets are sent (in sec)
Switch1(config)#cdp run
Switch1(config)#end
Disabling CDP
After CDP is running on your device, by default, CDP is enabled on all interfaces of the device. At times, you may want to disable CDP — for example, on the external interface of the Internet router connected to your ISP because the ISP does not need the details about the internal network configuration. Using this method only disables CDP on a specific interface where you choose not to transmit CDP data, but leaves it enabled on the device, so you are still able to receive CDP data. To disable CDP on an interface, use Interface Configuration mode, as shown here:
Switch1>enable
Switch1#configure terminal
Enter configuration commands, one per line. End with CNTL/Z.
Switch1(config)#interface fastEthernet 0/1
Switch1(config-if)#no cdp enable
Switch1(config)#end
Viewing information about devices
Once you have CDP running and collecting data about your neighboring devices, you may want to view information about those devices, which you obtain by using the show cdp neighbors command. The following is a list of options that go with that command. You can be specific about which neighbors you want to see, or you can show them all, and you can view summary data or detailed data.
Switch1>enable
Switch1#show cdp neighbors ?
Async Async interface
BVI Bridge-Group Virtual Interface
Dialer Dialer interface
FastEthernet FastEthernet IEEE 802.3
Lex Lex interface
Multilink Multilink-group interface
Port-channel Ethernet Channel of interfaces
Tunnel Tunnel interface
Virtual-Template Virtual Template interface
Virtual-TokenRing Virtual TokenRing
Vlan Catalyst Vlans
detail Show detailed information
| Output modifiers
<cr>
You can get detailed data with the cdp command. Here is detailed information that I can see about my neighboring devices. Look through the output for the information listed in Table 4-1.
Notice the device type of RootBridge.edtetz.net; pick out which switch port can see Router2; and decode what IOS version is running on Switch2.
Switch1>enable
Switch1#show cdp neighbors detail
-------------------------
Device ID: Switch2
Entry address(es):
IP address: 192.168.1.243
Platform: cisco WS-C2950-12, Capabilities: Trans-Bridge Switch
Interface: FastEthernet0/12, Port ID (outgoing port): FastEthernet0/1
Holdtime : 137 sec
Version :
Cisco Internetwork Operating System Software
IOS (tm) C2950 Software (C2950-C3H2S-M), Version 12.0(5.3)WC(1), MAINTENANCE INTERIM SOFTWARE
Copyright (c) 1986-2001 by cisco Systems, Inc.
Compiled Mon 30-Apr-01 07:56 by devgoyal
advertisement version: 2
Protocol Hello: OUI=0x00000C, Protocol ID=0x0112; payload len=27, value=00000000FFFFFFFF010121FF0000000000000006D6AC46C0FF0001
VTP Management Domain: ‘’
Management address(es):
-------------------------
Device ID: Router2
Entry address(es):
IP address: 192.168.1.240
Platform: Cisco 2621XM, Capabilities: Switch IGMP
Interface: FastEthernet0/3, Port ID (outgoing port): FastEthernet0/0
Holdtime : 142 sec
Version :
Cisco IOS Software, C2600 Software (C2600-ADVIPSERVICESK9-M), Version 12.3(4)T4, RELEASE SOFTWARE (fc2)
Technical Support: http://www.cisco.com/techsupport
Copyright (c) 1986-2004 by Cisco Systems, Inc.
Compiled Thu 11-Mar-04 19:57 by eaarmas
advertisement version: 2
VTP Management Domain: ‘’
Duplex: full
Management address(es):
-------------------------
Device ID: RootBridge.edtetz.net
Entry address(es):
IP address: 192.168.1.103
Platform: AIR-AP350, Capabilities:
Interface: FastEthernet0/1, Port ID (outgoing port): fec0
Holdtime : 131 sec
Version :
Cisco 350 Series AP 12.03T
advertisement version: 2
Duplex: full
Power drawn: 6.000 Watts
Management address(es):
After reviewing the code, you should now know
• RootBridge.edtetz.net is an AIR-AP350 — an Aironet 350 series access point
• Router2 is seen by port FastEthernet0/3 — Router2 is using FastEthernet0/0
• Switch2 is running IOS version 12.0
The show command offers a long list of items you can see information about. One of those items is cdp interface. The show cdp interface command provides you with detailed information about the interfaces CDP is running on. I shortened the output to show only the first four switch interfaces. Notice that all the interfaces are still running at the default CDP configuration.
Switch1>enable
Switch1#show cdp interface
FastEthernet0/1 is up, line protocol is up
Encapsulation ARPA
Sending CDP packets every 60 seconds
Holdtime is 180 seconds
FastEthernet0/2 is up, line protocol is up
Encapsulation ARPA
Sending CDP packets every 60 seconds
Holdtime is 180 seconds
FastEthernet0/3 is up, line protocol is up
Encapsulation ARPA
Sending CDP packets every 60 seconds
Holdtime is 180 seconds
FastEthernet0/4 is down, line protocol is down
Encapsulation ARPA
Sending CDP packets every 60 seconds
Holdtime is 180 seconds
Checking traffic data
If you are curious about the amount of CDP data that has gone through your devices, you can use the traffic option, which provides a summary about that data. Here is a copy of the output for my switch. Notice that it shows separate data for CDPv1 and CDPv2 protocols.
Switch1>enable
Switch1#show cdp traffic
CDP counters :
Total packets output: 25123, Input: 8011
Hdr syntax: 0, Chksum error: 0, Encaps failed: 0
No memory: 0, Invalid packet: 0, Fragmented: 0
CDP version 1 advertisements output: 0, Input: 0
CDP version 2 advertisements output: 25123, Input: 8011
Ogling CDP’s debug options
No protocol information would be complete in a Cisco book without a run-through of the debug options for that protocol. As with all other protocols, CDP has specific debug commands that can help you to identify errors or problems with the protocol. You can display debugging information for the following items (as shown by the context help for the command):
Switch1>enable
Switch1#debug cdp ?
adjacency CDP neighbor info
events CDP events
ip CDP ip info
packets CDP packet-related information
To see debug cdp in action, the following shows the output for debug cdp events:
Switch1>enable
Switch1#debug cdp events
CDP events debugging is on
Switch1#
CDP-EV: CDP sending protocol-hello notification
CDP-EV: protocol-hello notification, contents:
CDP-EV: notification_count = 1
CDP-EV: OUI =0x00000C, Protocol ID=0x0112
CDP-EV: payload len=27, value=00000000FFFFFFFF010121FF0000000000000006D6AC46C0FF0001
CDP-EV: receiving IDB name = ‘FastEthernet0/12’
CDP-EV: remote device name = ‘Switch2’, CDP device number = 4
CDP-EV: remote interface name = ‘FastEthernet0/1’
CDP-EV: src_mac = 0006.D6AC.46C1, capabilities = A
CDP-EV: duplex = 1, native-vlan = 0
CDP-EV: received_vtp_mgmt_domain = 1, vtp_mgmt_domain_length = 0
CDP-EV: vtp-management-domain-name = ‘’
Switch1#no debug all
All possible debugging has been turned off
Scanning through the preceding output, you can identify the following:
• Switch1 can see Switch2.
• The interfaces on Switch1 are connected to the interfaces on Switch2.
• The MAC address of Switch1.
• The VLAN that the switches are likely using to communicate.
• The VTP domain to which switches belong.
Overlooking CDP miscellany
Finally, there are a few more commands to manage CDP on your devices, such as the clear command, which you execute in Privileged EXEC mode. The clear command will reset your counters or remove all collected CDP data so it can be recollected from scratch. These commands are as follows:
Switch1>enable
Switch1#clear cdp ?
counters Clear CDP counters
table Clear cdp table
There is also the counters option for the clear command, which resets all the CDP counters to zero. You saw these counters when you ran the show cdp traffic command (see the earlier “Checking traffic data” section). The table option removes all entries from your neighbor’s table. Because this data is sent every 60 seconds, it is rebuilt very quickly.
Building Your Network Layout
I have spent a lot of time at client sites documenting their network configuration. This task sometimes involves hours in wiring closets tracing cables and documenting ports. In some cases, the wiring closet is a real rat’s nest of cables, and it can take hours of navigating to find out what switches are connected to which switches, to which routers, and on and on, ad infinitum.
Even a small network of a dozen switches with four WAN connections from different routers can take a long time to decipher. But with CDP, in a few minutes, you can have a network diagram — without the need of tracing cables through a network closet with a rat’s nest of cables.
![]() This exercise is also good for determining whether any Cisco switches you may not be aware of are kicking around your network. This is possible because you are going to build a table of all connections between devices. This means you will learn about all connected Cisco devices on your network, not just the ones you know are there.
This exercise is also good for determining whether any Cisco switches you may not be aware of are kicking around your network. This is possible because you are going to build a table of all connections between devices. This means you will learn about all connected Cisco devices on your network, not just the ones you know are there.
![]() The other nice piece of this puzzle is that, although I suggested that these devices are all in one wiring closet, you could obtain the same information if they were in wiring closets on the fourth and seventeenth floors, or in an office four blocks away connected with a LAN extension.
The other nice piece of this puzzle is that, although I suggested that these devices are all in one wiring closet, you could obtain the same information if they were in wiring closets on the fourth and seventeenth floors, or in an office four blocks away connected with a LAN extension.
Examine Figure 4-1 as I walk you through the process.
Figure 4-1: A small data network to be discovered via CDP.
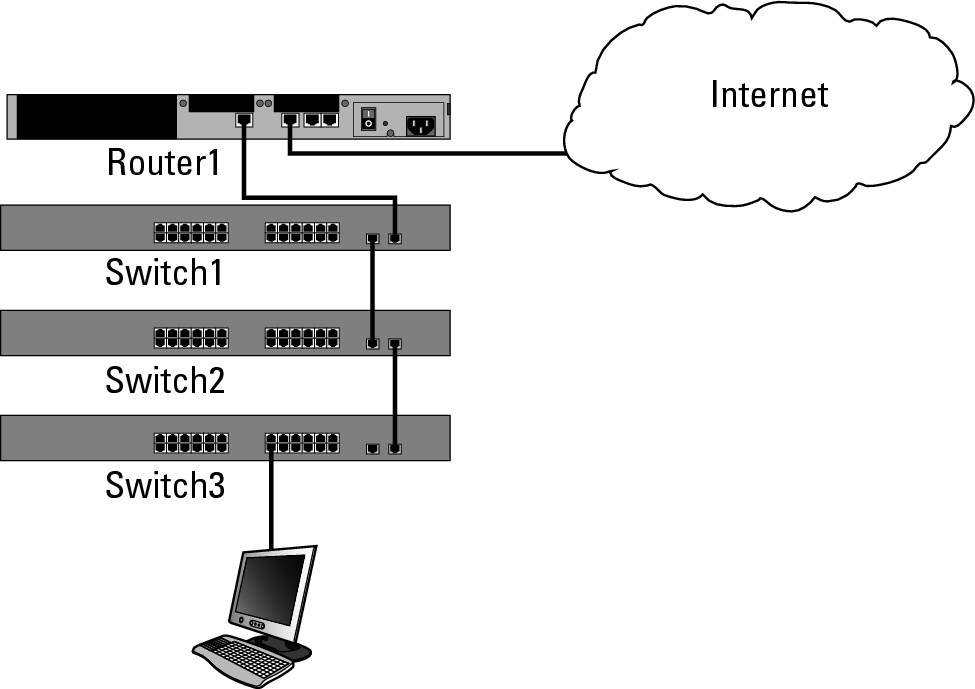
1. Choose a starting point, in this case, Switch2.
It does not matter where that starting point is, just that you have one.
2. Connect to the starting point device and run the command to see the CDP neighbors:
Switch2>enable
Switch2#show cdp neighbors
Capability Codes: R - Router, T - Trans Bridge, B - Source Route Bridge
S - Switch, H - Host, I - IGMP, r - Repeater, P - Phone
Device ID Local Intrfce Holdtme Capability Platform Port ID
Switch1 Gig 0/1 155 S I WS-C2960-1Gig 0/1
Switch3 Gig 0/2 120 S I WS-C2960-1Gig 0/2
From this output, you know
• There are two other switches named Switch1 and Switch3.
• These 3 switches are connected through the two Gigabit ports on the front of the switches, rather than through any of the 24 FastEthernet ports.
• This company probably does not have other Cisco equipment on this portion of the network because you do not see that they have any access points or IP phones.
3. On Switch3, view the show cdp neighbors command to see what it has connected:
Switch3>enable
Switch3#show cdp neighbors
Capability Codes: R - Router, T - Trans Bridge, B - Source Route Bridge
S - Switch, H - Host, I - IGMP, r - Repeater, P - Phone
Device ID Local Intrfce Holdtme Capability Platform Port ID
Switch2 Gig 0/2 145 S I WS-C2960-1Gig 0/2
You see that Switch3 is alone. The client computer that is connected to the switch does not send CDP data, so you do not need to worry about it.
4. Run show cdp neighbors on Switch1.
Switch1>enable
Switch1#show cdp neighbors
Capability Codes: R - Router, T - Trans Bridge, B - Source Route Bridge
S - Switch, H - Host, I - IGMP, r - Repeater, P - Phone
Device ID Local Intrfce Holdtme Capability Platform Port ID
Switch2 Gig 0/1 155 S I WS-C2960-1Gig 0/1
Router1 Gig 0/2 154 R I 2611 Fas 0/1
Switch1 offers no real surprises. It confirms the connection to Switch2 that you documented on the connection at Switch 2 and shows the connection you have with Router 1.
5. Connect to Router 1 and run the show cdp neighbors command.
If you (or your service provider) are on the ball, you will not see the service provider equipment listed in the show cdp neighbors command.
![]() To complete the exercise, it would be wise to run the
To complete the exercise, it would be wise to run the show cdp neighbors command on your router. You do not expect to see information about your ISP’s devices, but there is a possibility that your router has interfaces that are not listed in your documentation, such as a Demilitarized Zone (DMZ) supporting publicly accessible Internet resources.