Chapter 12
Bringing Applications to the Enterprise
What's In This Chapter?
- Bringing your application to nonmobile platforms
- Supporting multiple platforms
So at this point, you have learned a lot about MonoCross. You've learned how to design and build mobile applications, and you've learned about the architecture and how it's used in your applications. You've learned how to create and consume RESTful services and about the MonoCross utilities in writing cross-platform code for mobile applications. All of this leads to the question: Is MonoCross just for mobile applications? The answer is most definitely no!
You can develop MonoCross applications for any platform that supports C# and includes web applications and Windows applications with WPF and XAML. In this chapter you see how easy it is to leverage your design and modeling efforts and create a sample application for the desktop. You also learn how to bring your applications to the cloud via Windows Azure.
Lastly, the chapter covers additional concerns and thoughts you should consider as you build MonoCross applications going forward, including architectural considerations and a preview of how to build a single view in MonoCross that you can use for all your application platforms.
Expanding Your Application's Domain
The examples in previous chapters have shown you how to create a MonoCross application for the iPad, iPhone, and Android, as well as for web browsing on the mobile devices via WebKit containers. But the capabilities of MonoCross do not end there. You can bring the same application that you wrote for the iPad to the Windows desktop and web applications for yourpersonal computer's browser — and from there to the cloud.
Bringing Your Application to the Desktop
When you develop MonoCross applications for the Windows desktop, you simply need to create a WPF container to house the custom views that are written in WPF.
The steps to create a Windows Customer Management sample are as follows:
1. Create a new solution named CustomerManagement.WPF (or name it something else if you prefer).
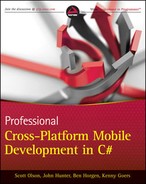
2. Add the existing shared projects to the solution. The solution and existing projects are shown in Figure 12.1.
3. Create a new WPF Application project and add it to the solution. Name the project CustomerManagement.WPF.
4. Add Project References to your new project. A complete list of references to include displays along with the project in Figure 12.2.
Figure 12.1 Your new solution should have a similar appearance.
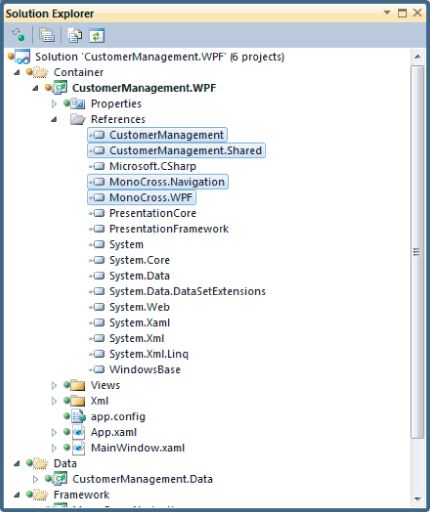
Figure 12.2 Add Project References to your project.
Now that you set up the solution and project files, take a closer look at the implementation of the WPF views. The application structure is similar to the other samples. The main difference, of course, is that the WPF views are implemented in XAML, but otherwise they correlate to other views in the other platform examples.
As in the previous examples, three views have been implemented for this sample. They are CustomerListView, CustomerEditView, and CustomerView. Each view provides a simple implementation of the sample to demonstrate that you can run MonoCross on Windows.
Each view is a simple WPF form that contains XAML with the corresponding C# file, known as a code-behind file. Code-behind files are used to create C# methods accessible to the WPF form and also to response to code events. Listing 12.1 shows the XAML for the CustomerListView.

Listing 12.1: Customer List View XAML
<src:ListViewGlue
  x:Class="CustomerManagement.WPF.Views.CustomerListView"
  xmlns="http://schemas.microsoft.com/winfx/2006/xaml/presentation"
  xmlns:x="http://schemas.microsoft.com/winfx/2006/xaml"
  xmlns:mc="http://schemas.openxmlformats.org/markup-compatibility/2006"
  xmlns:d="http://schemas.microsoft.com/expression/blend/2008"
  xmlns:src="clr-namespace:CustomerManagement.WPF.Views"
  xmlns:model
    ="clr-namespace:CustomerManagement.Shared.Model;assembly=CustomerManagement.Shared"
  mc:Ignorable="d"
  d:DesignHeight="296" d:DesignWidth="401"
  Title="Customer List">
  <ListBox Name="lbxCustomers">
    <ListBox.ItemTemplate>
      <DataTemplate>
        <TextBlock Text="{Binding Path=Name}" />
      </DataTemplate>
    </ListBox.ItemTemplate>
  </ListBox>
</src:ListViewGlue>
Found in the CustomerManagement.WPF/Views/CustomerListView.xaml file of the download
Each XAML code-behind class derives from the MonoCross MXPageView class, which is shown in Listing 12.2.
Listing 12.2: Generic MXPageView class
using System;
using System.Windows.Controls;
using MonoCross.Navigation;

namespace MonoCross.WPF
{
  public abstract class MXPageView<T> : Page, IMXView
  {
    public T Model { get; set; }
    public Type ModelType { get { return typeof(T); } }
    public abstract void Render();
    public void SetModel(object model)
    {
      Model = (T)model;
    }
  }
}
Found in the MonoCross.WPF/MXPageView.cs file of the download
Your CustomerListView actually derives from the ListViewGlue class, which is a simple wrapper around the generic MXPageView<List<Customer>> class. This wrapper can simplify consumption of the MXPageView for lists in XAML for the WPF platform. Listing 12.3 displays the implementation of ListViewGlue class.
Listing 12.3: ListViewGlue implementation
using System.Collections.Generic;
using CustomerManagement.Shared.Model;
using MonoCross.WPF;

namespace CustomerManagement.WPF.Views
{
  /// <summary>
  /// This class is used to simplify using a generic class in XAML
  /// </summary>
  public abstract class ListViewGlue : MXPageView<List<Customer>> { }
}
Found in the CustomerManagement.WPF/Views/ListViewGlue.xaml.cs file of the download
Finally, the CustomerListView C# contains the methods to render the view and respond when a customer is selected from the list. This code simply binds the customer list contained in Model to the ListBox that actually displays the values and subscribes to the SelectionChangedEventHandler to support navigation to the CustomerView. Listing 12.4 shows the C# code-behind for the CustomerListView.
Listing 12.4: Customer List View code
using System.Windows.Controls;
using MonoCross.WPF;

namespace CustomerManagement.WPF.Views
{
  /// <summary>
  /// Interaction logic for CustomerListView.xaml
  /// </summary>
  public partial class CustomerListView : ListViewGlue
  {
    public override void Render()
    {
      InitializeComponent();
      lbxCustomers.ItemsSource = Model;
      lbxCustomers.SelectionChanged
        += new SelectionChangedEventHandler(lbxCustomers_SelectionChanged);
    }

    void lbxCustomers_SelectionChanged(object sender, SelectionChangedEventArgs e)
    {
      MXWindowsContainer.Navigate(string.Format("Customers/{0}"
                                 , Model[lbxCustomers.SelectedIndex].ID));
    }
  }
}
Found in the CustomerManagement.WPF/Views/CustomerListView.xaml.cs file of the download
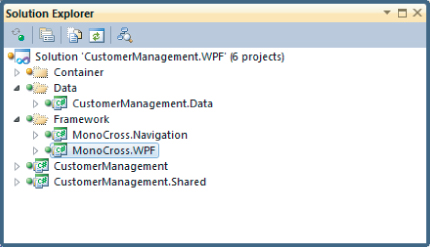
After you create your views, all you need to do to test your new MonoCross WPF sample is to run the CustomerManagement.WPF project. Either make the project the startup project or from the project files context menu, select Debug ⇒ Start New Instance. Figure 12.3 shows the sample running in Windows.
Figure 12.3 The Customer List View runs in Windows.
As you can see, after you create a MonoCross application, it is a relatively easy task to support the application on a new platform. You can reuse the bulk of your application and create as simple or complex a set of views as you like for each new platform. Now, how can you take your MonoCross web application to the cloud using Windows Azure?
Bringing Your Application to the Cloud
Sometimes you may not have the infrastructure in place to support your websites and RESTful services, or you may not want to use the available infrastructure. The cloud, especially when using Microsoft Azure, can come in handy in these situations.
Azure can scale your application automatically as you need more power. In addition, you can deploy Azure apps as a Windows service extended into the cloud or as a web application.
The basic structure of an Azure application includes two or more projects. One is the main project, which includes the wrappers/configuration that describe the actual applications that are part of the cloud application. The other projects, known as roles in Azure parlance, are either a web application (a web role) or a Windows service (a Windows role). Each Azure application can include multiple roles of either type, depending on the needs of your cloud applications.
You can create projects for deployment to the cloud in a couple ways. The first and simplest is to create a cloud deployment project from an existing ASP.NET web project, and the other is to create the cloud projects directly.
But before you can create any cloud projects, you need to install the Microsoft Azure SDK.
Installing the Azure SDK
The first step to create a cloud application is to install the Azure SDK, which you can access at www.microsoft.com/windowsazure/learn/get-started/?campaign=getstarted. Simply download the installation executable WindowsAzureToolsVS2010.exe and install the Azure SDK. (Incidentally, in addition to the SDK installation executable, many tutorials on creating Azure cloud applications are worth perusing.)
The following sections focus on how to create and deploy cloud applications based on the CustomerManagement.Webkit sample.
Creating the Cloud Deployment Project
The first of the two methods you consider to create cloud applications is to create a cloud deployment project associated with an existing web project. This is the easier of the two approaches but, of course, it requires that you already have a web project you intend to deploy to the cloud.
For this example, use the CustomerManagement.Webkit sample project to create the cloud deployment project. Follow these two steps:
1. In the Solution Explorer select the CustomerManagement.Webkit project.
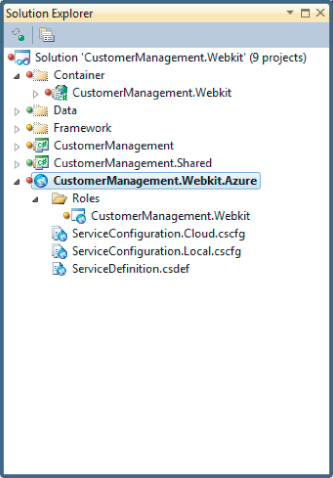
2. Right-click the project, and from the context menu select Add Windows Azure Deployment Project to create a new deployment project with a WebRole defined for CustomerManagement.Webkit. The name of the new project is CustomerManagement.Webkit.Azure, as shown in Figure 12.4.
Figure 12.4 Create the CustomerManagement.Webkit.Azure deployment project.
Now that you have created the Azure deployment project, you are ready to deploy to the cloud. You learn the deployment steps in the “Preparing for an Azure Project Deployment” section later in this chapter, after you learn how to create a cloud application from scratch (or in your case copying the files from CustomerManagement.Webkit).
Creating the Cloud Projects from Scratch
Creating a cloud application in Azure is straightforward. You simply create a cloud project with an associated web role project. Web roles can be ASP.NET applications and ASP.NET MVC2 or MVC3 applications. After you create the web role project, you can create new web forms for the application, or you can copy the files from another web application.
For this example, reuse the CustomerManagement.Webkit sample to create a new cloud-based application. This process adds two new projects to the CustomerManagement.Webkit solution. One is for the cloud project, and the other is for a web role project.
Follow these steps:
1. Open up the Customer.Webkit sample solution in Visual Studio.
2. Add a new cloud project to the solution by right-clicking the solution and selecting Add - New Project from the context menu. Select the cloud template for the new project using the Visual C3 Template - Cloud - Windows Azure Project, and name it CustomerManagement.Cloud, as shown in Figure 12.5.
3. Click OK. Another window pops up that shows your initial choice of roles to use for the application. For this example, select the ASP.NET MVC2 Web Role, and rename it to CustomerManagement.Cloud.Webkit, as shown in Figure 12.6.
4. Click OK again, and both the cloud project and the web role project are added to your solution file. The solution file should look like the solution in Figure 12.7.
The new CustomerManagement.Cloud.Webkit project contains many default folders and files that are intended to help you create a web role project from scratch. You do not need all these files because you copy the CustomerManagement.Webkit project files and use them for this example.
5. Delete all folders and files in the CustomerManagement.Cloud.Webkit project folder except for WebRole.cs. Also delete the scripts folder and the project file (*.csproj), and then copy all the files from the CustomerManagement.Webkit project to the new CustomerManagement.Cloud.Webkit project folder.
Your solution file should look similar to Figure 12.8.
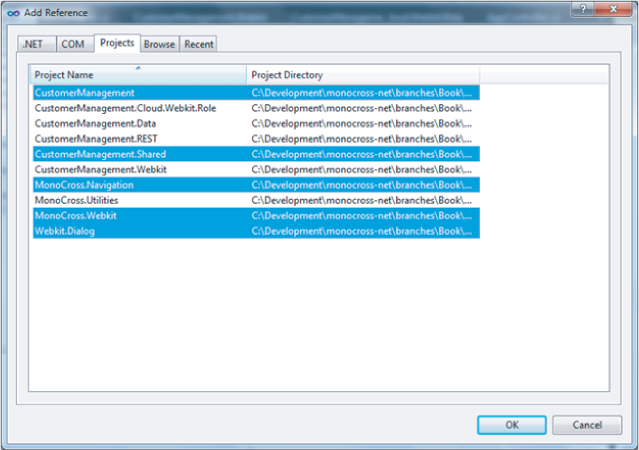
6. Copy the project references that you need to build the project. The project references you need to add to the web role project are the ones highlighted in Figure 12.9.
7. Build your application (right-click on the solution file and select Rebuild Solution from the context menu) and resolve any errors that may have crept in. Your new cloud-enabled WebKit application will be complete. Similar steps would work for other web and ASP.NET MVC applications.
Figure 12.5 Create your cloud project.
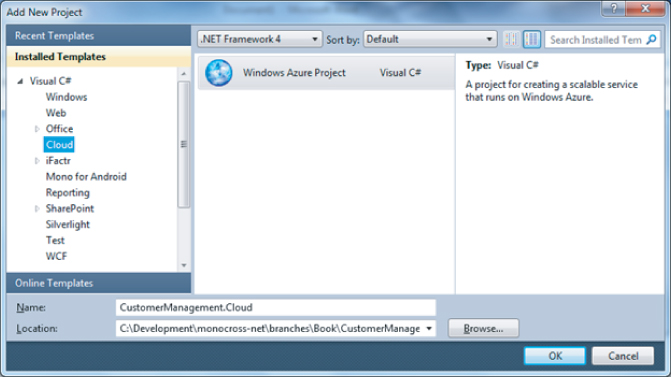
Figure 12.6 Create the web role project.
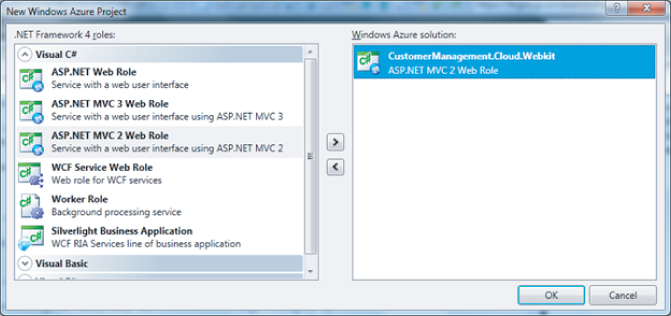
Figure 12.7 Your initial solution file should look like this.
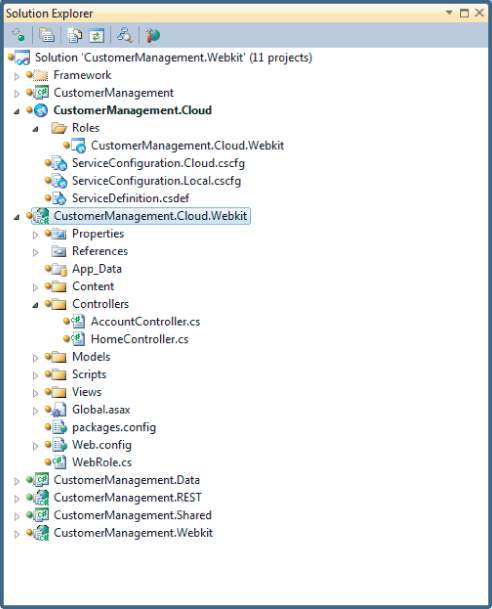
Figure 12.8 Copy files from your WebKit project to the cloud Webkit project.
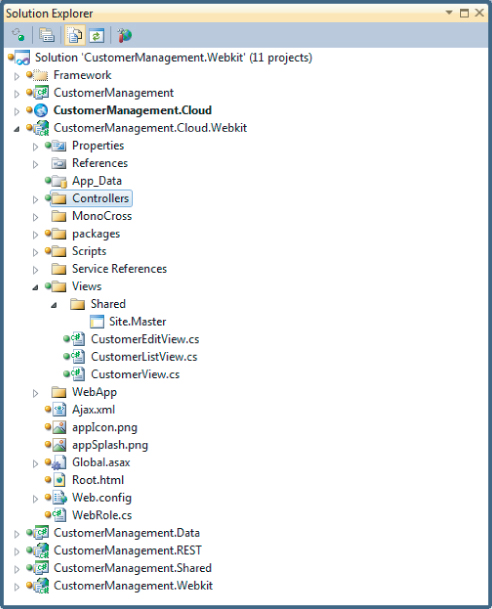
Figure 12.9 Select these web role references.
Testing Your Cloud Application
Now that you have created the CustomerManagement.Cloud project, the next step is to test it locally in your development environment to ensure that it works as expected before you try to deploy it to the cloud.
Because the CustomerManagement.Cloud.Webkit project makes RESTful calls to the CustomerManagement.REST project, that project needs to be running as well. Simply right-click the CustomerManagement.REST project and from the context menu select Debug ⇒ Start New Instance. When the RESTful service is running, the next step is to start the cloud application.
You don't start the CustomerManagement.Cloud.Webkit project; instead the CustomerManagement.Cloud application in which it is referenced as a role starts it. Start the CustomerManagement.Cloud project by right-clicking it; then select Debug ⇒ Start New Instance from the context menu. That starts the application in the local Application Fabric (or AppFabric for short), which is the test environment on your development computer that simulates the cloud.
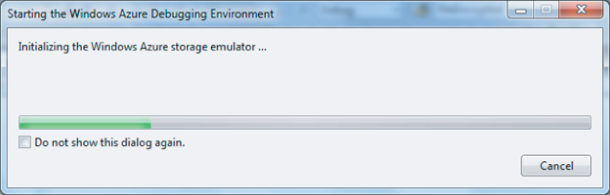
The Windows Azure Debugging Environment becomes available, as shown in Figure 12.10.
Figure 12.10 These steps start the Windows Azure Debugging Environment.
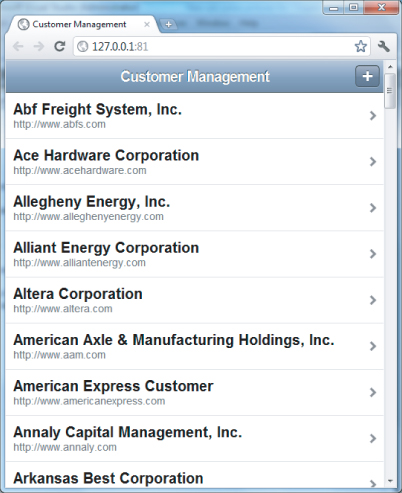
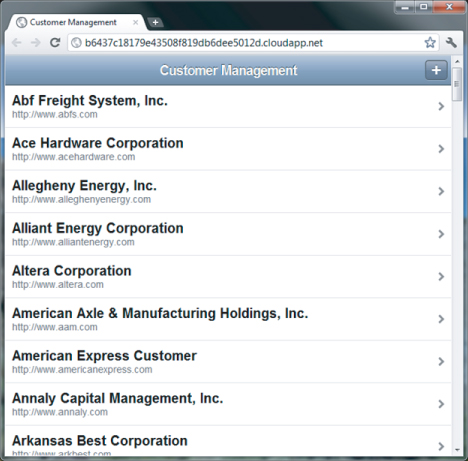
After the debugging environment is initialized, the application starts in your default browser. Figure 12.11 shows the initial view of the CustomerManagement.Cloud.Webkit project running in the local application.
Figure 12.11 The Customer Management project runs in the browser.
The next couple sections cover how to deploy your application to the Microsoft Azure cloud.
![]() Use the LOCAL_DATA attribute on the CustomerManagement shared project. This allows the service to get the data from the files contained within the local XML folder in the CustomerManagement.Webkit project. Because you use local XML data for this example, you don't need to create a CustomerManagement.REST.Azure project to obtain the data via RESTful Services. Although, most production applications need to have both the RESTful services and the web-based projects deployed independently to the cloud.
Use the LOCAL_DATA attribute on the CustomerManagement shared project. This allows the service to get the data from the files contained within the local XML folder in the CustomerManagement.Webkit project. Because you use local XML data for this example, you don't need to create a CustomerManagement.REST.Azure project to obtain the data via RESTful Services. Although, most production applications need to have both the RESTful services and the web-based projects deployed independently to the cloud.
Preparing for an Azure Project Deployment
As you've likely guessed, you need to complete some preparation before you can deploy an Azure application to the cloud. The following steps summarize the required prep work:
1. Establish a Windows Azure subscription.
2. Set up the Windows Azure credentials.
3. Set up a hosted service in Windows Azure.
4. Set up a storage account in Windows Azure.
Signing Up for a Subscription
You need to sign up for a subscription to the Azure Management Portal, which is the portal that you use for deploying and managing your cloud applications. Currently, temporary trials with limited bandwidth are available free of charge.
Go to www.microsoft.com/windowsazure/free-trial and select Get the Free Trial. Follow the instructions to create your subscription. Have your credit card ready. You need to enter contact and billing information to establish your trial subscription.
Creating Certificates and Credentials
To deploy applications to the cloud, you need to create a set of certificate-based credentials for your applications to use. You can obtain the certificate from a signing service, or you can create one.
1. Select the CustomerManagement.Cloud project, the CustomerManagement.Webkit.Azure project, or whatever cloud project you have created and need to deploy from the Solution Explorer. Right-click the project and select Publish from the context menu. The Windows Azure Publish Settings window displays, as shown in Figure 12.12.
2. Select Add from the Credentials drop-down list, and the Windows Azure Project Management Authentication window displays, as shown in Figure 12.13. You can use this window to set up your credentials. Windows Azure named the credentials WindowsAzureAccount1 by default, but we'll change them to MonoCrossCloudAccount.
3. From step 1 on the Project Management Authentication window, either indicate you want to create a new certificate or select an existing certificate you may already have prepared for Azure cloud deployments.
If you decide to create a new certificate, then the Create Certificate window displays. On this window, you simply need to enter a name for the certificate and click OK. For the purposes of this exercise, the name of the certificate is MonoCrossCloudCertificate, as shown in Figure 12.14.
4. Apply the newly created certificate to the Windows Azure Project Management Authentication window. The name of the credentials is MonoCrossCloudAccount, as shown in Figure 12.15.
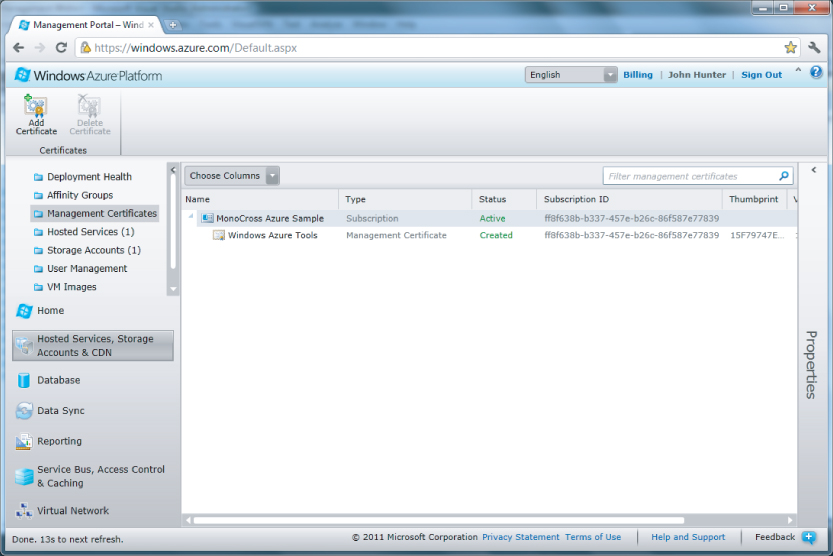
5. Log in to the Windows Azure Management Portal using the subscription credentials that you set up in the previous section. Copy the full path of your newly created certificate, and then follow the instructions on the Windows Azure Portal to upload it. You can find complete instructions for setting up named authentication credentials at http://msdn.microsoft.com/en-us/library/windowsazure/ff683676.aspx. Figure 12.16 shows the Management Certificates section on the current Windows Azure Platform, where you can add your certificate.
6. After the certificate is uploaded and saved, the last step is to copy the Subscription ID associated with the certificate, enter it on the Windows Azure Project Management Authentication window, and click OK. In this example, the Subscription ID is ff8f638b-b337-457e-b26c-86f587e77839.
Figure 12.12 The Windows Azure Publish Settings window enables you to add credentials.
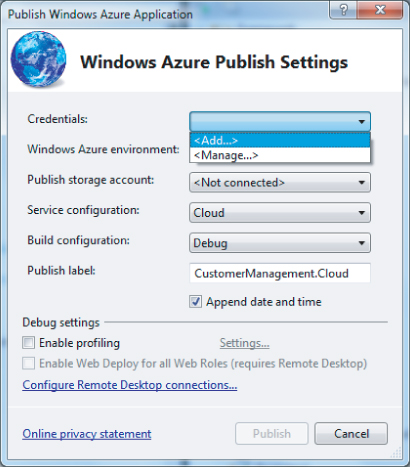
Figure 12.13 Set up your credentials through the Project Management Authentication window.

Figure 12.14 Name your certificate in the Create Certificate window.
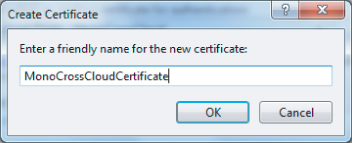
Figure 12.15 Apply the certificates and credentials in the Publish Settings window.
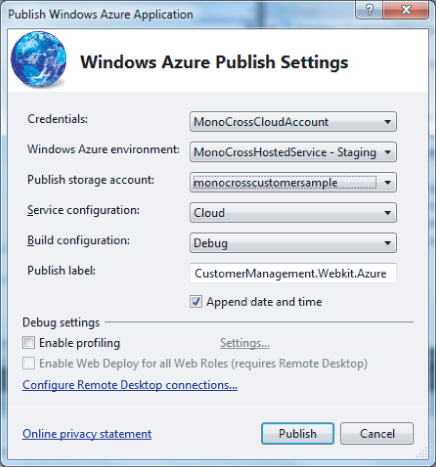
Figure 12.16 Add your certificates to the Windows Azure platform.
You have now completed setting a set of certificate-based credentials your applications can use when deploying to the Azure cloud.
Creating a Hosted Service in Windows Azure
A hosted service in Windows Azure is a combination of your cloud application and its associated configuration files that tells Windows Azure how to run your application as a service in the cloud. To create a hosted service you need a deployment package from your cloud application that contains the configuration files needed for deployment:
1. Right-click your cloud application and select Deploy Package from the context menu.
This both creates the configuration files and opens an instance of the Windows Explorer folder that contains them, as shown in Figure 12.17.
In this example, you create the deployment package from the CustomerManagement.Webkit.Azure project.
2. Log in to the Windows Azure Portal (if you have not already done so) and select the Hosted Services, Storage Accounts & CDN tab on the left.
This opens the portal to a page where you can add a new hosted service, as shown in Figure 12.18.
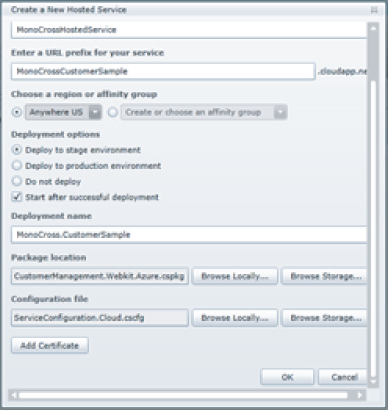
3. Click the New Hosted Service button. A window displays for you to enter the necessary information. Enter a name for the service (such as MonoCrossHostedService), and then enter the remaining fields on the New Hosted Service window.
4. Enter the Package location.
Click the Browse Locally button next to Package location, and navigate to the folder that contains the configuration files. If you still have the explorer window open to the configuration, just copy and paste the location. Select the CustomerManagement.Webkit.Azure.cspkg to place it into the service package location.
Likewise, for the Configuration file setting, click the Browse Locally button; then locate and select the ServiceConfiguration.Cloud.cscfg file to include it in the Hosted Service settings. Figure 12.19 shows the completed Create a New Hosted Service form.
5. Click OK; then you are done creating a new hosted service.
Figure 12.17 The configuration files are created and an instance of the Windows Explorer folder that includes them displays.
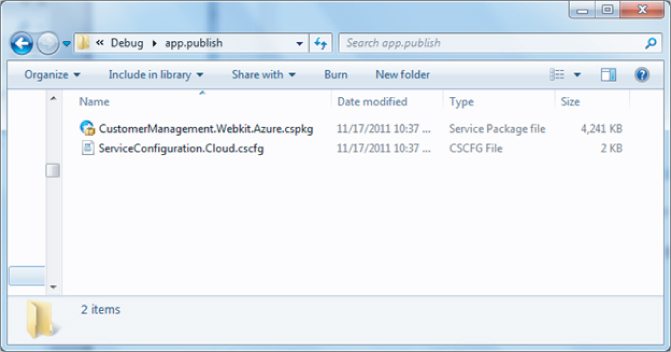
Figure 12.18 You can add Windows Azure hosted services.
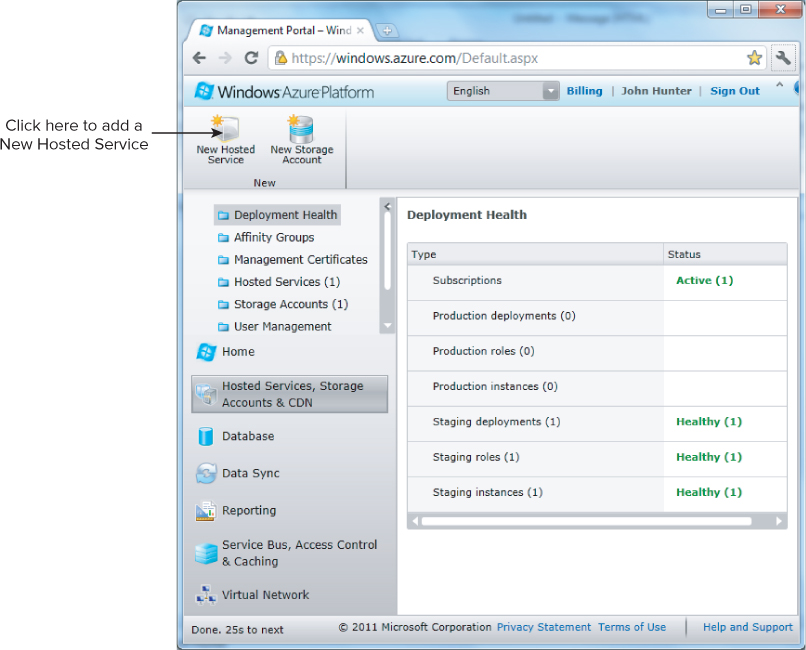
Figure 12.19 You must complete the form to create a new hosted service.
You can find complete instructions for creating a hosted service in Windows Azure at http://msdn.microsoft.com/en-us/library/windowsazure/gg432967.aspx.
Creating a Storage Account in Windows Azure
A storage account in Windows Azure allows the service administrator (that is, you) to access the cloud-based storage available to cloud applications. Here's all you need to do:
1. Log in to the Windows Azure Portal (if you have not already done so) and select the Hosted Services, Storage Accounts & CDN tab on the left. This brings the portal to a page where you can add a new Storage Account, as shown in Figure 12.20.
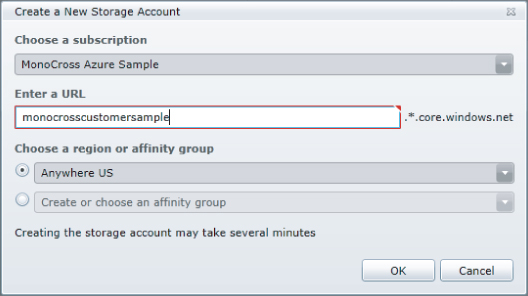
2. Click the New Storage Account button. A window displays on which you enter the necessary information.
3. Assign the subscription, and enter a URL to assign to the account (such as monocrosscustomersample; yes, it must be lowercase); then enter the remaining fields, as shown in Figure 12.21.
4. Click OK; then you are done creating a new hosted service.
Figure 12.20 You can add Windows Azure storage accounts.
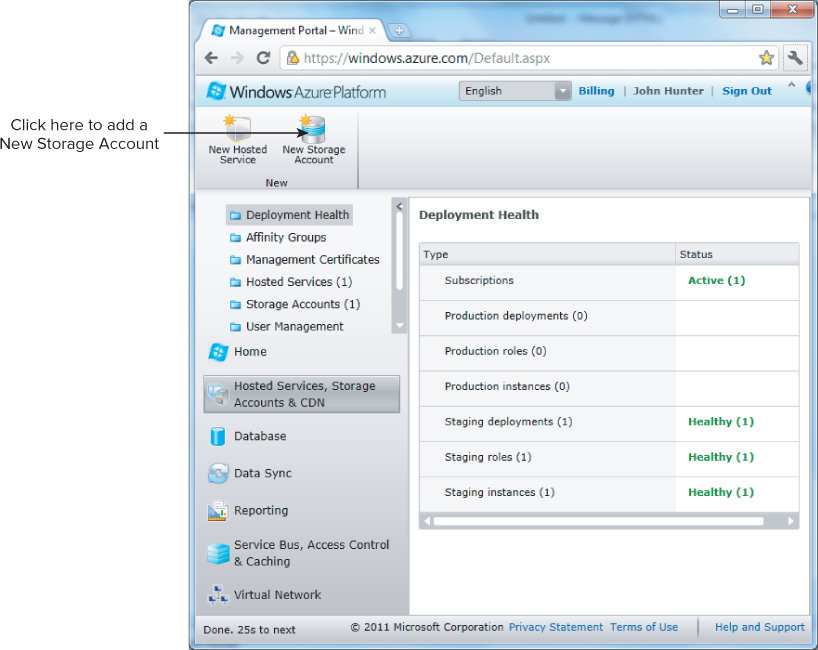
Figure 12.21 Enter the new storage account settings.
You can find complete instructions for creating a storage account in Windows Azure at http://msdn.microsoft.com/en-us/library/gg433066.aspx.
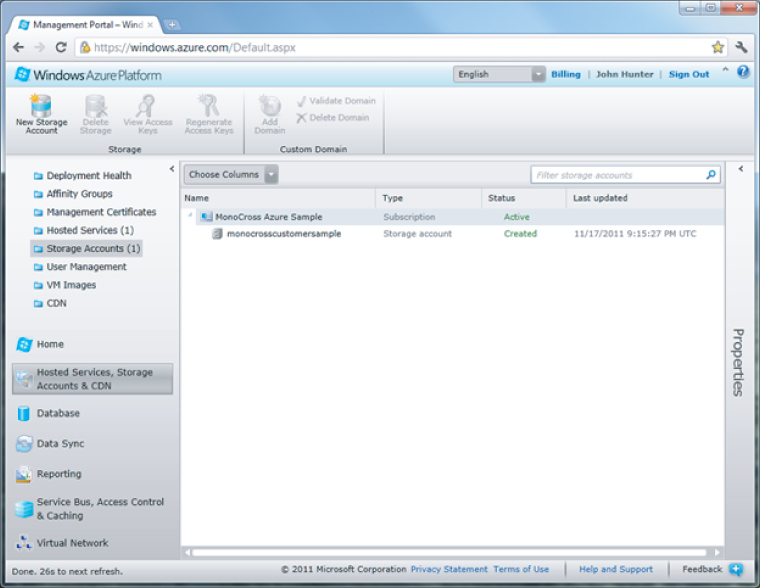
After you create the storage account, you can view its properties on the Windows Azure Platform, as shown in Figure 12.22. To modify the properties, simply expand the Properties panel by clicking on the < and make any necessary changes.
Figure 12.22 New storage account settings
You have now completed all the preparatory work needed for deploying cloud applications.
Deploying and Managing Your Cloud Application
At this point, you have created your cloud application and completed your preparatory work: You have created your subscription to Windows Azure and your host service and storage accounts. The next step is to deploy your application to the cloud.
1. In the Solution Explorer find your cloud application, right-click it, and from the context menu select Publish. The Publish Windows Azure Application window displays, as shown in Figure 12.23.
2. On this form, specify your credentials, the Windows environment, and the storage account that you created in the previous sections. Click the Publish button.
If the environment is in use (that is, you've deployed previously) a window appears telling you that the environment is in use and offers you a choice to delete the deployed environment and continue or cancel the deployment altogether. Figure 12.24 shows the confirmation window that displays when the deployment environment is in use.
3. Click Delete and Continue.
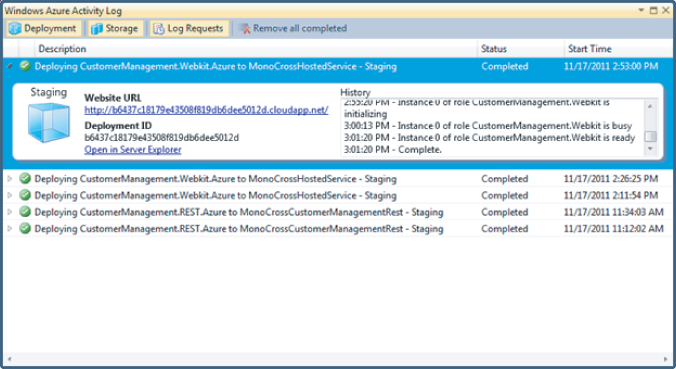
This brings up the Windows Azure Activity Log, which contains the list of deployment activity. It displays the deployment list in order of most recent to least recent and shows a status bar or the word Completed, depending on the status. In addition, the Azure Activity Log shows details of the deployment, including a convenient website URL you can use to test the deployment, as shown in Figure 12.25.
The publishing step may take several minutes, so don't be alarmed. Instead, use the time to take a break and refill your soda or coffee cup or something equally as productive….
Figure 12.23 Set the Windows Azure Publish Settings.

Figure 12.24 The Deployment Environment in Use message displays if you have deployed previously.
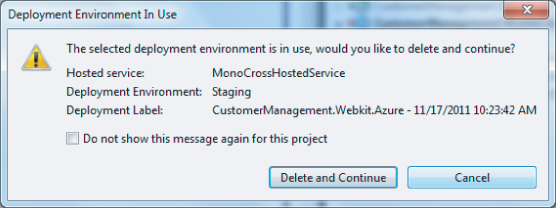
Figure 12.25 The Azure Activity Log provides useful information.
When the deployment does complete successfully, your cloud application deploys, and you can test it by clicking the URL link in the Azure Activity Log. The CustomerManagement.Webkit sample displays the initial page populated with the customer list, as shown in Figure 12.26.
Figure 12.26 The Customer Management application as it appears when deployed in the cloud.
There you have it. You have deployed your first MonoCross application to the cloud.
Throughout this book you've explored techniques for writing cross-platform mobile applications. In this chapter, you've explored ways to take your application from the various mobile platforms to the enterprise, but some key principles can help you stay one step ahead of the competition and the mobile marketplace you should keep in mind as you bring your applications to new platforms across your enterprise.
Future-Proofing Applications
When the iPad was released in the spring 2010, needless to say, it created quite a stir. At the time, we were working on a cross-platform application for one of our biggest enterprise clients. When it came to us to inquire about the possibility of porting the not-yet-finished application over to the iPad, I can't say we were surprised. Luckily for us, we had spent a great deal of time designing and optimizing the user-experience for the iPhone, and Apple's changes to the iOS SDK made it easy for existing iPhone applications to be ported to their new killer device.
What this experience illustrates so clearly is that the only certainty in mobile development is change. The ability to plan for and adapt to that change is essential for enterprises that want to survive in this environment. Mono and MonoCross can be key tools to achieve the goal of future-proofing your applications to enable rapid response to mobile market changes.
Because Mono and MonoCross adhere to both C# and .NET standards and support all the major mobile platforms in the marketplace today, you have great flexibility in both development and deployment of your applications across platforms and across the web/hybrid/native spectrum of architectures. As of this writing, Microsoft Windows Phone is only beginning to make inroads into an enterprise market dominated by iOS and Android devices; however, most industry analysts fully expect Windows Phone to become a major player in the marketplace in the coming years. By standardizing your applications on C#, .NET, and MonoCross, you'll be ahead of your competition when it comes to delivering new and existing applications to Windows Phone as demand increases. You simply can't do that as quickly or efficiently using the proprietary native languages and technologies of each platform vendor.
Building for Reuse
Beyond the future-proofing of your applications, the standardization on a single C#/.NET technology stack provides tremendous flexibility in your application development efforts. In Chapter 1, “Choosing the Right Architecture,” you learned about ways to create extendible modules that you could use across your applications. You can apply the same principles, coupled with sound, layered software architecture, to your application code as well to maximize reuse and code portability.
Layering Your Architectures
Beginning in Chapter 4, “The MonoCross Pattern,” you learned about the foundational architecture of MonoCross as loosely coupled layers that separate your platform-specific presentation code from your shared business logic and data access code. This separation is a time-tested and proven technique for creating robust, flexible applications that can be re-engineered easily in response to change. When you write your application code, always do so with a mind toward reuse. Continually ask yourself how the logic you write might be packaged in a way to allow other applications to take advantage of your hard work. This practice begins with careful, disciplined adherence to object-oriented principles such as encapsulation and interface abstraction.
Recall that encapsulation is the grouping of application behavior and data into logical pieces that can, optionally, hide the details of their implementation from other pieces that need to interact with them. This is one of the most powerful principles in object-oriented development, and one that is easily overlooked in the get-it-done-yesterday world of enterprise software development. However, with the multiple platforms and development paradigms inherent to mobile development, good encapsulation becomes even more critical.
Take the example of user interface and workflow development. Each mobile platform takes a slightly different approach to constructing and navigating between UI views. As you've learned in your exploration of MonoCross, each targeted platform has a different way to solve the same problem of presentation, consumption, and interaction with application information. To help minimize the impact of this mismatch, MonoCross employs the Model-View-Controller pattern to encourage proper encapsulation and separation of your application logic from the presentation layer. By keeping your presentation logic separated, the interaction between layers is simplified and standardized. Take these examples to the next level as you build out your applications, and refactor your code to provide a simple, logical model upon which to grow your suite of enterprise applications.
Now that you've created logically encapsulated objects that accurately model your application's behavior and data, you can begin to put them together into modules of functionality that can be packaged as components for reuse across your enterprise. Often the best way to do this is by defining public interfaces that expose the module's functionality in a logical manner. MonoCross uses two simple interfaces, IMXController and IMXView, to transfer control from the shared application to and from the platform container. We've created generic helper classes, MXController<T> and MXView<T>, which you can use as base implementations, but they are not required for a successful implementation. The contract for a MonoCross application is defined in the interfaces; as long as you adhere to that contract, you are free to implement your views and controllers in any way you want. This technique of public interface abstraction can be powerful when building any number of enterprise application modules. Look for opportunities to provide an interface abstraction for common business and application functions to enable reuse across your business.
Porting Your Code
The whole point to layering, encapsulation, and interface abstraction is to enable code portability. This has been the proverbial Holy Grail of software development for years, and the challenges of cross-platform development make the value of portable code even greater. Organizations that take these techniques seriously have much greater success when bringing new and existing applications to the mobile world. Standardization on C#/.NET technologies adds another dimension to code portability.
It pays to push the complexities of platform and architectural differences into well-encapsulated modules with simple, clearly defined interfaces. Take basic file or storage access as an example. We've created the MonoCross.Utilities.Storage namespace using this principle. The .NET System.IO namespace contains a much richer, complex implementation that works on some of our targeted platforms, but it is different on others. Full System.IO support is not available on all platforms. So we've created a simple, public interface to provide the most frequently used functions, and we provided working implementations for each supported platform. What's more, these implementations work on the device or the server, in a native or web application. Because we use a simple public interface to define the storage contract, we are now free to re-implement the contract when new platforms emerge in the market or business needs require a shift in our implementation approach.
For example, you may decide that a portion of your application would best be implemented on the server. A product catalog is generally a large set of data that would be impractical to put on a mobile device, but you may discover after implementing your server-based product catalog that your field sales personnel may have slow or sporadic connectivity that makes an online catalog unusable. Now you're faced with a problem: You have potentially large portions of your application that rely on the catalog to complete various workflows, and you are faced with re-engineering this important module. It is in this circumstance that a simple, well-defined interface provides the necessary flexibility to accomplish this rework. You can implement an abridged or partial catalog for delivery to the mobile device by using the best techniques for retrieval and caching; and, as long as you keep the interface intact, you can extend and port your catalog logic to the device.
Using View Abstraction
Another powerful technique you can apply to your application is view abstraction. Most enterprise applications focus on delivery and consumption of large sets of business information, as well as on completing transactions using that information. Time has shown that the method for presenting this information is best achieved using a few, well-proven user interface components.
Searchable lists, menus, blocks of text, panels, and forms are all common enterprise presentation components, and they generally translate well across platforms and architectures. A menu is a menu no matter what platform you're on. There may be some slight differences on each platform, but the interface needed to describe these concepts is relatively straightforward. Both menus and lists have a collection of items; menus have an optional header or name to further describe them. Forms have text entry fields, check boxes and date fields, with labels and values across the board. So, defining an abstraction using the techniques we've discussed can be accomplished and translation of these abstractions to platform-specific implementations achieved.
iFactr (www.ifactr.com) is a mobile enterprise development framework built on top of MonoCross that employs this view abstraction strategy. iFactr enables you to define your cross-platform views using these abstract concepts for deployment to multiple platforms. You define your abstract views once and deploy them with your shared application. The abstract views are compiled and processed at runtime, with your model data and controller logic rendered by the framework into a user experience that is optimized for each of your targeted platforms. An example of an iFactr abstract view is shown in Listing 12.5.
Listing 12.5: An iFactr abstract view
using System;
using System.Collections.Generic;
using System.Linq;
using System.Text;

using iFactr.Core;
using iFactr.Core.Layers;

using MonoCross.Navigation;

namespace CustomerManagement.Views
{
  public class CustomerListView : iView<List<Customer>>, IView, IMXView
  {
    public override void Render()
    {
      iMenu menu = new iMenu();
      menu.Text = "Customers";
      foreach (Customer customer in Model)
      {
        menu.Items.Add(new iItem(Customer. Name));
      }
      Items.Add(menu);
      iApp.Factory.OutputView(this);
    }
  }
}
This example uses the iFactr iView<T> generic class to create a list of customers. Inside the Render() method it uses the iFactr iMenu class, which represents a simple menu of items. The List<Customer> model is then enumerated, and the menu built from the information contained there. Finally, the menu is added to the view's items collection, and a call is made to the iFactr iApp.Factory, where the view is interpreted and outputted for the appropriate platform target.
iFactr offers a powerful view abstraction mechanism that greatly reduces development and maintenance of cross-platform views that are easily represented in conventional enterprise controls and presentations. iFactr offers a robust suite of abstract view concepts that makes cross-platform development rapid and simple.
Using a Mixed-View Model
Because iFactr views are built on top of MonoCross, they are fully compatible with MonoCross views and you can use them with one another. The code in Listing 12.6 shows an example of this technique.
Listing 12.6: Using mixed model views
using System;
using System.Collections.Generic;
using System.Linq;
using System.Text;
using System.Text.RegularExpressions;

using MonoCross.Navigation;
using MonoCross.Console;

using iFactr.Console;

namespace CustomerManagement.Console
{
  class Program
  {
    static void Main(string[] args)
    {
      // initialize container
      MXConsoleContainer.Initialize(new CustomerManagement.App());

      // initialize factory
      ConsoleFactory.Initialize();

      // initialize views
      MXConsoleContainer.AddView<List<Customer>>(
                         new CustomerManagement.Views.CustomerListView(),
                         ViewPerspective.Read);
      MXConsoleContainer.AddView<Customer>(
                         new Views.CustomerView(),
                         ViewPerspective.Default);
      MXConsoleContainer.AddView<Book>(
                         new Views.CustomerEdit(),
                         ViewPerspective.Update);

      // navigate to first view
      MXConsoleContainer.Navigate(null, MXApplication.Instance.NavigateOnLoad);
    }
  }
}
The highlighted code in Listing 12.6 shows the mixed view usage in a MonoCross application. The first step is to initialize the iFactr factory for the targeted platform. In this case, you deploy to the simple Windows console target, so the call to ConsoleFactory.Initialize() loads the components necessary to translate your abstract view to a console implementation. When that completes, you need to register only your abstract view as you would any MonoCross view by calling the AddView<T>() method of the container. Listing 12.6 places an instance of your abstract CustomerListView from Listing 12.5 into the view map for your initial view, while using the platform specific defined in your MonoCross console container project for the subsequent views.
This mixed-view approach empowers developers to develop cross-platform applications that take advantage of the power of iFactr view abstraction where it can be best applied, while maintaining the flexibility of platform-specific MonoCross views when a richer user experience is needed. In large cross-platform enterprise applications, this can translate into a huge savings in development cost and time to market because abstract views need to be written only once and can be shared across platforms.
In this chapter, you learned how to deploy your application to the desktop, the enterprise web, and to the cloud. You also learned how to design and build your applications in a cross-platform manner, and you saw how designing in MonoCross can enable you to future-proof your applications. You learned how to code your applications to optimize reuse. By layering your applications through implementing loosely-coupled encapsulation you can increase your code's portability across platforms. Finally you began to explore the power of view abstraction and mixed model views as a technique for sharing even more of your code on multiple devices.
As you move on to new projects and new applications, keep in mind the principles outlined in this book. The mobile landscape is changing every day, and the demand for cross-platform development is continuing to grow. Continue to look for opportunities to apply the knowledge you now possess to change the way your enterprise develops software.