
Chapter 10
Introduction to Project Management
WHAT'S IN THIS CHAPTER?
- Getting to know the additions and enhancements to project management capabilities in Team Foundation Server 2012
- Understanding work items and process templates
- Managing and querying work items with Visual Studio, Excel, Project, and Team Web Access
In Part I, you learned about the support that Team Foundation Server 2012 has for source control. In Part II, you learned about the importance of engaging with your project's stakeholders early and often during the development cycle to ensure that you are building the right software. In Part III, you learn about how Team Foundation Server 2012 helps you plan and track your software development projects in an agile manner.
Project management can involve many aspects of developing software, such as tracking remaining work and open bugs, determining how much work you can commit to with your available resources, and even helping to enforce a standard process of interaction between your team members. You will see that Team Foundation Server 2012 provides capabilities to help you achieve all of these things, and more.
This chapter starts with the enhancements to project management available in this release. It also provides an overview of work item tracking, including some ways to manage and query work items from Visual Studio, Excel, Project, and other clients. You find out about the importance of process templates, including an overview of the process templates provided by Microsoft for use with Team Foundation Server 2012.
In Chapter 11, you take a deeper look at the agile project management tools, which you can use to manage your backlog, plan your iterations, and track your work. Chapter 12 examines using reporting and SharePoint dashboards to get real-time insights into how your software development project is going. You might also want to consider obtaining a copy of Professional Team Foundation Server 2012 (Wrox, 2012. ISBN 978-1-118-31409-8), to find out how you can extend and customize the process templates in Team Foundation Server 2012 to meet the unique needs of your team.
Project Management Enhancements in Team Foundation Server 2012
Team Foundation Server 2012 continues to build upon the project management enhancements made to Team Foundation Server 2010, which was a substantial upgrade to the project management capabilities available in prior releases. This section highlights some of the most significant improvements and additions in this release, and recaps some of the enhancements first available in Team Foundation Server 2010. If you are brand new to Team Foundation Server, concepts such as work items are explained in greater detail later in this chapter.
Rich Work Item Relationships
Rich work item relationships were introduced in Team Foundation Server 2010, but this capability is worth covering here in case you are upgrading from an older release. According to Microsoft, the top-requested project management feature by users of Team Foundation Server releases prior to 2010 was representing rich relationships between work items. In releases of Team Foundation Server prior to 2010, it was only possible to relate work items with one another via a simple linking mechanism. But these links didn't provide any explicit meaning, directionality, or cardinality.
For example, a common project management use case for many software development projects is to be able to model parent/child relationships between work items, such as for modeling a feature catalog or for detailing the tasks required to implement a particular requirement. You could link these work items using releases of Team Foundation Server prior to 2010, but the links didn't carry enough meaning to convey proper parent/child relationships. Without directionality, it's not easy to discern which work item is the parent and which work item is the child in this representation. Furthermore, without cardinality, there isn't a mechanism for restricting that each child work item could only have (at most) one parent work item.
With Team Foundation Server 2010, Microsoft introduced rich relational linking between work items, allowing for rich relationships between work items using a variety of link types. These link types can also include directionality and cardinality. The most commonly used link types available in Team Foundation Server are the following:
- Parent/child — This is a useful link type for representing hierarchies such as feature catalogs, or for detailing task work items (children) that are used to implement a requirement or user story (parent). Any work item can have zero or more child work items, and zero or one parent work item.
- Tests/tested by — This link type is primarily intended to model the relationships between test case work items and the requirements or user stories that they test. This makes it easier to determine the quality of a given requirement or user story by examining the recent results for its related test cases. A work item can test zero or more work items.
- Successor/predecessor — The successor/predecessor link type is used to indicate work items that have a dependency relationship with one another. For example, designing the user interface for a web page is generally a predecessor to writing the code and markup that provides the implementation of that web page. A work item can have zero or more successor and/or predecessor links to other work items.
- Related — The related link type is the same as the legacy linking system found in previous releases of Team Foundation Server. These link types are not directional, and they provide no additional context about the type of relationship. If you had linked work items in a project that was upgraded to Team Foundation Server 2010 or Team Foundation Server 2012, those relationships are represented by the related link type.
You will discover that rich work item relationships provide the basis for other features and enhancements across the project management capabilities of Team Foundation Server, such as enhanced querying and reporting. It is also possible to define your own link types if you want, although for most teams, the provided link types are sufficient. You can find more information on creating custom link types at http://aka.ms/WICustomLinks.
Agile Planning Tools
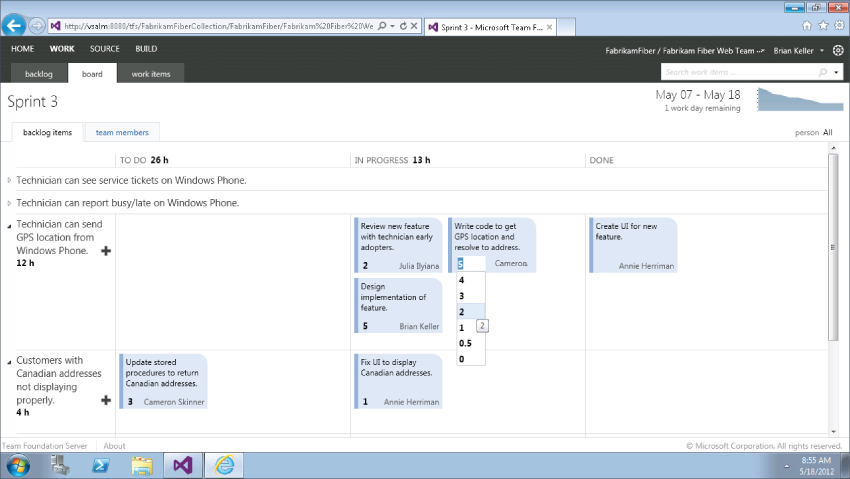
A new set of web-based tools in Team Foundation Server 2012 provides an agile way of planning and tracking your software development project. This tooling is immediately familiar to any development team that practices Scrum, because it includes tools for managing your product backlog, tracking velocity, planning iterations (or sprints), and viewing a burndown of hours remaining for a given iteration. It even includes a modern-day incarnation of sticky notes on a whiteboard for tracking your project, as shown in Figure 10.1, which you can use to track work through to completion.
It is important to point out, however, that you can use this tooling regardless of whether or not you are practicing a Scrum development methodology. All of the process templates included with Team Foundation Server 2012 work out-of-the-box with the agile planning and tracking tools, and you can adapt your own custom or third-party process templates to utilize this tooling as well. The process of customizing and adapting your own process templates to use this tooling is covered in depth in Professional Team Foundation Server 2012.
Test Case Management
Test cases began to be represented as work items in Team Foundation Server 2010. This made it possible to create rich relationships between the code you are implementing and the results of your quality assurance (QA) efforts.
For example, test case work items can be linked (via a tests/tested by link type) to requirements work items. As tests are run, results can be reported on by querying a given requirement work item, traversing to the related test cases, and viewing the results of recent test runs. Many of the new default reports make use of this information to expose new perspectives on software quality.
Feedback Management
Chapter 9 covered how feedback can be requested and stored in Team Foundation Server 2012. Two work item types were added to Team Foundation Server 2012 to support this: Feedback Request and Feedback Response.
By storing feedback as work items in Team Foundation Server, you are able to link it to other work items. For example, you might receive a Feedback Response from a stakeholder asking you to add a new piece of functionality. This may in turn get linked to a new User Story that your team plans to implement. This way when the development team wants to understand more details about the original request, including who asked for it, they can view the original Feedback Response to learn more.
You can also query feedback work items just like you would query any other work items in Team Foundation Server. For example, you might query for Feedback Requests which have fewer than five Feedback Response child work items to determine if there are areas of your application that have not yet been adequately reviewed by stakeholders.
Enhanced Reporting
One of the primary reasons Microsoft originally designed Team Foundation Server as an integrated solution (including source control, project management, build automation, and so on) is to enable multidimensional views into software development projects. Effectively managing a software project is not unlike managing other complex projects. Making smart decisions requires you to have a rich set of information resources available, usually in real time, which can help to inform resource allocations, prioritizations, cuts, schedule changes, and other important evaluations.
The rich work item relationships that were added since Team Foundation Server 2010 have enabled Microsoft to significantly enhance the types of reports available. As just one example, parent/child relationships between user stories and tasks can produce a report showing the amount of work required in order to finish implementing any given user story. By further analyzing the tests/tested by links, you can get a view into software quality for those same user stories based on the results of your test cases. There are countless other examples.
Along with the improvements made to Team Foundation Server 2010, Microsoft also made it much easier to customize existing reports, or create new ones, using Microsoft Excel to create reports based on work item queries.
SharePoint Server Dashboards
Most software development projects involve many stakeholders. In addition to the core programming team, a team may include project managers, business analysts, testers, architects, and so on. There may also be external stakeholders — such as end users or executive management — who have a vested interest in monitoring the progress of your project. Most of these people don't use Visual Studio; so how do you effectively communicate project status to everyone?
Microsoft has integrated Team Foundation Server with SharePoint for this reason. Whenever you create a team project with Team Foundation Server, you can optionally create a new SharePoint site (or use an existing one). You can use this site as a dashboard to provide everybody on your extended team with a view into your project. Your SharePoint site provides a web-based view of reports from your team project, along with a document repository where you can store artifacts such as specifications and storyboards.
Work Items
If you're brand new to Team Foundation Server, you may be wondering what exactly a work item is. A work item is the basic building block of the project management capabilities in Team Foundation Server. Microsoft defines a work item as “…a database record that Team Foundation uses to track the assignment and progress of work.”
Work Item Types
There are many kinds of work items, known as work item types. An instance of a work item type is a work item, in much the same way that, in object-oriented programming (OOP), an instance of a class is an object. A work item can represent explicit work that needs to be completed (or has been completed), such as with a Task work item type. Work items can capture details of the software you are building, such as with a Requirement or User Story work item types. You can use work items to capture problems, such as the Bug work item type (which indicates a problem with your software) or the Issue work item type (which might describe a problem with tooling, processes, or people that may be slowing down your project, or even preventing work from happening). Team Foundation Server includes other default work item types as well, and you can customize these or even create your own.
Work items include a handful of key elements, as shown in Table 10.1.
Table 10.1 Work Item Elements
| Element | Description |
| Field | Fields contain the information that can be captured as part of a work item. There are some fields that are shared by all work item types (called system fields). Examples of system fields include Title (a one-line description of your work item), ID (a number that is globally unique across your team project collection), and Assigned to (which can be a user, such as a developer, who is working on a fix for a bug work item). Other fields might be specific to a given work item type, such as the Steps to reproduce field, which is found in the Bug work item type and describes how a bug was discovered. |
| Rule | Rules can dictate which values are allowed for given fields. For example, you might decide that the Priority field for bugs should be assigned a value of 0, 1, or 2 and cannot be left blank. |
| Form | A form describes the way work items are displayed by work item clients such as Visual Studio. (You learn more about some of the ways to view and interact with work items later in this chapter.) |
| State | States indicate where in your project workflow a work item is. For example, a Bug work item type in the MSF for Agile Software Development process template starts out in an Active state when it is first created. After a developer declares that the code has been written or modified to fix a bug, the developer changes the state of the Bug work item to Resolved. If a tester can verify that the bug can no longer be reproduced, the tester changes the bug work item state to Closed. But if a tester can still reproduce the bug, the work item needs to be reactivated (that is, the tester changes the state of the bug back to Active). This signals to the developers that they still have work to do. |
| Transition | Transitions are similar to rules, but they define how a work item moves from one state to another. In the previous example, a bug work item must begin in an Active state, and then it can move into a Resolved or Closed state. But, from a Resolved state, it is also possible to move back to an Active state. This is all defined by the transition model as part of the work item type. Additionally, transitions can dictate that certain fields should be required in order to move from one state to another. For example, to move a bug from an Active to a Resolved state, a developer must assign a Reason (such as Fixed, As Designed, Cannot Reproduce, and so on). |
| Link | Work items can include links to other work items, using any of the link types you read about in the preceding section. |
| History | Work items also contain a full history that includes information about all changes to fields and transitions. |
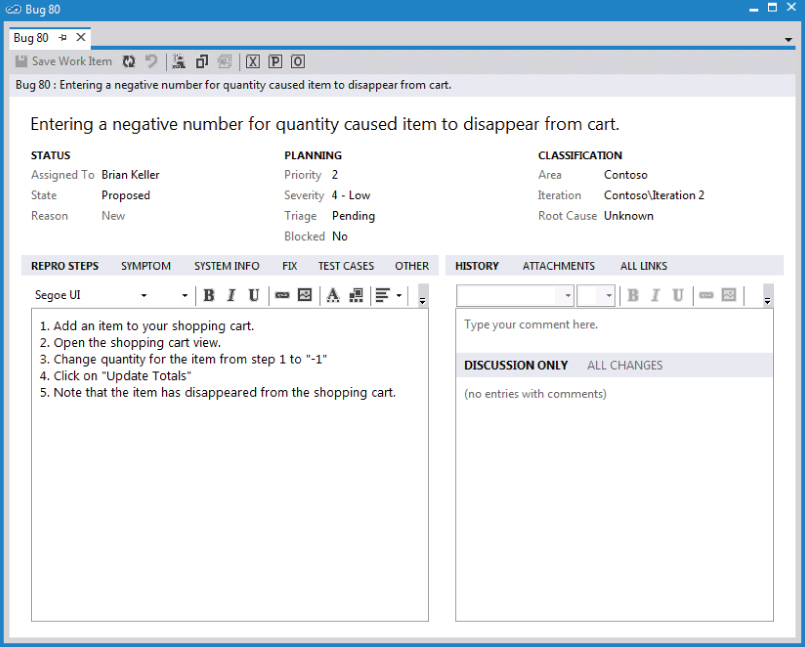
Figure 10.2 shows an example of a bug work item form that has been resolved by the developer. This screenshot is taken from a bug that was created with the MSF for Agile Software Development process template. You learn more about process templates later in this chapter.
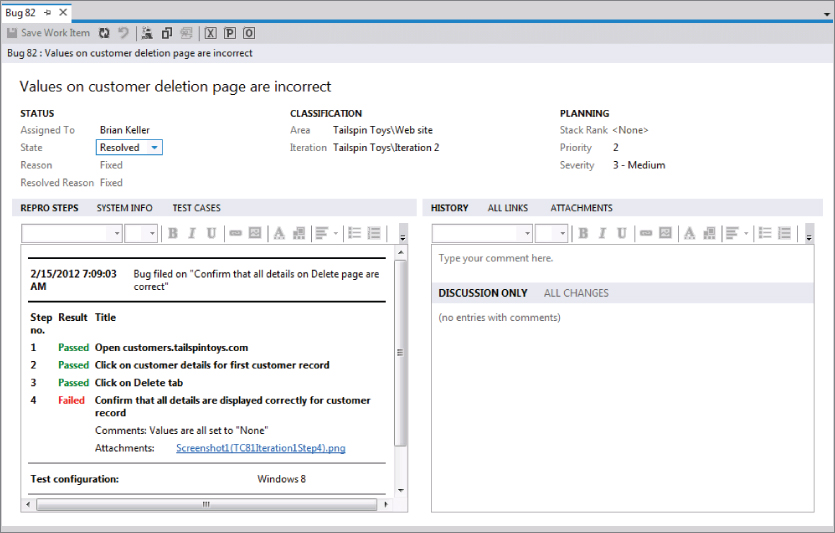
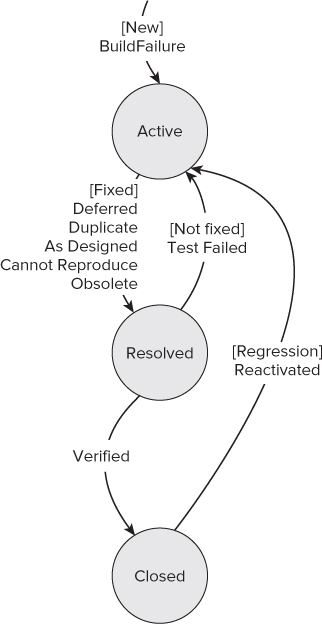
Figure 10.3 is a state diagram showing the transitions for the default Bug work item type included with the MSF for Agile Software Development process template. State diagrams for each work item type are included with the documentation for the process templates provided by Microsoft. They are useful for understanding how a work item behaves.
Areas and Iterations
Most of the system fields available for work items (such as Title and ID) are fairly self-explanatory. But there are two important fields — Area and Iteration — that warrant further discussion.
The Area field is a versatile field that you can use to create logical categories for your work items. There are many ways to use areas, but a common approach is to define an area for each logical part of your application.
For example, in Figure 10.2, this bug is assigned to the Tailspin ToysWeb site area to indicate that it is part of the web application being developed for the Tailspin Toys team project. The complete string that is used for this designation is referred to as an area path. Other area paths might include Tailspin ToysDatabase, Tailspin ToysMobile Application, and paths can be several levels deep, such as Tailspin ToysWeb siteShopping cartUpdate controller.
The Iteration field is useful for project planning and can indicate a time frame for when you plan to address a work item. In Figure 10.2, this work item is assigned to Tailspin ToysIteration 2, where Tailspin Toys is the name of the team project, and Iteration 2 is the specific iteration this work item is assigned to.
You can name your iterations whatever you'd like; some teams choose sequential iterations (such as Iteration 1, Iteration 2, and so on), whereas others choose to map them to milestone releases (such as Beta 1, Beta 2, and so on). You can also create trees of iterations and employ a blend of naming strategies, such as Tailspin ToysVersion 2.0Beta 1Iteration 2.
You are not required to use iterations and areas to categorize your work items, but they can be very useful for querying, managing, and reporting your work items as your team project grows. When used effectively, areas and iterations can enable you to employ a single team project for dozens or even hundreds of applications across many years of iterative releases.
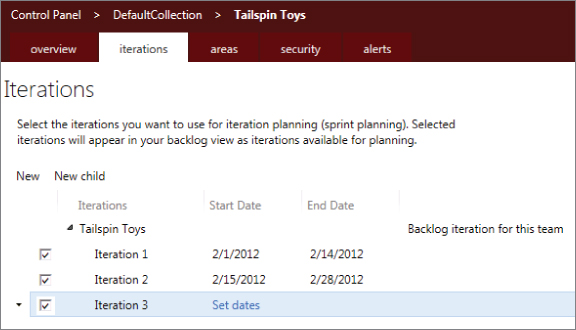
A team project administrator can manage the list of valid areas and iterations by opening Visual Studio ⇒ Settings and then clicking on either Work Item Areas or Work Item Iterations. Figure 10.4 and Figure 10.5 show the dialogs for editing areas and iterations, respectively. You can also access these menus directly from Team Web Access by clicking on the administrative icon in the upper-right corner.
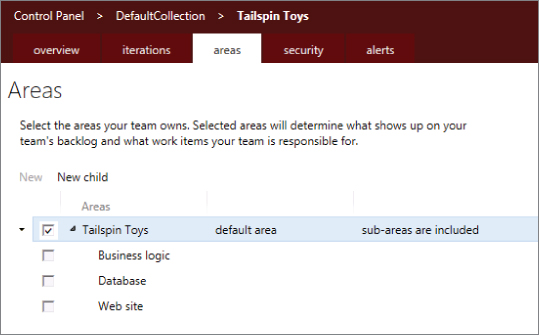
A nice feature of area and iteration administration is that you can define granular permissions for indicating who is allowed to modify or even read work items in each part of your team project. For example, maybe you work for a government security contractor and there are bugs of a sensitive nature that should only be viewed by team members with a certain security clearance. Or, maybe you are building a prototype of the next version of your application and want to restrict access to minimize the potential for leaks that your competitors could get access to. These sorts of restrictions are possible by using iteration and area security settings. To access the permissions menu, highlight an area path or iteration path then click the small down arrow on the left side of the row.
At any time, you can return to the area and iteration settings dialogs to add, rename, move, or delete areas and iterations. You can move nodes to be children of other nodes by simply dragging and dropping them on top of one another. If you rename or move areas or iterations for which there are existing work items, those work items are automatically reassigned by Team Foundation Server using the new name or location you choose. If you delete an area or iteration for which there are existing work items, you are prompted for the value that Team Foundation Server should use to replace the iteration or area value in affected work items.
Starting with Team Foundation Server 2012, you can also use the iteration settings dialog to assign start and end dates to iterations. This information is used by the Agile Planning Tools you can read about in Chapter 11 to determine which iteration is currently active. Iteration dates are also used to help Team Foundation Server render certain reports, such as the burndown report, which shows the amount of work remaining for an iteration and how remaining work is trending over time.
You will discover that work items are used throughout Team Foundation Server. You can use them to help you manage your product backlog and plan your iterations, which is covered in Chapter 11. Work items form the basis of many of the reports you read about in Chapter 12. You can link them to changesets (which you read about in Part I) to provide more information about what changes were made to a set of files and why. Project managers and team leaders can also use work items for project planning and to help control which work team members should be focused on, and how they should interact with other team members.
Work items, work item types, and all of the activities involving work items (editing, querying, reporting, and so on) are usually referred to collectively as the work item tracking capability of Team Foundation Server. Now that you understand the basics of work items, you are ready to learn about process templates, which include the definitions for work item types.
Process Templates
A process template defines the default characteristics of any new team project. Process templates are a powerful concept in Team Foundation Server. A process template includes the default work item types, reports, documents, process guidance, and other associated artifacts that provide you with everything you need to get started with your software project.
Choosing the right process template is an important step in creating a new team project. You should carefully choose the best process template for your team's preferred work style and the type of project you are working on. This section helps you understand the types of process templates available. While you are reading this section, you should be thinking about the following types of questions:
- How does your team work today?
- Are there ways your team works today that you'd like to change?
- Do you need a formal process, or do you work better as a more ad-hoc team?
- Are there areas of your process where you prefer to be more agile, but other areas where you need to be more formal? (For example, maybe you want to manage your team's iterations in an agile manner, but decisions about requirements require formal negotiations with your customer.)
- Do you have resources to invest in and maintain your own custom process template, or would one provided by Microsoft or a reputable third party be a better solution?
- What other stakeholders should be involved in the decision-making process for answering these questions?
If answering these questions proves difficult for you or your team, you may want to start with a small pilot project first and see how your team performs when using one of the existing process templates. You can then use the findings from that pilot to determine which process template to start with, and what changes (if any) you need to make to that process template before using it for subsequent projects. Process template customization is covered in Professional Team Foundation Server 2012.
Embracing the right process template can have a transformational effect on an organization by providing everybody on the team with a predictable and repeatable process for capturing and communicating information, making decisions, and ensuring that you are delivering on customer expectations. This, in turn, can drive up software quality and development velocity, which ultimately delivers more value to your customers.
MSF for Agile Software Development
The MSF for Agile Software Development v6.0 process template included with Team Foundation Server 2012 is designed for teams who are practicing agile methodologies, such as Scrum or eXtreme Programming (XP). These methodologies have their roots in the now-famous Agile Manifesto (www.agilemanifesto.org).
If you are practicing Scrum as a development methodology, you may prefer the relatively newer Visual Studio Scrum process template described later in this section. Visual Studio Scrum uses terminology which will immediately be familiar to any team practicing Scrum. In practice, teams that practice Scrum can use both of these process templates, but the MSF for Agile Software Development process template provides a bit more rigor and structure than the Visual Studio Scrum process template.
A key tenet of agile methodologies is that requirements will evolve over time, both as business needs change and as customers begin to use interim releases of your software. For this reason, the MSF for Agile Software Development process template assumes that teams will be frequently refining requirements and reprioritizing work by maintaining a common backlog of requirements (which are captured as user stories in this template). Periods of work are time-boxed into short lengths of time (iterations). Prior to each iteration, the development team works with the customer to prioritize the backlog, and the top user stories on the backlog are then addressed in that iteration.
Another important aspect of agile methodologies is, as the Agile Manifesto describes it, valuing “individuals and interactions over processes and tools.” This doesn't mean that processes and tools shouldn't be used at all, but instead that they sometimes can get in the way of empowering people to communicate and work together in order to make smart decisions. This principle is also reflected in the MSF for Agile Software Development process template, which defines a relatively small number of states, fields, transitions, and work item types as compared with other process templates such as the MSF for Capability Maturity Model Integration (CMMI) Process Improvement process template. By keeping the process simple, the goal is to prevent any unnecessary burdens from getting in the way of people making the right decisions.
Following are the work item types available in the MSF for Agile Software Development process template:
- Bug
- Issue
- Task
- Test Case
- User Story
MSF for CMMI Process Improvement
The MSF for CMMI Process Improvement v6.0 process template is designed for teams who want to, or may have to, take a more formal approach toward developing software. This process template is based on the Capability Maturity Model Integration (CMMI) for Development, which was developed by the Software Engineering Institute, a part of Carnegie Mellon University. CMMI defines not only a framework for developing software, but also prescribes ways for an organization to constantly improve their processes in an objective and repeatable way. An organization can even become certified by an outside appraiser who can verify whether or not it is performing at one of five CMMI maturity levels.
CMMI is a popular model for developing software by such organizations as systems integrators (SIs) and software factories. There is very little subjectivity in the model, so it allows an organization to represent its services using a standard that is well understood globally, and can be appraised and certified by a neutral third-party organization. CMMI is also used for developing many mission-critical systems, such as by NASA or defense contractors. In fact, the Software Engineering Institute at Carnegie Mellon was originally funded by the United States Department of Defense to help them find better ways of managing their projects.
As you might expect, the MSF for CMMI Process Improvement process template is more complex than its Agile counterpart. The CMMI template includes the following work item types:
- Bug
- Change Request
- Issue
- Requirement
- Review
- Risk
- Task
- Test Case
In addition to including three additional work item types, the work item types themselves are also more complex in the CMMI process template than in the Agile process template. Compare the screenshot of a bug work item form from the Agile process template, shown earlier in Figure 10.2, with a bug work item form from the CMMI process template, shown in Figure 10.6. Take note of the additional fields, such as Severity, Triage, and Blocked, which were not in the bug work item from the Agile process template. There are also additional tabs across the lower half of the bug work item from the CMMI process template.
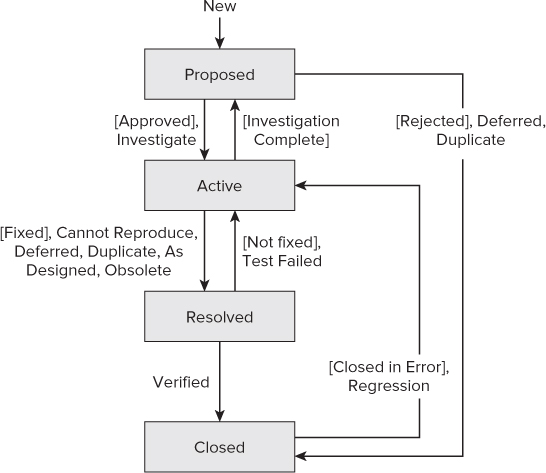
The states and transitions of work item types from the CMMI process template are also more complex than in the Agile process template. Now, compare the state diagram of the bug work item type from the Agile process template, shown in Figure 10.3, with the state diagram of the bug work item type from the CMMI process template, shown in Figure 10.7.
The key difference you should notice between these two state diagrams is that the CMMI process template introduces an additional state — Proposed. This explicit decision stage is required in the CMMI process template before a developer is ever assigned to work on a bug. This should cause the team to ask such questions as, “Is this really a bug, or does this represent a request to change the way certain functionality was designed? Will fixing this bug have unintended side effects on other parts of the software? If we choose to work on this bug, how should it be prioritized against our other work?”
This shouldn't imply that those aren't important questions to be asking even if you are using the Agile process template, and a seasoned team practicing an agile methodology will likely already be mentally following this checklist as they triage bugs. But the CMMI process template makes this step explicit, which helps to ensure that this step takes place for every bug, regardless of the experience level of the development team.
Another way of thinking of CMMI is to realize that by following the model, NASA isn't guaranteed that it will never again develop a rocket that fails because of a software defect. But if NASA is following CMMI correctly, then it can guarantee that an agreed-upon process was used to make decisions leading up to that defect. And conversely, in the event of a defect, it can audit the process that was used, examine the assumptions that went into the decision-making process, and learn from those mistakes in the interest of refining its process and helping to ensure that the same mistake never happens again.
It is also important to point out that using the MSF for CMMI Process Improvement process template alone does not ensure that an organization can successfully pass a CMMI certification audit. This is akin to the fact that simply having a smoke alarm and a fire extinguisher on hand won't keep a family safe if they don't know how to properly use and maintain this equipment.
But Team Foundation Server, along with the MSF for CMMI Process Improvement process template, can be very useful for helping an organization that wants to adopt CMMI as its model of development. Team Foundation Server features such as end-to-end traceability, multidimensional reporting, rich linking (between work items, and with other artifacts such as builds and changesets), and preservation of history are all incredibly useful capabilities that can help an organization to prepare for and pass a CMMI audit.
Visual Studio Scrum
Although there are many development methodologies that make up the agile movement, Scrum has established itself as the most popular. Scrum defines clear roles, responsibilities, and activities that team members practicing Scrum must follow.
A team practicing Scrum uses a standard vocabulary to define what they are doing. Teams hold daily stand-ups (meetings where team members talk about what they did yesterday, what they will do today, and anything that might be blocking them — called an impediment). Instead of a project manager, a team practicing Scrum is usually led by a ScrumMaster. There are other terms as well, which you can learn about in any of the dozens of books about Scrum, or from the hundreds of Scrum user groups or trainers around the world.
The Visual Studio Scrum process template was introduced specifically to help teams who want to practice Scrum and use Team Foundation Server. It was made available as a download a few months after Team Foundation Server 2010 first shipped, and it is now included as a built-in process template with Team Foundation Server 2012.
So, you might now be wondering what purpose the Visual Studio Scrum process template has if the MSF for Agile Software Development process template is designed to support any of the agile development methodologies — including Scrum. The Visual Studio Scrum process template was created to provide teams practicing Scrum with the specific artifacts and terminology used universally by teams who have adopted Scrum.
Instead of User Stories or Requirements, Visual Studio Scrum uses Product Backlog Item work item types. Instead of Issues or Risks, Visual Studio Scrum uses Impediment work item types. In short, if you practice Scrum or are considering practicing Scrum, the Visual Studio Scrum process template is designed to help you do so while making the most of Team Foundation Server.
If you used the Visual Studio Scrum 1.0 process template that shipped as an add-on to Team Foundation Server 2010, you will notice that Visual Studio Scrum 2.0 in Team Foundation Server 2012 no longer includes the Sprint work item type. The Sprint work item type was used by Visual Studio Scrum 1.0 to enable teams to define start and end dates for their iterations, and it was somewhat of a hack. The need for representing this information in a work item has disappeared now that Team Foundation Server 2012 enables you to define start and end dates for your iterations, as you discovered earlier in this chapter.
Third-Party Process Templates
Several third parties provide process templates for use with Team Foundation Server. A list of some of these third-party process templates can be found at http://aka.ms/ProcessTemplates. Process templates from third parties are usually licensed for free use, and sometimes additional services such as consulting or complementary products are available for purchase from the organizations building those process templates.
There are several great third-party process templates available, but you should carefully consider the support and road map implications of adopting a third-party process template. For example, when the next version of Team Foundation Server is released, will the process template be upgraded to take advantage of new or improved features? If so, what is the upgrade path for migrating existing projects to the new version of the process template?
If you aren't prepared to take over the maintenance of the process template in the event that the third party chooses to stop investing in it, then you might want to consider one of the aforementioned process templates that are built and supported by Microsoft.
Custom Process Templates
Finally, you might decide that none of the process templates provided by Microsoft or third parties fit the needs of your team or your development project. Although you could certainly create your own process template from scratch, a far more common approach is to start with an existing process template and customize it to suit your needs. You can learn about customizing process templates in the companion to this book, Professional Team Foundation Server 2012.
Now that you understand your options for choosing a process template, the next section introduces you to some of the different ways you can manage your work items.
Managing Work Items
There are many ways of accessing your work items within Team Foundation Server 2012. Because work items are used by many stakeholders across your team (including programmers, testers, project managers, and so on), and some of these roles don't use Visual Studio as their primary tool, Microsoft provides many client options for managing work items.
In this section you are introduced to using Visual Studio, Excel, Project, and Team Web Access to access your work items. This chapter doesn't cover every aspect of accessing work items from each of these clients, but it gives you a better idea of the ways each client can be used, as well as the relative benefits of each, and provides you with pointers to detailed documentation for each client.
The list of clients in this section isn't exhaustive. There are also dozens of third-party clients. Testers might use Microsoft Test Manager (discussed in Part VI). Eclipse users can utilize Team Explorer Everywhere. You can even write your own clients using the Team Foundation Server object model if you want to, and partner solutions are plentiful, such as TeamLook which integrates work items directly into Microsoft Outlook.
Using Visual Studio
In Chapter 2, you learned about using Team Explorer to access Team Foundation Server from within Visual Studio. Team Explorer not only provides access for Visual Studio users wanting to connect to Team Foundation Server, but it also installs the add-ins required to work with Excel and Project. So, even if you don't plan to use Visual Studio, if you want to use Excel or Project with Team Foundation Server, you should install Team Explorer. Team Explorer itself is a free download from Microsoft, but you need to be properly licensed with a client access license before you are permitted to access Team Foundation Server.
Creating Work Items
Work items are easy to create using Visual Studio. Open the Team Explorer window of Visual Studio 2012 (click View ⇒ Team Explorer if this window is not visible) and click the Work Items link. (If you don't see the Work Items link, try first clicking the Home icon at the top of the Team Explorer pane.) Now, click the New Work Item link. The fly-out menu reveals the work item types that are available in your team project. Click the work item type that you want to create an instance of. An empty work item form displays, similar to that shown in Figure 10.2.
The new work item form varies in appearance based on the work item type you chose to create. For the most part, filling out the work item form is self-explanatory, but there are a few things to notice when creating and editing work items.
The first is that your work item won't have an ID until it has been successfully saved for the first time. The ID is a number that is globally unique across your team project collection, numbered sequentially, starting with 1. This means that the first work item you save within a new team project won't have an ID of 1 if there are existing team projects in your team project collection that also contain work items.
For now, your work item probably says something like “New Bug 1” at the top of the form. The number 1 isn't your work item's ID; it's just a temporary number used by Visual Studio to track unsaved work items. In fact, until it is saved, Team Foundation Server won't know about your work item.
Before you can successfully save this work item, you need to provide a Title for it at a minimum. There may be other required fields as well, depending on the work item type you selected. An error message at the top of the form will indicate any remaining fields that you must complete. Some required fields may appear on other tabs.
Another thing to notice about work items is that you can't skip states. A work item must be saved in one state prior to moving to the next state. For example, if you refer to Figure 10.3, notice that a bug from the MSF for Agile Software Development process template generally moves from Active to Resolved to Closed.
But you can't immediately create a new bug and save it in the Resolved state, even if you already fixed the bug that you found, and you're just creating the bug work item as a record of what you did. You must first save it in an Active state, change the state to Resolved and save it again.
This may seem cumbersome at first, but the reason for this requirement is that the work item type may define rules that must be satisfied as a work item transition from one state to another. Additionally, the meaning of some fields changes during a work item's lifecycle, so each time you save in a new state, the available choices for a field may change. For example, when you create a new bug using the Agile process template, the Reason field helps to indicate how a bug was discovered. When you are transitioning the same bug from Active to Resolved, the Reason state indicates why you are doing so (the bug was fixed, or couldn't be reproduced, or was a duplicate, and so on).
The interface for creating and editing work items with Visual Studio is very straightforward. What can be difficult to master is an understanding of all of the fields found throughout the work item types, their transitions, when to use them, and so on.
For the process templates provided by Microsoft, the documentation is very thorough, and is recommended reading to help you decide how to best adopt these process templates within your team. But wholesale adoption of these templates isn't for every team. You should feel empowered as a team to decide which fields are more or less important than others. You may even decide to add to or simplify the work item types to better meet your needs.
Work Item Queries
Now that you know how to create work items, the next task you should learn about is how to find them. You can always search for work items by typing the work item ID or some other text into the Search Work Items textbox at the top of Team Explorer. But this assumes that you know the ID or some text for the work items you are looking for. Chances are you'll want to use queries most of the time.
The process template you are using probably includes some useful built-in queries already. Open Team Explorer ⇒ Work Items to reveal the My Queries and Shared Queries folders. The Shared Queries folder is visible to everybody on the team, whereas My Queries provides a location to save your own personal queries, which may only be useful to you. By keeping specialized queries in My Queries, you can avoid creating too much clutter for your fellow team members. You can also use subfolders in both of these categories to further organize your queries.
If you have an existing query, you can simply double-click it to run it. Your results will vary based on the type of query you run, and the number of matching work items in your team project, but it should look something like the query results shown in Figure 10.8.
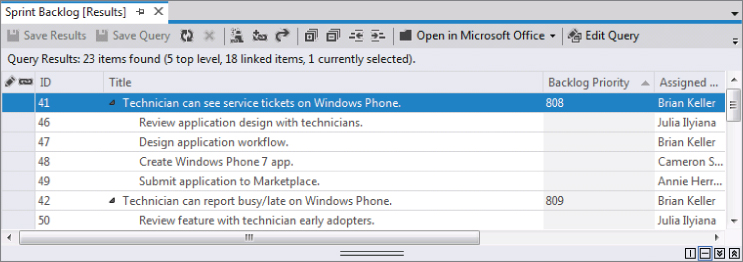
The query results shown in Figure 10.8 are from a Tree of Work Items query. This figure shows a Sprint Backlog query from a team project that was created using the Visual Studio Scrum process template, but other tree queries look similar. Tree queries return a list of work items matching your query, and groups them according to their parent/child relationships. In this example, there are top-level Product Backlog Item work items that are linked to child Task work items.
Another type of query is Work Items and Direct Links. This type of query is similar to the Tree of Work Items query, except that you are not limited to parent/child links. For example, you can specify that you want to see all user stories and their test cases as represented by a tested by link type. You can even construct a query that shows all of your user stories that do not have linked test cases; this is useful for spotting potential holes in your test plan.
Finally, the Flat List query type does not show any link types and is the same type of query found in versions of Team Foundation Server prior to 2010.
From within the query results window, you can open a work item simply by double-clicking it. You also have several options available to you from the toolbar located at the top of the query results window. You can place your mouse over these toolbar icons to learn more about them. The available options vary slightly between query types, but all of them enable you to create new work items (linked to any work items you have highlighted), to open your query results in Microsoft Project or Excel (more on this later), to change which columns are displayed in your query results (and in which order), and to edit the query you are working with.
The query editor shown in Figure 10.9 is the result of having opened the query from Figure 10.8 and clicking Edit Query.
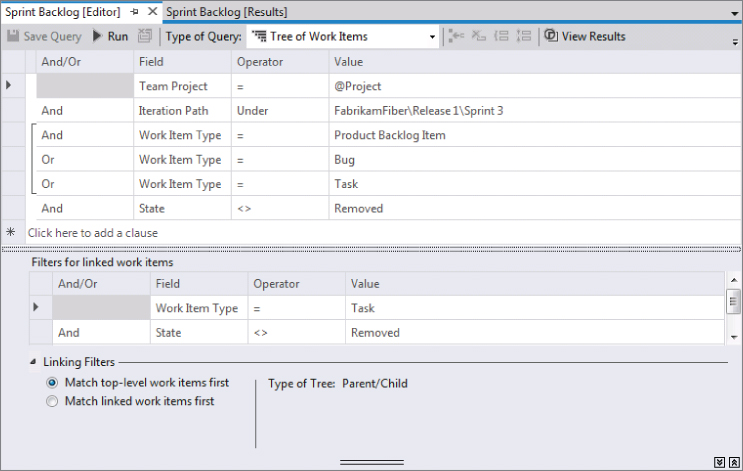
Even if you've never used queries with Team Foundation Server before, this query should be fairly straightforward to reverse-engineer to learn what it does.
The first row (Team Project = @Project) means that your query results should be scoped to the team project where the project is saved. If you delete this row, your results may return work items from the entire team project collection. @Project is a query variable. Query variables are converted into their respective values when the query is executed. So, for this project, @Project resolves to FabrikamFiber. By using query variables, you can write more flexible queries. The two other query variables available to you are @Me (which is converted into the username of the person running a query) and @Today (which is converted into today's date).
The next row of the query (AND Iteration Path Under FabrikamFiberRelease 1Sprint 3) defines the specific iteration this query should look for work items in. You could change this clause to look for work items from Sprint 4 by changing the 3 to a 4, or from the entire Release 1 path by simply removing “Sprint 3” from the end of this clause.
Clauses three, four, and five are grouped (as shown by the vertical bracket on the far-left side of the query). This means that they should be interpreted together in much the same way that math operations within parentheses or brackets are interpreted together. These clauses, when interpreted together, mean Only return work items with a work item type of Product Backlog Item OR a work item type of Task OR a work item of type Bug.
The last clause indicates that work items with a State of Removed should not be returned. In the “Deleting Work Items” note earlier you learned that Removed is a state that is available in the Visual Studio Scrum process template to enable you to easily remove work from your backlog without formally deleting the work item.
Finally, because the query type for this query is a Tree of Work Items, there is a second grid (labeled Filters for linked work item types), which enables you to specify any constraints on the child work items that are returned. In this example, only task work items are returned as children.
Using Microsoft Excel
Microsoft Excel is another popular client for editing work items. If you have installed Team Explorer on a machine with Microsoft Excel (2007 or newer), you have a Team tab available from the Office ribbon, which enables you to interface with Team Foundation Server.
There are two ways of opening work items in Excel. One option is to open query results from within Team Explorer and then, from the query results toolbar, click Open in Microsoft Office ⇒ Open in Microsoft Excel. The other approach is to start in Excel, open the Team tab from the Office ribbon, and then click New List. You are prompted to select your Team Foundation Server and team project, along with the query for the work items you want to manage. Or, instead of a query, you can start with an empty list. This enables you to enter new work items or to select individual work items to add to your list by clicking Get Work Items.
Managing work items in Excel is a fairly rich experience. You can create new work items, make edits to existing work items, and even manage Trees of Work Items. Figure 10.10 shows the results of the same query you saw earlier. Note that parent/child relationships are represented here as well. Parent work items have their titles listed in the Title 1 column, and their children have their titles listed in the Title 2 column. If you add a third level to the tree, grandchild work items are listed in a column named Title 3, and so on.

You can make any changes you want to within your Excel grid. You can add new work items for a Tree of Work Items query by clicking an existing work item and clicking Add Child from the Team tab of the ribbon. For queries of type Flat List or Work Items and Direct Links (which is also compressed to a flat list view in Excel), you can simply place your cursor on a new row at the bottom of your grid, and start typing to begin creating a new work item.
Note, however, that none of your work is persisted to Team Foundation Server until you click Publish from the Team tab of the ribbon. Even if you save the Excel workbook file, your work items aren't synchronized to Team Foundation Server until you publish them.
You receive an error message if the values you entered for work items in Excel do not conform to the validation rules or state transition workflow for the work item type. At this point, you can even view the offending work items using the same form view you are familiar with from Visual Studio.
Using Microsoft Project
Microsoft Project is one of the most popular project management tools in the world, and supports integration with Team Foundation Server. If you have installed Team Explorer on a machine with Microsoft Project (2007 or newer), you have a Team menu that enables you to interface with Team Foundation Server.
As with Excel, you can either start with a query in Team Explorer (and choose Open in Microsoft Office ⇒ Open in Microsoft Project), or you can open Project and use the Team menu to access a query of work items from Team Foundation Server. Figure 10.11 shows work items being managed by Microsoft Project.
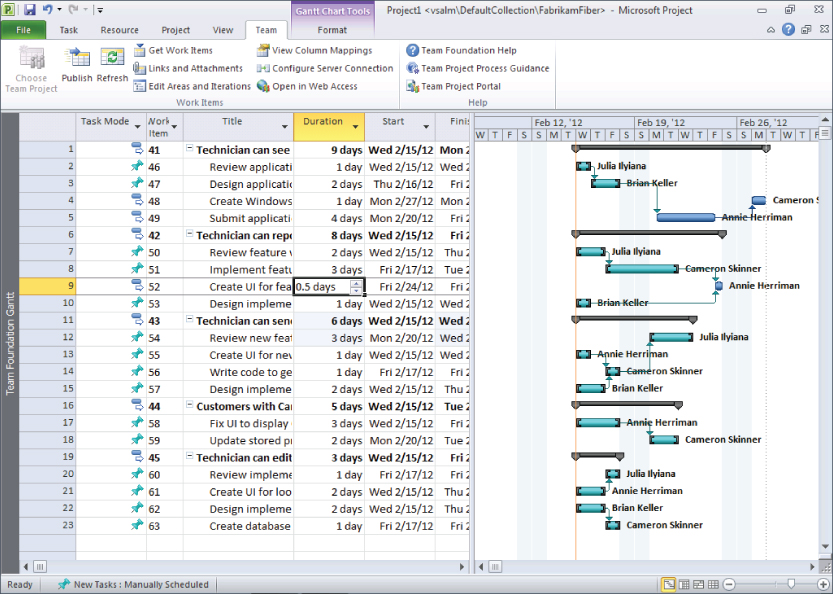
Project also displays work items according to their parent/child relationships. A major benefit of using Project to view your work items is that it's easy to visualize dependency relationships (successor/predecessor) using the built-in Gantt chart visualization that Project is popular for. In Figure 10.11, it's easy to see that some work items have dependencies on others, which can be helpful for teams deciding how to prioritize their work.
Like Excel, changes to work items that you make within Project are not synchronized to Team Foundation Server until you click Publish from the Team menu.
Using Team Web Access
Team Web Access provides yet another way of managing your work items. You learned about how to connect to Team Web Access in Chapter 2. Team Web Access provides a rich, web-based way of accessing Team Foundation Server. An obvious benefit of Team Web Access is that users do not need to have any software other than a web browser. Figure 10.12 shows Team Web Access being used to manage work items.
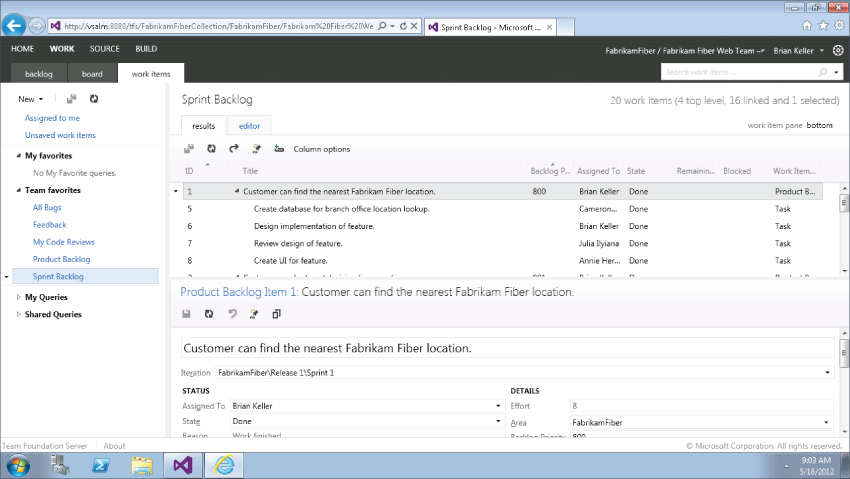
Team Web Access provides a surprising number of features for a web-based client. Team Web Access makes an ideal work item client for users who don't have Team Explorer installed. Some organizations even encourage end users to file bugs and enhancement requests about their software using Team Web Access. And as you see in the next chapter, Team Web Access provides new Agile Planning Tools to help you manage your plan and track your work.
Project Server Integration
Earlier in this chapter, you learned how you can use Microsoft Project to create project plans with your work items in Team Foundation Server. But organizations that utilize Project Server may also be interested in the capability of Team Foundation Server to integrate with their Project Server (2007 or newer) deployments.
This integration allows planning and status information from your development team, using Team Foundation Server, to flow through to your project management office, using Project Server. This enables the software development team to use a single tool — Team Foundation Server — for managing their work, while enabling Project Server users to easily report on and participate in project management activities from those same projects.
In order to enable this integration, you must configure Team Foundation Server to integrate with a Project Server deployment. As part of this configuration process, you can determine which work items in Team Foundation Server should be synchronized with work in Project Server. You can even decide, for example, that parent user stories should be synchronized between the two systems, but that child tasks should remain in Team Foundation Server.
The integration service can then roll up the remaining and completed work being recorded against those tasks and synchronize that information to the User Story work item when it is updated in Project Server. This provides near real-time information to the project management office without overwhelming them with implementation details about your development project that they may not be interested in.
Your Team Foundation Server administrator can learn more about integrating Team Foundation Server and Project Server in Professional Team Foundation Server 2012.
Summary
In this chapter, you learned about the project management capabilities of Team Foundation Server 2012, with a focus on work item tracking.
You first learned about some of the new enhancements related to project management that have been introduced in this release and the preceding Team Foundation Server 2010 release. You were introduced to work items, including the key components that make up work item types. You discovered the importance of process templates, which include predefined work item types, and you read overviews of the three process templates included by Microsoft for use with Team Foundation Server 2012. Finally, you were introduced to a variety of ways that you can manage your work items with Team Foundation Server 2012, including from within Visual Studio, Excel, Project, via a web browser, and through integration with Project Server.
In Chapter 11, you learn about the new Agile Planning Tools that you can use to help you plan and track your software development projects.