
Chapter 4
Branching and Merging
What's in this chapter?
- Understanding branching terminology and concepts
- Getting to know common branching strategies
- Using the branching and merging tools
The use of branching in version control can open up a whole world of possibilities for improving development productivity through parallelization. Yet, for many developers, branching and merging is slightly scary and full of uncertainty. Because of a lack of good tooling in the past, many developers still shy away from making use of branching and merging despite the good support in Team Foundation Server. At the other extreme, some people—who see the great branch and merge functionality now available—can go a little crazy with their newly found power. Overuse of branches can affect developer productivity and reduce the maintainability of their repository as a result.
No matter which side of the spectrum you find yourself on, this chapter explains the fundamental principles behind the important branching and merging strategies and provides some key guiding principles to help you apply them to your organization's needs. This chapter highlights the branching and merging tooling available with Team Foundation Server 2012, and then concludes by walking you through the application of this tooling with some example scenarios.
Branching Demystified
There are lots of terms and concepts peculiar to the world of branching and merging. The following sections provide some definitions and context for those basic terms and concepts.
Branch
A branch is a copy of a set of files in a different part of the repository that allows two or more teams of people to work on the same part of a project in parallel. In Team Foundation Server 2012 branching is a lightweight server-side operation; when you perform the branch, it doesn't actually create new copies of all those files on the server. It just creates a record pointing to them and does not take up any significant extra storage—one of the reasons why creating a new branch containing thousands or even millions of files can be done quickly.
Merge
A merge is the process of taking code in two branches and combining it back into one codebase. For example, if you have two teams of developers working on two branches, and you want to bring the changes together, then you merge them. If the changes consist simply of edits to different files in the branches, then the merge is simple—but it can get more complicated, depending on what was edited in both branches.
For example, if the same line of the same file has been edited in both branches, the person performing the merge must make a decision as to which change should take precedence. In some circumstances, this results in a hybrid merge, where the combination of the intent behind the two changes requires a different result than simply the text in those versions being combined. When you branch, Team Foundation Server keeps track of the relationship between branches, as shown in Figure 4.1.

The branch containing the changes that you want to merge is called the source branch. The branch that you want to push the changes into is the target branch. The common ancestor, that is to say the changeset which indicates the version from which these branches are derived, is called the base version. When you merge, you can select a range of changes in the source branch to merge into the target branch.
Conflict
If the same file has been edited in both the source and target branches, Team Foundation Server will flag this as a conflict. For certain changes (such as a file that was edited in two different places), Team Foundation Server can make a good guess about what should happen (that is, you want to see a file containing the changes from both places). This is called an automerge. In Team Foundation Server 2012 there have been significant improvements to the abilities of the automerge capabilities and the occasions in which they are available. A best practice is to let the tool perform an automerge, but you should then validate the merge results afterward to ensure the correct intent of the two changes has occurred. For example, if two different bugs were fixed, you probably want both changes. However, if the two changes were just fixing the same bug in two different ways, perhaps a different solution is in order. In most cases, where the development team has good communication, the changes are a result of different changes being made to the file. Automerge usually does a great job of merging them together, making it easy for the developer to simply validate the changes.
There can also be many cases where the actual outcome is unclear, so automerging is not available. For example, if you deleted the file in one branch and edited it in another, do you want to keep the file with the changes or have it removed? The person performing the merge is responsible for deciding the correct conflict resolution based on an understanding of the code, and communicating with the team members who made the conflicting changes to understand their intent.
As with life in general, conflict is never good in version control. Making the decision about the correct conflict resolution in version control can be a complex and time-consuming process. Therefore, it is best to adopt a branching strategy that minimizes the likelihood of conflicts occurring. However, conflicts will occur, and Team Foundation Server provides the tooling to deal with them, so conflicts should not be feared.
Branch Relationships
When you branch a folder, the relationships between those branches form a standard hierarchical relationship. The source of the branch is the parent, and the target of the branch is the child, as shown in Figure 4.2. Children who have the same parent are called sibling branches.
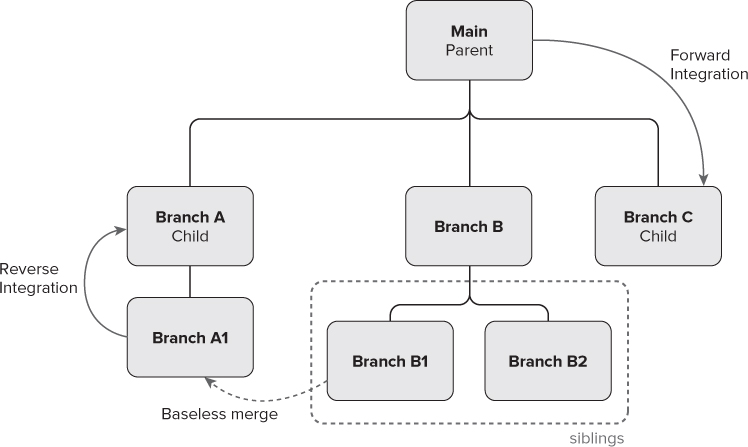
Baseless Merge
A baseless merge is a merging of two arbitrary branches in version control without reference to a base version. This is sometimes necessary if the source code was originally imported in a flat structure without the branch relationship being in place, or if you want to merge between one branch and another branch that is not a direct parent or child (for example, Branch A1 and Branch B1 in Figure 4.2).
Because no base version is being used to compare against, the probability of the server detecting conflicts occurring between the two branches is much higher. For example, if a file is renamed in one branch and edited in the other, it shows up as a file delete conflicting with the file edit, and then a file add that gives no hint as to which file it is related to, or that there is an edit intended for this file in the other branch. For this reason, baseless merges are discouraged and your branching model should attempt to constrain most merges between parent and child branches to minimize the amount of baseless merging required.
Forward/Reverse Integration
Forward integration (FI) occurs when you merge code from a parent branch to the child branch. Reverse integration (RI) occurs when you merge code from a child branch up to the parent branch. The terms FI and RI can often shoot around quite freely during a branching debate, so it is important to understand what they mean. If you are doing feature development in branches, it is common to use FI at various points during the feature development cycle, and then to use RI at the end. See the “Feature Branching” section later in this chapter for more information.
Common Branching Strategies
Depending on the organization of your team, and the software that you need to develop, there are numerous branching strategies that you can adopt, all with various pros and cons. However, just as every strategy in chess is made up of simple moves, every branching strategy uses one or more combinations of some basic techniques. This section details some of the basic techniques, how they are used, and why.
When developing your own branching strategy, you should take into account the needs of your organization. In all likelihood, you may adopt a strategy that combines one or many of the basic techniques described here.
When looking at any strategy for branching and merging, you should keep in mind the following important rules:
- Prefer simplicity over control.
- Only branch when you really need to. (You can branch after the fact if you find you need to.)
- If you ever want to merge two branches together, keep the time between merges to a minimum.
- Ensure that your branch hierarchy matches the path you intend your merges to follow.
No Branching
It may be counterintuitive, but the simplest branching technique is to not branch at all. This should always be your default position. Do not branch unless you know you need to. Remember that you are using a version control tool that tracks changes over time. You can branch at any point in the future from any point in the past. This gives you the luxury of not having to create a branch “just in case”—only create branches when you know you need them.
However, there are things you can do to prepare yourself to make branching easier in the future if you decide you need a branch.
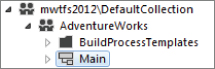
Figure 4.3 illustrates the most important thing that you should do if you think you might possibly need to branch in the future. When you first create your team project in Team Foundation Server, create a folder called Main and check it in. Then, right-click the folder in Source Control Explorer and select Branching and Merging ⇒ Convert to Branch to get to the screen shown in Figure 4.4.
With no branching, you only have one branch of code to work in for all teams. This technique works great when you have small teams working on the same codebase, developing features for the same version of the application, and only supporting one version of the application at a time. At some point, no matter how complex your branching strategy evolves to support your business needs, you need at least one stable area that is your main (or mainline) code. This is a stable version of the code that will be used for the build that you will create, test, and deploy.
However, during stabilization and test periods, while you are getting ready to release, it may be necessary for the team to not check in any new code into the codebase (that is, undergo a code freeze). With smaller teams working on a single version, this does not affect productivity because the people who would be checking in code are busy testing to ensure that the application works, as well as getting ready for deployment.
With this technique there is no way to start work on something new before the final build of the current version has been performed. The code freeze period can, therefore, be very disruptive because there is no way to start work on the next version until the current one has shipped. It's these times when other strategies become useful for teams of any size, even a team of one.
Branch per Release
After no branching, the second most common branching technique is branch per release. With this technique, the branches contain the code for a particular release version, as shown in Figure 4.5.
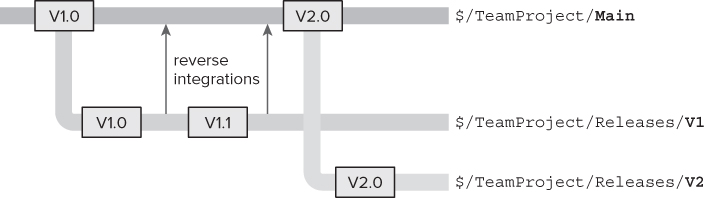
Development starts in the Main branch. After a period of time, when the software is considered ready, a branch is made to the V1 branch, and the final builds are performed from it. It is then released into production (with the code in the final production build getting a label to indicate which versions of which files were in that version). Meanwhile, development of new features for version 2 (V2) continues on the Main branch.
Let's say that some bugs are discovered in production that must be addressed, and a small change is necessary to reflect how the business needs something to work. However, the development group does not want to include all the work for V2 that has been going on in the Main branch. Therefore, these changes are made in the V1 branch, and builds are taken from it. Any bug fixes or changes that must also be included in the next version (to ensure the bug is still fixed in that next release) are merged back (that is, reverse-integrated) into the Main branch. If a bug fix was already in the Main branch, but needed to go into V1, then it might simply be merged (that is, forward-integrated) into it. At a certain point, the build is determined to be good, and a new V1.1 build is performed from the V1 branch and deployed to production.
During this time, development on the next version can continue uninterrupted without the risk of features being added into the code accidentally and making their way into the V1.X set of releases. At a certain point, let's say that it is decided that V2.0 is ready to go out the door, the mainline of code is branched again to the V2 branch, and the V2.0 build is created from it. Work can continue on the next release on the Main branch, but it is now easy to support and release new builds to customers running on any version that you want to keep supporting.
Branch per release is very easy to understand and allows many versions to be supported at a time. It can be extended to multiple supported releases very easily, and makes it trivial to view and compare the code that was included in a particular version of the application. Branch per release is well-suited to organizations that must support multiple versions of the code in parallel—such as a typical software vendor.
However, for a particular release, there is still no more parallelism of development than in a standard “no branching” strategy. Also, if the organization must only support two or three versions at a time (that is, the latest version, the previous version, and, perhaps, the version currently being tested by the business) then this model can lead to a number of stale branches. Although having lots of old, stale branches doesn't affect the performance of Team Foundation Server, or even cause any significant additional storage requirements, it can clutter the repository and make it difficult to find the versions you are interested in—especially if the organization releases new versions frequently. If this is the case, you may want to move old branches into an Archive folder, and only have the active branches (that is, the versions that the development team are currently supporting) in the Releases folder.
Code-Promotion Branching
An alternative to the branch per release technique is code-promotion branching (or promotion-level branching). This technique involves splitting the branches into different promotion levels, as shown in Figure 4.6.
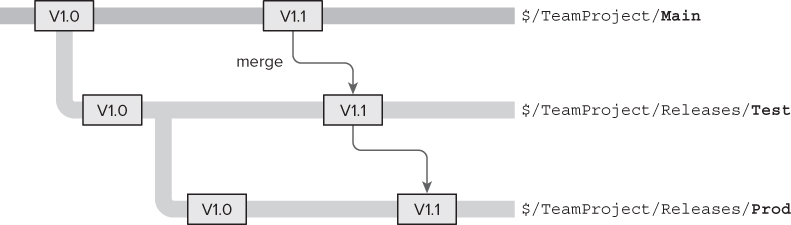
As before, development starts with just the Main branch. When the development team is ready to test the application with the business, it pushes the code to the Test branch (also often called the QA branch). While the code is being tested, work on the next development version is carried out in the Main branch. If any fixes are required during testing, they can be developed on the Test branch and merged back into the Main branch for inclusion in the next release. When the code is ready to release, it is branched again from Test to Prod. When the next release cycle comes along, the same is done again. Changes are merged from Main to Test and then Test to Prod.
Code-promotion branching works well in environments that have a single version running in production, but have long test-validation cycles that do not involve all of the development team. This allows development to continue on the next version in Main while test and stabilization of the build occurs in the Test branch. It also makes it trivial for the development team to look at the code currently on each system. Finally, the branch structure makes it easy to create an automated build and deployment system using Team Foundation Build that can automatically update the QA/Test environment as code is pushed to the QA branch.
Feature Branching
The previous branching strategies involve a single team working on the system in its entirety as they work toward a release. All features for that release are developed in parallel, and the build can only be deployed when all features in flight have been completed and tested. However, in large systems, or systems that require very frequent deployment (such as a large commercial website), feature branching (or branch per feature), as shown in Figure 4.7, can be useful.
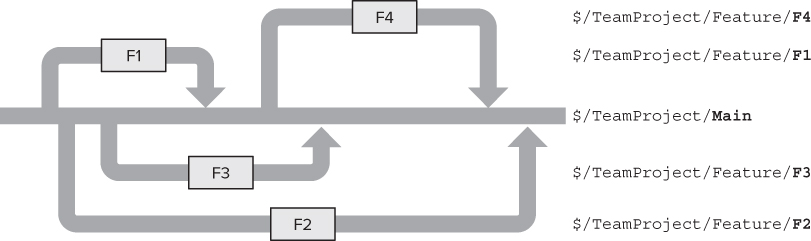
Feature branching is used when a project requires multiple teams to be working on the same codebase in parallel. In Figure 4.7, you see four feature teams working in separate branches (F1, F2, F3, and F4). Note that in a real branching structure, the feature branches themselves would likely have meaningful names such as FlightSelling, InsuranceExcess, or whatever shorthand is used by the project to refer to the feature under development. The Main branch is considered “gold code,” which means that no active development goes on directly in this branch. However, a feature must be reverse-integrated into this branch for it to appear in the final release build and for other teams to pick it up.
Initially, F1 is started with a branch from Main. But, while F1 is being developed, second and third teams start F2 and F3, respectively. At the end of development of the feature, F1 is merged back into the Main branch, and the F1 branch is deleted. Then that team starts on feature F4. The next feature to finish is F3, followed by F2. At each point, after the feature is merged into the Main branch, a new version of the software is released to the public website, but only one version is ever supported at any time.
Feature branching allows for a large amount of parallel development. However, this comes at the cost of delaying the pain of integrating each team's changes together until the feature is complete and you are merging the feature branch back into Main branch. For example, in Figure 4.7, when merging the F2 branch, all changes and inevitable conflicts introduced by features F1, F2, F3, and F4 must be analyzed and resolved.
The longer a period of time that code is separated into branches, the more independent changes occur, and, therefore, the greater the likelihood of merge conflicts. To minimize conflicts, and to reduce the amount of integration debt building up, you should do the following:
- Keep the life of a feature short—The time taken to develop features should be as short as possible, and should be merged back into the Main branch as soon as possible.
- Take integrations from the Main branch regularly—In the example shown in Figure 4.7, when F1 is merged back into Main, the feature teams still working on their features should merge those changes into their feature branches at the earliest possible convenient point.
- Organize features into discrete areas in the codebase—Having the code related to a particular feature in one area will reduce the amount of common code that is being edited in multiple branches, and, therefore, reduce the risk of making conflicting changes during feature development. Often, the number of teams that can be working in parallel is defined by the number of discrete areas of code in the repository.
When using feature branching, the whole team doesn't necessarily have to be involved. For example, one or two developers might split off from the rest of the team to go work on a well-isolated feature when there is a risk of the move not being possible (that is, they are working on a proof of concept), or when it is decided that the current release should not wait for that particular feature to be implemented.
Implementing Branching Strategies
So far, this chapter has covered a lot of the theory behind branching. This section puts that theory into action as it walks you through implementing a branching strategy using the branch tools available with Team Foundation Server 2012.
The Scenario
For this example, let's look at a fictional organization called Tailspin Toys that has installed Team Foundation Server and is using the version control functionality. Let's say that you are a member of the internal IT team which supports an order-fulfillment intranet site critical to the operation of the business. The team has only one version of the site in production at any one time. However, because of the criticality of the software, the IT team has lengthy test cycles involving a series of expert (but non-technical) users who come in from the business to ensure that the software is working as required.
The IT team has a single team project called IT and a single ASP.NET web application checked into the team project root folder at $/IT/Orders. They also have an automated build set up in Team Foundation Server.
The team has some issues when it comes to managing source. The development process is plagued by problems and inefficiencies. There are significant periods when developers are forbidden from checking in to the repository while getting ready for a release. The delays cause the developers to end up creating large shelvesets filled with changes that become unmanageable.
Occasionally, urgent bugs are required to be fixed in the production codebase. This is done by the developer getting the label that represents the production codebase, adding the fix, building it on a local machine, and manually pushing the modified files out to production. Ensuring that the correct files are pushed to production and that the source code fix is added back into version control is a manual process that has caused some problems. There have been instances where fixes to production were missing when the next version rolled out, and those fixes had to be repeated.
But, luckily, there are some people in the development organization who recognize the problems and want to come up with a branching plan to alleviate some of them. You have been selected to roll out this plan.
The Plan
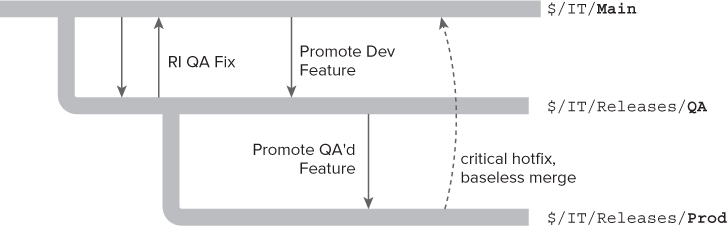
After some careful consideration, the team decides that a code-promotion strategy fits their organization quite well. Figure 4.8 shows the plan that the organization has decided to adopt.
The code will consist of the following three branches, as suggested by the code-promotion branching strategy:
- Main—This is where the main development effort is conducted. This is the branch from which the regular continuous integration build is performed, and where new features are developed.
- QA—This is where the code will live while it is being tested by the business. Because these test periods can be very lengthy, new code development will carry on in the Main branch. Any fixes or modifications to the version under test will be performed directly on the QA branch and reverse-integrated back into Main. An automated build will be created that will run early in the morning during the week. The results of that build will be pushed to the QA web server daily for testing by the business the following day.
- Prod—This represents the code that is currently running in production. Code normally goes from Main to QA and then into Prod. A build is also created for this branch so that urgent hotfixes can be checked in and repeatedly built. Urgent hotfixes like this are very much the exception, though. If an urgent hotfix is performed, a baseless merge is performed to push that fix back into Main. Note that the results of the Prod build are first deployed to a test environment to ensure that they work as expected before manually running a script that pushes the code to production.
Implementation
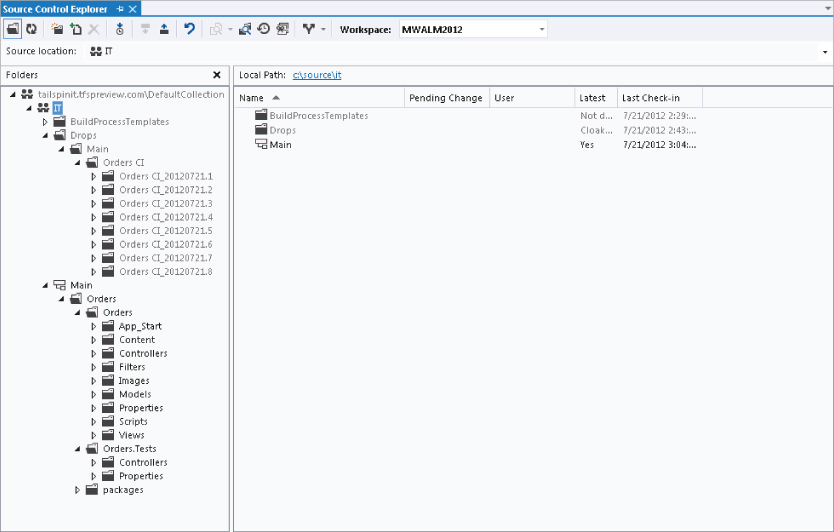
Figure 4.9 shows the current codebase.
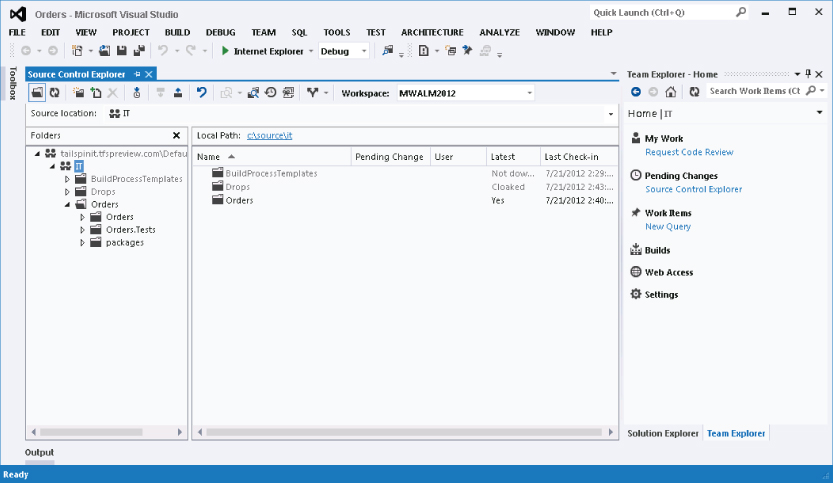
The first thing you want to do is to move the code currently at the root of the team project in version control into a Main branch. This is the most disruptive of the changes, because it requires the build to be reconfigured, and team members must re-sync their workspaces. So, you decide to do this late one night, a few weeks before the IT team is due to push a release to the test team.
To move the code into a branch, you right-click the Orders folder that contains the solution and select Move. Then you manually enter a path of $/IT/Main/Orders in the Move dialog shown in Figure 4.10. Note that the Main folder does not have to exist at this point. Check in the move by going to Pending Changes in Team Explorer and pressing Check In. This will then create the Main folder for the rest of the team and the Orders solution will be inside it.

As soon as this is done, you edit the build definition's workspace so that it only looks at the Orders Source Control Explorer folder under the Main folder, as shown in Figure 4.11.
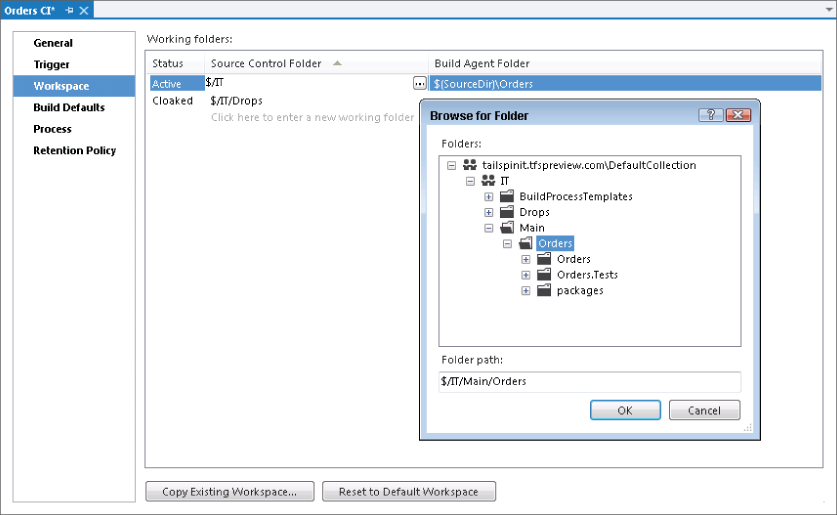
In this example, the build definition is set to copy build outputs to source control, and the build definition is set to point at the Team Project root ($/IT). Therefore, Visual Studio had automatically added the Drops folder as cloaked in the build workspace. This is so that file binary build outputs are not copied across to the build machine for each build. However, as you are now changing the build definition to be more specific by referencing a folder inside Main, you no longer need to have the Drop folder cloaked. You delete the mapping for it by right-clicking the $/Drops line shown in Figure 4.11 and selecting Delete.
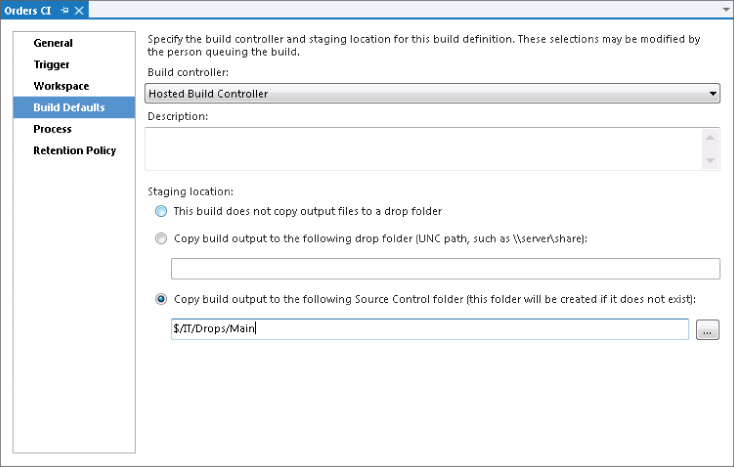
As you are going to have multiple builds defined for the different branches, and you also want these results to be placed in version control, you edit the Staging Location in the Build Defaults to be $/IT/Drops/Main (see Figure 4.12). Then you move the existing build drops from the $/IT/Drops/Orders CI folder to the $/IT/Drops/Main/Orders CI folder in the same way that you performed the move in Figure 4.10. Note that you do not place the Orders CI build results directly into the Main folder that you moved the source code into but create a new folder called Main under Drops. This is because you do not want your build results included in the branches; they are kept separately at the root of the Team Project. See Figure 4.15 for the eventual folder layout that you are aiming for.
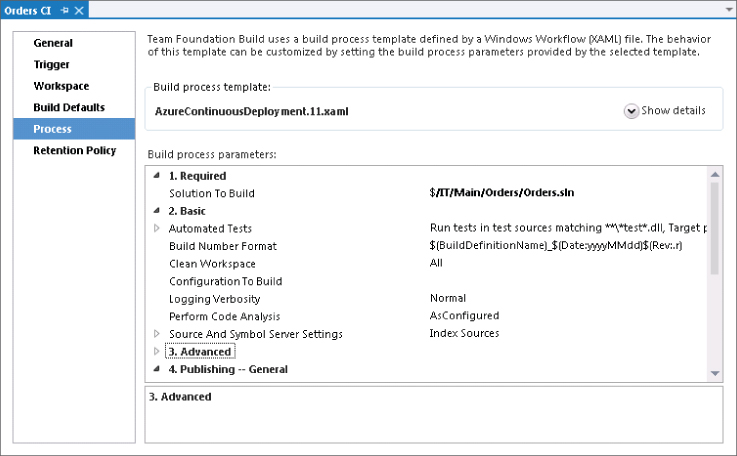
You also modify the process for the build to remove the solution file from the old location, and add it in again at the new location, as shown in Figure 4.13. You then manually queue a new build to ensure that everything is working well. Everything works, so you send an e-mail notifying the team of the change to version control, and you go home for the evening.
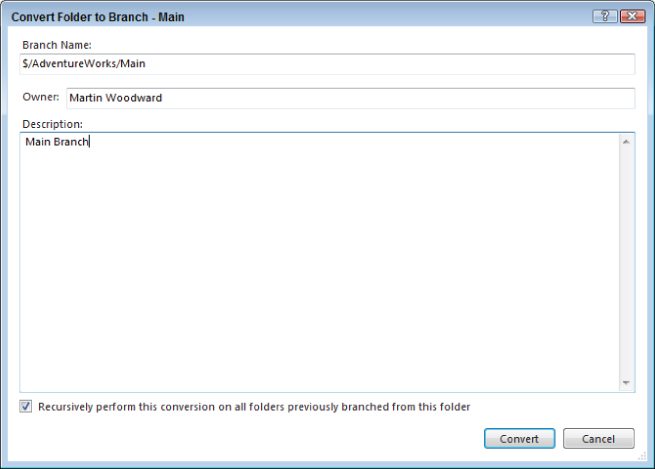
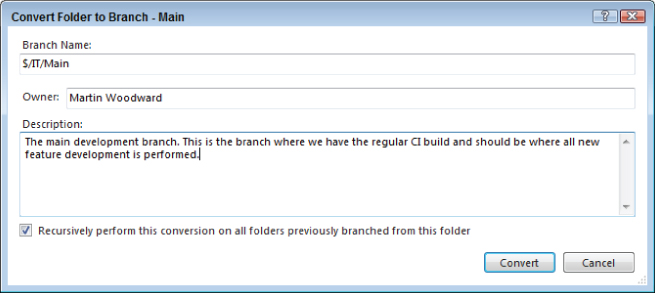
Now, as an aside, note that the source is in the correct path, but the Main folder is not yet a branch. In Team Foundation Server, branches are a first-class entity in version control. They are represented by a different icon than a folder, and have additional metadata such as Owner, Description, and Branch Relationships. To convert a folder to a branch, right-click the folder in Source Control Explorer and select Branching and Merging ⇒ Convert to Branch. This displays the Convert Folder to Branch dialog shown in Figure 4.14.
Note that to convert a folder to a branch, you must have the Manage Branch permission in Team Foundation Server. Also, after you have converted a folder to a branch, no folders above or below it may be a branch.
In the future if you need to convert a branch back to a regular folder, go to Visual Studio and select File ⇒ Source Control ⇒ Branching and Merging ⇒ Convert to Folder.
Now, let's get back to the example implementation. You come in the next morning and start to get the branches set up. You perform the Convert to Branch operation on Main as described previously, and the source tree is now as shown in Figure 4.15.
When the build is ready to be released to the QA team, instead of invoking the code freeze period that used to be enforced, you take the latest version of code and branch it to create the QA branch. You do this by right-clicking the Main branch and selecting Branching and Merging ⇒ Branch, which displays the Branch dialog for a branch (Figure 4.16).
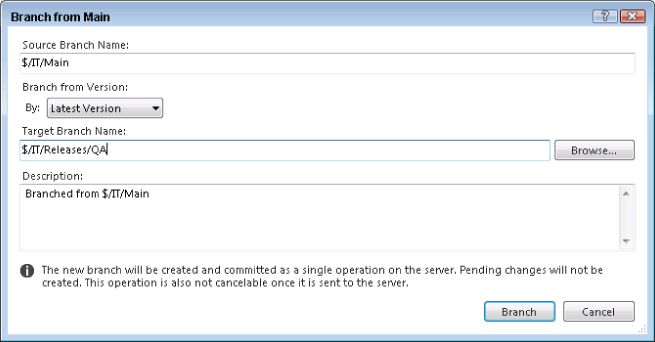
In this dialog, you enter the full path that you would like to create, which, in this example scenario, is $/IT/Releases/QA. If the Releases folder does not already exist, it is created automatically as part of this operation. When you press the Branch button there is a warning that the change will be committed to the repository as part of a single transaction; click Yes to continue.
This behavior is slightly different from that experienced when branching a folder or file. When you branch a folder or file in the Visual Studio or Eclipse clients, it is assumed that you are making a copy of the file in your local workspace as well. Figure 4.17 shows an example of the branch dialog when a folder is selected.
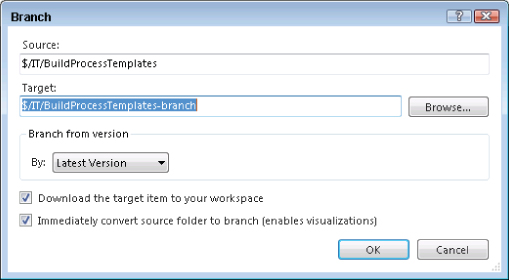
You also get the option to convert the folders to a full branch in Team Foundation Server—but you do not have to. This is a subtle point. Although branches are first-class objects in Team Foundation Server, you can branch any folder or file to another place in the repository. This is a great way to copy areas of the repository to a different part of the repository, but make the history of changes that occurred in the old location easily accessible in the new one. In Team Foundation Server, a rename is actually implemented under the covers as a simultaneous branch, and a delete of the source location.
In the instance of branching a file or folder, this is done as a two-phase operation. The branch changes are made in your workspace, and then you check these in.
However, in the vast majority of instances, you want to branch an entire branch in version control. Usually, you will not be making changes to the files or performing validation before check-in.
Performing these in a single atomic transaction is a much more efficient use of server resources. (This is functionally equivalent to the tf branch command line with the /checkin option supplied.) So, you have performed the branch as indicated in Figure 4.16 and the source tree is now as shown in Figure 4.18.
A new build definition (called Orders QA) is created for the QA branch, with a scheduled trigger of 6 a.m. Monday to Friday. That way, a fresh build is ready and waiting for the test team each morning if changes have been made to the QA branch during the day. The drop folder is set to be $/Drops/QA. A new QA build is triggered to make sure you have set everything up correctly.
Dealing with Changesets
During initial testing, someone notices that there is a small bug with the stylesheet on Internet Explorer 6 on Windows XP. None of the development team is running this configuration, but it is still used inside the company's network, so the team decides to create a fix for it.
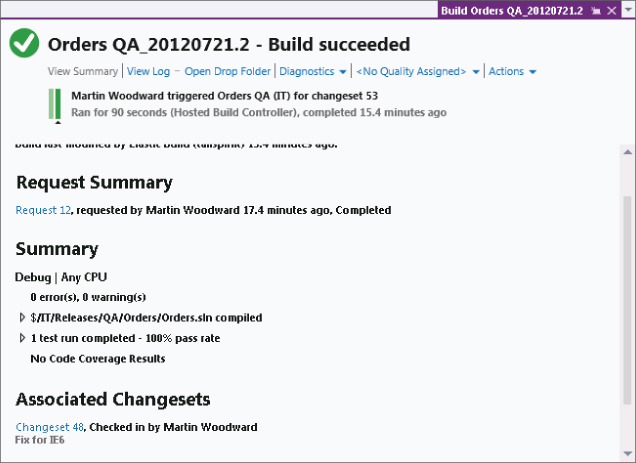
The modification is made to the Site.css file in the QA branch and checked in as changeset 48. The next scheduled build (Orders QA_20120721.2) picks up this change and adds it to the code running in the test environment. When the fix has been verified, the fix must be merged into the Main branch.
For merges like this, it is best if the merge is performed as soon as possible by the developer that made the change. That way, it is fresh in his or her mind, so the fix isn't misunderstood or forgotten about. The testing team has set a policy that the related bug cannot move to the Closed state until an urgent fix has been merged into the Main branch—which is a sensible policy.
To merge that code, the developer right-clicks the source branch in Source Control Explorer (in this case, the QA branch) and selects Branching and Merging ⇒ Merge. The Merge Wizard dialog displays, as shown in Figure 4.19.

The developer opts to merge selected changesets to ensure that only the change the developer is aware of is picked up. The developer checks that the target branch has been identified as Main and then clicks Next. This displays the changesets selection page.
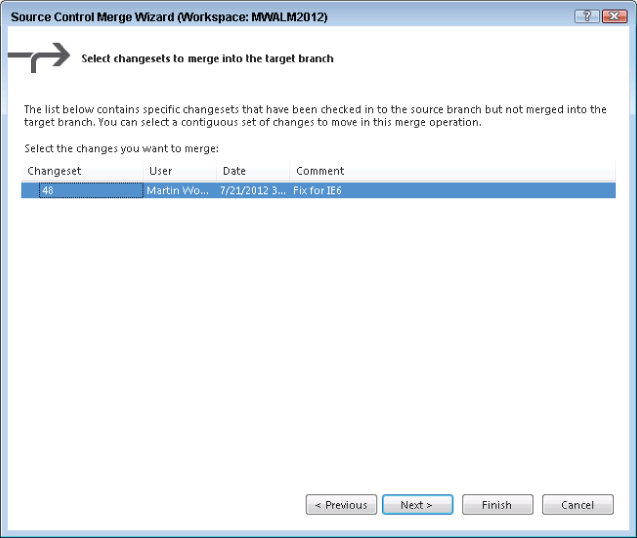
On this page, the developer can select a single changeset or a continuous range of changesets that need to be merged. In the case of the example testing team, they just have the one changeset that they are interested in (79), as shown in Figure 4.20, so the developer selects that and clicks Next. This provides a final confirmation page and, when the developer clicks Finish, the merge is performed in the user's workspace.
Note that the stylesheet file in the Main branch currently has a pending merge on it. At this point, it is good practice to compare the current version of the file with the latest version to ensure that the change you are making is still the correct one. In this case, it is, so the developer compiles and tests to make sure everything is good and then associates the changeset with the original bug, checks in the merge, and then marks the bug as Closed.
At this point, if you right-click the file in Source Control Explorer and select View History, you see the History for the file, as shown in Figure 4.21 (after the tree nodes have been expanded).

In Figure 4.21, you can see the merge of the changes back into Main at changeset 84. By expanding the node, you can see the changes made to that file in the source branch (in this case, the edit of the file in the QA branch in changeset 79). Then, further back in history, you can see the rename (move) of the file when the code was moved under the Main folder. Finally, if you expand that rename node, you can see all the history of the file before it was renamed in the current branch structure.
Another way to visualize this change and see that it made it into the correct branches is to right-click changeset 48 in the History view and select Tracking Changeset. This displays the Select Branches dialog inside the Tracking Changeset editor tab (Figure 4.22) that allows you to select which branches you would like to view.
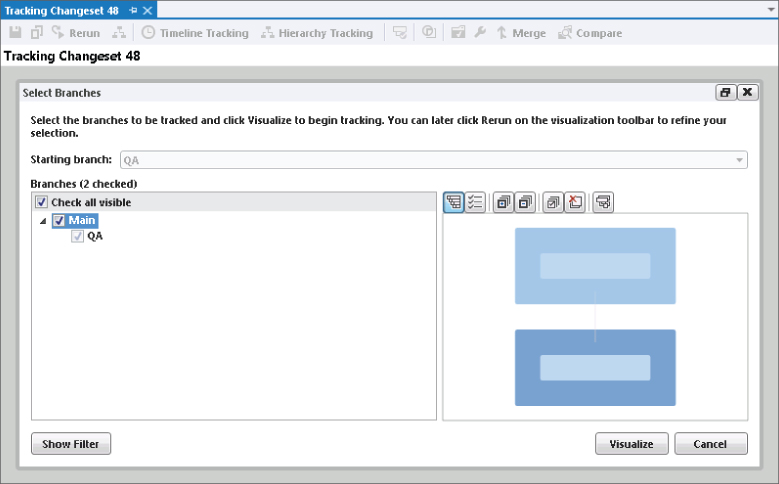
For this example scenario, the developer selects the Check All Visible check box and clicks the Visualize button. Initially, this sequence shows a hierarchical view of branches, which are colored according to which branches the changes in changeset 48 made it into. If you were to look at Figure 4.23 in color, you would see the result for this scenario was that everything showed up colored green to indicate that everything was good.
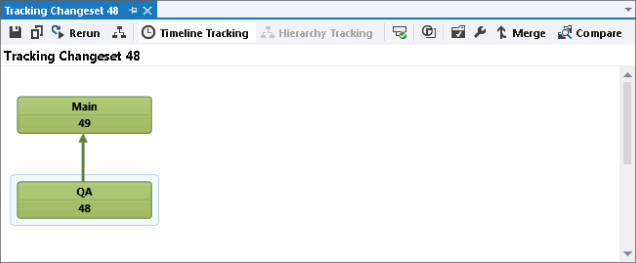
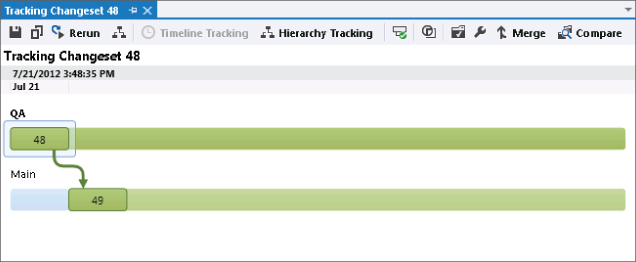
An alternative visualization is available by clicking the Timeline Tracking button, as shown in Figure 4.23. This displays the changes in a familiar timeline style view, as shown in Figure 4.24. Again, if this were in color, you would see that all the branches are green, which means that the code made it to all branches.
Back at Tailspin Toys, the IT product has undergone a bunch more testing on the QA branch, and development continues in the Main branch. At the end of the testing period, it is decided that the application is good, and so the build that was created with the stylesheet fix in changeset 48 (build Orders QA_20120721.2) is deployed to production.
However, all is not well. Once deployment to production, the Chief Information Officer (CIO) of the company notices an incorrect footer file at the bottom of the main page. The page footer still contains text from the initial template that reads, My ASP.NET MVC Application. Although this doesn't affect functionality in anyway, the CIO would like the issue fixed ASAP because she is about to demo the application to the board of directors.
It's a small, low-risk fix. In days gone by, this would be exactly the sort of thing for which one of the IT team would jump into the production environment and just fix it. However, it's exactly the sort of change that can be forgotten about in the development branch. So, to ensure that the change is not overlooked, the team decides to do it in version control using the new branch plan.
First, they must create the Prod branch. There are two ways to do this. One is to create the branch from the label that was applied as part of the build process. Another is to branch by the changeset that included the required fix. Let's take a brief look at both methods and see which is more appropriate for this example scenario.
Branch from Label
As previously discussed, it is possible to create branches after the fact by right-clicking the QA branch in Source Control Explorer and selecting Branching and Merging ⇒ Branch as well as from the tf branch command line. From the Branch from QA dialog, select Label from the Branch from Version dropdown as shown in Figure 4.25 and then click the ellipsis (…) button to find the label created by the build process (each build by default labels the files included in that build with the build number). Enter the target branch name of $/IT/Releases/Prod and click Branch.
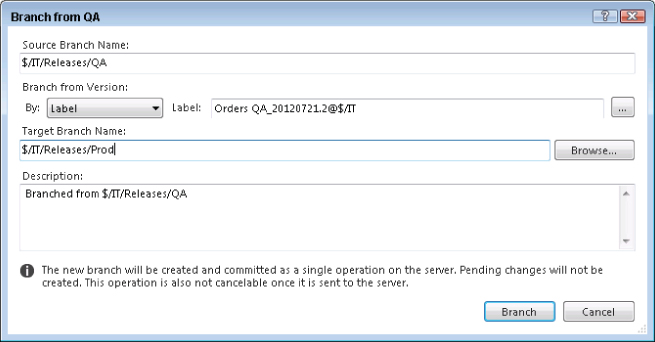
The advantage of branching by label is that it branches only the files that were included in the specified label, and that label was created automatically by the build process to only include the files that were in the workspace definition of the build at the time the build was performed.
The major downside is that, as stated in Chapter 3, labels in Team Foundation Server are editable. Someone with appropriate permissions could have edited the label, and removed or included certain key files after the label was created by the build process. This is unlikely in the example Tailspin Toys environment, but it is possible.
Branch from Changeset
From the build report shown in Figure 4.26, you can see the build associated with changeset 48 was successful. As discussed in Chapter 3, the changeset represents a unique (immutable) point in time in the version control repository. Therefore, if you were to branch from changeset 48, this would include the files at the exact state that they were in when the build was performed.
The team decides to branch by changeset 48 so as to include all changes up until changeset 48 in the QA branch when creating the Prod branch. To do this, the developer right-clicks on the QA branch in Source Control Explorer, and selects Branching and Merging ⇒ Branch. The developer then changes the Branch from Version to changeset 48, and sets the Target Branch Name to be $/IT/Releases/Prod.
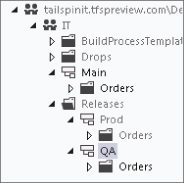
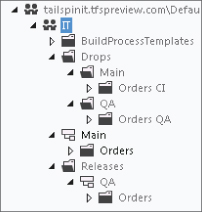
After the branch is created, the version control repository looks like Figure 4.27.
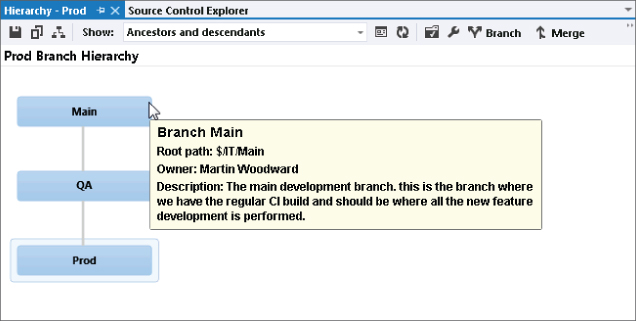
If you were to right-click the Main branch and select Branching and Merging ⇒ View Hierarchy, you could see a visualization of the current branch structure, as shown in Figure 4.28. If you hover over each branch with the mouse, you see a tooltip with the additional metadata about that branch, including any description that you have entered.
At this point, the developer can now create a fix in the Prod branch. The developer simply edits the offending cshtml file and checks it in as changeset 59. The developer then creates a build and deploys this to production. Now you must ensure that the fix is in the appropriate branches so that it also gets included in the future releases.
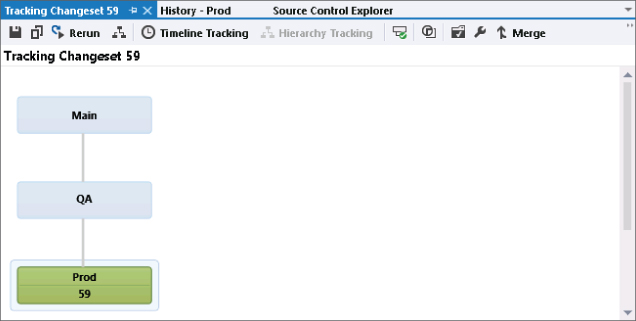
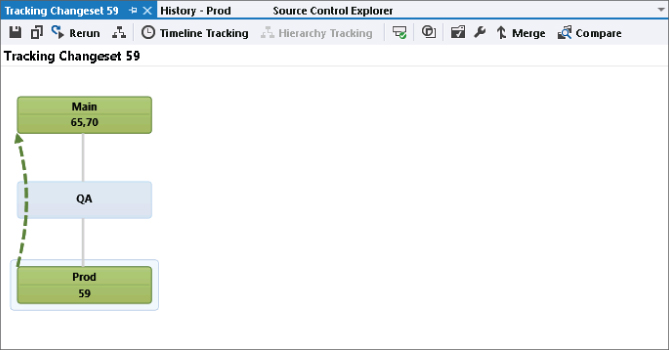
To do this you right-click on the Prod branch and select View History. Then you right-click on the changeset just created (59) and select Track Changeset. As before, you select the Check All Visible check box and click Visualize. The change shows in green in the Prod branch only, as represented by the bottom box in Figure 4.29.
To merge this change into Main, the developer now has two choices: a ladder merge or a baseless merge. If you find that during your branch process you frequently must perform baseless merges or merges through other branches (that is, ladder merges), this is a good indication that the model is no longer optimized for the typical circumstances encountered in your environment, and you may want to revise it.
However, in the Tailspin Toys scenario, making ad hoc changes to production is very much an exception case, so the IT team wants to optimize the branch plan for the usual case of a change starting in Main, getting promoted on to QA, and then to Prod. So, the developer must use a ladder merge or a baseless merge to go from Prod to Main.
Ladder Merge
As shown in Figure 4.29, the team has a change in Prod. To get that fix into Main using standard merges, the developer must first merge it into the QA branch, and then, from there, into Main. This is because in Team Foundation Server, a standard merge can flow from parent to child, or vice versa.
To merge the changes, from the Tracking Changeset view shown in 4-29, the developer simply drags and drops the Prod branch up to the QA branch using the mouse. The standard Source Control Merge Wizard (shown earlier in Figure 4.19) displays. The developer clicks the Selected Changesets radio button and clicks Next to display the changeset selection page.
On this page, the developer selects the desired changeset (59) and clicks Finish. The developer then checks in the merged file and clicks the Rerun button in the Tracking Changeset view to show the change in the QA branch. Finally, the developer drags and drops the QA branch to the Main branch, and repeats the process through the Merge Wizard.
In this particular example, because of when the change occurred in production, it actually would have been possible to get the change into Main in this way. However, if the change had been required when there was a different (newer) version of the software in the QA branch, you may have not wanted to merge the changes in this way. Instead, you could have opted to do a baseless merge directly into Main, and then the change would make it back up to the QA branch with the next release to the test team.
Let's take a look at how to use that option for the Tailspin Toys example scenario.
Baseless Merge
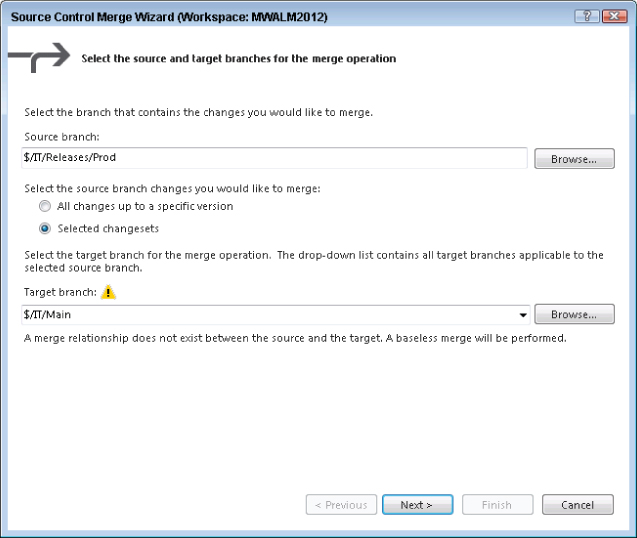
A simple drag-and-drop operation is not supported for a baseless merge. The use of baseless merges are discouraged due to the increased likelihood of hard-to-resolve conflicts. Instead, the Tailspin Toys IT developer must right-click the Prod branch and select Merge. The Source Control Merge Wizard (refer to Figure 4.19) displays with the available target paths shown in the dropdown. Only paths that the source branch has a direct branch relationship with are displayed in the dropdown (in the example $/IT/Releases/QA is the only option). To perform a baseless merge, press the Browse button and then select the Main branch. The merge dialog then shows a warning (see Figure 4.30) that a baseless merge is going to be performed.
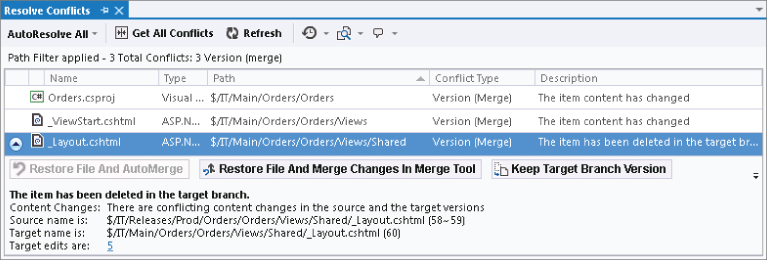
In this example scenario, because development has been ongoing by the rest of the team in the Main branch, it is highly likely that a conflict will occur during the baseless merge. In Team Foundation Server 2012 there have been a lot of improvements to the automerge logic. For example, if a file was edited by one developer and checked in, and in the meantime another developer was editing a different part of that same file, then when the second developer goes to check in those changes are merged automatically. The same is true in edits that have occurred in different places in the same file across branches which then have a baseless merge. However, in the example scenario someone has renamed the _Layout.cshtml file in the Main branch to _MainLayout.cshtml. If you had done a ladder merge, Team Foundation Server would have been able to use the common base version to be able to detect the rename operation and so merge the changes into the file with the new filename (_MainLayout.cshtml). However, with a baseless merge, there is no common base version, and Team Foundation Server can only use the current state of the two branches when working out the automatic merges. It is impossible for Team Foundation Server to detect that the rename that occurred on _Layout.cshtml in Main was after the branch to Prod was taken, and so Team Foundation server can't suggest that you want to merge changes into the _MainLayout.cshtml file. Instead, it thinks that you want to add _Layout.cshtml back into Main, but as it knows that a file used to exist by that name it is not sure that this is what you want to do. The user receives notification of a conflict as shown in Figure 4.31.
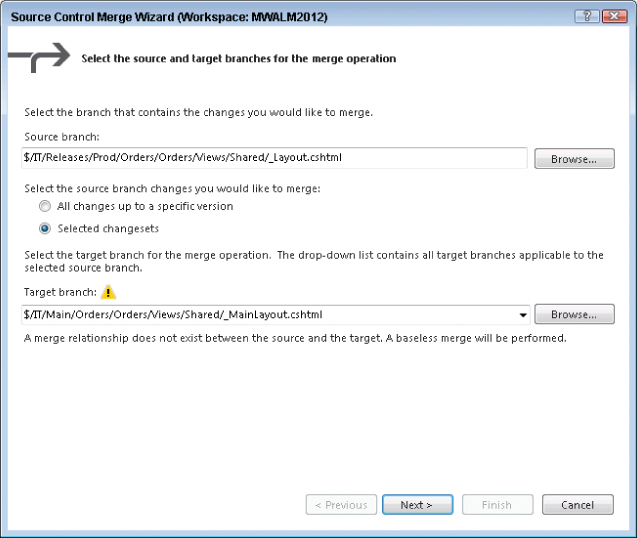
In this particular instance, you can see that something is wrong. If you look at the history of _Layout.cshtml in Main you see it was renamed to _MainLayout.cshtml after the branch was taken. None of the options Team Foundation Server presented to resolve the conflict are what you want as they all involve either getting rid of the changes to _Layout.cshtml from Prod or adding the _Layout.cshtml file back into Main. Therefore you should choose Take Source Branch Version to keep the _MainLayout.cshtml file unchanged. However, by doing this you haven't pushed up the changes from _Layout.cshtml in Prod. To do that, what you want to do is merge the changes from _Layout.cshtml in Prod into _MainLayout.cshtml in Main by first undoing the pending merge change on _Layout.cshtml in Main. Then from Source Control Explorer you right-click the _Layout.cshtml file in Prod, select Branching and Merging ⇒ Merge and then perform a baseless merge of that single file with _MainLayout.cshtml in Main as shown in Figure 4.32.
Validate that the file has all the correct changes that you want and check it in.
Although in day-to-day development these types of complex merge operations are less common with the latest Team Foundation Server 2012 release, they are always a lot harder to resolve when doing a baseless merge. That's the reason why you should avoid baseless merges in your normal operating procedure.
Now, when the developer clicks the Rerun button for tracking changeset 59, the visualization shows a dotted line between Prod and Main as shown in Figure 4.33, indicating a baseless merge.
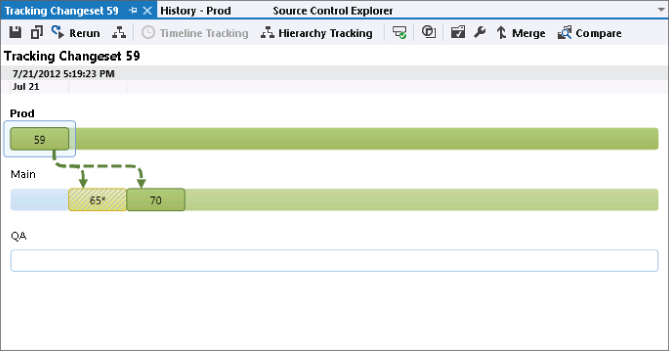
You can also switch to the Timeline tracking view. In the example shown in Figure 4.34, the baseless merge was actually done by two different developers who were responsible for different areas of the codebase. As you can see, the first merge is highlighted in a different color with cross-hatching (yellow, when viewing the actual screen), and the changeset number has an asterisk after it (65*). This is because only some of the changes have been merged into the branch in the initial baseless merge. After the second developer completes the merge in the second changeset (70), the branch goes to a solid color (green when viewing the actual screen), indicating that all the changes in changeset 59 have now been merged.
Tracking Change through Branches
As you have seen thus far, the branch visualization tooling in Visual Studio 2012 provides some powerful capabilities for viewing your branch hierarchy and tracking the progress of changes through it. Using the View Hierarchy functionality, you can immediately see the relationships of the branches in your source tree and navigate to their locations in the repository. By selecting Track Changeset for a changeset in the History view, you see into which branches that change has been made, and even merge the change into other branches by dragging and dropping between branches.
The Tracking Changeset visualization has some additional features that are not always displayed in simple examples such as the ones presented so far. Figure 4.35 shows an example from a more complex branch hierarchy.
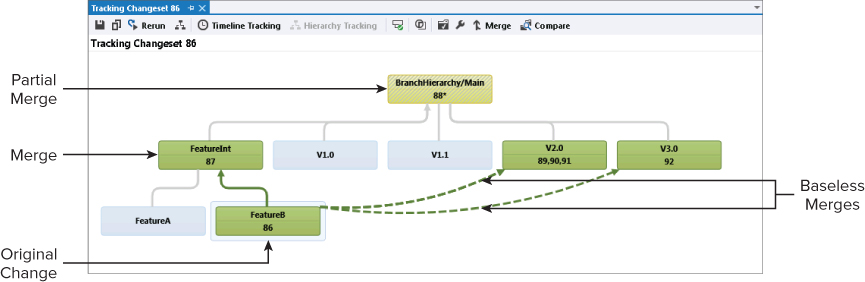
In the example shown in Figure 4.35, the original change occurred in the FeatureB branch as changeset 86. This was reverse-integrated into the FeatureInt branch as a standard merge in changeset 87. That change was then merged into Main. But not all files were copied over as part of the merge as the cross-hatching and the asterisk next to changeset 88 indicate. This should instantly be an area to query to investigate which files were checked in and why this was a partial merge. Double-clicking on the branch shows the changeset details to begin the investigation.
Then, rather than a standard merge back down from Main into the V2.0 branch, you can see that three baseless merges have occurred to get all the changes into that branch (changesets 89, 90 and 91). Finally, a single baseless merge took the code into V3.0. Figure 4.35 shows that the changes have yet to make it into the FeatureA branch or into the V1.0 and V1.1 branches. Clicking the Timeline Tracking button displays the timeline view for changeset 86, as shown Figure 4.36.
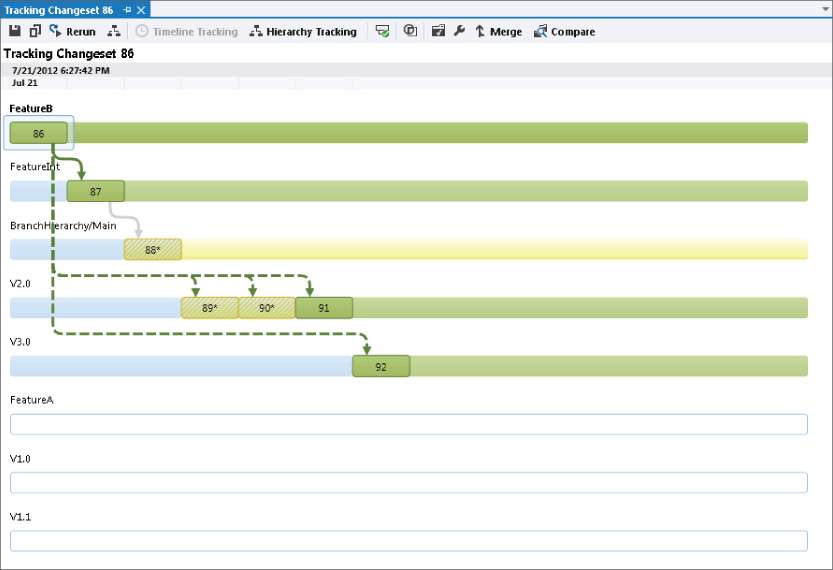
The timeline tracking view does not show the relationships between branches (that is, the hierarchy) but instead shows the merges as they happened. The sequence of events around the partial merges into Main and V2.0, and the subsequent full merge into V2.0 are therefore much more clearly represented. Hovering over each branch provides additional metadata, including its owner and description.
Summary
As you can tell from this chapter, the branch and merge capabilities of Team Foundation Server not only allow for some complex software configuration management scenarios, but they also provide the tooling to help understand what is happening with changes in your version control repository. There have also been significant improvements in Team Foundation Server 2012 by supporting baseless merging from Visual Studio as well as improved auto-merge functionality, which reduces, but cannot completely eliminate, merge conflicts.
The chapter began by looking at the terminology used in branching, discussed some common branching techniques, and then provided a detailed walkthrough of implementing a basic branching strategy in an organization using the tools provided in Visual Studio 2012. Finally, this chapter looked at the changeset tracking functionality available to determine to which branches a particular change has propagated.
This chapter briefly mentioned Build Definitions and how to change their properties when setting up a branching strategy. Chapter 5 covers using the build automation capabilities in Team Foundation Server, why build automation is a very important method to improve software quality, how to create a build definition in Team Foundation Server, and where you should start when customizing the build process.