
4
Exploring Live View Shooting and Movie Making
In This Chapter
![]() Getting acquainted with Live View and Movie modes
Getting acquainted with Live View and Movie modes
![]() Customizing the monitor display
Customizing the monitor display
![]() Exploring autofocusing options
Exploring autofocusing options
![]() Selecting camera settings and taking pictures in Live View mode
Selecting camera settings and taking pictures in Live View mode
![]() Recording and playing movies
Recording and playing movies
Like many dSLR cameras, the 70D offers Live View, a feature that enables you to use the monitor instead of the viewfinder to compose photos. You must rely on the monitor to compose shots during movie recording; using the viewfinder isn’t possible.
In many respects, shooting in Live View mode is no different from using the viewfinder. But a few aspects, such as autofocusing, are quite different. So the first part of this chapter provides an overview of the Live View and Movie mode features and discusses precautions to take to avoid damaging the camera when using either feature. Following that, you can find details on taking still photos in Live View mode and shooting and viewing movies.
 Note: In figures in this chapter, data at the bottom of the screen appears differently than it does on your monitor. In the figures, data displays against a plain black bar, but on your screen, it’s superimposed over the image. In some cases, this also applies to data at the top of the screen. The difference is due to the technology I use to capture the image that the monitor displays; for reasons that I won’t bore you with, it’s not possible to capture the superimposed data properly. I trust the discrepancy won’t throw you off too much.
Getting Started
The basics of using Live View and Movie modes are pretty simple:
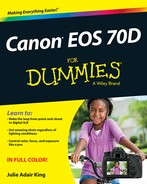
![]() Switching from viewfinder photography to Live View mode: Set the Live View switch to the still camera icon, as shown in Figure 4-1, and then press the Start/Stop button. You hear a clicking sound as the internal mirror that normally sends the image from the lens to the viewfinder flips up. Then your subject appears on the monitor, and you can no longer see anything in the viewfinder. Instead of the normal Shooting Settings screen, you see symbols representing certain camera settings displayed over the live image, as shown in Figure 4-2. (If you see different symbols, don’t panic; what’s displayed depends on your camera settings and the Live View display options, which I cover later in the chapter.)
Switching from viewfinder photography to Live View mode: Set the Live View switch to the still camera icon, as shown in Figure 4-1, and then press the Start/Stop button. You hear a clicking sound as the internal mirror that normally sends the image from the lens to the viewfinder flips up. Then your subject appears on the monitor, and you can no longer see anything in the viewfinder. Instead of the normal Shooting Settings screen, you see symbols representing certain camera settings displayed over the live image, as shown in Figure 4-2. (If you see different symbols, don’t panic; what’s displayed depends on your camera settings and the Live View display options, which I cover later in the chapter.)
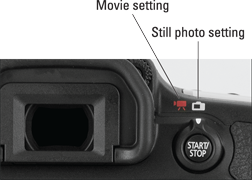
Figure 4-1: Set the switch to the camera icon for still photography and to the movie camera icon to record movies.
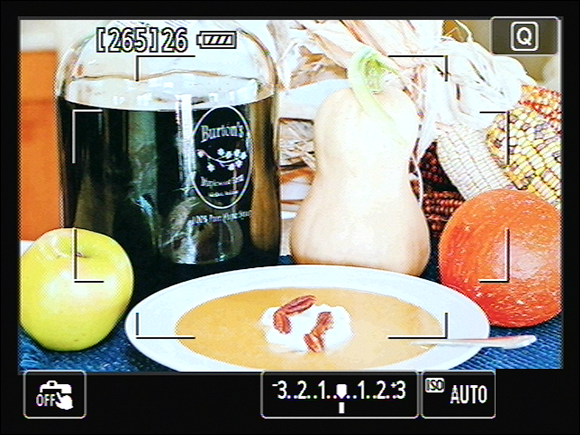
Figure 4-2: Picture data is superimposed over the live preview.
If nothing happens when you press the Start/Stop button, one of these two issues is the likely culprit:
• The camera is asleep. By default, the camera powers down after one minute of inactivity. Wake it up by pressing the Start/Stop button and then press again.
• Live View shooting is disabled. To turn it on, visit Live View Menu 1 and set the Live View Shoot option to Enable, as shown in Figure 4-3.
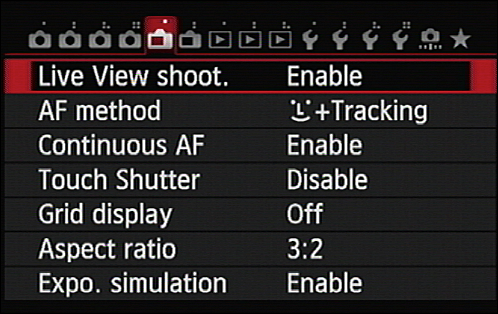
Figure 4-3: The Live View Shoot option determines whether Live View photography is possible.
As with certain other menus, the options on the Live View menus vary depending on your exposure mode. The menu in Figure 4-3 reveals options available when you shoot in the advanced exposure modes; in the fully automatic modes, you lose access to the last two options on the menu. You also can’t access an entire second Live View menu when you shoot in the fully auto modes.
![]() Shooting photos in Live View mode: Most steps are the same as for viewfinder photography. Autofocusing methods, however, are quite different, as I explain in the upcoming section, Focusing in Live View and Movie Modes.
Shooting photos in Live View mode: Most steps are the same as for viewfinder photography. Autofocusing methods, however, are quite different, as I explain in the upcoming section, Focusing in Live View and Movie Modes.
If you don’t care to explore those details now, just frame your subject so that it’s within the area indicated by the rectangular brackets in the frame (refer to Figure 4-2). By default, the camera uses an autofocusing method called Face+Tracking, which means that if it finds faces in the scene, it will lock focus onto one of those faces; if not, it will focus on the nearest object. Press the shutter button halfway to set focus, and then press the rest of the way to take the picture.
![]() Recording movies: The first step is to turn off the camera’s Wi-Fi function, which you accomplish via Setup Menu 3. You can’t record movies while the Wi-Fi system is active.
Recording movies: The first step is to turn off the camera’s Wi-Fi function, which you accomplish via Setup Menu 3. You can’t record movies while the Wi-Fi system is active.
Next, move the Live View switch to the movie camera icon, labeled in Figure 4-1. Again, the monitor displays the live scene along with some shooting data. To start and stop recording, press the Start/Stop button.
![]() Adjusting camera settings: For the most part, you use the same techniques as for viewfinder photography, selecting options on the menus, using the Quick Control screen, and so on. I provide details throughout the chapter. But note these critical differences up front:
Adjusting camera settings: For the most part, you use the same techniques as for viewfinder photography, selecting options on the menus, using the Quick Control screen, and so on. I provide details throughout the chapter. But note these critical differences up front:
• The touchscreen Quick Control icon (Q) resides in the upper-right corner of the screen. (Refer to Figure 4-2.) During viewfinder shooting, it’s in the lower-left corner.
• Certain buttons don’t perform the same functions as during viewfinder photography. For example, the AF Point Selection button plays a different role in focusing than it does during viewfinder photography.
• Exposure modes work differently in Movie mode. The camera operates as it does in Scene Intelligent Auto mode for all Mode dial settings except the advanced exposure modes. Furthermore, you can control aperture and shutter speed only in M (manual exposure) mode. In P, Tv, and Av modes, the camera controls exposure, although you gain control over other settings, such as White Balance, that you don’t have in the fully automatic modes.

![]() Viewing photos and movies: Press the Playback button to look at your images and movies. To switch back to shooting, give the Playback button another press or give the shutter button a half-press and then release it. Check out the end of this chapter to discover some special options available for movie playback; see Chapter 5 for details on playback features available for still photos and a couple that work for both photos and movies as well as for video snapshots, a specialty movie function that I cover in Chapter 10.
Viewing photos and movies: Press the Playback button to look at your images and movies. To switch back to shooting, give the Playback button another press or give the shutter button a half-press and then release it. Check out the end of this chapter to discover some special options available for movie playback; see Chapter 5 for details on playback features available for still photos and a couple that work for both photos and movies as well as for video snapshots, a specialty movie function that I cover in Chapter 10.
![]() Returning to viewfinder photography: To exit Live View mode, press the Start/Stop button. To exit Movie mode, rotate the Live View switch to the still-photography icon and then press the Start/Stop button.
Returning to viewfinder photography: To exit Live View mode, press the Start/Stop button. To exit Movie mode, rotate the Live View switch to the still-photography icon and then press the Start/Stop button.
As you may have guessed from the fact that I devote a whole chapter to Live View photography and movie recording, these points are just the start of the story, however. The rest of the chapter goes into detail about all your photographic and movie-recording options. First, though, the next section provides some safety tips to keep in mind when you use either feature.
Reviewing Live View and Movie mode cautions
 Be aware of the following safety rules when you use Live View and Movie modes:
![]() Cover the viewfinder to prevent light from seeping into the camera and affecting exposure. The camera ships with a cover designed just for this purpose. In fact, it’s conveniently attached to the camera strap. To install it, first remove the rubber eyecup that surrounds the viewfinder by sliding it up and out of the groove that holds it in place. Then slide the cover into the groove and over the viewfinder (Orient the cover so that the Canon label faces the viewfinder.)
Cover the viewfinder to prevent light from seeping into the camera and affecting exposure. The camera ships with a cover designed just for this purpose. In fact, it’s conveniently attached to the camera strap. To install it, first remove the rubber eyecup that surrounds the viewfinder by sliding it up and out of the groove that holds it in place. Then slide the cover into the groove and over the viewfinder (Orient the cover so that the Canon label faces the viewfinder.)
![]() Using Live View or Movie mode for an extended period can harm your pictures and the camera. This damage can occur because using the monitor full-time causes the camera’s innards to heat up more than usual, and that extra heat can create the right electronic conditions for noise, a defect that looks like speckles of sand.
Using Live View or Movie mode for an extended period can harm your pictures and the camera. This damage can occur because using the monitor full-time causes the camera’s innards to heat up more than usual, and that extra heat can create the right electronic conditions for noise, a defect that looks like speckles of sand.
 More critically, the increased temperatures can damage the camera. The symbol shown in the margin appears on the monitor when the camera is getting too hot. Initially, the symbol is white. If you continue shooting and the temperature continues to increase, the symbol turns red and blinks, alerting you that the camera soon will shut off automatically.
![]() Aiming the lens at the sun or other bright lights also can damage the camera. Of course, you can cause problems doing this even during normal shooting, but the possibilities increase when you use Live View and Movie mode.
Aiming the lens at the sun or other bright lights also can damage the camera. Of course, you can cause problems doing this even during normal shooting, but the possibilities increase when you use Live View and Movie mode.
![]() Live View and Movie modes put additional strain on the camera battery. The extra juice is needed to power the monitor. If you do a lot of Live View or movie shooting, you may want to invest in a second battery so that you can have a spare on hand when the first one runs out of gas.
Live View and Movie modes put additional strain on the camera battery. The extra juice is needed to power the monitor. If you do a lot of Live View or movie shooting, you may want to invest in a second battery so that you can have a spare on hand when the first one runs out of gas.
![]() The risk of camera shake during handheld shots is increased. When you use the viewfinder, you can help steady the camera by bracing it against your face. But when you compose shots using the monitor, you have to hold the camera away from your body to view the screen, making it harder to keep the camera still. Any camera movement during the exposure can blur the shot, so I recommend using a tripod for still photography. The same is true for movie recording — unless you like that “jiggling frame” effect that’s all the rage with some Hollywood directors.
The risk of camera shake during handheld shots is increased. When you use the viewfinder, you can help steady the camera by bracing it against your face. But when you compose shots using the monitor, you have to hold the camera away from your body to view the screen, making it harder to keep the camera still. Any camera movement during the exposure can blur the shot, so I recommend using a tripod for still photography. The same is true for movie recording — unless you like that “jiggling frame” effect that’s all the rage with some Hollywood directors.
If you do handhold the camera, enabling Image Stabilization can compensate for a bit of camera shake. On either kit lens, just set the Stabilizer switch to On.
Customizing the display
You can choose from a few display options, each of which adds different types of information to the screen. Here’s a look at your decorating possibilities:
![]() Press Info to change the amount and type of data displayed, as illustrated in Figure 4-4. Data varies according to your exposure mode, focusing mode, and other settings. In Movie mode, some data changes to show movie-recording options instead of still-photography settings. Later sections decode all the symbols for you.
Press Info to change the amount and type of data displayed, as illustrated in Figure 4-4. Data varies according to your exposure mode, focusing mode, and other settings. In Movie mode, some data changes to show movie-recording options instead of still-photography settings. Later sections decode all the symbols for you.
 The chart in the upper-right corner of that lower-left screen is a Brightness histogram, which is a tool you can use to gauge whether your current settings will produce a good exposure. See the discussion on interpreting a Brightness histogram in Chapter 5 to find out how to make sense of what you see. A few Live View histogram details:
• The histogram doesn’t appear in Movie mode.
• For Live View mode in the advanced exposure modes, you must set the Exposure Simulation option on Live View Menu 1 to Enable for the histogram to appear. This is the default setting, and the one that’s always used in the fully automatic settings.
• When you use flash, the histogram is dimmed; the histogram can’t display accurate information because the final exposure will include light from the flash and not just the ambient lighting.
• The histogram also is dimmed if you use the Handheld Night Scene, HDR Backlight Control, or B (Bulb) exposure modes.
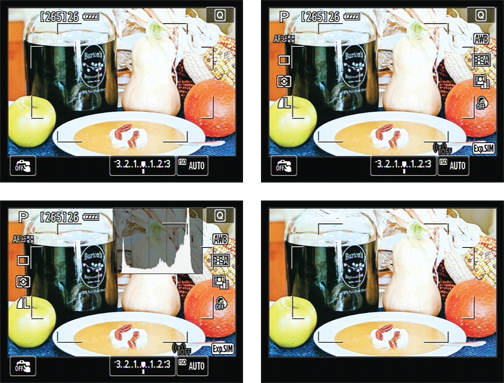
Figure 4-4: Press the Info button to cycle through information display styles.
![]() Display an electronic level. In addition to the four displays shown in the figure, you can add an electronic level to the mix; just press the Info button to cycle through the display styles until the level appears. A green line through the center of the level indicates that the camera is level.
Display an electronic level. In addition to the four displays shown in the figure, you can add an electronic level to the mix; just press the Info button to cycle through the display styles until the level appears. A green line through the center of the level indicates that the camera is level.
There’s a gotcha with respect to this feature, though: The level doesn’t appear when the AF (autofocus) method is set to Face+Tracking, which is the default setting. You can change the AF Method setting via the Quick Control screen, Live View Menu 1, or Movie Menu 1. Also make sure that the Info button is set to display the level; make that happen via the Info Button Display Options setting on Setup Menu 3.
![]() Display a grid. To assist you with composition, the camera can display one of three alignment grids on the monitor. In Live View mode, enable the grid via Live View Menu 1; in Movie mode, set the option on Movie Menu 2.
Display a grid. To assist you with composition, the camera can display one of three alignment grids on the monitor. In Live View mode, enable the grid via Live View Menu 1; in Movie mode, set the option on Movie Menu 2.
![]() Adjust the shutdown of the exposure-information display. By default, exposure information such as f-stop and shutter speed disappears from the display after 16 seconds if you don’t press any camera buttons. If you want the exposure data to remain visible for a longer period, you can adjust the shutdown time, but only if the Mode dial is set to an advanced exposure mode. Look for the Metering Timer option on Live View Menu 2 in still-photography mode and on Movie Menu 1 in Movie mode. The metering mechanism uses battery power, so the shorter the cutoff time, the better.
Adjust the shutdown of the exposure-information display. By default, exposure information such as f-stop and shutter speed disappears from the display after 16 seconds if you don’t press any camera buttons. If you want the exposure data to remain visible for a longer period, you can adjust the shutdown time, but only if the Mode dial is set to an advanced exposure mode. Look for the Metering Timer option on Live View Menu 2 in still-photography mode and on Movie Menu 1 in Movie mode. The metering mechanism uses battery power, so the shorter the cutoff time, the better.
![]() Control exposure simulation. For still-photo shooting in the advanced exposure modes, you can specify how you want the camera to simulate exposure. Make the call via Live View Menu 1, shown in Figure 4-5. You have three options:
Control exposure simulation. For still-photo shooting in the advanced exposure modes, you can specify how you want the camera to simulate exposure. Make the call via Live View Menu 1, shown in Figure 4-5. You have three options:
• Enable: The brightness of the scene on the monitor is as close as possible to the actual exposure. This setting is the default and the one used when you shoot in the fully automatic exposure modes.
• During Preview: The second option — the one that’s labeled with the little aperture symbol — displays the scene at the standard monitor brightness, with the goal of making the image easy to see. To display the scene at the actual exposure brightness, press and hold the Depth-of-field preview button (front right side of the camera, just beneath the lens).
Pressing the button with either this option or Enable selected also gives you a preview of how the selected f-stop will affect depth of field (how much of the scene appears in sharp focus). Chapter 7 explains f-stops.
• Disable: Use this option if you want the monitor to display the scene at standard brightness no matter what the actual image exposure will be.

Figure 4-5: Choose Enable if you want the monitor brightness to reflect the actual exposure of the picture.
![]()
 View the display on a TV. You can send the monitor signal to a television via a standard A/V cable or an HDMI cable (both must be purchased separately) for shooting as well as for playback. Chapter 5 provides help with connecting the camera to a TV. Keep in mind, though, that you lose all touchscreen operations when the camera is tethered to a TV or monitor: You must use camera buttons to control things.
In addition, you can connect the camera to your computer with the supplied USB cable or via Wi-Fi and then use the Canon EOS Utility software (provided in your camera box) to operate the camera remotely. See the software manual, provided on one of the two CDs in the camera box, for more information. You might want to take advantage of this feature when your presence near the camera might be disruptive, as when shooting wildlife, or dangerous, as when your kid asks you to record a movie of the class science experiment. (Remember that for movies, you need to connect the camera by cable because when Wi-Fi is turned on, movie recording is disabled.) See Chapter 6 for help connecting the camera to your computer.
Focusing in Live View and Movie Modes
Assuming that your lens supports autofocusing, you can choose from auto or manual focusing. Both methods involve different options than viewfinder focusing, though; read the next several sections to get the scoop.
Disabling continuous autofocusing
Your camera is set by default to start autofocusing as soon as you engage Live View or Movie mode. You may be able to see the picture going in and out of focus and hear the autofocus motor as the camera searches for a focusing target. For still photography, the idea is to have the camera find a preliminary focusing target so that when you press the shutter button halfway to set the final focusing distance, the camera can lock focus more quickly. For movies, continuous autofocusing is designed to track your subject as it moves through the frame during the recording.
This feature — called Continuous AF for Live View mode, and Movie Servo AF for Movie mode — presents some downsides:
![]() When recording movies with sound, the internal microphone may pick up the noise of the autofocus motor. The autofocusing system is very quiet, so you may not experience this issue frequently. If you do, use an external microphone and place it far enough from the camera that it doesn’t pick up the focusing sounds. Focusing with some lenses is quieter than with others — for example, STM lenses (which includes both kit lenses) were created especially for smoother, quieter operation.
When recording movies with sound, the internal microphone may pick up the noise of the autofocus motor. The autofocusing system is very quiet, so you may not experience this issue frequently. If you do, use an external microphone and place it far enough from the camera that it doesn’t pick up the focusing sounds. Focusing with some lenses is quieter than with others — for example, STM lenses (which includes both kit lenses) were created especially for smoother, quieter operation.
![]() Continuous autofocusing may falter in some scenarios. The focusing system can have trouble locking on subjects that are moving very quickly toward or away from the lens as well as on subjects that are very close to the lens. In addition, during movie recording, zooming the lens may cause the camera to lose and then reset focus. The same can happen if you pan the camera (move it up, down, right, or left to follow the subject). Use slower camera movements for smoother, less obvious focus transitions.
Continuous autofocusing may falter in some scenarios. The focusing system can have trouble locking on subjects that are moving very quickly toward or away from the lens as well as on subjects that are very close to the lens. In addition, during movie recording, zooming the lens may cause the camera to lose and then reset focus. The same can happen if you pan the camera (move it up, down, right, or left to follow the subject). Use slower camera movements for smoother, less obvious focus transitions.
![]() This feature is a power hog. All that activity by the autofocusing motor is a big drain on the camera battery.
This feature is a power hog. All that activity by the autofocusing motor is a big drain on the camera battery.
![]() For Live View photography, you can’t use Quick mode autofocusing with continuous autofocusing. As its name implies, Quick mode is the fastest Live View autofocusing option. Unfortunately, if you set the AF mode to Quick, the camera disables continuous autofocusing. This issue applies only to still photography; Quick mode AF isn’t available for movie recording.
For Live View photography, you can’t use Quick mode autofocusing with continuous autofocusing. As its name implies, Quick mode is the fastest Live View autofocusing option. Unfortunately, if you set the AF mode to Quick, the camera disables continuous autofocusing. This issue applies only to still photography; Quick mode AF isn’t available for movie recording.
![]() To switch to manual focusing (MF), you must exit Live View or Movie mode if continuous autofocusing is enabled. If you make this change when continuous autofocusing is in progress, you may damage the camera or the lens. So return to viewfinder shooting, move the lens switch to MF, and then shift back to Live View or Movie mode.
To switch to manual focusing (MF), you must exit Live View or Movie mode if continuous autofocusing is enabled. If you make this change when continuous autofocusing is in progress, you may damage the camera or the lens. So return to viewfinder shooting, move the lens switch to MF, and then shift back to Live View or Movie mode.
For these reasons, I typically disable continuous autofocusing for still photography. For shots in which the subject may be moving — making continuous focus tracking a plus — I prefer to go back to viewfinder photography because it offers faster focus tracking with less battery drain. (Chapter 8 has details on viewfinder autofocusing.) For movie recording, on the other hand, I typically rely on continuous autofocusing.
How you enable continuous autofocusing depends on whether you’re shooting stills or movies:
![]() Live View photography: Turn the feature on and off via the Continuous AF option on Live View menu 1, as shown on the left in Figure 4-6. Remember, when the AF Method is set to Quick mode, this option is unavailable.
Live View photography: Turn the feature on and off via the Continuous AF option on Live View menu 1, as shown on the left in Figure 4-6. Remember, when the AF Method is set to Quick mode, this option is unavailable.
When continuous autofocusing is enabled, you can lock focus by pressing and holding the shutter button halfway down or by pressing the AF-ON button. When you release the button, continuous autofocusing begins anew.
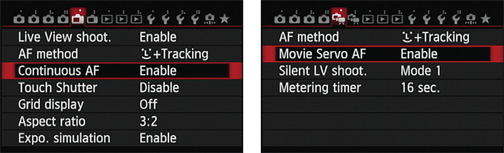
Figure 4-6: The continuous autofocusing feature goes by different names depending on whether you’re using Live View (left) or Movie mode (right).
![]() Movie mode: You can turn off continuous autofocusing in three ways:
Movie mode: You can turn off continuous autofocusing in three ways:
• Movie Menu 1: Control the option via the Movie Servo AF setting, as shown on the right in Figure 4-6.
• Touchscreen: You also can turn the feature on or off by tapping the icon labeled in Figure 4-7. A green dot on the icon means the feature is enabled. Note that if you disable the feature via the menu, the screen icon no longer appears.
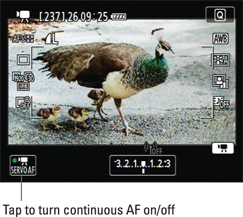
Figure 4-7: In Movie mode, you also can disable continuous autofocusing via the touchscreen.
 • Flash button: Press the button to toggle the feature on and off. Again, watch for the green dot on the screen icon to go on and off while you press the button.
Before you start recording, you also can set focus by pressing the shutter button halfway or by pressing the AF-ON button. If you turn off Movie Servo AF, you then can release the button, and focus will remain locked at the current focus distance. Otherwise, continuous autofocusing begins again when you release the button.
During movie recording, however, you can set autofocus only by pressing the AF-ON button. Using the shutter button doesn’t work.
Choosing an AF (autofocus) mode
For autofocusing, the AF mode determines the autofocusing method, as it does for viewfinder shooting. But the options for Live View and Movie auto-focusing work differently from the normal ones, which I cover in Chapter 8. For Live View photography, you get all four of the following options, represented on the display by the icons you see in the margins. For Movie mode, you lose the Quick mode option.
Upcoming sections detail the AF modes; here’s a quick introduction to each one:
![]()
![]() Face+Tracking: This setting is the default. If the camera detects a face, it automatically focuses on that face. When no faces are detected, the camera instead uses the FlexiZone-Multi autofocusing option.
Face+Tracking: This setting is the default. If the camera detects a face, it automatically focuses on that face. When no faces are detected, the camera instead uses the FlexiZone-Multi autofocusing option.
![]()
![]() FlexiZone-Multi: The camera automatically selects the focusing point, usually locking onto the closest object. In the advanced exposure modes, you can limit the camera’s choice of focusing areas by selecting one of several focus zones spread throughout the frame.
FlexiZone-Multi: The camera automatically selects the focusing point, usually locking onto the closest object. In the advanced exposure modes, you can limit the camera’s choice of focusing areas by selecting one of several focus zones spread throughout the frame.
![]()
![]() FlexiZone-Single: You specify which of the available focusing points the camera should use to establish focus.
FlexiZone-Single: You specify which of the available focusing points the camera should use to establish focus.
![]()
![]() Quick mode: In this mode, the camera uses the same autofocusing system as it does for viewfinder photography. As its name implies, Quick mode offers the fastest autofocusing of the Live View AF options. The downside is that it blanks out the Live View display temporarily as it sets focus, which can be a little disconcerting if you’re not expecting it to happen. And, as I mention a few paragraphs ago, it’s not available for movie recording and isn’t compatible with continuous autofocusing.
Quick mode: In this mode, the camera uses the same autofocusing system as it does for viewfinder photography. As its name implies, Quick mode offers the fastest autofocusing of the Live View AF options. The downside is that it blanks out the Live View display temporarily as it sets focus, which can be a little disconcerting if you’re not expecting it to happen. And, as I mention a few paragraphs ago, it’s not available for movie recording and isn’t compatible with continuous autofocusing.
Even with Quick mode, autofocusing is slower than when you use the viewfinder to compose your pictures. The difference has to do with how the camera performs the focusing operation, a technical detail not worth exploring here. Just know that for fastest autofocusing for still photography, shift out of Live View mode and go with the viewfinder.
When you do you choose Live View mode or set the camera to Movie mode, an icon representing the current AF mode appears in the upper left of the display, as shown on the left in upcoming Figure 4-8.
Don’t see the AF icon? Press Info to cycle through the various display modes until one appears. What other data shows up depends on the display mode and your exposure mode; the screens in Figure 4-8 show the monitor as it appears in the P (programmed autoexposure) mode with all data but the histogram displayed.
To change the AF mode setting, use these methods:

![]() Quick Control screen: Press the Quick Control button or tap the Q icon (upper right of the screen). Then select the icon that represents the focusing method, as shown on the right in Figure 4-8. To select the mode you want to use, tap it or use the Main dial, Quick Control dial, or Multi-controller to highlight it. To exit the Quick Control screen, tap the Return arrow or press the Q button.
Quick Control screen: Press the Quick Control button or tap the Q icon (upper right of the screen). Then select the icon that represents the focusing method, as shown on the right in Figure 4-8. To select the mode you want to use, tap it or use the Main dial, Quick Control dial, or Multi-controller to highlight it. To exit the Quick Control screen, tap the Return arrow or press the Q button.
Note that the figure on the right shows the screen as it appears during Live View photography; you don’t see the fourth option (AF Quick) in Movie mode.
![]() AF button: Press the AF button on top of the camera to access a screen offering the available settings.
AF button: Press the AF button on top of the camera to access a screen offering the available settings.
![]() Menus: For still photography, choose AF Method from Live View Menu 1, as shown on the left in Figure 4-9. For Movie recording, the option appears on Movie Menu 1, as shown on the right.
Menus: For still photography, choose AF Method from Live View Menu 1, as shown on the left in Figure 4-9. For Movie recording, the option appears on Movie Menu 1, as shown on the right.
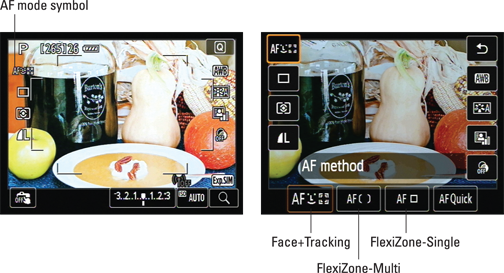
Figure 4-8: You can adjust the AF mode via the Quick Control screen.
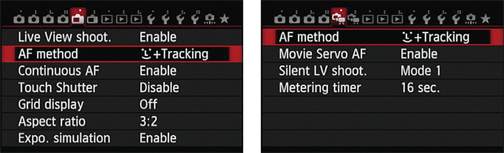
Figure 4-9: You also can adjust the autofocusing method via Live View Menu 1 for still photos (left) or via Movie Menu 1 for movie recording (right).
Face+Tracking autofocusing
![]() In this mode, which is the default for both still photography and movie recording, the camera searches for faces in the frame. If it finds one, it displays a white focus frame over the face, as shown on the left in Figure 4-10.
In this mode, which is the default for both still photography and movie recording, the camera searches for faces in the frame. If it finds one, it displays a white focus frame over the face, as shown on the left in Figure 4-10.
In a group shot where more than one face is recognized by the camera, you see arrows on either side of the focus frame. To choose a different face as the focusing target, tap the face or use the Multi-controller to move the target frame over the face.
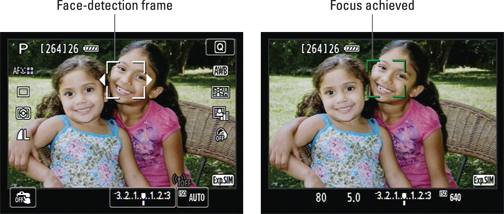
Figure 4-10: The white frame represents the face chosen for focusing; the frame turns green when focus is achieved.
To lock focus on the face, press and hold the shutter button halfway down or press and hold the AF-ON button. When focus is locked, the focus frame turns green, as shown on the right in the figure, and the camera emits a beep. (Disable the sound effect via the Beep option on Shooting Menu 1.) If focus isn’t successful, the focus frame turns red.
When the conditions are just right in terms of lighting, composition, and phase of the moon, this setup works fairly well. However, it has a number of “issues”:
![]() People must be facing the camera to be detected because the feature is based on the camera recognizing the pattern created by the eyes, nose, and mouth.
People must be facing the camera to be detected because the feature is based on the camera recognizing the pattern created by the eyes, nose, and mouth.
![]() The camera may mistakenly focus on an object that has a similar shape, color, and contrast to a face.
The camera may mistakenly focus on an object that has a similar shape, color, and contrast to a face.
![]() Face detection sometimes gets tripped up if the face isn’t just the right size with respect to the background, is tilted at an angle, is too bright or dark, or is partly obscured.
Face detection sometimes gets tripped up if the face isn’t just the right size with respect to the background, is tilted at an angle, is too bright or dark, or is partly obscured.
![]() Autofocusing isn’t possible when a subject is very close to the edge of the frame. The camera alerts you to this issue by displaying a gray frame instead of a white one over your subject. You can always temporarily reframe to put the subject within the acceptable autofocus area, lock focus, and then reframe to your desired composition.
Autofocusing isn’t possible when a subject is very close to the edge of the frame. The camera alerts you to this issue by displaying a gray frame instead of a white one over your subject. You can always temporarily reframe to put the subject within the acceptable autofocus area, lock focus, and then reframe to your desired composition.
If the camera can’t detect a face, it operates as it does when you use FlexiZone-Multi autofocusing, explained next.
FlexiZone-Multi autofocusing
By default, this mode is based on focus points spread throughout the area indicated by the framing marks you see in Figure 4-11. Note that Figure 4-11 shows the framing marks for Live View photography; in Movie mode, the framing marks occupy a different area of the screen due to the 16:9 aspect ratio of movie frames.
In the fully automated exposure modes, you don’t have any control over which points the camera uses to establish focus. Typically, focus is set on the object closest to the camera. When you press the shutter button halfway or press the AF-ON button, one or more focus points turns green, as shown on the right in the figure, to indicate the areas of the frame that were used to establish focus. You also hear a beep indicating that focus is set.
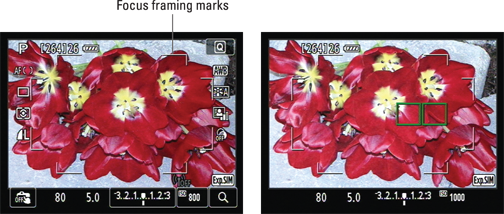
Figure 4-11: In fully automatic exposure modes, compose your shot so your subject is within these framing marks.
When you set the mode dial to P, Tv, Av, M, B, or C, you can break the focusing area into several smaller zones — thus, FlexiZone focusing — and limit the camera to finding its focusing point within one of those zones.
Exactly how many focusing points and zones are available depends on the following factors:
![]() Live View photography: The key here is the Aspect Ratio setting on Live View Menu 1. By default, the picture aspect ratio is 3:2 and you get 31 focusing points and 9 focus zones. But if you change the aspect ratio, things change:
Live View photography: The key here is the Aspect Ratio setting on Live View Menu 1. By default, the picture aspect ratio is 3:2 and you get 31 focusing points and 9 focus zones. But if you change the aspect ratio, things change:
• 3:4 and 1:1 aspect ratios: 25 focus points and 9 zones
• 16:9 aspect ratio: 21 focus points and 3 zones
![]() Movie mode: You get 21 focus points and 3 zones unless the Movie Recording Size option (Movie Menu 2) is set to 640 x 480, in which case you get 25 points and 9 zones.
Movie mode: You get 21 focus points and 3 zones unless the Movie Recording Size option (Movie Menu 2) is set to 640 x 480, in which case you get 25 points and 9 zones.
Yeah, I hear you — this stuff gets a little deep in the weeds, but don’t worry too much about how many points and zones are available. It’s not like you can control them, anyway. Just remember the techniques you use to select a zone:
![]() Switch from automatic focus point selection to zone selection. Press the Set button or the Erase button (the blue trash can button) to display a large rectangle indicating the current focus zone, as shown in Figure 4-12.
Switch from automatic focus point selection to zone selection. Press the Set button or the Erase button (the blue trash can button) to display a large rectangle indicating the current focus zone, as shown in Figure 4-12.
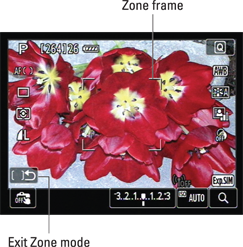
Figure 4-12: Press the Set button to toggle to zone focusing and then tap an area of the frame to locate the zone frame.
![]() Select the focus zone. Tap the subject to display a frame that represents the closest zone frame. Or use the Multi-controller to move the zone frame.
Select the focus zone. Tap the subject to display a frame that represents the closest zone frame. Or use the Multi-controller to move the zone frame.
![]() Quickly select the center zone. Press the Set button or the Erase button again.
Quickly select the center zone. Press the Set button or the Erase button again.
![]() Switch back to automatic focus selection. Tap the icon labeled Exit Zone mode in Figure 4-12 or press the Set or Erase button one more time.
Switch back to automatic focus selection. Tap the icon labeled Exit Zone mode in Figure 4-12 or press the Set or Erase button one more time.
The focusing technique for zone focusing is the same as for automatic selection: If continuous autofocusing is enabled, the camera hunts for its focus point in the zone frame. If you press and hold the shutter button halfway, the frame turns green and you hear the focus beep, indicating that focus is locked as long as you keep the shutter button pressed halfway. You also can use the AF-ON button to set focus.
FlexiZone-Single autofocusing
FlexiZone-Single AF mode lets you select a specific autofocus point. You see a single, small focus frame at the center of the screen, as shown on the left in Figure 4-13. The figure shows how the frame looks in Live View mode; in Movie mode, it’s a little larger. Either way, the next step is to move the frame over your subject. For example, I moved the frame over the soup garnish in the right screen in the figure. You can either use the Multi-controller to adjust the frame position or just tap the screen to place the frame.
As in FlexiZone-Multi mode, you can press the Set button or Erase (trash can) button to immediately move the focus frame back to the center of the frame.
Focusing works the same as in the AF methods already discussed; press the shutter button halfway or hold down the AF-ON button to set and lock focus. If the camera can’t focus on the spot you selected, the frame turns red.
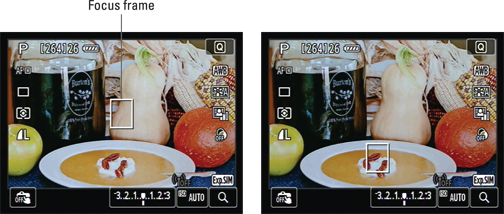
Figure 4-13: In FlexiZone-Single mode, use the Multi-controller or tap the screen to move the focus frame over your subject.
Quick mode autofocusing
As its name implies, Quick mode offers the fastest autofocusing during Live View or movie shooting. So why isn’t Quick mode the default setting? Well, it’s a little more complex to use. In addition, the monitor display goes dark during the time the camera is focusing, which can throw off the unsuspecting photographer. Finally, you can’t use Quick mode for movie shooting — it’s for still photography only. Nor is continuous autofocusing, explained earlier in this chapter, available for Quick mode.
On the up side, the technique you use to autofocus is almost exactly the same as the one you use during viewfinder photography, so it may feel more comfortable to you than the other Live View and Movie autofocusing methods.
Follow these steps to try it out:
1. Set the AF Method option to Quick Mode.
Use the Quick Control screen or Live View Menu 1.
![]() 2. Choose an AF Area Selection Mode.
2. Choose an AF Area Selection Mode.
This setting gives the camera some direction about where in the frame it should set focus. Press the AF Area Selection button (top of the camera, just forward of the Main dial) to display the screen shown in Figure 4-14. Keep pressing the button to cycle through the three mode choices, represented by the symbols labeled in the figure:
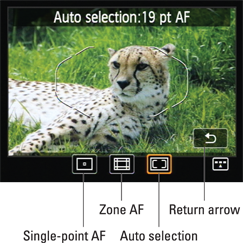
Figure 4-14: Press the AF Area Selection button to access this screen.
• 19-point automatic selection: The camera chooses the focus point for you, with the location of the 19 available focus points indicated by the same brackets that appear in the viewfinder during autofocusing. I label them in Figure 4-15.
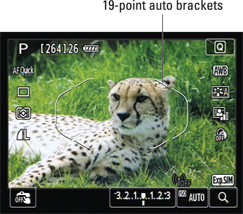
Figure 4-15: At the default AF Area Selection setting (19-point automatic selection), you see the regular autofocusing brackets on the screen.
• Zone AF: In this mode, you tell the camera to concentrate on a specific zone of autofocus points. The screen appears as shown on the left in Figure 4-16. You see all 19 focus points, represented by rectangles, with white framing brackets around the selected zone. For example, in the figure, the center zone of nine points is selected. Use the Multi-controller, Quick Control dial, or Main dial to select a different zone or just tap one of the points in the zone you want to use. To quickly select the center zone, press the Set button.
• Single-point AF: In this mode, you select a specific focus point. The chosen point is represented by the white rectangle, as shown on the right in Figure 4-16. To choose a different point, tap it or use the Multi-controller to move the focus box.
Again, you can press the Set button to select the center point quickly.
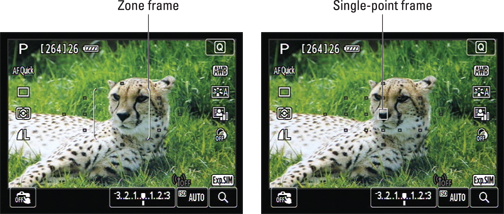
Figure 4-16: Quick Mode autofocusing also enables you to use Zone AF (left) and Single-point AF mode (right) to specify your focusing target.
To exit the AF Area Selection screen, tap the return arrow (labeled in Figure 4-14) or press the shutter button halfway and release it. (If you go the latter route, the monitor turns off briefly and then back on again.)
3. Frame the shot so that your subject is under the selected autofocus area.
4. Press and hold the shutter button halfway down.
The monitor turns off, and the autofocusing mechanism kicks into gear. (It may sound as though the camera took the picture, but don’t worry — that isn’t actually happening.) When focus is achieved, the camera beeps, the Live View display reappears, and the focus point (or points) used to achieve focus appear green. Focus remains locked as long as you keep the shutter button pressed halfway.
If the camera can’t find a focusing target, the focus point (or points) turn orange and blink. Try using manual focusing (explained next) or getting a little farther from your subject — you may be exceeding the minimum focusing distance of the lens.
5. Press the shutter button the rest of the way to take the picture.
You also can use the AF-ON button to set focus; see Chapter 8 for more about this camera feature.
Manual focusing
Manual focusing is the easiest of the Live View focusing options — and in most cases, it’s faster, too.
If continuous autofocusing is enabled, remember to exit Live View or Movie mode before you move the lens switch to the MF (manual focus position). Moving the switch while continuous autofocusing is engaged can damage your equipment.
After setting the lens to MF mode, simply rotate the lens focusing ring to set focus. On the monitor display, the letters MF take the place of the usual AF mode icon.
I find that most people who shy away from manual focusing do so because they don’t trust their eyes to judge focus. But thanks to a feature that enables you to magnify the Live View preview, you can feel more confident in your manual focusing skills. See the next section for details.
Zooming in for a focus check
Here’s a cool focusing feature not available during viewfinder photography: You can magnify the Live View display to ensure that focus is accurate. This trick works during manual focusing or in any AF mode except Face+Tracking mode. Follow these steps:
 1. Press the AF Point Selection button or tap the Zoom icon in the lower right of the screen (see Figure 4-17).
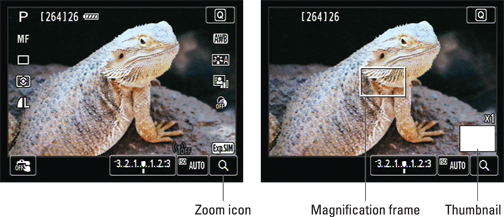
Figure 4-17: Tap the Zoom symbol (left) to switch to magnified view (right).
Most shooting data disappears, and you see a magnification frame on the screen plus a white box in the lower-right corner, as shown on the right in Figure 4-17. The white rectangle is a thumbnail representing the entire image area.
The value x1 appears above the thumbnail to show you that you’re viewing the image at its regular size (no magnification).
2. Move the focusing frame over your subject.
Tap the screen or use the Multi-controller to position the frame.
3. Press the AF Point Selection button or tap the Zoom icon again to magnify the display.
Your first press or tap displays a view that’s magnified five times, as shown in Figure 4-18. Now the thumbnail icon changes, and the tiny white rectangle indicates the area of the frame you’re viewing. Additionally, a scroll arrow appears on each side of the frame, as labeled in the figure.
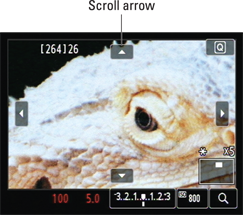
Figure 4-18: Tap the scroll arrows or use the Multi-controller to scroll the zoomed display.
If needed, tap the scroll arrows or use the Multi-controller to scroll the display.
Press the AF Selection Point button or tap the Zoom icon again for a x10 (ten-times) magnification.
4. To exit magnified view, press the AF Point Selection button or tap the Magnify icon again.
Pretty cool, yes? Just a couple of tips on using this feature:

![]() Press the Erase button or the Set button to quickly shift the magnification frame to the center of the screen.
Press the Erase button or the Set button to quickly shift the magnification frame to the center of the screen.
![]() Exit magnified view before you actually take the picture. Otherwise, exposure may be off. However, if you do take the picture in magnified view, the entire frame is captured — not just the area currently displayed on the monitor.
Exit magnified view before you actually take the picture. Otherwise, exposure may be off. However, if you do take the picture in magnified view, the entire frame is captured — not just the area currently displayed on the monitor.
Exploring Other Live View Options
After sorting out the focusing rigmarole, understanding the rest of the Live View photography options is a piece of cake. The next three sections explore these remaining features.
Setting the photo aspect ratio
When you shoot with the viewfinder, photos have a 3:2 aspect ratio (the relationship of a photo’s width to its height). But in Live View mode, you can choose a different aspect ratio if you shoot in the advanced exposure modes. Select one of the following aspect ratios from Live View Menu 1, shown in Figure 4-19:
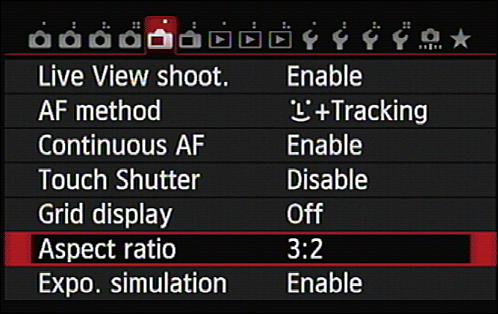
Figure 4-19: When you use Live View in the advanced exposure modes, you can change the picture aspect ratio.
![]() 3:2: The standard aspect ratio and the same as 35mm film (as well as a 4 x 6-inch print)
3:2: The standard aspect ratio and the same as 35mm film (as well as a 4 x 6-inch print)
![]() 4:3: The aspect ratio of older television and computer screens
4:3: The aspect ratio of older television and computer screens
![]() 16:9: The aspect ratio of most new TVs and monitors
16:9: The aspect ratio of most new TVs and monitors
![]() 1:1: Produces square photos
1:1: Produces square photos
How many pixels your image contains depends on the aspect ratio; at the 3:2 setting, you get the full complement of pixels delivered by your chosen Image Quality setting. (Chapter 2 explains that setting.) Note, too, that if you set the Image Quality option to record JPEG pictures, the camera creates the different aspect ratios by cropping a 3:2 original — and the cropped data can’t be recovered. Raw photos, although they appear cropped on the camera monitor, actually retain all the original data, which means you can change your mind about the aspect ratio later, when you process your Raw files. (Read about that subject in Chapter 6.)
At any setting except 3:2, the Live View display updates to indicate the framing area. For example, Figure 4-20 shows the framing area produced by the 1:1 aspect ratio.
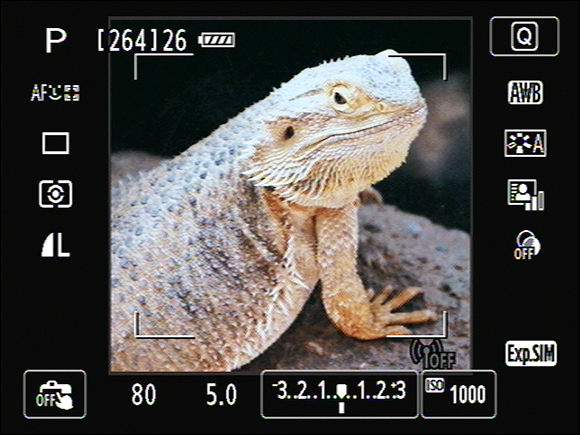
Figure 4-20: The live preview indicates the aspect ratio — 1:1, in this shot.
Adjusting other Live View picture settings
Before getting into the details of adjusting picture settings, I want to point out the following limitations so you don’t waste your time trying to figure out how to use the related features:
![]() Certain Custom Functions are unavailable. If an option on the Custom Functions menu is dimmed, the camera can’t deal with the feature in Live View mode. A few options in the Autofocus group of Custom Functions are available only when you use the Quick mode of autofocusing.
Certain Custom Functions are unavailable. If an option on the Custom Functions menu is dimmed, the camera can’t deal with the feature in Live View mode. A few options in the Autofocus group of Custom Functions are available only when you use the Quick mode of autofocusing.
![]() Some flash options are affected. To wit:
Some flash options are affected. To wit:
• Flash Exposure Lock doesn’t work. I cover this flash feature in Chapter 7.
• The modeling flash feature found on some Canon Speedlite flash units doesn’t work.
• The sound of the shutter release is different. When you take a flash shot in Live View mode, the camera’s shutter sound leads you to believe that two shots have been recorded; in reality, though, only one photo is captured.
![]() Exposure is calculated differently in Continuous Drive modes. You can use any of the Continuous Drive modes (introduced in Chapter 2), but the camera uses the exposure settings chosen for the first frame for all images. And as with flash shots, you hear two shutter sounds for the first frame in the continuous sequence.
Exposure is calculated differently in Continuous Drive modes. You can use any of the Continuous Drive modes (introduced in Chapter 2), but the camera uses the exposure settings chosen for the first frame for all images. And as with flash shots, you hear two shutter sounds for the first frame in the continuous sequence.
Quieting the camera with Silent LV Shooting
In the advanced exposure modes (P, Tv, Av, M, B, and C), you can enable a feature called Silent LV Shooting, found on Live View Menu 1 and Movie Menu 2. This feature enables you to control how much noise the camera makes when you take a picture using Live View or snap a still photo during movie recording. Well, sort of, anyway — you can’t achieve completely silent operation with the 70D. And if you use flash, the feature is disabled.
You can choose from three settings:
![]() Mode 1: This setting is the default; it tamps down camera noise slightly.
Mode 1: This setting is the default; it tamps down camera noise slightly.
![]() Mode 2: In this mode, designed for still photography, keep holding the shutter button down after taking a picture to delay the sound the camera makes at the end of the exposure. This option enables you to wait to release the button until a moment when the camera noise won’t be objectionable. Note, though, that continuous shooting isn’t possible in this mode. Also, if you use a remote control unit, the camera behaves as if you selected Mode 1.
Mode 2: In this mode, designed for still photography, keep holding the shutter button down after taking a picture to delay the sound the camera makes at the end of the exposure. This option enables you to wait to release the button until a moment when the camera noise won’t be objectionable. Note, though, that continuous shooting isn’t possible in this mode. Also, if you use a remote control unit, the camera behaves as if you selected Mode 1.
![]() Disable: This mode turns off the camera’s sound dampeners. Choose this setting if you use a non-Canon flash unit; otherwise, the flash won’t fire. Also choose Disable if you’re using a lens extension tube or a TS-E lens (Tilt-Shift for EOS) other than the TS-E 17mm f/4L or TS-E 24mm f/3.5L II lens.
Disable: This mode turns off the camera’s sound dampeners. Choose this setting if you use a non-Canon flash unit; otherwise, the flash won’t fire. Also choose Disable if you’re using a lens extension tube or a TS-E lens (Tilt-Shift for EOS) other than the TS-E 17mm f/4L or TS-E 24mm f/3.5L II lens.
Now that you know what you can’t do, here’s what you can do. First, when Live View is enabled, you can set the display to reveal many of the same picture settings that normally appear on the Shooting Settings screen — and then some. Figure 4-21 shows the screen as it appears when you shoot in the P exposure mode and display the maximum shooting data. (Press the Info button to cycle through the various Live View displays.)
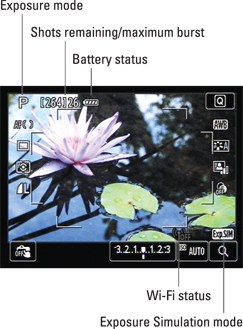
Figure 4-21: Symbols representing the current picture settings appear on the Live View display.
The onscreen symbols break down into three categories: Information only symbols; settings that you can adjust via the Quick Control screen; and options you can access by tapping the touchscreen. Here’s how things shake out:
![]() Information only data: Labeled in Figure 4-21, this data includes
Information only data: Labeled in Figure 4-21, this data includes
• Exposure mode: For the figure, the P (programmed autoexposure) mode was in force. When you shoot in the Scene Intelligent Auto mode, an icon representing the type of scene the camera detected appears along with the exposure mode symbol. Your camera manual has a long list of icons that indicate what type of photo the camera detected, but don’t waste time memorizing them. If you have a certain scene type in mind, you’re better off choosing a scene mode via the SCN exposure mode.
• Shots remaining: Here’s the number of pictures you can fit on your memory card.
• Maximum burst: This number is related to the Continuous drive modes; it indicates how many pictures will fit in the camera’s internal memory buffer before you need to stop shooting and give the camera time to catch up with writing the picture data to the memory card.
• Battery status: A full battery icon like the one in the figure means that you’re good to go.
• Exp. Sim: In the lower-right corner, an Exp Sim symbol represents the setting of the Exposure Simulation setting on Live View Menu 1, which I detail in the earlier section Customizing the display. The symbol shown in Figure 4-21 represents the default setting, Enable. At this setting, the brightness of the scene is as close as possible to the actual exposure of the photo. Remember that if flash is enabled, the feature is automatically turned off and thus dimmed in the display. If you set the Exposure Simulation setting to During Preview (you press the Depth of Preview button to see the exposure simulation) or Disable, the icon appears as a camera with the letters DISP.
• Wi-Fi status: This symbol tells you whether the camera’s Wi-Fi transmitter is turned on. A dimmed symbol like the one in the figure indicates that the feature is off. Change the setting via Setup Menu 3.
In addition, you may see these additional symbols scattered around the screen if you use the related features, all of which I cover in later chapters:
• AEB appears when you enable Automated Exposure Bracketing. The lines under the exposure meter show you the range of exposure stops you set the feature to use.
• FEB indicates that Flash Exposure Bracketing is enabled.
• D+: Means that you enabled Highlight Tone Priority.
• HDR/Multiple Exposures/Multi-Shot Noise Reduction: A symbol appearing in the portion of the screen highlighted in Figure 4-22 indicates that you have one of these features turned on. The symbol in Figure 4-22 represents the HDR function.
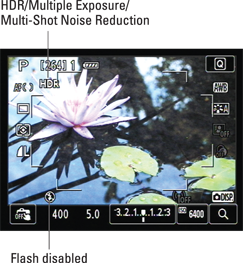
Figure 4-22: This area of the screen is reserved for displaying the status of the HDR, Multiple Exposure, or Multi-Shot Noise Reduction feature.
• Flash ready symbol: If the flash is raised, you see a lightning bolt when the flash is ready to fire. If flash is disabled because of a conflicting picture setting (such as the HDR feature), you see the flash with the slash through it, as shown in the figure.
![]() Touch-control settings: A symbol surrounded by a rectangular border indicates that tapping that symbol produces a result. In the case of the Q icon in the upper right, of course, a tap shifts the screen to Quick Control mode. But during Live View shooting, you also can tap to adjust the following settings, labeled in Figure 4-23:
Touch-control settings: A symbol surrounded by a rectangular border indicates that tapping that symbol produces a result. In the case of the Q icon in the upper right, of course, a tap shifts the screen to Quick Control mode. But during Live View shooting, you also can tap to adjust the following settings, labeled in Figure 4-23:
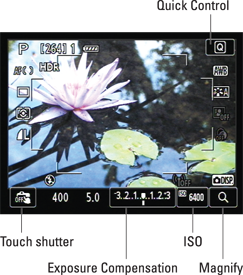
Figure 4-23: A border around a symbol indicates a tappable function.
• Touch shutter: This feature enables you to focus the shot and release the shutter simply by tapping your subject on the monitor. When the option is disabled, the word Off appears with the symbol, as in Figure 4-23. Just tap the icon to toggle the feature on and off; see the upcoming section Using the touch shutter for details about using it.
Make sure this feature is turned off if you want to use the touchscreen to select a focus point without triggering the shutter release.
• Exposure Compensation: In the P, Tv, and Av exposure modes, you can apply Exposure Compensation to force a brighter or darker picture than the camera’s autoexposure brain thinks is appropriate. After you tap the meter, a scale appears atop the image; drag your finger along the scale to adjust the setting. Or tap the minus and plus signs underneath the scale to raise or lower image brightness a notch at a time. To exit the screen, tap the return arrow in the upper-right corner or press Set.
You also can adjust this setting the old-fashioned way: After making sure that Lock switch under the Quick Control dial is set to the unlock position, rotate the dial. (If nothing happens, wake up the exposure meter by giving the shutter button a quick half-press.)
Either way, assuming that you set the Exposure Simulation option on Live View Menu 1 to Enable, the monitor updates as you change the setting — to a certain limit. The image on the monitor becomes brighter or darker only up to shifts of +/– EV 3.0, even though you can select values as high as +5.0 and as low as –5.0. See Chapter 7 to get a primer on exposure compensation.
• ISO: Tapping this option enables you to adjust the ISO setting, an exposure control I cover in Chapter 7. Again, you see a scale after you tap the option; this time, drag along the scale or tap the left and right arrows beneath it. Tap the return arrow to exit the screen.
Pressing the ISO button on top of the camera is another route to the same option.
• Magnified display: Except when using the Face+Tracking AF mode, you can tap the Zoom icon to magnify the display to verify focus. See the earlier section Zooming in for a focus check for details.
![]() Settings adjustable via the Quick Control display: After you press the Q button or tap the Q icon on the display, you can adjust the settings labeled in Figure 4-24 and described in the following list. With some settings, the preview updates to show you the result of your choice. To exit Quick Control mode, tap the return arrow or press the Quick Control button.
Settings adjustable via the Quick Control display: After you press the Q button or tap the Q icon on the display, you can adjust the settings labeled in Figure 4-24 and described in the following list. With some settings, the preview updates to show you the result of your choice. To exit Quick Control mode, tap the return arrow or press the Quick Control button.
• AF mode: The AF mode symbol appears regardless of whether you set your lens to manual or autofocus. When manual focus is active, the letters MF appear instead of the AF Mode symbol.
• Drive mode: The icon you see in the figure represents Single Drive mode, in which you capture one image for each press of the shutter button. See Chapter 2 for information about other drive modes.
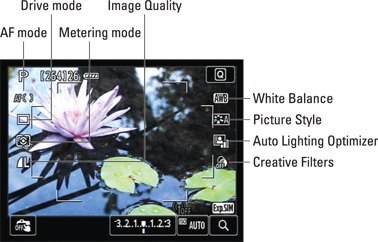
Figure 4-24: You can use the Quick Control screen to modify these settings.
You also can access the Drive mode by pressing the Drive button on top of the camera.
• Metering mode: Chapter 7 also explores this option, which determines which part of the frame the camera uses to calculate exposure. By default, the camera uses evaluative metering, which means that exposure is based on the entire frame. The symbol shown in the figures represents that setting.
 As with the Drive mode, you also can access this setting via a button on top of the camera; it’s marked with the symbol you see in the margin here. Either way, if you use the Partial or Spot metering setting, a circle appears in the center of the display to indicate the area that’s being used to calculate exposure.
• Image Quality: Chapter 2 explains this setting, which sets the resolution (pixel count) and file type (JPEG or Raw). The symbol shown in the figure represents the Large/Fine setting. When you select this setting, an Info icon appears on the screen; tap that icon or press the Info button to select one of the Raw Image Quality options.
• White Balance: This setting, which you can explore in Chapter 8, determines how the camera compensates for the color of the light source that’s illuminating your subject. The symbol in the figure represents the Automatic White Balance setting.
• Picture Style: Chapter 8 also details Picture Styles, which affect picture color, contrast, and sharpness. After selecting this setting, press Info or tap the Info icon to access a screen that enables you to tweak the characteristics of the selected Picture Style.
• Auto Lighting Optimizer: Check out Chapter 7 for help understanding this feature, which aims to improve image contrast. By default, the Standard setting is used; the symbol shown in the figure represents that setting. Note that by default, this option is always disabled for the M (Manual) and B (Bulb) exposure modes; to enable the feature for those modes, tap the check mark next to the Info icon or press the Info button.
In the P, Tv, and Av modes, experiment with disabling Auto Light-ing Optimizer if your picture appears too bright even after you’ve requested a darker photo through the Exposure Compensation setting.
• Creative Filters: This feature lets you apply Creative Filters (Grainy Black and White, Soft Focus, and Art Bold are a few examples) to photos as you take them. Chapter 10 has more information.
Using the touch shutter
Here’s one final Live View photography feature to try: When touchscreen operation is enabled, you can tap the monitor to set focus and trigger the shutter release. Follow these steps:
1. Enable the Touch Control option on Setup Menu 3.
You can select Standard or Sensitive as the menu option; your choice determines how firm of a touch you need to use to get the touchscreen to respond.
2. Shift to Live View mode.
Just move that Live View switch to the camera position and then press the Start/Stop button.
3. Look for the Touch Shutter icon in the lower-left corner of the monitor.
I label the icon in Figure 4-25. By default, the touch-shutter feature is turned off, so the word Off appears with the icon.
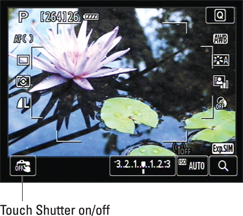
Figure 4-25: Turn the touch-shutter function on and off by tapping its icon.
4. Tap the icon to toggle the touch shutter function on.
You also can turn the feature on via Live View Menu 1.
5. Compose your shot and then tap the subject on the monitor.
If you’re focusing manually, the camera releases the shutter to take the picture. For autofocusing, the camera attempts to focus on the spot you tapped. If it’s successful, it releases the shutter to take the picture. If focus can’t be achieved, the camera won’t record the photo.
A few fine points: In the FlexiZone-Multi autofocus mode, the camera instead behaves as if FlexiZone-Single mode is active. The Continuous Drive modes don’t function; you can’t shoot a burst of images using the touch shutter. Nor does the touch shutter operate when the Live View display is magnified. And finally, to shoot a bulb exposure (using the B exposure mode), tap the screen once to open the shutter and tap again to end the exposure.
Turn off the touch shutter function after you’re done using it. Otherwise, it’s easy to forget that the feature is enabled and accidentally take a picture when your tap is really meant to select an autofocusing point or zone.
Recording Your First Movie
By moving the Live View switch to the Movie position, you can record high-definition video, with or without sound. The camera records movies in the MOV format, which is a popular file format for storing digital video. Movie filenames begin with the characters MVI_.
For best recording results, use a high-speed memory card (class 10 or UHS-1). With slower cards, the camera may not be able to write the movie data to the card fast enough to keep pace with recording. If this happens, a vertical bar appears on the right side of the screen to indicate how much data is yet to be sent to the card. When the indicator appears full, movie recording is halted automatically.
Assuming that your card is fit for the job, recording a movie using the default settings is a cinch:
1. Disable the Wi-Fi function via Setup Menu 3.
You can’t record a movie while the Wi-Fi feature is turned on.
2. To use an external microphone, plug the mic into the port on the left side of the camera.
Otherwise, sound is recorded via the internal microphone, positioned in the location shown on the left in Figure 4-26. Plug an external mic into the jack labeled on the right in the figure.
3. Set the Mode dial to Scene Intelligent Auto (the green A+).
In this mode, the camera handles all exposure settings for you, which is the way to go unless you’re an experienced videographer.
4. Set the Live View switch to the Movie setting.
The viewfinder shuts off, and the live preview appears on the monitor. You see various data onscreen, as shown on the left in Figure 4-27. The next section explains what each bit of information means. For now, the critical detail is the available recording time, which depends on how much free space exists on your memory card and the Movie Recording Size setting, which determines the movie file size. (I explain this option later.)

Figure 4-26: You can record sound using the internal mic (left) or attach an external microphone (right).
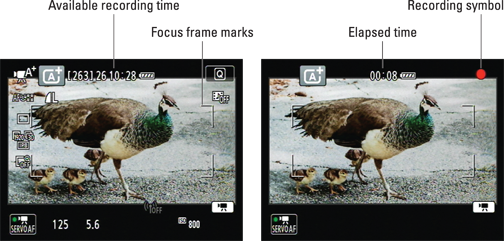
Figure 4-27: The display shows how many minutes of video will fit on your memory card (left) and, after you begin recording, elapsed recording time (right).
5. Frame your initial shot and set focus.
By default, the camera uses continuous autofocusing (Movie Servo AF) and the Face+Tracking AF mode, which I explain earlier in this chapter. If the camera detects a face, it automatically focuses on that face; otherwise, it shifts to FlexiZone-Multi AF mode and typically focuses on the closest object found within the framing marks labeled in Figure 4-27.
To use manual focusing, first shift back to viewfinder shooting and then move the lens switch to the MF position. (This step prevents possible damage that can occur if you move the switch while continuous auto-focusing is in progress.) Return to Movie mode and bring the subject into focus using the lens focusing ring.
6. To start recording, press the Start/Stop button.
Most shooting data disappears, and a red “recording” symbol appears, as shown on the right in Figure 4-27. Now, instead of showing you the length of the recording that will fit on your memory card, the display shows the elapsed recording time.
The maximum movie length at the default recording settings is 16 minutes, which is how long it takes for the file to reach 4 gigabytes (GB), the file size limit. When you reach that limit, the camera creates a new movie file to hold the next 16 minutes of video. Recording stops automatically when the total recording time reaches 29 minutes and 59 seconds.
To reset focus during recording, press the AF-ON button.
7. To stop recording, press the Start/Stop button again.
At the default settings, your movie is recorded using the following settings:
![]() Full HD video quality (1920 x 1080p, or pixels) at 30 frames per second (fps), using the IPB compression setting
Full HD video quality (1920 x 1080p, or pixels) at 30 frames per second (fps), using the IPB compression setting
![]() Audio recording enabled
Audio recording enabled
![]() Evaluative (whole frame) exposure metering
Evaluative (whole frame) exposure metering
![]() Automatic white balancing
Automatic white balancing
![]() Auto Lighting Optimizer applied at the Standard setting
Auto Lighting Optimizer applied at the Standard setting
![]() Auto Picture Style
Auto Picture Style
But of course, you didn’t buy this book so that you could remain trapped in the camera’s default behaviors. So the upcoming sections explain all your recording options, which range from fairly simply to fairly not.
Customizing Movie Recording Settings
After you set the Live View switch to the Movie position, you can display critical recording settings on the monitor, shown in Figure 4-28. If you don’t see the same data, press the Info button to cycle through different display styles. The figure shows the screen as it appears when you shoot in the P exposure mode; the data varies slightly depending on your exposure mode.
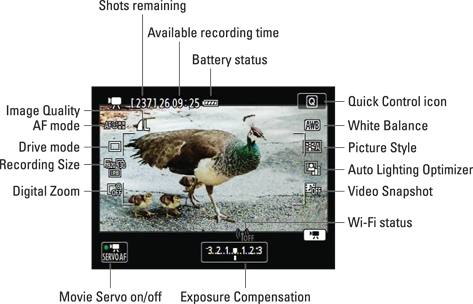
Figure 4-28: Press the Info button to change the data display.
The following list offers insights into a few screen symbols; upcoming sections provide more details about recording settings.
![]() The Drive mode, shots remaining, and Image Quality settings relate only to still shots you capture during a recording. See the later section Snapping a Photo During Recording for help.
The Drive mode, shots remaining, and Image Quality settings relate only to still shots you capture during a recording. See the later section Snapping a Photo During Recording for help.
![]() By default, the camera controls the aperture, shutter speed, and ISO. Pressing the shutter button halfway displays the shutter speed, f-stop, and ISO for the still shot, which may be different than for the movie recording. However, you can switch to manual exposure control for the movie by setting the Mode dial to M. This option is best left to experts and involves more details than I have room to cover, so see the camera instruction manual for the full story.
By default, the camera controls the aperture, shutter speed, and ISO. Pressing the shutter button halfway displays the shutter speed, f-stop, and ISO for the still shot, which may be different than for the movie recording. However, you can switch to manual exposure control for the movie by setting the Mode dial to M. This option is best left to experts and involves more details than I have room to cover, so see the camera instruction manual for the full story.
Regardless of exposure mode, you can’t adjust the metering mode; evaluative (whole frame) metering is always used.
![]() In P, Tv, and Av modes, the exposure meter indicates the amount of Exposure Compensation. Exposure Compensation enables you to adjust the brightness of your next recording. If the bar under the meter is at the center position, as shown in Figure 4-28, no compensation has been applied. You can tap the setting and then adjust it by dragging your finger along the scale that appears: Drag right for a brighter picture; drag left for a darker picture.
In P, Tv, and Av modes, the exposure meter indicates the amount of Exposure Compensation. Exposure Compensation enables you to adjust the brightness of your next recording. If the bar under the meter is at the center position, as shown in Figure 4-28, no compensation has been applied. You can tap the setting and then adjust it by dragging your finger along the scale that appears: Drag right for a brighter picture; drag left for a darker picture.

![]() In P, Tv, and Av exposure modes, you can press the AE Lock button to disable automatic exposure adjustment. When you use autoexposure, the camera adjusts exposure during the recording as needed. If you prefer to use the same settings throughout the recording — or to lock in the current settings during the recording — you can use AE (autoexposure) Lock. Just press the AE Lock button. A little asterisk appears in the lower left of the screen.
In P, Tv, and Av exposure modes, you can press the AE Lock button to disable automatic exposure adjustment. When you use autoexposure, the camera adjusts exposure during the recording as needed. If you prefer to use the same settings throughout the recording — or to lock in the current settings during the recording — you can use AE (autoexposure) Lock. Just press the AE Lock button. A little asterisk appears in the lower left of the screen.
To cancel AE Lock during recording, press the AF Point Selection button. When recording is stopped, AE Lock is cancelled automatically after 16 seconds by default; this shutoff timing is determined by the Metering Timer option on Movie Menu 1.
![]() Focus options: You select and adjust focus settings just as you do for Live View photography; see the earlier section, Focusing in Live View and Movie Mode. for details. Quick Mode autofocusing isn’t available for movie recording, however.
Focus options: You select and adjust focus settings just as you do for Live View photography; see the earlier section, Focusing in Live View and Movie Mode. for details. Quick Mode autofocusing isn’t available for movie recording, however.
By default, continuous autofocusing — Movie Servo AF — is enabled. Toggle continuous autofocusing on and off by tapping the icon in the lower left of the screen (refer to Figure 4-28). You also can change this setting via Movie Menu 1.
After you begin recording, you can reset focus only by pressing the AF-ON button. Pressing the shutter button halfway doesn’t work.
To adjust other movie recording options, you can go two routes:
![]() Movie Menus 1 and 2: The Movie menus appear only after you set the Live View switch to the Movie setting. Which menu options appear depend on the exposure mode; some advanced settings are unavailable in the fully automatic exposure modes.
Movie Menus 1 and 2: The Movie menus appear only after you set the Live View switch to the Movie setting. Which menu options appear depend on the exposure mode; some advanced settings are unavailable in the fully automatic exposure modes.
![]() Quick Control screen: You can also adjust some recording options via the Quick Control screen. The icons running down the left and right side of the screen, labeled in Figure 4-28, represent these settings. Again, the Image Quality and Drive mode settings apply only to still photos you shoot during recording. I explain the movie-only options, Recording Size and Digital Zoom, later in this chapter; see Chapter 10 for a look at the Video Snapshot feature. The other settings affect exposure and color the same as they do for still photography and are explained in Chapters 7 and 8.
Quick Control screen: You can also adjust some recording options via the Quick Control screen. The icons running down the left and right side of the screen, labeled in Figure 4-28, represent these settings. Again, the Image Quality and Drive mode settings apply only to still photos you shoot during recording. I explain the movie-only options, Recording Size and Digital Zoom, later in this chapter; see Chapter 10 for a look at the Video Snapshot feature. The other settings affect exposure and color the same as they do for still photography and are explained in Chapters 7 and 8.
Movie Menu 1
Start customizing your production with the options on Movie Menu 1, shown in Figure 4-29. Note that you can access only the first two options when you shoot in the fully automatic exposure modes.
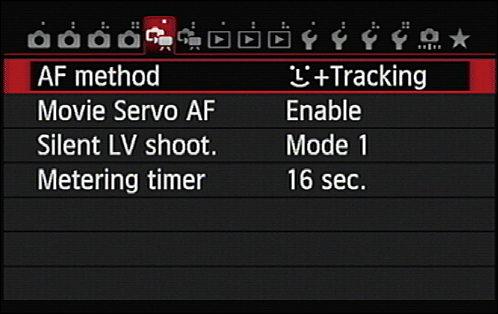
Figure 4-29: You must set the exposure mode to P, Tv, Av, M, B, or C to access the entire cadre of Movie Menu 1 options.
![]() AF Method: This option does the same thing as the AF mode option available via the Quick Control screen: It sets the autofocusing method, as outlined earlier in this chapter. Remember, you can’t use Quick mode auto-focusing for movie recording.
AF Method: This option does the same thing as the AF mode option available via the Quick Control screen: It sets the autofocusing method, as outlined earlier in this chapter. Remember, you can’t use Quick mode auto-focusing for movie recording.
![]() Movie Servo AF: Here’s where to enable or disable continuous autofocusing if you forget that you can do it more quickly by tapping the screen icon (refer to Figure 4-28). For more about this feature, see the earlier section, Disabling continuous autofocusing.
Movie Servo AF: Here’s where to enable or disable continuous autofocusing if you forget that you can do it more quickly by tapping the screen icon (refer to Figure 4-28). For more about this feature, see the earlier section, Disabling continuous autofocusing.
![]() Silent LV Shooting: This feature relates only to still photos that you take during recording. Stick with the default, Mode 1, until you have time to explore the commentary found in the earlier sidebar in this chapter.
Silent LV Shooting: This feature relates only to still photos that you take during recording. Stick with the default, Mode 1, until you have time to explore the commentary found in the earlier sidebar in this chapter.
![]() Metering Timer: This option is the one that adjusts the auto shutoff timing of the exposure meter, as explained in the earlier section, Customizing the display. By default, the meter shuts down and disappears from the display after 16 seconds. The setting also controls the automatic cancellation of AE Lock, as explained in the preceding section.
Metering Timer: This option is the one that adjusts the auto shutoff timing of the exposure meter, as explained in the earlier section, Customizing the display. By default, the meter shuts down and disappears from the display after 16 seconds. The setting also controls the automatic cancellation of AE Lock, as explained in the preceding section.
Movie Menu 2
Movie Menu 2, shown in Figure 4-30, includes the following settings:
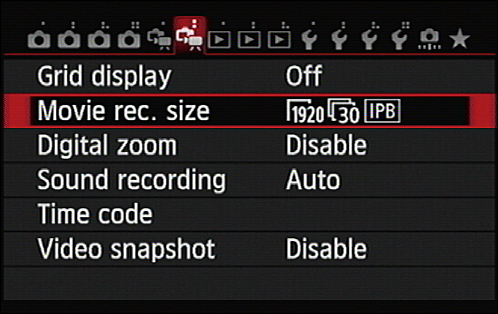
Figure 4-30: Options controlling video quality and sound recording reside on Movie Menu 2.
![]() Grid Display: Display one of three grid styles to help ensure alignment of vertical and horizontal structures when you’re framing the scene.
Grid Display: Display one of three grid styles to help ensure alignment of vertical and horizontal structures when you’re framing the scene.
![]() Movie Recording Size: This option determines movie resolution (frame size, in pixels), frames per second (fps), frame aspect ratio, and file compression method. This setting is a little complex, so see the next section if you don’t know what option to choose.
Movie Recording Size: This option determines movie resolution (frame size, in pixels), frames per second (fps), frame aspect ratio, and file compression method. This setting is a little complex, so see the next section if you don’t know what option to choose.
![]() Digital zoom: This feature, which I detail later in the chapter, records the movie using just the central portion of the image sensor to create the illusion that you shot the movie using a lens with a longer focal length than the actual lens.
Digital zoom: This feature, which I detail later in the chapter, records the movie using just the central portion of the image sensor to create the illusion that you shot the movie using a lens with a longer focal length than the actual lens.
![]() Sound Recording: Via this menu item, you adjust microphone volume and a couple other sound options. See “Choosing audio recording options,” later in this chapter, for help.
Sound Recording: Via this menu item, you adjust microphone volume and a couple other sound options. See “Choosing audio recording options,” later in this chapter, for help.
![]() Time Code: This feature is for advanced videographers who edit movies on the computer. The time code is an invisible counter that synchronizes video and audio during shooting. The feature is on by default, but if you choose the menu option, you can control how the time code counter works and whether the time code appears onscreen during shooting and playback:
Time Code: This feature is for advanced videographers who edit movies on the computer. The time code is an invisible counter that synchronizes video and audio during shooting. The feature is on by default, but if you choose the menu option, you can control how the time code counter works and whether the time code appears onscreen during shooting and playback:
• Count Up: Choose Rec Run (the default) to have the time counter running only during shooting. At the Free Run setting, the counter runs even when you’re not shooting.
• Start Time Setting: Establish the start time of the counter. Set the time manually, setting the hour, minute, second, and frame number of the start time. Or you can tell the camera to use the current start time with the camera’s internal clock. The Reset option sets the counter back to whatever time you selected via the other two options.
• Movie Recording Count: Normally, the monitor displays the elapsed recording time at the top of the screen (refer to Figure 4-27). If you choose Time Code, the time code is displayed instead.
• Movie Playback Count: This one affects playback: At the default (Rec Time) setting, the screen displays the recording time and playback time; at Time Code, you see the time code instead.
• Drop Frame: Okay, here’s one that’s even higher on the video-wonk scale: This feature, which is provided only when the Video System option on Setup Menu 3 is set to NTSC, accounts for discrepancies that occur between the actual time and the time code when the frame rate setting is 30fps or 60fps. The Enable setting automatically corrects the problem by skipping time code numbers; you see the initials DF (for Drop Frame) when this setting is in force. Select Disable, and the discrepancy isn’t corrected. In this case, you see the letters NDF (Non-Drop Frame).
![]() Video Snapshot: Create multiple brief movie clips and combine the clips into one movie. Turn off this feature for regular movie recording and see Chapter 10 for how to create video snapshots.
Video Snapshot: Create multiple brief movie clips and combine the clips into one movie. Turn off this feature for regular movie recording and see Chapter 10 for how to create video snapshots.
Setting the Movie Recording Size option
Through this setting, you set movie resolution, frames per second (fps), and the file-compression method. You can access the option via Movie Menu 2, in which case you see the somewhat obtuse screen shown in Figure 4-31.
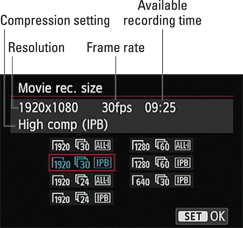
Figure 4-31: After you choose a resolution setting, the screen updates to show the length of the movie that will fit on your memory card.
You also can adjust the setting via the Quick Control screen, as shown in Figure 4-32. If you go that route, the available settings are displayed along the bottom of the screen.
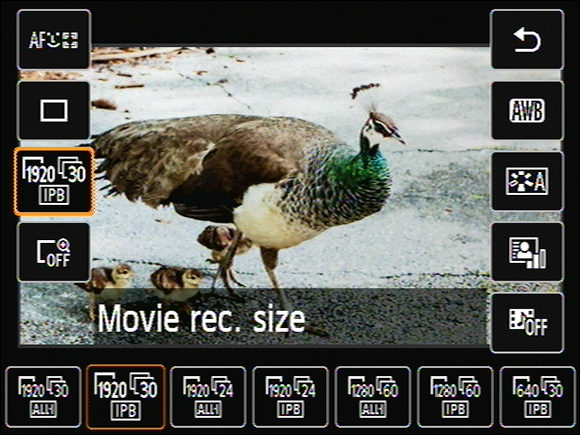
Figure 4-32: You also can access the setting via the Quick Control screen.
Either way, you get the following choices:
![]() 1920 x 1080 pixels, 30fps (16:9 aspect ratio)
1920 x 1080 pixels, 30fps (16:9 aspect ratio)
![]() 1920 x 1080 pixels, 24fps (16:9)
1920 x 1080 pixels, 24fps (16:9)
![]() 1280 x 720 pixels, 60fps (16:9)
1280 x 720 pixels, 60fps (16:9)
![]() 640 x 480 pixels, 30fps (4:3)
640 x 480 pixels, 30fps (4:3)
The frame rate options depend on the Video System option on Setup Menu 2, which sets the camera to one of two video standards: NTSC or PAL. NTSC is the standard in North America and Japan; PAL is used in Europe, China, and many other countries. If you choose NTSC, you see the recording options shown in Figure 4-31 and in the preceding list. If you select PAL, you can choose frame rates of 24, 25, and 50 instead of 24, 30, and 60.
Notice, too, that for each of the resolution and frames per second offerings except the 640 x 480 pixel option, you can choose from two compression settings: IPB and ALL-I. The default, IPB, produces smaller files but results in individual frames that may be slightly lower in quality than the ALL-I setting. That second setting is designed for video enthusiasts who plan to edit their footage, in which case the quality of the individual frames is important.
Here’s a bit more information to help you choose the best resolution, frame rate, and compression combo:
![]() For high-definition (HD) video, choose 1920 x 1080 (Full HD) or 1280 x 720 (Standard HD). The 640 x 480 setting gives you standard definition (SD) video. This smaller size video is useful for videos that you want to post online.
For high-definition (HD) video, choose 1920 x 1080 (Full HD) or 1280 x 720 (Standard HD). The 640 x 480 setting gives you standard definition (SD) video. This smaller size video is useful for videos that you want to post online.
![]() The resolution and compression settings determine file size and the maximum length of your movie. The following list shows the maximum approximate recording time of a single movie clip for each of the resolution and compression combinations:
The resolution and compression settings determine file size and the maximum length of your movie. The following list shows the maximum approximate recording time of a single movie clip for each of the resolution and compression combinations:
• 1920 x 1080: IPB, 16 minutes; ALL-I, 5 minutes
• 1280 x 720: IPB, 18 minutes; ALL-I, 6 minutes
• 640 x 480: IPB, 29 minutes, 59 seconds (ALL-I not available)
For most people, the default setting (1920 x 1080, 30fps, IPB) makes the most sense. You’ll get good quality without the huge file sizes required for the ALL-I compression option.
The maximum file size for a movie is 4GB. However, you can keep shooting until you reach a total time of 29 minutes, 59 seconds — the camera automatically creates a new file to hold your new clip. You have to play back each clip separately or join them together in a movie-editing program if you want one continuous 30-minute (or so) movie.
At the SD setting (640 x 480 frame size), the maximum movie length is still just shy of 30 minutes even though you can fit more minutes of recording in the 4GB file-size limit. (Don’t yell at me. I don’t set the limits; I just report them.)
Either way, when the maximum recording time is up, the camera automatically stops recording. You can always start a new recording, however, and, again, you can join the segments in a movie-editing program later, if you want.
![]() Frame rate affects playback quality. Higher frame rates transfer to smoother playback, especially for fast-moving subjects, but the frame rate also influences the crispness of the picture. To give you some reference, 30fps is the NTSC standard for television-quality video, and 24fps is the motion picture standard. Movies shot at 60fps tend to appear very sharp and detailed. It’s hard to explain the difference in words, so experiment to see which look you prefer. The uber-high frame rate is also good for maintaining video quality if you edit your video to create slow-motion effects. Additionally, if you want to “grab” a still frame from a video to use as a photograph, 60fps gives you more frames from which to choose.
Frame rate affects playback quality. Higher frame rates transfer to smoother playback, especially for fast-moving subjects, but the frame rate also influences the crispness of the picture. To give you some reference, 30fps is the NTSC standard for television-quality video, and 24fps is the motion picture standard. Movies shot at 60fps tend to appear very sharp and detailed. It’s hard to explain the difference in words, so experiment to see which look you prefer. The uber-high frame rate is also good for maintaining video quality if you edit your video to create slow-motion effects. Additionally, if you want to “grab” a still frame from a video to use as a photograph, 60fps gives you more frames from which to choose.
Choosing audio recording options
In the fully automatic exposure modes, the Sound Rec. option on Movie Menu 2 gives you just two options: You can enable or disable audio recording. If you set the Mode dial to one of the advanced exposure options, you access the audio controls shown on the left in Figure 4-33. The settings apply whether you use the internal microphone or attach an external one.
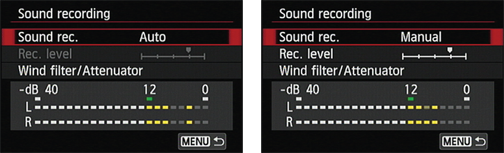
Figure 4-33: The sound meter at the bottom of the screen offers guidance if you set audio recording levels manually.
The audio controls work as follows:
![]() Sound Rec.: At the default setting, Auto, sound is recorded, with the camera automatically adjusting recording volume. To control recording levels yourself, choose Manual. To record a silent movie, choose Disable.
Sound Rec.: At the default setting, Auto, sound is recorded, with the camera automatically adjusting recording volume. To control recording levels yourself, choose Manual. To record a silent movie, choose Disable.
![]() Rec. Level: If you choose the Manual sound-recording option, this option becomes available, as shown on the right in Figure 4-33, enabling you to set the recording volume. To guide you, a volume-level meter appears at the bottom of the screen, as shown in the figure.
Rec. Level: If you choose the Manual sound-recording option, this option becomes available, as shown on the right in Figure 4-33, enabling you to set the recording volume. To guide you, a volume-level meter appears at the bottom of the screen, as shown in the figure.
Audio levels are measured in decibels (dB). Levels on the volume meter range from –40 (very, very soft) to 0 (as much as can be measured digitally without running out of room).
For best results, adjust the recording level until the sound peaks consistently in the –12 range, as shown in Figure 4-33. The indicators on the meter turn yellow in this range, which is good. (The extra space beyond that level, called headroom, gives you both a good signal and a comfortable margin of error.) If the sound is too loud, the volume indicators will peak at 0 and appear red — a warning that the audio may be distorted.
If you choose the Manual Sound Recording option, the meters appear on the live preview during recording to help you keep track of audio levels.
![]() Wind Filter/Attenuator: Choose this option to access the following two audio options:
Wind Filter/Attenuator: Choose this option to access the following two audio options:
• Wind Filter: Ever seen a newscaster out in the field, carrying a microphone that looks like it’s covered with a big piece of foam? That foam thing is a wind filter. It’s designed to lessen the sounds that the wind makes when it hits the microphone. You can enable a digital version of the same thing via the Wind Filter menu option. Essentially, the filter works by reducing the volume of noises that are similar to those made by wind. The problem is that some noises not made by wind can also be muffled when the filter is enabled. So when you’re indoors or shooting on a still day, keep this option set to Disable. Also note that when you use an external microphone, the Wind Filter feature has no effect.
• Attenuator: This feature is designed to eliminate distortion that can occur with sudden loud noises. Experiment with enabling this feature if you’re shooting in a location where this audio issue is possible.
Using Movie Digital Zoom
Digital zoom enables you to capture a movie using a smaller area of the image sensor than normal. The result is a movie that gives you a smaller angle of view, as if you zoomed to a longer focal length to record the scene — or, to put it another way, as if you shot the movie using the whole sensor and then cropped away the perimeter of each frame.
The best way to understand the feature is to try it:
1. Set the movie size to one of the 1920 x 1080 resolution settings.
This is the only resolution that permits digital zooming. You adjust the setting via the Quick Control screen or Movie Menu 2.
2. Enable Digital Zoom from via the Quick Control screen, as shown in Figure 4-34.
You also can turn on the feature via Movie Menu 2. Either way, select the Approx. 3-10x (zoom) option. The preview updates to show you the new framing area, as shown on the right in Figure 4-34.
3. Press the Multi-controller up to zoom in; press down to zoom out.
You also can tap the zoom icon in the lower right of the screen, labeled in Figure 4-35. The current zoom ratio appears above the little movie camera icon, as labeled in the figure.
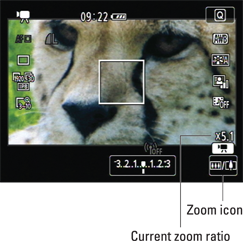
Figure 4-35: Press the Multi-controller up or down to zoom in or out.

Figure 4-34: Digital zoom records the movie using just the central portion of the image sensor, creating the illusion that you shot the footage with a zoom lens.
4. If autofocusing, press the shutter button halfway or press the AF-ON button to set focus.
The camera automatically uses the FlexiZone-Single AF mode, using the center focus point as the focusing target.
5. If focusing manually, set focus by turning the lens focusing ring.
6. Press the Start/Stop button to start and then stop recording as usual.
7. To return to regular shooting, disable digital zoom via the menu or Quick Control screen.
Because you’re not making use of the full image sensor, the resulting movie quality may not appear as finely rendered as without digital zoom. Also note these other caveats:
![]() You can’t take a still photo during recording when digital zoom is enabled.
You can’t take a still photo during recording when digital zoom is enabled.
![]() The maximum ISO speed when using digital zoom is ISO 6400.
The maximum ISO speed when using digital zoom is ISO 6400.
![]() Autofocusing may be slower than usual because the camera has to use a different type of autofocusing than when digital zoom is turned off.
Autofocusing may be slower than usual because the camera has to use a different type of autofocusing than when digital zoom is turned off.
![]() Perhaps most critically, continuous autofocusing doesn’t work when digital zoom is enabled, even if the Movie Servo AF feature is turned on.
Perhaps most critically, continuous autofocusing doesn’t work when digital zoom is enabled, even if the Movie Servo AF feature is turned on.
Snapping a Photo During Recording
You can take a still photo during recording without exiting Movie mode. Just press the shutter button to take the shot. The camera records the still photo as a regular image file, using the same Picture Style, White Balance, and Auto Lighting Optimizer settings you chose for your movie. The Image Quality setting determines the picture resolution and file format, as outlined in Chapter 2. You can choose single-frame or continuous as the Drive mode; evaluative (whole frame) exposure metering is always used.
There are a few drawbacks to this feature:
![]() If you’re shooting a movie at one of the Movie Recording Size settings that results in the 16:9 aspect ratio, the area included in your still photo is different from what’s in the movie shots. All still photos have an aspect ratio of 3:2, so you gain some image area at the top and bottom and lose it from the sides.
If you’re shooting a movie at one of the Movie Recording Size settings that results in the 16:9 aspect ratio, the area included in your still photo is different from what’s in the movie shots. All still photos have an aspect ratio of 3:2, so you gain some image area at the top and bottom and lose it from the sides.
![]() You can’t use flash.
You can’t use flash.
![]() Your movie will contain a still frame at the point you took the photo; the frame lasts about 1 second. Ouch. If you’re savvy with a video editor, you can edit each still photo out of the video, but if you shoot 50 stills in 5 minutes of video, editing is going to take a while.
Your movie will contain a still frame at the point you took the photo; the frame lasts about 1 second. Ouch. If you’re savvy with a video editor, you can edit each still photo out of the video, but if you shoot 50 stills in 5 minutes of video, editing is going to take a while.
Playing Movies
Chapter 5 explains how to connect your camera to a television set for big-screen movie playback. To view movies on the camera monitor, press the Playback button and display the movie in full-frame view. You can spot a movie file by looking for the little movie camera icon in the upper left of the screen. You also see a big playback symbol in the center of the screen, as shown in Figure 4-36.
If you see thumbnails instead of a full movie frame on the screen, tap the thumbnail or use the Multi-controller to highlight it and then press Set to display the file in the full-frame view. You can’t play movies in thumbnail view.
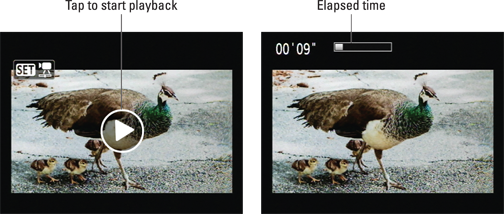
Figure 4-36: To start movie playback, just tap the big playback arrow.
Use these techniques to start, stop, and control playback:
![]() Start playback. You have two options:
Start playback. You have two options:
• Tap the playback arrow. I label this in Figure 4-36. Your movie begins playing, with a progress bar and time-elapsed value provided at the top of the screen, as shown on the right in Figure 4-36.
• Press the Set button or tap the Set icon. Now you see the first frame of your movie plus a slew of control icons, as shown in Figure 4-37. To start playback, tap the Play icon or use the Multi-controller to highlight it and then press the Set button.
![]() Pause playback. Tap the screen or press the Set button. To resume, tap the playback symbol or press Set again.
Pause playback. Tap the screen or press the Set button. To resume, tap the playback symbol or press Set again.
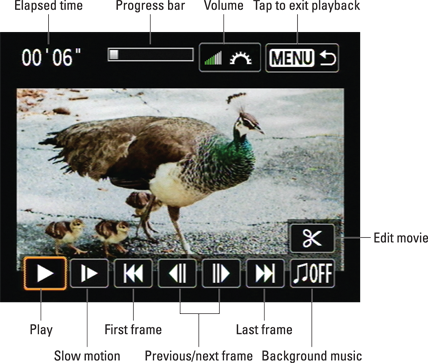
Figure 4-37: If the playback controls disappear, just press the Set button to redisplay them.
![]() Play in slow motion. Tap the slow-motion icon or select it and press Set. Press the Multi-controller right to increase playback speed; press left to decrease it. You also can adjust the speed by dragging your finger along the scale that appears in the upper-right corner during slo-mo playback.
Play in slow motion. Tap the slow-motion icon or select it and press Set. Press the Multi-controller right to increase playback speed; press left to decrease it. You also can adjust the speed by dragging your finger along the scale that appears in the upper-right corner during slo-mo playback.
![]() Adjust volume. Rotate the Main dial. Note the little white wheel and a volume display bar at the top right of the display — it reminds you to use the Main dial to adjust volume. Note that the dial controls volume only for on-camera playback. If you connect the camera to a TV, control the volume using the TV controls instead.
Adjust volume. Rotate the Main dial. Note the little white wheel and a volume display bar at the top right of the display — it reminds you to use the Main dial to adjust volume. Note that the dial controls volume only for on-camera playback. If you connect the camera to a TV, control the volume using the TV controls instead.
If you recorded a movie without sound, you can enable the Background Music option to play a sound file. In order to use this feature, you must install the Canon EOS Utility found on the software provided with your camera and then use the program to copy music files to your camera memory card. The EOS Utility program’s user guide, found on one of the two CDs in your camera box, offers details you need to know to copy music files to the card.
![]() Fast forward/fast rewind. To fast-forward, tap or select the Next Frame icon. Then hold down the Set button. To rewind, tap or select the Previous Frame icon and hold down the Set button.
Fast forward/fast rewind. To fast-forward, tap or select the Next Frame icon. Then hold down the Set button. To rewind, tap or select the Previous Frame icon and hold down the Set button.
![]() Go forward/back one frame while paused. Highlight or tap the Next Frame or Previous Frame icon, respectively, and then press the Set button.
Go forward/back one frame while paused. Highlight or tap the Next Frame or Previous Frame icon, respectively, and then press the Set button.
![]() Skip to the first or last frame. Tap the first or last frame icons, respectively, or highlight the icon and press Set.
Skip to the first or last frame. Tap the first or last frame icons, respectively, or highlight the icon and press Set.
![]() View a still photo you shot during the recording. If you took this step, the photo is displayed for about 1 second automatically during playback. You can also view the separate image file after you exit the movie playback; see Chapter 5 for still-photo playback details.
View a still photo you shot during the recording. If you took this step, the photo is displayed for about 1 second automatically during playback. You can also view the separate image file after you exit the movie playback; see Chapter 5 for still-photo playback details.
![]() Edit the movie. Tap the Edit icon or highlight it and press Set. Then follow the instructions in Chapter 10 to trim frames from the start or end of the movie — the limits of the editing you can do in-camera.
Edit the movie. Tap the Edit icon or highlight it and press Set. Then follow the instructions in Chapter 10 to trim frames from the start or end of the movie — the limits of the editing you can do in-camera.
![]() Exit playback. Tap the Menu icon or press the Menu button.
Exit playback. Tap the Menu icon or press the Menu button.
If you connect your camera to a TV or monitor for viewing, you can’t use the touchscreen controls; you must use the camera buttons to control playback.