
![]()
6
Downloading, Printing, and Sharing Your Photos
In This Chapter
![]() Choosing photo software
Choosing photo software
![]() Transferring pictures to your computer using Nikon ViewNX 2
Transferring pictures to your computer using Nikon ViewNX 2
![]() Processing Raw (NEF) files
Processing Raw (NEF) files
![]() Taking steps to ensure great print quality
Taking steps to ensure great print quality
![]() Preparing your photos for online sharing
Preparing your photos for online sharing
For many digital photographers, moving pictures from the camera to the computer — downloading, in geekspeak — is one of the more confusing aspects of the art form. Unfortunately, providing detailed downloading instructions in this book is impossible because the steps depend on which computer software you use for the job.
To give you as much help as I can, however, this chapter starts with a quick review of photo software, just in case you aren’t happy with your current solution. Following that, you can find information about downloading images, converting pictures that you shoot in the Raw format to a standard format, and preparing your pictures for print and online sharing. I do include specifics for performing some of these critical tasks using Nikon ViewNX 2, the free software that ships with your camera.
Choosing the Right Photo Software
Photo programs abound, ranging from inexpensive solutions for beginners to high-end options geared to professionals. The good news is that if you don’t need serious photo-editing capabilities, you may find a free program that serves your needs. The next section offers a look at a few of these freebies; following that, I present some programs to consider when the free options don’t meet your needs.
Three free photo programs
If you don’t do much retouching or other manipulation of your photos, one of the following free programs may be a good solution:
![]() Nikon ViewNX 2: This program, found on the CD included in your camera box, provides a photo organizer plus a few photo-editing features. You also can use the program to download pictures and to convert Raw files to a standard format. I show you how to accomplish both tasks later in this chapter.
Nikon ViewNX 2: This program, found on the CD included in your camera box, provides a photo organizer plus a few photo-editing features. You also can use the program to download pictures and to convert Raw files to a standard format. I show you how to accomplish both tasks later in this chapter.
Figure 6-1 offers a look at the ViewNX 2 window as it appears when you use Thumbnail Grid view mode, one of three display options available from the View menu.
 Two very cool program features to note:
• Viewing picture metadata: After you download photos, you can view picture metadata, which is hidden data that records the settings you used to take the picture. Just display the Metadata panel, located on the right side of the program window, as shown in Figure 6-1. If the panel is hidden, click the triangle on the far right side of the window and then click the triangle at the top of the panel. (I labeled both controls in the figure.) Many other photo programs also display metadata but sometimes can’t reveal data that’s very camera-specific.
• Viewing the focus point: Here’s a feature that other programs don’t offer: Click the Focus Point button, labeled in Figure 6-1, to display a red rectangle that indicates which focus point (or points, in some cases) that the camera used to establish focus, which can be helpful when you’re trying to troubleshoot focus problems. You don’t see the point if you used manual focusing, and it also may not appear if you used continuous autofocusing.
This book features Nikon ViewNX2 version 2.7.2. To find out which version you have, choose Help➮About ViewNX 2 in Windows and ViewNX 2➮About ViewNX 2 on a Mac. If you own an earlier version, download the updated software from the Nikon website (http://nikon.com). You must install version 2.7.2 or later for full functionality with files from your D5200.
![]() Apple iPhoto: Built into the Mac operating system (OS), this program offers a download tool and organizer, plus some basic editing features. Apple provides some great tutorials on using iPhoto at its website (
Apple iPhoto: Built into the Mac operating system (OS), this program offers a download tool and organizer, plus some basic editing features. Apple provides some great tutorials on using iPhoto at its website (www.apple.com) to help you get started using the program.
![]() Windows Live Photo Gallery: Some versions of Microsoft Windows also offer a free photo downloader and browser, Windows Live Photo Gallery. (The name varies slightly depending on your version of the Windows OS.) Like the other freebies mentioned here, this program offers a few basic retouching tools — again, depending on which version of Windows you use.
Windows Live Photo Gallery: Some versions of Microsoft Windows also offer a free photo downloader and browser, Windows Live Photo Gallery. (The name varies slightly depending on your version of the Windows OS.) Like the other freebies mentioned here, this program offers a few basic retouching tools — again, depending on which version of Windows you use.
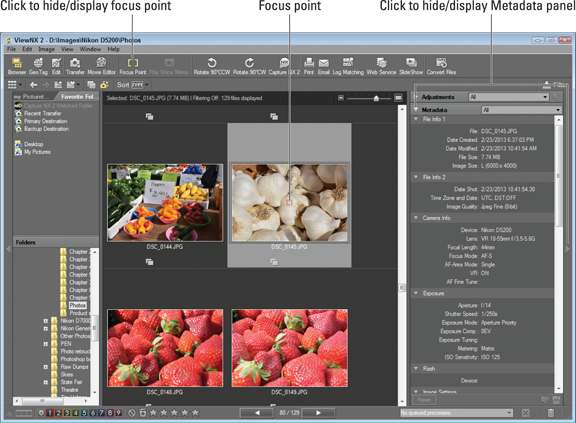
Figure 6-1: Nikon ViewNX 2, free with your camera, offers a photo organizer and some photo-editing functions.
Advanced photo programs
For serious retouching or advanced digital-imaging artistry, you need to step up to a full-fledged photo-editing program, such as one of the following:
![]() Adobe Photoshop Elements (about $100)
Adobe Photoshop Elements (about $100)
www.adobe.com/products/photoshop-elements.html
With a full complement of retouching tools, onscreen guidance for beginners, and an assortment of templates for creating photo projects such as scrapbooks, Elements offers all the features that most consumers need.
![]() Nikon Capture NX 2 (about $180)
Nikon Capture NX 2 (about $180)
www.capturenx.com/en/index.html
This Nikon program offers an image browser/organizer plus a wealth of pro-level photo-editing tools, including a sophisticated tool for processing Raw images. Visit its website for tutorials.
![]() Apple Aperture (about $80 through Mac App store)
Apple Aperture (about $80 through Mac App store)
Aperture is geared to shooters who need to organize and process lots of images but typically do only light retouching work — wedding photographers and school portrait photographers, for example.
![]() Adobe Photoshop Lightroom (about $150, or available as a monthly subscription via Adobe Cloud services)
Adobe Photoshop Lightroom (about $150, or available as a monthly subscription via Adobe Cloud services)
www.adobe.com/products/photoshop-lightroom.html
Lightroom is the Adobe counterpart to Aperture. In its latest version, it offers some fairly powerful retouching tools as well.
![]() Adobe Photoshop (about $700, or available as a monthly subscription via Adobe Cloud services)
Adobe Photoshop (about $700, or available as a monthly subscription via Adobe Cloud services)
Geared to photo pros, Photoshop offers the industry’s most sophisticated retouching tools.
Of these programs, only Elements is designed with the novice in mind, and even using Elements involves a bit of a learning curve. I recommend buying (and reading!) a guidebook or taking some classes to help you maximize your software investment.
Not sure which tool you need, if any? You can download 30-day free trials of all these programs from the manufacturers’ websites.
Sending Pictures to the Computer
Whatever software you choose, here are the ways you can download images to your computer:
![]() Connect the camera to the computer via a USB cable. The cable you need is supplied in the camera box.
Connect the camera to the computer via a USB cable. The cable you need is supplied in the camera box.
![]() Use a memory card reader. With a card reader, you simply pop the memory card out of your camera and into the card reader instead of hooking the camera to the computer. Many computers and printers now have card readers, and you also can buy standalone readers for less than $30.
Use a memory card reader. With a card reader, you simply pop the memory card out of your camera and into the card reader instead of hooking the camera to the computer. Many computers and printers now have card readers, and you also can buy standalone readers for less than $30.
![]() Invest in Eye-Fi memory cards and transfer images via a wireless network. You can find out more about these special wireless-enabled memory cards and how to set up the card to connect with your computer at the manufacturer's website,
Invest in Eye-Fi memory cards and transfer images via a wireless network. You can find out more about these special wireless-enabled memory cards and how to set up the card to connect with your computer at the manufacturer's website, www.eye.fi. Also check the Eye-Fi details provided in the D5200 manual; look for the section related to the Eye-Fi Upload option on the Setup menu. (The menu item appears only when an Eye-Fi card is installed in the camera.) I don't cover these cards in this book.
I recommend using a card reader because sending pictures directly from the camera requires that the camera be turned on during the entire download process, wasting battery power. That said, I include information about cable transfer in the next section in case you don’t have a card reader. To use a card reader, skip ahead to “Starting the transfer process.”
Connecting the camera and computer for picture download
With the USB cable that shipped with your camera, you can connect the camera to your computer and then transfer images to the computer’s hard drive. The next section explains the actual image-transfer process; the following steps walk you through connecting the two devices:
1. Check the level of the camera battery.
 If the battery is low, charge it before continuing. Running out of battery power during downloading can cause problems, including lost picture data. Alternatively, if you purchased the optional AC adapter, use that to power the camera during downloading.
2. Turn on the computer and give it time to finish its normal startup routine.
3. Turn off the camera.
4. Insert the smaller of the two plugs on the USB cable into the USB port on the side of the camera.
Look under the rubber door on the left side of the camera for this port, labeled in Figure 6-2.
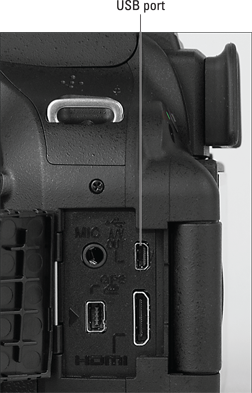
Figure 6-2: The port for connecting the USB cable is hidden under the rubber door on the left side of the camera.
5. Plug the other end of the cable into a USB port on the computer.
6. Turn on the camera.
What happens now depends on the photo software you have installed on your computer. The next section explains the possibilities and how to proceed with the image transfer process.
7. When the download is complete, turn off the camera and then disconnect it from the computer.
I repeat: Turn off the camera before severing its ties with the computer. Otherwise, you can damage the camera and/or the memory card.
Starting the transfer process
After you connect the camera to the computer or insert a memory card into your card reader, your next step depends, again, on the software installed on your computer.
Here are the most common possibilities and how to move forward:
![]() On a computer running Windows, a Windows message box similar to the one in Figure 6-3 appears. The figure shows the dialog box as it appears in Windows 7. By default, clicking the Import Pictures and Videos icon starts image transfer using Windows picture-transfer utility, but you can click the Change Program link to choose Nikon ViewNX 2 or some other program as your preferred transfer tool.
On a computer running Windows, a Windows message box similar to the one in Figure 6-3 appears. The figure shows the dialog box as it appears in Windows 7. By default, clicking the Import Pictures and Videos icon starts image transfer using Windows picture-transfer utility, but you can click the Change Program link to choose Nikon ViewNX 2 or some other program as your preferred transfer tool.
In older versions of Windows, you may see a dialog box listing installed programs that can handle the transfer; if so, click the one you want to use.
![]() An installed photo program automatically displays a photo-download wizard. For example, the downloader associated with Nikon ViewNX 2, iPhoto, or some other photo software may leap to the forefront. Usually, the downloader that appears is associated with the software that you most recently installed.
An installed photo program automatically displays a photo-download wizard. For example, the downloader associated with Nikon ViewNX 2, iPhoto, or some other photo software may leap to the forefront. Usually, the downloader that appears is associated with the software that you most recently installed.
If you don’t want a program’s auto-downloader to launch whenever you insert a memory card or connect your camera, you can turn off that feature. Check the software manual to find out how to disable the auto launch.

Figure 6-3: Windows 7 may display this initial boxful of transfer options.
![]() Nothing happens. Don’t panic; assuming that your card reader or camera is properly connected, all is probably well. Someone simply may have disabled all the automatic downloaders on your system. Just launch your photo software and then transfer your pictures using whatever command starts that process.
Nothing happens. Don’t panic; assuming that your card reader or camera is properly connected, all is probably well. Someone simply may have disabled all the automatic downloaders on your system. Just launch your photo software and then transfer your pictures using whatever command starts that process.
As another option, you can use Windows Explorer or the Mac Finder to drag and drop files from your memory card to your computer’s hard drive. You connect the card through a card reader, and the computer sees the card as just another drive on the system. Windows Explorer also shows the camera as a storage device when you cable the camera directly to the computer. So the process of transferring files is exactly the same as when you move any other file from a CD, DVD, or other storage device onto your hard drive. (With some versions of the Mac OS, including the most recent ones, the Finder doesn’t recognize cameras in this way.)
In the next section, I provide details on using Nikon ViewNX 2 to download your files. If you use some other software, the concepts are the same, but check your program manual to get the small details. In most programs, you also can find lots of information by simply clicking open the Help menu.
Downloading using ViewNX 2
Built into ViewNX 2 is a handy image-downloading tool called Nikon Transfer 2. Follow these steps to use it to transfer your pictures to your computer:
1. Attach your camera to the computer or insert a memory card into your card reader.
Depending on what software you have installed on your system, you may see a dialog box asking you how to download your photos. If the window that appears is the Nikon Transfer 2 window, as shown in Figure 6-4, skip to Step 3.
Similarly, if you see a Windows dialog box that contains the Nikon Transfer 2 option, click that option and skip to Step 3.
If nothing happens, don’t worry — just travel to Step 2, which shows you how to launch the Nikon Transfer 2 software if it didn’t appear automatically.
2. Launch Nikon Transfer 2 (if it isn’t already open).
To access the transfer tool, open Nikon ViewNX 2 and then choose File⇒Launch Transfer or click the Transfer button at the top of the window. The window shown in Figure 6-4 appears. (If you use a Mac, the window decor is slightly different, but the main controls and features are the same.)
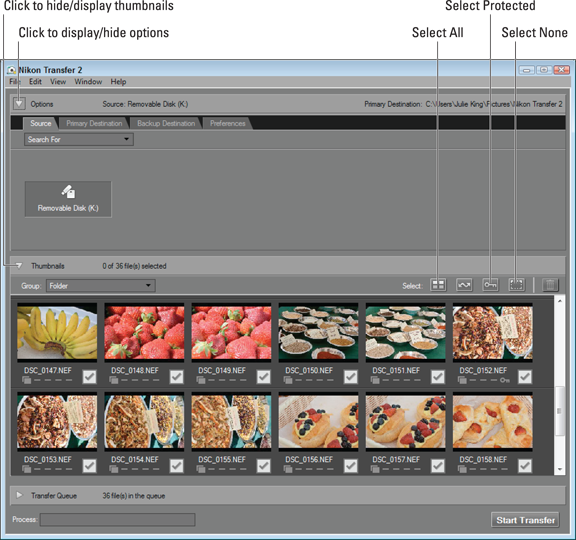
Figure 6-4: Select the check boxes of the images that you want to download.
3. Display the Source tab to view thumbnails of your pictures, as shown in the figure.
Don’t see any tabs? Click the Options triangle, labeled in Figure 6-4, to display them. Then click the Source tab. The icon representing your camera or memory card should be selected, as shown in the figure. If not, click the icon.
Thumbnails of your images appear in the bottom half of the dialog box. If you don’t see the thumbnails, click the Thumbnails arrow, labeled in Figure 6-4, to open the thumbnails area.
4. Select the images that you want to download.
A check mark in the little box under a thumbnail tells the program that you want to download the image. Click the box to toggle the check mark on and off.
Here are a few tips to speed up this process:
• Select protected images only. If you used the in-camera function to protect pictures (see Chapter 5), you can select just those images by clicking the Select Protected icon, labeled in Figure 6-4.
• Select all images. Click the Select All icon, also labeled in the figure.
• Select no images. Click the Select None icon. Use this trick if you accidentally select all photos but don’t want to import all of them.
5. Click the Primary Destination tab at the top of the window.
The top of the transfer window now offers options that enable you to specify where and how you want the images to be stored on your computer. Figure 6-5 offers a look.
6. Select the folder where you want to store the images from the Primary Destination Folder drop-down list.
The list is labeled in Figure 6-5. If the folder you want to use isn’t in the list, open the drop-down list, choose Browse from the bottom of the list, and then track down the folder and select it.
7. Specify whether you want the pictures to be placed inside a new subfolder.

Figure 6-5: Specify the folder where you want to put the downloaded images.
In the center portion of the dialog box, you get these secondary storage-folder options:
• Create Subfolder for Each Transfer: The program creates a new folder inside the storage folder you selected in Step 6. Then it puts all the pictures from the current download session into that new subfolder. You can either use the numerical subfolder name that the program suggests or click the Edit button to set up your own naming system. You might find it helpful to go with a folder name that includes the date that the batch of photos was taken, for example. You can reorganize your pictures into this type of setup after download, however.
• Use Subfolder with Same Name If It Exists: If the folder shown in the Create Subfolder box already exists, select this check box to avoid overwriting existing photo files. The program automatically assigns new filenames to the downloaded photos if the folder contains images that have the same filenames as the downloading ones.
• Choose Subfolder Under Primary Destination Folder: If you don’t want to create a new folder but put images into the existing subfolder under the primary folder, select this option. For example, if the primary folder is Pictures and the secondary folder is Nikon Transfer 2, as shown in Figure 6-5, your photos go into that Nikon Transfer 2 folder.
• Don’t Use Subfolder: Pictures go into the primary folder (Pictures, in the example shown in Figure 6-5).
• Copy Folder Names from Camera: As one final alternative, select the Copy Folder Names from Camera box if you want the program to retain the folder structure of the camera memory card. That folder is placed inside whatever folder or subfolder you select via the other options.
Yowsa. Don’t ever say the program developers didn’t want you to have plenty of storage folder flexibility.
8. Tell the program whether you want to rename the picture files during the download process.
If you do, select the Rename Files during Transfer check box. Then click the Edit button to display a dialog box where you can set up your new filenaming scheme. Click OK after you do so to close the dialog box.
9. (Optional) Set a backup destination.
This option is great if you back up photos to a secondary hard drive. You can download your photos to your primary image-storage drive and to the backup at the same time. To take advantage of this feature, click the Backup Destination tab, select the Backup Files box, and then use the other panel options to specify where you want the files to go.
10. Click the Preferences tab to set the rest of the transfer options.
The tab shown in Figure 6-6 takes over the top of the program window. Here you find a number of options that enable you to control how the program operates. Rather than covering all of them, which are explained quite nicely in the program’s Help system (access it via the Help menu), I want to highlight just three of the most helpful and critical options.
• Transfer New Files Only: This option, when selected, ensures that you don’t waste time downloading images that you’ve already transferred but are still on the memory card.
• Delete Original Files after Transfer: Turn off this option, as shown in Figure 6-6. Otherwise, your pictures are automatically erased from your memory card when the transfer is complete. Always make sure the pictures really made it to the computer before you delete them from your memory card. (See Chapter 5 to find out how to use the Delete function on your camera.)
• Open Destination Folder with the Following Application after Transfer: You can tell the program to immediately open your photo program after the transfer is complete. Choose ViewNX 2, as shown in the figure, to view, organize, and edit your photos using that program. To choose another program, open the drop-down list, select Browse, and select the program from the dialog box that appears. Click OK after doing so.
Your choices remain in force for any subsequent download sessions, so you don’t have to revisit this tab unless you want the program to behave differently.
11. When you’re ready to start the download, click the Start Transfer button.
It’s located in the lower-right corner of the program window. After you click the button, the Process bar in the lower-left corner indicates how the transfer is progressing. Again, what happens when the transfer completes depends on the choices you made in Step 10; if you selected Nikon ViewNX 2 as the photo program, it opens and displays the folder that contains your just-downloaded images.
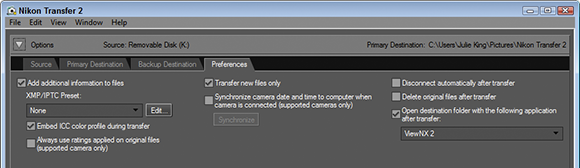
Figure 6-6: Control other aspects of the program’s behavior via the Preferences tab.
Processing Raw (NEF) Files
Chapter 2 introduces you to the Raw file format. The advantage of capturing Raw files — NEF files on Nikon cameras — is that you make the decisions about how to translate the original picture data into an actual photograph. You can specify attributes such as color intensity, image sharpening, contrast, and so on — which are all handled automatically by the camera if you use its other file format, JPEG, also detailed in Chapter 2. You take these steps by using a software tool known as a Raw converter.
 The bad news: Until you convert your NEF files into a standard file format, you can’t share them online or print them from most programs other than Nikon ViewNX 2. You also can’t get prints from retail outlets or open them in many photo-editing programs.
To process your NEF files, you have the following options:
![]() Use the in-camera processing feature. Through the Retouch menu, you can process your Raw images right in the camera. You can specify only limited image attributes, and you can save the processed files only in the JPEG format, but still, having this option is a nice feature.
Use the in-camera processing feature. Through the Retouch menu, you can process your Raw images right in the camera. You can specify only limited image attributes, and you can save the processed files only in the JPEG format, but still, having this option is a nice feature.
![]() Process and convert in ViewNX 2. ViewNX 2 also offers a Raw processing feature. Again, the controls for setting picture characteristics are a little limited, but you can save the adjusted files in either the JPEG or TIFF format, and TIFF is better at holding onto the original image quality than JPEG.
Process and convert in ViewNX 2. ViewNX 2 also offers a Raw processing feature. Again, the controls for setting picture characteristics are a little limited, but you can save the adjusted files in either the JPEG or TIFF format, and TIFF is better at holding onto the original image quality than JPEG.
 TIFF stands for Tagged Image File Format.
![]() Use Nikon Capture NX 2 or a third-party Raw conversion tool. For the most control over your Raw images, you need to open your wallet and invest in a program that offers a truly sophisticated converter. See the first part of this chapter for a review of Capture NX 2; the other programs mentioned in the same section also offer good Raw converters.
Use Nikon Capture NX 2 or a third-party Raw conversion tool. For the most control over your Raw images, you need to open your wallet and invest in a program that offers a truly sophisticated converter. See the first part of this chapter for a review of Capture NX 2; the other programs mentioned in the same section also offer good Raw converters.
The next two sections show you how to convert Raw files using your camera and ViewNX 2. If you opt for a third-party conversion tool, check the program’s Help system for details on how to use the various controls, which vary from program to program.
Processing Raw images in the camera
Through the NEF (RAW) Processing option on the Retouch menu, you can create a JPEG version of a Raw file right in the camera. Follow these steps:
![]() 1. Press the Playback button to switch to playback mode.
1. Press the Playback button to switch to playback mode.
2. Display the picture you want to process in the single-image (full-frame) view.
If necessary, you can shift from thumbnails view to single-image view by just pressing OK.
3. Press the OK button.
The Retouch menu appears atop your photo, as shown in Figure 6-7.
4. Use the Multi Selector to scroll to the NEF (RAW) Processing option, as shown in Figure 6-7.
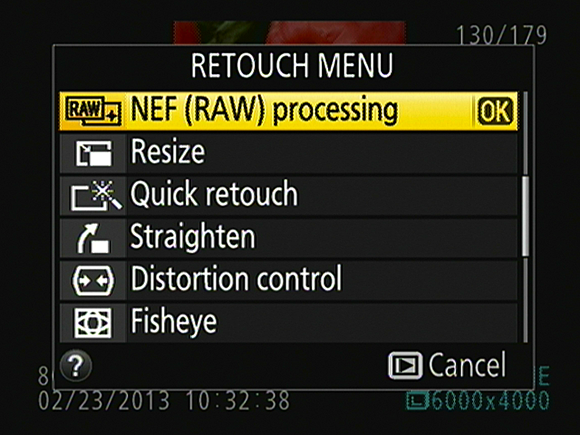
Figure 6-7: In single-image playback mode, press the OK button to display the Retouch menu over your photo.
5. Press OK to display your processing options.
You see a screen similar to the one in Figure 6-8, which is where you specify what settings you want the camera to use when creating the JPEG version of your Raw image. If you press the Multi Selector down, you scroll to the second page of options, shown in Figure 6-9.
6. Set the conversion options.
Along the right side of the screen, you see a vertical column offering the conversion options labeled in Figures 6-8 and 6-9. To establish the setting for an option, highlight it and then press the Multi Selector right. You then see the available settings for the option. Use the Multi Selector to adjust or highlight the setting you want to use and press OK to return to the main Raw conversion screen. Or, if a triangle appears to the right of an option name, you can press the Multi Selector right to uncover additional options.
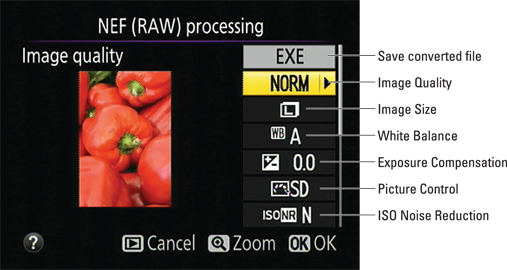
Figure 6-8: These Raw conversion options are on the first page of the menu screen.
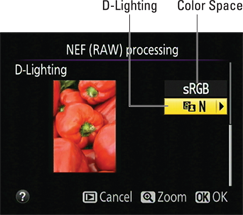
Figure 6-9: Press the Multi Selector down to scroll to the second page of conversion settings.
Rather than detailing all the options here, the following list points you to the chapter where you can explore the settings available for each:
• Image Quality: See the Chapter 2 section related to the JPEG format for details on this option. Choose Fine to retain maximum picture quality.
• Image Size: Chapter 2 explains this one, too. Choose Large to retain all the original image pixels.
• White Balance: Check out Chapter 8 for details about White Balance options, which affect picture colors. Unless colors look off, stick with the default, Auto.
• Exposure Compensation: With this option, which I cover in Chapter 7, you can adjust image brightness. When using this feature for Raw conversion, you’re limited to a range of –2.0 and +2.0; when shooting, you can choose from settings ranging from –5.0 to +5.0.
• Picture Control: This option enables you to adjust color saturation, contrast, and image sharpness. For a review of the available settings, see the last part of Chapter 8. Or just experiment with the different settings: The onscreen image preview updates to show you the results of each option.
• ISO Noise Reduction: If your picture looks noisy — that is, marred by a speckled look — playing with this setting may help eliminate the flaw. See Chapter 7 for an explanation of this feature, which is designed to reduce the amount of noise in pictures shot using a high ISO Sensitivity setting.
• Color Space: This setting determines whether the camera sticks with the default color space, sRGB, or the larger Adobe RGB color space when converting your photo. Stick with sRGB until you digest the Chapter 8 section that details this option.
• D-Lighting: To brighten the darkest part of your picture without also brightening the lightest areas, try adjusting this setting. It’s the post-capture equivalent of the Active D-Lighting feature that’s available during shooting; see Chapter 7 for help with the option. To darken shadows, try setting the option to Off.
![]() At any time, you can magnify the view of the image by pressing the Zoom In button. Release the button to return to the normal display.
At any time, you can magnify the view of the image by pressing the Zoom In button. Release the button to return to the normal display.
7. After setting the conversion options, highlight EXE on the first conversion screen (refer to Figure 6-8) and press OK.
The camera records a JPEG copy of your Raw file and displays the copy in the monitor. The camera assigns the next available file number to the image, so the number of the original and the number of the processed JPEG don’t match.
Processing Raw files in ViewNX 2
In Nikon ViewNX 2, you can convert your Raw files to the JPEG format or, for top picture quality, to the TIFF format. Although the ViewNX 2 converter isn’t as full-featured as the ones in Nikon Capture NX 2 and some other photo-editing programs, it does enable you to make some adjustments to your Raw images. Follow these steps to try it out:
1. Open ViewNX 2 and click the thumbnail of the image that you want to process.
You may want to set the program to Image Viewer mode, as shown in Figure 6-10, so that you can see a larger preview of your image. Just choose View⇒Image Viewer to switch to this display mode. To give the photo even more room, also hide the Browser panel, which normally occupies the left third of the window, and the Filmstrip panel that usually runs across the bottom of the window. Choose Window⇒Browser and Window⇒Filmstrip to toggle those window elements on and off.
2. Display the Adjustments panel on the right side of the program window.
You can see the panel in Figure 6-10. Show and hide this panel and the Metadata panel by choosing Window⇒Edit or by clicking the triangle on the far-right side of the window. You can then display and collapse the individual panels by clicking the triangles to the left of their names. (I labeled the triangles in the figure.) To allow the maximum space for the Raw conversion adjustments, collapse the Metadata panel, as shown in the figure. If necessary, drag the vertical bar between the image window and the Adjustments panel to adjust the width of the panel.
3. To display all available image settings, choose All from the Adjustments drop-down list at the top of the panel, as shown in Figure 6-10.
You may need to use the scroll bar on the right side of the panel to adjust the display to see all the options.
4. Use the panel controls to adjust your image.
The preview you see in the image window reflects the default conversion settings chosen by Nikon, but you can play with any of the settings as you see fit. If you need help understanding any of the options, open the built-in help system (via the Help menu), where you can find descriptions of how each adjustment affects your image.
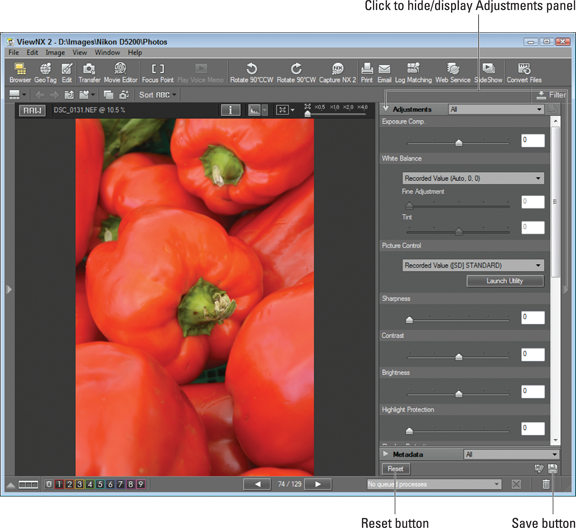
Figure 6-10: Display the Adjustments panel to tweak Raw images before conversion.
To return to the original image settings, click the Reset button at the bottom of the panel, labeled in Figure 6-10.
5. Click the Save button at the bottom of the panel. (Refer to Figure 6-10.)
This step stores your conversion settings as part of the image file but doesn’t actually create your processed image file. Don’t worry, though. Your original Raw data remains intact; all that’s saved with the file is a “recipe” for processing the image, which you can change at any time.
6. To save the processed file, choose File⇒Convert Files.
Alternatively, click the Convert Files button on the toolbar at the top of the program window. Either way, you see the Convert Files dialog box, shown in Figure 6-11.
7. Choose TIFF(8 Bit) from the File Format drop-down list.
TIFF is the best format because it retains your processed file at the highest image quality. (This format has long been the preferred format for print publication.) Don’t choose JPEG; the JPEG format applies lossy compression, thereby sacrificing some image quality. If you need a JPEG copy of your processed Raw image for online sharing — TIFF files won’t work for that use — you can easily create one from your TIFF version by following the steps laid out near the end of this chapter, in the section “Prepping online photos using ViewNX 2.”
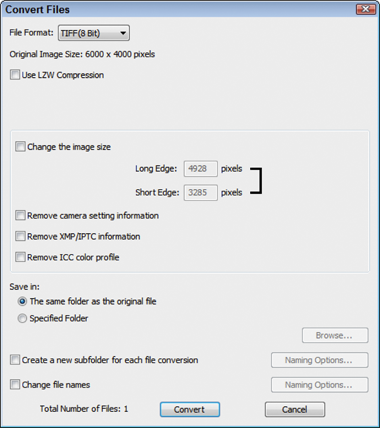
Figure 6-11: To retain the best image quality, save processed Raw files in the TIFF format.
As for the 8 Bit part of the option name: A bit is a unit of computer data; the more bits you have, the more colors your image can contain. Although you can create 16-bit TIFF files in the converter, many photo-editing programs either can’t open them or limit you to a few editing tools, so I suggest you stick with the standard, 8-bit image option. Your image will contain more than enough colors, and you’ll avoid potential conflicts caused by so-called “high-bit images.”
8. Deselect the Use LZW Compression option, as shown in Figure 6-11.
Although LZW compression reduces the file size somewhat and does not cause any quality loss, some programs can’t open files that were saved with this option enabled, so turn it off.
9. Deselect the Change the Image Size check box.
This step ensures that you retain all the original pixels in your processed image, which gives you the most flexibility in terms of generating quality prints at large sizes. For details on printing as it relates to this issue, check out the next section.
10. Deselect each of the three Remove check boxes.
If you select the check boxes, you strip image metadata — the extra text data that’s stored by the camera — from the file. Unless you have some specific reason to do so, clear all three check boxes so that you can continue to access the metadata when you view your processed image in programs that know how to display metadata.
11. Select a storage location for the processed TIFF file.
You do this in the Save In area of the dialog box. Select the top option to save your processed file in the same folder as the original Raw file. Or, to put the file in a different folder, select the Specified Folder button. If you do, you see the name of the currently selected alternative folder below the button; change the storage destination by clicking the Browse button and then selecting the drive and folder where you want to put the file.
By selecting the Create a New Subfolder for Each File Conversion check box, you can put your TIFF file into a separate folder within the destination folder. With this check box enabled, click the Naming Options button and then specify how you want to name the subfolder.
12. Specify whether you want to give the processed TIFF a different filename from the original Raw image.
To do so, select the Change File Names check box, click the Naming Options button, and enter the name you want to use.
If you don’t change the filename, the program gives the file the same name as the original Raw file. However, you don’t overwrite that Raw file because you’re storing the copy in a different file format (TIFF). In Windows, the filename of the processed TIFF image has the three-letter extension TIF.
13. Click the Convert button.
A window appears to show you the progress of the conversion process. When the window disappears, your TIFF image appears in the storage location you selected in Step 11.
One neat thing about working with Raw images is that you can easily create as many variations of your photo as you want. For example, you might choose one set of options when processing your Raw file the first time and then use an entirely different set to create another version of the photo. Just be sure to give each processed file a unique name so that you don’t overwrite the first TIFF file you create with your second version.
Planning for Perfect Prints
Images from your D5200 can produce dynamic prints, but getting the best prints from your picture files requires a little knowledge and prep work on your part. To that end, the next three sections help you avoid the most common printing problems.
Check the pixel count before you print
Resolution — the number of pixels in your digital image — plays a huge role in how large you can print your photos and still maintain good picture quality. You can get the complete story on resolution in Chapter 2, but here’s a recap as it relates to printing:
![]() Choose the right resolution before you shoot. Set resolution via the Image Size option on the Shooting menu or via the Information display control strip.
Choose the right resolution before you shoot. Set resolution via the Image Size option on the Shooting menu or via the Information display control strip.
You must select the size before you capture an image, which means that you need some idea of the ultimate print size before you shoot. When you do the resolution math, remember to take any cropping you plan to do into account.
![]() Aim for a minimum of 200 pixels per inch (ppi). You’ll get a wide range of recommendations on this issue, even among professionals. But in general, if you aim for a resolution in the neighborhood of 200 ppi, you should be pleased with your results. If you want a 4 x 6" print, for example, you need at least 800 x 1200 pixels.
Aim for a minimum of 200 pixels per inch (ppi). You’ll get a wide range of recommendations on this issue, even among professionals. But in general, if you aim for a resolution in the neighborhood of 200 ppi, you should be pleased with your results. If you want a 4 x 6" print, for example, you need at least 800 x 1200 pixels.
Depending on your printer, you may get even better results at a slightly lower resolution. On the other hand, some printers do their best work when fed 300 ppi, and a few request 360 ppi as the optimum resolution. However, using a resolution higher than that typically doesn’t produce any better prints. Unfortunately, because most printer manuals don’t bother to tell you what image resolution produces the best results, finding the right pixel level is a matter of experimentation.
Don’t confuse ppi with the manual’s statements related to the printer’s dpi. Dots per inch (dpi) refers to the number of dots of color the printer can lay down per inch; many printers use multiple dots to reproduce one image pixel.
If you’re printing photos at a retail kiosk or at an online site, the software you use to order prints should determine the resolution of your files and then suggest appropriate print sizes. If you’re printing on a home printer, though, you need to be the resolution cop.
What do you do if you don’t have enough pixels for the print size you have in mind? You have the following two choices, neither of which provides a good outcome:
![]() Keep the existing pixel count and accept lowered photo quality. In this case, the pixels simply get bigger to fill the requested print size. When pixels grow too large, they produce a defect known as pixelation: The picture starts to appear jagged, or stairstepped, along curved or oblique lines. Or, at worst, your eye can make out the individual pixels, and your photo begins to look more like a mosaic than, well, like a photograph.
Keep the existing pixel count and accept lowered photo quality. In this case, the pixels simply get bigger to fill the requested print size. When pixels grow too large, they produce a defect known as pixelation: The picture starts to appear jagged, or stairstepped, along curved or oblique lines. Or, at worst, your eye can make out the individual pixels, and your photo begins to look more like a mosaic than, well, like a photograph.
![]() Add more pixels and accept lowered photo quality. In some photo programs, you can add pixels to an image. (The technical term for this process is upsampling.) Some other photo programs even upsample the photo automatically for you, depending on the print settings you choose.
Add more pixels and accept lowered photo quality. In some photo programs, you can add pixels to an image. (The technical term for this process is upsampling.) Some other photo programs even upsample the photo automatically for you, depending on the print settings you choose.
Although adding pixels might sound like a good option, it actually doesn’t help in the long run. You’re asking the software to make up photo information out of thin air, and the resulting image usually looks worse than the original. You don’t see pixelation, but details turn muddy, giving the image a blurry, poorly rendered appearance.
To hammer home the point about the impact of resolution on picture quality, Figures 6-12 through 6-14 show you the same image as it appears at 300 ppi (the resolution required by the publisher of this book), at 50 ppi, and then resampled from 50 ppi to 300 ppi. As you can see, there’s just no way around the rule: If you want the best-quality prints, you need the right pixel count from the get-go.
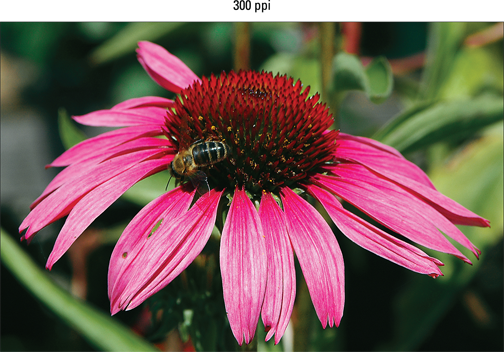
Figure 6-12: A high-quality print depends on a high-resolution original.
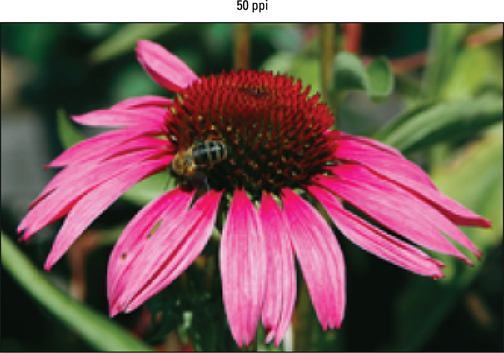
Figure 6-13: At 50 ppi, the image has a jagged, pixelated look.
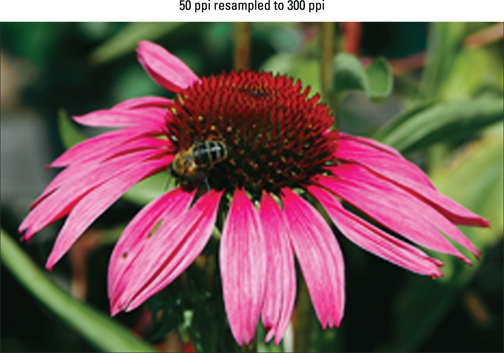
Figure 6-14: Adding pixels in a photo editor doesn’t rescue a low-resolution original.
Allow for different print proportions
Your camera produces images that have a 3:2 aspect ratio, which matches the proportions of a 4 x 6" print. To print your photo at other traditional sizes — 5 x 7, 8 x 10, and so on — you need to crop the photo to match those proportions. Alternatively, you can reduce the photo size slightly and leave an empty margin along the edges of the print as needed.
As a point of reference, both images in Figure 6-15 are original, 3:2 images. The red outlines indicate how much of the original can fit within a 5 x 7" frame and an 8 x 10" frame, respectively.
Chapter 11 shows you how to crop your image using the Trim option on the Retouch menu. However, this in-camera tool enables you to crop to only five aspect ratios: 3:2, 4:3, 5:4, 1:1, and 16:9. For other crop proportions, use Nikon ViewNX 2 or some other photo software to do the job. (The crop tool lives on the Adjustments panel in Nikon ViewNX 2.)
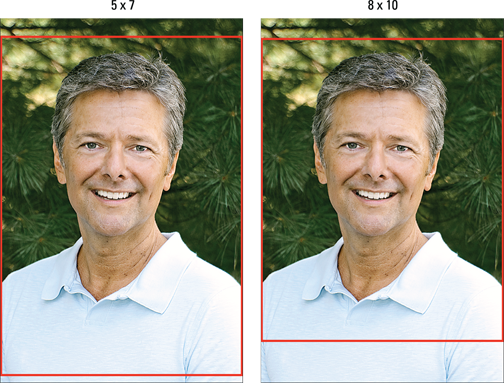
Figure 6-15: Composing your shots with a little head room enables you to crop to different frame sizes.
You also can usually crop your photo using the software provided at online printing sites and at retail print kiosks. If you plan to simply drop off your memory card for printing at a lab, be sure to find out whether the printer automatically crops the image without your input. If so, use your photo software to crop the photo, save the cropped image to your memory card, and deliver that version of the file to the printer.
To allow yourself some printing flexibility, leave a little margin of background around your subject when you shoot. That way, you don’t clip off the edges of the subject, no matter what print size you choose. (Some people refer to this margin padding as head room, especially when describing portrait composition.)
Get print and monitor colors in sync
Your photo colors look perfect on your computer monitor, but when you print the picture, the image is too red or too green or has another nasty color tint. This problem can occur because of any or all the following factors:
![]() Your monitor needs to be calibrated. If the monitor isn’t accurately calibrated, the colors it displays aren’t a true reflection of your image. The same caveat applies to monitor brightness: You can’t accurately gauge the exposure of a photo if the brightness of the monitor is cranked way up or down. Many monitors sold today are very bright, providing ideal conditions for web browsing and watching movies but not necessarily for photo editing. You may need to turn the brightness way, way down to get to a true indication of image exposure.
Your monitor needs to be calibrated. If the monitor isn’t accurately calibrated, the colors it displays aren’t a true reflection of your image. The same caveat applies to monitor brightness: You can’t accurately gauge the exposure of a photo if the brightness of the monitor is cranked way up or down. Many monitors sold today are very bright, providing ideal conditions for web browsing and watching movies but not necessarily for photo editing. You may need to turn the brightness way, way down to get to a true indication of image exposure.
To ensure that your monitor displays photos on a neutral canvas, I recommend that you invest in a monitor calibration tool such as the huey PRO (about $100, www.pantone.com); the Spyder4Express (about $120, http://spyder.datacolor.com); or the X-Rite ColorMunki Display ($190, www.xritephoto.com). These products use a device known as a colorimeter to accurately measure display colors.
At the end of the calibration process, the tool produces a monitor profile that tells your computer how to adjust the display to compensate for any monitor color casts or brightness and contrast issues. Your Windows or Mac OS loads this file automatically when you start your computer.
![]() One of your printer cartridges is empty or clogged. If your prints look great one day but are way off the next, the number-one suspect is an empty ink cartridge or a clogged print nozzle or head. Check your manual to find out how to perform the necessary maintenance to keep the nozzles or print heads in good shape.
One of your printer cartridges is empty or clogged. If your prints look great one day but are way off the next, the number-one suspect is an empty ink cartridge or a clogged print nozzle or head. Check your manual to find out how to perform the necessary maintenance to keep the nozzles or print heads in good shape.
If black-and-white prints have a color tint, a logical assumption is that your black ink cartridge is to blame, if your printer has one. However, that’s probably not the case. Images from a printer that doesn’t use multiple black or gray cartridges typically have a slight color tint, even when all ink cartridges are fine because to create gray, the printer instead has to mix yellow, magenta, and cyan in perfectly equal amounts — and that’s a difficult feat for the typical inkjet printer to pull off. Long story short: Unless your printer is marketed for producing good black-and-white prints, save yourself some grief by having your black-and-whites printed at a retail lab.
![]() You chose the wrong paper setting in your printer software. When you set up a print job, be sure to select the right setting from the paper type option — glossy or matte, for example. This setting affects how the printer lays down ink on the paper.
You chose the wrong paper setting in your printer software. When you set up a print job, be sure to select the right setting from the paper type option — glossy or matte, for example. This setting affects how the printer lays down ink on the paper.
![]() Your photo paper is low quality. Sad but true: Cheap, store-brand photo papers usually don’t render colors as well as the higher-priced, name-brand papers.
Your photo paper is low quality. Sad but true: Cheap, store-brand photo papers usually don’t render colors as well as the higher-priced, name-brand papers.
Some paper manufacturers, especially those that sell fine-art papers, offer downloadable printer profiles, which are simply data files that tell your printer how to manage color for the paper. Refer to the manufacturer’s website for information on how to install and use the profiles.
![]() Your printer and photo software fight over color management duties. Some photo programs offer color management tools, which enable you to control how colors are handled as an image passes from camera to monitor to printer. Most printer software also offers color management features. The problem is that if you enable the color management controls in both your photo software and printer software, you can create conflicts that lead to wacky colors. Check your photo software and printer manuals for color management options and ways to turn them on and off.
Your printer and photo software fight over color management duties. Some photo programs offer color management tools, which enable you to control how colors are handled as an image passes from camera to monitor to printer. Most printer software also offers color management features. The problem is that if you enable the color management controls in both your photo software and printer software, you can create conflicts that lead to wacky colors. Check your photo software and printer manuals for color management options and ways to turn them on and off.
Even if all the aforementioned issues are resolved, however, don’t expect perfect color matching between printer and monitor. Printers simply can’t reproduce the entire spectrum of colors that a monitor can display. In addition, monitor colors always appear brighter because they are, after all, generated with light.
Finally, be sure to evaluate print colors and monitor colors in the same ambient light — daylight, office light, whatever — because that light source has its own influence on the colors you see. Also allow your prints to dry for 15 minutes or so before you make any final judgments.
Exploring two special printing options
Your camera offers two features that enable you to print directly from the camera or memory card:
![]() DPOF (Digital Print Order Format): With this option, accessed via the DPOF Print Order option on the Playback menu, you select pictures from your memory card to print and then specify how many copies you want of each image. Then, if your photo printer has a memory-card slot compatible with your camera’s cards and supports DPOF, you just pop the memory card into that slot. The printer reads your “print order” and outputs just the requested copies of your selected images. (You use the printer’s own controls to set paper size, print orientation, and other print settings.)
DPOF (Digital Print Order Format): With this option, accessed via the DPOF Print Order option on the Playback menu, you select pictures from your memory card to print and then specify how many copies you want of each image. Then, if your photo printer has a memory-card slot compatible with your camera’s cards and supports DPOF, you just pop the memory card into that slot. The printer reads your “print order” and outputs just the requested copies of your selected images. (You use the printer’s own controls to set paper size, print orientation, and other print settings.)
![]() PictBridge: If you have a PictBridge-enabled photo printer, you can connect the camera to the printer by using a USB cable. A PictBridge interface appears on the camera monitor, and you use the camera controls to select the pictures you want to print. With PictBridge, you specify additional print options from the camera, such as page size and whether to print a border around the photo.
PictBridge: If you have a PictBridge-enabled photo printer, you can connect the camera to the printer by using a USB cable. A PictBridge interface appears on the camera monitor, and you use the camera controls to select the pictures you want to print. With PictBridge, you specify additional print options from the camera, such as page size and whether to print a border around the photo.
If you’re interested in exploring either printing feature, look for details in your camera manual.
Preparing Pictures for E-Mail and Online Sharing
Have you ever received an e-mail containing a photo so large that you can’t view the whole thing on your monitor without scrolling the e-mail window? This annoyance occurs because monitors can display only a limited number of pixels. The exact number depends on the screen resolution setting, but suffice it to say that today’s digital cameras produce photos with pixel counts in excess of what the monitor can handle.
Thankfully, the newest e-mail programs incorporate features that automatically shrink the photo display to a viewable size. In Windows Live Mail, for example, photos arrive with a thumbnail link to a slide show viewer that can handle even gargantuan images. That doesn’t change the fact that a large photo file means longer downloading times, though — and if recipients choose to hold onto the picture, a big storage hit on their hard drives.
Sending a high-resolution photo is the thing to do if you want the recipient to be able to generate a good print. However, it’s polite practice to ask people if they want to print 11 x 14 glossies of your new puppy before you send them a dozen 24 megapixel (MP) shots.
For simple onscreen viewing, I suggest limiting your photos to fewer than 1,000 pixels on the longest side of the image. That ensures that people who use an e-mail program that doesn’t offer the latest photo-viewing tools can see the entire picture without scrolling the viewer window.
This size recommendation means that even if you shoot at your camera’s lowest Image Size setting (2992 x 2000), you wind up with more pixels than you need for onscreen viewing. Some new e-mail programs have a photo-upload feature that creates a temporary low-res version for you, but if not, creating your own copy is easy. If you’re posting to an online photo-sharing site, you may be able to upload all your original pixels, but many sites have resolution limits.
In addition to resizing high-resolution images, check their file types; if the photos are in the Raw (NEF) or TIFF format, you need to create a JPEG copy for online use. Web browsers and e-mail programs can’t display Raw or TIFF files.
You can tackle both bits of photo prep in ViewNX 2 or by using the Resize option in your camera. The next sections explain both methods.
Prepping online photos using ViewNX 2
For pictures already downloaded to the computer, you can create small-sized JPEG copies for online sharing using ViewNX 2. Just click the image thumbnail and then choose File⇒Convert Files from the menu bar. When the Convert Files dialog box appears (see Figure 6-16), set up things as follows:
![]() Select JPEG as the file format. Make your selection from the File Format drop-down list.
Select JPEG as the file format. Make your selection from the File Format drop-down list.
![]() Set the picture-quality level. Use the Quality slider, labeled in Figure 6-16, to set the picture quality, which is controlled by how much JPEG compression is applied when the file is saved. For best quality, drag the slider all the way to the right, but remember the tradeoff: As you raise the quality, less compression occurs, which results in a larger file size. (See Chapter 2 for more information about JPEG compression.)
Set the picture-quality level. Use the Quality slider, labeled in Figure 6-16, to set the picture quality, which is controlled by how much JPEG compression is applied when the file is saved. For best quality, drag the slider all the way to the right, but remember the tradeoff: As you raise the quality, less compression occurs, which results in a larger file size. (See Chapter 2 for more information about JPEG compression.)
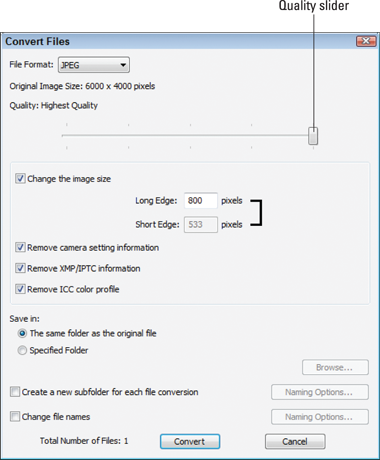
Figure 6-16: In ViewNX 2, select the Convert Files option to create a web-friendly version of a photo.
![]() Set the image size (number of pixels). To resize the photo, select the Change the Image Size check box and then enter a value (in pixels) for the longest dimension of the photo. The program automatically fills in the other value.
Set the image size (number of pixels). To resize the photo, select the Change the Image Size check box and then enter a value (in pixels) for the longest dimension of the photo. The program automatically fills in the other value.
![]() Select all three Remove check boxes, as shown in Figure 6-16. Selecting these options removes unnecessary camera metadata, which reduces image file size.
Select all three Remove check boxes, as shown in Figure 6-16. Selecting these options removes unnecessary camera metadata, which reduces image file size.
The rest of the options work just as they do during Raw conversion; see “Processing Raw files in ViewNX 2,” earlier in this chapter, for details.
If you’re resizing a JPEG original, be sure to give the small version a new name to avoid overwriting that original.
Resizing pictures from the Retouch menu
The in-camera resizing tool, found on the Retouch menu, works on both JPEG and Raw images. With both types of files, your resized copy is saved in the JPEG format.
To use this tool, take these steps:
![]() 1. Set the camera to playback mode, display your photo in single-image view, and press OK.
1. Set the camera to playback mode, display your photo in single-image view, and press OK.
The Retouch menu appears over your photo, as shown on the left in Figure 6-17.
2. Select Resize and press the Multi Selector right.

Figure 6-17: Use the Resize option to create a low-resolution version of a picture on your memory card.
You see a screen listing the possible image sizes, as shown on the right in Figure 6-17. The first value shows the pixel dimensions of the small copy; the second, the total number of pixels, measured in megapixels.
3. Highlight the size you want to use and press the Multi Selector right.
A screen appears asking you for permission to make a small copy of the photo.
4. Highlight Yes and press OK.
The camera duplicates the selected images and downsamples (eliminates pixels from) the copies to achieve the size you specified. The small copies are saved in the JPEG file format, using the same Image Quality setting (Fine, Normal, or Basic) as the original. Raw originals are saved as JPEG Fine images. Either way, your original picture files remain untouched.
To resize a batch of photos at a time, take a different route: Display the Retouch menu, choose Resize, and press OK to display a screen that has two options: Select Image and Choose Size. First, select Choose Size to set the pixel count of the small images. Then choose Select Image to display thumbnails of your photos.
![]() Next, use the Multi Selector to move the yellow highlight box over an image you want to resize and then press the Zoom Out button to tag it with a resize icon. Highlight the next photo, rinse, and repeat. After tagging all the photos, press OK to display the go-ahead screen; highlight Yes and press OK to resize all the selected photos.
Next, use the Multi Selector to move the yellow highlight box over an image you want to resize and then press the Zoom Out button to tag it with a resize icon. Highlight the next photo, rinse, and repeat. After tagging all the photos, press OK to display the go-ahead screen; highlight Yes and press OK to resize all the selected photos.
However you go about the process, small-size copies appear during playback marked by a Resize symbol next to the file size (lower-right corner), as shown in Figure 6-18. The filename of the resized image begins with SSC_ (or _SSC, if the original was captured using the Adobe RGB Color Space). And if you’re viewing the photo in any playback display mode except None, the Retouch icon — a little paintbrush symbol — appears at the top of the screen, as shown in the figure. (See Chapter 5 for details about playback display modes.)
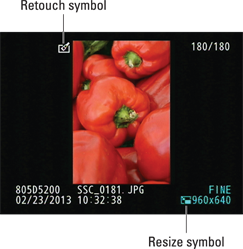
Figure 6-18: The Resize icon indicates a small-size copy.