
Chapter 9
Working with Data
What You Will Learn in This Chapter
- Working with data collections
- Consuming data
- Performing I/O operations
- Understanding serialization
WROX.COM CODE DOWNLOADS FOR THIS CHAPTER
You can find the code downloads for this chapter at www.wrox.com/remtitle.cgi?isbn=1118612094 on the Download Code tab. The code is in the chapter09 download and individually named according to the names throughout the chapter.
Managing data is an essential part of most applications, and understanding all the options available to you is critical when studying for the test, but also for advancing your career as a developer. The first section in this chapter will explain the concept of arrays and collections. These are two options you have for managing sets of data in C#.
The second section, on consuming data, discusses accessing databases using ADO.NET, the ADO.NET Entity Framework, and WCF Data Services. ADO.NET is a set of classes in the .NET Framework that enables you to connect to a database, retrieve data, execute stored procedures, add, update, and delete records. The ADO.NET Entity Framework is an object relational mapping tool that provides a graphical user interface that generates the code for you to perform the operations against a database using ADO.NET. WCF Data Services is a feature in .NET that exposes an ADO.NET Entity Framework model so that it can be accessed over the web or an intranet.
The third section reviews I/O operations and the many choices available for reading and writing files. It also demonstrates how to read and write files asynchronously to create responsive applications during long running processes.
The final section discusses serialization and how to convert an object into binary format, XML, or JSON. This allows you to easily transform a record, or records, in a database to a format that could be used by another system or persisted to disk as a file.
Table 9-1 introduces you to the exam objectives covered in this chapter.
Table 9-1: 70-483 Exam Objectives Covered in This Chapter
| Objective | Content Covered |
| Perform I/O operations | This includes reading-and-writing files and streams either synchronously or asynchronously. |
| Consume data | This includes retrieving, adding, updating, and deleting data from a database. This also includes using the ADO.NET Entity Framework and WCF Data Services to expose a database to other systems. |
| Serialize and deserialize data | This includes how to serialize and deserialize data using binary, custom, XML, JSON, and Data Contract serialization. |
| Store data in and retrieve data from collections | This includes data using arrays and collections |
Working with Data Collections
Understanding how to manipulate a series of data is critical for all types of developers. For example, drop-down lists require a set of data, reading records from a database requires a set of data, and reading a file requires storing a set of data in memory. There are many different terms peoples use to describe a series of data such as arrays, sets, collections, lists, dictionaries, or queues. They all are used to store a series of data in memory, and each offers functionality for appending, searching, and sorting the data. This section explains arrays and collections and the differences between the two. Arrays are the most primitive type in C#, with limited functionality, while collections is a general term that encompasses lists, dictionaries, queues, and other objects.
Arrays
An array is the most basic type used to store a set of data. An array contains elements, and they are referenced by their index using square brackets, []. The following example creates a single dimensional array of integers:
int[] mySet = new int[5];

mySet[0] = 1;
mySet[1] = 2;
mySet[2] = 3;
mySet[3] = 4;
mySet[4] = 5;
When you create an array, you must specify the number of elements the array can contain. In the previous example the number of elements is 5. You can also create a multidimensional array using the following syntax:
int[,] mySet = new int[3, 2];

mySet[0, 0] = 1;
mySet[0, 1] = 2;
mySet[1, 0] = 3;
mySet[1, 1] = 4;
mySet[2, 0] = 5;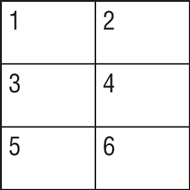
mySet[2, 1] = 6;The preceding code created a two-dimensional array with three elements in the first dimension and two elements in the second dimension. Conceptually, this is like having a table with rows and columns. The preceding code could be represented by the table shown in Figure 9-1.
Figure 9-1: Two-dimensional array
You can create 3, 4, or 5, or up to 2,147,483,647 dimensions. You simply need to declare the variable with the number of dimensions and initialize the size of each dimension.
All arrays inherit from the base class System.Array. This class contains properties and methods that are useful when working with arrays. The two most commonly used properties of an array are Length and Rank. The Length property indicates the total number of elements in all dimensions of the array. The Rank property indicates the number of dimension in the array. These properties are helpful when determining the bounds of an array when doing for or while loops.
The Clone method is used to make a shallow copy of the array, while the CopyTo method copies the elements of the array to another array.
Person[] orginal = new Person[1];

orginal[0] = new Person() { Name = "John" };

Person[] clone = (Person[])orginal.Clone();

clone[0].Name = "Mary";

Debug.WriteLine("Original name " + orginal[0].Name);
Debug.WriteLine("Clone name " + clone[0].Name);Original name Mary
Clone name MaryPerson[] orginal = new Person[1];
orginal[0] = new Person() { Name = "John" };
Person[] clone = (Person[])orginal.Clone();
clone[0] = new Person() { Name = "Bob" };
Debug.WriteLine("Original name " + orginal[0].Name);
Debug.WriteLine("Clone name " + clone[0].Name);Original name John
Clone name BobCollections
Collections is a generic term for special classes in C# that are more flexible than arrays. These classes enable you to dynamically add or subtract elements after they have been initialized, associate keys for elements, automatically sort the elements, and allows for elements to be different types or type specific. Some of the classes are List, List<T>, Dictionary, Dictionary<T>, Stack, and Queue. These classes all have slightly different functionality and are explained in detail in next few sections.
The namespaces for the collection classes are System.Collections, System.Collections.Generic, and System.Collections.Concurrent. The classes in the System.Collections.Concurrent namespace are for performing safe operations for accessing the items from multiple threads and are not covered in this section of the book.
System.Collections
The System.Collections namespace contains classes for use when you do not have the same type of elements stored within the collection. These collections can mix int, string, classes, or structs within the same collection. Table 9-2 lists the types in the System.Collections namespace. Each of these types is discussed in more detail in the following sections.
Table 9-2: System.Collections
| Collection Name | Description |
| ArrayList | Creates a collection whose size is dynamic and can contain any type of object |
| HashTable | Creates a collection with a keyvalue pair whose size is dynamic and contains any type of object |
| Queue | Creates a collection that is first-in-first-out for processing |
| SortedList | Creates a collection of keyvalue pairs whose elements are sorted by the key value |
| Stack | Creates a collection that is last-in-first-out for processing |
ArrayList
An ArrayList is a class that enables you to dynamically add or remove elements to the array. This is different from the simple array, which does not enable you to change the dimensions after it is initialized. The ArrayList class is useful when you don’t know the number of elements at the time of creation and also if you want to store different types of data in the array. In the Array examples, all elements of the mySet array had to be an int. An ArrayList has an Add method that takes an object as a parameter and enables you to store any type of object. The following code creates an ArrayList object and adds three elements of different types to the ArrayList:
ArrayList myList = new ArrayList();

myList.Add(1);
myList.Add("hello world");
myList.Add(new DateTime(2012, 01, 01));
Tables 9-3 and 9-4 list the most common properties and methods of the System.Collections.ArrayList class.
Table 9-3: Common System.Array Properties
| Property | Description |
| Capacity | Gets or sets the number of elements in the ArrayList |
| Count | Gets the number of actual elements in the ArrayList |
| Item | Gets or sets the element at the specified index |
Table 9-4: Common System.Array Methods
| Method | Description |
| Add | Adds an element at the end of the ArrayList |
| AddRange | Adds multiple elements at the end of the ArrayList |
| BinarySearch | Searches the sorted ArrayList for an element using the default comparer and returns the index of the element |
| Clear | Removes all the elements from the ArrayList |
| Contains | Determines if an element is in the ArrayList |
| CopyTo | Copies the ArrayList to a compatible one-dimensional array |
| IndexOf | Searches the ArrayList and returns the index of the first occurrence within the ArrayList |
| Insert | Inserts an element into the ArrayList at a specific index |
| Remove | Removes an element from the ArrayList |
| RemoveAt | Removes an element from the ArrayList by index |
| Reverse | Reverses the order of the elements in the ArrayList |
| Sort | Sort the elements in the ArrayList |
In addition to the Add method, an AddRange method enables you to add multiple elements with one call. You can use an Insert method, which enables you to add an element in a specific location in the array, and a Remove method, which enables you to remove an element from the array. These few methods enable easier maintenance compared to a simple array type.
You can also use the Sort method, which enables you to sort the elements in the array. Consider the following example for a simple sorting exercise:
ArrayList myList = new ArrayList();

myList.Add(4);
myList.Add(1);
myList.Add(5);
myList.Add(3);
myList.Add(2);

myList.Sort();

foreach (int i in myList)
{
    Debug.WriteLine(i.ToString());
}
The preceding code can print the numbers in order to the Output window. But, what if you want to store a custom object in the array list that wasn’t a simple type? For example, say you have a custom class with an ID property that stores the unique identifier for this object:
class MyObject
{
    public int ID{ get; set; }
}
Now if you were to create an ArrayList, add five instances of this class, and then call the Sort method, what do you think would happen?
ArrayList myList = new ArrayList();

myList.Add(new MyObject() { ID = 4 });
myList.Add(new MyObject() { ID = 1 });
myList.Add(new MyObject() { ID = 5 });
myList.Add(new MyObject() { ID = 3 });
myList.Add(new MyObject() { ID = 2 });

myList.Sort();
If you were to execute this code, you would get an exception on the line that calls the Sort method: Failed to Compare Two Elements in the Array. This is because the Sort method does not know what it is supposed to sort on. To fix this you can implement the IComparable interface in the MyObject class. The IComparable interface enables the class to be sorted.
The IComparable interface has one method called CompareTo, which takes one parameter, the object that you want to compare. The CompareTo method returns either a number less than zero, zero, or greater than zero. Less than zero indicates that the current instance is higher in the sort order; zero indicates that the two objects are equal; and greater than zero indicates that the second object is higher in the sort order.
class MyObject : IComparable
{
    public int ID{ get; set; }

    public int CompareTo(object obj)
    {
        MyObject obj1 = obj as MyObject;
        return this.ID.CompareTo(obj1.ID);
    }
}
In the preceding example, the ID property is used to sort the MyObject type. Because the ID property is defined as an int, you can use its CompareTo method to determine which object is higher in the hierarchy. If you were to execute the previous code, it would work without error.
Another common use of arrays and array lists is the ability to search the array. You can use a simple for or foreach loop to find a specific element in the array, or you can use the much quicker BinarySearch method. In order to use the BinarySearch method, you must have already sorted the elements in the ArrayList, either by calling the Sort method or explicitly adding them to the ArrayList in order; otherwise, you get unexpected results. The BinarySearch method returns the index of the element if it is found. If it is not found, it returns a negative number.
ArrayList myList = new ArrayList();

myList.Add(new MyObject() { ID = 4 });
myList.Add(new MyObject() { ID = 1 });
myList.Add(new MyObject() { ID = 5 });
myList.Add(new MyObject() { ID = 3 });
myList.Add(new MyObject() { ID = 2 });

myList.Sort();
int foundIndex = myList.BinarySearch(new MyObject() { ID = 4 });

if (foundIndex >= 0)
{
    Debug.WriteLine(((MyObject)myList[foundIndex]).ID.ToString());
}
else
{
    Debug.WriteLine("Element not found");
}Hashtable
A Hashtable enables you to store a keyvalue pair of any type of object. The data is stored according to the hash code of the key and can be accessed by the key rather than the index of the element. The following sample creates a Hashtable and stores three elements with different keys. You can then reference the elements in the Hashtable by its key.
Hashtable myHashtable = new Hashtable();

myHashtable.Add(1, "one");
myHashtable.Add("two", 2);
myHashtable.Add(3, "three");

Debug.WriteLine(myHashtable[1].ToString());
Debug.WriteLine(myHashtable["two"].ToString());
Debug.WriteLine(myHashtable[3].ToString());
The preceding code will produce the following output:
one
2
three
Queue
A Queue is a first-in-first-out collection. Queues can be useful when you need to store data in a specific order for sequential processing. The following code will create a Queue, add three elements, remove each element, and print its value to the Output window:
Queue myQueue = new Queue();

myQueue.Enqueue("first");
myQueue.Enqueue("second");
myQueue.Enqueue("third");

int count = myQueue.Count;
for (int i = 0; i < count; i++)
{
    Debug.WriteLine(myQueue.Dequeue());
}
Notice that instead of an Add method, there is an Enqueue method that adds the element to the Queue. To Dequeue method is used to remove an element from the Queue. You can’t reference an element by index or key; all you can do is add, remove, or peek at the value that is on the top of the Queue. The Peek method returns the value at the top of the Queue but does not remove it from the Queue.
SortedList
A SortedList is a collection that contains keyvalue pairs but it is different from a Hashtable because it can be referenced by the key or the index and because it is sorted. The elements in the SortedList are sorted by the IComparable implementation of the key or the IComparer implementation when the SortedList is created. The following code creates a SortedList, adds three elements to the list, and then prints the elements to the Output window:
SortedList mySortedList = new SortedList();

mySortedList.Add(3, "three");
mySortedList.Add(2, "second");
mySortedList.Add(1, "first");

foreach (DictionaryEntry item in mySortedList)
{
    Debug.WriteLine(item.Value);
}
The preceding code produces the following output:
first
second
thirdStack
A Stack collection is a last-in-first-out collection. It is similar to a Queue except that the last element added is the first element retrieved. To add an element to the stack, you use the Push method. To remove an element from the stack, you use the Pop method. The following code creates a Stack object, adds three elements, and then removes each element and prints the value to the Output window:
Stack myStack = new Stack();

myStack.Push("first");
myStack.Push("second");
myStack.Push("third");

int count = myStack.Count;
for (int i = 0; i < count; i++)
{
    Debug.WriteLine(myStack.Pop());
}
The preceding code produces the following output:
third
second
first
You cannot access the elements in the stack by an index. All you can do is add, remove, or peek at the next element on the stack.
System.Collections.Generic
The System.Collections.Generic namespace contains classes that are used when you know the type of data to be stored in the collection and you want all elements in the collection to be of the same type. Table 9-5 lists the types in the System.Collections.Generic namespace. These types are described in detail in the following sections.
Table 9-5: System.Collections.Generic
| Collection Name | Description |
| Dictionary<TKey, TValue> | Creates a collection of keyvalue pairs that are of the same type |
| List<T> | Creates a collection of objects that are all the same type |
| Queue<T> | Creates a first-in-first-out collection for objects that are all the same type |
| SortedList<TKey, TValue> | Creates a collection of keyvalue pairs that are sorted based on the key and must be of the same type |
| Stack<T> | Creates a collection of last-in-first-out object that are all of the same type |
Dictionary
A Dictionary type enables you to store a set of elements and associate a key for each element. The key, instead of an index, is used to retrieve the element from the dictionary. This can be useful when you want to store data that comes from a table that has an Id column. You can create an object that holds the data and use the record’s Id as the key.
The following example creates a class called MyRecord, which represents a record in a table that has three columns. A Dictionary is used to store multiple instances of this class. After the dictionary is loaded, you can then retrieve the elements from the dictionary using the key rather than an index.
class MyRecord
{
    public int ID { get; set; }
    public string FirstName { get; set; }
    public string LastName { get; set; }
}

static void Sample1()
{
    Dictionary<int, MyRecord> myDictionary = new Dictionary<int, MyRecord>();

    myDictionary.Add(5, new MyRecord() { ID = 5,
                                         FirstName = "Bob",
                                         LastName = "Smith" });

    myDictionary.Add(2, new MyRecord() { ID = 2,
                                         FirstName = "Jane",
                                         LastName = "Doe" });

    myDictionary.Add(10, new MyRecord() { ID = 10,
                                          FirstName = "Bill",
                                          LastName = "Jones" });

    Debug.WriteLine(myDictionary[5].FirstName);
    Debug.WriteLine(myDictionary[2].FirstName);
    Debug.WriteLine(myDictionary[10].FirstName);
}
The preceding code will write "Bob", "Jane", and "Bill" to the Output window.
If you want to know how many elements are in the Dictionary object, you use the Count property, unlike an Array, which has a Length property.
Table 9-6 lists the most common methods of the System.Collections.ArrayList class.
Table 9-6: Common System.Collections.Generic.Dictionary Methods
| Method | Description |
| Add | Adds a key and value to the dictionary |
| Clear | Removes all the keys and values in the dictionary |
| ContainsKey | Returns true if the dictionary contains the specified key |
| ContainsValue | Returns true if the dictionary contains the specified value |
| Remove | Removes the element with the specified key |
The Dictionary object has an Add method to add elements to the dictionary, a Remove method to remove an element, and a Clear method to remove all the elements from the Dictionary. There is also a ContainsKey and ContainsValue method that allows you to determine if an element exists in the Dictionary before trying to reference it.
List
A List class is a strongly typed collection of objects. It is similar to an ArrayList except all elements of the List must be of the same type. It is different from a Dictionary because there is no Key, and elements are referenced by index. When you declare the List object, you specify the type of elements it can contain.
List<int> myList = new List<int>();When you add elements to the list, they must be of that type, or you get an error. The preceding code created a List object that can contain only int values.
myList.Add(1);
myList.Add(2);
myList.Add(3);The SortedList<TKey, TValue>, Queue<T>, and Stack<T> types are the same as their counterpart in the System.Collections namespace except that when you create the object, you must specify the type of data for the key or elements, and all elements must be of the same type.
Custom Collections
In addition to the standard collections provided by .NET, you can create your own custom strongly typed collections. Strongly typed collections are useful because they do not incur the performance hit due to boxing and unboxing. To create your own custom collection, you can inherit from the CollectionBase class. Tables 9-7 and 9-8 list the commonly used properties and method of the CollectionBase class.
Table 9-7: System.Collections.CollectionBase Properties
| Property | Description |
| Capacity | Gets or sets the number of elements the collection can contain |
| Count | Returns the number of elements in the dictionary |
| InnerList | Gets an ArrayList containing the elements in the collection |
| List | Get an IList containing the elements in the collection |
Table 9-8: System.Collections.CollectionBase Methods (Partial List)
| Method | Description |
| Clear | Clears the elements from the collection |
| OnInsert | Enables you to perform custom processing before inserting a new element |
| OnRemove | Enables you to perform custom processing before removing an element |
| OnSet | Enables you to perform custom processing before setting a value in the collection |
| RemoveAt | Removes the element at the specified index |
There are not Add, Insert, Sort, or Search methods in the base class. When you implement your class, you need to implement whichever methods you want to add, insert, sort, or search items within the collection.
For example, say you have a Person class with a few properties:
class Person
{
    public int PersonId { get; set; }
    public string FName { get; set; }
    public string LName { get; set; }
    public string Address { get; set; }
    public string City { get; set; }
    public string State { get; set; }
    public string ZipCode { get; set; }
}
You can then create a person collection class that inherits from the CollectionBase class. The following code creates a custom collection class for the Person class and creates Add, Insert, and Remove methods and creates a strongly typed indexer. The indexer is used when you reference the collection by index, such as myCollection[index].
class PersonCollection : CollectionBase
{
    public void Add(Person person)
    {
        List.Add(person);
    }
    public void Insert(int index, Person person)
    {
        List.Insert(index, person);
    }
    public void Remove(Person person)
    {
        List.Remove(person);
    }
    public Person this[int index]
    {
        get
        {
            return (Person)List[index];
        }

        set
        {
            List[index] = value;
        }
    }
}
Now that you have a strongly typed PersonCollection class, you can use it in your code:
static void Main(string[] args)
{
    PersonCollection persons = new PersonCollection();

    persons.Add(new Person() {
        PersonId = 1,
        FName = "John",
        LName = "Smith" });

    persons.Add(new Person()
    {
        PersonId = 2,
        FName = "Jane",
        LName = "Doe" });

    persons.Add(new Person()
    {
        PersonId = 3,
        FName = "Bill Jones",
        LName = "Smith" });

    foreach (Person person in persons)
    {
        Debug.WriteLine(person.FName);
    }

}
The preceding code creates an instance of the PersonCollection class, adds three objects to the class, and then enumerates through the collection and prints the element’s value to the Output window.
public class MyRecord
{
    public int Id { get; set; }
    public string Name { get; set; }
}List<MyRecord> myRecordList = new List<MyRecord>();
myRecordList.Add(new MyRecord() { Id = 1, Name = "John" });
myRecordList.Add(new MyRecord() { Id = 2, Name = "Sue" });
myRecordList.Add(new MyRecord() { Id = 3, Name = "Jack" });
DropDownList1.DataSource = myRecordList;
DropDownList1.DataTextField = "Name";
DropDownList1.DataValueField = "Id";
DropDownList1.DataBind();Consuming Data
This section explains how to retrieve data from a database using ADO.NET, the Entity Framework, or a WCF Data Service. Many applications store information in a database and retrieve the data using one of these methods, and then store the data in memory using the arrays or collections.
Working with ADO.NET
ADO.NET is a set of classes in the .NET Framework that enables you to connect to a database; insert, update, select, or delete records from a table; execute store procedures; or perform data definition language statements. Almost all applications use databases, so you must understand the concepts surrounding ADO.NET.
The ADO.NET types are located in the System.Data namespace. There are numerous base classes and interfaces defined in this namespace that a data provider must implement to allow ADO.NET to access a database. For example, the System.Data.SqlClient namespace contains the types that implement the ADO.NET base classes and interfaces to connect to a SQL Server database. Oracle, MySQL, and other major database systems all have their own namespace and classes that implement the ADO.NET base classes and interfaces. This enables you to use consistent syntax across all databases. This section uses the classes defined in the System.Data.SqlClient namespace.
Connection
A connection object is used to open up a line of communication with a database. The SqlConnection object is used to connect to a SQL Server database. This class, along with any provider’s connection class, inherits from the System.Data.Common.DBConnection class. Table 9-9 lists the most common properties for the DBConnection class.
Table 9-9: Common System.Data.Common.DBConnection Properties
| Property | Description |
| ConnectionString | Gets or sets the string used to open a connection to a database |
| ConnectionTimeout | Gets the time in seconds that the system should wait while establishing a connection to the database before generating an error |
| Database | Gets the name of the database |
| DataSource | Gets the name of the database server |
| ServerVersion | Gets the server version for the database |
| State | Gets a string that represents the state of the connection such as Open or Closed |
The most important property to take note of is the ConnectionString property. This tells the connection object which server and database to connect to. For SQL Server a connection string has the following syntax.
Server=myServerAddress;Database=myDataBase;User Id=myUsername;Password=myPassword;Table 9-10 lists the most important methods for the DBConnection class.
Table 9-10: System.Data.Common.DBConnection Methods (Partial List)
| Method | Description |
| BeginTransaction | Begins a database transaction |
| Close | Closes the connection to the database |
| GetSchema | Returns a DataTable that contains the schema information for the data source |
| Open | Opens the database connection using the connection string |
The Open method is used to establish a connection to the database. After you have a connection, you can then use this object along with the other ADO.NET objects to execute commands against the database. The following code creates an instance of the SqlConnection object, sets the ConnectionString property, and opens a connection to the database:
SqlConnection cn = new SqlConnection();
cn.ConnectionString = "Server=myServerAddress;Database=myDataBase;
                       User Id=myUsername;Password=myPassword;";
cn.Open();
Command
A Command object is used to execute statements against a database. You can execute insert, update, delete, select, or stored procedures using the command object. The System.Data.Common.DBCommand class is the base class for all provider Command classes. The System.Data.SqlClient.SqlCommand class is SQL Server’s implementation of the DBCommand class.
ExecuteNonQuery Method
The ExecuteNonQuery method is used to execute statements against the database that do not return resultsets. For example, an insert, update, or delete statement does not return any records. They simply execute the statement against a table. The following code demonstrates how to execute an insert statement against the database:
SqlConnection cn = new SqlConnection();
cn.ConnectionString = "Server=myServerAddress;Database=myDataBase;
                       User Id=myUsername;Password=myPassword;";
cn.Open();

SqlCommand cmd = new SqlCommand();
cmd.Connection = cn;
cmd.CommandType = CommandType.Text;
cmd.CommandText = "INSERT INTO Person (FirstName, LastName) " +
                  "VALUES ('Joe', 'Smith')";
cmd.ExecuteNonQuery();

cn.Close();
Notice the three properties of the command object that had to be set before calling the ExecuteNonQuery method. The first is the Connection property. This must be set to an open connection. This tells the command object what database to use when executing the text contained in the CommandText property. In this sample you use inline SQL, which is why the CommandType property is set to CommandType.Text.
If you used a stored procedure to insert a Person record, you would need to change the CommandType to CommandType.StoredProcedure and set the CommandText to the name of the stored procedure. For example, assume you have the following stored procedure that inserts a record into the Person table:
CREATE PROCEDURE PersonInsert
     @FirstName varchar(50),
     @LastName varchar(50)
AS
BEGIN
     INSERT INTO PERSON (FirstName, LastName) VALUES (@FirstName, @LastName)
END
The following code executes the stored procedure and passes in the @FirstName and @LastName parameters:
SqlConnection cn = new SqlConnection();
cn.ConnectionString = "Server=myServerAddress;Database=myDataBase;
                       User Id=myUsername;Password=myPassword;";
cn.Open();

SqlCommand cmd = new SqlCommand();
cmd.Connection = cn;
cmd.CommandType = CommandType.StoredProcedure;
cmd.CommandText = "PersonInsert";
cmd.Parameters.Add(new SqlParameter("@FirstName", "Joe"));
cmd.Parameters.Add(new SqlParameter("@LastName", "Smith"));
cmd.ExecuteNonQuery();
The Command object has a Parameters property that you use to pass parameters to the stored procedure. Also note that the ExecuteNonQuery method returns the number of rows affected by the query. In this example, 1 is returned, but if you have an Update or Delete statement, you can determine the number of records affected by the query using the return value.
ExecuteReader Method
Use the ExecuteReader method to retrieve results from the database such as when you use a Select statement. The ExecuteReader returns a DBDataReader object. The DBDataReader object is another class defined in ADO.NET. A DBDataReader object is a forward-only resultset that remains connected to the database the entire time the reader is open. Forward-only means that you can traverse only through the records once, and you cannot move the cursor back to any previous record. The following code prints all the records in the Person table to the output window using a DBDataReader object. The return object is declared as a SqlDataReader because that is SQL Server’s implementation of the DBDataReader class.
SqlConnection cn = new SqlConnection();
cn.ConnectionString = "Server=myServerAddress;Database=myDataBase;
                       User Id=myUsername;Password=myPassword;";
cn.Open();

SqlCommand cmd = new SqlCommand();
cmd.Connection = cn;
cmd.CommandType = CommandType.Text;
cmd.CommandText = "SELECT * FROM Person";
SqlDataReader dr = cmd.ExecuteReader();

if (dr.HasRows)
{
    while (dr.Read())
    {
        Debug.WriteLine(string.Format("First Name: {0} , Last Name: {1}",
                                      dr["FirstName"], dr["LastName"]));
    }
}
dr.Close();
cn.Close();
You must call the Close method on the DBDataReader object and then close the Connection object. If you don’t you can be left with orphaned open connections, which can hurt performance. The ExecuteReader method is overloaded and can take a parameter of type CommandBehavior that tells ADO.NET to close the connection automatically when the reader is closed.
using (SqlConnection cn = new SqlConnection())
{

}Table 9-11 lists commonly used properties of the DBDataReader class.
Table 9-11: Commonly used Properties for System.Data.Common.DBDataReader
| Property | Description |
| FieldCount | Returns the number of columns on the current row. |
| HasRows | Returns a boolean indicating if the reader has any rows. |
| IsClosed | Returns a boolean indicating if the reader is closed. |
| Item[Int32] | This is an indexer that returns the column based on the index. |
| Item[String] | This is an indexer that returns the column based on the name of the column. |
There isn’t a Count property for the number of rows in the resultset. The only way to get the count is to traverse through the datareader. The indexers, which are the Item properties, return an object. They enable you to get the value of a column either by column index or by name. It is up to you to cast the object to the right type when using the indexers.
Table 9-12 lists commonly used methods for the DBDataReader class.
Table 9-12: Commonly used method for the System.Data.Common.DBDataReader
| Method | Description |
| Close | Closes the object |
| GetBoolean | Returns the value of the specified column as a boolean |
| GetByte | Returns the value of the specified column as a byte |
| GetChar | Returns the value of the specified column as a character |
| GetDateTime | Returns the value of the specified column as a DateTime object |
| GetDecimal | Returns the value of the specified column as a Decimal object |
| GetDouble | Returns the value of the specified column as a double object |
| GetFieldType | Returns the data type of the specified column |
| GetFieldValue<T> | Returns the value of the specified column as a type |
| GetFloat | Returns the value of the specified column as a single object |
| GetGuid | Returns the value of the specified column as a GUID |
| GetInt16 | Returns the value of the specified column as a 16-bit integer |
| GetInt32 | Returns the value of the specified column as a 32-bit integer |
| GetInt64 | Returns the value of the specified column as a 64-bit integer |
| GetName | Returns the name of the specified column given the ordinal position |
| GetOrdinal | Returns the ordinal position of a column given the column name |
| GetSchemaTable | Returns a DataTable that describes the column metadata |
| GetString | Returns the value of the specified column as a string |
| GetValue | Returns the value of the specified column as an object |
| GetValues | Populates an array of objects with the values of the columns |
| NextResult | Moves the cursor to the next resultset in the reader |
| IsDBNull | Returns a boolean to indicate if the specified column contains a null value |
| Read | Advances the cursor to the next record |
Numerous GetTYPE methods enable you to use a column index to get the value from the data reader and casts the value to the specified type. This works only with column indexes and not names. If the order in your SELECT clause changes, your indexes must also change.
The Read method moves to the next record in the resultset if it exists. It returns true if there is another record and false after it reaches the end of the resultset. There is also a HasRows property, which returns a boolean to tell you if there are rows in the resultset.
When retrieving data from a database, you can save trips by executing multiple SELECT statements in a single call. The DBDataReader has the capability to hold multiple resultsets in a single object. To move to the next resultset, you simply call the NextResult method.
The GetSchemaTable method returns a DataTable that contains the metadata about the columns in the DBDataReader. The returned table with the schema has a row for each column that contains columns for the column name, the column type, the column size, the ordinal position, whether it is an Identity column, and whether the column enables nulls. If all you need is the schema for a query rather than the data, you can call the ExecuteDataReader method and pass in CommandBehavior.SchemaOnly.
ExecuteScalar Method
The ExecuteScalar method is used when you know that your resultset contains only a single column with a single row. This is great when your query returns the result of an aggregate function such as SUM or AVG. The following code calls the ExecuteScalar method and returns the Count of records in the Person table:
SqlConnection cn = new SqlConnection();
cn.ConnectionString = "Server=myServerAddress;Database=myDataBase;
                       User Id=myUsername;Password=myPassword;";
cn.Open();

SqlCommand cmd = new SqlCommand();
cmd.Connection = cn;
cmd.CommandType = CommandType.Text;
cmd.CommandText = "SELECT COUNT(*) FROM Person";
object obj = cmd.ExecuteScalar();

Debug.WriteLine(string.Format("Count: {0}", obj.ToString()));

cn.Close();
The ExecuteScalar method always returns an object, so it is up to you to cast this value to the right type when you want to use the value.
ExecuteXmlReader Method
The ExecuteXmlReader method returns an XMLReader, which enables you to represent the data as XML. The following code returns the data from the Person table into an XmlReader object:
SqlConnection cn = new SqlConnection();
cn.ConnectionString = "Server=myServerAddress;Database=myDataBase;
                       User Id=myUsername;Password=myPassword;";
cn.Open();

SqlCommand cmd = new SqlCommand();
cmd.Connection = cn;
cmd.CommandType = CommandType.Text;
cmd.CommandText = "SELECT * FROM Person FOR XML AUTO, XMLDATA";
System.Xml.XmlReader xml = cmd.ExecuteXmlReader();

cn.Close();
The SQL statement was changed and included the FOR XML AUTO, XMLDATA clause. The XML result for this query follows:
<Schema name="Schema1" xmlns="urn:schemas-microsoft-com:xml-data"
 xmlns:dt="urn:schemas-microsoft-com:datatypes">
  <ElementType name="Person" content="empty" model="closed">
    <AttributeType name="PersonId" dt:type="i4"/>
    <AttributeType name="FirstName" dt:type="string"/>
    <AttributeType name="LastName" dt:type="string"/>
    <AttributeType name="Address" dt:type="string"/>
    <AttributeType name="City" dt:type="string"/>
    <AttributeType name="State" dt:type="string"/>
    <AttributeType name="ZipCode" dt:type="string"/>
    <attribute type="PersonId"/>
    <attribute type="FirstName"/>
    <attribute type="LastName"/>
    <attribute type="Address"/>
    <attribute type="City"/>
    <attribute type="State"/>
    <attribute type="ZipCode"/>
  </ElementType>
</Schema>
<Person xmlns="x-schema:#Schema1" PersonId="1" FirstName="John" LastName="Smith"
Address="123 First Street" City="Philadelphia" State="PA" ZipCode="19111"/>
Notice that the schema is returned along with the data in this example.
DataSet, DataTable, and DataAdapter
Another way to retrieve results from a database is to use DataSets and DataTables. A DataTable is similar to a DBDataReader except that it is disconnected from the database; you can move the cursor back and forth; and you can update data in the DataTable, reconnect to the database, and commit the changes. A DataSet is a container for one or more DataTables. You can execute a SQL statement that returns multiple resultsets, and each can be contained in the DataSet. You can then filter, sort, or update the data in memory. The DataAdapter is the object used to populate a DataSet or DataTable and also the reconnect to the database to perform insert, update, or delete commands.
The following code uses a DataSet to retrieve the data from the Person table and write all the records to the Output window:
SqlConnection cn = new SqlConnection();
cn.ConnectionString = "Server=myServerAddress;Database=myDataBase;
                       User Id=myUsername;Password=myPassword;";
cn.Open();

SqlDataAdapter da = new SqlDataAdapter("SELECT * FROM Person", cn);

DataSet ds = new DataSet();
da.Fill(ds, "Person");

cn.Close();

foreach (DataRow row in ds.Tables[0].Rows)
{
    Debug.WriteLine(string.Format("First Name: {0} , Last Name: {1}",
                                  row["FirstName"], row["LastName"]));
}
In this example, the constructor of the SqlDataAdapter was passed the SQL statement to execute when calling the Fill method. The Fill method is used to populate the DataSet. Notice that after the Fill method was called that the Connection was closed, but the DataSet was still available for use. You cannot do this with a DBDataReader because it is connected to the database.
The DataSet object has a Tables property that you can use to reference the DataTable objects returned from your query. In this example there was only one resultset returned, so you can reference it by using the zero index of the Tables property. DataTables has a Rows property, which contains a collection of DataRow objects that contains the records. You can reference the records by row index or enumerate through them with a loop. The Rows collection also has a Count property, which can tell you the number of rows in the DataTable. This is also a different from the DBDataReader because you can move back and forth between rows.
The DataAdapter class enables you to insert, update, or delete rows after you have changed the underlying DataTable in your dataset. The following example shows you how to use the DataAdapter to insert records into a database.
SqlConnection cn = new SqlConnection();
cn.ConnectionString = "Server=myServerAddress;Database=myDataBase;
                       User Id=myUsername;Password=myPassword;";
cn.Open();

SqlDataAdapter da = new SqlDataAdapter("SELECT * FROM Person", cn);

//Create the insert command
SqlCommand insert = new SqlCommand();
insert.Connection = cn;
insert.CommandType = CommandType.Text;
insert.CommandText = "INSERT INTO Person (FirstName, LastName) VALUES (@FirstName,
                      @LastName)";

//Create the parameters
insert.Parameters.Add(new SqlParameter("@FirstName", SqlDbType.VarChar, 50,
                                       "FirstName"));
insert.Parameters.Add(new SqlParameter("@LastName", SqlDbType.VarChar, 50,
                                       "LastName"));

//Associate the insert command with the DataAdapter.
da.InsertCommand = insert;

//Get the data.
DataSet ds = new DataSet();
da.Fill(ds, "Person");

//Add a new row.
DataRow newRow = ds.Tables[0].NewRow();
newRow["FirstName"] = "Jane";
newRow["LastName"] = "Doe";
ds.Tables[0].Rows.Add(newRow);

//Update the database.
da.Update(ds.Tables[0]);

cn.Close();The next code lab demonstrates how to use the DeleteCommand and UpdateCommand.
SqlConnection cn = new SqlConnection();
cn.ConnectionString = "Server=myServerAddress;Database=myDataBase;
                       User Id=myUsername;Password=myPassword;";
cn.Open();

SqlDataAdapter da = new SqlDataAdapter("SELECT * FROM Person", cn);

//Create the update command
SqlCommand update = new SqlCommand();
update.Connection = cn;
update.CommandType = CommandType.Text;
update.CommandText = "UPDATE Person SET FirstName = @FirstName, LastName = @LastName
                      WHERE PersonId = @PersonId";

//Create the parameters
update.Parameters.Add(new SqlParameter("@FirstName", SqlDbType.VarChar, 50,
                                       "FirstName"));
update.Parameters.Add(new SqlParameter("@LastName", SqlDbType.VarChar, 50,
                                       "LastName"));
update.Parameters.Add(new SqlParameter("@PersonId", SqlDbType.Int, 0, "PersonId"));

//Create the delete command
SqlCommand delete = new SqlCommand();
delete.Connection = cn;
delete.CommandType = CommandType.Text;
delete.CommandText = "DELETE FROM Person WHERE PersonId = @PersonId";

//Create the parameters
SqlParameter deleteParameter = new SqlParameter("@PersonId", SqlDbType.Int, 0,
                                                "PersonId");
deleteParameter.SourceVersion = DataRowVersion.Original;
delete.Parameters.Add(deleteParameter);

//Associate the update and delete commands with the DataAdapter.
da.UpdateCommand = update;
da.DeleteCommand = delete;

//Get the data.
DataSet ds = new DataSet();
da.Fill(ds, "Person");

//Update the first row
ds.Tables[0].Rows[0]["FirstName"] = "Jack";
ds.Tables[0].Rows[0]["LastName"] = "Johnson";

//Delete the second row.
ds.Tables[0].Rows[1].Delete();

//Updat the database.
da.Update(ds.Tables[0]);

cn.Close();Working with the ADO.NET Entity Framework
The ADO.NET Entity Framework is a set of classes within the .NET Framework that also enables you to add, insert, update, and delete data within a database. The Entity Framework has a graphical user interface that enables you to drag and drop objects from a database onto a design surface. This is called an Object-Relational Mapping tool, or ORMtool. There are many different ORM tools on the market. The Entity Framework and LINQ to SQL are just two examples that Microsoft has created for use within Visual Studio. There are other vendors that create ORM tools for other databases and other languages such as NHibernate, CakePHP, and ActiveRecord, just to name a few.
The sample code in this section uses the Northwinds database, which is a sample database provided by CodePlex.com. You can download the database from http://northwinddatabase.codeplex.com/ and restore the backup file to your SQL Server.
Create an Entity Framework Model
At the core of the Entity Framework is the Model. The Model contains all of the classes that represent an object in the database. Follow these steps to create an Entity Framework Model by mapping the Northwinds database:
The Entity Data Model Wizard automatically generates the Model (see Figure 9-2).
Figure 9-2: Northwinds Model - Entity Framework Designer
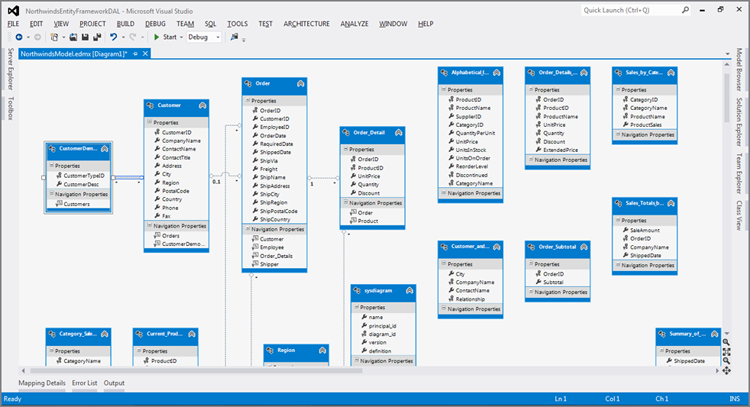
The NorthwindsModel.edmx file was added to your project in the Solution Explorer. This file is the graphical representation of all the classes that were created to represent the objects in the database. Click the arrow next to the NorthwindsModel.edmx file in the Solution Explore to view all the files that were created for you.
Notice the file called NorthwindsModel.tt. This is a Text Transformation Template Toolkit file, also known as a T4 template. A T4 template file is used to automatically generate code within Visual Studio. T4 templates are a mixture of text blocks and control statements that enable you to generate a code file. Click the arrow next to the NorthwindsModel.tt file to expand the list of files generated by this template. A file was created for each table, view, and stored procedure that returns a resultset.
Click the Category.cs file. This file contains a class that maps to the Category table in the Northwinds database. There is a property for each column in the table. There is also a property called Products, which is of type ICollection<Product>. The reason why this property was created is because there is a foreign key in the Products table that references the Category table. Categories can have many products associated with it. The Entity Framework Wizard was smart enough to recognize this and generated these properties for you.
Click the Category_Sales_for_1997.cs file. This maps to the Category_Sales_for_1997 view in the database. The class file that was generated maps to the columns in the query of the view.
Click the CustOrderHist_Results.cs file. This class was created to represent the columns that are returned from the CustOrderHist stored procedure. The CustOrderHist stored procedure is defined as follows:
CREATE PROCEDURE [dbo].[CustOrderHist] @CustomerID nchar(5)
AS
SELECT ProductName, Total=SUM(Quantity)
FROM Products P, [Order Details] OD, Orders O, Customers C
WHERE C.CustomerID = @CustomerID
AND C.CustomerID = O.CustomerID
AND O.OrderID = OD.OrderID
AND OD.ProductID = P.ProductID
GROUP BY ProductName
This procedure returns two columns: ProductName and Total. Notice that the CustOrderHist_Result class has two properties, ProductName and Total. So as you can see, the Entity Data Model Wizard saves you from writing these classes and is smart enough to read the definition of a view or a stored procedure to create a class that can be used to represent the resultset of either.
Now click the NorthwindsModel.Context.tt file in the Solution Explorer. This is the T4 Template for the Context object. Think of the Context object as the class that represents the entire database. If you click the arrow next to the NorthwindsModel.Context.tt file, you can see one file, NorthwindsModel.Context.cs. This is the class that was created by the T4 Template. Open the NorthwindsModel.Context.cs file by clicking it. The class name is NorthwindsEntities and has properties for each table contained in the database. The properties are generic DbSet types, which is a collection of the each type that represents a table or view. A few of the properties that were created are listed here:
public DbSet<Category> Categories { get; set; }
public DbSet<CustomerDemographic> CustomerDemographics { get; set; }
public DbSet<Customer> Customers { get; set; }
public DbSet<Employee> Employees { get; set; }
public DbSet<Order_Detail> Order_Details { get; set; }
The stored procedures are created as methods. After the properties are defined, there is a list of methods that have the same name as the stored procedures in the database. Any parameters to the stored procedures are parameters to the method. If a store procedure returns a resultset, the return value of the method is an ObjectResult collection of that type. For example, the CustOrderHist stored procedure is created as the following method:
public virtual ObjectResult<CustOrderHist_Result> CustOrderHist(string customerID)
{
    var customerIDParameter = customerID != null ?
        new ObjectParameter("CustomerID", customerID) :
        new ObjectParameter("CustomerID", typeof(string));

    return ((IObjectContextAdapter)this).ObjectContext.ExecuteFunction
               <CustOrderHist_Result>("CustOrderHist", customerIDParameter);

}
The CustOrderHist_Result class is the type for the return set. The stored procedure had one string parameter for the customer ID, so the method has one parameter for the customer ID. To call the stored procedure, the ExecuteFunction method is called, which is a method contained in the NorthwindEntities base class, DbContext. The DbContext class is defined in the System.Data.Entity namespace, and this is like an ADO.NET connection object on steroids. This class has methods for executing commands against the database and behind the scenes is using ADO.NET to do the heavy lifting. The gory details are spared from you, and everything is automatically generated by running the wizard.
Select Records
Now that you have a Model, you can use it to make calls to the database without having to know anything about SQL syntax. Follow the next set of instructions to select the records from the Category table, and print them to the Output window.
using System.Diagnostics;using (NorthwindsEntities db = new NorthwindsEntities())
{
var categories = from c in db.Categories
select c;
foreach (Category category in categories)
{
Debug.WriteLine(string.Format("CategoryId: {0}, CategoryName: {1}",
category.CategoryID,
category.CategoryName));
}
}CategoryId: 1, CategoryName: Beverages
CategoryId: 2, CategoryName: Condiments
CategoryId: 3, CategoryName: Confections
CategoryId: 4, CategoryName: Dairy Products
CategoryId: 5, CategoryName: Grains/Cereals
CategoryId: 6, CategoryName: Meat/Poultry
CategoryId: 7, CategoryName: Produce
CategoryId: 8, CategoryName: SeafoodAs you can see it took only a few lines of code to get the records, and you didn’t have to write any SQL queries. Everything is handled for you by the Entity Framework. In this example the db variable is declared as a NorthwindsEntities type. A LINQ query is used to retrieve the data from the database and retrieve the results in the categories variable. Notice that you write the query using C# syntax. The Entity Framework classes know how to convert that to a SQL query for you behind the scenes. When the data is retrieved, you can then enumerate through the categories to write each record to the Output window.
Earlier it was pointed out that the Products table had a foreign key to the Categories table. The Product class that is generated by the Entity Data Model Wizard created a property to represent this relationship.
public virtual Category Category { get; set; }The following code sample shows you how to write a LINQ query to join the two tables and write the product name and the category name to the Output window:
using (NorthwindsEntities db = new NorthwindsEntities())
{
    var products = from c in db.Categories
                   join p in db.Products on c.CategoryID equals p.CategoryID
                   select p;

    foreach (Product product in products)
    {
        Debug.WriteLine(string.Format("ProductName: {0}, CategorName: {1}",
                                      product.ProductName,
                                      product.Category.CategoryName));
    }
}
In this example instead of selecting the Category object, it selects the Products object. The Entity Framework retrieves the correct columns and populate the properties of the Products class, and as you can see, it also populates the Category property, which is a Categories class.
Insert Records
Inserting records into a database with the Entity Framework is simple. The following code sample inserts a record in the Categories table:
using (NorthwindsEntities db = new NorthwindsEntities())
{
    Category category = new Category()
    {
        CategoryName = "Alcohol",
        Description = "Happy Beverages"
    };

    db.Categories.Add(category);
    db.SaveChanges();
}
This code created an instance of the Category class and initialized its properties. It then added the object to the Categories property of the NorthwindsEntities. The SaveChanges() method is then called to add the record to the database. Again, there was no SQL syntax needed; the Entity Framework handled all that behind the scenes.
Update Records
Updating records is just as trivial. The following code sample retrieves the Category with the name Alcohol, changes its description, and then updates the record in the database:
Category category = db.Categories.First(c => c.CategoryName == "Alcohol");
category.Description = "Happy People";
db.SaveChanges();
Delete Records
You can also delete records by using just a few lines of code.
using (NorthwindsEntities db = new NorthwindsEntities())
{
    Category category = db.Categories.First(c => c.CategoryName == "Alcohol");
    db.Categories.Remove(category);
    db.SaveChanges();
}
In Entity Framework 5.0 you use the Remove method. In previous versions the method was called DeleteObject.
Call a Stored Procedure
As previously shown, all the stored procedures were created as methods in the NorthwindsEntities class by the Entity Data Model Wizard. To call a stored procedure, you simply need to call the method. The following code sample calls the CustOrderHist stored procedure, passes in a customer ID, and then prints the orders to the Output window:
using (NorthwindsEntities db = new NorthwindsEntities())
{
    var custOrderHist = db.CustOrderHist("ALFKI");

    foreach (CustOrderHist_Result result in custOrderHist)
    {
      Debug.WriteLine(string.Format("ProductName: {0}, Total: {1}",
                                      result.ProductName, result.Total));
    }
}
As you can see, all the heavy lifting is done for you by the Entity Framework, but it is still important to understand what is going on behind the scenes with ADO.NET to become a more complete developer.
Creating WCF Data Services
WCF Data Services is a component of the .NET Framework that enables you to access a database over the web or an intranet using a URI. In previous versions of .NET, this was called ADO.NET Data Services. You can select, filter, add, update, and even delete data using a URI and query string parameters. The WCF Data Services use the Open Data Protocol, OData, which is a web protocol that uses HTTP. For example, the following request can be made to a WCF Data Service that exposes the Categories table from the Northwinds database.
http://localhost/WcfDataService1.svc/Categories?$filter=CategoryName eq 'Beverages'In this example, Categories specifies the entity to return, and the filter parameter in the querystring is used to find the category with the name ‘Beverages’. In the example the filter is set to CategoryName eq 'Beverages'. The spaces are allowed in the query string. You can choose to have the data returned as either XML, in which case it follows the OData ATOM Format (the XML representation of data returned from an OData query), or JavaScript Object Notation, JSON (a lightweight data-interchange format). By default the data is returned as XML. The following XML shows the response for the preceding call to the WCF Data Service:
<?xml version="1.0" encoding="utf-8" ?>
<feed xml:base="http://localhost:5000/WcfDataService1.svc/"
 xmlns=http://www.w3.org/2005/Atom
 xmlns:d=http://schemas.microsoft.com/ado/2007/08/dataservices
 xmlns:m="http://schemas.microsoft.com/ado/2007/08/dataservices/metadata">
<id>http://localhost:5000/WcfDataService1.svc/Categories</id>
<title type="text">Categories</title>
<updated>2013-01-01T23:54:24Z</updated>
<link rel="self" title="Categories" href="Categories" />
<entry>
<id>http://localhost:5000/WcfDataService1.svc/Categories(1)</id>
<category term="NorthwindsModel.Category"
 scheme="http://schemas.microsoft.com/ado/2007/08/dataservices/scheme" />
<link rel="edit" title="Category" href="Categories(1)" />
<title />
<updated>2013-01-10T23:54:24Z</updated>
<author>
<name />
</author>
<content type="application/xml">
<m:properties>
<d:CategoryID m:type="Edm.Int32">1</d:CategoryID>
<d:CategoryName>Beverages</d:CategoryName>
<d:Description>Soft drinks, coffees, teas, beers, and ales</d:Description>
<d:Picture m:type="Edm.Binary">FRwvA…</d:Picture>
</m:properties>
</content>
</entry>
</feed>
Notice that the columns have been returned as elements in the m:properties element along with the data.
Create a WCF Data Service
Creating a WCF Data Service involves creating a web application, creating an ADO.NET Entity Framework model for the database and then exposing the model by adding a WCF Data Service file to your web application.
public class NorthwindsService : DataService
                       < /* TODO: put your data source class name here */ >
{
    // This method is called only once to initialize service-wide policies.
    public static void InitializeService(DataServiceConfiguration config)
    {
        // TODO: set rules to indicate which entity sets and service
        //       operations are
                  visible, updatable, etc.
        // Examples:
        // config.SetEntitySetAccessRule("MyEntityset",
        //                               EntitySetRights.AllRead);
        // config.SetServiceOperationAccessRule("MyServiceOperation",
        //                                      ServiceOperationRights.All);
        config.DataServiceBehavior.MaxProtocolVersion =
                                             DataServiceProtocolVersion.V3;
    }
}
The NorthwindsService inherits from the DataService class, which expects an Entity Framework model as the type. Notice the /* TODO: code that was automatically generated.
config.SetEntitySetAccessRule("Categories", EntitySetRights.AllRead );This line of code defines which entities are available for the web service. In this example only the Categories entity is exposed. Your class should contain the following code:
public class NorthwindsService : DataService< NorthwindsEntities >
{
    // This method is called only once to initialize service-wide policies.
    public static void InitializeService(DataServiceConfiguration config)
    {
        config.SetEntitySetAccessRule("Categories", EntitySetRights.AllRead);
        config.DataServiceBehavior.MaxProtocolVersion =
                                              DataServiceProtocolVersion.V3;
    }
}<?xml version="1.0" encoding="UTF-8"?>
<service xmlns:atom=http://www.w3.org/2005/Atom
xmlns="http://www.w3.org/2007/app"
xml:base="http://localhost:8999/NorthwindsService.svc/">
<workspace>
<atom:title>Default</atom:title>
<collection href="Categories">
<atom:title>Categories</atom:title>
</collection>
</workspace>
</service>This lists the entities that are exposed by this service; for this example only the Categories entity is exposed.
http://localhost:8999/NorthwindsService.svc/CategoriesYou should now get an XML response that lists all the records in the Categories table. If you were to append "?$filter=CategoryName eq 'Beverages'" to the URL in the browser and click enter, you would get only the Category with the name Beverages. The $filter is an OData query option. The WCF Data Services also support the following query options, as shown in Table 9-13.
Table 9-13: OData Query Options
| Option | Description |
| $orderby | Sets the sort order for the returned data. Example: $orderby=CategoryName,CategoryId |
| $top | Set the number of entities to include in the returned data. Example: $top=10 |
| $skip | Specifies the number of entities to skip before returning data. Example: $skip=10 |
| $filter | Defines an expression that filters the entities. See Table 9-14 through Table 9-18 for OData filter options. |
| $expand | Specifies which related entities are returned in the data. Example: $expand=Products |
| $select | Specifies which properties (columns) in the returned data. Example: $select=CategoryName,CategoryId |
| $inlinecount | Requests the count of entities returned from the query. |
Table 9-14 lists the keywords for use with the $filter query option.
Table 9-14: OData $filter Query Options
| Option | Description |
| Eq | Equal |
| Ne | Not equal |
| Gt | Greater than |
| Ge | Greater than or equal to |
| Lt | Less than |
| Le | Less than or equal to |
| And | Logical and |
| Or | Logical or |
| Not | Logical not |
| () | Precedence grouping |
| Add | Addition ($filter=Cost Add 5 Gt 100) |
| Sub | Subtraction ($filter=Cost Sub 5 Gt 100) |
| Mul | Multiplication ($filter=Cost Mul 5 Gt 1000) |
| Div | Division ($filter=Cost Div 5 Gt 100) |
| Mod | Remainder ($filter=Cost Mod 2 Eq 0) |
In addition to the operators, there are also specific functions that can be used for string, dates, math, and type (see Tables 9-15 through 9-18).
Table 9-15: OData $filter string Functions
| Function | Description |
| bool substring(string p0, string p1) | Returns true if p0 is in p1 |
| bool endswith(string p0, string p1) | Returns true if p0 ends with p1 |
| bool startswith(string p0, string p1) | Returns true if p0 starts with p1 |
| int length(string p0) | Returns the length of p0 |
| int indexof(string p0, string p1) | Returns the first character index of p0 that contains p1 |
| string replace(string p0, string p1, string replace) | Searches p0 for p1 and replaces it with replace |
| string substring(string p0, int pos) | Returns the substring of p0 from position pos |
| string substring(string p0, int pos, int length) | Returns the substring of p0 from position pos for the specified length of characters |
| string tolower(string p0) | Returns p0 in lowercase |
| string toupper(string p0) | Returns p0 in uppercase |
| string trim(string p0) | Removes leading and trailing whitespace |
| string concat(string p0, string p1) | Concatenates strings p0 and p1 |
Table 9-16: OData $filter date Functions
| Function | Description |
| int day(DateTime p0) | Returns the day of the date time |
| int hour(DateTime p0) | Returns the hour of the date time |
| int minute(DateTime p0) | Returns the minute of the date time |
| int month(DateTime p0) | Returns the month of the date time |
| int second(DateTime p0) | Returns the second of the date time |
| int year(DateTime p0) | Returns the year of the date time |
Table 9-17: OData $filter math Functions
| Function | Description |
| double round(double p0) | The nearest integral value to the parameter value, following the rules defined in IEEE754-2008 |
| decimal round(decimal p0) | The nearest integral value to the parameter value, following the rules defined in IEEE754-2008 |
| double floor(double p0) | The largest integral value less than or equal to the parameter value, following the rules defined in IEEE754-2008 |
| decimal floor(decimal p0) | The largest integral value less than or equal to the parameter value, following the rules defined in IEEE754-2008 |
| double ceiling(double p0) | The smallest integral value greater than or equal to the parameter value, following the rules defined in IEEE754-2008 |
| decimal ceiling(decimal p0) | The smallest integral value greater than or equal to the parameter value, following the rules defined in IEEE754-2008 |
Table 9-18: OData $filter type Functions
| Function | Description |
| bool isOf(type p0) | Returns true if the entity is of type p0 |
| bool IsOf(expression p0, type p0) | Returns true if p0 is of type p1 |
In addition to filtering with the $filter syntax, OData also enables you to specify a primary key value in ()to select a record based on its primary key. The following URI returns the Category with the primary key of 1:
http://localhost:8999/NorthwindsService.svc/Categories(1)The following URI returns the CategoryName of the Category with a primary key of 1:
http://localhost:8999/NorthwindsService.svc/Categories(1)/CategoryNameCreate a Client Application That Uses WCF Data Services
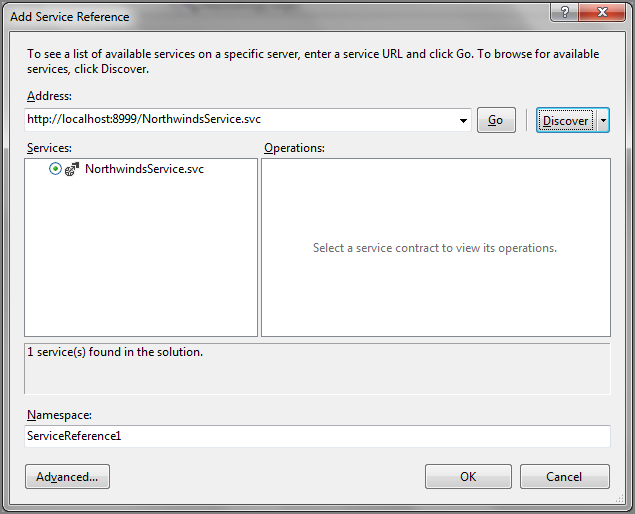
The section creates a client application that consumes the WCF Service. This is similar to the section that described how to create an ADO.NET Entity Framework model and showed you how to select, add, update, and delete records. This section creates a console application that references the Northwinds WCF Data Service and performs all the CRUD operations on the data.
Figure 9-3: Add Service Reference dialog
using NorthwindsClient.NorthwindsServiceReference;
using System.Diagnostics;
using System.Data.Services.Client;
using System.Net;NorthwindsEntities db = new NorthwindsEntities(new
Uri("http://localhost:8999/NorthwindsService.svc/"));
var categories = from c in db.Categories
select c;
foreach (Category category in categories)
{
Debug.WriteLine(string.Format("CategoryId: {0}, CategoryName: {1}",
category.CategoryID, category.CategoryName));
} Notice that the code to query the database was the same as it was when querying directly against the ADO.NET Entity Framework model in the last section. The only difference is that when you create the NorthwindsEntities object, you need to pass in the URI of the WCF Data Service.
Add Records Using WCF Data Services
The next few lines of code can be used to add a record to the Categories table in the Northwinds database. Replace the code in the Main method with the following:
NorthwindsEntities db = new NorthwindsEntities(new
                              Uri("http://localhost:8999/NorthwindsService.svc/"));

//Create a category
Category category = new Category()
{
    CategoryName = "Alcohol",
    Description = "Happy Beverages"
};

db.AddToCategories(category);
DataServiceResponse response = db.SaveChanges();

if (response.First().StatusCode == (int)HttpStatusCode.Created)
{
    Debug.WriteLine("New CategoryId: {0}", category.CategoryID);
}
else
{
    Debug.WriteLine("Error: {0}", response.First().Error.Message);
}
There are a couple things to note here that are different from when you added a record using the ADO.NET Entity Framework. First, a method called AddToCategories was created in the NorthwindsEntities class. This is used to add records to the Categories table. Second, the SaveChanges method returns a DataServiceResponse object. This object has a list of responses from the server. In this example, you use the first response’s StatusCode property to determine if the record were successfully added. If you run this code as-is, you get an error: “An Error Occurred While Processing This Request.” This is because you did not allow the creation of Category records when you set up the security in the WCF Data Service. To allow add, update, and delete capability to the Categories table, you need to open the NorthwindsService.svc.cs file in the WCF Data Service project. Change the InitializeService method to the following:
public static void InitializeService(DataServiceConfiguration config)
{
    config.SetEntitySetAccessRule("Categories", EntitySetRights.AllRead |
                                                EntitySetRights.AllWrite );
    config.DataServiceBehavior.MaxProtocolVersion = DataServiceProtocolVersion.V3;
}
The SetEntitySetAccessRule has an additional permission, EntitySetRights.AllWrite. This allows a client to add, update, or delete records in the table. If you run the project again, it adds the new Category record and prints the newly added CategoryId to the Output window.
Update Records Using WCF Data Services
The following code updates a Category record using the WCF Data Service. Replace the code in the Main method with the following:
NorthwindsEntities db = new NorthwindsEntities(new
                             Uri("http://localhost:8999/NorthwindsService.svc/"));

Category category = db.Categories.Where(c => c.CategoryName ==
                                             "Alcohol").FirstOrDefault();

category.Description = "Happy People";

db.UpdateObject(category);

db.SaveChanges();
This code uses a lambda expression to retrieve the Category entity from the service. The code then changes the Description property and calls the UpdateObject method of the NorthwindsEntities object. This marks the object to be updated when SaveChanges is called.
Delete Records Using WCF Data Services
The following code deletes a record from the Category table:
NorthwindsEntities db = new NorthwindsEntities(new
                              Uri("http://localhost:8999/NorthwindsService.svc/"));

Category category = db.Categories.Where(c => c.CategoryName ==
                                             "Alcohol").FirstOrDefault();
db.DeleteObject(category);
db.SaveChanges();
This time you needed to call the DeleteObject method instead of the Remove method when using the ADO.NET Entity Framework.
Request Data as JSON in a Client Application
By default, the data returned from a WCF Data Service is in XML format. You can, however, send the header “Accept: application/json;odata=verbose” in the HTTP request to return the data in JSON format. The following code creates a request using the WebRequest object in the System.Net namespace:
HttpWebRequest req =
(HttpWebRequest)WebRequest.Create("http://localhost:8999/NorthwindsService.svc/
                       Categories(1)?$select=CategoryID,CategoryName,Description");

req.Accept = "application/json;odata=verbose";

using (HttpWebResponse resp = (HttpWebResponse)req.GetResponse())
{
    Stream s = resp.GetResponseStream();
    StreamReader readStream = new StreamReader(s);

    string jsonString = readStream.ReadToEnd();

    Debug.WriteLine(jsonString);

    resp.Close();
    readStream.Close();
}
This code creates a request that selects the Category record with the primary key of 1 and selects the CategoryId, CategoryName, and Description properties. The req.Accept = "application/json;odata=verbose" line tells the WCF Data Service to return the data as JSON. When you execute this code, it prints the following to the Output window. Line breaks are added to make it easier to read.
{
  "d":
  {
    "__metadata":
    {
      "id":"http://localhost:8999/NorthwindsService.svc/Categories(1)",
      "uri":"http://localhost:8999/NorthwindsService.svc/Categories(1)",
      "type":"NorthwindsModel.Category"
    },
    "CategoryID":1,
    "CategoryName":"Beverages",
    "Description":"Soft drinks, coffees, teas, beers, and ales"
  }
}
Performing I/O Operations
I/O operations refer to reading and writing files to and from storage. Files are stored in directories, and the .NET Framework provides a set of classes for copying, moving, deleting, or checking for the existence of files or directories. A file is an ordered and named collection of bytes that has been saved to storage. When working with files, you use a stream. A stream is an in-memory object used to represent the sequence of bytes in a file. Special reader and writer classes enables working with encoded streams. This section first reviews the basic types that represent files and directories, then reviews the different types of streams, and finally reviews the different types of readers and writers. All the types for performing these I/O operations can be found in the System.IO namespace.
Files and Directories
Table 9-19 lists the classes defined for working with files and directories.
Table 9-19: File and Directory Classes
| Class Name | Description |
| File | A static class that provides methods for creating, copying, deleting, moving, and opening files |
| FileInfo | Provides for creating an instance of a class that provides methods for creating, copying, deleting, moving, and opening files |
| Directory | A static class that provides methods for creating, moving, deleting, and enumerating through the files in a directory |
| DirectoryInfo | Provides for creating an instance of a class that provides methods for creating, moving, deleting, and enumerating through the files in a directory |
| Path | A static class that provides methods for obtaining information or manipulating a file or directory name using a string variable |
The File and FileInfo class are similar except that the File class is static and contains only methods in which the FileInfo class enables you to create an instance that represents a file, so it has properties and methods. Table 9-20 lists some of the properties for the FileInfo class. Note that the File class does not have properties because it is a static class.
Table 9-20: FileInfo Properties
| Property Name | Description |
| Directory | Gets an instance of a DirectoryInfo object for the parent directory |
| DirectoryName | Gets a string for the directory’s full path |
| Exists | Returns a boolean indicating if the file exists |
| IsReadOnly | Returns a boolean indicating if the file is read-only |
| Length | Returns the size in bytes of the file |
| Name | Gets the name of the file |
The FileInfo object, unlike the File object, inherits from the System.IO.FileSystemInfo object, which contains properties for the attributes, the creation time, the extension, the full name, the last access time, and the last write time of the file.
The constructor of the FileInfo class takes a string parameter that contains the path and name of the file. This is the only constructor for the FileInfo object. The following code sample creates an instance of a FileInfo object and writes the name of the file to the Output window:
FileInfo fileInfo = new FileInfo(@”c:Chapter9SamplesHelloWorld.txt”);
Debug.WriteLine(fileInfo.Name);The methods for the File and FileInfo class are similar. The methods for the File class take parameters to a file path where the methods for the FileInfo class use the instance rather than parameters. Table 9-21 lists some of the common methods between the File and FileInfo class. Be aware that the parameters are different based on whether you use a File or FileInfo object.
Table 9-21: File and FileInfo Methods
| Method Name | Description |
| AppendAllText | Creates a StreamWriter that can be used to append text to the file |
| CopyTo (FileInfo) Copy (File) | Copies the file |
| Create | Creates the file |
| Decrypt | Decrypts the file that was encrypted by the current account |
| Delete | Deletes the file |
| Encrypt | Encrypts the file so only the account used to encrypt the file can decrypt it |
| MoveTo | Moves a file to a different directory |
| Open | Returns a FileStream object for read, write, or readwrite access |
| Replace | Replaces the content of a file with the contents from another file |
| SetAccessControl | Applies access control list entries by a FileSecurity object |
The Directory and DirectoryInfo classes are similar to the File and FileInfo classes except they handle directories rather than files. The Directory class is a static object and the DirectoryInfo class enables the creation of an instance of the class. The DirectoryInfo class inherits from the System.IO.FileSystemInfo object, and just like the FileInfo object, it contains the same properties for the attributes, the creation time, the extension, the full name, the last access time, and the last write time of the directory. The properties for the DirectoryInfo class are listed in Table 9-22.
Table 9-22: DirectoryInfo Properties
| Property Name | Description |
| Exists | Returns a boolean indicating if the directory exists |
| Name | Gets the name of the DirectoryInfo instance |
| Parent | Returns a DirectoryInfo object of the parent directory |
| Root | Returns a DirectoryInfo object of the root directory |
The Directory and DirectoryInfo object have similar methods that perform the same operation; the only difference is that because the Directory object is static, the methods take parameters to the directories to manipulate, and the DirectoryInfo object manipulates the directory for the instance. Table 9-23 lists some of the common methods between the Directory and DirectoryInfo object.
Table 9-23: Directory and DirectoryInfo Methods
| Method Name | Description |
| Create (DirectoryInfo) CreateDirectory (Directory) | Creates the directory |
| Delete | Deletes the directory |
| GetAccessControl | Returns a DirectorySecurity object that encapsulates the access control list entries for the current directory |
| GetDirectories | Returns a DirectoryInfo array of the subdirectories in the current directory |
| GetFiles | Returns a FileInfo array of the files in the current directory |
| GetFileSystemInfos | Returns a FileSystemInfo array of the files and directories in the current directory |
| MoveTo (DirectoryInfo) Move (Directory) | Moves a directory |
| SetAccessControl | Applies access control list entries described by a DirectorySecurity object to the current directory |
The following code writes all the directories and all the files in the c drive to the Output window:
//DirectoryInfo
DirectoryInfo directoryInfo = new DirectoryInfo(@"c:");

//Directories
Debug.WriteLine("Directories");
foreach (FileInfo fileInfo in directoryInfo.GetFiles())
{
    Debug.WriteLine(fileInfo.Name);
}

//Files
Debug.WriteLine("Files");
foreach (DirectoryInfo di in directoryInfo.GetDirectories())
{
    Debug.WriteLine(di.Name);
}
Streams
Streams are classes used to contain the contents of a file. Table 9-24 lists the different types of streams available in the .NET Framework.
Table 9-24: Streams
| Class Name | Description |
| FileStream | Reads and writes files |
| IsolatedStorageFileStream | Reads and writes files in isolated storage |
| MemoryStream | Reads and writes data to memory |
| BufferedStream | Used to store a block of bytes in memory to cache data |
| NetworkStream | Reads and writes data over a network socket |
| PipeStream | Reads and writes data over an anonymous or named pipes |
| CryptoStream | Used to link data streams to cryptographic transformations |
A FileStream can be used to read, write, open, and close files. The following example creates a new file, writes the numbers 1 through 10 in the file, and then closes the file:
FileStream fileStream = new FileStream(@"c:Chapter9SamplesNumbers.txt",
                               FileMode.Create, FileAccess.Write, FileShare.None);

for(int i = 0; i < 10; i++)
{
    byte[] number = new UTF8Encoding(true).GetBytes(i.ToString());
    fileStream.Write(number, 0, number.Length);
}

fileStream.Close();
In this example, the FileStream constructor takes four parameters, the path to the file, the file mode, the file access, and the file share. The FileMode enumeration values are listed in Table 9-25. The FileMode enumeration determines whether you create, open, or truncate a file.
Table 9-25: FileMode Enumeration
| Value | Description |
| Append | Opens a file if it exists and seeks to the end of the file, or creates a new file if it doesn’t exist. This can be used only with FileAccess.Write. |
| CreateNew | Creates a new file. If the file already exists, an exception is thrown. |
| Create | Creates a new file. If the file already exists it will be overwritten. If the file exists and is hidden, an exception is thrown. |
| Open | Opens a file. If the file does not exist, an exception is thrown. |
| OpenOrCreate | Opens a file if it exists or creates a new file if it does not exist. |
| Truncate | Opens an existing file and truncates the data in the file. If the file does not exist, an exception is thrown. |
The FileAccess enumeration determines what you can do with the stream after it is created (see Table 9-26).
Table 9-26: FileAccess Enumeration
| Value | Description |
| Read | Read access to the file |
| Write | Write access to the file |
| ReadWrite | Read-and-write access to the file |
The FileShare enumeration determines the type of access other streams can have on this file at the same time you have it open (see Table 9-27).
Table 9-27: FileShare Enumeration
| Value | Description |
| None | Does not enable another stream to open the file |
| Read | Enables subsequent opening of the file for reading only |
| Write | Enables subsequent opening of the file for writing |
| ReadWrite | Enables subsequent opening of the file for reading or writing |
| Delete | Enables for subsequent deletion of the file |
| Inheritable | Makes the file handle inheritable by child processes |
When creating or opening a file, the process must have the correct permissions to the file or directory to perform the specified operation. The System.Security.Permissions.FileIOPermissionAccess enumeration contains the types of permissions for a file or directory (see Table 9-28).
Table 9-28: FileIOPermissionAccess Enumeration
| Value | Description |
| NoAccess | No access to a file or directory |
| Read | Read access to a file or directory |
| Write | Write access to a file or a directory |
| Append | Access to append data to a file or directory. Append access also includes the ability to create a new file or directory |
| PathDiscovery | Access to the information about the path |
| AllAccess | Append, Read, Write, and PathDiscovery provide access to the file or directory |
The stream classes are used for reading or writing byte arrays. The next section will discuss using reader and writer classes to manipulate arrays of binary values, arrays of characters, or strings.
Readers and Writers
Readers and writers are classes in the System.IO namespace that read or write encoded characters to and from streams. Table 9-29 lists the common types of readers and writers in the System.IO namespace.
Table 9-29: Reader and Writer Classes (Partial List)
| Class | Description |
| BinaryReader,BinaryWriter | Used for reading and writing binary values |
| StreamReader,StreamWriter | Used for reading and writing characters by using an encoded value to convert the characters to and from bytes |
| StringReader,StringWriter | Used for reading and writing characters to and from strings |
| TextReader,TextWriter | Abstract classes for other readers and writers that read-and-write character or strings |
The StreamReader and StringReader both inherit from the TextReader abstract class. The StreamWriter and StringWriter both inherit from the TextWriter class.
The StreamReader class is used to read character input in a particular encoding. The default encoding is UTF-8. You can use a StreamReader to read a standard text file. Table 9-30 lists some of the methods for the StreamReader class.
Table 9-30: StreamReader Methods (Partial List)
| Method Name | Description |
| Close | Closes the stream reader and underlying stream |
| Peek | Returns the next character in the stream but does not move the character position |
| Read() | Returns the next character in the stream and moves the character position by one |
| Read(Char[], Int32, Int32) ReadBlock(Char[], Int32, Int32) | Reads the specified number of characters into the byte array |
| ReadLine | Reads a line of characters and returns a string |
| ReadToEnd | Reads all characters from the current position to the end of the file and returns a string |
The StreamReader provides methods for reading character by character, line by line, or an entire file in one call. The Read and ReadBlock methods return characters and character arrays; the ReadLine and ReadToEnd methods return strings. The following code opens a file with the following content:
abc
123
456
789
The code first writes the contents character by character to the Output window, line by line to the Output window, and then writes the entire contents to the Output window:
StreamReader streamReader = new StreamReader(@"c:Chapter9SamplesNumbers.txt");
Debug.WriteLine("Char by Char");
while (!streamReader.EndOfStream)
{
    Debug.WriteLine((char)streamReader.Read());
}

streamReader.Close();

streamReader = new StreamReader(@"c:Chapter9SamplesNumbers.txt");
Debug.WriteLine("Line by line");
while (!streamReader.EndOfStream)
{
    Debug.WriteLine(streamReader.ReadLine());
}

streamReader.Close();

streamReader = new StreamReader(@"c:Chapter9SamplesNumbers.txt");
Debug.WriteLine("Entire file");
Debug.WriteLine(streamReader.ReadToEnd());
The preceding code prints the following to the Output window:
Char by Char
a
b
c


1
2
3


4
5
6


7
8
9
Line by line
abc
123
456
789
Entire file
abc
123
456
789
The StringReader class is similar to the StreamReader class, except that instead of reading a file you read a string. The constructor of the StringReader class takes a string as a parameter. This is not a path to a file but just a regular string that contains text. The StringReader then enables you read the string character by character, line by line, or the entire string. The following code writes the contents of a string character by character to the Output window:
StringReader stringReader = new StringReader("Hello
Goodbye");
int pos = stringReader.Read();
while (pos != -1)
{
    Debug.WriteLine("{0}", (char)pos);
    pos = stringReader.Read();
}
stringReader.Close();
The StreamWriter class is similar to a Stream except that a StreamWriter is for characters of a particular encoding, and a Stream is designed for byte input and output. You can use the StreamWriter class to write data to a file. The StreamWriter has Write and WriteLine methods used to write to the stream in memory. The StreamWriter has a property called AutoFlush that, when set to true, can write to store when the Write method is called and when set to false can write to storage when the Flush method is called or the StreamWriter is closed. The following code creates a StreamWriter and writes a string, a boolean value, and an integer to the file:
StreamWriter streamWriter = new
                            StreamWriter(@"c:Chapter9SamplesStreamWriter.txt");

streamWriter.WriteLine("ABC");
streamWriter.Write(true);
streamWriter.Write(1);

streamWriter.Close();
In this example, the constructor is passed a path to a file. If the file does not exist, it is created; if it does exist it is overwritten. Be aware that you can also pass a Stream object to the constructor. The sample code uses both the WriteLine and Write methods to write to the file. The character representation of nonstring or char values will be written. The boolean value true is written as “True” in the file.
You can use the BinaryWriter class to write primitive types in binary or strings in a specific coding. The following code writes the same data as the last exercise but writes it in binary format:
FileStream fileStream = new FileStream(@"c:Chapter9SamplesBinaryWriter.txt",
     FileMode.Create);
BinaryWriter binaryWriter = new BinaryWriter(fileStream);

binaryWriter.Write("ABC");
binaryWriter.Write(true);
binaryWriter.Write(1);

binaryWriter.Close();
The BinaryWriter class requires a Stream object be passed to the constructor; you cannot pass a string that points to a file path. If you open the BinaryWriter.txt file created in this exercise, you would see the values in binary format.
If you need to read a binary file, you use a BinaryReader class to read the data. The following code reads the file created in the previous exercise:
FileStream fileStream = new FileStream(@"c:Chapter9SamplesBinaryWriter.txt",
     FileMode.Open);
BinaryReader binaryReader = new BinaryReader(fileStream);

string abs = binaryReader.ReadString();
bool b = binaryReader.ReadBoolean();
int i = binaryReader.ReadInt32();

binaryReader.Close();
Asynchronous I/O Operations
The Stream, Reader, and Writer classes all provide the ability to read or write files asynchronously. This can be helpful when you want to return processing back to the user interface while you are performing a time-consuming operation on a large file. In C# there are two new keywords used when dealing with asynchronous processing: async and await.
The async keyword is a method modifier that enables the method to use the await keyword and also enables a calling method to this function using the await keyword. The await keyword is used when calling a method to suspend execution in that method until the awaited task completes. For example, suppose you have a Windows forms application that has a button that performs a long-running task. You can modify the button click event signature with the async modifier and then call the long-running method using the await keyword. This allows the long-running process to run, but also allows the user to navigate to different parts of your application, so the system does not appear to be locked up.
private async void button1_Click(object sender, EventArgs e)
{
    this.Text = "Started";
await MyLongRunningProcess();

    this.Text = "Finished";
}
In the preceding example the caption of the form is changed to "Started" when the button is clicked. When the MyLongRunningProcess method is called, the method is executed, but processing is returned to the main thread until the MyLongRunningProcess method finishes executing. After it is done, the form’s caption is changed to "Finished".
You can use the asynchronous methods for file IO in a similar manner. The following code sample searches all files in a given folder and searches for a specific string in the file. If the file contains the string, its name is written to an output file. When the process is complete, the output file is shown in the default text viewer.
private async void button1_Click(object sender, EventArgs e)
{
    this.Text = "Searching...";

    string outputFileName = @"c:TestFoundFiles.txt";
await SearchDirectory(@"c:Chapter9Samples", "A", outputFileName);

    this.Text = "Finished";

    Process.Start(outputFileName);
}

private static async Task SearchDirectory(string searchPath, string searchString,
     string outputFileName)
{
    StreamWriter streamWriter = File.CreateText(outputFileName);

    string[] fileNames = Directory.GetFiles(searchPath);
await FindTextInFilesAsync(fileNames, searchString, streamWriter);

    streamWriter.Close();
}

private static async Task FindTextInFilesAsync(string[] fileNames, string
    searchString, StreamWriter outputFile)
{
    foreach (string fileName in fileNames)
    {
        if (fileName.ToLower().EndsWith(".txt"))
        {
            StreamReader streamReader = new StreamReader(fileName);

            string textOfFile = await streamReader.ReadToEndAsync();
            streamReader.Close();

            if (textOfFile.Contains(searchString))
            {
                await outputFile.WriteLineAsync(fileName);
            }
        }
    }
}
Each method is modified with the async keyword. This enables you to call asynchronous methods within the method using the await keyword. If you don’t use the async keyword but have an await command in the method, you get a compile error. The potentially time-consuming operation is the reading of the file. The StreamReader’s ReadToEndAsync method is called with the await command. Execution does not continue in this method until the entire file is read, but the calling method can continue to execute.
Understanding Serialization
Serialization is the process of transforming an object into a form that can either be persisted to storage or transferred from one application domain to another. When transforming the object you are serializing the object; when reading it back, you are deserializing the object. You can serialize an object to a disk, to a stream, to memory, or over a network. Two common formats for passing objects between systems are XML and JSON. You’ve seen samples of these in the section about WCF DataServices. As you remember, by default, in WCF Data Services an object is returned as XML. There was also a later sample that showed how to return the object as JSON. The objects were serialized to either XML or JSON before being transferred to the client. The .NET Framework has classes that support binary, XML, and JSON, and you can even create your own custom serialization, as discussed in the following sections.
Binary Serialization
The BinaryFormatter object is used to serialize and deserialize an object. This is found in the System.Runtime.Serialization.Formatters.Binary namespace. The two main methods you need to be concerned about are the Serialize and Desearialize methods. You can use the BinaryFormatter along with a FileStream to read and write your objects to disk. Remember, the FileStream is an object used to read and write data to and from disk as byte arrays. For a class to be serialized, you must add the [Serializable] attribute to the top of the class. The following example creates a class called Person and makes it serializable:
[Serializable]
class Person
{
    private int _id;
    public string FirstName;
    public string LastName;

    public void SetId(int id)
    {
        _id = id;
    }
}
If you want to persist this object’s data to storage, you can create an instance of the BinaryFormatter object and call its Serialize method.
Person person = new Person();
person.SetId(1);
person.FirstName = "Joe";
person.LastName = "Smith";

IFormatter formatter = new BinaryFormatter();
Stream stream = new FileStream("Person.bin", FileMode.Create, FileAccess.Write,
    FileShare.None);
formatter.Serialize(stream, person);
stream.Close();
Be aware that even the private field will be persisted to the disk. You can restore the state of the object by reading the Person.bin file and deserializing the file.
stream = new FileStream("Person.bin",FileMode.Open,FileAccess.Read,FileShare.Read);
Person person2 = (Person)formatter.Deserialize(stream);
stream.Close();
If you execute the code and view the person2 object in the Watch window, you can see that all the fields retain their value, even the private _id field. If you want to prevent the private field from being persisted, you can add the [NonSerialized] attribute before the field declaration.
[Serializable]
class Person
{
    [NonSerialized]
    private int _id;
    public string FirstName;
    public string LastName;

    public void SetId(int id)
    {
        _id = id;
    }
}
When serializing the object, the _id field will be skipped. If you were to run the code again and serialize the object and deserialize the object and view person2 in the Watch window, you would notice the _id is 0.
XML Serialization
XML serialization is just as simple to implement as binary serialization. You use the XmlSerializer class in the System.Xml.Serialization namespace. One difference between the XmlSerializer and BinaryFormatter is that the XmlSerializer serializes only public properties and fields. You also do not need to use the [Serializable] attribute when declaring the class. Also, the class must be public. The following code serializes the Person object:
Person person = new Person();
person.SetId(1);
person.FirstName = "Joe";
person.LastName = "Smith";

XmlSerializer xmlSerializer = new XmlSerializer(typeof(Person));
StreamWriter streamWriter = new StreamWriter("Person.xml");
xmlSerializer.Serialize(streamWriter, person);
The code produces the following file:
<?xml version="1.0" encoding="utf-8"?>
<Person xmlns:xsi="http://www.w3.org/2001/XMLSchema-instance"
    xmlns:xsd="http://www.w3.org/2001/XMLSchema">
  <FirstName>Joe</FirstName>
  <LastName>Smith</LastName>
</Person>
If you want to ignore a property, use the [XmlIgnore] attribute before the property. The following code would ignore the FirstName property when serializing the object to XML:
[XmlIgnore]
public string FirstName;
You can use the following code to read the XML back into an object:
XmlSerializer xmlSerializer = new XmlSerializer(typeof(Person));
FileStream fs = new FileStream("Person.xml", FileMode.Open);
Person person = (Person)xmlSerializer.Deserialize(fs);
JSON Serialization
JSON is similar to XML except it is less verbose. JSON looks like a namevalue pair but also enables one-to-many relationships such as when you have an invoice object and invoice details. You need to do a little more coding with JSON because you must explicitly put an attribute before each property or field that you want to be serialized. In addition you need to add the [DataContract] attribute before the declaration of the class. The following code demonstrates how to change the code for the Person class to allow for JSON serialization:
[DataContract]
public class Person
{
    [DataMember]
    private int _id;
    [DataMember]
    public string FirstName;
    [DataMember]
    public string LastName;

    public void SetId(int id)
    {
        _id = id;
    }
}
To ignore a field or property, you simply do not put the [DataMember] attribute in front of its declaration. To serialize an object to JSON, use the DataContractJsonSerializer class. This class is in the System.Runtime.Serialization.Json namespace. The following code serializes the Person object to JSON:
Person person = new Person();
person.SetId(1);
person.FirstName = "Joe";
person.LastName = "Smith";

Stream stream = new FileStream("Person.json", FileMode.Create);
DataContractJsonSerializer ser = new DataContractJsonSerializer(typeof(Person));
ser.WriteObject(stream, person);
stream.Close();
Instead of calling a Serialize method, you call the WriteObject method. The JSON for the Person object is:
{
    "FirstName":"Joe",
    "LastName":"Smith",
    "_id":1
}
The code to read the JSON back to the object follows:
Person person = new Person();

Stream stream = new FileStream("Person.json", FileMode.Open);
DataContractJsonSerializer ser = new DataContractJsonSerializer(typeof(Person));
person = (Person)ser.ReadObject(stream);
stream.Close();
Custom Serialization
There are two methods for customizing the serialization processes. The first is to add an attribute before a custom method that manipulates the object’s data during and upon completion of serialization and deserialization. You can use four attributes to accomplish this: OnDeserializedAttribute, OnDeserializingAttribute, OnSerializedAttribute, and OnSerializingAttribute. Adding this attribute before a method declaration fires this method during or after the serialization or deserialization process. The following code can be added to the Person class to customize the serialization logic:
[OnSerializing()]
internal void OnSerializingMethod(StreamingContext context)
{
    FirstName = "Bob";
}

[OnSerialized()]
internal void OnSerializedMethod(StreamingContext context)
{
    FirstName = "Serialize Complete";
}

[OnDeserializing()]
internal void OnDeserializingMethod(StreamingContext context)
{
    FirstName = "John";
}

[OnDeserialized()]
internal void OnDeserializedMethod(StreamingContext context)
{
    FirstName = "Deserialize Complete";
}
If you run the code for any of the serializer objects and put breakpoints in each method, you can see when each method is called. This enables you to customize the input or output in case you have enhancements to your objects in later versions, and properties are missing from your persisted files.
The second option for customizing the serialization process is to implement the ISerializable interface. The ISerializable interface has one method that you must implement called GetObjectData. This method is called when the object is serialized. You must also implement a special constructor that will be called when the object is deserialized. The following code changes the Person object, so it implements the ISeriliazable interface:
[Serializable]
public class Person : ISerializable
{
    private int _id;
    public string FirstName;
    public string LastName;

    public void SetId(int id)
    {
        _id = id;
    }

    public Person() { }

    public Person(SerializationInfo info, StreamingContext context)
    {
        FirstName = info.GetString("custom field 1");
        LastName = info.GetString("custom field 2");
    }

    public void GetObjectData(SerializationInfo info, StreamingContext context)
    {
        info.AddValue("custom field 1", FirstName);
        info.AddValue("custom field 2", LastName);
    }
}
First, take a look at the GetObjectData method. This has a parameter of type SerializationInfo, which enables you to customize the name and data that will be written to the stream. In this example, the value of the FirstName field is written to "custom field 1" and the value of the LastName field is written to "custom field 2". If you were to serialize this code as JSON, the output would be as follows:
{
    "custom_x0020_field_x0020_1":"Joe",
    "custom_x0020_field_x0020_2":"Smith"
}
When the data is deserialized, the constructor is called. Here you call methods on the SerializationInfo object to get the value based on the custom name you gave the field. Notice that the value for "custom field 1" is set to the FirstName property, and the value for "custom field 2" is set to the LastName property.
Summary
Working with data collections is a fundamental concept that you must learn not only for the test, but also to become a better programmer. This chapter explained the difference between simple arrays and collections and elaborated on the different reasons for why you would choose one class over another. The main classes to know for the test are Arrays, Lists, ArrayLists, Stacks, HashTables, and Queues. You should also know about the generic version of these classes that are available when you have a set of data that must be of the same type.
Consuming data using ADO.NET, the ADO.NET Entity Framework, and WCF Data Services is another concept that is fundamental for building an application that interacts with a database. ADO.NET is the core technology in the .NET Framework that contains the classes that communicate with a database. The Entity Framework allows you to generate a majority of the code using a designer that is needed to communicate with a database. ADO.NET is used behind the scenes in the ADO.NET Entity Framework. WCF Data Services is a layer on top of an ADO.NET Entity Framework model that allows you to access a database via the Internet or an intranet using query string parameters in a URL.
Many applications still use files to exchange data between systems so understanding the many choices you have in the .NET Framework for reading and writing files is important. The .NET Framework has classes that allow you to determine the properties of a file or folder, and also for reading and writing files to disk, in memory, or over a network pipe.
Serialization is the concept of transforming an object and its data into another form such as XML, JSON, or a binary format. The .NET Framework has classes that can accomplish this with very little code or you can implement your own custom serialization.
This chapter covered a lot of material, so it might be a good idea to review it a few times. You might have plenty of questions about the material covered in this chapter, so be sure to walk through all the sample code and get a good understanding of the concepts that have been discussed. Many times on the test you will see specific syntax questions about a particular object, so you must know method and property names. In addition to this chapter, review the articles listed in the “Additional Reading and Resources” section at the end of this chapter. Not only must you understand these concepts for the test, but you will see these concepts when you work with real-world applications.
Chapter Test Questions
Read each question carefully and select the answer or answers that represent the best solution to the problem. You can find the answers in Appendix A, “Answers to Chapter Test Questions.”
Int[] mySet = new int[5];using (NorthwindsEntities db = new NorthwindsEntities())
{
Category category = new Category()
{
CategoryName = "Alcohol",
Description = "Happy Beverages"
};
db.Categories.Add(category);
db.SaveChanges();
}using (NorthwindsEntities db = new NorthwindsEntities())
{
Category category = new Category()
{
CategoryName = "Alcohol",
Description = "Happy Beverages"
};
db.Categories.Add(category);
db.InsertRecords ();
}using (NorthwindsEntities db = new NorthwindsEntities())
{
Category category = new Category()
{
CategoryName = "Alcohol",
Description = "Happy Beverages"
};
db.Categories.Insert (category);
db.SaveChanges();
}using (NorthwindsEntities db = new NorthwindsEntities())
{
Category category = new Category()
{
CategoryName = "Alcohol",
Description = "Happy Beverages"
};
db.Categories.Insert(category);
db.InsertRecords();
}Category category = db.Categories.First(c => c.CategoryName == "Alcohol");
category.Description = "Happy People";
db.UpdateRecords ();Category category = db.Categories.First(c => c.CategoryName == "Alcohol");
category.Description = "Happy People";
db.Categories.UpdateRecords();Category category = db.Categories.First(c => c.CategoryName == "Alcohol");
category.Description = "Happy People";
db.SaveChanges();Category category = db.Categories.First(c => c.CategoryName == "Alcohol");
category.Description = "Happy People";
db.Categories.SaveChanges();Additional Reading and Resources
Here are some additional useful resources to help you understand the topics presented in this chapter:
Microsoft WCF Data Services Documentation http://msdn.microsoft.com/en-us/library/cc668792.aspx
Open Data Protocol http://www.odata.org
Open Data Protocol Filter Options http://www.odata.org/developers/protocols/uri-conventions#FilterSystemQueryOption
NHibernate http://nhforge.org
Microsoft’s Entity Framework http://msdn.microsoft.com/en-us/data/ef.aspx
Julie Lerman’s blog (Entity Framework Guru) http://thedatafarm.com/blog/
Microsoft’s Collection Reference http://msdn.microsoft.com/en-us/library/ybcx56wz(v=vs.110).aspx
Connection String http://www.connectionstrings.com
JSON Reference http://www.json.org
Cheat Sheet
This cheat sheet is designed as a way for you to quickly study the key points of this chapter.
Arrays and collections
- Arrays all inherit from the System.Array type.
- There are numerous collection types that are similar to arrays, but they offer much more flexibility for manipulating the data contained in the collection.
- ArrayList, HashTable, Queue, SortedList, and Stack are all in the System.Collections namespace.
- Dictionary<TKey, TValue>, List<T>, Queue<T>, SortedList<TKey, TValue>, and Stack<T> are all in the System.Collections.Generic namespace.
- The generic collection classes are used when you want all objects to be of the same type.
- Queues are first-in-first-out.
- Stacks are last-in-first-out.
- You can implement the IComparable interface to control how two objects are compared.
- A Dictionary object stores a keyvalue pair.
- Custom collections inherit from the CollectionBase class.
ADO.NET
- ADO.NET is a set of classes used to execute commands on a database.
- A Command object is used to call a stored procedure or execute a dynamic SQL statement.
- The Command’s ExecuteNonQuery method is used to execute nonresult-returning queries such as an INSERT or UPDATE command.
- A DBDataReader object is a read-only, forward-only cursor connected to the database.
- The Command’s ExecuteScalar method is used to return a single value from a database such as when a query returns a SUM or COUNT.
- The Command’s ExecuteXMLReader method returns the data represented as XML. Use the FOR XML clause in SQL Server to select the data as XML.
- A DataSet is a disconnected resultset and can contain one or more DataTables. A DataAdapter is used to fill a DataSet.
- A DataAdapter can be used with a DataSet to add, update, or delete records in a database.
ADO.NET Entity Framework
- The Entity Framework is an ORM tool that masks the syntax for using ADO.NET to communicate with a database.
- An Entity Framework Model contains the classes that represent the objects in a database.
- Stored procedures are methods on an Entity Framework Model.
WCF Data Services
- WCF Data Services enables you to access a database over the web or an intranet.
- WCF Data Services uses the OData protocol.
- WCF Data Services returns data in OData ATOM format but also can return data in JSON format.
- You can query data in a database by passing parameters in the URL’s query string.
File IO
- File and FileInfo object are used to determine properties about a file and also perform operations on a file.
- A Stream is used to represent the contents of a file in memory and can be used to write data to a file or read data from a file.
- A BinaryReader and BinaryWriter are used for reading and writing binary values.
- A StreamReader and StreamWriter are used for reading and writing characters by using an encoded value to convert the characters to and from bytes.
- The default character encoding for a StreamReader and StreamWriter is UTF-8.
- You can use a StreamReader to read a file character by character, line by line, or the entire file at once.
- The StringReader and StringWriter is used to read and write string data.
- The async and await keywords are used to perform asynchronous operations.
- The async keyword must modify a method signature for it to use the await keyword.
- The await command kicks off the method but returns processing back to the calling method until the method completes.
Serialization
- Serialization is the process of transforming an object’s data to persisted storage or to transfer the object from one domain to another.
- The BinaryFormatter is used to perform binary serialization.
- The XmlSerializer is used to perform XML serialization.
- The DataContractJsonSerializer is used to perform JSON serialization.
- There are two ways to customize serialization, using attributes or implementing the ISerializable interface.
Review of Key Terms
ADO.NET A set of classes in the .NET Framework that enables you to connect to a database, retrieve data, execute stored procedures, add, update, or delete records in a table.
ADO.NET Entity Framework An object relational mapping tool that provides a graphical user interface that generates to code to perform operations against a database using ADO.NET
array The most basic type used to store a set of data.
async Indicates that the method, lambda expression, or anonymous method is asynchronous.
await Suspends the execution of a method until the awaited task completes.
boxing/unboxing Boxing is the process of converting a value type to a reference type. Unboxing is the process of converting a reference type to a value type.
collection A generic term that encompasses lists, dictionaries, queues, stacks, hash tables, and other objects that can contain sets of data.
connection object An object in ADO.NET that allows you to open and execute commands against a database.
IComparable interface A class that implements the IComparable interface can be sorted when used in a collection or array.
indexer A method that is used when referencing an element in an array or collection by using square brackets, [], and its index.
JSON JavaScript Object Notation is a lightweight data-interchange format.
Object Relational Mapping (ORM) A computer software term for tools that convert data between type systems using an object oriented programming language.
OData ATOM The XML representation of data returned from an OData query.
Open Data Protocol (OData) A web protocol for querying and updating data through the Internet or intranet.
shallow copy Creating a new copy of an object that copies all value types and copies object references for reference types.
serialization The process of converting an object into a stream of bytes that can be stored or transmitted.
stream An abstract class that provides a generic view of a sequence of bytes.
Text Transformation Template Toolkit (T4 Template) A file that contains text blocks and control statements that enable to you to generate a code file.
WCF Data Services Enables you to use OData to expose and consume data over the web or an intranet.