Chapter 6
Deploying an ASP.NET MVC 4 Project to Windows Azure
EXERCISES AND EXAMPLES
IN THIS CHAPTER
- How to access Windows Azure
- How to create the Window Azure Web Site and Cloud Service
- How to add and connect a SQL database
- How to deploy and test your code
- Establishing a Team Foundation Server (TFS) connection and publishing the ASP.NET MVC 4 website
- How to connect a Windows Azure Web Site to a GitHub code repository
- Using FTP to publish an ASP.NET MVC 4 website
WROX.COM CODE DOWNLOADS FOR THIS CHAPTER
You can find the wrox.com code downloads for this chapter at www.wrox.com/go/azureaspmvcmigration on the Download Code tab. It is recommended that you download the code and review it so that you have a good understanding of what is about to be discussed.
Now that you understand many of the deployment options available on the Windows Azure platform, it is time to put your recently learned knowledge to work. By deploying source code and data structures to a Web Site or Cloud Service hosted on Windows Azure, users, customers, or visitors can access and use its features. If you have performed the exercises described in this book up to this point, you’ve created a website and a Cloud Service; however, they exist only on your development PC and only you can access them. For other people to view the site, you must deploy it to a server that’s publicly accessible. Once you complete this chapter, you’ll have a deeper understanding of what the different types of Windows Azure platform deployment services offer and your website or Cloud Service will be available for anyone to access.
NOTE The following exercises provide step-by-step instructions for making different types of deployments. If you’re not familiar with the concepts behind this chapter, Chapter 5, discusses the various concepts behind deploying an ASP.NET project to Azure.
Before you can perform a deployment to the Windows Azure platform, you need to create an account and choose the kind of subscription you need. A Windows Azure account is what resource usage is reported against and is the entity in which the services are billed to. The subscription describes the Windows Azure services to which the account has access.
To access the Windows Azure platform, you need a Microsoft ID; this was formally called a Windows Live ID. If you currently have either types of ID, including an Office 365 ID, you can bind any of them to your Windows Azure account when you create it.
To view the different subscription types, follow these steps:
2. Click the Pricing link at the top of the page, as shown in
Figure 6-1. You are now navigated to the Calculator that enables you to choose between numerous Windows Azure services and configure them to see what the cost would be.
NOTE The pace of change on the Azure platform is happening fast. Figure 6-1 might change at some point. If this happens, search for the pricing information on the website mentioned in Step 1.
3. Navigate to the Purchase Options to pick a subscription that best meets your requirements. Subscription details are likely to change over time due to the very competitive state of the cloud and the current players such as Google,
Amazon.com, Sales Force, and Microsoft. For example, MSDN subscribers have a monthly credit available to use against their Azure charges. This is something newly provided at the time of writing this book. At the moment, there are three subscription options: pay as you go, 6-month offer, and 12-month offer. Each has its own benefits, so research and choose which option best meets you needs.
4. Regardless of which option you choose, when selected, you are walked through an Account Creation Wizard that collects details and required information for the Windows Azure account creation.
If you want to test only the Windows Azure platform, you can use the 90-day free trial before you purchase a subscription. This is a great option and you get 90 days to create websites, Cloud Services, virtual machines, SQL databases, and so on and see how they all work together.
If you have an MSDN subscription, you can get some free benefits based on your MSDN subscription level, for example (at the time of writing this chapter):
- 375–1,500 hours of the small compute instance
- 500,000–2,000,000 CDN transaction
- 70 GB–90 GB of storage
- 50,000,000–100,000,000 storage transactions
- 1–5 SQL Database Web Edition
- 30 GB–40 GB of data transfers
If you are an individual who wants to move your websites to the Windows Azure platform, seriously consider purchasing an MSDN subscription and use the free Windows Azure benefits. You will receive a lot of other benefits in addition.
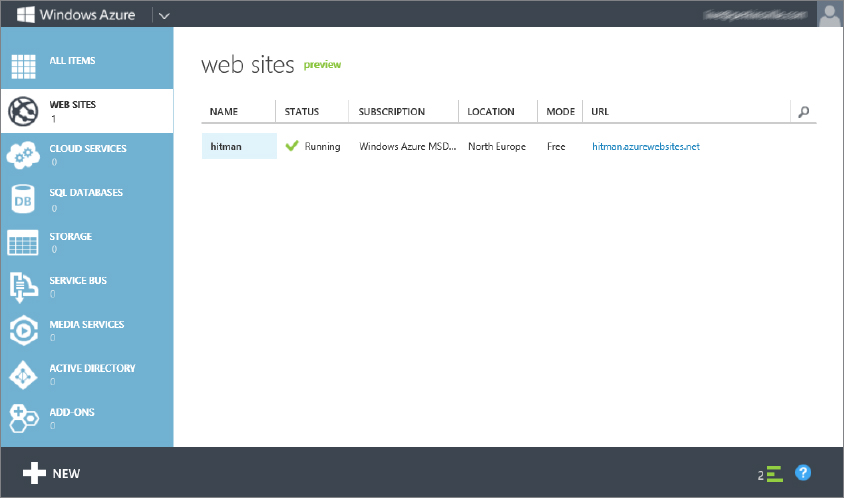
Now that you have access to the Windows Azure platform, you can create Web Sites, Cloud Services, and a SQL database. First, you should create a website instance that you can later use to host the ASP.NET MVC 4 project you created in Chapter 2, and fine-tuned in Chapter 4. After the creation of the website, I’ll discuss the creation of the Cloud Service. The Cloud Service, which is synonymous with Web Role, will host the same ASP.NET MVC 4 project after a simple conversion from a project to a Web Role, also discussed in this chapter.
Creating a Website
To create a website on the Windows Azure platform, follow these steps:
1. Click +NEW located on the bottom left of the page, as shown in
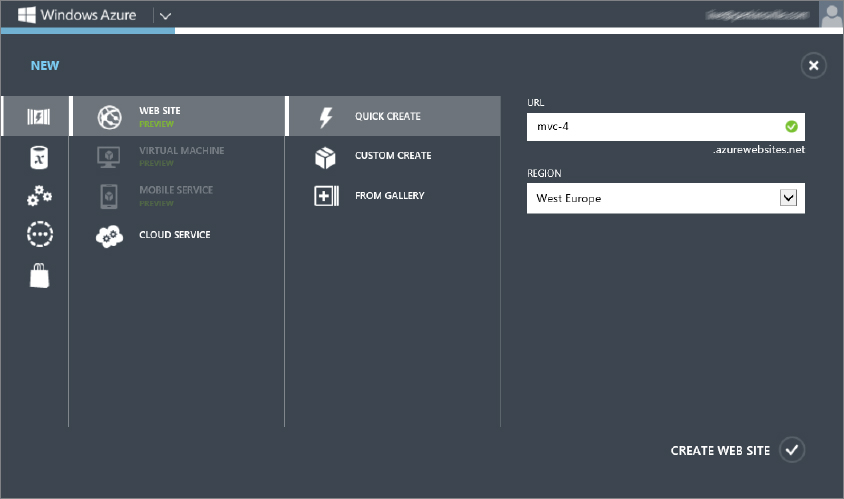
Figure 6-2. When selected a pop-up window is rendered, as shown in
Figure 6-3.
2. You are presented three different options for creating a website:
- Quick Create: Enables you to quickly create a website by specifying the URL and Region only. You can perform other configurations after creating the website.
- Custom Create: In addition to specifying the URL and Region, this option enables you to choose a database that the website connects to, and a source for publishing your source from. Currently, Team Foundation Server and Git are supported.
- From Gallery: When this item is selected, it enables you to install a number of templates to use with your website, for example, WordPress, Das Blog, or .DotNetNuke.
For this example, select Quick Create.
3. Enter an available URL and the Region, and select the Create Website link on the lower right.
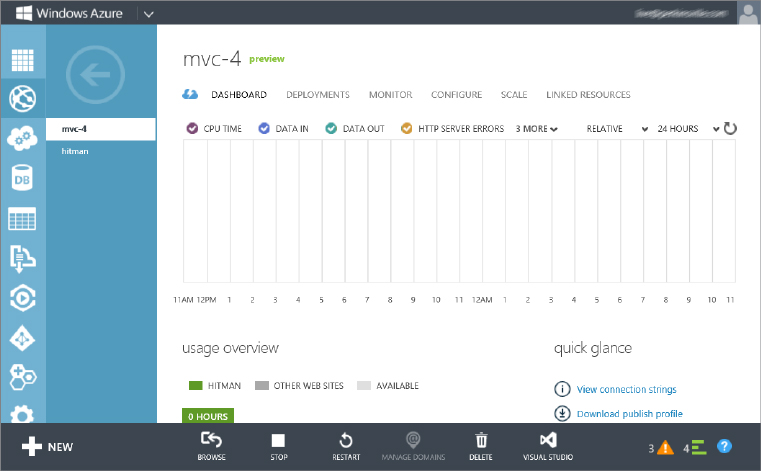
4. When created, click the Website and view the Website Dashboard, as illustrated in
Figure 6-4. If the QuickStart page come up first, select the DASHBOARD link located at the top left of the main page.
The website on the Windows Azure platform is now created and ready for you to publish some source code. If you would like to jump straight to the deployment exercise, skip the next section, “Creating a Cloud Service,” and go directly to the “Adding a SQL Server Database” section. Come back to the “Creating a Cloud Service” after you are ready to create the Cloud Service, and migrate the ASP.NET MVC 4 project to a Web Role.
Creating a Cloud Service
A Cloud Service falls into the category of a PaaS, meaning, the administrator does not need to be concerned about the operating system, hardware, and network components of the solution. In addition, a Cloud Service can be connected to via a Remote Desktop Connection and administrated similar to a normal server. To create a Cloud Service, follow these steps:
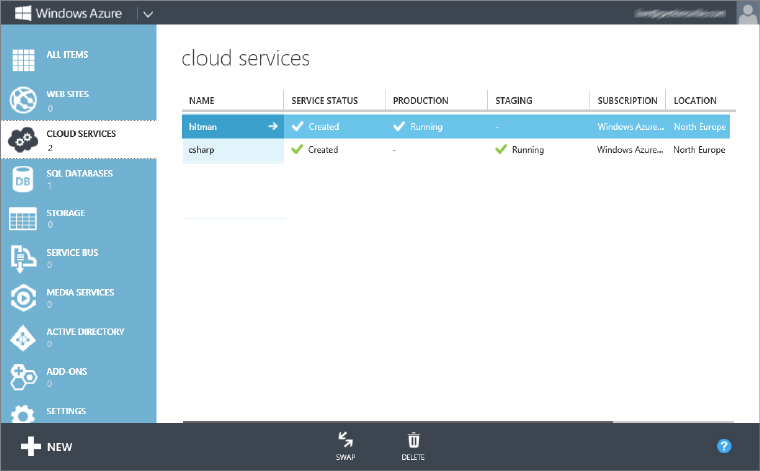
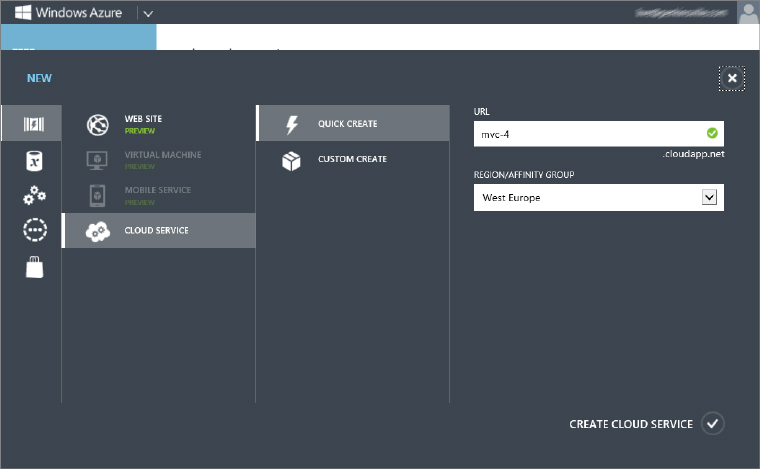
1. In the Windows Azure Management console, click the Cloud Services menu item; then click the +NEW link on the bottom left of the web page, as shown in
Figure 6-5. When clicked a pop-up is rendered that walks you through the creation of the Cloud Service.
Figure 6-6 illustrates how this pop-up looks.
2. Select the Quick Create menu item, and enter the URL and Region/Affinity Group you would like for your Cloud Service.
3. When complete, select the Create Cloud Service link on the lower right of the pop-up window.
After clicking the Create Cloud Service Link, you are redirected to the list of Cloud Services you have in your Windows Azure Subscription. Wait until the status shows as completed, then you can click the Cloud Service and view its details.
Now that you have access to the Windows Azure platform, and have created the Windows Azure Web Site or a Cloud Service, the next step is to add the SQL database. The sample ASP.NET MVC 4 project uses the database to retrieve blog and comment information.
To add a SQL database to the Windows Azure platform, the basics steps involve logging into Windows Azure and selecting the SQL Databases menu item; creating a new SQL Database if this is the first database you’re created; providing details such as Login Name, Password, as so on. After you do all this, you can view the details found on the database Dashboard.
Adding a SQL Server Database
To create the SQL Database on Windows Azure, follow these steps:
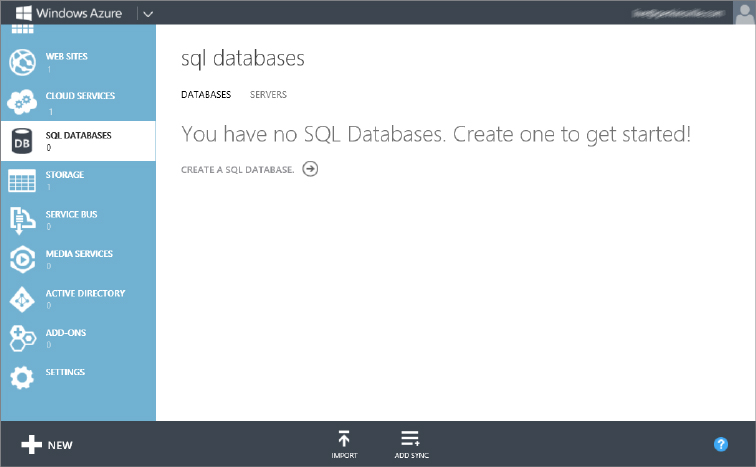
1. Select the SQL Databases menu item on the left navigation pane. Assuming that you do not have exiting databases, select the Create a SQL Database link on the feature window, as shown in
Figure 6-7.
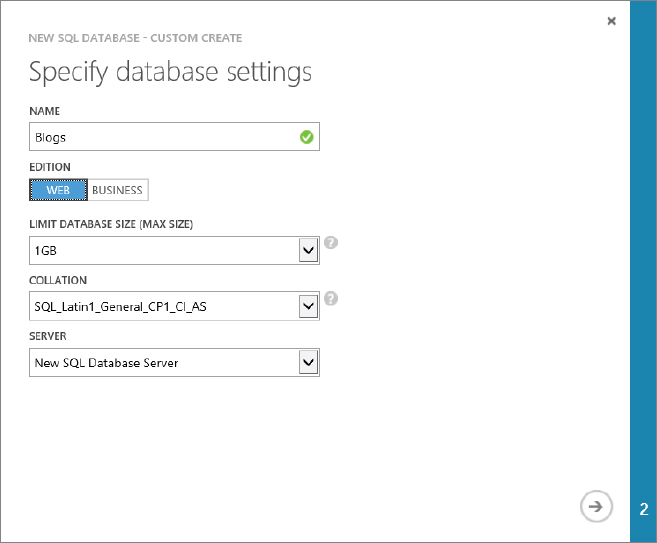
2. In the Specify Database Settings window that appears (see
Figure 6-8), enter
Blogs as the database Name, and select Web as the database Edition. Keep the default Collation name. Finally, select the New SQL Database Server from the drop-down, and then click the arrow on the bottom right to go to the next step.
Figure 6-9 displays the final request for information before the database is created.
NOTE The difference between the Web and Business edition has to do with capacity and the billing model. For example, the Web edition scales from 1 GB to 5 GB, whereas the Business edition scales from 100 GB to 150 GB. Because this is just a test example, choose Web ⇒ Server ⇒ Create SQL Database. Also note that collation has to do with supporting, sorting, and comparing certain character types. So unless you have some special needs, leave this as the default setting. Note that you cannot change this parameter after you create the database.
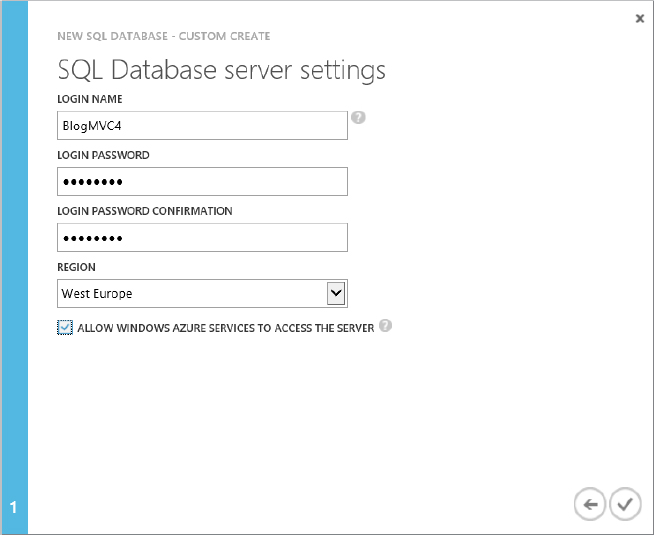
3. In the SQL Database server settings, enter and remember the database Login Name and Password. Select the Region that is closest to your customers, and select the check button on the bottom right to create the database.
If this is not the first time you are creating a database in your Windows Azure environment, the Create New SQL Database does not appear in the main section. Instead, a list of the existing databases display.
4. To add a new database, select the +NEW button on the lower-left side of the page previously shown in
Figure 6-7. When selected, the pop-up, as shown in
Figure 6-10, appears.
5. Select the Quick Create item, enter the requested information (Database Name and Server location), and select the Create SQL Database button.
6. Select Quick Create for creating an SQL database in this exercise. Notice that you have three options:
- Quick Create: A good option for creating a simple database and then making the configurations later via the database Dashboard. You can choose Database Name and Server using this option.
- Custom Create: Provides a few more options during the creation of the SQL Database. You can choose Database Name, decide between Web and Business edition, set the max size of the database, choose the collation method, and then select the server where the database is stored.
- Import: Enables you to import a saved database from your BLOB storage account.
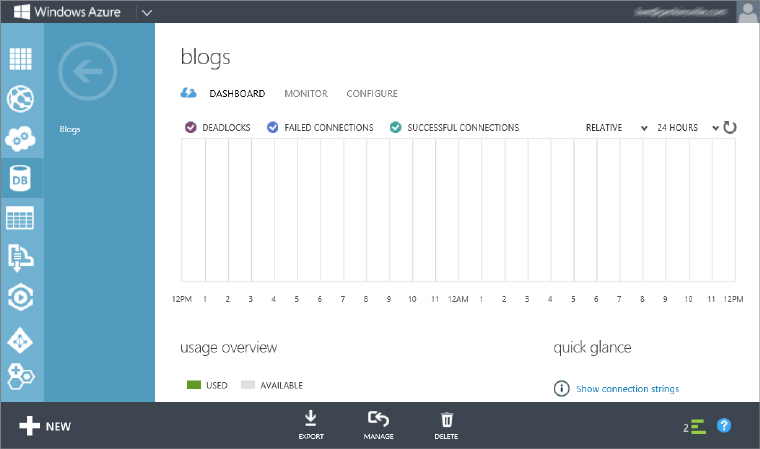
7. After the database is created and has a status of Online, click the Name, and you are redirected to the Dashboard, as shown in
Figure 6-11. You can find some important information on this screen, for example, the usage statistics, the connection string that applications can use to connect to the database, troubleshooting tips, back-up and restore capabilities, and a URL to remotely connect to the database.
Connecting to the Database
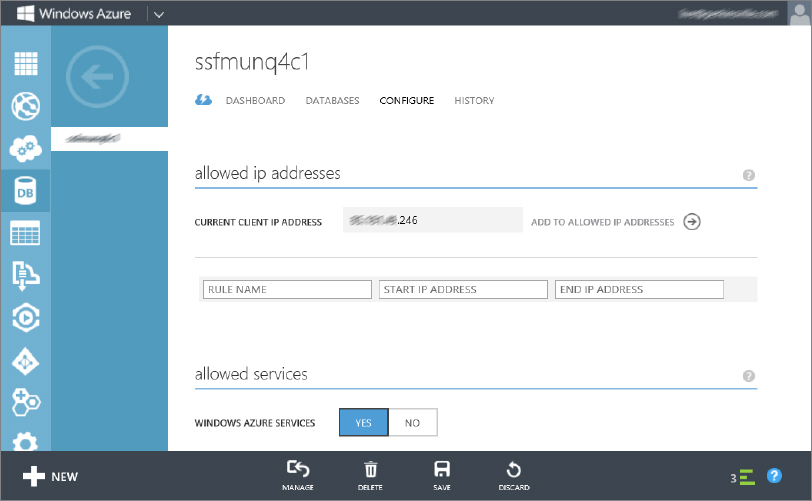
You can add a connection to this database from Visual Studio. To add an additional layer of security, you’re required to configure the database on Widows Azure to allow access based on the IP address of the client. To do this, follow these steps:
1. In the Dashboard for the Blogs database, look on the right side for a section titled Quick Glance. In that list of links, find and select the one titled Manage Allowed IP Addresses. By default, the page shows the IP address of the machine currently connected to the Windows Azure platform, as shown in
Figure 6-12.
2. Select the Add to Allowed IP Addresses link next to the IP address, and then click the Save button at the bottom of the page to allow the machine with that IP address to connect to the database remotely.
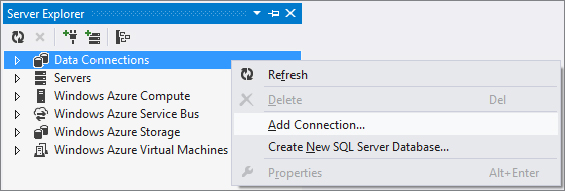
3. To add the connection from within the Visual Studio 2012, open the Server Explorer, right-click Data Connection, and then select Add Connection, as shown in
Figure 6-13.
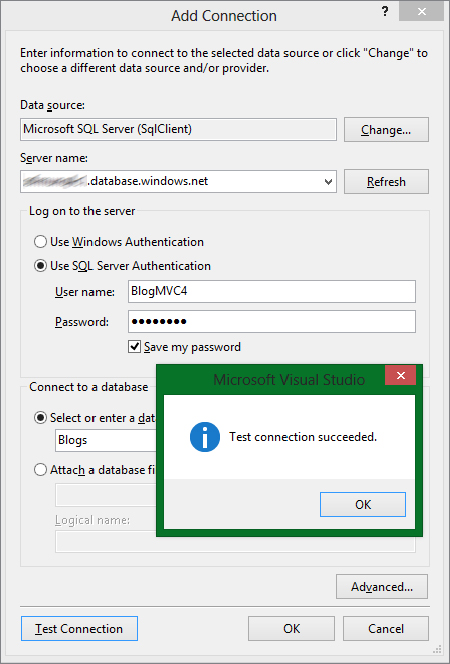
4. In the Server Explorer window that appears, you can find the server name where your database is created on the right side of the database Dashboard window under the label Server Name.
5. Enter that server name into the Add Connection window, select the Use SQL Server Authentication option, and enter the Login Name and Password that you created in
Figure 6-3 using the steps in the section “Creating a Website.” After clicking the Select or Enter a Database Name option, select the Blogs database, and then click the Test Connection button. If successful, you see the Test Connection Succeeded message, as shown in
Figure 6-14.
6. In Visual Studio, you can right-click the database and select Properties. In the Properties window on the lower right of the Visual Studio IDE, look in the Connection String element. You can use this value from in your Windows Azure-hosted application to connect to the database.
You now have successfully created a SQL Server database on the Windows Azure platform and have the connection string required to connect to it. You can now move onto the next section and deploy the code that uses this database.
Now that you have a Windows Azure account, your Website and/or Cloud Service, and a SQL database, the next step is to deploy the ASP.NET MVC 4 source code and the dependencies to the cloud so that user, customers and visitors can access it. There are two kinds of Windows Azure features that support websites. As previously discussed in Chapter 5, they are Web Sites and Cloud Services.
The sample ASP.NET MVC 4 project for this chapter was created in a way that restricts its deployment to a website. Therefore, the section “Converting an ASP.NET MVC 4 Project to a Cloud Service” describes the steps required to transition the ASP.NET MVC 4 project from a website to a Cloud Service. However, you must first make a few modifications that apply to both the Web Site and Cloud Service project before migrating them to your Windows Azure instances. They are as follows:
1. Change the path to the XML RSS blog list. In Chapter 2 the path to the XML RSS file was hard-coded, as shown in the following code snippet:
XDocument doc = XDocument.Load(@"C:...MVCMVCContentRSScsharp2011.xml");
You must update this to use a relative path. Update this line of code located in the
ControllerHomeController.cs and
ControllerBlogController.cs, as shown in the following code snippet:
XDocument doc = XDocument.Load(Server.MapPath("Content/RSS/csharp2011.xml"));
2. Change the Connection String to point to the previously created SQL database. In the previous section, you added the connection to the database to the Server Explorer Data Connections. Go back to this, right-click the database connection, and select Properties. Look in the Properties window to find the value located in the Connection String attribute. Copy this value. (Highlight it and press Ctrl+C.) Then open the
ConfigureNHibernate() method located in the Global.asax.cs file, and modify the
db.ConnectionString property to be that of the Windows Azure SQL database. For example, the existing value is as shown in the following code snippet:
db.ConnectionString =
      "Data Source=.SQLExpress;
       Initial Catalog=Blogs;
       Persist Security Info=True;
       User ID=sa;Password=****;Pooling=False";
This code snippet makes a connection to the SQL Server Express instance on a development PC that was installed and configured in Chapter 2. Change this value to your instance of the SQL database created on Windows Azure. The following code snippet is an example of how it may look:
db.ConnectionString =
      "Data Source=SERVERNAME.database.windows.net;
      Initial Catalog=Blogs;
      Persist Security Info=True;
      User ID=BlogMVC4;Password=********";
3. Uncomment, execute, and comment out the logic that creates the database tables using NHibernate methods. Recall from Chapter 2 the segment of code that creates the database schema and populates the database with data. This code segment is located in the
Application_Start() method and shown in the following segment shown in
Listing 6-1.
LISTING 6-1: NHibernate Create Database Code Segment
new SchemaExport(configuration).Drop(false, true);
new SchemaExport(configuration).Create(false, true);
SchemaValidator schemaValidator = new SchemaValidator(configuration);
schemaValidator.Validate();
InsertTestData();
NOTE Be sure to comment this with your first deployment; then, after the database is successfully created, comment out this code segment and republish the file.
Converting an ASP.NET MVC 4 Project to a Cloud Service
As previously discussed, there are numerous realized benefits from using a Cloud Service versus a website. The following details cover the steps required to convert the ASP.NET MVC 4 website to a Cloud Service. Perform the following to make the conversion:
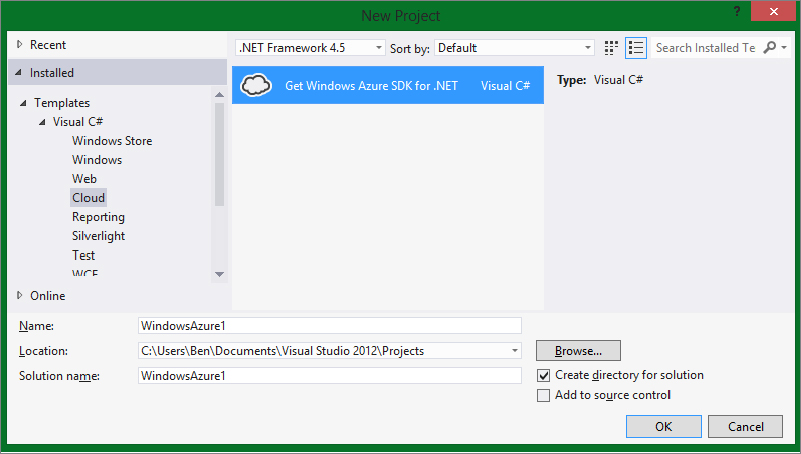
1. Download and install the Windows Azure SDK for .NET. To install the Windows Azure SDK for .NET, open Visual Studio 2012 and select File ⇒ New ⇒ Project. In the Template folder select Cloud. If you have not already manually installed the SDK, you will see that the Get Windows Azure SDK for .NET is the only selectable choice provided.
2. Select Get Windows Azure SDK for .NET, and click OK. Figure 6-15 illustrates the New Project window.
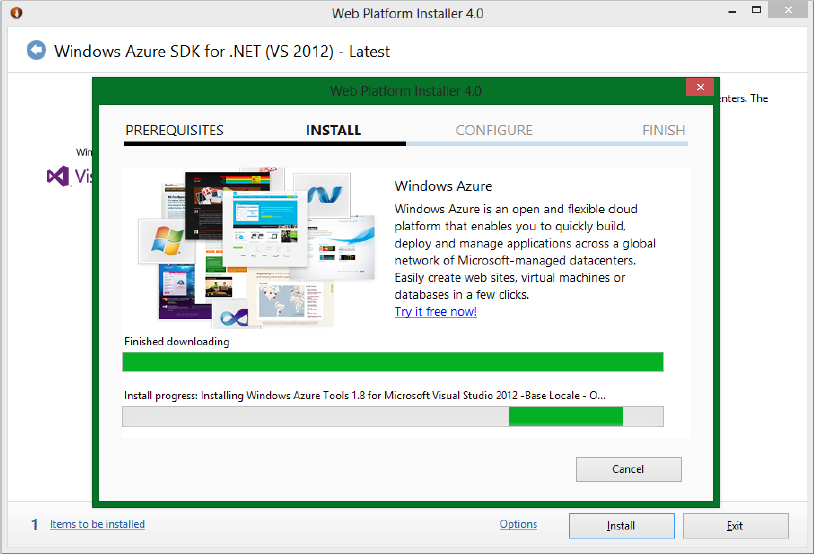
3. Download the SDK. Follow the Installation Wizard (shown in
Figure 6-16), which includes the download and installation of the Web Platform Installer and completes the SDK installation. You will need to close any open instances of Visual Studio.
4. Create the ASP.NET MVC 4 Web Role. After the installation is complete, open Visual Studio 2012 in elevated mode (that is, run as Administrator). Select File ⇒ New ⇒ Project.
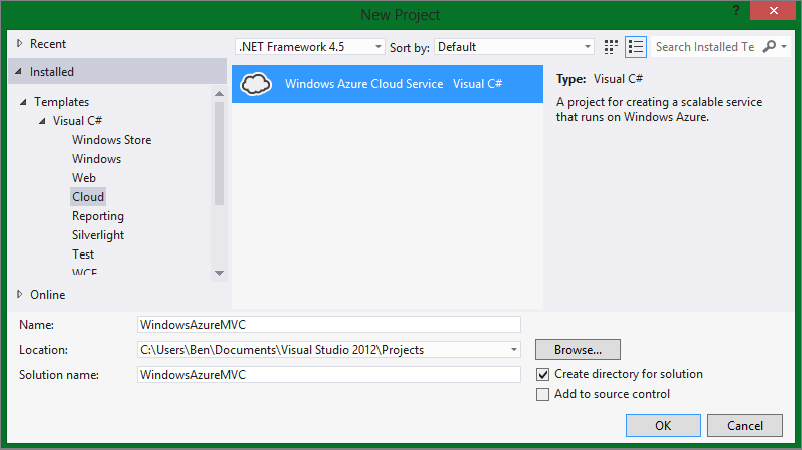
5. Create a name for the Web Role. Select the Cloud Template ⇒ Windows Azure Cloud Service, and enter the name
WindowsAzureMVC. Select OK.
Figure 6-17 shows the Add Project window. The New Windows Azure Cloud Service window opens, as shown in
Figure 6-18.
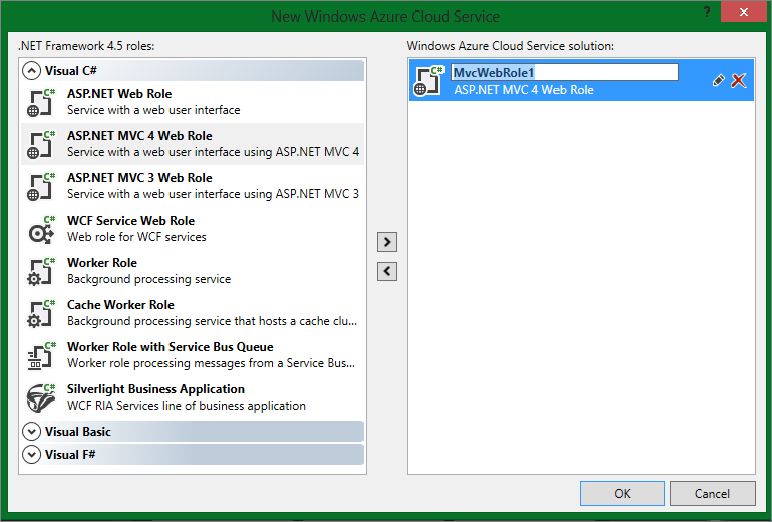
6. Define the Web Roles. Select ASP.NET MVC 4 Web Role; then click the “>” button to add the Web Role to the solution. Hover over the just-added Web Role, and click the Edit button. Rename the Web Role to any name you would like or leave it as is; then click OK. (csharp is used in this example.) In the next window, select Internet Application, leave all of the other default settings, and click OK.
7. Add the NHibernate package using the Package Manager and NuGet. When the project creation process successfully completes, select Tools ⇒ Library Package Manager ⇒ Package Manager Console, and enter
install-package NHibernate to install the NHibernate binaries.
Figure 6-19 displays the outcome of the execution of that command.
The command install-package NHibernate automatically adds the required DLL libraries to the References directory of the solution. The NHibernate components can now be referenced within the source code so that its features can be used.
Adding ASP.NET MVC 4 Website Code to the ASP.NET MVC 4 Web Role/Cloud Service
To complete the migration from the ASP.NET MVC 4 website to a Web Role so that you can deploy it to the previously created Windows Azure Cloud Service instance, complete the following:
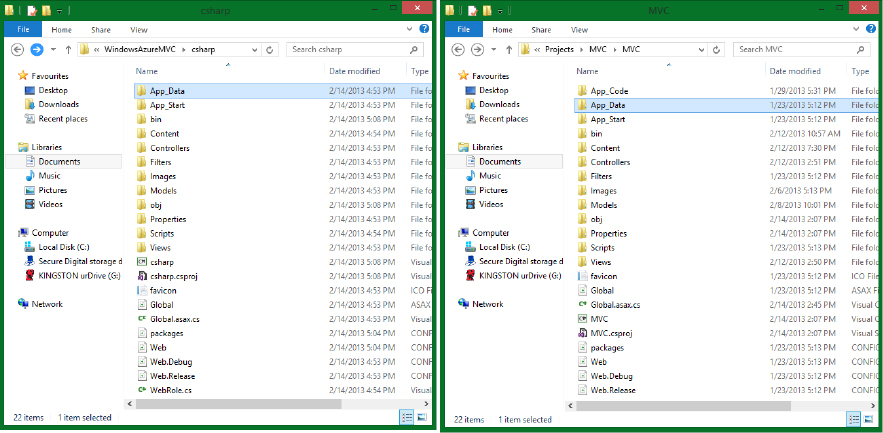
1. Open two different instances of Windows Explorer. You’ll open one for the ASP.NET MVC 4 website and another for the ASP.NET MVC 4 Web Role.
2. Navigate to the locations where you stored both of these projects and open them. This is shown in
Figure 6-20.
3. Copy the following files from the MVC project to the WindowsAzureMVC project:
- MVCContentRSS directory and contents
- MVCContentSyntax directory and contents
- MVCContentSite.css
- MVCControllersBlogsController.cs
- MVCControllersCSharpFundamentalsController.cs
- MVCControllersHelp.cs
- MVCControllersHomeController.cs
- MVCControllersLessonsController.cs
- MVCControllersNewsController.cs
- MVCControllersReviewsController.cs
- MVCImages all contents
- MVCModelsBlog.cs
- MVCModelsBlogArchives.cs
- MVCModelsBlogList.cs
- MVCModelsBlogNavBarElements.cs
- MVCModelsComments.cs
- MVCViewsBlogs directory and contents
- MVCViewsCSharpFundamentals directory and contents
- MVCViewsHelp directory and contents
- MVCViewsHome directory and contents
- MVCViewsLessons directory and contents
- MVCViewsNews directory and contents
- MVCViewsReviews directory and contents
- MVCViewsShared directory and contents
- MVCFavicon.ico
- MVCGlobal.asax.cs
4. Add each of the copied files to the WindowsAzureMVC project. From within Visual Studio 2012, right-click the Content directory ⇒ Add ⇒ New Folder ⇒ RSS. Then right-click the RSS folder ⇒ Add ⇒ Existing Item. Navigate to the WindowsAzureMVCContentRSS directory, and select the CSHARP2011.xml file.
5. Perform the action in step 4 for all the files identified in step 3.
NOTE You must change all places that reference the MVC namespace, for example using MVC.Models, to the name of the Web Role you selected, (such as csharp), as shown previously in 6-18. Search in all the model, view, and controller files for this entry. If you get lost, you can download the source code as an example, from the Wrox website, to help you get through any difficulty.
6. When all the changes are complete, select F5 to locally run the Web Role, and click around the website making sure everything is working as expected.
After you are certain that it is ready to be published, continue to the next section, “Deploying to a Windows Azure Cloud Service,” and follow those instructions to move the Web Role to the Windows Azure Cloud Service.
Deploying with Visual Studio Publishing Features
As you know, there are two different types of hosting capabilities on the Windows Azure platform: the website and the Cloud Service. At this point you now have two ASP.NET MVC 4 projects. One is a Windows Azure Web Site created in Chapter 2, and the other is a Windows Azure Cloud Service migrated from the website in the previous section.
Use the instructions in the following two sections to deploy your website or Cloud Service to the Windows Azure platform.
Deploying to a Windows Azure Web Site
After making changes to the Connection String and changing the path to the XML RSS feeds used for presenting the most current blogs on the Home and Blogs page, the ASP.NET MVC 4 project is ready for deployment to the previously created Windows Azure Web Site.
To publish the ASP.NET MVC 4 website to the Windows Azure Web Site, complete the following steps:
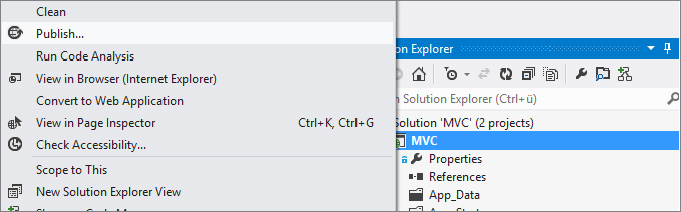
1. Create a publish profile name. To create the publish profile, right-click the project name, and select Publish, as shown in
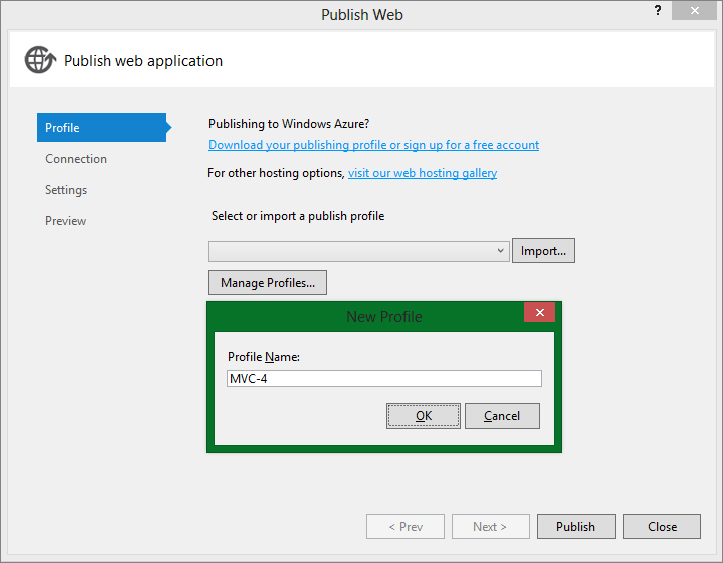
Figure 6-21. From the drop-down box on the Publish Web window, select <New...> and enter the profile name, as illustrated with
Figure 6-22.
NOTE Creating a publish profile lets you store connection information and settings specific to this project. If, in the future, you have more than a single project hosted on Windows Azure, you can select the profile for the project and publishing happens without the need to reconfigure the settings.
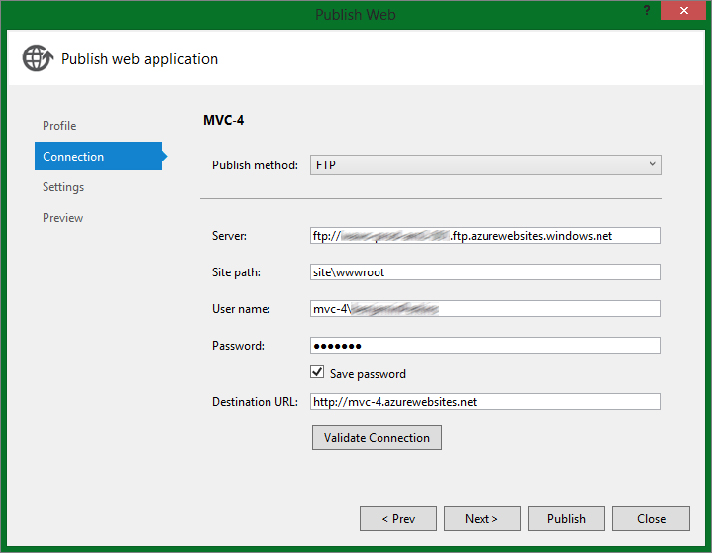
2. Create the connection to the Windows Azure Web Site. When all of the information is entered, select the Validate Connection to confirm that the provided information is valid.
Figure 6-23 demonstrates this activity. Select the Next button.
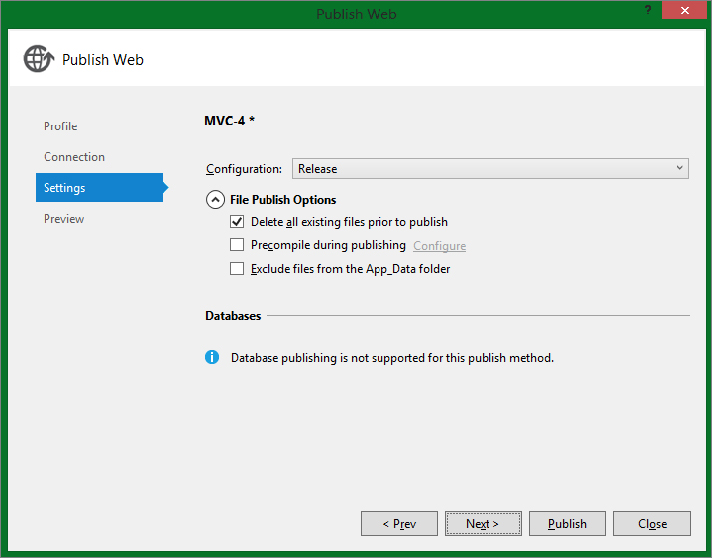
3. Select publishing settings. Enter the settings, as shown in
Figure 6-24. In this example, select the Delete All Existing Files Prior to Publish check box. This is done to make sure that files you no longer need are removed to avoid conflict with other files, in the event that the versions of dependent files get out of sync. You can also choose to compile the code during deployment and to exclude the file from the App_Data folder.
4. Select the Configuration type (Release or Debug). Select Release from the Configuration drop-down; however, if you were publishing to a Staging instance on your Cloud Service you might consider or need to deploy the Debug project.
5. Publish the ASP.NET MVC 4 website. Select the Next button to preview the configuration; then select the Publish button. During the publishing you should see the status as shown in
Figure 6-25.
6. Review the result of the published website. After the publishing is complete, the website address entered into the Destinations URL, as shown in
Figure 6-23, opens.
WARNING After the website has been run once, don’t forget to comment out the code that creates the database structure from the Global.asax.cs file and then republish.
Deploying to a Windows Azure Cloud Service
After making changes to the Connection String and changing the path to the XML RSS feeds that present the most current blogs on the Home and Blogs page, the ASP.NET MVC 4 Web Role project is ready for deployment.
To publish the ASP.NET MVC 4 website to the Windows Azure Cloud Service, complete the following steps:
1. Sign-in and download Windows Azure credentials. To begin the publishing of the Web Role, right-click the project name and select Publish to Windows Azure.
Figure 6-26 displays this menu item.
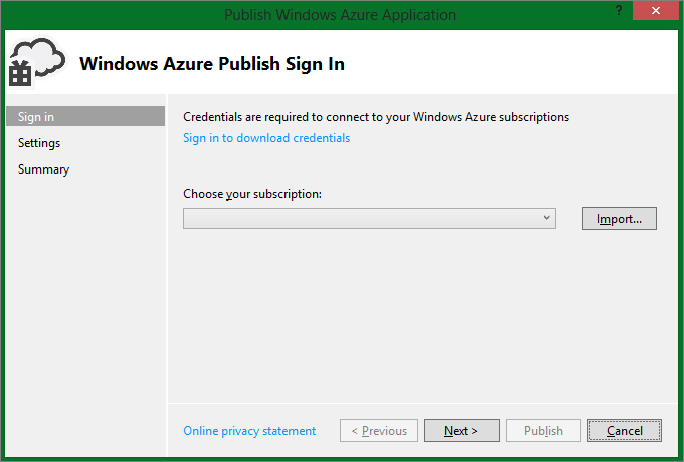
2. Enter your download credentials. When the Publish Windows Azure Application window is rendered, as shown in
Figure 6-27, select the Sign In to Download Credentials link, and enter your Windows Azure credentials. When successfully authorized, you are prompted to download a *.publishsettings file.
3. Save the publish file. Save this file to your local computer, and, for later reference, write down where it is saved. Select the Import button (refer to
Figure 6-27) and select the *.publishsettings file you just downloaded. Then select Next to move to the next window.
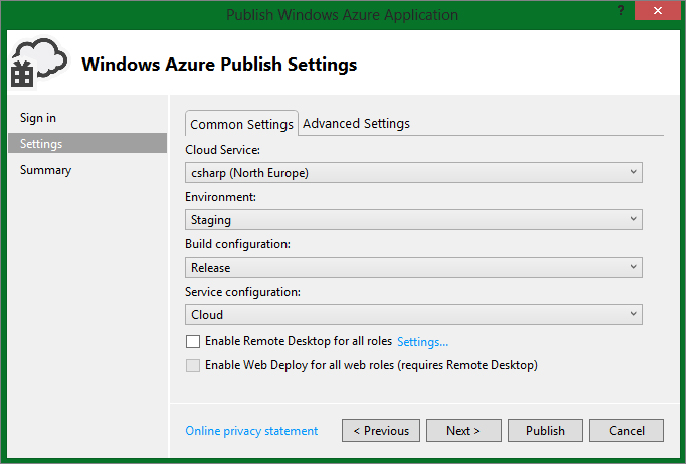
Figure 6-28 illustrates the next window.
NOTE With the release of the Windows Azure SDK 2.0, you can now associate your Windows Azure Subscription directly with Visual Studio. Instead of downloading and importing the publishing file, you can select the specific website to which you want to publish.
4. Publish the ASP.NET MVC 4 website. Select the Cloud Service that you created earlier in the chapter, chose Staging for the Environment, and leave the remaining default values as they are.
5. Review the summary. Select the Next button to review the Summary.
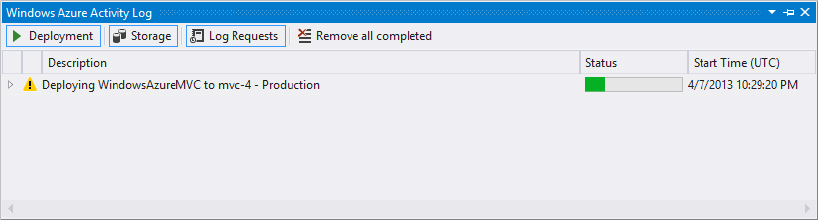
6. Deploy the Web Role. Select the Publish button to deploy your Web Role to the Windows Azure Platform.
Figure 6-29 is an example of the deployment status window rendered after the Publish button is selected.
NOTE You may want to give the migration a few minutes to complete its installation and configuration before you begin testing if the deployment were successful.
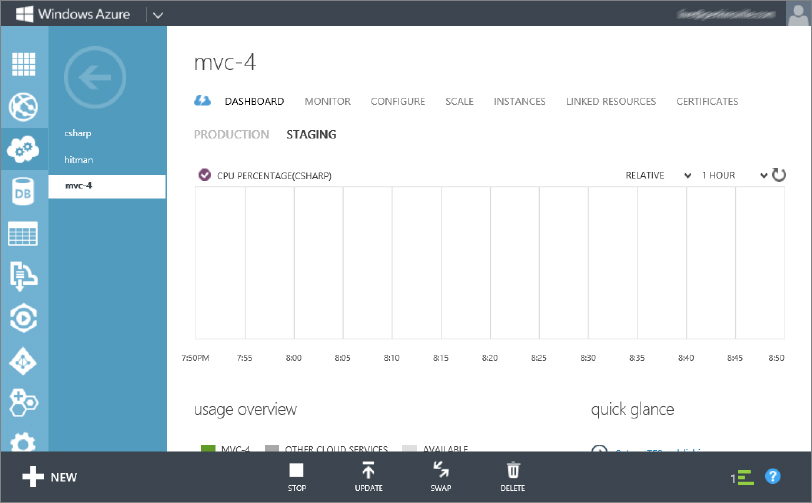
7. Review the result of the published website. When you are ready to begin testing the deployment, open the Windows Azure management console, and select the Cloud Services menu item. Then select the Cloud Service you created at the beginning of this chapter.
Figure 6-30 shows this page.
8 Select the URL to test. On the lower-right side of the under the Quick Glance section, look for the URL under SITE URL. Use this URL for testing the Staging deployment.
9. Navigate through all the pages. Test all the functionalities to confirm that the deployment of the Web Role was successful. When confirmed, you can move the Staging environment to Production.
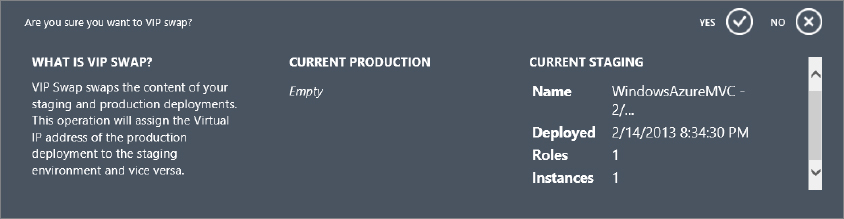
10. Swap from Staging to Production. Select the Swap button on the lower middle of the page, and you are prompted with a message box resembling that in
Figure 6-31. Select Yes and watch the status bar for deployment updates and completion notification.
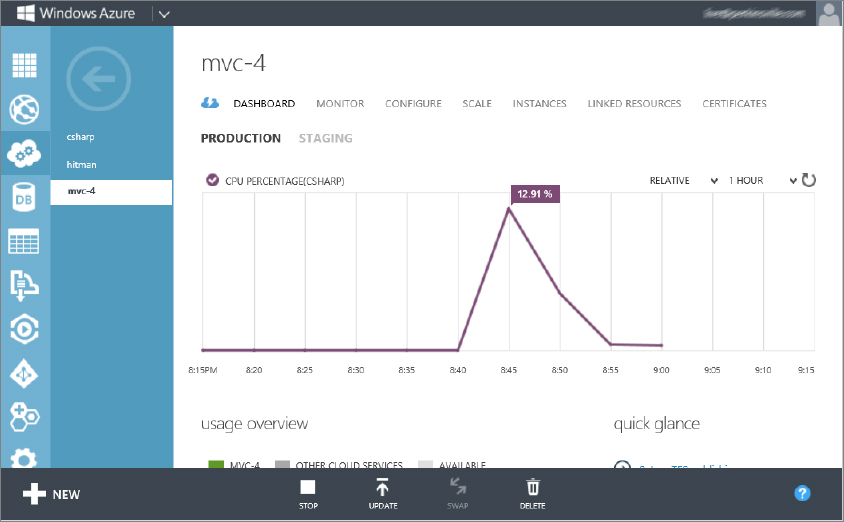
11. Confirm the Web Role has migrated. When complete click the Production link to confirm that the Web Role has been migrated from Staging to Production, as shown in
Figure 6-32. Then search for the Production URL under the heading of SITE URL and validate the Web Role responds and everything is okay with the Cloud Service.
For this example the SITE URL is http://mvc-4.cloudapp.net and you can access it to compare it against your migrated website. At this point you have completed the migration of the sample ASP.NET MVC 4 Web Role to the Windows Azure platform. To perform the same from Team Foundation Server (TFS), continue to the next section.
In this section you set up a link between the ASP.NET MVC 4 website created earlier in this chapter and Team Foundation Server. As you learned in the previous chapter, Team Foundation Server is not only useful for source code storage and control, but also for managing team workflow assignments, application lifecycles, and so on.
Implementing Team Foundation Server into your company is not only a change in the way you deploy your code from a local machine onto the Windows Azure platform, but also to the way you manage your entire project management and software development processes. So be sure you have read about Team Foundation Server in Chapter 5; plus, review the numerous resources found on the Internet. The information covered in this section discusses only how to set up the connection between TFS and a website hosted on Windows Azure.
To set up a link between a website hosted on Windows Azure and Team Foundation Server, follow the steps in these sections.
Accessing the Team Foundation Server
Before you can publish your ASP.NET MVC website to Windows Azure using Team Foundation Server you must have access to Team Foundation Server and a project to publish your site. To get a Team Foundation Server account, follow these steps:
1. Create an account. After logging into the Windows Azure management console at:
http://manage.windowsazure.com, navigate to a website that you have already created and click the Set Up TFS publishing link on the right side of the page. The pop-up wizard appears and provides you the opportunity to create a New User account. You click the Create a TFS Account Now link to get your account.
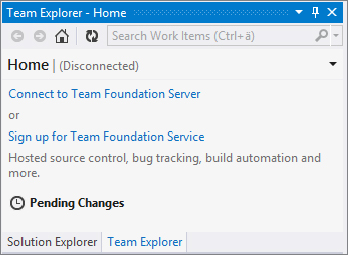
NOTE You can also sign up for a TFS account from within Visual Studio 2012 by selecting View ⇒ Team Explorer and clicking the Sign Up for Team Foundation Service.
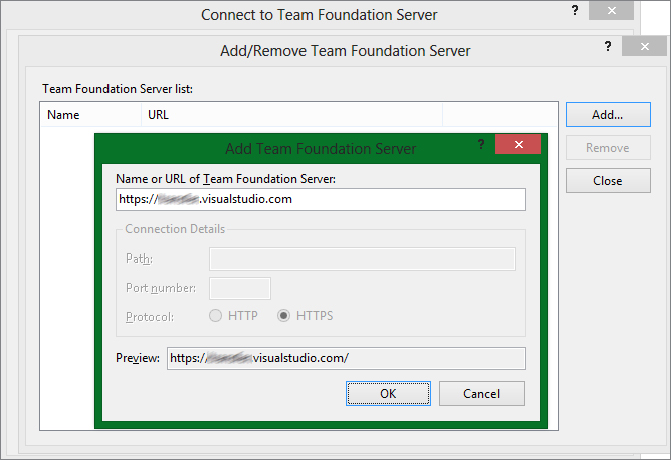
2. Connect Visual Studio to your TFS. After your account is created, open Visual Studio 2012, and select Team ⇒ Connect to Team Foundation Server. Click the Servers button, then click Add, and enter your URL, as shown in
Figure 6-33. Click OK to open the Add/Remove Team Foundation Server window.
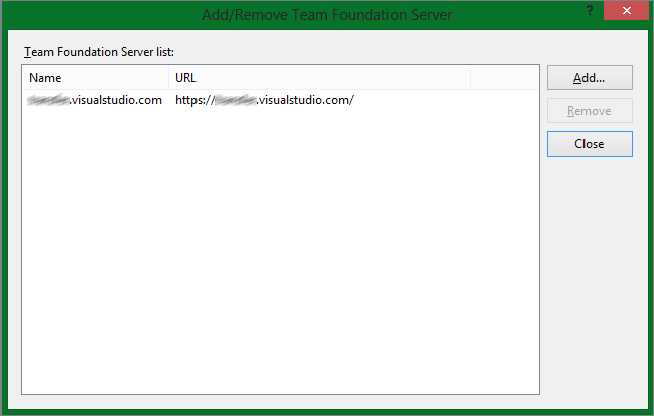
3. Enter your credentials. You are prompted to enter your Microsoft ID credentials. Provide the credentials and the server is successfully added to the Team Foundation Server list, as shown in
Figure 6-34. Select the Close button, and, on the following window, select the Connect button.
NOTE When connected from Visual Studio 2012, the Team Explorer windows open on the right side of the IDE. If this is not the case, select View ⇒ Team Explorer from the menu or press Ctrl+M to open it.
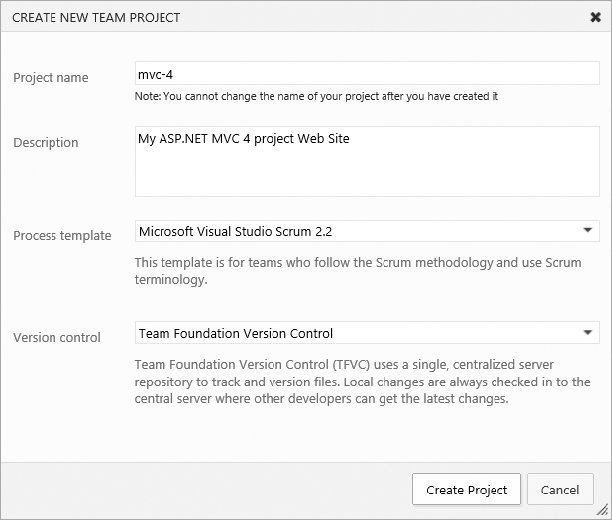
4. Create a TFS Project. Select the Create a New Team Project link to start the Project Creation Wizard in your TFS environment.
Figure 6-35 shows the first window in the wizard.
5. Enter project information. Enter the information shown in
Figure 6-35, and select the Create Project button. When selected, a status window is rendered, and the creation of your TFS project is run to completion.
6. View your project overview. When complete click the Navigate to Project button that provides an overview of your just-created project.
NOTE You need an Internet connection to complete these and many of the previous steps in this section. They cannot be performed offline.
7. Add the ASP.NET MVC 4 source code to the TFS project. Return to Visual Studio 2012, and select the Connect to a Team Project link, as shown in
Figure 6-36. Select the project that was just created from the Team Projects list box; select the Connect button.
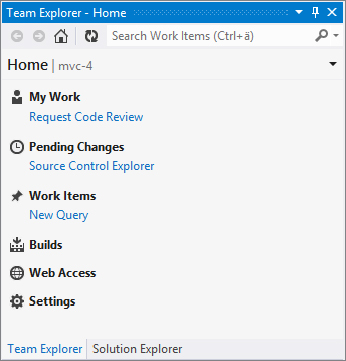
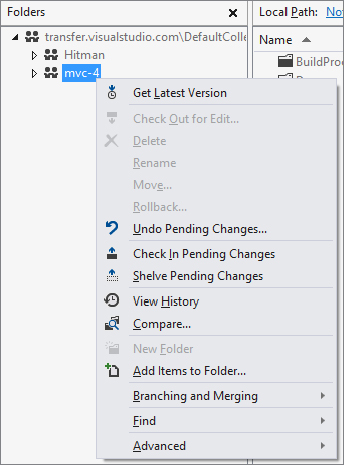
8. Add code to your project. Select the Source Code Explorer link, as illustrated in
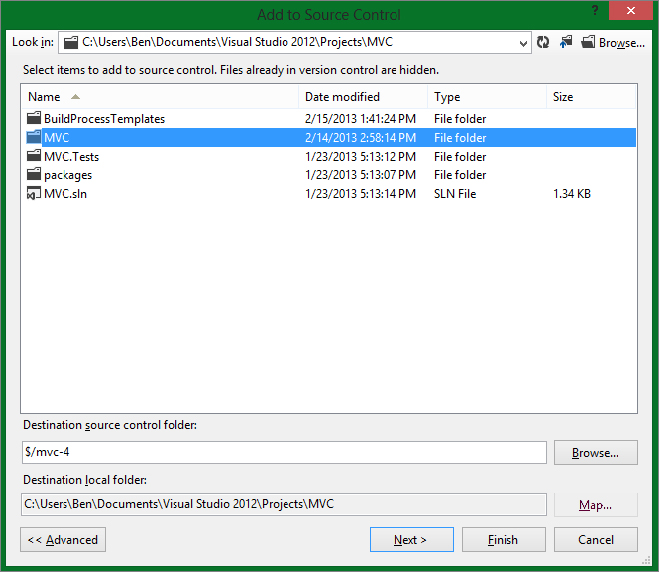
Figure 6-37. This opens up a window that allows you to add code to the mvc-4 project. Right-click the mvc-4 project in the Folder pane, and select Add Items to Folder, as shown in
Figure 6-38. Navigate to the location where you saved the ASP.NET MVC 4 project, and select the folder, as shown in
Figure 6-39. Select the Map button on the same window, and make sure the path is the same as the location just provided. Press the Map button. Then click Next.
9. Review the code files you’re adding. Selecting the Next button presents the files to be added to the project. Review the files and press the Finish button to add the files to the project.
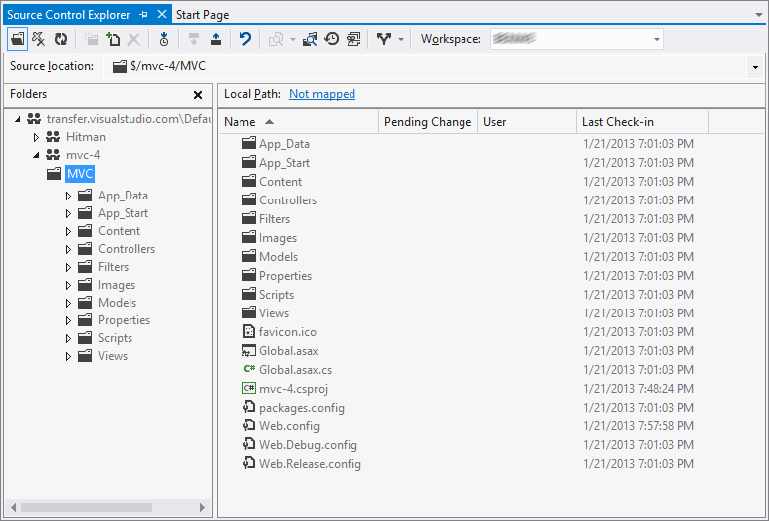
You can now expand the mvc-4 project and view the files you just added. Figure 6-40 shows the files added to the project.
Adding Links Between TFS and Windows Azure
Up to now, you have created a TFS account, a TFS project, and you’ve added the ASP.NET MVC 4 source code to the TFS project. Now you must link the TFS project and Windows Azure. Without linking these two accounts together, deployment of the code is not possible.
1. Connect the TFS project just created to Windows Azure. In the Windows Azure management console, click the website you want to create the link with.
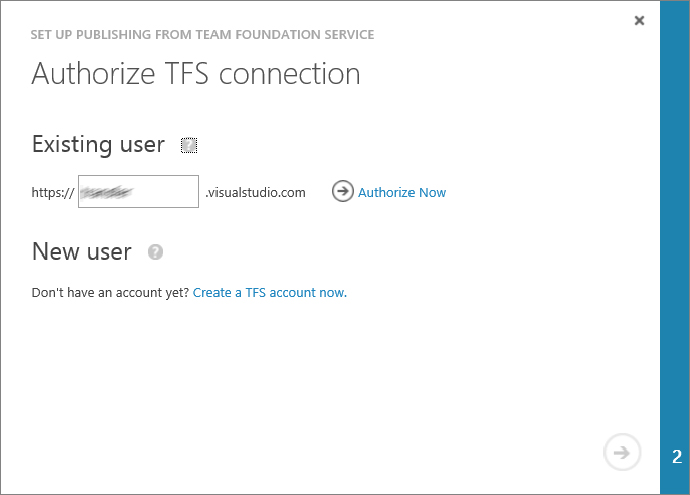
2. Authorize the connection. Click the Set Up TFS Publishing link, as shown in
Figure 6-41. When clicked, a pop-up window is rendered and walks you through the step to authorize the connection.
Figure 6-42 shows the first page of this wizard. If you do not already have a TFS account, click the Create a TFS Account Now link to select an account URL and link it to your Microsoft ID and create the account.
NOTE If you do already have a TFS account, enter the user ID into the wizard, and click the Authorize Now link ⇒ Accept the Request for Permissions, if you want. (It is required to continue.)
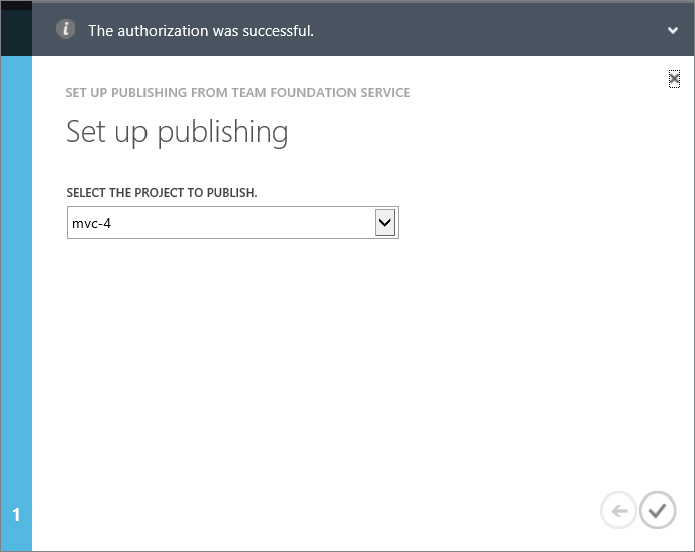
3. Create the link. As illustrated in
Figure 6-43, you can select the TFS link you just created in step 2. Click the check on the lower-right side of the window to complete the link between Team Foundation Server and the Windows Azure Web Site.
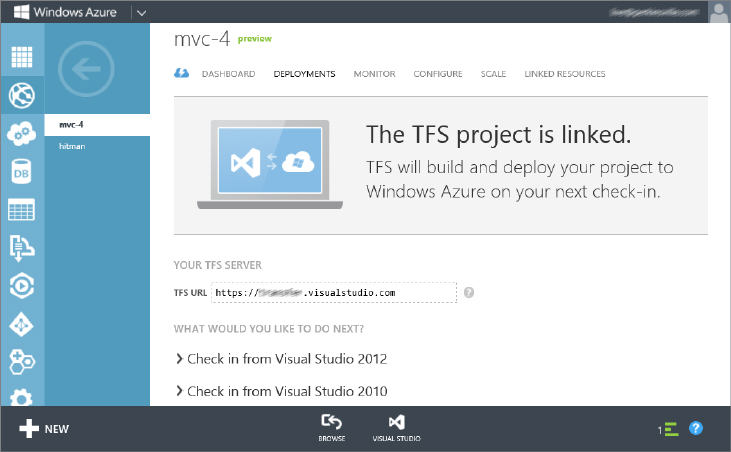
After the link is completed, the page shown in
Figure 6-44 is rendered.
4. Select a Visual Studio version. Click the link appropriate to your version of Visual Studio. This example has been using Visual Studio 2012; follow the instructions shown. You can return to these instructions at any time by selecting the Deployments link found on the Web Site details page on the Windows Azure management console.
5. Check in your project to publish it. Open Visual Studio and connect to Team Foundation Server. Select the mvc-4 (or your project) to open it, and then, in the Team Explorer window, click the Pending Changes item, as shown in
Figure 6-45. Enter a Comment and press the Check In button and Yes. Once the project is built without compile errors, the project is deployed to Azure.
6. Wait for the code to be checked in and published to the mvc-4 Windows Azure Web Site. This can take a while, so please be patient. When check in is complete, confirm your SITE URL has been published by entering it into a browser and pressing the Enter key.
NOTE One thing to remember about this process is that each time you make changes and check them in, the content is published to the linked website. There are configurations that can change the frequency of publishing, as mentioned in the previous chapter.
In the next section, you learn how to connect your Windows Azure Web Site to Git.
There are alternative source code integration platforms to Team Foundations Server. One such platform is GitHub located at https://github.com/. Like TFS, GitHub is a place that you can use to store your source code and manage its versions, state, and migration. GitHub is used by many open source projects and if you make your source code public, the service is free. TFS does currently provide up to five accounts for free, however, if more developers require access, then there is a charge. To set up GitHub to publish to your Windows Azure Web Site, perform the following:
NOTE To complete this section, you need an FTP user ID and password that is created in the section titled “Setting Up FTP Capability.” You might consider completing that section before starting this one.
1. Disconnect from TFS. You can have only a single source code repository associated with your Windows Azure Web Site, so if you are still linked to TFS from the previous exercise, you need to disconnect from it before you can enable Git. To disconnect from TFS, access the Dashboard of the mvc-4 website you previously used and select the Disconnect from TFS link found in the Quick Glance section. After the connection is broken, both options for connecting to TFS and Git return.
2. Select the Set up Git publishing link. The following page, as shown in
Figure 6-46, is rendered after the Hub is created. Write down the GIT URL for use in Step 6.
3. Set up the GitHub project. Go to
http://github.com and create an account if you do not already have one. Log in and create a new repository, as illustrated with
Figure 6-47.
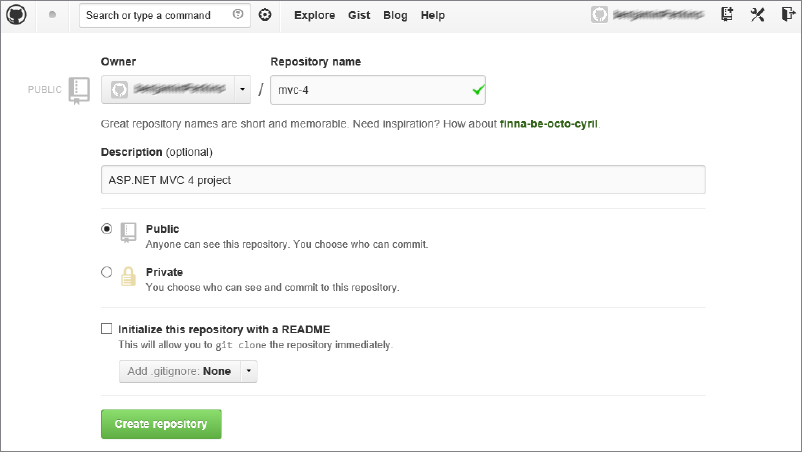
4. Create the repository. On the create repository page that appears, enter data similar to that shown in
Figure 6-48 and then click the Create Repository button.
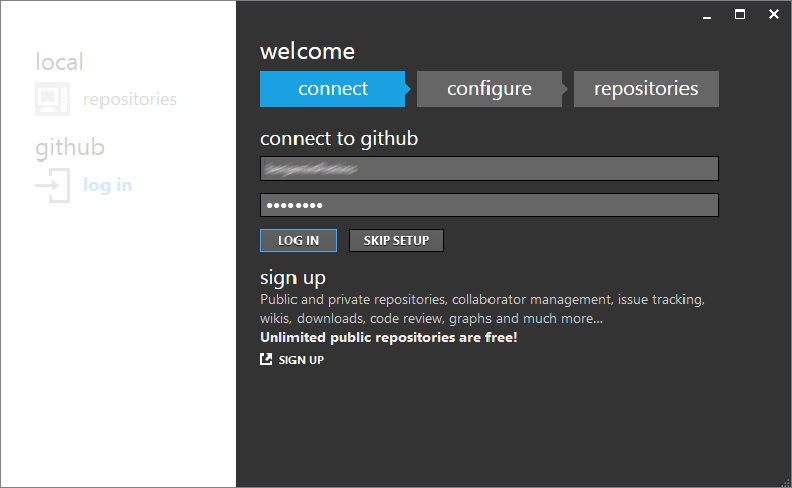
5. Download and install GitHub. Click the Clone in Windows button, as shown in
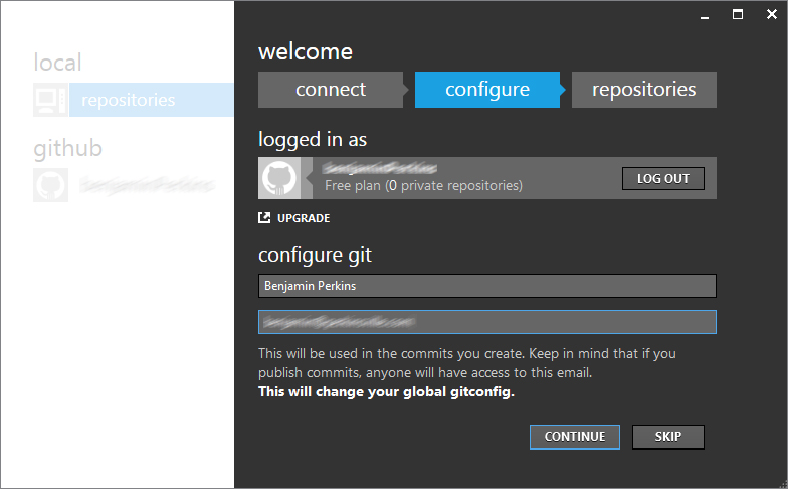
Figure 6-49. This takes you to a website where you can download GitHub. Once you download and install GitHub, you must enter your credentials in the window shown in
Figure 6-50. Then, continue to the next window and enter in your full name and e-mail address, as shown in
Figure 6-51. You’ll see the GitHub repository you just created.
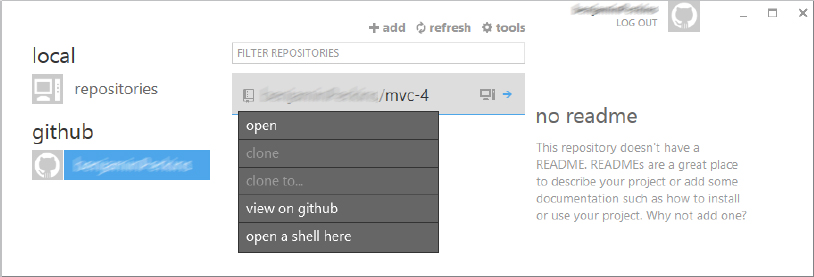
6. Connect the GitHub with the Windows Azure Web Site. Right-click the mvc-4 repository and select Open a Shell Here, as shown in
Figure 6-52, from the pop-up menu. In the shell, enter the command shown in
Figure 6-53 to connect the GitHub with the Windows Azure Web Site. Notice that the HTTP address is the same as shown in
Figure 6-46.
7. Publish to Windows Azure. Enter this command: git push azure master. This prompts you for your FTP user ID and password, created in the next section, and the site will be published to Windows Azure.
A very common approach for individuals and some companies to publish code from a local machine to a website is by using an FTP application. One of the most popular open source FTP software programs today is FileZilla. It can be downloaded from this Internet address: http://sourceforge.net/projects/filezilla/.
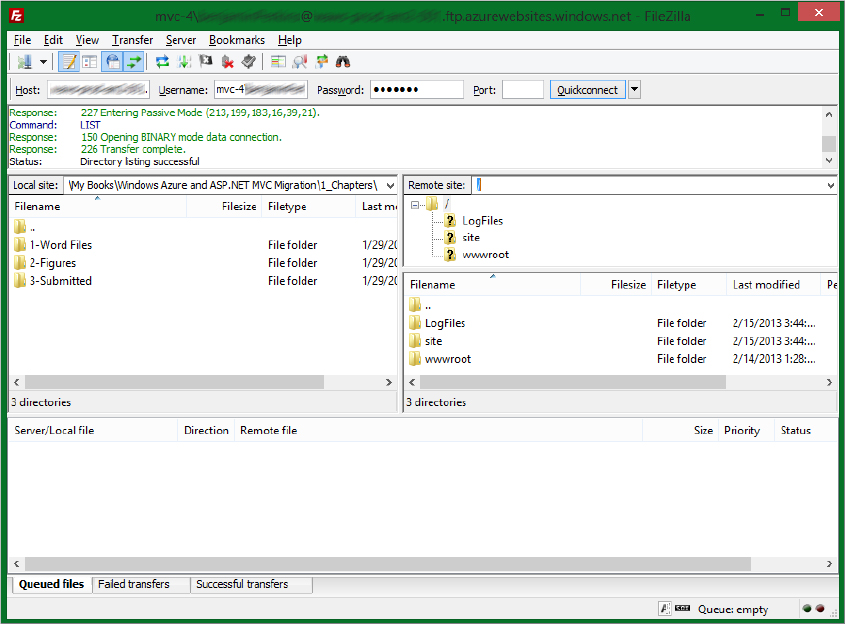
FileZilla enables the user to connect to an FTP address and add, remove, rename, and copy files in a similar way that is supported in Windows Explorer. Figure 6-54 shows a snapshot of FileZilla.
Using an FTP application such as FileZilla is actually one of the easiest ways to publish your website to Windows Azure. It works just like it would at any other web-hosting company.
The following sections show you how to set up the FTP application, and then how to publish your project.
Setting Up FTP Capability
Using the FTP protocol is a good choice for individuals or companies with smaller websites who do not want or need to manage all the complexities of GitHub or TFS. To set up FTP capabilities on the Windows Azure platform, complete the following actions:
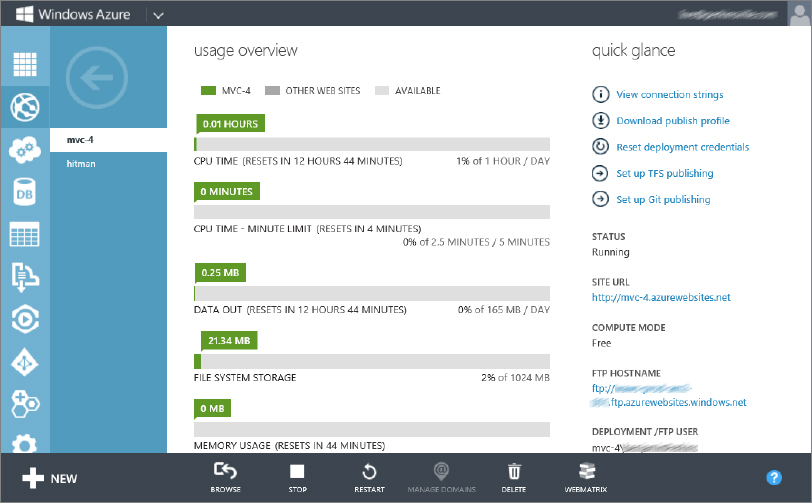
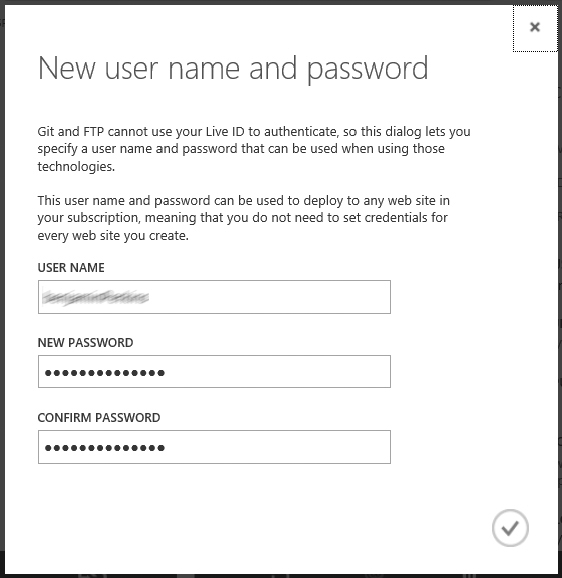
1. Create your deployment credentials. To create or modify your deployment credentials, select the Create/Reset Deployment Credentials link found under the quick glance section. A window, shown in
Figure 6-55, appears where you enter the username for your FTP account and then your password, and then click the check mark on the lower-right.
NOTE It is not possible to use your Microsoft ID to perform an FTP deployment.
2. Retrieve the FTP HOSTNAME. Navigate down the right side of the website Dashboard until you find the heading FTP HOSTNAME. Under this heading is the FTP address you can use to publish to your Windows Azure Web Site.
You now have all the information required for making an FTP connection to your website hosted on Windows Azure. The required information is the FTP username, the FTP password, and FTP host name.
Publishing the Project
To publish the ASP.NET MVC 4 project to the mcv-4 Windows Azure Web Site perform the following steps:
1. Open FileZilla using the credentials and FTP HOSTNAME created previously.
2. In the Local Site window in FileZilla, navigate to the MVC project. As an example, on my machine the directory is C:UsersBenDocumentsVisual Studio 2012ProjectsMVCMVC.
3. Select all the files in the directory in step 2 using Ctrl+A.
5. In the Remote Site window, navigate to /site/wwwroot/.
6. Select the Upload button and the files are transferred to that directory.
7. When the upload is complete, test your website by navigating through the pages making sure all the links and functionality work as expected.
WARNING Don’t forget to comment out the code that created the database structure from the Global.asax.cs file after the website has been run once and then republish.
SUMMARY
In this chapter, you saw how to create a Windows Azure account, the requirements for creating a Cloud Service and website, how to create a SQL database and multiple methods for publishing your website and Web Role to the Windows Azure platform. You also learned the requirements for converting an ASP.NET MVC 4 website project to a Windows Azure Web Role using the Windows Azure SDK for .NET template.
This chapter showed that although publishing your code using a source code repository, such as Team Foundation Server or GitHub, requires only a few steps, the process and organization required for getting the code into position to deploy can take significant effort. For example, using Scrum teams and workflow processes can impact the frequency of deployments as well as the development and integration testing requirements.
Now that you have created the ASP.NET MVC 4 project, fine-tuned it for optimal performance, and deployed it to the Windows Azure environment, you should know how to monitor, maintain, and troubleshoot issues that may happen after your website is live. The next chapter covers ideas and techniques you need to perform many of these tasks.