
Chapter 5
Enhancing Glass with the MyGlass Website
In This Chapter
![]() Touring the MyGlass website
Touring the MyGlass website
![]() Adding and managing contacts
Adding and managing contacts
![]() Enabling a Wi-Fi network
Enabling a Wi-Fi network
![]() Tracking the current location of your Glass
Tracking the current location of your Glass
![]() Enabling and disabling Glassware applications
Enabling and disabling Glassware applications
Each day I live in a glass room unless I break it with the thrusting of my senses and pass through the splintered walls to the great landscape.
— Mervyn Peake
In this chapter, we introduce the MyGlass website, which you can access from your computer, tablet, or smartphone. MyGlass allows you to tweak your Glass settings so that the device works best for you.
If you want to add your Glass to another Wi-Fi network, such as a network offered by a hotel where you’re staying, you can do this with MyGlass. You can also locate a misplaced Glass with MyGlass so that you can get your device back in your hands as soon as possible.
In addition, you can use MyGlass to enable or disable Glassware, which is a Google term for web-based apps that can send data to and receive data from Glass, as well as apps that are written specifically to run on Glass. This enabling and disabling feature allows you to hide Glassware so that your Glass screen shows only the apps you want to use.
Taking the Red Carpet Tour of MyGlass
To tour MyGlass for the first time, fire up your favorite browser on your computer, tablet, or smartphone and then follow these steps:
- In the browser address bar, type www.google.com/myglass and then tap or press Enter.
If you aren’t logged in to your Google account already, you see the Google login page so that you can log in to your Google account.
If you’re already logged in to Google, you may see a warning page similar to Figure 5-1. Don’t panic; this warning screen is a good thing. Google is making sure that you are who you say you are, because it doesn’t want an unauthorized user changing your Glass experience.
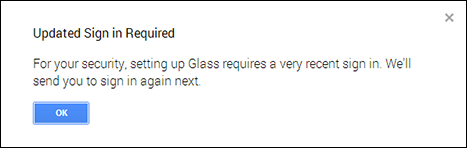
Figure 5-1: The Updated Sign In Required warning page.
- Tap or click the OK button and then type your Google e-mail address and password in the Accounts screen.
After you log in, the MyGlass home page appears, as shown in Figure 5-2. The home-page content is organized in a row of cards, just as in your Glass timeline, so you’ll feel right at home. A menu bar appears at the top of the home page, with menu options at the left end and your Google e-mail address and account photo at the right end.
- Do any of the following:
- Select Setup if you want to set up Glass for the first time or after you perform a factory reset.
- Select MyGlass or the Glass logo to return to the MyGlass home page.
- Select Glassware so you can shop for Glassware, add Glassware to your Glass, or remove Glassware from your Glass.
- Select Explorers to visit the Glass Community website at https://www.glass-community.com.
- Select Support to open a new tab in your browser and view the Glass support page.
- Select your Google e-mail address or account photo to view your Google account information, add an account, or sign out of MyGlass.
Managing Your Contact List
One of the cards on the MyGlass home page lets you add a contact (refer to Figure 5-2), because Google recognizes that you’ll often want to contact your friends via voice call, video call, or instant message. Google also knows that you’ll likely prefer telling your Glass to call people to fumbling for your smartphone.
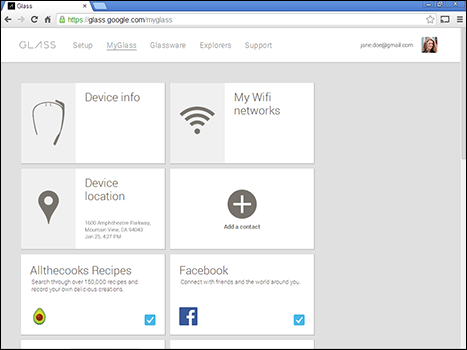
Figure 5-2: The MyGlass home page.
 If you don’t have a Google Contacts database, you can set one up for free at www.google.com/contacts. You can access your contacts list from your favorite web browser, as well as synchronize your contacts with other programs and devices.
To make your life even easier, Google allows you to import contacts from your Google Contacts database to your Glass by using the MyGlass website or the MyGlass app on your smartphone. When you initiate a voice call, video call, or instant message, your Glass shows a list of your contacts so you can scroll to and select the desired contact.
You can access your imported contacts from the Google Contacts database only by using the touchpad; you can’t use the voice feature. That is, when you send a message, you need to scroll through the contact list by swiping backward and forward on the touchpad. When you find the contact you want, tap the touchpad.
 Unfortunately, at this writing, MyGlass can store no more than ten contacts that you add within Glass. If your MyGlass contact database is full and you want to add another contact, you have to remove an existing contact first.
Importing a contact
To import an existing contact from your Google Contacts database to MyGlass, follow these steps:
- On the MyGlass website, tap or click the Add a Contact card (see Figure 5-3).
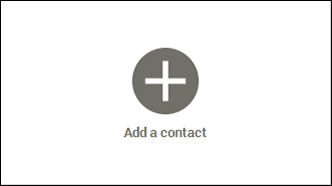
Figure 5-3: The Add a Contact card.
- Type the contact name in the Add Contact field, shown in Figure 5-4.
As you type, contact names appear in a list below the Add Contact field. These names are those in your Google Contacts database that most closely match the name you’re typing. If you keep typing, the list may grow shorter as MyGlass finds database names that even more closely match the contact you’re searching for.
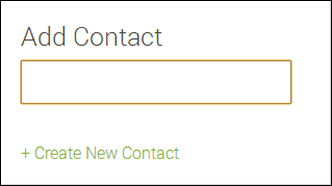
Figure 5-4: The Add Contact field.
- When you find the name that you want to add (see Figure 5-5), tap or click it.
The new contact appears as a card on the MyGlass home page. You find out more about contact cards later in this chapter.
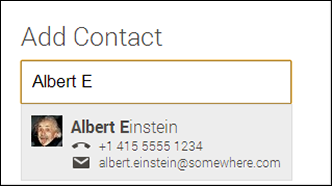
Figure 5-5: Add a contact by tapping the contact’s name.
Adding a contact
If you want to add a contact, here’s how to do it:
- On the MyGlass website, tap or click the Add a Contact card.
- Tap or click the Create New Contact link (refer to Figure 5-4).
The New Contact page appears as a new tab in your web browser (see Figure 5-6). If you’re using the MyGlass app on your Android smartphone, your default contact management app appears on your smartphone’s screen.
- Add contact information, including the contact’s name, photo (if any), e-mail address, phone number, and birthday.
- Tap or click the Save Now button in the top-right corner.
- Tap or click the MyGlass tab in your browser, or switch to the MyGlass app on your smartphone.
- On your Glass, import the contact as we describe in “Importing a contact” earlier in this chapter.
If you don’t see your new contact, refresh the browser window by pressing F5 on your computer keyboard; on your smartphone, tap Refresh on the menu.
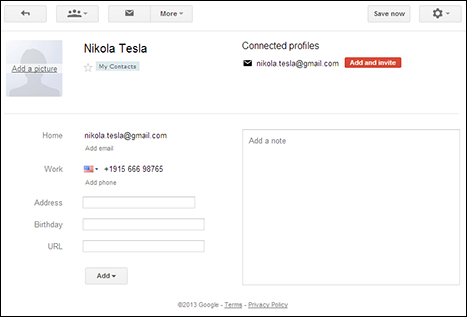
Figure 5-6: The New Contact page.
Viewing a contact card
A contact card (see Figure 5-7) displays the same information on the MyGlass website and in the MyGlass app: the contact’s name, a photo of the contact (if any), and icons in the top-left corner that show what type of information the card contains.

Figure 5-7: Example contact card.
In Figure 5-7, the envelope icon indicates that the contact has an e-mail address, and the telephone-receiver icon shows that the contact has a phone number.
You can get more information about the contact by tapping the contact card. If the contact has more than one e-mail address and/or more than one phone number, a blue check box appears to the right of the contact’s preferred e-mail address and/or phone number, as shown in Figure 5-8.
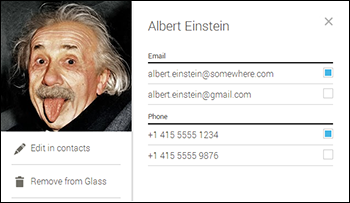
Figure 5-8: Preferred e-mail address and phone number.
If you want to set a new preferred e-mail address and/or phone number for a contact, tap the check box to the right of that address or number (refer to Figure 5-8). The check box turns blue to indicate that the address or number is now the preferred one.
When you finish viewing a contact card, close it by tapping the Close icon (the X) in the top-right corner.
Editing a contact
MyGlass makes it easy for you to edit a contact. Follow these steps:
- Tap the contact card on the MyGlass home page.
- Tap or click Edit in Contacts below the contact photo.
The Google Contacts website opens.
- Edit the contact information.
- Save your changes by tapping or clicking the Save Now button in the top-right corner of the page.
- Click the MyGlass tab in your browser or switch back to the MyGlass app on your Android smartphone.
Your changes appear in the contact tile.
- Close the card and return to the MyGlass home page by tapping the Close icon in the top-right corner.
Removing a contact
You can remove a contact from MyGlass by clicking or tapping the contact card in the MyGlass screen and then clicking or tapping Remove from Glass (refer to Figure 5-8 earlier in this chapter). MyGlass removes the contact from its database.
 Removing a contact removes it only from MyGlass. The contact remains safely stored in Google Contacts.
Merging contacts
Synchronizing your Google Contacts database with Glass can take a while if your database has multiple contacts for several people. Fortunately, Google Contacts makes it easy to clean up your database by merging information in all contacts that have the same name. To merge contacts, follow these steps:
- Open the Google Contacts webpage at https://www.google.com/contacts.
- Log in to Google Contacts, if necessary, using your Google e-mail address and password.
- In the contact list, tap or click the More button and then tap or click Find & Merge Duplicates on the resulting menu (see Figure 5-9).
You see a list of contacts that contain duplicate data, such as the same e-mail address.
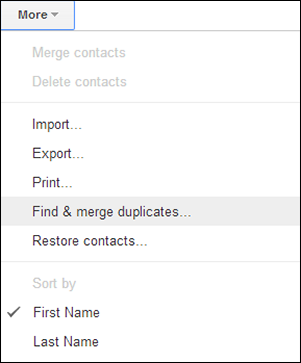
Figure 5-9: Select Find & Merge Duplicates.
- Merge the contacts by tapping or clicking Merge Contacts at the top of the list.
 You can view information about merging two or more contacts manually at https://support.google.com/mail/answer/165334?hl=en.
Adding a Wi-Fi Network by Using the MyGlass Web App
When you’re out and about, you won’t have access to the Wi-Fi network that you use on a regular basis in your home or office. If you’re going to be using a Wi-Fi network in your office, at a hotel, or even at your favorite coffee shop, you can add a new Wi-Fi network for your current location within the MyGlass website (www.google.com/myglass) and save it the next time you’re there.
You’ll find two types of Wi-Fi networks:
- Open: An open network allows anyone to use your Wi-Fi connection because it isn’t secured with a password.
- Protected: A protected network requires authentication to gain access to network resources. To use and connect to a protected Wi-Fi network, you need three things: a network name, an encryption method, and the network password.
MyGlass makes it easy for you to set up a new Wi-Fi network that you can store on your Glass so you can connect to the network easily when you’re in range of that network.
Generating a QR code
The first step in connecting to a Wi-Fi network in MyGlass is generating a QR (Quick Response) code for that network. You can create a QR code for two types of Wi-Fi networks: an open network, which doesn’t require a password, and an encrypted (or hidden) network, which requires a password. (For more on QR codes, see Chapter 3.)
For an open network
If you’re at a location that offers public Wi-Fi, such as a coffee shop or an airport, here’s how to create a QR code for that public network:
- Tap or click the My Wifi Networks card on the home page (see Figure 5-10).
The Add Network card appears so that you can add information about your Wi-Fi network.
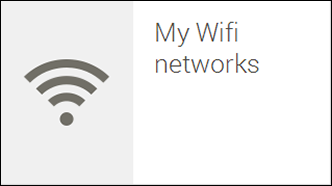
Figure 5-10: The My Wifi Networks card.
- Type your wireless network name in the Enter Network Name field.
- Type the password (if one is required) in the Click to Enter Password field.
Passwords are case-sensitive.
- Tap or click Generate Code (see Figure 5-11).
This link is active only when you’ve entered all the information for your Wi-Fi network. If the link is disabled, check your settings to ensure that you named your network properly, selected the correct encryption method, and entered a password if necessary.
After you select Generate Code, a QR code appears onscreen. This code allows you to add the Wi-Fi network, which we discuss in “Adding the network to your Glass” later in this chapter.
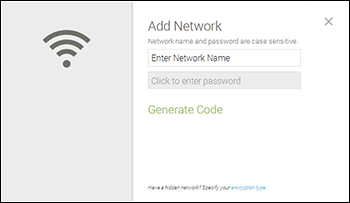
Figure 5-11: Generating a QR code for an open network.
For a hidden network
To create a QR code for a hidden network, follow these steps:
- Tap or click the My Wifi Networks card on the home page (refer to Figure 5-10).
The Add Network card appears (refer to Figure 5-11).
- At the bottom of the card, tap or click the Encryption Type text link.
- Type your wireless network name in the MyWifiNetwork field.
- Type the password in the password field.
Note that passwords are case-sensitive.
- Select the Wi-Fi encryption method by tapping or clicking the WPA/WPA2 button.
You see three encryption options in the drop-down menu: None, WPA/WPA2, and WEB (see Figure 5-12).
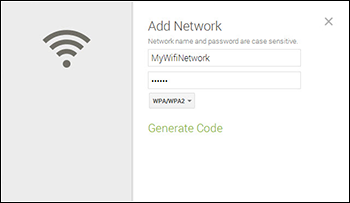
Figure 5-12: Choose an encryption option.
- Select the appropriate encryption method.
If you don’t know which encryption method the network uses and/or the network password, consult the staff of the location that offers the Wi-Fi service.
- Tap or click Generate Code.
This link is active only when you’ve entered all the information for your Wi-Fi network. If the link is disabled, check your settings to ensure that you named your network properly, selected the correct encryption method, and entered a password (if necessary).
After you select Generate Code, a QR code appears onscreen, as shown in Figure 5-13. This code allows you to add the Wi-Fi network, which we discuss in the next section.

Figure 5-13: The generated QR code for a hidden network.
Adding the network to your Glass
Here’s how to add a Wi-Fi network to your Glass with a generated QR code (refer to the preceding section):
- Swipe backward on the touchpad until you see the Settings bundle card.
- Tap the Settings bundle card.
The Settings screen appears.
- Tap the Wi-Fi Settings card (see Figure 5-14).
Figure 5-14: The Wi-Fi Settings card.
- Tap the resulting Join Network menu option (see Figure 5-15).
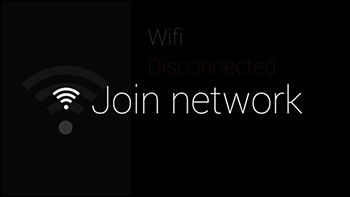
Figure 5-15: The Join Network menu option.
- Tap the resulting Add Wifi Network card (see Figure 5-16).
If Glass detects Wi-Fi networks available near you, you see one of the network cards onscreen. Scroll through all the networks by swiping forward on the touchpad. After you scroll past the last network card, you see the Add Wifi Network card.
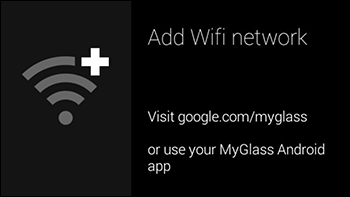
Figure 5-16: The Add Wifi Network card.
- When your Glass prompts you to point to the QR code on your screen (see Figure 5-17), align the box on your Glass display with the QR code on your screen.
When Glass recognizes the QR code, it connects to the Wi-Fi network automatically and chimes when the connection is complete.
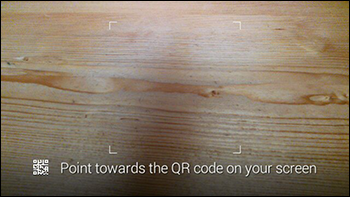
Figure 5-17: Glass prompts you to point to the QR code.
- On the MyGlass site, close the card with the QR code by tapping or clicking the Close icon (the X) in the top-right corner.
You return to the MyGlass home page.
On your Glass, you see your new Wi-Fi network connection onscreen (see Figure 5-18).
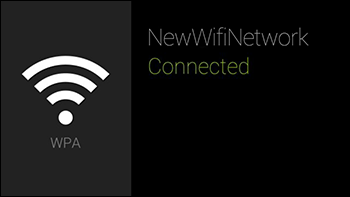
Figure 5-18: The NewWifiNetwork Connected card on Glass.
- Return to the Home screen on your Glass by swiping down on the touchpad.
Tracking Down Your Glass
The MyGlass app for your Android smartphone includes the nifty Device Location card, which helps you locate your Glass as quickly as possible in case you misplace it.
The Device Location card works if your Glass has a Wi-Fi connection or is paired with a smartphone that has the MyGlass app installed on it. If you haven’t done so yet, find out how to pair your Glass and your smartphone in Chapter 3.
The Device Location card in MyGlass (see Figure 5-19) shows you the current location of your Glass. It also shows the last time MyGlass checked your smartphone to get the location of your Glass.
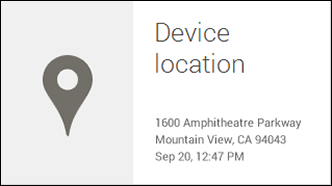
Figure 5-19: The Device Location card.
To view a map showing the device’s current location, click or tap the card. A map displays the pinned location of your Glass device, as shown in Figure 5-20. Unfortunately, this display is as close as MyGlass can get to finding your Glass, but it should give you enough information to search the area or call the authorities.
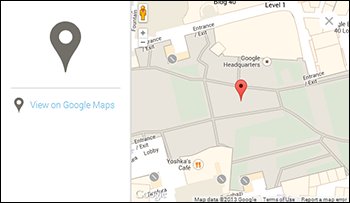
Figure 5-20: A map displays the current location of your Glass.
You can view the location in Google Maps by tapping or clicking the View on Google Maps link.
Enabling or Disabling Glassware
Glassware apps can send content to and receive content from your Glass. Some Glassware apps are preinstalled. You can use MyGlass to shop for more Glassware and to customize the apps on your Glass by tapping the Glassware menu option at the top of the MyGlass home page.
See Chapter 12 for a complete discussion of preinstalled and third-party Glassware apps.
A list of Glassware apps appears on the MyGlass home page. Each Glassware app card contains the name of the app, a brief description, and an On/Off slider button (see Figure 5-21).
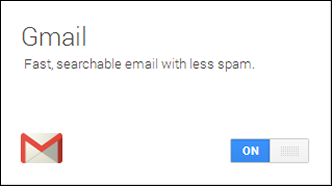
Figure 5-21: The Gmail Glassware app card.
If the slider displays the blue On button, the Glassware app is enabled. You can disable the app by tapping or clicking the gray Off button.
To view more information about a Glassware app, tap or click its app card. A new window opens, displaying detailed information about the app. In the bottom-left corner of the window, you also see the permissions and Glass resources that the app requires.