
Chapter 14
Hacking Your Glass
In This Chapter
![]() Giving users the best experience in your Glass app
Giving users the best experience in your Glass app
![]() Deciding how to develop a Glass app
Deciding how to develop a Glass app
![]() Submitting your Glassware for inclusion on the MyGlass website
Submitting your Glassware for inclusion on the MyGlass website
If you give a hacker a new toy, the first thing he’ll do is take it apart to figure out how it works.
— Jamie Zawinski
When desktop computers were new and exciting (in the 1970s and 1980s), the term hack appeared in the computing lexicon. If you were a hacker who hacked a computer, it meant that you were able to figure out how to make the computer do useful, interesting, and/or unexpected things that you would share with others. Your hack inspired others to hack more computers and do more useful things. These days, however, the terms hack and hacker have negative connotations.
Glass brings new, exciting technology to the computing realm, so when we say hacking in this chapter, we mean teaching Glass new tricks, building something useful, and inspiring other Glass app developers.
Google wants as many people as possible to develop Glassware — apps for Glass — because (blunt honesty alert) if more Glassware is available, more people are likely to buy Glass. What’s more, if you offer good-quality Glassware, your chances of submitting even more Glassware to the MyGlass website go up.
Giving Users What They Want
Glass has some specific user interface requirements that you need to follow, not only to create a great app, but also to give users the features they expect after they’ve used other Glass apps.
 Don’t just port an app written for a smartphone, tablet, or laptop to Glass, because the user interfaces for those other devices are fundamentally different from the Glass user interface.
 Keep three main design principles at the top of your mind as you create your app:
- Ensure that the information on the screen doesn’t distract the user from what’s going on in the real world in front of him.
- Show information that’s relevant and timely.
- Use an interface that integrates both visual and audial models.
Unobtrusive display
Glass is designed to provide quick information that adds to what the user is experiencing in real life. Too much information, however, subtracts from the user’s experience. Users are looking at real life as well as information on the Glass screen, so it’s important to make the information displayed on your Glassware as unobtrusive as possible.
One good example of how to use the Glass interface correctly is Google Search. If a user searches for jellyfish while viewing the creatures in an aquarium, for example, a brief definition of jellyfish appears on her Glass screen just above her line of sight (see Figure 14-1). The definition doesn’t detract from her view of the jellyfish in the aquarium tank in front of her.

Figure 14-1: A search result appears slightly above what the user sees in real life.
What’s more, information provided at inappropriate times will likely cause users to remove your Glassware…and tell all their friends to avoid it, too. Consider the example shown in Figure 14-2. The user wakes up very early in the morning and puts on his Glass to see what’s going on. A few seconds later, he sees an ad for a cabbage sale.
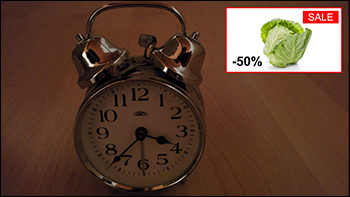
Figure 14-2: A cabbage sale can be good or bad news, depending on your audience.
Chances are pretty good that most users don’t need cabbage at 3:37 a.m., and most grocery stores are closed at that time anyway. If the user regularly shops at a 24-hour supermarket, however, and needs to get cabbage for the day’s holiday meal right away, the ad may be appropriate. Your app can use the GPS connection between your app and your smartphone to “see” that the user is in or near the store and display information about that cabbage sale.
Relevant information
The information on the screen should be both current and relevant to what the user is seeing on her Glass so she’s convinced that your Glassware is important. If the user isn’t convinced, she won’t let your wares take up valuable storage space on her Glass.
If a user needs to pop over to the grocery store to pick up some dinner, for example, she can use the Evernote app to display the shopping list on the Glass screen. This app saves the Glass user time because she doesn’t have to fumble for her smartphone or a handwritten list to find out what’s needed. Instead, she can focus on shopping.
Voice control
Users are going to use their voices to manipulate Glass and Glassware, so it’s important to implement a visual and audial user model. After all, a user can start any app by using his voice, and there are plenty of examples about how to use voice control within an app. Figure 14-3, for example, shows the use of voice control in the Google Search app.
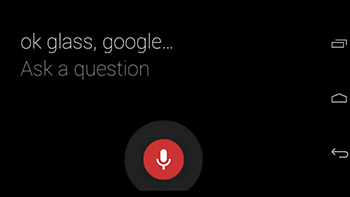
Figure 14-3: The Google Search app.
If you’re going to include voice interaction in your Glassware, keep in mind the Glass rule that a voice command or message is initiated or sent after the user stops talking.
Choosing a Development Environment
You can use two types of development environments to build your Glassware: the Glass Development Kit (GDK) and the Mirror application programming interface (API).
Google produces the GDK so that you can build your Glassware directly on your Glass — useful if you want to use features such as location, sensors, and voice input. With GDK development, you can do basically the same things that you would on an Android smartphone or tablet, but your app needs to be designed to meet specific Glass user-interface requirements, discussed in “Giving Users What They Want” earlier in this chapter.
If you want to build web-based services that you can use to interact with Glass, use the Mirror API instead. This technology stores your Glassware code on the web so that you don’t need to run the Glass app on Glass. Instead, your web-based service accesses your app code in the cloud and shows its information on the Glass screen.
 If you develop a Glassware app with GDK and want to run that Glassware from a card on Glass, you can use the Mirror API to insert the card into the timeline. Then your users have it easy: They can just select the Glassware web app’s card in the timeline and choose the app name from the menu.
Looking into the Mirror
Google recommends that you use the Mirror API to start developing your Glassware because you can write the code in a variety of programming languages, such as Java, PHP, and .NET.
Before you start, check out the Quick Start demo project to see how Mirror API code works (discussed later in this section) and get cues for building your own Glassware from that sample code. You can view the Quick Start project on your smartphone, tablet, or computer.
You need to have an existing web server so you can run your Glassware. You also need to know the address of the website where your Glassware project is stored so you can access that website from Glass and test your Glassware.
Start by visiting the Google Developers website to find Quick Start projects in each of the six programming languages that Google uses for the mobile API:
- Go: https://developers.google.com/glass/quickstart/go
- Java: https://developers.google.com/glass/quickstart/java
- .NET: https://developers.google.com/glass/quickstart/dotnet
- PHP: https://developers.google.com/glass/quickstart/php
- Python: https://developers.google.com/glass/quickstart/python
- Ruby: https://developers.google.com/glass/quickstart/ruby
Each website tells you how to access the Quick Start project for that language. For this example, we look at the Quick Start project that shows you how basic functions work in the Mirror API.
Here’s how to find and run the project that tests the Mirror API functionality on Glass:
- Navigate to https://glass-java-starter-demo.appspot.com in your web browser.
An OAuth 2.0 permission request screen appears.
- Type the account username and password.
This account should be the same account that you use to access Glass.
- Click or tap the OK button.
- Look at the controls of the project website, shown in Figure 14-4, and experiment with the features of the Mirror API.
The timeline items appear on the Glass screen.
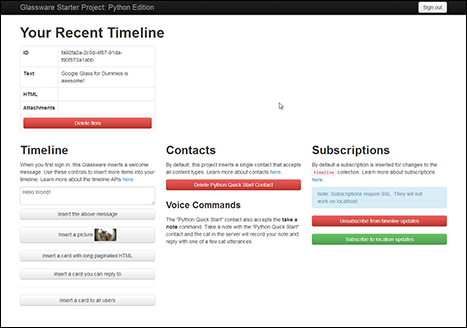
Figure 14-4: The timeline section allows you to insert a text message, picture, or card into the Glass timeline.
Building from the kit
The Glass Development Kit (GDK) is for people who already know how to develop apps for the Android operating system and want to get building. Even if you’re a seasoned Android developer, the differences in the Glass user interface create a learning curve.
Setting up the GDK
These instructions presume that you already have the ADT (Android Developer Tools) bundle installed and running on the computer you use to develop software. If you don’t, download the ADT from the Android Developers website at http://developer.android.com/sdk/installing/bundle.html.
With that out of the way, here’s how to set up GDK within the ADT bundle window:
- Click Window on the menu bar.
- Click Android SDK Manager.
The Android SDK Manager window appears.
- In the Android 4.0.3 (API 15) section, check the boxes labeled SDK Platform and Glass Development Kit Sneak Peek, as shown in Figure 14-5.
The ADT bundle installs both items.
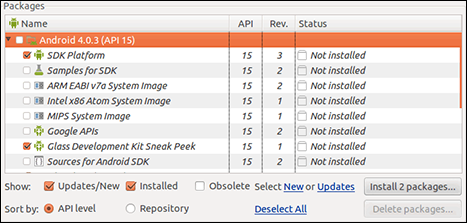
Figure 14-5: Select SDK Platform and GDK Sneak Peek.
Connecting Glass to the GDK
To connect your Glass to the GDK, follow these steps:
- Put your Glass on your head, if you haven’t done so already.
- Select the Settings card.
- Select the Device Info Settings card.
- Tap Debug.
When you’re set up, you can verify the connection between your Glass and the GDK by opening the Eclipse app on your computer. This app allows you to create apps in a variety of languages, such as Java, Python, PHP, and C. You can confirm that Glass and the GDK are connected from within the Eclipse app by following these steps:
- Choose Window⇒Open Perspective⇒DDMS.
The DDMS window opens.
- Verify that Glass is listed on the Devices tab.
Checking out sample Glassware
If you want to see examples of what Glassware looks like, the GDK contains several sample files for you to play with. Here’s how to find and launch them on your computer within the Eclipse app window:
- Choose File⇒New Project⇒Android Sample Project.
The Android Sample Project window appears.
- Check the Glass Development Kit box, and click Next.
- Check the box next to the name of the sample you want to run.
You can choose the Compass, Stopwatch, or Time sample.
- Click Finish.
You return to the Eclipse app window.
- Right-click the sample name in the list and choose Run As from the contextual menu.
A new window opens, asking whether you want to run the app on your computer within the Glass emulator or on the Glass device that’s connected to your computer.
- Click Glass Device.
You see the sample Glassware running on the Glass screen.
Getting to work
When you’ve finished inspecting the sample files, put this book down and visit the Google Developers website so you can go through the interactive Building Your First App tutorial at http://developer.android.com/training/basics/firstapp/index.html. You can also explore the Developers website to see whether the other tutorials on the site strike your fancy.
You should build a few simple Glassware apps before you start building the Glassware of your dreams. Practice gives you the experience you need to prevent development headaches later.
Submitting Your Glassware to Google
When you’re satisfied that the Glassware you’ve developed is ready for users, submit it for inspection at the Glassware Distribution page (https://developers.google.com/glass/distribute/index).
Naturally, Google wants all the software it offers in MyGlass to be high-quality. To meet that goal, it requires developers to follow a launch checklist, which includes the following items:
- Review the app to ensure that it reflects Google’s best practices for Glassware development. You can get the latest information about best practices at https://developers.google.com/glass/design/best-practices.
- Follow Google’s branding and writing requirements, such as writing Glassware descriptions in English.
- If your site has a website that you use to promote your Glassware, follow Google’s requirements for designing the site.
- Confirm that you tested the Glassware on your Glass by using the software as users would.
- Provide graphics and screen shots that can be used to promote your Glassware.
If you’re not intimidated by this partial list, you can read the entire checklist of requirements at https://developers.google.com/glass/distribute/checklist.
As with any task that goes through a checklist review, the review process will go more quickly if you meet all these requirements to a T.