
2
HTML
There is a hidden standard behind almost everything that we see and do when surfing the web, the HyperText Markup Language, short: HTML. Whether we look for information on Wikipedia, search for sites on Google, check our bank account, or become social on Twitter, Facebook, and YouTube—when we use a browser—we use HTML.
HTML is a language for presenting content on the Web that was first proposed by Tim Berners-Lee (1989). The standard has continuously evolved since the initial introduction, the most recent incarnation is HTML5 that is being developed by the World Wide Web Consortium (W3C) and the Web Hypertext Application Technology Working Group (WHATWG).1 Although each revision of HTML has established new features and restructured old ones, the basic grammar of HTML documents has not changed much over the years and is likely to remain fairly stable in the foreseeable future, making it one of the most important standards for working with and on the Web.
This chapter introduces the fundamentals of HTML from the perspective of a web data collector. We will learn how to use browsers to display the source code of webpages and inspect specific HTML elements (Section 2.1). Section 2.2 develops the logic of markup languages in general and the syntax of HTML as a specific instance of a markup language. We go on to present the most important vocabulary in HTML (Section 2.3). Finally, we consider parsing—the process of reconstructing the structure and semantics of HTML documents—and how it helps to retrieve information from web documents in Section 2.4.
2.1 Browser presentation and source code
An HTML file is basically nothing but plain text—it can be opened and edited with any text editor. What makes HTML so powerful is its marked up structure. HTML markup allows defining the parts of a document that need to be displayed as headlines, the parts that contain links, the parts that should be organized as tables, and numerous other forms. The markup definitions rely on predefined character sequences—the tags—that enclose parts of the text. Markup tells browsers (more specifically, parsers; see Section 2.4) how the document is structured and the function of its various parts.
What you see in your browser is therefore not the HTML document itself but an interpretation of it. Let us elaborate this idea with a small example. Figures 2.1 and 2.2 show the same HTML document—OurFirstHTML.html. Figure 2.1 displays an interpreted version of the file like we are used to; Figure 2.2 shows the source code of the document. Try it yourself. Use your browser and go to http://www.r-datacollection.com/materials/html/OurFirstHTML.html. Right-click on the window and select view source code from the context menu. Now check out other websites and inspect their source code. Under ordinary circumstances there is little reason to inspect the source code, but in online data collection it is often crucial. Incidentally, as we introduce the specifics of the HTML format over the course of this chapter we will make reference to several supplementary files that are available at http://www.r-datacollection.com/materials/html/.
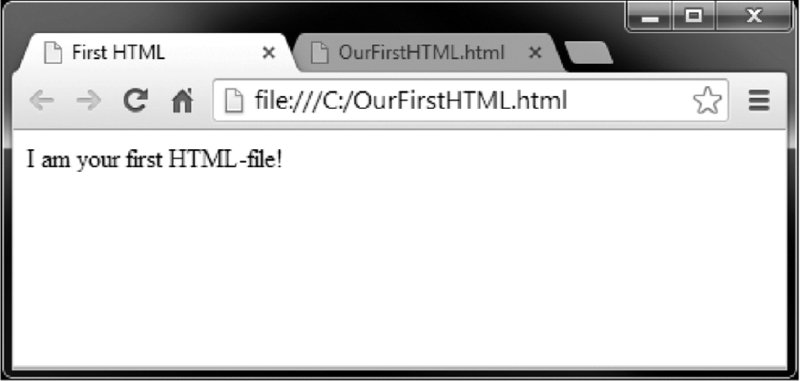
Figure 2.1 Browser view of a simple HTML document
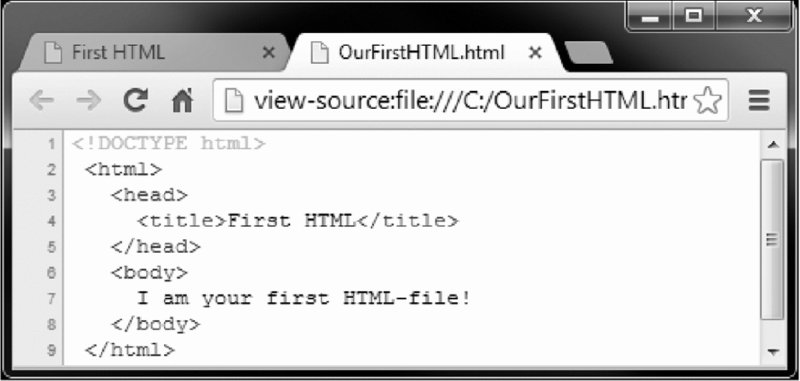
Figure 2.2 Source view of a simple HTML document
It might seem that a lot of information from the source code gets lost in the interpretation of the document. After all, there is considerably more text in the source code than just the single sentence we see in Figure 2.1. In fact, the scale of structuring information and actual content is clearly tipped in favor of the former. There is a fair amount of text in the source code that contains instructions for the browser that is not printed to the screen. Nevertheless, part of the information is in fact displayed, but in more subtle ways. Have a look at the browser tab headings in Figure 2.1. The page title is First HTML, which was defined in the source code: <title>First HTML</title>. This is HTML markup in action: First HTML was marked up by <title> and </title> to define it as the title of the document.
To identify which parts of the source code correspond to which elements in the browser window and vice versa, we can use an element inspector, which is implemented in most browsers. Again, try it yourself. Highlight the sentence in the browser window that we opened above, right-click on the window, and select inspect element from the context menu. The browser will display the part of the HTML document that is responsible for the selected element (Figure 2.3). We can also reverse the process by clicking on parts of the source code to highlight the corresponding parts in the interpreted version of the document. Try to do the same with other websites and start inspecting elements.

Figure 2.3 Inspect elements view of a simple HTML document
2.2 Syntax rules
Now that we have checked out our first HTML document and learned about the difference between the interpreted version of a document and its source code, let us dive deeper into the rules and concepts that underlie HTML.2
2.2.1 Tags, elements, and attributes
Plain text is turned into an HTML document by tags that can be interpreted by a browser. They can be thought of as named braces that enclose content and define its structural function. For instance, the <title> tags in our introductory example designated the enclosed text as title to be displayed in the head of the browser tab. The combination of start tag, content, and end tag is called element, as in:

Start tags and end tags are also known as opening and closing tags. Tags are always enclosed by < and > to distinguish them from the content. Start and end tags carry the same name, but the end tag is preceded by a slash /. When referring to an element, it is common to leave out the angle brackets and just use the name within the tags, as in body tag, title tag and so on. We sometimes find that elements and tags are actually used synonymously. Throughout the book, we will refer to the start tag—for example, <name>—to address the entire element.
Although it is recommended that each element has a start and an end tag, this is not common practice for all types of elements. For example, the <br> tag indicates a line break and is not closed by a </br> counterpart. Tags can also be closed within the start tag by adding a slash at the end, as in <body/>. We call such elements empty because they do not hold any content. Otherwise they would have to be written as <body></body>. It is possible to write a tag as <tagname>, <TAGNAME>, <TagName> or any other combination of capital and small letters, as standard HTML is not case sensitive. It is nevertheless recommended to always use small letters as in <tagname>.
Another feature of tags are attributes. A widely used attribute is the following:
![]()
The anchor tag <a> allows the association of text—here, ‘Link to Homepage’—with a hyperlink—http://www.r-datacollection.com/—that points to another address. The href=”http://www.r-datacollection.com/” attribute specifies the anchor. Browsers automatically format such elements by underlining the content and making it clickable. In general, attributes enable the specification of options for how the content of a tag should be handled. Which attributes are permitted depends on the specific tag.
Attributes are always placed within the start tag right after the tag name. A tag can hold multiple attributes that are simply separated by a space character. Attributes are expressed as name–value pairs, as in name=”value”. The value can either be enclosed by single or double quotation marks. However, if the attribute value itself contains one type of quotation mark, the other type has to be used to enclose the value:

2.2.2 Tree structure
Have another look at the source code of OurFirstHTML.html in Figure 2.4. Ignoring <!DOCTYPE html> for now, the first element in the example is the <html> element. Between the tags of this element, several tags are opened and closed again: <head>, <title>, and <body>. The <head> and <body> tags are directly enclosed by the <html> element; the <title> element is enclosed by the <head> tag. A good way to describe the multiple layers of an HTML document is the tree analogy. Figure 2.5 illustrates the simple tree structure of OurFirstHTML.html. The <html> element is the root element that splits into two branches, <head> and <body>. <head> is followed by another branch called <title>.
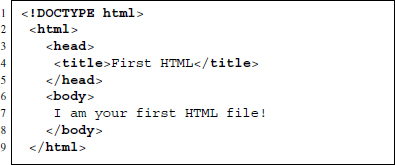
Figure 2.4 Source code of OurFirstHTML.html
Elements need to be strictly nested within each other in a well-formed and valid HTML file. A pair of start and end tags has to be completely enclosed by another pair of tags. An obvious violation of this rule would be:

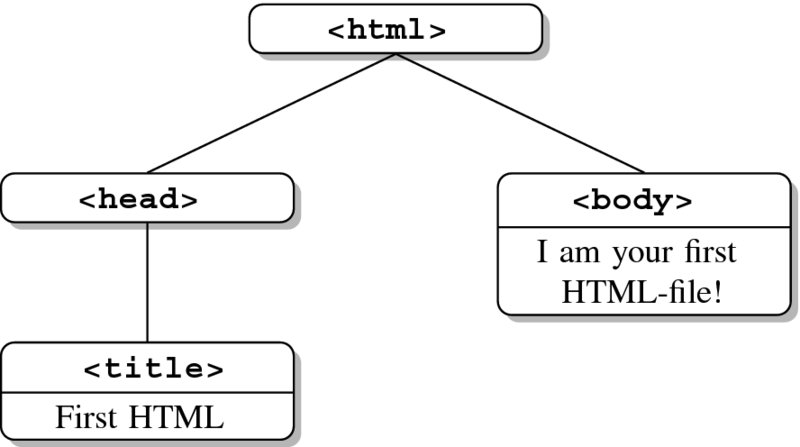
Figure 2.5 A tree perspective on OurFirstHTML.html (see Figure 2.4)
2.2.3 Comments
HTML offers the possibility to insert comments into the code that are not evaluated and therefore not displayed in the browser. Comments are marked by <!-- at the beginning and --> at the end. All text between these character sequences will be ignored. In practice, a comment could look like this:

Note that comments are still part of the document and can be read by anyone who inspects the source code of a page.
2.2.4 Reserved and special characters
Reserved characters are used for control purposes in a language. We have learned that HTML content is written in plain text, which is true both for the markup and the content part of the document. As some characters are needed for the markup, they cannot be used literally in the content. For example, we have learned that < and > are used to form tags in HTML. They are markup characters. Imagine we want to display something like this in the browser: 5 < 6 but 7 > 3. It is impossible to include them plainly into an HTML file, like…
![]()
… as the parser would interpret the < and > signs as enclosing a tag name. In order to display the characters literally in a browser window, HTML relies on specific sequences of characters called character entities or simply entities. All the entities start with an ampersand & and end with a semicolon ;. Thus, < and > can be included in the content of a file with their entity expressions < and >. When interpreting the HTML file, the browser will now display the character that these entities represent. The above example therefore needs to be rewritten as follows:

Since HTML documents can be written in numerous languages that often contain non-simple latin characters like Ö, É, or Ø, there is an extensive list of entities, all starting with an ampersand (&) and ending with a semicolon (;). Table 2.1 provides a couple of examples of characters and their entity representation—note that entities can be written either by number or name.
Table 2.1 HTML entities
| Character | Entity number | Entity name | Explanation |
| ” | " | " | quotation mark |
| ’ | ' | ' | apostrophe |
| & | & | & | ampersand |
| < | < | < | less than |
| > | > | > | greater than |
|   | | non-breaking space | |
| § | § | § | section |
| Á | À | À | A with grave accent |
| É | È | È | E with grave accent |
| á | à | à | a with grave accent |
| é | è | è | e with grave accent |
| ♥ | ♥ | heart | |
| 𐇑 | plumed head (Phaistos Disc) |
Note: For a more comprehensive list of HTML entities, visit http://unicode-table.com
2.2.5 Document type definition
Recall the example from the beginning of the chapter? The first line of the HTML read <!DOCTYPE html>. It contains the so-called document type definition (DTD) that informs the browser about the version of the HTML standard the document adheres to. HTML emerged more than 20 years ago and has since seen some reformulation of the rules that might lead to misinterpretations if the HTML version of the document was not made explicit. As the DTD plays a more crucial role in XML, we postpone an extensive elaboration of the concept to Section 3.3. For now, it suffices to know that DTDs are found—if included—in the first line of the HTML document. Below you find a list of various DTDs.
- HTML5:

- Strict HTML version 4.01:

2.2.6 Spaces and line breaks
Spaces and line breaks in HTML source code do not translate directly into spaces and line breaks in the browser presentation. While line breaks are ignored altogether, any number of consecutive spaces are presented as a single space. To force spaces into the interpreted version of the document, we use the non-breaking space entity and the line break tag <br> for line breaks:

For a more extensive treatment of the subject, you may want to look into SpacesAndLin eBreaks.html from the book's materials.
2.3 Tags and attributes
HTML has plenty of legal tags and attributes, and it would go far beyond the scope of this book to talk about each and every one. Instead, we will focus on a subset of tags that are of special interest in the context of web data collection. Note that if not specified otherwise working examples of the tags introduced in the following can be found in the TagExample.html from the book's materials.
2.3.1 The anchor tag <a>
The anchor tag <a> is what turns HTML from just a markup language into a hypertext markup language by enabling HTML documents to link to other documents. Much of the site-to-site navigation in browsers works via anchor elements.
We often find ourselves in situations where we want to extract information not from a single page but from a whole series of pages. If we are lucky, the pages are listed on an index page. More frequently, however, we have to collect links from one page that points to the next page, which points to the next page, and so on. In both cases the information we are looking for—the location of another page—is stored in an <a> element.
In fact, <a> elements are even more flexible as they can not only link to other files, but also link to specific parts of a document. It is possible to link to anchors in a document to make navigation on a site more convenient.
Have a look at TagExample.html. The parts of the HTML that are most interesting to us at the moment are the blue underlined text snippets—the hyperlinks. There should be three links. One refers to another webpage and two other point to the top and bottom, respectively, of the current page. Have a look at the source code or the following list to see how this was achieved.
- Linking to another document:

- Setting a reference point:

- Linking to a reference point:

- Linking to reference point in another document:

2.3.2 The metadata tag <meta>
The <meta> tag is an empty tag written in the head element of an HTML document. <meta> elements do not have to be closed and thus differ from the general rule that empty elements have to be closed with a dash /. As the name already suggests, <meta> provides meta information on the HTML document and answers questions like: Who is the author of the document? Which encoding scheme is used? Are there any keywords characterizing the page? What is the language of the document?
In general, two attributes are specified in a meta element. The first attribute can be either name or http-equiv; the second is always content. <meta> elements with name as first attribute refer to information on the document while meta elements with http-equiv define how the document needs to be handled by HTTP (see Chapter 5). Below you find several examples showing the diverse usage of meta. To see <meta> in a real HTML document, check out TagExample.html again. Some popular <meta> tags are used for:
- specifying keywords:

- asking robots not to index the page or to follow its links (on robots see Section 9.3.2):

- declaring character encodings (since HTML5):

- defining character encodings (prior to HTML5):

2.3.3 The external reference tag <link>
The link tag is used to link to and include information and external files. External information linked to the the HTML document might be license information for the website, a document listing authors, a help page for the website, an icon that appears in the browser tab or one or more style sheets that are used for layouts. The <link> element is empty and used within the <head> element. All information is provided with attributes. Below you find two examples of the most common use.
- specifying style sheets to use:

- specifying the icon associated with the website:

Again, you might also like to check the source code of TagExample.html. Note that the rel attribute describes the type of relationship between the current and the linked document. The href attribute specifies the location of the external file. The type attribute describes the file type according to the MIME scheme3.
2.3.4 Emphasizing tags <b>, <i>, <strong>
Tags like <b>, <i>, <strong> are layout tags that refer to bold, italics, and strong emphasis. We can make use of the information in emphasis tags to locate content with a specific layout. Imagine a document that contains a list of addresses where the name is set in italics. Looking for the <i> tag makes it easy to identify the useful information. The examples below exemplify the usage of these various layout tags. TagExample.html shows how they work in a full-fledged HTML document.
- Text with bold type setting:

- Text set in italics:

- Text defined as important:

2.3.5 The paragraphs tag <p>
The <p> tag labels its content as being a paragraph and ensures that line breaks are inserted before and after its content:

2.3.6 Heading tags <h1>, <h2>, <h3>, …
In order to define different levels of headlines—level 1 to level 6—HTML provides a series of tags <h1>, <h2>, … down to <h6>. See below for some examples:

2.3.7 Listing content with <ul>, <ol>, and <dl>
Several tags exist to list content. They are used depending on whether they wrap around an ordered list (<ol>), an unordered list (ul), or a description list (<dl>). The former two tags make use of nested <li> elements to define list items, while the latter needs two further elements: <dt> for keyword and <dd> for its description. An example for an unordered list would be:

2.3.8 The organizational tags <div> and <span>
Another way of defining the appearance of parts of the HTML document are the <div> and <span> tags. While <div> and <span> themselves do not change the appearance of the content they enclose, these tags are used to group parts of the document—the former is used to define groups across lines, tags, and paragraphs, while the latter is used for in-line grouping.
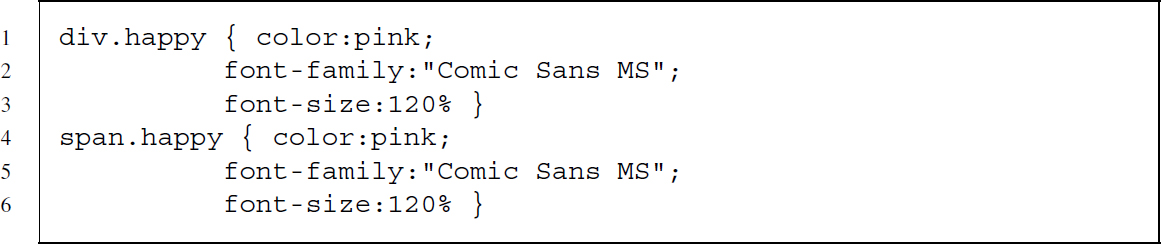
Grouping parts of an HTML document is handy when combined with Cascading Style Sheets (CSS), a language for describing the layout of HTML and other markup documents like XML, SVG, and XHTML. Below you find example definitions of two styles. The first style definition applies to all <div> elements of class happy, while the second does the same for <span> elements:
Style definitions are commonly stored in separate CSS files, for example, awesomestyle .css, and are later included via <link> tags in the header:

Later in the document they are passed to an element using an additional class attribute:

Alternatively, the style can be directly defined within the style attribute of an element:

The purpose of CSS is to separate content from layout to improve the document's accessibility. Defining styles outside of an HTML and assigning them via the class attribute enables the web designer to reuse styles across elements and documents. This enables developers to change a style in one single place—within the CSS file—with effects on all elements and documents using this style.
So why should we care about style? First of all, one should always care about style. But second, as CSS is so handy for developers, <div>, <span>, and class tags are used frequently. They thus provide structure to the HTML document that we can make use of to identify where our desired information is stored.
2.3.9 The <form> tag and its companions
An advanced feature of HTML are forms. HTML forms do more than just layout content. They enable users to interact with servers by sending data to them instead of only receiving data from them. Forms are introduced by the <form> tag and supported by other tags like <fieldset>, <input>, <textarea>, <select>, and <option> and their respective attributes. This two-way exchange of information between user and server allows for a more dynamic browsing experience. Instances where we use forms on a daily basis are search engines like Google. We type in a query in the text field and a new site is called based on our request. Let us proceed with an example to explain various concepts of HTML forms. The code snippet below is part of FormExample.html from the book's materials:

The form in the example consists of one <form> element and two <input> elements nested within the former. The <form> tag has a name attribute, an action attribute, and a specific method. The name of the form serves as an internal identifier. The action and method attributes define what the browser is supposed to do once the submit button is pressed. action defines the location of the response.
The most common protocol for requesting and receiving resources on the Web is HTTP (Hypertext Transfer Protocol). The method attribute refers to the HTTP method that is used to send the information to the server. Most likely it will be POST or GET. For now it suffices to say that when GET is used, the information that is sent to the server is appended to the URL. Conversely, when POST is used the information is not transmitted via the requested URL. For details on HTTP methods, see Chapter 5.
Regarding the <input> elements we can distinguish between several flavors. There are normal inputs, hidden inputs, reset inputs, and those that are used to define the submit button. Normal inputs collect the data to be sent to the server and come in various forms like text fields, color selectors, check boxes, date selectors, and sliders. Hidden inputs define data that is sent to the server but the user has no option to manipulate the input. Reset inputs simply reset all inputs and selections made so far. Inputs that form submit buttons result in sending the supplied data. The input flavor is defined by the value of the type attribute. For hidden inputs the type is hidden, for reset inputs reset, and for submit buttons submit. The types for normal inputs depend on the type of information that is collected, for example, text, color, checkbox, date, and range.
Inputs require two attributes. First, the name attribute unambiguously associates the information with a specific input; the type attribute is required to tell the browser how to gather the information. An optional attribute, value, supplies a default value that is sent to the server if no information is supplied by the user.
Three other tags can be used to gather information in a form—<textarea> and <select> in combination with <option>. <textarea> elements are used to gather text that spans multiple lines. To select one or multiple items from a list, HTML documents use <select>. While the <select> element serves to set attribute values, the nested option elements define the list of items the user can select from. Similar to the <input> elements, a name attribute is needed for sending the data from <textarea> and <select> elements. For an overview of the various types of inputs, check out InputTypes.html.
To see forms in action, go to: http://www.r-datacollection.com/materials/html/FormEx ample.html. The page pretends to be a gate keeper and asks for a password. As we are about halfway through the HTML chapter we trust that you are able to guess the password with three tries at most. Go ahead and give it a try! In the example the action attribute is set to Passed.html, meaning that the password gathered on the first page gets submitted to this new page. Try it out once more and select another password. Again, we get to the new document and the page contains the information that we typed into the text field. HTML forms turn the static HTML dinosaur into a flexible and mighty tool.4 The takeaway point is that the information gets sent and the response changes according to our inputs.
Let us consider the example form from above again. We notice that pw is the name of the first <input> element. We already know that the name attribute of <input> serves as a label for transporting the information. If you inspect the URL of the response you notice that the password has been appended to the URL, which now looks something like .../Passed.html?pw=xxxxxxx. From this we conclude that the form uses a GET method rather than a POST method—otherwise the pasword would not show up in the URL. The part of the URL that contains our password is called query string. Query strings always appear at the end of the URL and start with ?. The information in query strings is written as parameter=value pairs—just like HTML tag attributes—and are separated by & if more than one pair is specified.
Now that you know about HTML forms and query strings, take a moment and use your browser to check out forms in actions. Find pages that use forms and look carefully if and how they use query strings. You might also want to go back to Passed.html in your browser and manipulate the pw value directly within the address bar to see what happens.
2.3.10 The foreign script tag <script>
HTML itself is not a programming language. HTML is a markup language that describes content and defines its presentation. Once an HTML file is loaded in the browser, it remains stable and does not change by events or user interaction. Nevertheless, we all know examples of highly dynamic websites. Most of them probably make heavy use of the <script> element.5
The <script> element is a container for scripts that enable HTML to include functionality from other programming languages. This other language will frequently be JavaScript. JavaScript allows the browser to change the content and structure of the document after it has been loaded from the server, enabling user interaction and event handling.
In FormExample.html and Passed.html we already made use of the <script> element. There are two <script> elements in the Passed.html document. The first is placed within the header and defines the function that extracts the value of a specific parameter from the URL. The second is placed directly within the body and executes the function that searches for the value of the pw parameter. After storing the value in a variable, it writes the value into the HTML document.
Once again, go ahead and try it yourself: Open Passed.html and manipulate the URL so it looks something like this: .../Passed.html?pw=xxxx. Save the page on your hard disk (right click, save as) and reopen the saved page in your browser. Now check out the source code of the page before and after saving. While the original page contained the original source code, the second includes the changes your browser made after loading the page.
Let us get back to HTML and how we can recognize that JavaScript has been used. JavaScript can appear broadly in three forms: explicitly in a <script> element, implicitly by referring to an external JavaScript within a <script> element, and implicitly as an event in an HTML element. Below you find examples of all three types of JavaScript usage.
- Explicit JavaScript (printing the current time and date):
This snippet adds the current date and time to the document.
- Reference to an external JavaScript and using its functions within another script element (printing the browser used to view the document):
This snippet loads an external JavaScript file (browserdetect.js) and uses the functions it contains (BrowserDetect) to add information about the browser of the document.
- Triggering JavaScript with events (changing the style class when hovering over the element)
This snippet triggers two events, one when the mouse cursor hovers over the element and one when the mouse cursor leaves the area of the element—onmouseover and onmouseout—and assigns two JavaScript functions that are executed whenever the events take place. The functions change the class of the element to over or out and the styles associated with these two classes take effect.
Now open http://www.r-datacollection.com/materials/html/JavaScript.html in your browser and have a look at the examples. The document displays the time you opened the document, shows the current time, indicates which browser you are using (the version number as well as the platform it is running on), changes colors from white to black as long as you hover over the Hover Me! text, and adds text to the document when you fill out the text field and press enter.
Have a look at the source code and try to map which parts of the document are plain HTML and which are the work of JavaScript.
2.3.11 Table tags <table>, <tr>, <td>, and <th>
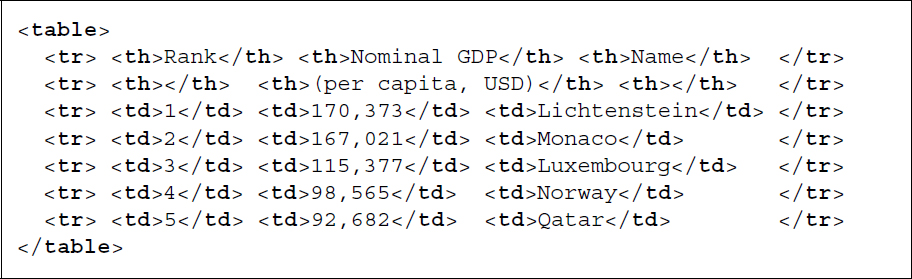
The next group of elements enables HTML to display tables. Check out Table 2.2 and compare it to its HTML code representation below. To begin a table we make use of <table>. We start new lines with <tr>. Within <tr>, we can either use <td> for defining cells or <th> for header cells.
Table 2.2 Nominal GDP per capita
| Nominal GDP | ||
| Rank | (per capita, USD) | Name |
| 1 | 170,373 | Lichtenstein |
| 2 | 167,021 | Monaco |
| 3 | 115,377 | Luxembourg |
| 4 | 98,565 | Norway |
| 5 | 92,682 | Qatar |
Table 2.2 as HTML code—the full HTML document is HTMLTable.html from the book's materials:
2.4 Parsing
After having learned the key features of HTML documents, we now turn to loading and representing the contents of HTML/XML files in an R session.6 This step is crucial if we care to extract information from web documents in a principled and robust fashion from within R.7
While performing web scraping, we usually get in touch with HTML in two steps: First, we inspect content on the Web and examine whether it is attractive for further analyses. Second, we import HTML files into R and extract information from them. Parsing HTML occurs at both steps—by the browser to display HTML content nicely, and also by parsers in R to construct useful representations of HTML documents in our programming environment. In the remainder of this chapter we begin by motivating the use of parsers and then discuss some of the problems inherent in the process as well as their solutions.
2.4.1 What is parsing?
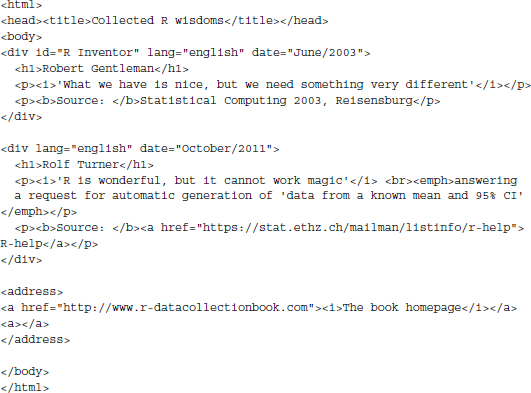
Before showing the application of a parser, let us think about why we need to parse the contents of marked up web documents such as HTML compared to merely reading them into an R session. The difference between reading and parsing is not just a semantic one. Instead, reading functions differ from parsing functions in that the former do not care to understand the formal grammar that underlies HTML but merely recognize the sequence of symbols included in the HTML file. To see that, let us employ base R’s readLines() function, which loads the content of an HTML file. As a stylized, running example in this part, we consider fortunes.html (see the chapter's materials)—a simple HTML file that consists of several nuggets of R wisdoms. We apply readLines() on the document, store the output in an object called fortunes, and print its content to the screen:
R> url <-"http://www.r-datacollection.com/materials/html/fortunes.html"
R> fortunes <- readLines(con = url)
R> fortunes
readLines() maps every line of the input file to a separate value in a character vector. Although easy to use, readLines() creates a flat representation of the document, which is of limited use for extracting information from it. The main problem is that readLines() is agnostic about the different tag elements (name, attribute, values, etc.) and produces results that do not reflect the document's internal hierarchy as implied by the nested tags in any sensible way.
To achieve a useful representation of HTML files, we need to employ a program that understands the special meaning of the markup structures and reconstructs the implied hierarchy of an HTML file within some R-specific data structure. This representation is also referred to as the Document Object Model (DOM). It is a queryable data object that we can build from any HTML file and is useful for further processing of document parts. This transformation from HTML code to the DOM is the task of a DOM-style parser. Parsers belong to a general class of domain-specific programs that traverse over symbol sequences and reconstruct the semantic structure of the document within a data object of the programming environment. In the remainder of this book, we will use functionality from the XML package to parse web documents (Temple Lang 2013c). XML provides an interface to libxml2, a powerful parsing library written in C that is able to cope with many parsing-specific problems. To get started, let us parse fortunes.html and store it in a new object called parsed_fortunes using XML’s htmlParse() function:

Printing the object to the screen, we receive a visual feedback that we created a copy of the file inside the R session. For conventional parsing tasks, htmlParse() will be all that is necessary to create a properly parsed document object. At a minimum, the function needs to be handed the file path via its file argument. This may either be an HTML file (or compressed archive of HTML files) that already exists on the hard drive or an URL pointing to a web document.
htmlParse() and other DOM-style parsers effectively conduct the following steps.
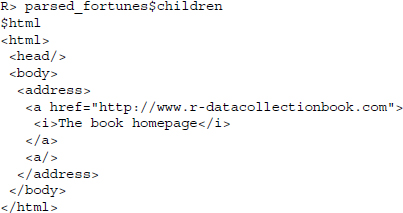
- htmlParse() first parses the entire target document and creates the DOM in a tree-like data structure of the C language. In this data structure every element that occurs in the HTML is now represented as its own entity, or as an individual node. All nodes taken together are referred to as the node set. The parsing process also includes an automatic validation step for malformation. From its source code (see object fortunes) we learn that fortunes.html contains two structural errors. Not only have some of the attribute values been left unquoted but also a closing tag for the second paragraph tag (<p>) is missing. Yet, as we see from the parsed output, these two flaws have both been remedied. This is due to libxml2 which is capable to work on non-well-formed HTML documents because it recognizes errors and corrects them in order to create a valid DOM.
- In the next step the C-level node structure is converted into an object of the R language. This is necessary because further processing of the DOM, for example, modifying and extracting information from it, is tremendously more convenient in a higher-level language such as R. Internally, R uses lists to reflect the hierarchical order of nodes. More specifically, the transformation between C and R is managed through so-called handler functions. These handler functions regulate the translation of a C-level node into an R list element and can be intercepted by the user to determine whether and how a node should be reflected in the R object.
For most parsing tasks, you will find that htmlParse()’s default options are sufficiently powerful to create the DOM. Nevertheless, some control over the parsing process can be beneficial in cases where the target document is of considerable size, carries unnecessary information, or needs to be altered in some predefined way. To deal with these situations, the next section looks at ways to affect the building process of the DOM, for example, by formulating rules that structure the mapping of specific elements into an R object.
2.4.2 Discarding nodes
Discarding unnecessary parts of web documents in the parsing stage can help mitigate memory issues and enhance extraction speed. Handlers provide a comfortable way to manipulate (i.e., delete, add, modify) nodes in the tree construction stage. As we have already noted, handler functions regulate the conversion of the C-level node structure into the R-object. By default, that is, when the handlers are left unchanged, all nodes will be mapped into the R list structure, but we are free to manipulate this process.
We specify handlers as a list of named functions, where the name corresponds to a node name and the function specifies what should happen with the node. The function is executed on encountering a node with a specific name. To exemplify, consider the problem of deleting the <body> node in our example HTML file. In the parsing stage, we can easily get rid of this node including all of its children, that is, nodes that are nested deeper in the tree as follows:

We first create an object h1 containing a list of a function named after the node we want to delete. We then pass this object to the htmlTreeParse() function via its handlers argument. Printing parsed_doc to the screen shows that the <body> node is not part of the DOM tree anymore. Internally, the handler has replaced all instances of the <body> node with the NULL object, which is equivalent to deleting these nodes. When using handler functions, one needs to set the asTree argument to TRUE to indicate that the DOM should be returned and not the handler function itself.
Via the XML package we can pass generic handler functions to operate on specific XML elements such as the processing instructions, XML comments, CDATA, or the general node set.8 A complete overview over these generic handlers is presented in Table 2.3. To illustrate their use, consider the problem of deleting all nodes with name div or title as well as comments that appear in the document. We start again by creating a list of handler functions. Inside this list, the first handler element specifies a function for all XML nodes in the document (startElement). Handlers of that name allow describing functions that are executed on all nodes in the document. The function specifies a request for a node's name (xmlName) and implements a control structure that returns the NULL object if the node's name is either div or title (meaning we discard this node) or else includes the full node in the DOM tree. The second handler element (comment) specifies a function for discarding any HTML comment:
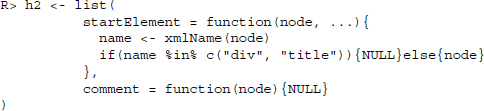
Table 2.3 Generic handlers for DOM-style parsing
| Function name | Node type |
| startElement() | XML element |
| text() | Text node |
| comment() | Comment node |
| cdata() | <CDATA> node |
| processingInstruction() | Processing instruction |
| namespace() | XML namespace |
| entity() | Entity reference |
Source: Adapted from Nolan and Temple Lang (2014, p. 153).
Let us pass the handler function to htmlTreeParse():
R> parsed_fortunes <- htmlTreeParse(file = url, handlers = h2, asTree = TRUE)
If we print parsed_fortunes to the screen, we find that we rid ourselves of the nodes specified in the handlers:
2.4.3 Extracting information in the building process
We motivated the parsing of HTML files as a necessary intermediate step to extracting information from web documents. In this process, we usually want the parser to traverse the entire C-level node set and then build the document tree in an R data structure from which we extract a particular information. Conceptually, there is an alternative strategy where we conduct the extraction directly during the parsing process. Under some circumstances, this strategy can provide considerable advantages since multiple loadings of a document can be avoided, although it is also a little bit more challenging compared to the DOM-style parsing approach presented before. Once again, handler functions play a key role in this process. But rather than using the handler to describe how a C-level node should be converted into an element of the R DOM tree, we now want to specify the handlers to route specific nodes into an R object of our own choosing. Ultimately, this saves us an additional traversal step and thus constitutes a more efficient way to pull out target information. Before we dive deeper into this section, we would like to point out that the contents of this section are fairly advanced. If you are not too familiar with R scoping issues, you might like to skip ahead to the summary of this chapter. You can continue with the book just fine without having read this part.
For an example, consider the problem of extracting the information from fortunes.html that is written in italics, that is, encapsulated with <i> tags. Underlying this task is a tricky problem of functional scope that we need to address. Ultimately, we want to create a data object containing the information in our current workspace or global environment. But functions in R—and our handler functions are no different—operate on local variables and have no writing access to the global environment, which is a necessary requirement for this problem.
The solution is to define the handler function for the <i> nodes in the document as a so-called closure—a function that is capable of referencing objects that are not local to it. A closure function not only contains a function's arguments and body, but also an environment. Here, the environment is needed to define container variables to which we route the handler's output, as well as a return function for the variables’ contents.
We start by defining a nesting function getItalics(). i_container is our local container variable that will hold all information set in italics. Next, we define the handler function for the <i> nodes. On the right side of the first line of this function, we concatenate the contents of the container variable with a new instance of the <i> node value. The resulting vector then overwrites the existing container object by using the super assignment operator < < − , which allows making an assignment to nonlocal variables. Lastly, we create a function called returnI() with the purpose of returning the container object just created:
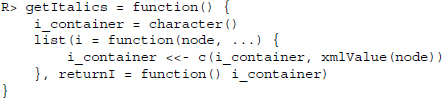
Next, we execute getItalics() and route its return values into a new object h3. Essentially, h3 now contains our handler function, but additionally, the function can access i_container and returnI() as these two objects were created in the same environment as the handler function:
R> h3 <- getItalics()
Now we can pass this function to htmlTreeParse()’s handlers argument:
R> invisible(htmlTreeParse(url, handlers = h3))
For clarity, we employ the invisible() function to suppress printing of the DOM to the screen. To take a look at the fetched information we can make a call to h3()’s returnI() function to print all the occurrences of <i> nodes in the document to the screen:
R> h3$returnI()
[1]"’What we have is nice, but we need something very different’"
[2]"’R is wonderful, but it cannot work magic’"
[3]"The book homepage"
Summary
In this chapter we focused on getting a basic understanding of HTML. We learned that what we get presented when surfing the web is an interpreted version of the marked up source code that holds the content. Tags form the core of the markup used in HTML and can be used to define structure, appearance, and content. Furthermore, elements not only contain information but can also be used to transmit information from user to server or to incorporate functionality from other computer languages, most notably JavaScript. We should be able at this point to locate information we seek in the source code and to connect source code to browser interpretation and vice versa. Along with knowledge about the structure of HTML elements we are ready to learn how to exploit structure and layout of HTML files to collect the information we need.
Parsing is an important step in processing information from web documents. The native structure of HTML does not naturally map into R objects. We can import HTML files as raw text, but this deprives us of the most useful features of these documents. We have learned in this chapter how to parse the tree structure of HTML documents, giving them a representation in the R environment. We will learn powerful tools to locate and extract nodes within these objects and the information they hold in Chapter 4. But first we turn to XML, a more generic counterpart to HTML and a frequently used format to exchange data on the Web.
Further reading
As HTML is a W3C standard, we recommend a look at the W3 pages and the accompanied W3schools pages (http://www.w3schools.com) if you want to dive deeper into HTML and JavaScript. As HTML is also a WHATWG standard, you might like to check out their web pages for further information on HTML and related technologies (http://www.whatwg.org/). For example, the history section explains why W3C and WHATWG develop HTML5 parallelly. Further helpful web sources are the following.
- A complete list of tags with description and example: http://www.w3schools.com/tags
- A long list of special characters, symbols, and their entity representation: http://www.w3schools.com/charsets/ref_html_8859.asp
- A much much longer list of characters and their entity representation: http://unicode-table.com
- An HTML validator: http://validator.w3.org
For those who like it short but also like to hold a real book in their hands there is Niederst Robbins's (2013) less than 200 pages HTML5 Pocket Reference. You can find more thorough treatments of the subjects in Castro and Hyslop (2014) for HTML and CSS and Flanagan (2011) for JavaScript.
Problems
-
Why is it important that HTML is a web standard?
-
Write down the HTML tags for (a) the primary heading, (b) starting a new paragraph, (c) inserting foreign code, (d) constructing ordered lists, (e) creating a hyperlink, and (f) creating an email link!
-
HTML source code inspection.
- Open three webpages you frequently use in your browser.
- Have a look at the source code of all three.
- Inspect various elements with the Inspect Elements tool of your browser.
- Save each of them to your hard drive.
-
Building a basic HTML document, part I.
- Write a minimal HTML file.
- Add your name as a comment.
- Add a level one and a level two headline.
- Add some further content, for example, a sentence about the current weather.
- Add a paragraph with some further content, for example, a sentence about tomorrow's weather.
-
Building a basic HTML document, part II.
- Write a minimal HTML document.
- Include a paragraph that contains 10 special characters—only five of them may be mentioned in Table 2.1.
- Use http://www.r-datacollection.com/materials/html/simple.css as your default style file.
- Check the validity of your document at http://validator.w3.org.
-
Building a basic HTML document, part III.
- Write a minimal HTML document.
- Include a table with two columns and three rows.
- The first column should contain first, second, and third. The second column should contain links to your top three web pages.
- Have a look at the list of tags at http://www.w3schools.com/tags. Try to use some of the tags you are not yet familiar with in your HTML document.
-
The base R function download.file() is a standard tool to gather data from the Web with R. Investigate the function's syntax and try to use it to save the front pages of your three most favorite websites to your local disk.
-
The base R functions readLines() and writeLines() can be used to import and export character data to and from R Try to use them to import the webpages you have gathered in the previous exercise and save them in different objects. Next, combine the three objects into a list object. Finally, use writeLines() to store the pages again in external files.
-
An encounter with JavaScript.
- Check out http://www.r-datacollection.com/materials/html/fortunes3.html in your browser.
- View the page's source code.
- Download both JavaScript files linked to the document using the download .file() function.
-
Building a basic HTML document, part IV.
- Write a minimal HTML document.
- Include a form that has two inputs—name and age.
- Define the form in a way that it sends data to http://www.r-datacollection.com/ materials/http/GETexample.php via the GET method.
- Make sure it works—the server should respond with Hello YourName! You are YourAge years old.
- Try to send high age values. At what point does the response message change?