
Chapter 14
Creating and Using Classes
In This Chapter
![]() Defining the characteristics of a class
Defining the characteristics of a class
![]() Specifying the class components
Specifying the class components
![]() Creating your own class
Creating your own class
![]() Working with the class in an application
Working with the class in an application
![]() Working with subclasses
Working with subclasses
You’ve already worked with a number of classes in previous chapters. Many of the examples are easy to construct and use because they depend on the Python classes. Even though classes are briefly mentioned in previous chapters, those chapters largely ignore them simply because discussing them wasn’t immediately important.
Classes make working with Python code more convenient by helping to make your applications easy to read, understand, and use. You use classes to create containers for your code and data, so they stay together in one piece. Outsiders see your class as a black box — data goes in and results come out.
 At some point, you need to start constructing classes of your own if you want to avoid the dangers of the spaghetti code that is found in older applications. Spaghetti code is much as the name implies — various lines of procedures are interwoven and spread out in such a way that it’s hard to figure out where one piece of spaghetti begins and another ends. Trying to maintain spaghetti code is nearly impossible, and some organizations have thrown out applications because no one could figure them out.
Besides helping you understand classes as a packaging method that avoids spaghetti code, this chapter helps you create and use your own classes for the first time. You gain insights into how Python classes work toward making your applications convenient to work with. This is an introductory sort of chapter, though, and you won’t become so involved in classes that your head begins to spin around on its own. This chapter is about making class development simple and manageable.
Understanding the Class as a Packaging Method
A class is essentially a method for packaging code. The idea is to simplify code reuse, make applications more reliable, and reduce the potential for security breaches. Well-designed classes are black boxes that accept certain inputs and provide specific outputs based on those inputs. In short, a class shouldn’t create any surprises for anyone and should have known (quantifiable) behaviors. How the class accomplishes its work is unimportant, and hiding the details of its inner workings is essential to good coding practice.
Before you move onto actual class theory, you need to know a few terms that are specific to classes. The following list defines terms that you need to know in order to use the material that follows later in the chapter. These terms are specific to Python. (Other languages may use different terms for the same techniques or define terms that Python uses in different ways.)
- Class: Defines a blueprint for creating an object. Think of a builder who wants to create a building of some type. The builder uses a blueprint to ensure that the building will meet the required specifications. Likewise, Python uses classes as a blueprint for creating new objects.
 Class variable: Provides a storage location used by all methods in an instance of the class. A class variable is defined within the class proper but outside of any of the class methods. Class variables aren’t used very often because they’re a potential security risk — every method of the class has access to the same information. In addition to being a security risk, class variables are also visible as part of the class rather than a particular instance of a class, so they pose the potential problem of class contamination.
- Data member: Defines either a class variable or an instance variable used to hold data associated with a class and its objects.
- Function overloading: Creates more than one version of a function, which results in different behaviors. The essential task of the function may be the same, but the inputs are different and potentially the outputs as well. Function overloading is used to provide flexibility so that a function can work with applications in various ways.
- Inheritance: Uses a parent class to create child classes that have the same characteristics. The child classes usually have extended functionality or provide more specific behaviors than the parent class does.
- Instance: Defines an object created from the specification provided by a class. Python can create as many instances of a class to perform the work required by an application. Each instance is unique.
- Instance variable: Provides a storage location used by a single method of an instance of a class. The variable is defined within a method. Instance variables are considered safer than class variables because only one method of the class can access them. Data is passed between methods using arguments, which allows for controlled checks of incoming data and better control over data management.
- Instantiation: Performs the act of creating an instance of a class. The resulting object is a unique class instance.
- Method: Defines the term used for functions that are part of a class. Even though function and method essentially define the same element, method is considered more specific because only classes can have methods.
- Object: Defines a unique instance of a class. The object contains all the methods and properties of the original class. However, the data for each object differs. The storage locations are unique, even if the data is the same.
- Operator overloading: Creates more than one version of a function that is associated with an operator such as: +, -, /, or *, which results in different behaviors. The essential task of the operator may be the same, but the way in which the operator interacts with the data differs. Operator overloading is used to provide flexibility so that an operator can work with applications in various ways.
Considering the Parts of a Class
A class has a specific construction. Each part of a class performs a particular task that gives the class useful characteristics. Of course, the class begins with a container that is used to hold the entire class together, so that’s the part that the first section that follows discusses. The remaining sections describe the other parts of a class and help you understand how they contribute to the class as a whole.
Creating the class definition
A class need not be particularly complex. In fact, you can create just the container and one class element and call it a class. Of course, the resulting class won’t do much, but you can instantiate it (tell Python to build an object using your class as a blueprint) and work with it as you would any other class. The following steps help you understand the basics behind a class by creating the simplest class possible.
- Open a Python Shell window.
You see the familiar Python prompt.
- Type the following code (pressing Enter after each line and pressing Enter twice after the last line):
class MyClass:
MyVar = 0The first line defines the class container, which consists of the keyword class and the class name, which is MyClass. Every class you create must begin precisely this way. You must always include class followed by the class name.
The second line is the class suite. All the elements that comprise the class are called the class suite. In this case, you see a class variable named MyVar, which is set to a value of 0. Every instance of the class will have the same variable and start at the same value.
- Type MyInstance = MyClass() and press Enter.
You have just created an instance of MyClass named MyInstance. Of course, you’ll want to verify that you really have created such an instance. Step 4 accomplishes that task.
- Type MyInstance.MyVar and press Enter.
The output of 0, as shown in Figure 14-1, demonstrates that MyInstance does indeed have a class variable named MyVar.
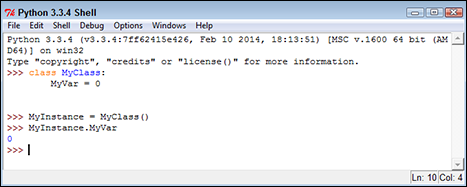
Figure 14-1: The instance contains the required variable.
- Type MyInstance.__class__ and press Enter.
Python displays the class used to create this instance, as shown in Figure 14-2. The output tells you that this class is part of the __main__ module, which means that you typed it directly into the shell.
- Retain this window and class for the next section.
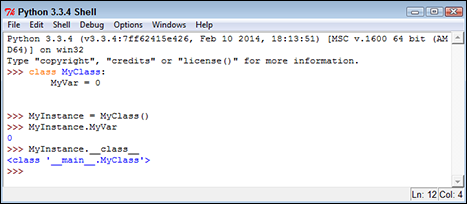
Figure 14-2: The class name is also correct, so you know that this instance is created using MyClass.
Considering the built-in class attributes
When you create a class, you can easily think that all you get is the class. However, Python adds built-in functionality to your class. For example, in the preceding section, you type __class__ and press Enter. The __class__ attribute is built in; you didn’t create it. It helps to know that Python provides this functionality so that you don’t have to add it. The functionality is needed often enough that every class should have it, so Python supplies it. The following steps help you work with the built-in class attributes.
- Use the Python Shell window that you open in the preceding section.
If you haven’t followed the steps in the preceding section, “Creating the class definition,” please do so now.
- Type dir(MyInstance) and press Enter.
A list of attributes appears, as shown in Figure 14-3. These attributes provide specific functionality for your class. They’re also common to every other class you create, so you can count on always having this functionality in the classes you create.
- Type help(‘__class__') and press Enter.
Python displays information on the __class__ attribute, as shown in Figure 14-4. You can use the same technique for learning more about any attribute that Python adds to your class.
- Close the Python Shell window.
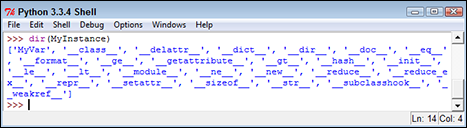
Figure 14-3: Use the dir() function to determine which built-in attributes are present.
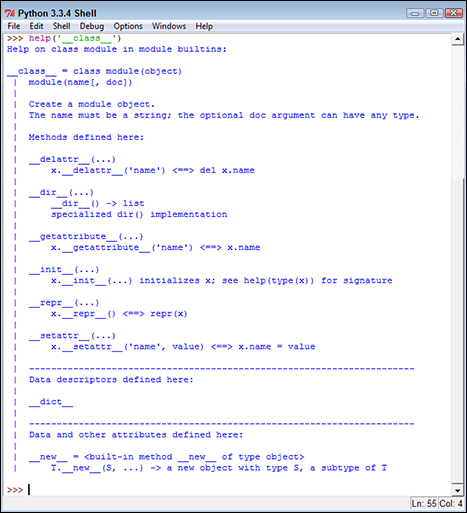
Figure 14-4: Python provides help for each of the attributes it adds to your class.
Working with methods
Methods are simply another kind of function that reside in classes. You create and work with methods in precisely the same way that you do functions, except that methods are always associated with a class (you don’t see freestanding methods as you do functions). You can create two kinds of methods: those associated with the class itself and those associated with an instance of a class. It’s important to differentiate between the two. The following sections provide the details needed to work with both.
Creating class methods
A class method is one that you execute directly from the class without creating an instance of the class. Sometimes you need to create methods that execute from the class, such as the functions you used with the str class in order to modify strings. As an example, the MultipleException4.py example in Chapter 9 uses the str.upper() function. The following steps demonstrate how to create and use a class method.
- Open a Python Shell window.
You see the familiar Python prompt.
- Type the following code (pressing Enter after each line and pressing Enter twice after the last line):
class MyClass:
def SayHello():
print("Hello there!")The example class contains a single defined attribute, SayHello(). This method doesn’t accept any arguments and doesn’t return any values. It simply prints a message as output. However, the method works just fine for demonstration purposes.
- Type MyClass.SayHello() and press Enter.
The example outputs the expected string, as shown in Figure 14-5. Notice that you didn’t need to create an instance of the class — the method is available immediately for use.
- Close the Python Shell window.
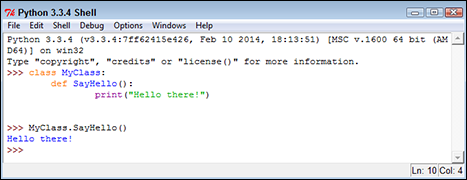
Figure 14-5: The class method outputs a simple message.
A class method can work only with class data. It doesn’t know about any data associated with an instance of the class. You can pass it data as an argument, and the method can return information as needed, but it can’t access the instance data. As a consequence, you need to exercise care when creating class methods to ensure that they’re essentially self-contained.
Creating instance methods
An instance method is one that is part of the individual instances. You use instance methods to manipulate the data that the class manages. As a consequence, you can’t use instance methods until you instantiate an object from the class.
All instance methods accept a single argument as a minimum, self. The self argument points at the particular instance that the application is using to manipulate data. Without the self argument, the method wouldn’t know which instance data to use. However, self isn’t considered an accessible argument — the value for self is supplied by Python, and you can’t change it as part of calling the method.
The following steps demonstrate how to create and use instance methods in Python.
- Open a Python Shell window.
You see the familiar Python prompt.
- Type the following code (pressing Enter after each line and pressing Enter twice after the last line):
class MyClass:
def SayHello(self):
print("Hello there!")The example class contains a single defined attribute, SayHello(). This method doesn’t accept any special arguments and doesn’t return any values. It simply prints a message as output. However, the method works just fine for demonstration purposes.
- Type MyInstance = MyClass() and press Enter.
Python creates an instance of MyClass named MyInstance.
- Type MyInstance.SayHello() and press Enter.
You see the message shown in Figure 14-6.

Figure 14-6: The instance message is called as part of an object and outputs this simple message.
- Close the Python Shell window.
Working with constructors
A constructor is a special kind of method that Python calls when it instantiates an object using the definitions found in your class. Python relies on the constructor to perform tasks such as initializing (assigning values to) any instance variables that the object will need when it starts. Constructors can also verify that there are enough resources for the object and perform any other start-up task you can think of.
The name of a constructor is always the same, __init__(). The constructor can accept arguments when necessary to create the object. When you create a class without a constructor, Python automatically creates a default constructor for you that doesn’t do anything. Every class must have a constructor, even if it simply relies on the default constructor. The following steps demonstrate how to create a constructor:
- Open a Python Shell window.
You see the familiar Python prompt.
- Type the following code (pressing Enter after each line and pressing Enter twice after the last line):
class MyClass:
Greeting = ""
def __init__(self, Name="there"):
self.Greeting = Name + "!"
def SayHello(self):
print("Hello {0}".format(self.Greeting))This example provides your first example of function overloading. In this case, there are two versions of __init__(). The first doesn’t require any special input because it uses the default value for the Name of "there". The second requires a name as an input. It sets Greeting to the value of this name, plus an exclamation mark. The SayHello() method is essentially the same as previous examples in this chapter.
 Python doesn’t support true function overloading. Many strict adherents to strict Object-Oriented Programming (OOP) principles consider default values to be something different from function overloading. However, the use of default values obtains the same result, and it’s the only option that Python offers. In true function overloading, you see multiple copies of the same function, each of which could process the input differently.
 - Type MyInstance = MyClass() and press Enter.
Python creates an instance of MyClass named MyInstance.
- Type MyInstance.SayHello() and press Enter.
You see the message shown in Figure 14-7. Notice that this message provides the default, generic greeting.
- Type MyInstance = MyClass(“Amy”) and press Enter.
Python creates an instance of MyClass named MyInstance.
- Type MyInstance.SayHello() and press Enter.
You see the message shown in Figure 14-8. Notice that this message provides a specific greeting.
- Close the Python Shell window.
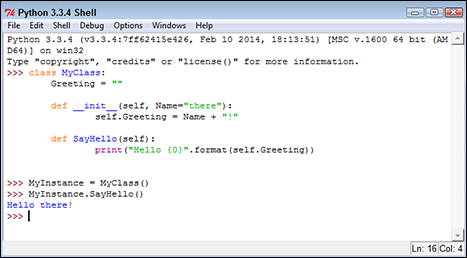
Figure 14-7: The first version of the constructor provides a default value for the name.

Figure 14-8: Supplying the constructor with a name provides a customized output.
Working with variables
As mentioned earlier in the book, variables are storage containers that hold data. When working with classes, you need to consider how the data is stored and managed. A class can include both class variables and instance variables. The class variables are defined as part of the class itself, while instance variables are defined as part of methods. The following sections show how to use both variable types.
Creating class variables
Class variables provide global access to data that your class manipulates in some way. In most cases, you initialize global variables using the constructor to ensure that they contain a known good value. The following steps demonstrate how class variables work.
- Open a Python Shell window.
You see the familiar Python prompt.
- Type the following code (pressing Enter after each line and pressing Enter twice after the last line):
class MyClass:
Greeting = ""
def SayHello(self):
print("Hello {0}".format(self.Greeting))This is a version of the code found in the “Working with constructors” section of the chapter, but this version doesn’t include the constructor. Normally you do include a constructor to ensure that the class variable is initialized properly. However, this series of steps shows how class variables can go wrong.
- Type MyClass.Greeting = “Zelda” and press Enter.
This statement sets the value of Greeting to something other than the value that you used when you created the class. Of course, anyone could make this change. The big question is whether the change will take.
- Type MyClass.Greeting and press Enter.
You see that the value of Greeting has changed, as shown in Figure 14-9.
- Type MyInstance = MyClass() and press Enter.
Python creates an instance of MyClass named MyInstance.

Figure 14-9: You can change the value of Greeting.
- Type MyInstance.SayHello() and press Enter.
You see the message shown in Figure 14-10. The change that you made to Greeting has carried over to the instance of the class. It’s true that the use of a class variable hasn’t really caused a problem in this example, but you can imagine what would happen in a real application if someone wanted to cause problems.
This is just a simple example of how class variables can go wrong. The two concepts you should take away from this example are as follows:- Avoid class variables when you can because they’re inherently unsafe.
- Always initialize class variables to a known good value in the constructor code.
- Close the Python Shell window.
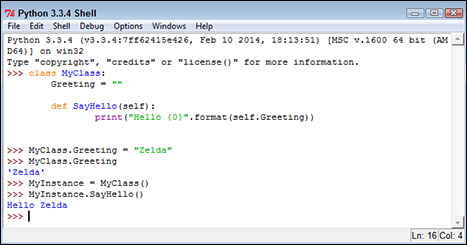
Figure 14-10: The change to Greeting carries over to the instance of the class.
Creating instance variables
Instance variables are always defined as part of a method. The input arguments to a method are considered instance variables because they exist only when the method exists. Using instance variables is usually safer than using class variables because it’s easier to maintain control over them and to ensure that the caller is providing the correct input. The following steps show an example of using instance variables.
- Open a Python Shell window.
You see the familiar Python prompt.
- Type the following code (pressing Enter after each line and pressing Enter twice after the last line):
class MyClass:
def DoAdd(self, Value1=0, Value2=0):
Sum = Value1 + Value2
print("The sum of {0} plus {1} is {2}."
.format(Value1, Value2, Sum))In this case, you have three instance variables. The input arguments, Value1 and Value2, have default values of 0, so DoAdd() can’t fail simply because the user forgot to provide values. Of course, the user could always supply something other than numbers, so you should provide the appropriate checks as part of your code. The third instance variable is Sum, which is equal to Value1 + Value2. The code simply adds the two numbers together and displays the result.
- Type MyInstance = MyClass() and press Enter.
Python creates an instance of MyClass named MyInstance.
- Type MyInstance.DoAdd(1, 4) and press Enter.
You see the message shown in Figure 14-11. In this case, you see the sum of adding 1 and 4.
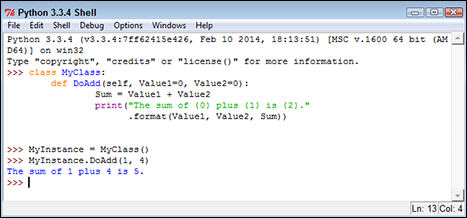
Figure 14-11: The output is simply the sum of two numbers.
- Close the Python Shell window.
Using methods with variable argument lists
Sometimes you create methods that can take a variable number of arguments. Handling this sort of situation is something Python does well. Here are the two kinds of variable arguments that you can create:
- *args: Provides a list of unnamed arguments.
- **kwargs: Provides a list of named arguments.
The actual names of the arguments don’t matter, but Python developers use *args and **kwargs as a convention so that other Python developers know that they’re a variable list of arguments. Notice that the first variable argument has just one asterisk (*) associated with it, which means the arguments are unnamed. The second variable has two asterisks, which means that the arguments are named. The following steps demonstrate how to use both approaches to writing an application. This example also appears with the downloadable source code as VariableArgs.py.
- Open a Python File window.
You see an editor in which you can type the example code.
- Type the following code into the window — pressing Enter after each line:
class MyClass:
def PrintList1(*args):
for Count, Item in enumerate(args):
print("{0}. {1}".format(Count, Item))
def PrintList2(**kwargs):
for Name, Value in kwargs.items():
print("{0} likes {1}".format(Name, Value))
MyClass.PrintList1("Red", "Blue", "Green")
MyClass.PrintList2(George="Red", Sue="Blue",
Zarah="Green")For the purposes of this example, you’re seeing the arguments implemented as part of a class method. However, you can use them just as easily with an instance method.
 Look carefully at PrintList1() and you see a new method of using a for loop to iterate through a list. In this case, the enumerate() function outputs both a count (the loop count) and the string that was passed to the function.
The PrintList2() function accepts a dictionary input. Just as with PrintList1(), this list can be any length. However, you must process the items() found in the dictionary to obtain the individual values.
- Choose Run⇒Run Module.
You see the output shown in Figure 14-12. The individual lists can be of any length. In fact, in this situation, playing with the code to see what you can do with it is a good idea. For example, try mixing numbers and strings with the first list to see what happens. Try adding Boolean values as well. The point is that using this technique makes your methods incredibly flexible if all you want is a list of values as input.
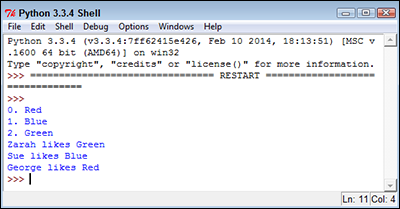
Figure 14-12: The code can process any number of entries in the list.
Overloading operators
In some situations, you want to be able to do something special as the result of using a standard operator such as add (+). In fact, sometimes Python doesn’t provide a default behavior for operators because it has no default to implement. No matter what the reason might be, overloading operators makes it possible to assign new functionality to existing operators so that they do what you want, rather than what Python intended. The following steps demonstrate how to overload an operator and use it as part of an application. This example also appears with the downloadable source code as OverloadOperator.py.
- Open a Python File window.
You see an editor in which you can type the example code.
- Type the following code into the window — pressing Enter after each line:
class MyClass:
def __init__(self, *args):
self.Input = args
def __add__(self, Other):
Output = MyClass()
Output.Input = self.Input + Other.Input
return Output
def __str__(self):
Output = ""
for Item in self.Input:
Output += Item
Output += " "
return Output
Value1 = MyClass("Red", "Green", "Blue")
Value2 = MyClass("Yellow", "Purple", "Cyan")
Value3 = Value1 + Value2
print("{0} + {1} = {2}"
.format(Value1, Value2, Value3))The example demonstrates a few different techniques. The constructor, __init__(), demonstrates a method for creating an instance variable attached to the self object. You can use this approach to create as many variables as needed to support the instance.
When you create your own classes, no + operator is defined until you define one, in most cases. The only exception is when you inherit from an existing class that already has the + operator defined (see the “Extending Classes to Make New Classes” section, later in this chapter, for details). In order to add two MyClass entries together, you must define the __add__() method, which equates to the + operator.The code used for the __add__() method may look a little odd, too, but you need to think about it one line at a time. The code begins by creating a new object, Output, from MyClass. Nothing is added to Output at this point — it’s a blank object. The two objects that you want to add, self.Input and Other.Input, are actually tuples. (See “Working with Tuples,” in Chapter 13, for more details about tuples.) The code places the sum of these two objects into Output.Input. The __add__() method then returns the new combined object to the caller.
Of course, you may want to know why you can’t simply add the two inputs together as you would a number. The answer is that you’d end up with a tuple as an output, rather than a MyClass as an output. The type of the output would be changed, and that would also change any use of the resulting object.
To print MyClass properly, you also need to define a __str__() method. This method converts a MyClass object into a string. In this case, the output is a space-delimited string (in which each of the items in the string is separated from the other items by a space) containing each of the values found in self.Input. Of course, the class that you create can output any string that fully represents the object.
The main procedure creates two test objects, Value1 and Value2. It adds them together and places the result in Value3. The result is printed onscreen.
- Choose Run⇒Run Module.
Figure 14-13 shows the result of adding the two objects together, converting them to strings, and then printing the result. It’s a lot of code for such a simple output statement, but the result definitely demonstrates that you can create classes that are self-contained and fully functional.
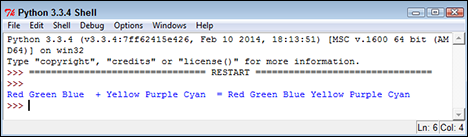
Figure 14-13: The result of adding two MyClass objects is a third object of the same type.
Creating a Class
All the previous material in this chapter has helped prepare you for creating an interesting class of your own. In this case, you create a class that you place into an external module and eventually access within an application. Listing 14-1 shows the code that you need to create the class. This example also appears with the downloadable source code as MyClass.py.
Listing 14-1: Creating an External Class
class MyClass:
def __init__(self, Name="Sam", Age=32):
self.Name = Name
self.Age = Age
def GetName(self):
return self.Name
def SetName(self, Name):
self.Name = Name
def GetAge(self):
return self.Age
def SetAge(self, Age):
self.Age = Age
def __str__(self):
return "{0} is aged {1}.".format(self.Name,
self.Age)
In this case, the class begins by creating an object with two instance variables: Name and Age. If the user fails to provide these values, they default to Sam and 32.
This example provides you with a new class feature. Most developers call this feature an accessor. Essentially, it provides access to an underlying value. There are two types of accessors: getters and setters. Both GetName() and GetAge() are getters. They provide read-only access to the underlying value. The SetName() and SetAge() methods are setters, which provide write-only access to the underlying value. Using a combination of methods like this allows you to check inputs for correct type and range, as well as verify that the caller has permission to view the information.
As with just about every other class you create, you need to define the __str__() method if you want the user to be able to print the object. In this case, the class provides formatted output that lists both of the instance variables.
Using the Class in an Application
Most of the time, you use external classes when working with Python. It isn’t very often that a class exists within the confines of the application file because the application would become large and unmanageable. In addition, reusing the class code in another application would be difficult. The following steps help you use the MyClass class that you created in the previous section. This example also appears with the downloadable source code as MyClassTest.py.
- Open a Python File window.
You see an editor in which you can type the example code.
- Type the following code into the window — pressing Enter after each line:
import MyClass
SamsRecord = MyClass.MyClass()
AmysRecord = MyClass.MyClass("Amy", 44)
print(SamsRecord.GetAge())
SamsRecord.SetAge(33)
print(AmysRecord.GetName())
AmysRecord.SetName("Aimee")
print(SamsRecord)
print(AmysRecord) The example code begins by importing the MyClass module. The module name is the name of the file used to store the external code, not the name of the class. A single module can contain multiple classes, so always think of the module as being the actual file that is used to hold one or more classes that you need to use with your application.After the module is imported, the application creates two MyClass objects. Notice that you use the module name first, followed by the class name. The first object, SamsRecord, uses the default settings. The second object, AmysRecord, relies on custom settings.
Sam has become a year old. After the application verifies that the age does need to be updated, it updates Sam’s age.
Somehow, HR spelled Aimee’s name wrong. It turns out that Amy is an incorrect spelling. Again, after the application verifies that the name is wrong, it makes a correction to AmysRecord. The final step is to print both records in their entirety.
- Choose Run⇒Run Module.
The application displays a series of messages as it puts MyClass through its paces, as shown in Figure 14-14. At this point, you know all the essentials of creating great classes.
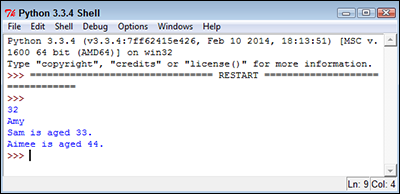
Figure 14-14: The output shows that the class is fully functional.
Extending Classes to Make New Classes
As you might imagine, creating a fully functional, production-grade class (one that is used in a real-world application actually running on a system that is accessed by users) is time consuming because real classes perform a lot of tasks. Fortunately, Python supports a feature called inheritance. By using inheritance, you can obtain the features you want from a parent class when creating a child class. Overriding the features that you don’t need and adding new features lets you create new classes relatively fast and with a lot less effort on your part. In addition, because the parent code is already tested, you don’t have to put quite as much effort into ensuring that your new class works as expected. The following sections show how to build and use classes that inherit from each other.
Building the child class
Parent classes are normally supersets of something. For example, you might create a parent class named Car and then create child classes of various car types around it. In this case, you build a parent class named Animal and use it to define a child class named Chicken. Of course, you can easily add other child classes after you have Animal in place, such as a Gorilla class. However, for this example, you build just the one parent and one child class, as shown in Listing 14-2. This example also appears with the downloadable source code as Animals.py.
Listing 14-2: Building a Parent and Child Class
class Animal:
def __init__(self, Name="", Age=0, Type=""):
self.Name = Name
self.Age = Age
self.Type = Type
def GetName(self):
return self.Name
def SetName(self, Name):
self.Name = Name
def GetAge(self):
return self.Age
def SetAge(self, Age):
self.Age = Age
def GetType(self):
return self.Type
def SetType(self, Type):
self.Type = Type
def __str__(self):
return "{0} is a {1} aged {2}".format(self.Name,
self.Type,
self.Age)
class Chicken(Animal):
def __init__(self, Name="", Age=0):
self.Name = Name
self.Age = Age
self.Type = "Chicken"
def SetType(self, Type):
print("Sorry, {0} will always be a {1}"
.format(self.Name, self.Type))
def MakeSound(self):
print("{0} says Cluck, Cluck, Cluck!".format(self.Name))
The Animal class tracks three characteristics: Name, Age, and Type. A production application would probably track more characteristics, but these characteristics do everything needed for this example. The code also includes the required accessors for each of the characteristics. The __str__() method completes the picture by printing a simple message stating the animal characteristics.
The Chicken class inherits from the Animal class. Notice the use of Animal in parentheses after the Chicken class name. This addition tells Python that Chicken is a kind of Animal, something that will inherit the characteristics of Animal.
Notice that the Chicken constructor accepts only Name and Age. The user doesn’t have to supply a Type value because you already know that it’s a chicken. This new constructor overrides the Animal constructor. The three attributes are still in place, but Type is supplied directly in the Chicken constructor.
Someone might try something funny, such as setting her chicken up as a gorilla. With this in mind, the Chicken class also overrides the SetType() setter. If someone tries to change the Chicken type, that user gets a message rather than the attempted change. Normally, you handle this sort of problem by using an exception, but the message works better for this example by making the coding technique clearer.
Finally, the Chicken class adds a new feature, MakeSound(). Whenever someone wants to hear the sound a chicken makes, he can call MakeSound() to at least see it printed on the screen.
Testing the class in an application
Testing the Chicken class also tests the Animal class to some extent. Some functionality is different, but some classes aren’t really meant to be used. The Animal class is simply a parent for specific kinds of animals, such as Chicken. The following steps demonstrate the Chicken class so that you can see how inheritance works. This example also appears with the downloadable source code as ListStack.py.
- Open a Python File window.
You see an editor in which you can type the example code.
- Type the following code into the window — pressing Enter after each line:
import Animals
MyChicken = Animals.Chicken("Sally", 2)
print(MyChicken)
MyChicken.SetAge(MyChicken.GetAge() + 1)
print(MyChicken)
MyChicken.SetType("Gorilla")
print(MyChicken)
MyChicken.MakeSound()The first step is to import the Animals module. Remember that you always import the filename, not the class. The Animals.py file actually contains two classes in this case: Animal and Chicken.
The example creates a chicken, MyChicken, named Sally, who is age 2. It then starts to work with MyChicken in various ways. For example, Sally has a birthday, so the code updates Sally’s age by 1. Notice how the code combines the use of a setter, SetAge(), with a getter, GetAge(), to perform the task. After each change, the code displays the resulting object values for you. The final step is to let Sally say a few words.
- Choose Run⇒Run Module.
You see each of the steps used to work with MyChicken, as shown in Figure 14-15. As you can see, using inheritance can greatly simplify the task of creating new classes when enough of the classes have commonality so that you can create a parent class that contains some amount of the code.
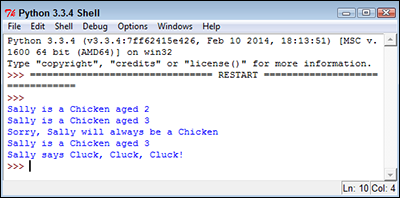
Figure 14-15: Sally has a birthday and then says a few words.