
Chapter 4
An Android Social Media App
In This Chapter
![]() Posting on Twitter with Android code
Posting on Twitter with Android code
![]() Tweeting with your app on a user’s behalf
Tweeting with your app on a user’s behalf
Areader from Vancouver (in British Columbia, Canada) writes:
“Hello, Barry. I just thought I would ask that you include the area that seems to get attention from app developers: programs connecting with social sites. I look forward to reading the new book! Best regards, David.”
Well, David, you’ve inspired me to create a Twitter app. This chapter’s example does two things: It posts a new tweet, and it gets a Twitter user’s timeline. The app can perform many more Twitter tasks — for example, search for tweets, look for users, view trends, check friends and followers, gather suggestions, and do lots of other things that Twitter users want done. For simplicity, though, I have the app perform only two tasks: tweet and display a timeline.
I can summarize the essence of this chapter’s Twitter code in two short statements. To post a tweet, the app executes
twitter.updateStatus("This is my tweet.");
And, to display a user’s timeline, the app executes
List<twitter4j.Status> statuses =
twitter.getUserTimeline("allmycode");
Of course, these two statements only serve as a summary, and a summary is never the same as the material it summarizes. Imagine standing on the street in Times Square and shouting the statement “Twitter dot update status: 'This is my tweet.’” Nothing good happens because you’re issuing the correct command in the wrong context. In the same way, the context surrounding a call to twitter.updateStatus in an app matters an awful lot.
This chapter covers all the context surrounding your calls to twitter.updateStatus and twitter.getUserTimeline.
The Twitter App’s Files
You can import this chapter’s code from my website (http://allmycode.com/Android
) by following the instructions in Book I, Chapter 3. As is true for any Android app, this chapter’s Android Studio project contains about 100 files and about 170 different folders. In this chapter, I concentrate on the project’s MainActivity.java file. But a few other files require some attention.
The Twitter4J API jar file
Android has no built-in support for communicating with Twitter. Yes, the raw materials are contained in Android’s libraries, but to deal with all of Twitter’s requirements, someone has to paste together those raw materials in a useful way. Fortunately, several developers have done all the pasting and made their libraries available for use by others. The library that I use in this chapter is Twitter4J. Its website is http://twitter4j.org.
Chapter 4 in Book II describes the role of .jar files in Java program development. For this chapter’s example to work, your project must include a .jar file containing the Twitter4J libraries. If you’ve downloaded the code from this book’s website and opened the 04_04_01 project, you have everything you need. (The project that you downloaded contains the required .jar file.)
If you’re creating this chapter’s example on your own, or if you’re having trouble with the project’s existing .jar files, you can add the Twitter4J libraries by following these steps:
- Visit
http://twitter4j.org. -
Find the link to download the latest stable version of Twitter4J.
To run this chapter’s example, I use Twitter4J version 4.0.2. If you download a later version, it’ll probably work. But I make no promises about the backward compatibility, forward compatibility, or sideward compatibility of the various Twitter4J versions. If my example doesn’t run properly for you, you can search the Twitter4J site for a download link to version 4.0.2.
-
Click the link to download the Twitter4J software.
The file that I downloaded is
twitter4j-4.0.2.zip. -
Look for a
twitter4j-core.jarfile in the downloaded.zipfile.In the
.zipfile that I downloaded, I found a file namedtwitter4j-core-4.0.2.jar. -
Extract the
twitter4j-core.jarfile to this project’sapp/builddirectory.Use your operating system’s File Explorer or Finder to do the extracting and copying.
- In Android Studio’s main menu, choose File ⇒ Project Structure.
-
In the Project Structure dialog box, in the panel on the left side, select
app(in the Modules group).See Figure 4-1.
-
In the main body of the Project Structure dialog box, select the Dependencies tab.
You want to add the
twitter4j-core.jarfile to the list of dependencies. -
Click the plus sign that’s to the right of the Dependencies list.
A little pop-up menu appears. (Refer to Figure 4-1.)
-
In the pop-up menu, select File Dependency.
Android Studio displays a Select Path dialog box.
-
In the Select Path dialog box, expand the
builddirectory and select thetwitter4j-core.jarfile. What I refer to as your
 twitter4j-core.jarfile is probably namedtwitter4j-core-4.0.2.jaror something similar. -
Click OK to close the Select Path dialog box.
Doing so adds your
twitter4j-core.jarfile to the list of items on the Dependencies tab. -
In the Project Structure dialog box, click OK.
Now Twitter4J’s
.jarfile is part of your project. (See Figure 4-2.)

Figure 4-1: Adding a dependency.
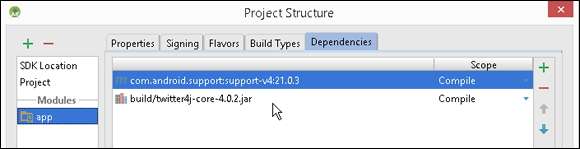
Figure 4-2: Your project depends on Twitter4J.
The manifest file
Listing 4-1 contains the AndroidManifest.xml file for this chapter’s Twitter app.
Listing 4-1: The AndroidManifest.xml File
<?xml version="1.0" encoding="utf-8"?>
<manifest xmlns:android=
"http://schemas.android.com/apk/res/android"
package="com.allmycode.twitter">
<uses-permission android:name=
"android.permission.INTERNET"/>
<application
android:allowBackup="true"
android:icon="@drawable/ic_launcher"
android:label="@string/app_name"
android:theme="@style/AppTheme" >
<activity
android:name="com.allmycode.twitter.MainActivity"
android:label="@string/app_name"
android:windowSoftInputMode="adjustPan" >
<intent-filter>
<action android:name=
"android.intent.action.MAIN" />
<category android:name=
"android.intent.category.LAUNCHER" />
</intent-filter>
</activity>
</application>
</manifest>
In Listing 4-1, you find the same stuff that you find in other AndroidManifest.xml files. In addition, you find the following:
- The
uses-permissionelement warns Android that my app requires Internet connectivity. -
The
windowSoftInputModeattribute tells Android what to do when the user activates the onscreen keyboard.The
adjustPanvalue tells Android not to squash together all my screen’s widgets. (Take my word for it: The app looks ugly without thisadjustPanvalue.)
The main activity’s layout file
The layout file for this chapter’s example has no extraordinary qualities. I include it in Listing 4-2 for completeness. As usual, you can import this chapter’s code from my website (http://allmycode.com/Android
). But if you’re living large and creating the app on your own from scratch, you can copy the contents of Listing 4-2 to the project’s res/layout/activity_main.xml file. Alternatively, you can use Android Studio’s Designer tool to drag and drop, point and click, or type and tap your way to the graphical layout shown in Figure 4-3.
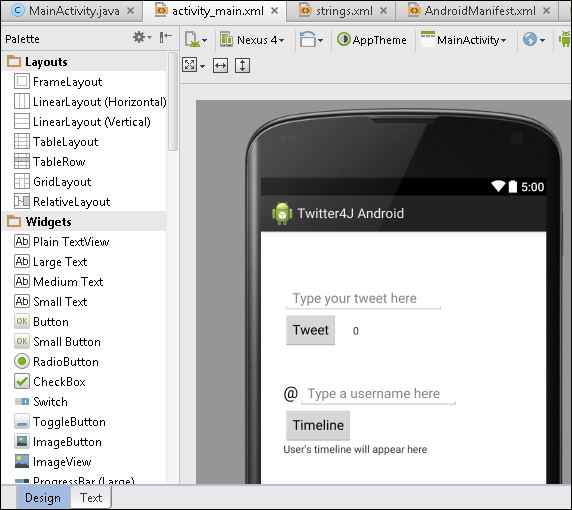
Figure 4-3: The graphical layout of the main activity’s screen.
Listing 4-2: The Layout File
<RelativeLayout xmlns:android=
"http://schemas.android.com/apk/res/android"
xmlns:tools="http://schemas.android.com/tools"
android:layout_width="match_parent"
android:layout_height="match_parent"
android:paddingBottom="@dimen/activity_vertical_margin"
android:paddingLeft="@dimen/activity_horizontal_margin"
android:paddingRight=
"@dimen/activity_horizontal_margin"
android:paddingTop="@dimen/activity_vertical_margin"
tools:context=".MainActivity" >
<TextView
android:id="@+id/textView2"
android:layout_width="wrap_content"
android:layout_height="wrap_content"
android:layout_alignBaseline="@+id/editTextUsername"
android:layout_alignBottom="@+id/editTextUsername"
android:layout_alignLeft="@+id/editTextTweet"
android:text="@string/at_sign"
android:textAppearance=
"?android:attr/textAppearanceLarge" />
<EditText
android:id="@+id/editTextUsername"
android:layout_width="wrap_content"
android:layout_height="wrap_content"
android:layout_above="@+id/timelineButton"
android:layout_toRightOf="@+id/textView2"
android:ems="10"
android:hint="@string/type_username_here" />
<TextView
android:id="@+id/textViewTimeline"
android:layout_width="wrap_content"
android:layout_height="wrap_content"
android:layout_alignLeft="@+id/timelineButton"
android:layout_below="@+id/timelineButton"
android:maxLines="100"
android:scrollbars="vertical"
android:text="@string/timeline_here" />
<Button
android:id="@+id/timelineButton"
android:layout_width="wrap_content"
android:layout_height="wrap_content"
android:layout_alignLeft="@+id/textView2"
android:layout_centerVertical="true"
android:onClick="onTimelineButtonClick"
android:text="@string/timeline" />
<Button
android:id="@+id/tweetButton"
android:layout_width="wrap_content"
android:layout_height="wrap_content"
android:layout_above="@+id/editTextUsername"
android:layout_alignLeft="@+id/editTextTweet"
android:layout_marginBottom="43dp"
android:onClick="onTweetButtonClick"
android:text="@string/tweet" />
<EditText
android:id="@+id/editTextTweet"
android:layout_width="wrap_content"
android:layout_height="wrap_content"
android:layout_above="@+id/tweetButton"
android:layout_alignParentLeft="true"
android:layout_marginLeft="14dp"
android:ems="10"
android:hint="@string/type_your_tweet_here" />
<TextView
android:id="@+id/textViewCountChars"
android:layout_width="wrap_content"
android:layout_height="wrap_content"
android:layout_alignBaseline="@+id/tweetButton"
android:layout_alignBottom="@+id/tweetButton"
android:layout_toRightOf="@+id/timelineButton"
android:text="@string/zero" />
</RelativeLayout>
How to Talk to the Twitter Server
Listing 4-3 contains a snippet of code from the main activity in this chapter’s example.
Listing 4-3: Some Fake Java Code (Yes, It’s Fake!)
Twitter twitter;
// … Some code goes here
ConfigurationBuilder builder =
new ConfigurationBuilder();
builder
.setOAuthConsumerKey("01qedaqsdtdemrVJIkU1dg")
.setOAuthConsumerSecret("TudeMgXgh37Ivq173SNWnRIhI")
.setOAuthAccessToken("1385541-ueSEFeFgJ8vUpfy6LBv6")
.setOAuthAccessTokenSecret("G2FXeXYLSHI7XlVdMsS2e");
TwitterFactory factory =
new TwitterFactory(builder.build());
twitter = factory.getInstance();
The code in Listing 4-3 creates an instance of the Twitter class.
Here’s some information regarding the Twitter4J API:
-
A
Twitterobject is a gateway to the Twitter servers.A call to one of the methods belonging to a
Twitterobject can post a brand-new tweet, get another Twitter user’s timeline, create favorites, create friendships, create blocks, search for users, and do other cool things. -
TwitterFactoryis a class that helps you create a newTwitterobject.As the name suggests,
TwitterFactoryis a factory class. In Java, a factory class is a class that can call a constructor on your behalf. -
Calling the
getInstancemethod creates a newTwitterobject.A factory method, such as
getInstance, contains the actual constructor call.
The ConfigurationBuilder, TwitterFactory, and Twitter classes belong to the Twitter4J API. If, instead of using Twitter4J, you use a different API to communicate with Twitter servers, you’ll use different class names. What’s more, those classes probably won’t match up, one for one, with the Twitter4J classes.
Using OAuth
When you run this chapter’s example, the code has to talk to Twitter on your behalf. And normally, to talk to Twitter, you supply a username and password. But should you be sharing your Twitter password with any app that comes your way? Probably not. Your password is similar to the key to your house. You don’t want to give copies of your house key to strangers, and you don’t want an Android app to remember your Twitter password.
So how can your app post a tweet without having your Twitter password? One answer is OAuth, a standardized way to have apps log on to host computers.
The big, ugly strings in Listing 4-3 are OAuth strings. You get strings like this from the Twitter website. If gobbledygook of the kind you see in Listing 4-3 is copied correctly, your app acquires revocable permission to act on behalf of the Twitter user. And the app never gets hold of the user’s password.
Now, here come the disclaimers:
-
A discussion of how OAuth works, and why it’s safer than using ordinary Twitter passwords, is far beyond the scope of this book.
I don’t pretend to explain OAuth and its mysteries in this chapter.
-
True app security requires more than what you see in Listing 4-3.
The goal of this chapter is to show how an app can talk to a social media site. In this chapter’s code, I use OAuth and Twitter4J commands to achieve that goal as quickly as I can, without necessarily showing you the “right” way to do it. For more comprehensive coverage of OAuth, visit
oauth.net: the official website for OAuth developers. -
The codes in Listing 4-3 don’t work.
I’m not prepared to share my own OAuth codes with the general public, so to create Listing 4-3, I took the general outline of my real
ConfigurationBuildercode and then ran my fingers over the keyboard to replace most of the characters in the OAuth strings.To run this chapter’s app, you must create your own set of OAuth keys and copy them into your Java code. The section entitled “Getting OAuth codes” outlines the steps.
Making a ConfigurationBuilder
In Listing 4-3, the chaining of set method calls, one after another, is called the builder pattern.
Here’s the basic idea. A configuration builder has lots of properties, and you can imagine several different ways of setting those properties. For example, you could have one enormous constructor:
// This is not correct Twitter4J code:
ConfigurationBuilder builder = new ConfigurationBuilder(
"01qedaqsdtdemrVJIkU1dg", "TudeMgXgh37Ivq173SNWnRIhI",
"1385541-ueSEFeFgJ8vUpfy6LBv6", "G2FXeXYLSHI7XlVdMsS2e");
This approach is really cumbersome because you must remember which string belongs in which position. In fact, it gets worse. A configuration builder has 46 different properties, and you may want to set more than four of these properties. However, a constructor with 46 parameters would be really awful.
Another possibility is to create a blank-slate configuration builder and then set each of its properties with separate method calls.
// This is not correct Twitter4J code:
ConfigurationBuilder builder = new ConfigurationBuilder();
builder.setOAuthConsumerKey("01qedaqsdtdemrVJIkU1dg");
builder.setOAuthConsumerSecret
("TudeMgXgh37Ivq173SNWnRIhI");
builder.setOAuthAccessToken
("1385541-ueSEFeFgJ8vUpfy6LBv6");
builder.setOAuthAccessTokenSecret
("G2FXeXYLSHI7XlVdMsS2e");
This is less awkward than having a giant constructor, but there’s a better way. In the Twitter4J API, the ConfigurationBuilder class has 46 set methods. Each method applies to an existing ConfigurationBuilder instance. And each method returns, as its result, a new ConfigurationBuilder instance. So, in Listing 4-3, the statement
ConfigurationBuilder builder =
new ConfigurationBuilder();
creates a blank-slate configuration builder. The next piece of code
builder
.setOAuthConsumerKey("01qedaqsdtdemrVJIkU1dg")
applies to the blank-slate instance. But the value of this piece of code is an instance with a particular OAuth consumer key. To this enhanced instance you apply
.setOAuthConsumerSecret("TudeMgXgh37Ivq173SNWnRIhI")
The combined code’s value is an even better instance — one with a particular OAuth consumer key and an OAuth consumer secret. And so on. Each application of a set method takes an existing instance and yields an instance with more and better properties. This elegant way of adding properties to an object is the builder pattern. It’s the idea behind the code in Listing 4-3.
Getting OAuth codes
For your Android app to communicate with Twitter servers, you need your own OAuth codes. To get them, follow this section’s steps.
 The following instructions apply to the Twitter web pages for developers at the time of this book’s publication. Twitter might change the design of its website at any time without notice. (At any rate, Twitter won’t notify me!)
- Sign in to your Twitter user account (or register for an account if you don’t already have one).
-
Visit
https://apps.twitter.com/app/new.If the stars are aligned harmoniously, you should see Twitter’s Create an Application page.
-
On the Create an Application page, fill in all required fields along with the (misleadingly optional) Callback URL field.
When I visit the page, I see the Name field, the Description field, the Website field, and the Callback URL field. All but the Callback URL field are listed as being required.
Making up an application name (for the Name field) isn’t challenging. But what do you use for the other fields? After all, you aren’t creating an industrial-strength Android app. You’re creating only a test app — an app to help you see how to use Twitter4J.
The good news is that almost anything you type in the Description field is okay. The same is true for the Website and Callback URL fields, as long as you type things that look like real URLs.
 I’ve never tried typing a
 twitter.comURL in either the Website or Callback URL fields, but I suspect that typing atwitter.comURL doesn’t work.To communicate with Twitter via an Android app, you need a callback URL. In other words, for this chapter’s example, the callback URL isn’t optional. Neither the Website field nor the Callback URL field has to point to a real web page. But you must fill in those two fields.
 This chapter’s app doesn’t work through a web browser. But, using OAuth, you can log a user into Twitter through a web browser. When the log in is successful, the user’s browser visits a particular page, and that page’s URL is the callback URL. The Callback URL field isn’t marked as being required. Nevertheless, you must type a URL (such as
 http://www.example.com) in the Callback URL field. -
After agreeing to the terms, and doing the other stuff to prove that you’re a good person, click the Create Your Twitter Application button.
Doing so brings you to a page where you see some details about your new application — the Details tab, in other words. For this example, the two most important items are your app’s access level and its consumer key.
In the OAuth world, an app whose code communicates with Twitter’s servers is a consumer. To identify itself as a trustworthy consumer, an app must send passwords to Twitter’s servers. In OAuth terminology, these passwords are called the consumer key and the consumer secret. -
On that same web page, select your application’s Permissions tab.
In the Permissions tab, you see a choice of access types.
-
Change your app’s access from Read Only (the default) to Read, Write and Access Direct Messages.
For this toy application, you select Read, Write and Access Direct Messages — the most permissive access model that’s available. This option prevents your app from hitting brick walls because of access problems. But when you develop a real-life application, you do the opposite — you select the least permissive option that suits your application’s requirements.
First change your app’s access level, and then create the app’s access token (as explained in Step 9). Don’t create the access token before changing the access level. If you try to change the access level after you’ve created the access token, your app won’t work. What’s worse, the dev.twitter.compage won’t warn you about the problem. Believe me — I’ve wasted hours of my life on this Twitter quirk. -
Click the button that offers to update your application’s settings.
Doing so changes your app’s access level to Read, Write and Access Direct Messages.
-
On that same web page, select the Keys and Access Tokens tab.
After selecting that tab, you see some new stuff on the page.
-
Click the Create My Access Token button.
After doing so, your app’s Keys and Access Tokens tab displays your app’s access token and the access token secret, in addition to your app’s access level, consumer key, and consumer secret.
-
Copy the four codes (Consumer Key, Consumer Secret, Access Token, and Access Token Secret) from your app’s Details tab to the appropriate lines in your app’s main activity.
The main activity is in this book’s very next section.
The Application’s Main Activity
Listing 4-4 contains the Twitter app’s Java code.
Listing 4-4: The MainActivity.java File
package com.allmycode.twitter;
import android.app.Activity;
import android.os.AsyncTask;
import android.os.Bundle;
import android.text.Editable;
import android.text.TextWatcher;
import android.text.method.ScrollingMovementMethod;
import android.view.View;
import android.widget.EditText;
import android.widget.TextView;
import java.util.List;
import twitter4j.Twitter;
import twitter4j.TwitterException;
import twitter4j.TwitterFactory;
import twitter4j.conf.ConfigurationBuilder;
public class MainActivity extends Activity {
TextView textViewCountChars, textViewTimeline;
EditText editTextTweet, editTextUsername;
Twitter twitter;
@Override
protected void onCreate(Bundle savedInstanceState) {
super.onCreate(savedInstanceState);
setContentView(R.layout.activity_main);
editTextTweet =
(EditText) findViewById(R.id.editTextTweet);
editTextTweet.addTextChangedListener
(new MyTextWatcher());
textViewCountChars =
(TextView) findViewById(R.id.textViewCountChars);
editTextUsername =
(EditText) findViewById(R.id.editTextUsername);
textViewTimeline =
(TextView) findViewById(R.id.textViewTimeline);
textViewTimeline.setMovementMethod
(new ScrollingMovementMethod());
ConfigurationBuilder builder =
new ConfigurationBuilder();
builder
.setOAuthConsumerKey("01qedaqsdtdemrVJIkU1dg")
.setOAuthConsumerSecret("TudeMgXgh37Ivq173SNWnRIhI")
.setOAuthAccessToken("1385541-ueSEFeFgJ8vUpfy6LBv6")
.setOAuthAccessTokenSecret("G2FXeXYLSHI7XlVdMsS2e");
TwitterFactory factory =
new TwitterFactory(builder.build());
twitter = factory.getInstance();
}
// Button click listeners
public void onTweetButtonClick(View view) {
new MyAsyncTaskTweet().execute
(editTextTweet.getText().toString());
}
public void onTimelineButtonClick(View view) {
new MyAsyncTaskTimeline().execute
(editTextUsername.getText().toString());
}
// Count characters in the Tweet field
class MyTextWatcher implements TextWatcher {
@Override
public void afterTextChanged(Editable s) {
textViewCountChars.setText
("" + editTextTweet.getText().length());
}
@Override
public void beforeTextChanged
(CharSequence s, int start, int count, int after) {
}
@Override
public void onTextChanged
(CharSequence s, int start, int before, int count) {
}
}
// The AsyncTask classes
public class MyAsyncTaskTweet
extends AsyncTask<String, Void, String> {
@Override
protected String doInBackground(String… tweet) {
String result = "";
try {
twitter.updateStatus(tweet[0]);
result =
getResources().getString(R.string.success);
} catch (TwitterException twitterException) {
result = getResources().
getString(R.string.twitter_failure);
} catch (Exception e) {
result = getResources().
getString(R.string.general_failure);
}
return result;
}
@Override
protected void onPostExecute(String result) {
editTextTweet.setHint(result);
editTextTweet.setText("");
}
}
public class MyAsyncTaskTimeline
extends AsyncTask<String, Void, String> {
@Override
protected String doInBackground(String… username) {
String result = new String("");
List<twitter4j.Status> statuses = null;
try {
statuses = twitter.getUserTimeline(username[0]);
} catch (TwitterException twitterException) {
result = getResources().
getString(R.string.twitter_failure);
} catch (Exception e) {
result = getResources().
getString(R.string.general_failure);
}
for (twitter4j.Status status : statuses) {
result += status.getText();
      result += "
";
}
return result;
}
@Override
protected void onPostExecute(String result) {
editTextUsername.setText("");
textViewTimeline.setText(result);
}
}
}
Twitter’s network protocols require that the device that runs this chapter’s app is set to the correct time. I don’t know how correct the “correct time” has to be, but I’ve had lots of trouble running the app on emulators. Either my emulator is set to get the time automatically from the network (and it gets the time incorrectly) or I set the time manually and the seconds part of the time isn’t close enough. One way or another, the error message that comes back from Twitter (usually specifying a null authentication challenge) isn’t helpful. So I avoid lots of hassle by avoiding emulators whenever I test this code. Rather than run an emulator, I set my phone or tablet to get the network time automatically. Then I run this chapter’s app on that phone or tablet. I recommend that you do the same.
When you run the app, you see two areas. One area contains a Tweet button; the other area contains a Timeline button, as shown in Figure 4-4.

Figure 4-4: The main activity in its pristine state.
In Figure 4-4, the text in both text fields is light gray. This happens because I use android:hint attributes in Listing 4-2. A hint is a bunch of characters that appear only when a text field is otherwise empty. When the user clicks inside the text field, or types any text inside the text field, the hint disappears.
Type a tweet into the text field on top; then press the Tweet button, as shown in Figure 4-5. If your attempt to tweet is successful, the message Success! replaces the tweet in the text field, as shown in Figure 4-6. If, for one reason or another, your tweet can’t be posted, a message such as “Failed to tweet” replaces the tweet in the text field, as shown in Figure 4-7.

Figure 4-5: The user types a tweet.

Figure 4-6: The app indicates a successful tweet.

Figure 4-7: The app brings bad tidings to the user.
Next, type a username in the lower text field and click Timeline. If all goes well, a list of the user’s most recent tweets appears below the Timeline button, as shown in Figure 4-8. You can scroll the list to see more of the user’s tweets.

Figure 4-8: A user’s timeline.
The onCreate method
The onCreate method in Listing 4-4 makes a MyTextWatcher instance to listen for changes in the field where the user types a tweet. Android notifies the MyTextWatcher instance whenever the user types characters in (or deletes characters from) the app’s editTextTweet field. Later in Listing 4-4, the actual TextChangedListener class’s afterTextChanged method counts the number of characters in the editTextTweet field. The method displays the count in the tiny textViewCountChars field. (With the advent of Twitter, the number 140 has become quite important.)
This chapter’s app doesn’t do anything special if a user types more than 140 characters into the editTextTweet field. In a real-life app, I’d add code to handle 141 characters gracefully, but when I create sample apps, I like to keep the code as uncluttered as possible.
Android actually notifies the MyTextWatcher instance three times for each text change in the editTextTweet field — once before changing the text, once during the change of the text, and once after changing the text. In Listing 4-4, I don’t make MyTextWatcher execute any statements before or during the changing of the text. In MyTextWatcher, the only method whose body contains statements is the afterTextChanged method. Even so, in order to implement Android’s TextWatcher interface, the MyTextWatcher class must provide bodies for the beforeTextChanged and the onTextChanged methods.
Also, in the onCreate method, the call to setMovementMethod(new ScrollingMovementMethod()) permits scrolling on the list of items in a user’s timeline.
 For another way to make things scroll on the user’s screen, visit Chapter 1 in this minibook.
The last several lines in the onCreate method set up the Twitter object for communicating with Twitter’s server. To read about that, refer to this chapter’s “How to Talk to the Twitter Server” section.
The button listener methods
Listing 4-2 describes two buttons, each with its own onClick method. I declare the two methods in Listing 4-4 — the onTweetButtonClick method and the onTimelineButtonClick method. Each of the methods has a single statement in its body — a call to execute a newly constructed AsyncTask of some kind. Believe me, this is where the fun begins!
My Twitter app’s AsyncTask classes
In Chapter 3 of this minibook, I describe Android’s AsyncTask. An AsyncTask is what you use when something takes too much time during the run of your app. For example, the user requests a web page. Who knows how long it takes to fetch the page? The service that hosts the web page might be experiencing high volume. Or the user might be on a train passing through a tunnel. All kinds of things might slow down the page’s retrieval. And during this retrieval, the user might want to click buttons, scroll a document, or do something else that demands a response from your app.
You can’t stop the show while your app waits for a web page, fetches a Twitter timeline, or updates the user’s Twitter status. That’s why you code the network request inside an AsyncTask.
Android’s AsyncTask is versatile enough to deal with all types of values. In fact, the documentation defines an AsyncTask this way:
android.os.AsyncTask<Params,Progress,Result>
The definition has three generic type placeholders — Params, Progress, and Result. When you create your own AsyncTask, you “fill in the blanks” by specifying actual types in place of Params, Progress, and Result. Listing 4-4 contains two AsyncTask classes — one to post the user’s tweet, and another to get a Twitter user’s timeline. This gives you two opportunities to specify Params, Progress, and Result types. (Don’t you love the way I call them “opportunities”?)
Posting a new tweet
To add a tweet on behalf of the user, you grab a Twitter object (the instance that you made with factory.getInstance()), and you call the instance’s updateStatus method. You don’t want this network request to interrupt the flow of your main activity, so you put the request inside an AsyncTask. In Listing 4-4, the task’s name is MyAsyncTaskTweet. The task’s three generic types are as follows: String, Void, and String:
public class MyAsyncTaskTweet
    extends AsyncTask<
String, Void, String> {
-
The first type (
String) represents a 140-character tweet.The code
execute(editTextTweet.getText().toString())grabs a string of characters from one of the activity’s text fields and passes that string to
MyAsyncTaskTweet. InsideMyAsyncTaskTweet, thedoInBackgroundmethod calls that stringtweet[0]and uses thattweet[0]string to update the user’s status. In Listing 4-4, the parameter to the updateStatusmethod is an array element. That’s because, in thedoInBackgroundmethod’s header,tweetis a varargs parameter. The word varargs means “variable number of arguments.” You can pass as many values todoInBackgroundas you want. In the body of the method, you treattweetas though it’s an ordinary array. The firsttweetvalue istweet[0]. If there were a secondtweetvalue, it would betweet[1], and so on. -
The second type (
Void) stands for a value (or values) that mark the background thread’s progress in completing its work.This chapter’s example has no progress bar, nor a progress indicator of any kind. So in Listing 4-4, the second type name is
Void. In Java, the Voidclass is a wrapper class for thevoidvalue. Put that in your black hole of nothingness! -
The third type (
String) stands for a phrase such as Success! or Failed to tweet.The
doInBackgroundmethod finds the string associated with eitherR.string.success,R.string.twitter_failure, orR.string.general_failureand returns this string as its result. Then theonPostExecutemethod displays this string in the screen’seditTextTweetfield.
Figure 4-9 summarizes the way generic type names influence the methods' types in Listing 4-4, and Figure 4-10 summarizes how values move from one place to another in the MyAsyncTaskTweet class of Listing 4-4.

Figure 4-9: The use of types in MyAsyncTaskTweet.

Figure 4-10: The flow of values in MyAsyncTaskTweet.
Getting a user’s timeline
If you’ve seen one AsyncTask, you’ve seen 'em all! In Listing 4-4, the MyAsyncTaskTimeline class is almost identical to the MyAsyncTaskTweet. The only differences are as follows:
- In
MyAsyncTaskTweet, the parameter passed todoInBackgroundis treated as a tweet. But inMyAsyncTaskTimeline, the parameter passed todoInBackgroundis a username. The code passes this username to thegetUserTimelinemethod. - In
MyAsyncTaskTweet, the value returned fromdoInBackgroundis a success or failure message. But inMyAsyncTaskTimeline, the value returned fromdoInBackgroundis a string full of tweets (a timeline).
In Listing 4-4, the code to fetch a user’s timeline looks something like this:
List<twitter4j.Status> statuses = null;
statuses = twitter.getUserTimeline(username[0]);
A fellow named Yusuke Yamamoto developed Twitter4J (or at least, Yusuke Yamamoto was the Twitter4J project leader), and at some point, Mr. Yamamoto decided that the getUserTimeline method returns a collection of twitter4J.Status objects. (Each twitter4J.Status instance contains one tweet.) So, to honor the contract set by calling the getUserTimeline method, the code in Listing 4-4 declares statuses to be a collection of twitter4J.Status objects.
A few lines later in the code, an enhanced for statement steps through the collection of statuses values and appends each value’s text to a big result string. The loop adds "
" (Java’s go-to-the-next-line character) after each tweet for good measure. In the onPostExecute method, the code displays the big result string in the screen’s textViewTimeline field.
In Listing 4-4, in the second doInBackground method, I use the fully qualified name twitter4j.Status. I do this to distinguish the twitter4J.Status class from Android’s own AsyncTask.Status class (an inner class of the AsyncTask class).
In Java, an inner class is a class declared inside of another class. For more insight into Java’s inner classes, refer to Chapter 4 in Book II.
An AsyncTask can be fairly complicated. But when you compare Android’s AsyncTask to the do-it-yourself threading alternatives, the AsyncTask idea isn’t bad at all. In fact, when you get a little practice and create a few of your own AsyncTask classes, you get used to thinking that way. The whole business starts to feel quite natural.