Chapter 3
Developing for Android TV
In This Chapter
![]() Running Android apps for television sets
Running Android apps for television sets
![]() Running Android Studio’s TV app
Running Android Studio’s TV app
![]() Creating an Android TV app
Creating an Android TV app
Do you remember the first time you heard about “the cloud”? I’m not referring to condensed water vapor. I’m referring to that collection of hardware and software that feeds us our contacts, our calendars, and our bookmarks wherever we go. Some buzzwords like the word “cloud” enter our psyches without fuss or fanfare. Other buzzwords knock us on the head and say “Pay attention to me. I will become important.”
I had an interesting response when I first heard about the ten-foot experience. I was at a seminar on Amazon Fire TV, and I was wondering why anyone needed a ten-foot TV screen. I had seen 70-inch TV screens in stores and wanted to know how a ten-foot device would fit into the average consumer’s living room.
Of course, I was getting the story all wrong. In the phrase ten-foot experience, “ten feet” doesn’t refer to the screen size. It refers to the user’s distance from the device. The basic idea is, when a user isn’t right up against a screen (the way we are with computer monitors and cellphone screens), the user interface must be designed accordingly. You can’t have lots of detail on a television screen because the user can’t see very much detail. In addition, most TVs don’t have the kinds of input facilities that computers (or even smartphones) have. A remote control or a game controller is a crude instrument compared with a keyboard, a mouse, or even a virtual keypad on a smartphone screen. So when you design an app for Android TV, you can’t expect the user to do much scrolling or typing.
The ten-foot experience plays an important role in the creation of good Android TV apps. For many apps, the user doesn’t do any continuous (smooth) scrolling. Instead, scrolling jumps from one item to the next. Of course, when the user searches for his or her favorite program, you need text or speech input. For text input, a keyboard appears on the screen, and the user scrolls from key to key (a slow and tedious process). For speech input, the user says a phrase out loud. When the device’s voice recognizer gets the phrase all wrong, the user says the phrase a second time (much louder this time). Yelling titles into a remote control device can be embarrassing if you’re living in a house with other people.
Anyway, in this chapter, I provide a brief introduction to Android’s TV app development environment.
Getting Started
To get started with Android TV development, plug an Android TV device into your development computer. If you don’t have such a device (or you don’t want to move the device from your living room to your office), create an Android TV AVD on your development computer. To do so, follow the steps that you follow in Chapter 2 of this minibook for creating an Android Wear AVD. (The only change is to select TV instead of Wear when you pick a device category.)
After creating an AVD, you’re ready to start a TV project. Follow the same steps that you follow for creating a Phone and Tablet project, but make the following changes:
- In the Target Android Devices dialog box, remove the Phone and Tablet check mark, and put a check mark in the TV box.
- When you reach the Add an Activity dialog box, select Android TV Activity.
You probably would have done these things without reading about them in this chapter. One way or another, you get a skeletal app with an enormous amount of meat on its bones. (The word “skeletal” doesn’t do justice to this newly created app.) The Project tool window’s tree is shown in Figure 3-1.

Figure 3-1: Android Studio’s skeletal TV app.
Running the Skeletal App
Television sets don’t have touch screens. So when you start up the emulator and click your mouse on the TV screen’s icons, you find the emulator to be particularly unresponsive. Look for a small panel of buttons on the edge of the emulator window. Figure 3-2 has an example.

Figure 3-2: An Android TV emulator’s buttons.
In Figure 3-2, the capsule-shaped button and the left/right/up/down buttons surrounding that capsule do most of the work. Use these directional buttons to scroll from one screen item to another. Use the capsule-shaped button as a kind of Enter key.
If you look at the emulator’s Home screen, you might see an icon displaying the words Videos by Your Company. (See Figure 3-3.)

Figure 3-3: The skeletal app’s icon.
When you click the Videos by Your Company icon, the emulator fires up the activity shown in Figure 3-4.

Figure 3-4: The skeletal app’s main activity.
The app’s layout has several rows. In Figure 3-4, the top row has the heading Category Zero and has several Movie ABC entries. The next several rows don’t look like real rows. In fact, only one of the headings (Category Zero) appears immediately to the left of its corresponding items. The Category Two row heading appears roughly midway between the top and bottom of the screen, but the movie items in the Category Two row appear near the bottom of the screen. This happens because the items are taller than the headings, and the layout tries to keep as many headings on the screen as possible. When the user scrolls from one heading to another (say, from Category Zero to Category Two), the rows of items scroll proportionately so that the Category Two heading is immediately to the left of its Category Two items.
In Figure 3-4, Category Zero is highlighted. If you scroll rightward from Category Zero, you see a highlighted version of a video (the leftmost video in the Category Zero row). See Figure 3-5.

Figure 3-5: You’ve scrolled to one of the videos.
If you press Enter with a video selected, you see a detail screen for that particular video. (See Figure 3-6.)
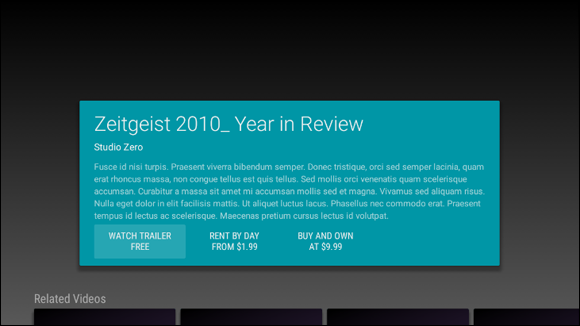
Figure 3-6: A detail screen.
None of the videos in the fictional app really exist, so the detailed description of each video is mumbo-jumbo. (According to Google Translate, the first few sentences in Figure 3-6 are Latin for “Clinical this traffic. This cartoon always drink. Unfortunately, sad, clinical, but always the latest and the mass of Zen as it has been, it is not the earth, who Planning relax.” Does this sound like a movie that you’d want to rent or buy?)
The emulator’s Back button returns you to the grid full of videos. If you scroll downward, you eventually reach a list of preferences. (See Figure 3-7.)

Figure 3-7: Some preferences.
The richness of Android Studio’s skeletal TV app might seem strange. But (I think) there’s method to this madness. It’s all about the ten-foot experience, also known as the lean-back experience.
When you use a computer, you’re in work mode. You lean forward and try to accomplish something. (It might be something frivolous, but it’s an accomplishment nevertheless.) When you watch television, you’re not in work mode. You want to minimize any accomplishment phase. Your primary purpose is to lean back and enjoy the show. You want to relax. So, with Android TV, it’s especially important that the user interface is unobtrusive. You want every interface to look like every other interface. That way, you can use simple reflexes to navigate from category to category, from movie to movie, and from a highlighted movie to details about the movie. If the skeletal app has so much pre-built scaffolding, it’s to make that scaffolding be the same for every app’s interface. With such a familiar interface, users can ignore the app’s interface and relax with their favorite movies.
Creating a TV App
The skeletal TV app that Android Studio creates contains too much code for leisurely bedside reading. In this section, I present an app that’s scaled down from Android Studio’s skeletal app. My app illustrates the backbone features in the skeletal app. Figures 3-8 and 3-9 illustrate my simple app’s behavior.

Figure 3-8: A super simple sample.

Figure 3-9: The user moves to a movie item.
 You can download my simple app from this book’s web site (
allmycode.com/android
). What the heck? You can download all the apps in this book from the book’s web site!
My app starts with the layout shown in Listing 3-1.
Listing 3-1: The Layout for This Section’s App
<LinearLayout xmlns:android=
"http://schemas.android.com/apk/res/android"
android:layout_width="match_parent"
android:layout_height="match_parent"
android:orientation="vertical">
<fragment android:name=
"android.support.v17.leanback.app.BrowseFragment"
android:id="@+id/browse_fragment"
android:layout_width="match_parent"
android:layout_height="match_parent" />
</LinearLayout>
The layout contains only one element — an instance of Android’s pre-declared BrowseFragment class. A BrowseFragment is an elaborate layout element consisting of one or more rows. Each row has a header and several “movie” items. (Refer to Figure 3-8.)
The app’s main activity grabs the layout’s BrowseFragment and populates it with data. The main activity is in Listing 3-2.
Listing 3-2: The Main Activity
package com.allmycode.catalogbrowser;
import android.app.Activity;
import android.app.FragmentManager;
import android.os.Bundle;
import android.support.v17.leanback.app.BrowseFragment;
import
android.support.v17.leanback.widget.ArrayObjectAdapter;
import android.support.v17.leanback.widget.HeaderItem;
import android.support.v17.leanback.widget.ListRow;
import android.support.v17.leanback.widget.ListRowPresenter;
public class BrowseMediaActivity extends Activity {
protected BrowseFragment mBrowseFragment;
@Override
protected void onCreate(Bundle savedInstanceState) {
super.onCreate(savedInstanceState);
setContentView(R.layout.browse_fragment);
final FragmentManager fragmentManager =
getFragmentManager();
mBrowseFragment = (BrowseFragment) fragmentManager.
findFragmentById(R.id.browse_fragment);
mBrowseFragment.
setHeadersState(BrowseFragment.HEADERS_ENABLED);
mBrowseFragment.
setTitle(getString(R.string.app_name));
mBrowseFragment.setBadgeDrawable(getResources().
getDrawable(R.drawable.ic_launcher, null));
buildRowsAdapter();
}
private ArrayObjectAdapter mRowsAdapter;
private static final int NUM_ROWS = 4;
private void buildRowsAdapter() {
mRowsAdapter =
new ArrayObjectAdapter(new ListRowPresenter());
for (int i = 0; i < NUM_ROWS; ++i) {
ArrayObjectAdapter listRowAdapter =
new ArrayObjectAdapter(new CardPresenter());
listRowAdapter.add("Media Item " + i + ".1");
listRowAdapter.add("Media Item " + i + ".2");
listRowAdapter.add("Media Item " + i + ".3");
HeaderItem header =
new HeaderItem(i, "Category " + i);
mRowsAdapter.add
(new ListRow(header, listRowAdapter));
}
mBrowseFragment.setAdapter(mRowsAdapter);
}
}
Each row consists of a heading and a bunch of individual items. For example, in Figure 3-8, shown earlier, the selected row’s heading contains the text Category 1, and the row’s items (like all other items) display the slanted Movie! graphic. The code in Listing 3-2 puts these things onto the screen.
In Listing 3-2, the body of the buildRowsAdapter method contains a for loop. The loop performs an iteration for each row. During one loop iteration, three calls to listRowAdapter.add create the movies in a row, and a call to the HeaderItem constructor creates a category heading (such as the Category 1 heading in Figure 3-8). At the end of a loop iteration, the call to mRowsAdapter.add puts the entire row onto the user’s screen.
The Adapter and the Presenter
Central to the mission of the code in Listing 3-2 are the notions of an Adapter and a Presenter. An Adapter stores data, and a Presenter displays the data that an Adapter stores. That’s the way Android’s TV classes separate data from presentation.
It’s a classic principle of app development:
Data and presentation don’t belong in the same parts of your code.
If you interleave your data code with your presentation code, it’s difficult to modify the presentation without messing up the data. Data is data, whether it’s displayed on a 70-inch TV or a one-inch watch screen.
Imagine dealing with data about a movie as in Figure 3-6, shown earlier. In a more realistic app, the data might include the title, the release date, a synopsis, the actors' names, a link to a trailer, and other information. A user might view the data on an Android TV. But in another setting, the same user might view the same data on a computer, a smartphone, or whatever other device is available. With the presentation code separated from the data code, you can provide several alternatives for displaying the same data. With one class to store the data, you can plug in a big TV display one time, a smartphone display another time, and a 10-inch laptop display the next time. You can offer the user a choice of interfaces — one for daytime browsing and another for nighttime perusal. You’re ready for any kind of display because the code to control the data doesn’t care what display logic is behind it.
Imagine changing the way you store each movie’s release date. Instead of storing an ordinary Gregorian calendar date, you decide to store each movie’s Star Trek star date. (According to one online calculator, the first Matrix movie was released in the United States on star date –323754.8.) With the data decoupled from the display, you don’t have to inform your display code about this data storage change. The data code already has a method named getReleaseDate, and the presentation code calls this method during the app’s run. While you’re setting up the data code to handle star dates, you modify the getReleaseDate method to convert between star dates and Gregorian dates. The display code doesn’t know about this change, and what the display code doesn’t know won’t hurt it.
Using the Adapter class
Figure 3-10 illustrates the relationships among classes used in Listing 3-2.

Figure 3-10: Adapters, presenters, and other good stuff.
For an adapter, TV apps normally use the ArrayObjectAdapter class (a member of the android.support.v17.leanback.widget package). When you construct a new ArrayObjectAdapter, you supply a Presenter in the constructor call.
private ArrayObjectAdapter mRowsAdapter;
…
mRowsAdapter =
new ArrayObjectAdapter(new ListRowPresenter());
…
ArrayObjectAdapter listRowAdapter =
new ArrayObjectAdapter(new CardPresenter());
Thus, each ArrayObjectAdapter has its own Presenter.
But that’s not all. Each Presenter constructs its own ViewHolder. (The ViewHolder class is an inner class of the Presenter class. Each Presenter actually constructs its own Presenter.ViewHolder.)
A ViewHolder holds a view. (Don’t look so surprised!) An instance of the ViewHolder class has no methods of its own and has only one public field. The public field is the view field. A ViewHolder instance’s view field refers to whatever view the ViewHolder is holding. A presenter displays views, and a presenter gets its views from the ViewHolder. You can think of the ViewHolder as a cache for views. The ViewHolder stores views so that you don’t have to call findViewById to get a view.
But wait! Why would you avoid calling findViewById?
Calling findViewById means digging into the hierarchy of elements in an XML file, and this hierarchy might be fairly deep. So calling findViewById can be computationally expensive. You don’t mind calling findViewById once or twice in an onCreate method, but you don’t want to call findViewById repeatedly as movie items (views) scroll on and off of a screen. What’s more, there’s room on the screen for only a certain number of movie items. As one item scrolls onto one side of the screen, another item scrolls off the other side of the screen. This means that views can be recycled and reused. The view that you see leaving the left edge of the screen might be the same view that you eventually see entering on the right side. (The view has been recycled, so the movie on that view isn’t the same from one appearance of that view to the next.) The ViewHolder manages this recycling behavior so that precious views don’t go to waste, and calls to findViewById are unnecessary.
In Listing 3-2, a call to an adapter’s add method adds an object to the adapter. This adding process happens in two ways.
- In my not-so-realistic code, adding a movie to a row means adding a string.
listRowAdapter.add("Media Item " + i + ".1"); -
After adding movies to a row, you add the row to the grid.
mRowsAdapter.add(new ListRow(header, listRowAdapter));The
mRowsAdaptervariable refers to the entire grid. In addition to several movies, each row of the grid has aheader. In the previously shown Figure 3-8, the highlighted row’s header is the text Category 1.
When you’re done calling the add methods in Listing 3-2, you have the adapters shown in Figure 3-11.

Figure 3-11: A conceptual representation of the grid in Figure 3-8.
Using the Presenter class
When you construct a new ArrayObjectAdapter, you supply a presenter in the constructor call. Thus, an ArrayObjectAdapter has its own presenter. Keep that idea in mind while you read the following facts:
- The presenter belonging to a row of items handles the presenting of an individual item (a movie, for example).
- The presenter belonging to an entire grid handles the presenting of an individual row in the grid.
I illustrate these facts in Figure 3-12. In the figure, each listRowAdapter stores an entire row of movies. But each listRowAdapter has one CardPresenter instance. At any given time, that CardPresenter instance handles the display of a single movie item.

Figure 3-12: The relationship between adapters and presenters.
 A card is a rectangular area in which an object’s data are displayed. In Figure 3-5, the highlighted card’s title is Zeitgeist 2010_ Year in Review.
In Figure 3-12, the mRowsAdapter stores several rows. But the mRowsAdapter has one ListRowPresenter instance. At any given time, that ListRowPresenter instance handles the display of a single row.
You don’t have to define the ListRowPresenter class. That class is declared in Android’s own android.support.v17.leanback.widget package. But you do have to define a CardPresenter class. Listing 3-3 contains my simple app’s CardPresenter class.
Listing 3-3: The Presenter
package com.allmycode.catalogbrowser;
import android.content.Context;
import android.support.v17.leanback.widget.ImageCardView;
import android.support.v17.leanback.widget.Presenter;
import android.view.View;
import android.view.ViewGroup;
public class CardPresenter extends Presenter {
private static Context mContext;
private static int CARD_WIDTH = 313;
private static int CARD_HEIGHT = 176;
static class ViewHolder extends Presenter.ViewHolder {
private ImageCardView mCardView;
public ViewHolder(View view) {
super(view);
mCardView = (ImageCardView) view;
}
}
@Override
public ViewHolder onCreateViewHolder(ViewGroup parent) {
mContext = parent.getContext();
ImageCardView cardView = new ImageCardView(mContext);
cardView.setFocusable(true);
cardView.setFocusableInTouchMode(true);
return new ViewHolder(cardView);
}
@Override
public void onBindViewHolder
(Presenter.ViewHolder viewHolder, Object item) {
((ViewHolder) viewHolder).mCardView.
setTitleText((String) item);
((ViewHolder) viewHolder).mCardView.
setMainImageDimensions(CARD_WIDTH, CARD_HEIGHT);
((ViewHolder) viewHolder).mCardView.
setMainImage(mContext.getResources().
getDrawable(R.drawable.movie_poster, null));
}
@Override
public void onUnbindViewHolder
(Presenter.ViewHolder viewHolder) {
//No unbinding code needed in this simple example
}
}
The presenter in Listing 3-3 has three required methods:
-
The
onCreateViewHoldermethod does what its name suggests. It creates aViewHolderinstance.The
ViewHolderinstance has a view. How nice! -
The
onBindViewHoldermethod binds data to aViewHolderinstance.In Listing 3-3, the view in the
ViewHoldergets the properties that you see in Figure 3-9. In particular, the card’s title becomesMovie Item 1.1(or whatever other string you pass in Listing 3-2). The card’s background becomesR.drawable.movie_poster(my own image — the diagonal word Movie! on a white background). -
The
onUnbindViewHoldermethod can do some cleanup when the data in a view becomes obsolete.In Listing 3-3, the
onUnbindViewHoldermethod does nothing. But in a more complicated example, theonUnbindViewHoldermethod sets fields tonulland releases resources that were being hogged by the view. For example, if your movie item plays music, you probably callMediaPlayer.createin theonBindViewHoldermethod. So, in theonUnbindViewHoldermethod, you call theMediaPlayerclass’sreleasemethod.