
Lesson 22
HTML5 Audio
The third section of the book will cover many of the multimedia enhancements added in HTML5, beginning with HTML5's audio capabilities.
Audio has been part of the web almost since browsers first appeared but, unlike images that are natively supported by the browser, audio support has always been provided by third-party plugins such as QuickTime. Browser plugins are supported by the HTML object tag, and are used to support a wide selection of media types such as audio, video, PDF files, and animations.
There are a number of problems with plugins, however:
- They often rely on the user installing a plugin manually, and this can be an inconvenience for users. Additionally, users are typically required to update plugins independently of the browser's update cycle, which can lead to further frustration.
- Plugins can effectively do anything they want on the computer running the browser (or at least, anything that the browser could do). This presents a security loophole, and has been exploited on many occasions.
- Plugins can cause stability issues in browsers because a bug in a plugin can cause the browser to crash.
- Plugins are not standards-based for the most part, and therefore they encourage lock-in to proprietary formats.
In order to counteract these issues, HTML5 supports an audio tag (along with a video tag, as you will see in the next lesson). The audio tag is intended to remove the need for plugins, and has begun to find widespread adoption.
File Formats
Although HTML5 specifies an audio tag, it does not specify an audio format. In fact, it does not even specify a single default format that all browsers are required to support.
As you will see, this is not such a problem for audio because the two most popular formats are well supported, but it is a bigger issue for video.
There are good reasons why there are multiple audio formats. Different formats compress audio in different ways, and these in turn present trade-offs in terms of quality on the one hand, and file size on the other.
Because raw audio files are extremely large, it is almost always necessary to compress them in some manner. This compression fits into two main categories:
- Lossless compression: This means the size of the audio file is reduced, but no audio quality is lost. This is similar to zipping a text file: The file size is reduced, but the text can be fully recovered at a later date.
- Lossy compression: This means that some information is lost during the compression process, but the algorithm tries to lose information that will not be noticed by the listener. Most audio formats use lossy compression.
The other main difference between audio formats relates to patents and licensing:
- Some audio formats require a license or the payment of royalties to create or stream files using the audio format.
- Some audio formats are protected by patents but are available royalty free.
- Some audio formats are unencumbered by patents and royalties completely.
This can present problems to browser vendors, particularly in the open source world, and is the reason Firefox historically has not supported some of the most popular file formats.
Before looking at the various formats, it is important to distinguish two different types of format. This will become even more important when you start looking at video:
- Container formats: A container format is used for storing the data, and dictates the file extension. A container format is like an envelope: It contains the audio data along with any other relevant information about the file.
- Codec format: The codec format specifies the way in which the audio should be encoded and decoded.
In many cases a single container format supports many different codecs. One of the responsibilities of the container format, therefore, is to describe the codec format.
The most common audio codecs are as follows:
- MP3: This format is in many ways the de-facto standard for music files and uses lossy compression. The degree of loss can be specified when an MP3 file is created by specifying the bit rate per second. Many organizations have claimed patent rights over various aspects of the MP3 format, and a license is required to stream MP3 content on a commercial site.
- MP3 is technically a codec, but it does perform many of the functions of a container, and therefore does not need to be placed inside a container format.
- AAC (Advanced Audio Coding): This format is in many ways the successor to MP3, and generally achieves superior sound quality at equivalent bit rates. It is not necessary to pay royalties to stream AAC content, which makes it an attractive option over MP3.
- AAC files can exist as a raw bit stream (typically with the
.aacextension) but are usually packaged in the MPEG-4 container and given a variety of extensions such as.mp4,.m4p, and.m4a. - Vorbis: This is a free audio format that performs lossy compression. This format can technically be stored in any container format but is most commonly stored inside the OGG container format. It is also often used in conjunction with the WebM container format.
- Opus: This is another free, lossy format that has been standardized by IETF. Like Vorbis, Opus is supported by both the OGG and WebM container formats. As you will see in the next lesson, this is becoming increasingly popular for encoding the audio stream of a video.
Table 22.1 outlines the support of the various formats in the most common browsers.
Table 22.1: Audio Support in Browsers
| MP3 | ACC (MP4) | Vorbis (OGG, WebM) | Opus (OGG, WebM) | |
| Chrome | Yes | Yes | Yes | Yes |
| Firefox | Partial | Partial | Yes | Yes |
| Internet Explorer | Yes | Yes | No | No |
| Opera | Yes | Yes | Yes | Yes |
| Safari | Yes | Yes | Supported with the OGG container format | No |
The main outlier here is Firefox. Older versions of Firefox did not support the royalty encumbered audio formats, but newer versions of Firefox do support these formats, as long as the underlying operating system provides support (both OS X and Windows do).
Audio Tag
The following is a simple example of the audio tag in use:
<audio controls>
    <source src="test.ogg" type="audio/ogg">
Your browser does not support the audio element.
</audio>
The test.ogg audio file referred to can be downloaded from the book's website: This contains an audio version of one of the book's screencasts, so feel free to use your own audio file if you would prefer. This file uses the Vorbis codec and the OGG container format.
If you embed this in an HTML page, and open the page in Chrome, it will display as you see in Figure 22.1.

If, on the other hand, you open this in Internet Explorer, it will display as you see in Figure 22.2

This should not come as a surprise because the OGG format is not supported in Internet Explorer.
In order to circumvent this, it is possible to specify more than one audio file in a single audio tag. For example:
<audio controls>
    <source src="test.ogg" type="audio/ogg">
    <source src="test.mp4" type="audio/mp4">
Your browser does not support the audio element.
</audio>
The test.mp4 file can also be downloaded from the book's website and contains an AAC encoded audio stream inside an MP4 container.
Where multiple formats are provided, the browser will use the first version that it supports.
You will notice that this example specifies the MIME type of each audio file. Specifically, it contains information on the type of the container because the container itself contains information on the codec. Although it is optional, it is recommended that you add the type attribute. If it is omitted, the browser will sample each file until it finds one that is in a compatible format, and this will likely cause a delay.
You will notice that when the file is displayed in Chrome, it contains a set of components for controlling playback. This has been provided because the controls attribute has been added to the tag. If this was omitted, the controls would not be shown.
It is common to omit the controls if you want the audio to play in the background when the page loads. Although this is a major annoyance to many users, setting the autoplay attribute supports it:
<audio autoplay>In order to annoy users even further, the loop attribute can be added to make the audio track play in a loop indefinitely:
<audio autoplay loop>The final attribute supported by the audio tag is preload. This can be set to the following:
auto: A hint to the browser that it should load the audio when the page loads. This should be used if you are reasonably confident the user will play the file.none: A hint to the browser that it should not begin downloading the file until the user selects to play it.metadata: A hint to the browser that only metadata should be downloaded when the page loads.
Controlling Playback
Rather than relying on the default browser controls, it is possible to add your own set of controls and interact with the audio track via JavaScript. The audio element is represented in the DOM by an object that supports an assortment of methods, properties, and events.
In this section, you will write your own set of controls to create the interface shown in Figure 22.3.

This contains the following controls:
- A progress bar that shows how far through the track is as it plays
- Three hyperlinks for controlling playback
Start by creating the following page and save it as audio.html:
<!DOCTYPE html>
<html lang="en">
    <head>
        <meta charset="utf-8">
        <script src="jquery-2.1.1.js"></script>
    </head>
    <body>
        <audio id="audioTrack">
            <source src="test.ogg" type="audio/ogg">
            <source src="test.mp3" type="audio/mpeg">
                 Your browser does not support the audio element.
        </audio>
        <div id="controls">
            <progress></progress>
            <div id="buttons" style="padding:5px;">
                <a href="#" id="play">Play</a>
                <a href="#" id="pause">Pause</a>
                <a href="#" id="stop">Stop</a>
           </div>
        </div>
    </body>
</html>
In order to simplify your interaction with the DOM, you will use jQuery so ensure that the jQuery file is in the same directory as audio.html.
Once you confirm that the page looks as expected, you can start adding JavaScript to the page, so create a script block immediately before the closing body tag.
You will begin by writing the code for updating the progress bar. This will be triggered via a timeupdate event generated by the audio element. As the track plays, the audio element will generate one of these events approximately every second.
In order to register an event listener for this event, you can use the following code:
$("audio").on('timeupdate', function(evt){
});By default, a progress bar starts at 0 and ends at 1 so you need to find:
- How long the audio file is: This is supported by the
durationproperty on the DOM object and returns the time in seconds. - How much of the audio has been played so far: This is supported by the
currentTimeproperty on the DOM object and also returns the time in seconds.
The target of the event will be the DOM object representing the audio tag; therefore, the properties can be accessed directly from this. Once you know the value of these two properties, you can simply divide the current position by the total duration (which will be a value between 0 and 1) and update the value of the progress bar.
$("audio").on('timeupdate', function(evt){
    var duration = evt.target.duration;
    var current = evt.target.currentTime;
    $('progress').val(current/duration);
});
You can now add jQuery click listeners to the three hyperlinks as follows:
$('#play').click(function(evt) {
    evt.preventDefault();
    $("audio")[0].play();
});
$('#pause').click(function(evt) {
    evt.preventDefault();
    $("audio")[0].pause();
});
$('#stop').click(function(evt) {
    evt.preventDefault();
    $("audio")[0].currentTime = 0;
    $("audio")[0].pause();
});
The play functionality simply invokes the play method on the underlying DOM object, and the pause functionality uses the pause method. The stop functionality is slightly more complex; in this case, you want to:
- Pause the audio if it is playing.
- Set the current position back to the start of the audio file. As you can see, the
currentTimeproperty is writable.
The functionality of these controls will be enhanced in the Try It section, and additional API methods will be introduced in the next lesson, but this example gives you an idea of how simple it is to interact with an audio file.
Try It
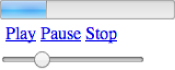
In this Try It, you will enhance the controls by adding a range input field. The user will be able to use this component to select the position in the audio file that they want to jump to. Figure 22.4 shows the finished version of the audio controls.
Lesson Requirements
You need to have created the audio.html file outlined in this lesson. Alternatively, you can download audio_pre.html from the book's website, along with the audio files.
Step-by-Step
- Start by adding an
inputelement with atypeattribute set torange. This should have aminattribute set to 0, and amaxattribute set to 100. - You need to add an event listener for detecting changes to the input field. This can be achieved by selecting the
rangeinput field with jQuery and using thechangemethod to specify an event listener. - Start by finding the value of the
rangeinput field using the jQueryvalmethod. Store the value in a local variable. - Find the duration of the audio file using the
durationproperty on the native DOM object. Remember that you need to access this property on the native DOM object, not the jQuery wrapper. - Given that the value of the range field is a number between 0 and 100, you can consider this as a percentage. Therefore, work out what position you should set the audio file to in order to represent this percentage. For instance, if the audio file was 90 seconds long, and the user chose a value of 50 with the range control, you would want to set the position to 45 seconds.
- Once you determine the position the audio file should be set to, set the
currentTimeproperty to this value. Additionally, call theplaymethod on the audio just in case it was not playing when the user interacted with therangeinput field.My input field looked like this:
<input type="range" min="0" max="100" value="0" id="setLocation"/>And my event listener looked like this:
$('#setLocation').change(function(evt) {
    var val = $(evt.target).val();
    var duration = $("audio")[0].duration;
    var location = duration*(parseInt(val)/100);
    $("audio")[0].currentTime = location;
    $("audio")[0].play();
});