
CHAPTER 8
Using Widgets and Menus
After a web page’s main content, the next most important elements visitors see are in sidebars and footers. WordPress widgets make it easy to manage these areas, whereas the WordPress menu system gives you full control over the navigation that helps visitors find what they need.
Understand Widgets and Widget Areas
Get to Know the Widgets Screens
Manage Widgets from the Customizer
Understand Widgets and Widget Areas
A lot happens on websites outside of the main content area — in the header, footer, and sidebars. Whether you include a feed from your social media accounts, a sign-up form, or a search function for e-commerce, these features play an important role on your site, and in WordPress are performed by widgets.
Widgets

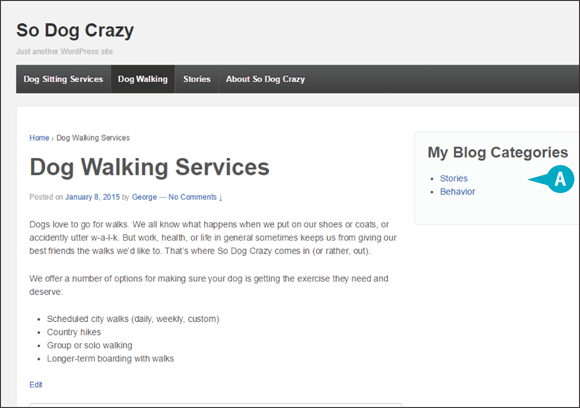
Think of widgets as individual apps that perform a specific function, such as displaying a list of your post categories or a countdown timer to a certain date. Usually the widget provides settings that allow you to customize it, such as choosing how to display categories or writing a message to go with a countdown timer. Widgets are easily added, removed, or rearranged through the WordPress interface.
Standard Widgets for WordPress.com Sites
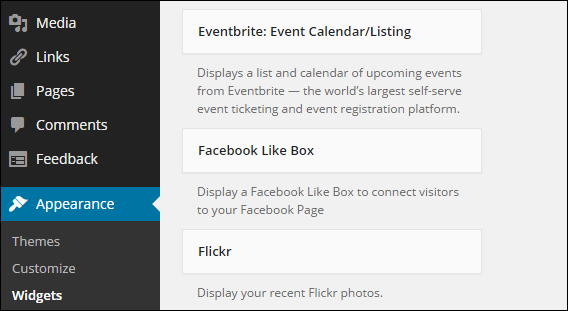
WordPress.com sites come with more than 30 widgets, many of which connect to your social media accounts or other sites, like Flickr or Goodreads. Although new widgets are added to the system from time to time, you cannot add your own widgets.
Standard Widgets for WordPress.org Sites
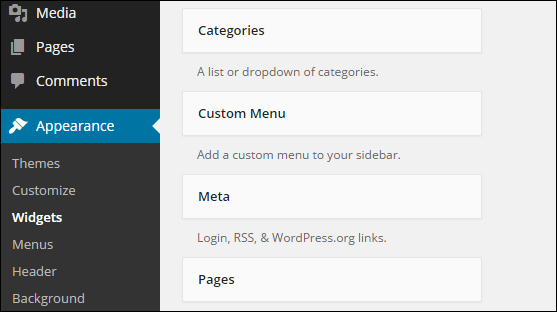
WordPress.org sites come with fewer standard widgets, such as categories, recent comments, or custom menus. However, you can add as many widgets as you want using plugins, and many themes add their own widgets as well.
Widget Areas
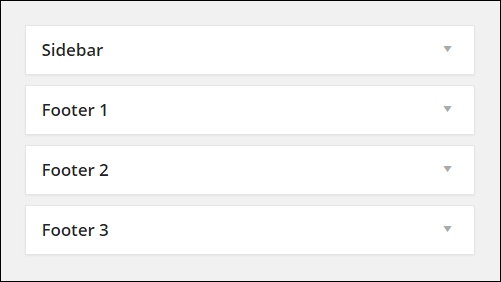
A widget area is a location on your site where widgets can be placed. What widget areas you have is determined by your theme. On WordPress.com sites, this is usually limited to the sidebar or footer. On WordPress.org sites, themes may also have widget areas in the header, above or below the content area, or widget areas that appear only on certain pages.
Custom Widget Areas
WordPress.org sites offer themes and plugins that allow you to create your own widget areas. If you get a developer to customize or create a theme, you can put widget areas wherever you want or have them restricted to whatever pages or sections of your site you want.
Restricting Widget Visibility
On WordPress.com sites, every widget can be set to appear only under certain circumstances: on specific pages or if a certain category is being viewed or to certain users. You can add the same functionality to WordPress.org sites using plugins. For example, you probably do not want testimonials in the sidebar to appear on the testimonials page.
Get to Know the Widgets Screens
You can manage widgets from two different locations in WordPress: the Widget screen and from the Widgets section of the Customizer. To access the Widgets screen, click Widgets under Appearance in the left admin menu. To access widgets in the Customizer screen, click Customize under Appearance and then click the arrow beside Widgets.
The Widgets Screen
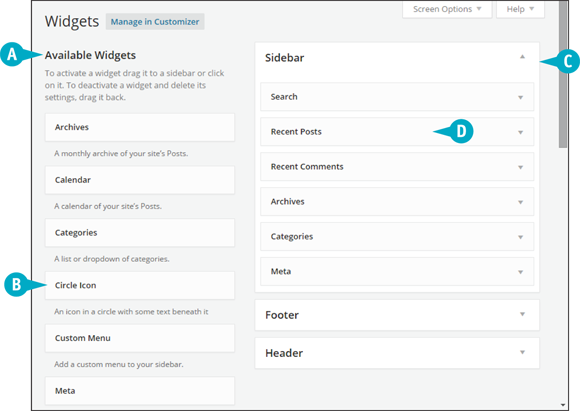
![]() The left side of the screen contains all Available Widgets, listed in alphabetical order. On
The left side of the screen contains all Available Widgets, listed in alphabetical order. On WordPress.org sites, what you see here varies depending on your theme and the plugins you have. Below this area, but not visible here, is the Inactive Widgets area, where you can store widgets with their settings saved.
![]() Individual widgets show as rectangular buttons that you drag over to one of the widget areas, or click one to see a list of widget areas you can add it to. A short description below each gives some details about what the widget does.
Individual widgets show as rectangular buttons that you drag over to one of the widget areas, or click one to see a list of widget areas you can add it to. A short description below each gives some details about what the widget does.
![]() The right side of the screen displays all available widget areas. Widgets are dragged or assigned to these areas. On
The right side of the screen displays all available widget areas. Widgets are dragged or assigned to these areas. On WordPress.org sites, what areas you have vary depending on your theme and the plugins you have.
![]() When you arrive at the Widgets screen, WordPress automatically has the topmost widget area open. A widget area displays all its widgets vertically, and this is the order in which they are displayed on your site. Clicking a widget reveals its settings, and dragging a widget allows you to rearrange the order.
When you arrive at the Widgets screen, WordPress automatically has the topmost widget area open. A widget area displays all its widgets vertically, and this is the order in which they are displayed on your site. Clicking a widget reveals its settings, and dragging a widget allows you to rearrange the order.
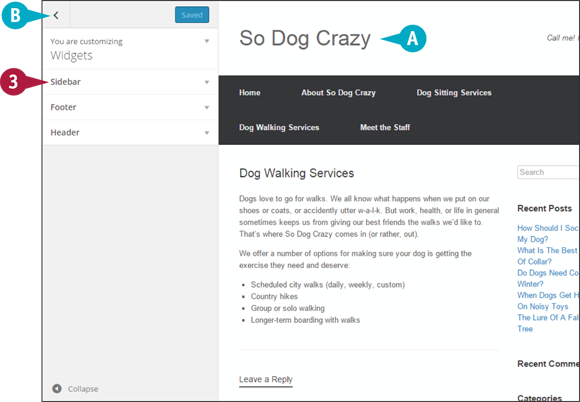
Widgets in the Customizer
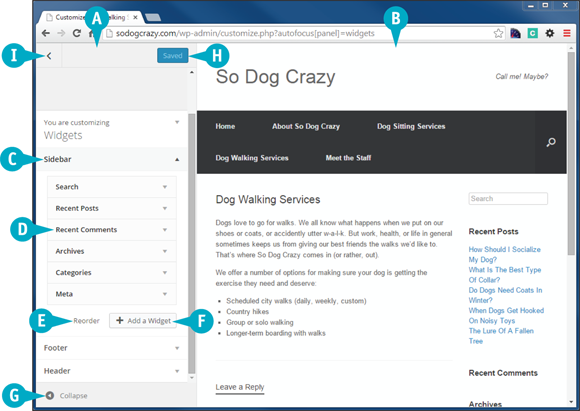
![]() The left side of the Customizer screen contains all available widget areas, and within them, the widgets that have been added. On
The left side of the Customizer screen contains all available widget areas, and within them, the widgets that have been added. On WordPress.org sites, the widget areas vary depending on your theme and the plugins you have.
![]() The right side of the screen displays a preview of your site, which you can navigate and view all pages. As you work with widgets, you see your changes in real time, but nothing affects your live site until you save.
The right side of the screen displays a preview of your site, which you can navigate and view all pages. As you work with widgets, you see your changes in real time, but nothing affects your live site until you save.
![]() Widget areas toggle open and closed. When you arrive at the Widgets screen, WordPress automatically has the topmost widget area open.
Widget areas toggle open and closed. When you arrive at the Widgets screen, WordPress automatically has the topmost widget area open.
![]() Widgets are displayed in their widget areas, and you click a widget to reveal its configuration settings.
Widgets are displayed in their widget areas, and you click a widget to reveal its configuration settings.
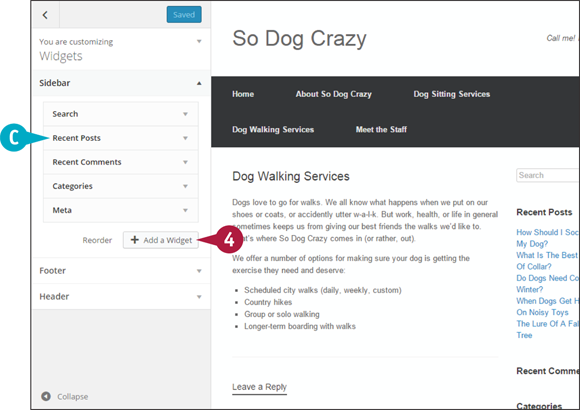
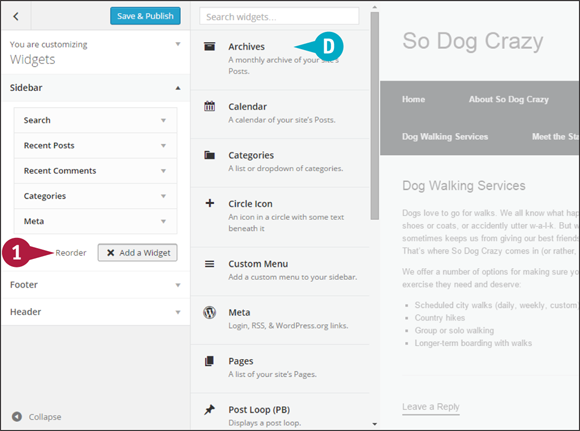
![]() Click Reorder if you want to rearrange the widgets in a particular area. A widget area displays all its widgets vertically, and this is the order in which they are displayed on your site.
Click Reorder if you want to rearrange the widgets in a particular area. A widget area displays all its widgets vertically, and this is the order in which they are displayed on your site.
![]() The Add a Widget button slides open a list of all available widgets. On
The Add a Widget button slides open a list of all available widgets. On WordPress.org sites, the available widgets vary depending on your theme and the plugins you have.
![]() When the left side of the Customizer is not collapsed, the preview you get tends to be the mobile version of your theme. Click the Collapse link to collapse the widget areas and view your site in desktop format.
When the left side of the Customizer is not collapsed, the preview you get tends to be the mobile version of your theme. Click the Collapse link to collapse the widget areas and view your site in desktop format.
![]() When you are finished, click the Save and Publish button. This makes all your changes live on the site. You remain on the Customizer screen and the button changes to Saved.
When you are finished, click the Save and Publish button. This makes all your changes live on the site. You remain on the Customizer screen and the button changes to Saved.
![]() When you finish all changes, click
When you finish all changes, click ![]() to return to the primary Customizer screen. Clicking Close (
to return to the primary Customizer screen. Clicking Close (![]() ) on that screen returns you to the regular WordPress admin screen.
) on that screen returns you to the regular WordPress admin screen.
Choose and Add Widgets
You can add or remove widgets any time from either the Widgets screen or the Customizer. This section covers the Widgets screen, but you can get the Customizer details in the section “Manage Widgets from the Customizer” later in this chapter.
Choose and Add Widgets
Add Widgets to a Widget Area
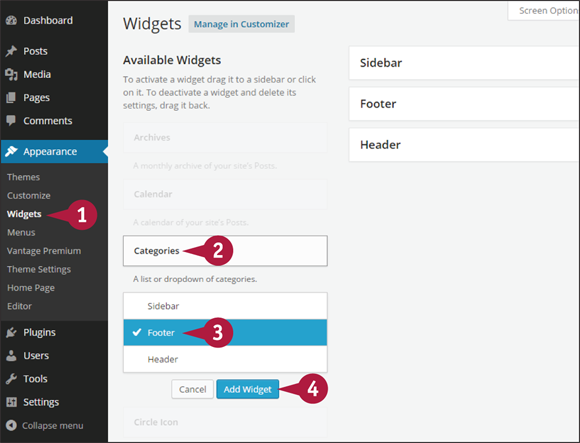
![]() In the left admin menu, click Widgets under Appearance.
In the left admin menu, click Widgets under Appearance.
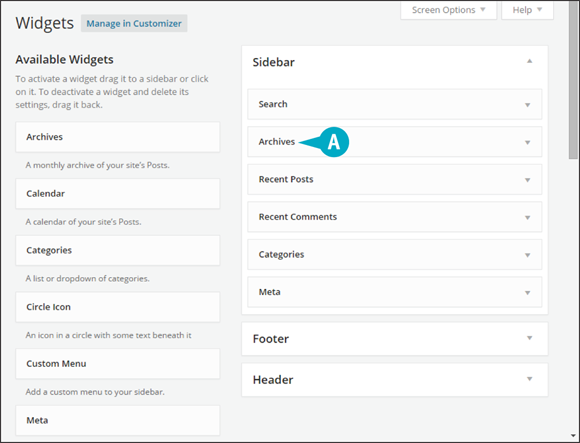
![]() Click a widget in the list of available widgets.
Click a widget in the list of available widgets.
The other widgets are grayed out and a list of widget areas appears.
![]() Click the name of the widget area you want. The name is highlighted and a check mark appears.
Click the name of the widget area you want. The name is highlighted and a check mark appears.
![]() Click Add Widget.
Click Add Widget.
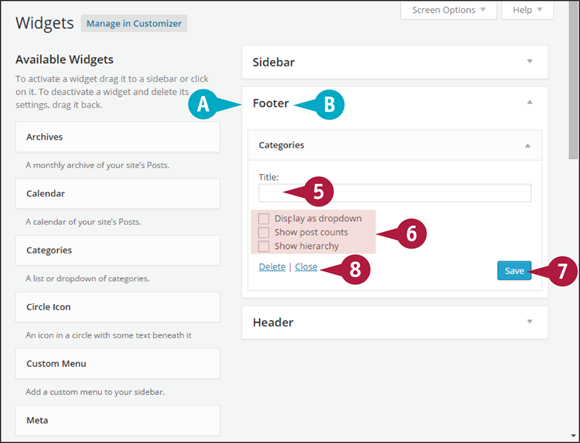
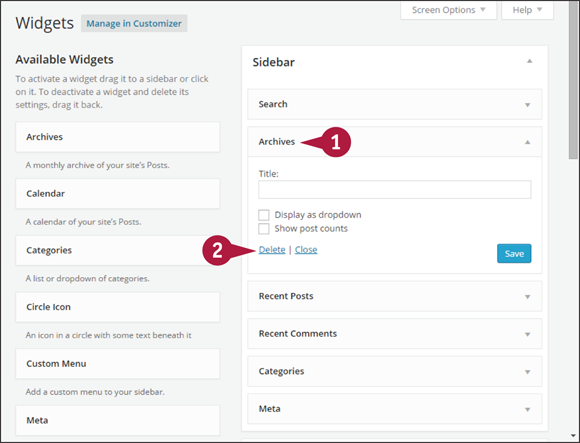
![]() The widget area opens and the widget settings appear.
The widget area opens and the widget settings appear.
Note: The widget is added to the bottom of any existing widgets. You can then drag it to change the order of its appearance.
![]() Type a title for the widget.
Type a title for the widget.
![]() Choose the settings (
Choose the settings (![]() changes to
changes to ![]() ).
).
Note: Widget settings vary widely. In a few cases there are not even any to choose.
![]() Click Save.
Click Save.
A circular icon appears next to Save to indicate when the saving process is complete.
![]() Click Close.
Click Close.
![]() You can also click the header of the widget to collapse it.
You can also click the header of the widget to collapse it.
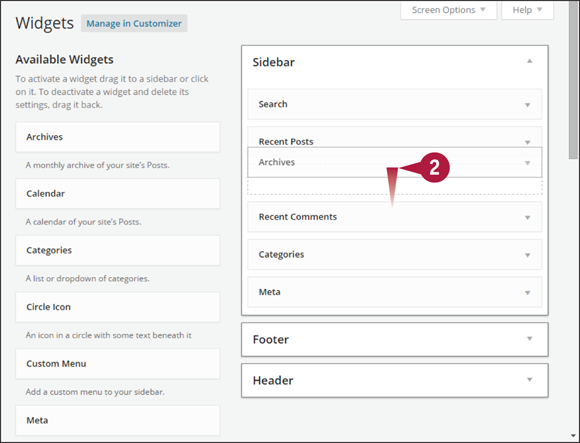
Drag Widgets to a Widget Area
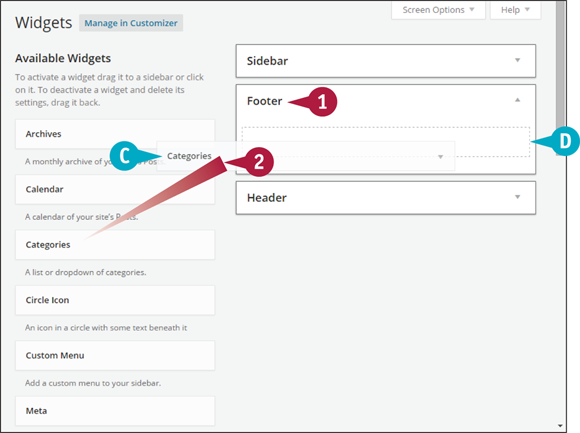
![]() Open the widget area where you want your widget to appear.
Open the widget area where you want your widget to appear.
![]() Click and drag the widget you want.
Click and drag the widget you want.
![]() A transparent copy of the widget moves with your mouse pointer.
A transparent copy of the widget moves with your mouse pointer.
![]() When the widget reaches the widget area, a box with a dotted line appears, indicating where your widget will be placed.
When the widget reaches the widget area, a box with a dotted line appears, indicating where your widget will be placed.
![]() When the widget is in the location you want, release the mouse button.
When the widget is in the location you want, release the mouse button.
Use Accessibility Mode
Note: If you have turned off JavaScript in your browser or if there is a problem with JavaScript, the Widgets screen will not work. You can, however, still work in accessibility mode.
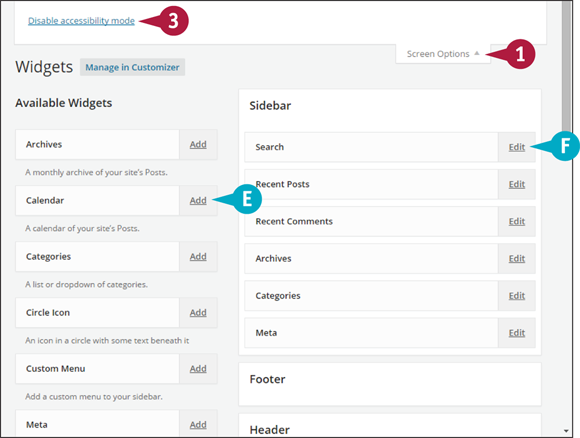
![]() Click Screen Options.
Click Screen Options.
![]() Click the Enable accessibility mode link at the top left.
Click the Enable accessibility mode link at the top left.
![]() Available widgets on the left have Add links.
Available widgets on the left have Add links.
![]() Widgets in widget areas on the right have Edit links.
Widgets in widget areas on the right have Edit links.
![]() Click Disable accessibility mode to return to default widget behavior.
Click Disable accessibility mode to return to default widget behavior.
Rearrange and Remove Widgets
Changing the order of widgets in a widget area is as easy as dragging and dropping. The same is true for deleting a particular widget.
Rearrange and Remove Widgets
Rearrange a Widget
![]() Click and hold on the widget that you want to move.
Click and hold on the widget that you want to move.
![]() Drag the widget to the position you want it to have in the widget area.
Drag the widget to the position you want it to have in the widget area.
The widget becomes transparent as you drag it.
![]() When a rectangle with a dotted line appears at the desired location, release the mouse button.
When a rectangle with a dotted line appears at the desired location, release the mouse button.
![]() The widget appears in its new position in the widget area.
The widget appears in its new position in the widget area.
Remove a Widget without Retaining Its Settings
![]() Click a widget to open it, if it is not already.
Click a widget to open it, if it is not already.
![]() Click the Delete link at the bottom left.
Click the Delete link at the bottom left.
The widget disappears and all settings are lost.
Note: You can also delete a widget by dragging it to Available Widgets. As you drag the widget, a Deactivate notice with the name of the widget appears beside the Available Widgets title.
Remove a Widget and Retain Its Settings
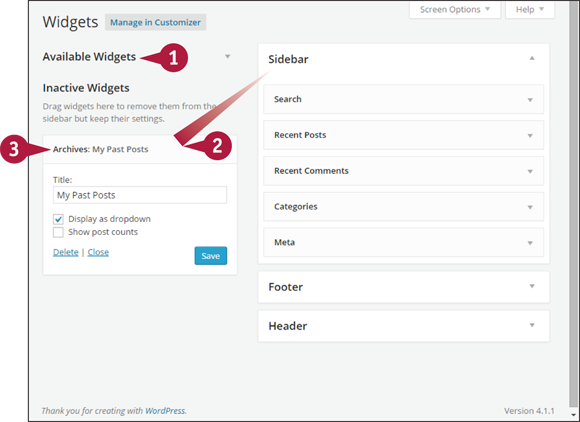
![]() Click the header area of Available Widgets to collapse that portion of the screen.
Click the header area of Available Widgets to collapse that portion of the screen.
The Inactive Widgets area moves up.
![]() Drag the widget from the widget area over to Inactive Widgets.
Drag the widget from the widget area over to Inactive Widgets.
![]() Click the widget to open it and verify that your settings have been retained.
Click the widget to open it and verify that your settings have been retained.
Note: If you want to use the widget again, you need to drag it to a widget area. The assign function does not work because the widget has settings.
Manage Widgets from the Customizer
WordPress is adding more and more functions into its Customizer screen, and managing widgets is one of the most recent additions.
Find the Widgets customizer screen by going to Customize under Appearance in the left admin menu. WordPress.org sites also include a Manage in Customizer button on the Widgets screen.
Manage Widgets from the Customizer
Choose and Insert Widgets
![]() In the left admin menu, click Customize.
In the left admin menu, click Customize.
Note: Once the Customizer screen opens, the left admin menu is gone. You can return to it by clicking ![]() at the top left.
at the top left.
![]() A live preview of your site appears on the right side of the screen.
A live preview of your site appears on the right side of the screen.
![]() Click Widgets on the left side of the screen to open the Widget panel.
Click Widgets on the left side of the screen to open the Widget panel.
You can now see all widget areas on the left.
![]() Click the widget area you want to manage.
Click the widget area you want to manage.
![]() If you need to return to the main Customizer screen, click
If you need to return to the main Customizer screen, click ![]() .
.
![]() Whatever widgets are in the widget area are now displayed in order of appearance.
Whatever widgets are in the widget area are now displayed in order of appearance.
![]() Click Add a Widget.
Click Add a Widget.
![]() A list of all available widgets appears.
A list of all available widgets appears.
You can click a widget to collapse the list; the open widget appears in the widget area, displaying its settings.
Note: There is no Save button on Customizer widgets. Any additions or changes are collectively saved by clicking Save & Publish at the top of the screen.
Reorder Widgets
![]() Click the Reorder link located at the bottom of each widget area.
Click the Reorder link located at the bottom of each widget area.

Each widget now displays three icons.
![]() Click
Click ![]() or
or ![]() to move one position.
to move one position.
![]() If you want to move the widget to a different widget area, click the external icon (
If you want to move the widget to a different widget area, click the external icon (![]() ).
).
![]() A list of widget areas appears. Select the one you want and click Move.
A list of widget areas appears. Select the one you want and click Move.
![]() When you finish reordering, click Done.
When you finish reordering, click Done.
Note: You can also reorder widgets within a widget area by clicking and dragging.
Understand Menus and Menu Locations
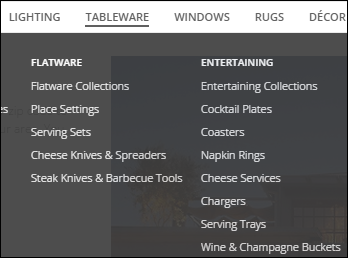
Clear and comprehensive navigation is vital to any website. WordPress makes it easy to create menus that help your visitors find the content they need. And menu items are not restricted to pages; virtually any element in WordPress — posts, categories, tags, and more — can be on a menu.
Menus
A menu is a group of links to various elements of your WordPress site, which you can create, edit, and rearrange from the Menus screen. There are default elements to choose from, such as pages, posts, categories, and tags. On WordPress.org sites, you may have other elements such as products or events, depending on the plugins available for a particular theme. You can build as many different menus as you want in WordPress.
Menu Locations
A menu location is a designated area in a theme where you can place any menu you create. Virtually every theme has at least one menu location in the header area of the site. How many other menu locations there are — in the footer, say, or a secondary menu in the header — depends on the theme. On WordPress.org sites, you can customize theme code to include more menu locations.
Custom Menu Widget
Although themes determine what menu locations are available, you can, on any WordPress site, place a menu in any available widget area using the custom menu widget. For example, you might want a menu of all your categories in a sidebar, or if your theme does not include a footer menu location, simply drop a custom menu widget into a footer widget area.
The Default Menu
To ensure there is some type of navigation for visitors, WordPress has a default menu that appears when you first set up a site. It automatically lists all WordPress pages in alphabetical order. The default menu disappears when you create and assign a menu to that location, and reappears if you ever delete your menu without replacing it.
Custom Links
In addition to adding any WordPress elements to a menu, you can create custom links. It could be a link to a special download file on your site, or it could be a link to a completely different site, such as a third-party shopping cart or another of your websites. Because all menu items can be targeted with CSS or even assigned their own classes, you could specially style a custom link to stand out from other menu items.
Know Your Limits
WordPress menus support multiple levels of dropdowns, which means they can get quite large. If you get beyond 60 or 70 items on a single menu, you could run into server security restrictions when trying to save such a large menu. You could ask your server to raise those restrictions, but a better plan is to rethink your menu. Could it be broken down into two menus or have separate menus for different areas of your site, with a simple main menu leading to each area?
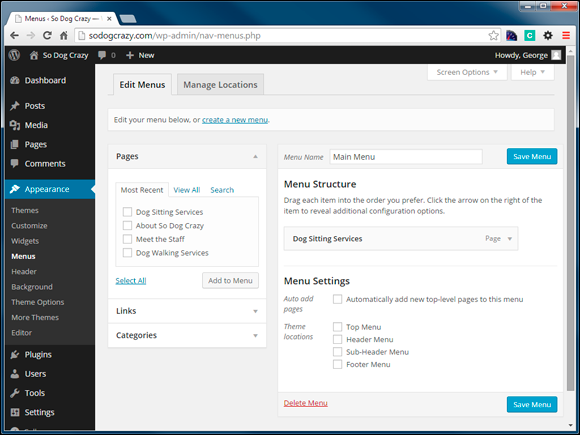
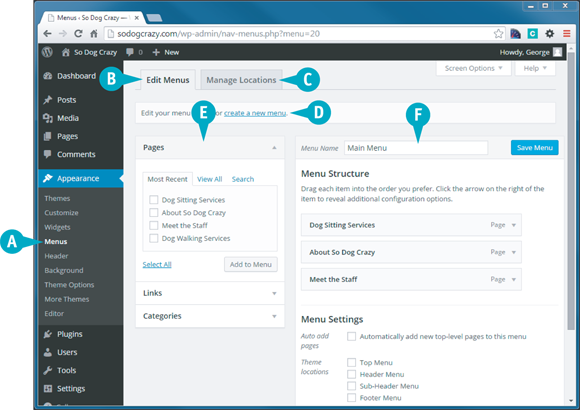
Get to Know the Menus Screen
The WordPress menu system is a powerful tool for managing the navigation on your site. Every element of your content is a potential menu item, and the configuration possibilities are endless.
Get to Know the Menus Screen
![]() Click Menus under Appearance on the left admin menu.
Click Menus under Appearance on the left admin menu.
![]() The Edit Menus tab displays the menu creation and editing panel.
The Edit Menus tab displays the menu creation and editing panel.
![]() The Manage Locations tab displays a set of dropdowns for managing the various menu locations created by your theme. Note: The Manage Locations tab appears only when you have created at least one menu, and not at all if your theme does not support menus or menu locations.
The Manage Locations tab displays a set of dropdowns for managing the various menu locations created by your theme. Note: The Manage Locations tab appears only when you have created at least one menu, and not at all if your theme does not support menus or menu locations.
![]() Click the create a new menu link to begin a new menu.
Click the create a new menu link to begin a new menu.
![]() For the Edit Menus tab, the left side of the screen displays available menu items. What is shown here varies depending on your Screen Options settings, and on
For the Edit Menus tab, the left side of the screen displays available menu items. What is shown here varies depending on your Screen Options settings, and on WordPress.org sites the available menu items also vary with themes and plugins.
![]() For the Edit Menus tab, the right side of the screen displays all the settings of the menu being edited.
For the Edit Menus tab, the right side of the screen displays all the settings of the menu being edited.
Tour the Dashboard
![]() Click Menus under Appearance on the left admin menu.
Click Menus under Appearance on the left admin menu.
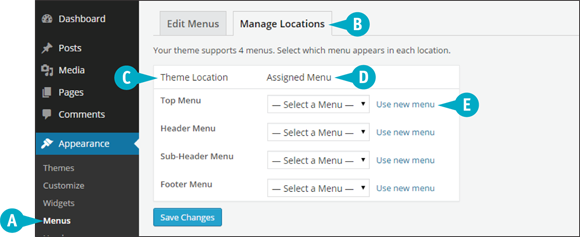
![]() The Manage Locations tab shows you which menus are assigned to which menu locations, and is one of the points where you can assign those locations.
The Manage Locations tab shows you which menus are assigned to which menu locations, and is one of the points where you can assign those locations.
![]() Every menu location provided by your theme is listed here.
Every menu location provided by your theme is listed here.
![]() The dropdown contains the names of all the menus you have created. From this you can assign a menu to a menu location. If a menu is already assigned, the dropdown says so.
The dropdown contains the names of all the menus you have created. From this you can assign a menu to a menu location. If a menu is already assigned, the dropdown says so.
![]() The Use New Menu link allows you to create a new menu.
The Use New Menu link allows you to create a new menu.
![]() Click Menus under Appearance on the left admin menu.
Click Menus under Appearance on the left admin menu.
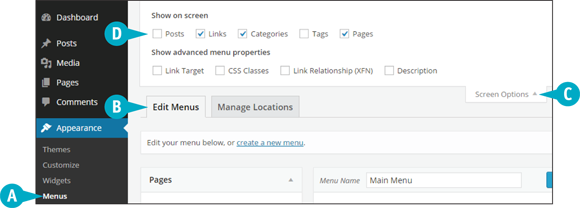
![]() The Edit Menus tab displays the menu creation and editing panel. When you are on the Edit Menus tab, WordPress by default does not show all available menu items. You can display them using Screen Options.
The Edit Menus tab displays the menu creation and editing panel. When you are on the Edit Menus tab, WordPress by default does not show all available menu items. You can display them using Screen Options.
![]() Clicking the Screen Options tab reveals the options for menus.
Clicking the Screen Options tab reveals the options for menus.
![]() Clicking the Show on screen check boxes toggles the appearance of different menu items. On
Clicking the Show on screen check boxes toggles the appearance of different menu items. On WordPress.org sites, the available menu items also vary with themes and plugins.
Create a Menu
You can create any number of menus in WordPress and assign any type and number of items to each. The easy-to-use interface helps keep you organized while you create navigation to help your visitors.
Create a Menu
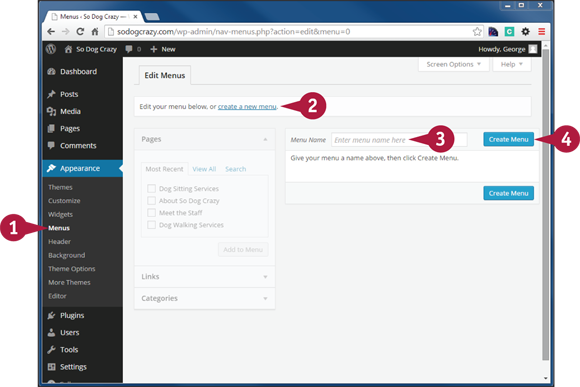
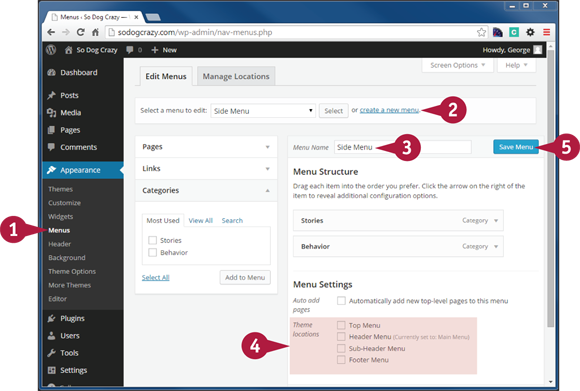
![]() In the left admin menu, click Menus under Appearance.
In the left admin menu, click Menus under Appearance.
![]() Click the create a new menu link.
Click the create a new menu link.
Note: When you have no menus yet, the screen is ready to create a menu and everything remains grayed out until you click Create Menu.
![]() Type a menu name. This is not displayed publicly, only to help you remember what the menu is for.
Type a menu name. This is not displayed publicly, only to help you remember what the menu is for.
![]() Click Create Menu.
Click Create Menu.
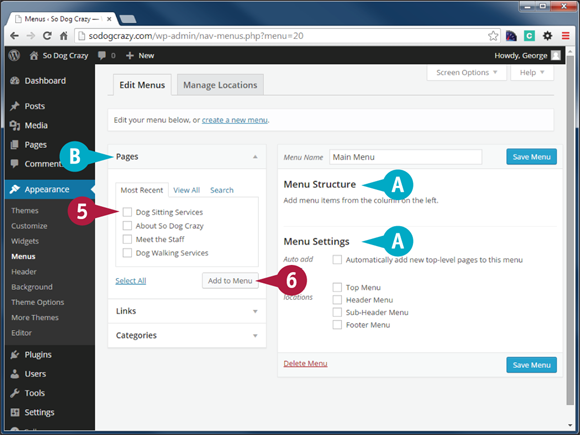
![]() You now see the Menu Settings and the Menu Structure areas.
You now see the Menu Settings and the Menu Structure areas.
![]() The menu items area now becomes active.
The menu items area now becomes active.
![]() To add a page to the menu, click the box next to it (
To add a page to the menu, click the box next to it (![]() changes to
changes to ![]() ).
).
![]() Click Add to Menu.
Click Add to Menu.

![]() The page item you chose in step 5 now appears as a menu item under Menu Structure.
The page item you chose in step 5 now appears as a menu item under Menu Structure.
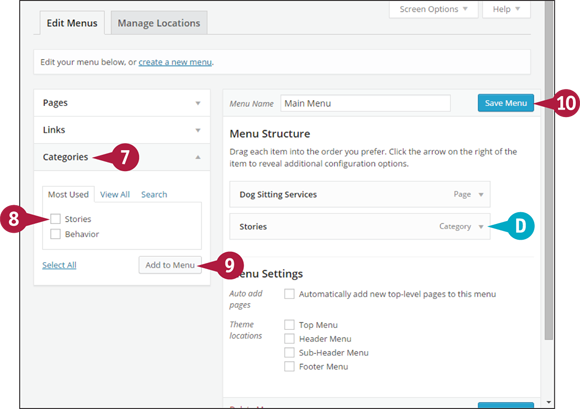
![]() Click the Categories section of the menu items area to open its settings and close Pages.
Click the Categories section of the menu items area to open its settings and close Pages.
![]() Click the box beside the category you want to add to your menu (
Click the box beside the category you want to add to your menu (![]() changes to
changes to ![]() ).
).
![]() Click Add to Menu.
Click Add to Menu.
![]() The category you chose in step 8 now appears at the bottom of the list of items in the Menu Structure.
The category you chose in step 8 now appears at the bottom of the list of items in the Menu Structure.
![]() Click Save Menu.
Click Save Menu.
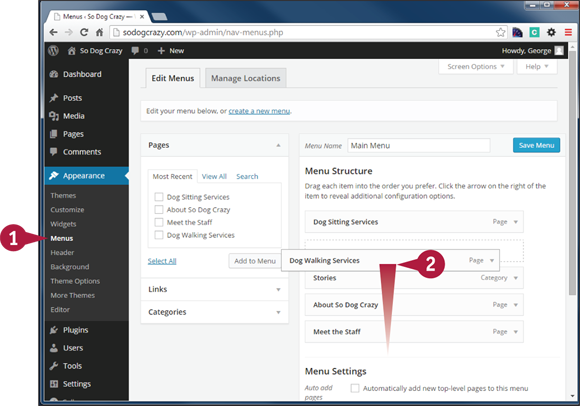
Reorder Menu Items
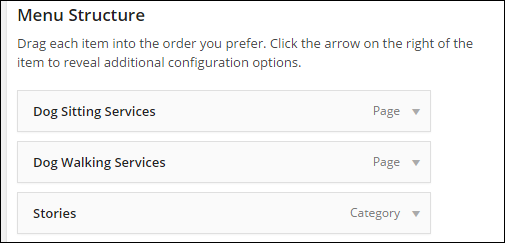
You can change the order of items on your menus in the same way you change the order of widgets: by dragging and dropping them. You can also have submenu items.
Reorder Menu Items
Reorder Menu Items
![]() In the left admin menu, click Menus under Appearance.
In the left admin menu, click Menus under Appearance.
![]() Click and hold on the menu item you want to move and then drag it to the position you want.
Click and hold on the menu item you want to move and then drag it to the position you want.
![]() When a rectangle with a dotted line appears at the desired location, release the mouse button.
When a rectangle with a dotted line appears at the desired location, release the mouse button.
The menu item appears in its new position.
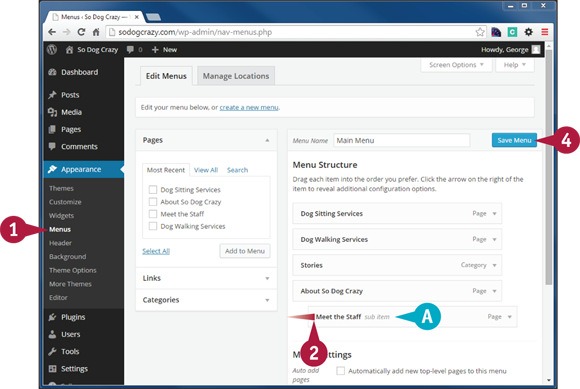
Create a Submenu Item
![]() In the left admin menu, click Menus under Appearance.
In the left admin menu, click Menus under Appearance.
![]() Click the menu item you want to appear as a dropdown and drag it below its parent menu item.
Click the menu item you want to appear as a dropdown and drag it below its parent menu item.
![]() Keep dragging to the right until you see an indented dotted box. Now you can release your mouse button.
Keep dragging to the right until you see an indented dotted box. Now you can release your mouse button.
![]() Click Save Menu.
Click Save Menu.
![]() The submenu item now appears with a right indent and the words “sub item” next to its name.
The submenu item now appears with a right indent and the words “sub item” next to its name.
Assign a Menu Location
WordPress themes provide one or more menu locations to which you can assign any menu you create. There are two ways to assign locations from the Menus screen.
Assign a Menu Location
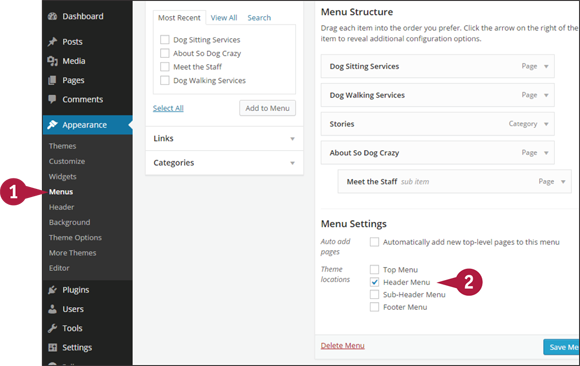
Assign a Location from Menu Settings
![]() In the left admin menu, click Menus under Appearance.
In the left admin menu, click Menus under Appearance.
![]() While creating or editing a menu, click the box of a menu location in Menu Settings (
While creating or editing a menu, click the box of a menu location in Menu Settings (![]() changes to
changes to ![]() ).
).
Note: WordPress tells you if a menu location is already assigned to another menu. You can assign the same menu to different locations.
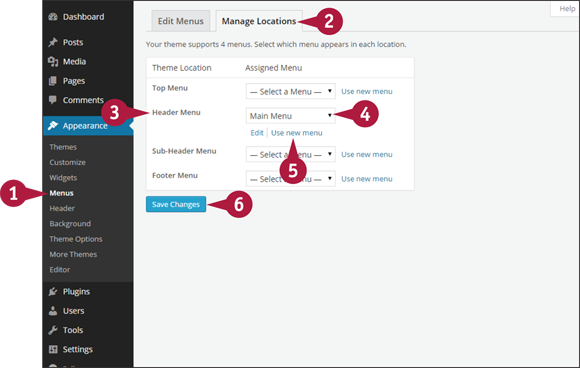
Assign a Menu from the Manage Locations Tab
![]() In the left admin menu, click Menus under Appearance.
In the left admin menu, click Menus under Appearance.
![]() Click the Manage Locations tab.
Click the Manage Locations tab.
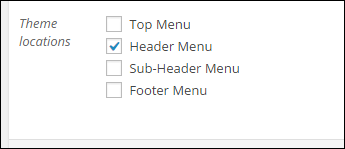
![]() Find the theme location you want to work with.
Find the theme location you want to work with.
![]() Click
Click ![]() and select the menu you want to assign. If a menu is currently assigned, its name appears in the dropdown.
and select the menu you want to assign. If a menu is currently assigned, its name appears in the dropdown.
Note: The Edit link takes you to a currently assigned menu for editing.
![]() If you want to create a new menu to assign here, click Use new menu.
If you want to create a new menu to assign here, click Use new menu.
![]() Click Save Changes.
Click Save Changes.
Edit and Delete Menu Items
The titles of pages and posts should be descriptive of the content, but that usually makes them too long for menus. WordPress makes it easy to edit the name that appears on the menu, as well as to edit other menu item parameters.
Edit and Delete Menu Items
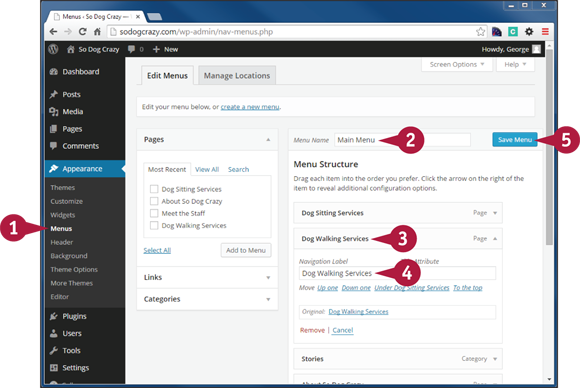
Edit the Navigation Label
![]() In the left admin menu, click Menus under Appearance.
In the left admin menu, click Menus under Appearance.
![]() Make sure you are editing the correct menu.
Make sure you are editing the correct menu.
Note: If you have more than one menu, a dropdown appears below the Edit Menus tag, where you can select the correct menu.
![]() Click the menu item you want to edit.
Click the menu item you want to edit.
![]() In the Navigation Label field, change the title of the menu item.
In the Navigation Label field, change the title of the menu item.
Note: This does not change the name of the item elsewhere on the site.
![]() Click Save Menu.
Click Save Menu.
![]() Check that the menu item name has changed to match the navigation label setting.
Check that the menu item name has changed to match the navigation label setting.
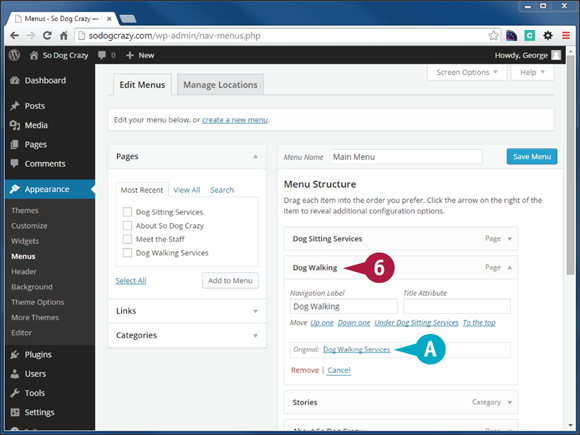
![]() The original name of the menu item is always visible. This is also helpful to remember what the menu item is pointing to.
The original name of the menu item is always visible. This is also helpful to remember what the menu item is pointing to.
Edit Additional Elements of a Menu Item
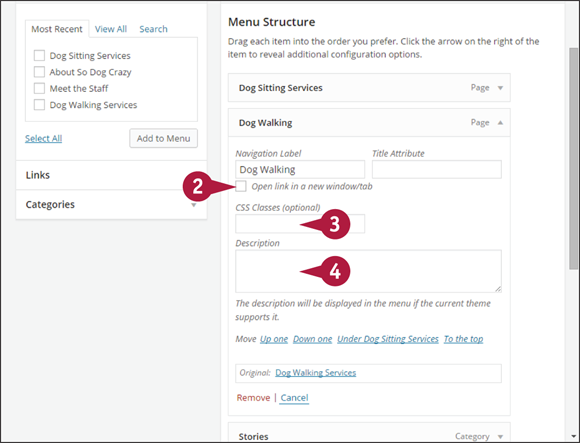
![]() While editing a menu, click Screen Options and then click check boxes under Show Advanced Menu Properties to reveal whichever menu item options you want, such as CSS Classes or Description.
While editing a menu, click Screen Options and then click check boxes under Show Advanced Menu Properties to reveal whichever menu item options you want, such as CSS Classes or Description.
![]() Click Open link in a new window/tab (
Click Open link in a new window/tab (![]() changes to
changes to ![]() ) if you want the menu item to leave the current browser tab.
) if you want the menu item to leave the current browser tab.
![]() Assign custom CSS classes to menu items here.
Assign custom CSS classes to menu items here.
![]() Type a description of the menu item here. Some menus display this below the navigation label.
Type a description of the menu item here. Some menus display this below the navigation label.
![]() Scroll up or down and click Save Menu.
Scroll up or down and click Save Menu.

Move a Menu Item without Dragging
Note: If you have a lot of menu items, dragging one to a new position may be difficult. WordPress has links to speed the process.
![]() Click a link, such as Up one or To the top, and the menu item moves.
Click a link, such as Up one or To the top, and the menu item moves.
![]() You can delete a menu item by clicking Remove and scrolling up and clicking Save Menu.
You can delete a menu item by clicking Remove and scrolling up and clicking Save Menu.
Add a Custom Menu
You are not limited to displaying menus in the menu locations provided by your theme. Using the custom menu widget, you can display a menu in any available widget area.
Add a Custom Menu
![]() In the left admin menu, click Menus under Appearance.
In the left admin menu, click Menus under Appearance.
![]() Click the create a new menu link and create a menu that you want to assign to a custom menu widget.
Click the create a new menu link and create a menu that you want to assign to a custom menu widget.
![]() Type a name that helps you remember what this custom menu is for.
Type a name that helps you remember what this custom menu is for.
![]() Do not assign the menu to any location.
Do not assign the menu to any location.
![]() Click Save Menu.
Click Save Menu.

![]() In the left admin menu, click Widgets under Appearance.
In the left admin menu, click Widgets under Appearance.
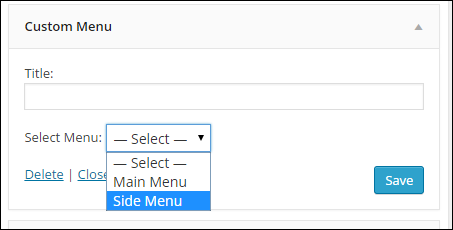
![]() On the Widgets screen, click the Custom Menu widget under Available Widgets.
On the Widgets screen, click the Custom Menu widget under Available Widgets.
![]() From the list of widget areas, select the one where you want your menu. The name is highlighted and a check mark appears beside it.
From the list of widget areas, select the one where you want your menu. The name is highlighted and a check mark appears beside it.
![]() Click Add Widget.
Click Add Widget.
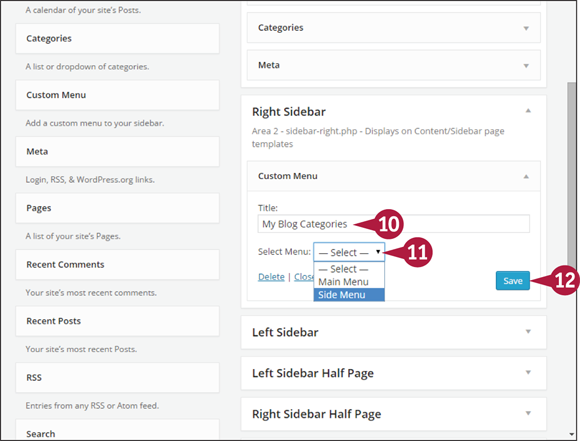
The Custom Menu widget opens in the widget area to which you assigned it.
![]() Type a title for your menu.
Type a title for your menu.
![]() Click the Select Menu
Click the Select Menu ![]() and choose the menu you created in steps 1 to 5.
and choose the menu you created in steps 1 to 5.
![]() Click Save.
Click Save.
![]() Confirm that the menu appears on the site in the location you placed it.
Confirm that the menu appears on the site in the location you placed it.