
CHAPTER 9
Tweaking Your Theme
It is very rare for any theme to exactly match your design and functionality requirements. Fortunately, WordPress and its many themes offer ways to tweak the way things look and work. Beyond that, you can also customize themes as much as you want using CSS and PHP.
Understand Options for Tweaking Your Theme
Get to Know the Theme Customizer
Make Your Site Mobile Friendly
Understand Options for Tweaking Your Theme
The Theme Customizer
Introduced in WordPress 3.4, the Theme Customizer interface is a way for theme developers to allow users to easily make changes using a consistent interface. Although WordPress has been adding more and more default elements to the Customizer, such as widget management, individual developers can use it any way they want, so there will be variations depending on the theme.
Theme Options
Prior to the introduction of the Theme Customizer, developers created their own interfaces for managing the look and functionality of sites. Typically called theme options, these interfaces continue to be important for many themes because they control far more than is included in the Customizer. The functionality and interface of theme options vary widely.
Custom CSS
Being able to override the styling of your theme using CSS is another option for those interested in learning even just a bit about this powerful design tool. On WordPress.org sites, some themes provide a custom CSS interface, but there are also plugins which add that functionality. On WordPress.com, custom CSS is a paid upgrade.
Child Themes
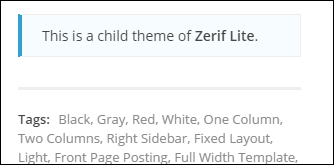
An even more powerful tool for customizing your theme is to create a child theme. It uses all the design and functionality of the parent, but looks first in the child theme folder to see if a file is present there. In other words, you can override absolutely any parent file, not just the CSS. You can also add new files, such as page templates or a template for a specific category.
Get to Know the Theme Customizer
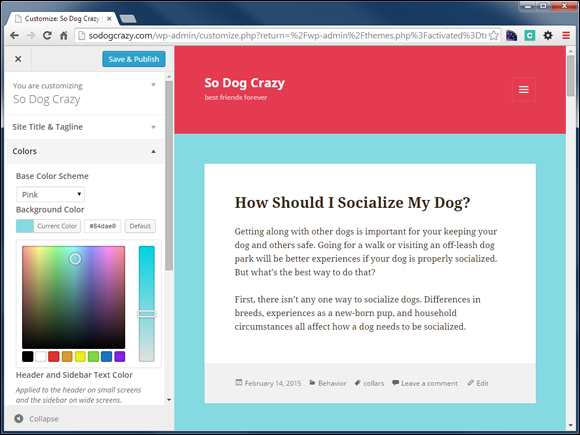
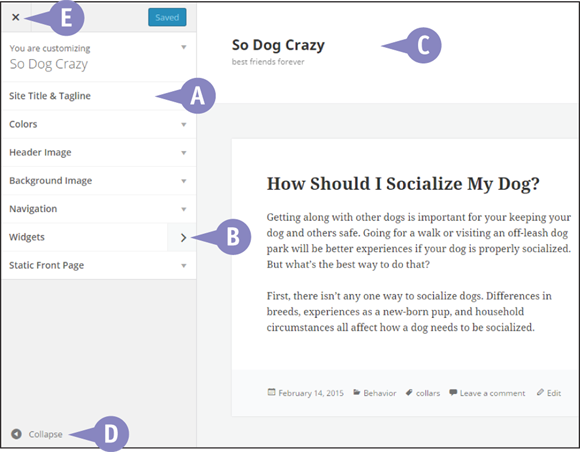
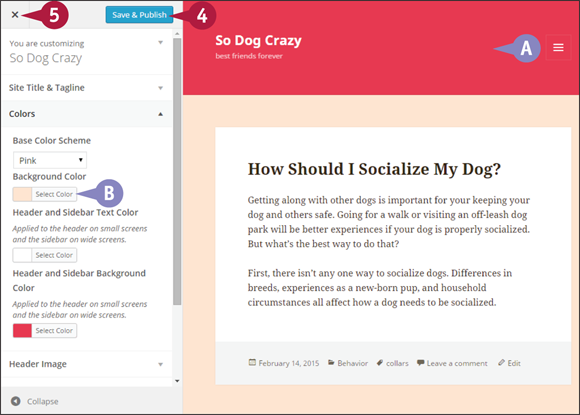
Learning to use WordPress’s Theme Customizer is important, not only because it allows you to customize various aspects of your site’s design and content, but because it works the same way no matter what theme you use. What you can customize varies by theme, but the interface is the same for all.
![]() Click Customize under Appearance on the left admin menu. The left admin menu disappears and is replaced with a list of options.
Click Customize under Appearance on the left admin menu. The left admin menu disappears and is replaced with a list of options.
![]() A right arrow (
A right arrow (![]() ) on an option indicates a submenu of options.
) on an option indicates a submenu of options.
![]() The preview pane displays your website, where you see in real time any changes you make. The live site is not changed until you click Save & Publish.
The preview pane displays your website, where you see in real time any changes you make. The live site is not changed until you click Save & Publish.
![]() The Collapse link hides the options pane temporarily to allow more space for the preview pane.
The Collapse link hides the options pane temporarily to allow more space for the preview pane.
![]() Close (
Close (![]() ) allows you to exit the Theme Customizer. If you made changes but have not saved them, a reminder asks if you want to leave the screen or remain.
) allows you to exit the Theme Customizer. If you made changes but have not saved them, a reminder asks if you want to leave the screen or remain.
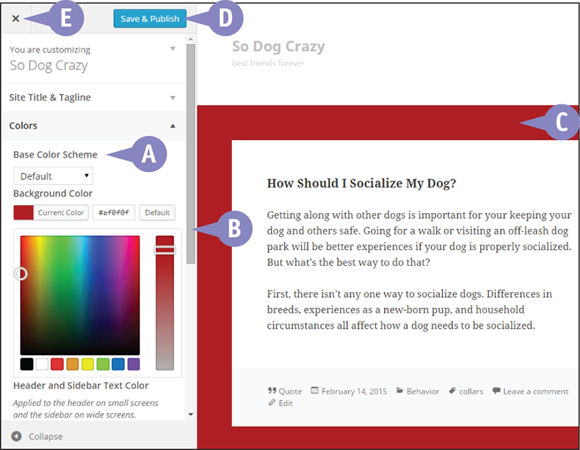
![]() What controls or inputs you get depend on the option that you open, such as Colors in this example. To close an option, either click its header again or open another option to close the first option automatically.
What controls or inputs you get depend on the option that you open, such as Colors in this example. To close an option, either click its header again or open another option to close the first option automatically.
![]() Use the scroll bar to check if there are other controls for the option.
Use the scroll bar to check if there are other controls for the option.
![]() In the preview pane, you see in real time any changes made using the various options.
In the preview pane, you see in real time any changes made using the various options.
![]() The live site is not changed until you click Save & Publish.
The live site is not changed until you click Save & Publish.
![]() If you are finished making changes, click Close (
If you are finished making changes, click Close (![]() ) to exit the Theme Customizer. If you made changes but forgot to save, a reminder asks if you want to leave the screen or remain.
) to exit the Theme Customizer. If you made changes but forgot to save, a reminder asks if you want to leave the screen or remain.
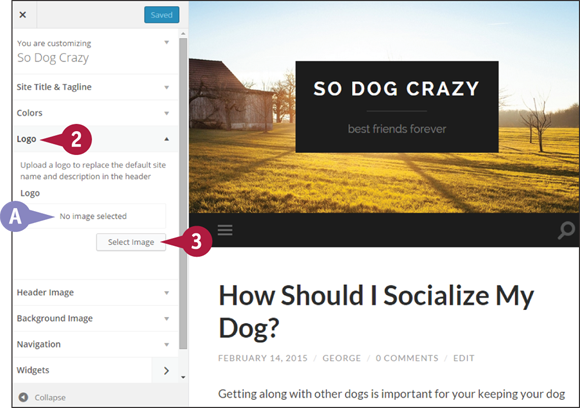
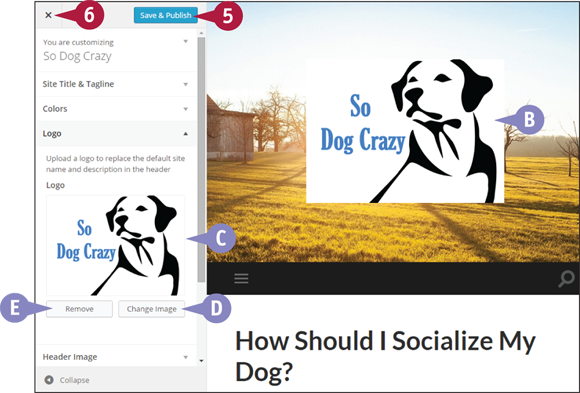
Add a Logo
The most important way for business websites in particular to tweak their themes is to add their logo. Not all themes have a specific logo upload. Often there is only a header image upload, in which case the logo would need to be incorporated into that image.
This example uses the Hemingway Rewritten theme for WordPress.com or Hemingway for WordPress.org sites.
Add a Logo
![]() Click Customize under Appearance in the left admin menu.
Click Customize under Appearance in the left admin menu.
The Theme Customizer screen opens.
![]() In the list of options at the left, click Logo. You can click anywhere in its box to reveal the controls.
In the list of options at the left, click Logo. You can click anywhere in its box to reveal the controls.
![]() If no logo currently exists, this area will say No Image Selected.
If no logo currently exists, this area will say No Image Selected.
![]() Click Select Image.
Click Select Image.
A Select Image window opens, allowing you to choose from the media library or upload a new image.
![]() When you have selected the image, click Choose Image.
When you have selected the image, click Choose Image.
![]() Look for the image you selected to appear in the header.
Look for the image you selected to appear in the header.
![]() The logo also appears as a thumbnail in the Logo option area.
The logo also appears as a thumbnail in the Logo option area.
![]() A Change Image button appears, allowing you to replace the logo now or in the future.
A Change Image button appears, allowing you to replace the logo now or in the future.
![]() A Remove button appears.
A Remove button appears.
![]() To keep the changes and have them appear live on the site, click Save & Publish.
To keep the changes and have them appear live on the site, click Save & Publish.
![]() To exit, click Close (
To exit, click Close (![]() ).
).
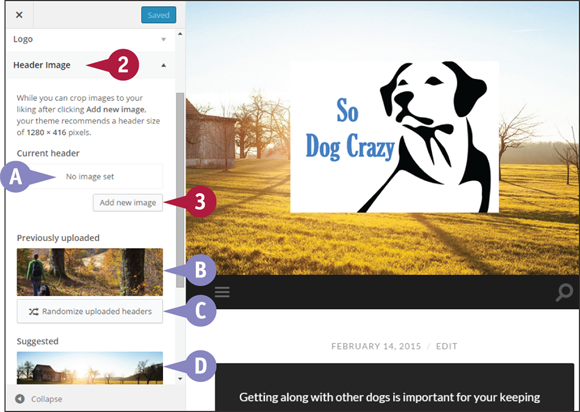
Add a Header Image
The use of header images varies widely between themes. In some cases, they display across the width of the header but inside of any margins. In others, the image is really a background that stretches the width of the browser window. In still others, the header image is used as a logo.
This example uses the Hemingway Rewritten theme for WordPress.com or Hemingway for WordPress.org sites.
Add a Header Image
![]() Click Customize under Appearance in the left admin menu.
Click Customize under Appearance in the left admin menu.
![]() Click Header Image.
Click Header Image.
![]() The current header image appears here unless no custom header has been assigned.
The current header image appears here unless no custom header has been assigned.
![]() Previously uploaded images appear here. You can click to restore one.
Previously uploaded images appear here. You can click to restore one.
![]() You can click Randomize uploaded headers to see one on each page load.
You can click Randomize uploaded headers to see one on each page load.
![]() Some themes provide one or more default images.
Some themes provide one or more default images.
![]() Click Add new image.
Click Add new image.
![]() The Choose Image window opens, allowing you to choose from the media library or upload. Click Select and Crop.
The Choose Image window opens, allowing you to choose from the media library or upload. Click Select and Crop.
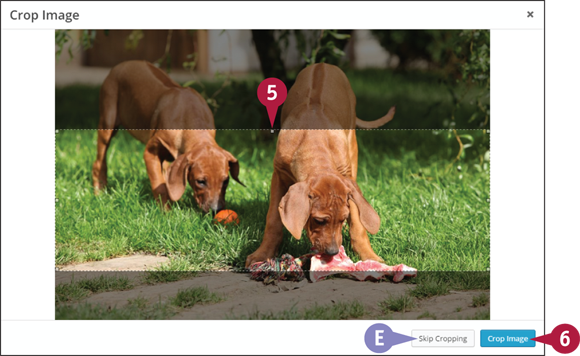
![]() In the Crop Image window, drag the crop box until you see the portion you want.
In the Crop Image window, drag the crop box until you see the portion you want.
![]() You can skip cropping.
You can skip cropping.
![]() Click Crop Image.
Click Crop Image.
Your header image appears in the preview pane.
![]() Click Save & Publish.
Click Save & Publish.
![]() Click Close (
Click Close (![]() ) to exit.
) to exit.
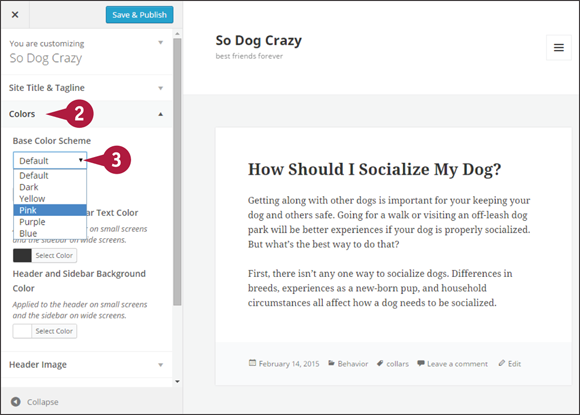
Change Color Scheme
Some themes offer predetermined color schemes to choose from. What exactly is controlled by the color scheme varies, but typically it will be headings, backgrounds, and links. The advantage of themes with this feature is that professional designers have chosen the colors, so you do not need to try and do your own matching.
This example uses the Twenty Fifteen theme for WordPress.com or WordPress.org sites.
Change Color Scheme
![]() Click Customize under Appearance in the left admin menu.
Click Customize under Appearance in the left admin menu.
![]() Click Colors to reveal its controls.
Click Colors to reveal its controls.
Note: In this case, there are multiple controls under Colors, not just the Color Scheme. Some themes might separate those controls or use a slightly different naming convention.
![]() Click
Click ![]() and click a color scheme.
and click a color scheme.
![]() The preview pane changes to show what your choice will look like on your site.
The preview pane changes to show what your choice will look like on your site.
What changes color depends on your theme. In this case, the header area and the background for the content changed color.
![]() The changes also appear on the individual color controls.
The changes also appear on the individual color controls.
Note: Some themes may not have these controls for individual elements of the color scheme.
![]() To keep the changes, click Save & Publish.
To keep the changes, click Save & Publish.
![]() Click Close (
Click Close (![]() ) to exit.
) to exit.
Change Background Color
Controlling the background color of a site is a common Customizer function among WordPress themes.
This example uses the Twenty Fifteen theme for WordPress.com or WordPress.org sites.
Change Background Color
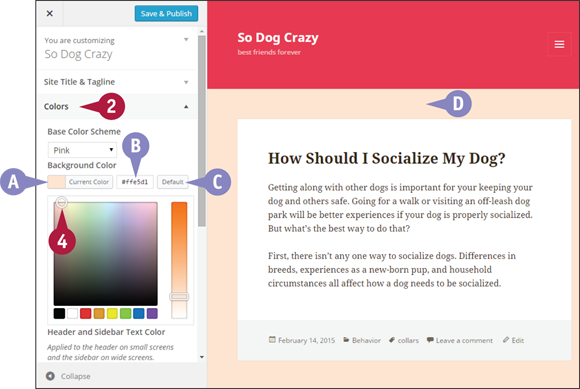
![]() Click Customize under Appearance in the left admin menu.
Click Customize under Appearance in the left admin menu.
![]() Click Colors to reveal its controls.
Click Colors to reveal its controls.
![]() Under Background Color, click Select Color.
Under Background Color, click Select Color.
![]() Use the various color picker controls to choose a color.
Use the various color picker controls to choose a color.
![]() As you move around the color picker, the current color appears here.
As you move around the color picker, the current color appears here.
![]() The hexadecimal code of the current color appears here. You can also enter a code here for the color you want.
The hexadecimal code of the current color appears here. You can also enter a code here for the color you want.
![]() The Default button restores the default background color of the theme.
The Default button restores the default background color of the theme.
![]() As you select from the color picker, the background color changes in the preview pane.
As you select from the color picker, the background color changes in the preview pane.
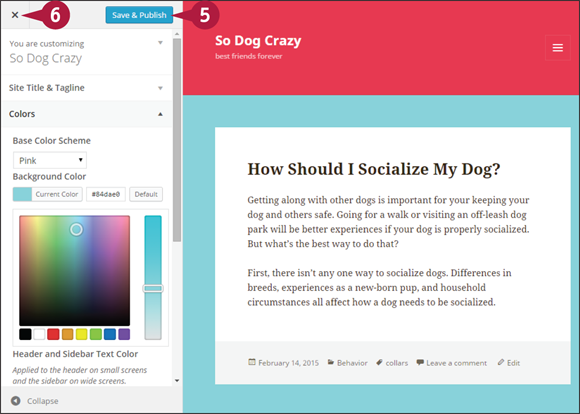
![]() When you have got the background color you want, click Save & Publish to apply the changes to the live site.
When you have got the background color you want, click Save & Publish to apply the changes to the live site.
![]() Click Close (
Click Close (![]() ) to exit the Theme Customizer.
) to exit the Theme Customizer.
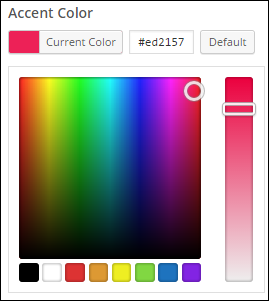
Change Text Color
Themes which allow you to change text color most commonly do so for linked text, but you may also be able to change heading colors and more.
This example uses the Hemingway Rewritten theme for WordPress.com or Hemingway for WordPress.org sites.
Change Text Color
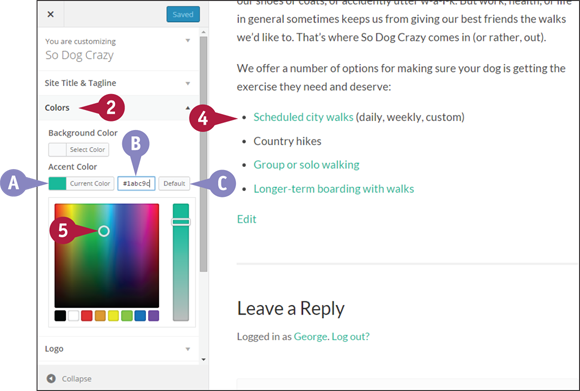
![]() Click Customize under Appearance in the left admin menu.
Click Customize under Appearance in the left admin menu.
![]() Click Colors to reveal its controls.
Click Colors to reveal its controls.
![]() Under Accent Color, click Select Color.
Under Accent Color, click Select Color.
Note: This particular theme uses the term Accent Color, but your theme may say Link Color or something else.
![]() Navigate in the preview pane to a page where you can see one or more links.
Navigate in the preview pane to a page where you can see one or more links.
![]() Use the various color picker controls to choose a color.
Use the various color picker controls to choose a color.
![]() As you move around the color picker, the current color appears here.
As you move around the color picker, the current color appears here.
![]() The hexadecimal code of the current color appears here. You can also enter a code here for the color you want.
The hexadecimal code of the current color appears here. You can also enter a code here for the color you want.
![]() The Default button restores the default accent color of the theme.
The Default button restores the default accent color of the theme.
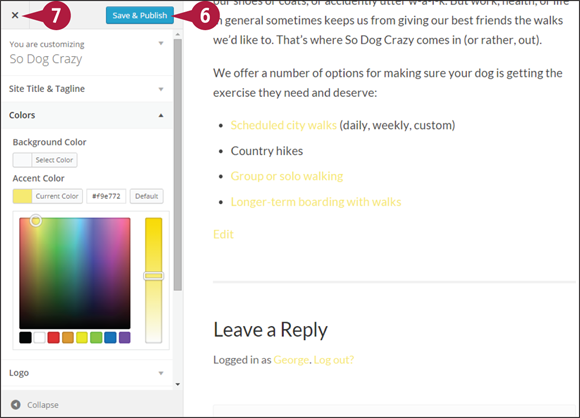
![]() When you have finished, click Save & Publish to apply the changes to the live site.
When you have finished, click Save & Publish to apply the changes to the live site.
![]() Click Close (
Click Close (![]() ) to exit.
) to exit.
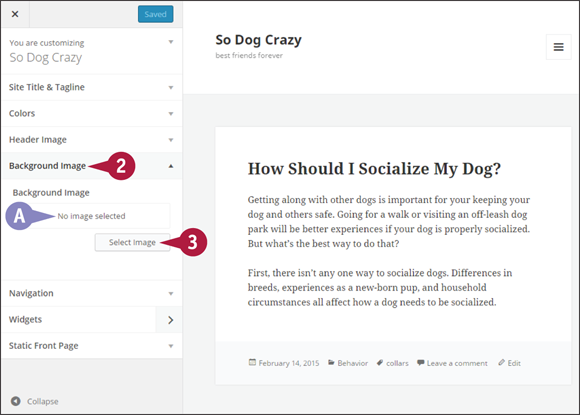
Add a Background Image
Many themes allow you to add a background image using the Customizer interface. Where and how much of the image appears depends on the design of the theme.
This example uses the Twenty Fifteen theme for WordPress.com or WordPress.org sites.
Add a Background Image
![]() Click Customize under Appearance in the left admin menu.
Click Customize under Appearance in the left admin menu.
![]() Click Background Image.
Click Background Image.
![]() The current background image appears here unless none has been assigned.
The current background image appears here unless none has been assigned.
![]() Click Select Image.
Click Select Image.
A Select Image window opens, allowing you to choose from the media library or upload.
![]() Click Choose Image.
Click Choose Image.
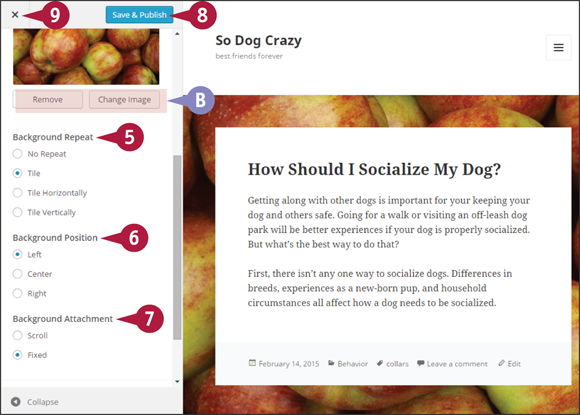
The image now appears in the background of your site in the preview panel.
![]() The image also appears in the options area with two buttons: Remove and Change Image.
The image also appears in the options area with two buttons: Remove and Change Image.
![]() Choose how you want the background image to repeat (
Choose how you want the background image to repeat (![]() changes to
changes to ![]() ).
).
![]() Choose how you want the background image positioned (
Choose how you want the background image positioned (![]() changes to
changes to ![]() ).
).
![]() Choose whether you want the background image to move as you scroll or stay fixed in place (
Choose whether you want the background image to move as you scroll or stay fixed in place (![]() changes to
changes to ![]() ).
).
![]() Click Save & Publish.
Click Save & Publish.
![]() Click Close (
Click Close (![]() ) to exit.
) to exit.
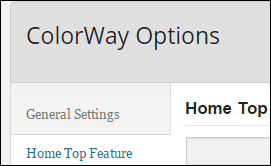
Get to Know Theme Options
Before the days of the WordPress Customizer, theme developers for WordPress.org sites began offering ways of customizing their themes and controlling elements of content through theme options screens. Not every theme has such a screen, but those that do vary widely in what is offered and in the design of the interface. Four examples are shown here.
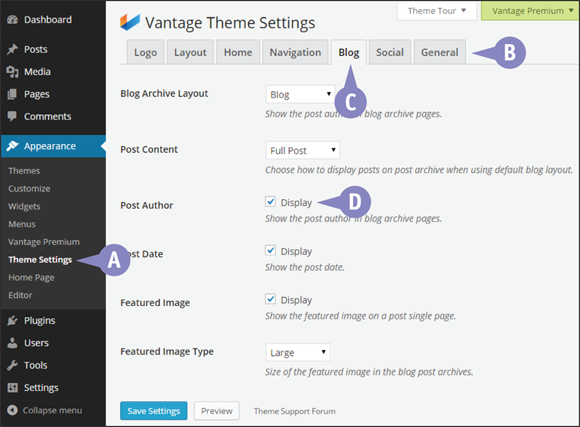
![]() Click Theme Settings under Appearance on the left admin menu. This example is from the Vantage theme, available in the
Click Theme Settings under Appearance on the left admin menu. This example is from the Vantage theme, available in the WordPress.org theme directory.
![]() The theme settings are divided up on a single page by the use of tabs.
The theme settings are divided up on a single page by the use of tabs.
![]() This example shows the Blog settings available for this theme.
This example shows the Blog settings available for this theme.
![]() These controls affect the display of posts, sometimes on web pages that list posts or in other cases on individual posts.
These controls affect the display of posts, sometimes on web pages that list posts or in other cases on individual posts.
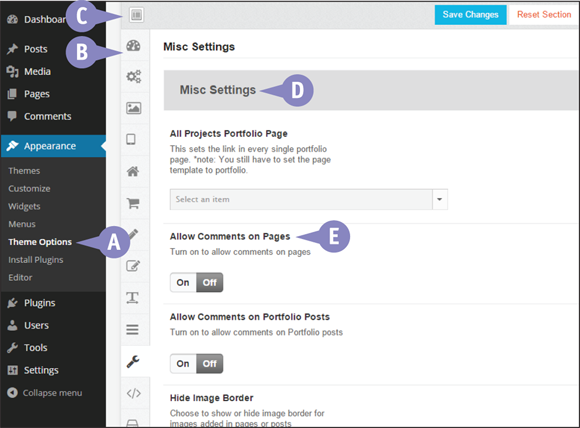
![]() Click Theme Options under Appearance on the left admin menu. This example is from the Virtue theme, available in the
Click Theme Options under Appearance on the left admin menu. This example is from the Virtue theme, available in the WordPress.org theme directory.
![]() The theme settings are divided up on a single page by the use of tabs displayed using vertically aligned tabs. Mouse over the icons to see their titles, such as Main Settings and Home Layout.
The theme settings are divided up on a single page by the use of tabs displayed using vertically aligned tabs. Mouse over the icons to see their titles, such as Main Settings and Home Layout.
![]() Click this button to display all settings in a single scrolling page instead of using the vertical tabs.
Click this button to display all settings in a single scrolling page instead of using the vertical tabs.
![]() This example shows some of the miscellaneous settings available for this theme that affect the entire site.
This example shows some of the miscellaneous settings available for this theme that affect the entire site.
![]() Some themes offer control of WordPress’s settings, such as these controls for displaying comments.
Some themes offer control of WordPress’s settings, such as these controls for displaying comments.
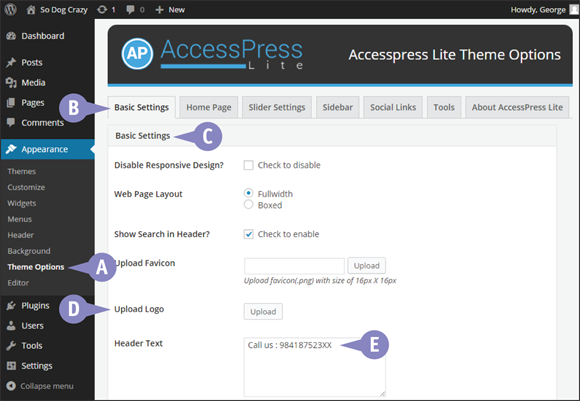
![]() Click Theme Options under Appearance on the left admin menu. This example is from the AccessPress Lite theme, available in the
Click Theme Options under Appearance on the left admin menu. This example is from the AccessPress Lite theme, available in the WordPress.org theme directory.
![]() The theme settings are divided up on a single page by the use of tabs.
The theme settings are divided up on a single page by the use of tabs.
![]() This example shows some of the settings available for this theme that affect the entire site.
This example shows some of the settings available for this theme that affect the entire site.
![]() Some themes manage the logo from here rather than with the Theme Customizer.
Some themes manage the logo from here rather than with the Theme Customizer.
![]() This text appears in the header area. It is a good example of how theme options can control more than just design.
This text appears in the header area. It is a good example of how theme options can control more than just design.
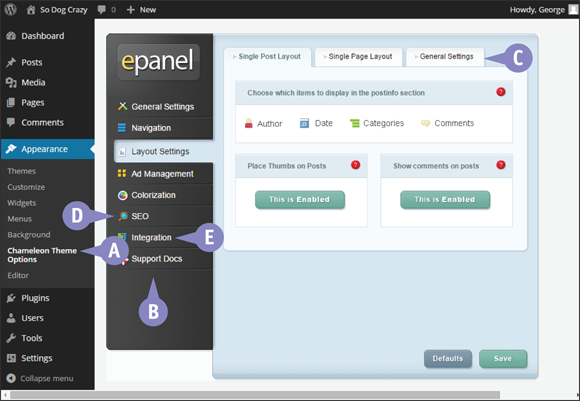
![]() Click Chameleon Theme Options under Appearance on the left admin menu. This example is from Chameleon, a paid theme from Elegant Themes.
Click Chameleon Theme Options under Appearance on the left admin menu. This example is from Chameleon, a paid theme from Elegant Themes.
![]() The ePanel interface may vary with some of the settings offered, but the look and feel is the same on all the company’s themes.
The ePanel interface may vary with some of the settings offered, but the look and feel is the same on all the company’s themes.
![]() Many of the sections on the menu have their own tabbed content.
Many of the sections on the menu have their own tabbed content.
![]() The SEO settings are an example of themes going beyond the control of design.
The SEO settings are an example of themes going beyond the control of design.
![]() The Integration section allows you to add HTML code to various points on a web page, including the beginning and end of individual posts — something you would typically see under Widgets.
The Integration section allows you to add HTML code to various points on a web page, including the beginning and end of individual posts — something you would typically see under Widgets.
Use Post Formats
WordPress allows theme developers to display posts in a variety of ways using what are called post formats. There are nine possible formats designated by WordPress: aside, gallery, link, image, quote, status, video, audio, and chat. Although WordPress has suggested styling for each, it is really up to theme developers how, or even if, they use some or all of them.
This example uses the Hemingway Rewritten theme for WordPress.com or Hemingway for WordPress.org sites.
Use Post Formats
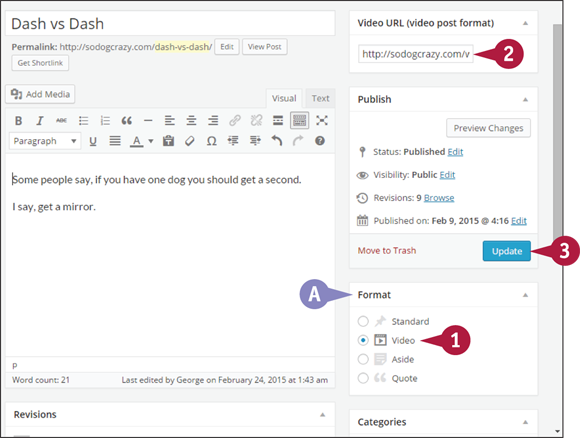
![]() On the Add New Post or Edit Post screens, the Format meta box is located under the Publish meta box.
On the Add New Post or Edit Post screens, the Format meta box is located under the Publish meta box.
Note: If a theme does not support post formats, then no box appears.
![]() Click a format from the list of available post formats (
Click a format from the list of available post formats (![]() changes to
changes to ![]() ). This examples use a video post format.
). This examples use a video post format.
Note: Themes show only the formats they support.
![]() Type the URL for your video.
Type the URL for your video.
Note: In this particular theme, the screen displays a custom meta box for the video URL. This is used only if the Video post format is chosen in step 1. The theme displays the video at the top of the post.
![]() Click Update.
Click Update.

![]() The post now displays a video icon in post listings.
The post now displays a video icon in post listings.
![]() Each post format has its own icon.
Each post format has its own icon.
Note: Some themes display the post format publicly, with a link to display all other posts with that format.
Use Page Templates
Whereas post formats control only the look of the post, page templates can control the look and layout of the entire web page. Some themes do not offer any page templates; others offer dozens. You can also have your own page templates created.
This example uses the Twenty Fifteen theme for WordPress.com or WordPress.org sites.
Use Page Templates
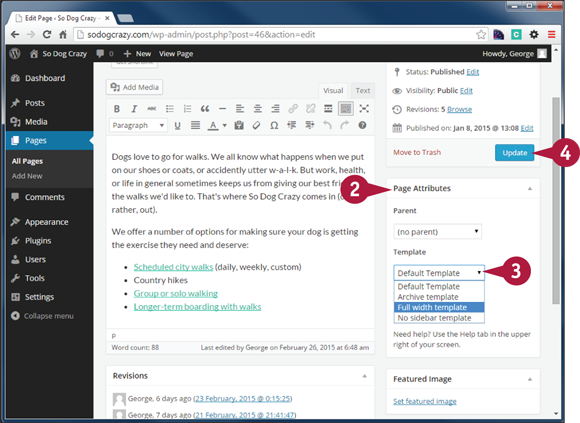
Note: For this theme, the default page template displays a sidebar on the right.
![]() From the Pages screen, find the page you want and click Edit.
From the Pages screen, find the page you want and click Edit.
![]() Locate the Page Attributes box on the right side of the screen.
Locate the Page Attributes box on the right side of the screen.
![]() Click the Template
Click the Template ![]() and choose the template you want. In this example, the theme has a full width template.
and choose the template you want. In this example, the theme has a full width template.
Note: If your theme only has a default page template, then the dropdown does not appear.
![]() Click Update.
Click Update.

![]() The page now extends to the full width of the content area.
The page now extends to the full width of the content area.
Make Your Site Mobile Friendly
It is vital that your website appear properly on any device. WordPress offers several options to make your site look good not just on desktops, but tablets and smartphones of all types.
Responsive Themes

A responsive web design is one that adjusts itself depending on the width of the screen displaying it. Most developers have been making their themes responsive since at least 2013, so plenty of choices are out there, both free and paid. If you are not sure if a theme is responsive, you can test it by making your web browser smaller and see whether the layout and images adjust accordingly.
Mobile Themes
If your theme is not responsive, there are options for displaying an alternative mobile-only theme. On WordPress.org sites, plugins are available that detect what device the user has and replaces the desktop theme with a separate mobile theme. In addition, some plugins allow you to have a separate menu and other options just for mobile users.
WordPress.com Mobile Options
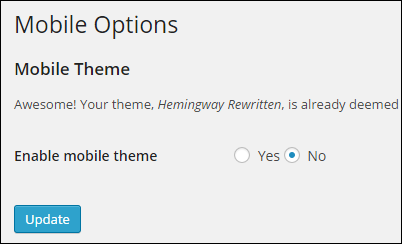
For WordPress.com users, you have an option under Appearance for controlling what mobile users see. In most cases, the themes WordPress offers are responsive and the Mobile Options screen will tell you if your theme is or not. If it is not, you can turn on a generic, but good-looking mobile theme, as well as some controls affecting the appearance of the site.
Image Optimization
Image optimization has always been important for fast-loading sites, but for mobile it is even more crucial. Make sure you have sized your dimensions to no more than 1,000 pixels on the longest side and remember to Save For Web, using the compression settings to get the file size as low as possible.
Make Existing Themes Responsive

For WordPress.org sites, if your theme is not mobile-friendly and you are very attached to it, you can have it modified to be responsive. However, keep in mind that HTML has changed greatly in the last couple of years, so it is not just your CSS you would need to update. It might be less costly to take a responsive theme and modify it to match your current design.
More than Just Design
For WordPress.org sites, being mobile-friendly is not just about design. For example, a smartphone user may not have the time or patience to wade through your 60-page site. Showing only key pages to mobile users is one way to be mobile-friendly. Similarly, a lengthy page that reads well on desktop could be trimmed to a couple of paragraphs for mobile users. These examples of adaptive content can be handled by plugins or with the help of your web designer.
Understand CSS
CSS, which stands for Cascading Style Sheets, defines how your browser should display HTML elements, such as paragraphs or headings. Every WordPress theme has at least one stylesheet, although some have stylesheets for specific parts of design, such as colors or layout.
How CSS Works
In the early days of HTML, a few attributes were added to HTML tags, which allowed developers to control the look of the element. But that was limited and cumbersome. CSS was created to keep formatting separate and let HTML focus on what it was intended for: defining content. CSS is applied to HTML using rules, which are commonly contained in stylesheets separate from the HTML.
CSS Rules
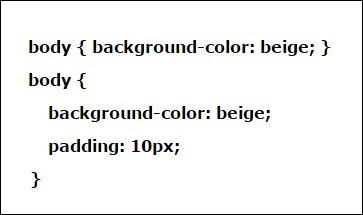
The first part of a CSS rule is the selector, which can be an HTML element, or a class or id which has been applied to an HTML element. The second part of a CSS rule is the declaration, which defines how you want the element to look. In the CSS rule body {background-color: beige;}, body is the selector and {background-color: beige;} is the declaration. If a selector has several declarations, it is efficient to group them in a rule set, instead of repeating the selector over and over. Similarly, several selectors, separated by commas, can belong to a single rule or rule set.
CSS Declarations
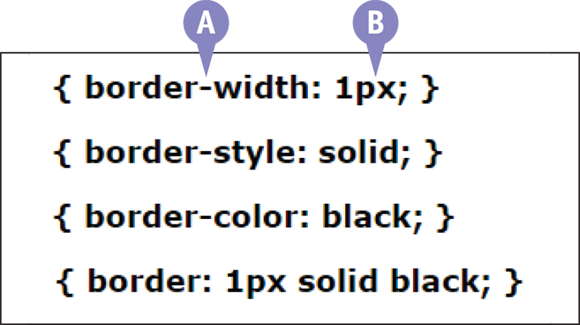
CSS declarations consist of a property - value pair, where property (![]() ) is the aspect of the element you want to define, and value (
) is the aspect of the element you want to define, and value (![]() ) is the definition. In the previous example,
) is the definition. In the previous example, background-color is the property, and beige is the value. To save on declarations, sometimes you see multiple values under a single declaration, such as {border: 1px solid black;}, instead of specifying the thickness, style, and color of the border separately.
Media Queries for Mobile
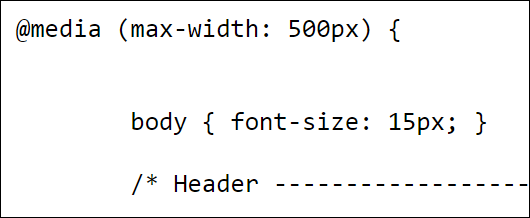
Responsive designs rely on a feature of CSS called media queries. These are conditional sections of CSS triggered by the parameters of the media query, most commonly the width of the browser. If you specify a maximum browser width of 500 pixels, the CSS rules within that media query will apply only for browser windows with a width of that many pixels or less.
The Growing Power of CSS
With each new generation of CSS, the control over design greatly increases. Transforming elements on the page, such as making images appear at an angle, or animating elements, such as having an element slide out from the side of the browser window, are some of the more recent additions to the CSS repertoire. Google doodles often show off cutting-edge CSS capabilities.
Learn More about CSS
Whether you just want to feel comfortable making a few changes or you want to truly learn CSS, there are hundreds of free and paid tutorials online. Some excellent starting points are: http://learn.shayhowe.com or www.w3schools.com. Another excellent site which is free but requires registration is http://www.codecademy.com/en/tracks/web.
Experiment with Your Site’s CSS
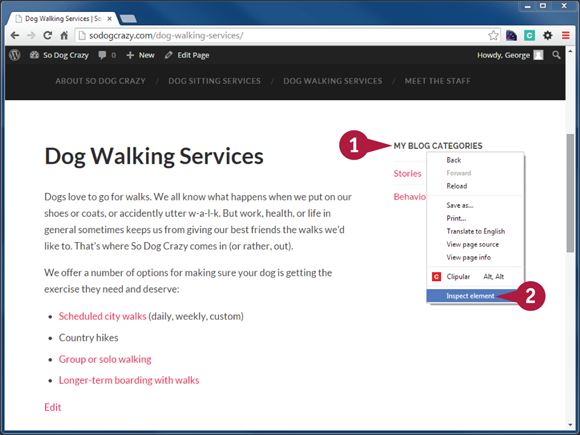
If you are interested in learning about CSS or are ready to try some changes, you can experiment in your browser without affecting the actual site. Because CSS is applied at the browser level, you can literally interrupt the process and apply your own CSS to see what it does.
To view your page’s CSS, most browsers today have a function called Inspect Element, or you can add extensions to your browser with different versions of the same function.
Experiment with Your Site’s CSS
Use Chrome to Work with CSS
![]() Position your mouse pointer over any element on the page and right-click.
Position your mouse pointer over any element on the page and right-click.
![]() Click Inspect element.
Click Inspect element.
Note: The name may vary.
A developer pane opens across the bottom of the browser, while still displaying the page above.
![]() The left portion of the new pane shows the HTML for your page.
The left portion of the new pane shows the HTML for your page.
![]() The right portion shows the CSS rules governing whatever you chose using Inspect Element.
The right portion shows the CSS rules governing whatever you chose using Inspect Element.
![]() Mouse over the highlighted element in the HTML area.
Mouse over the highlighted element in the HTML area.
![]() The element is now highlighted on the web page, with variously colored regions. Here the lighter color is the bottom margin.
The element is now highlighted on the web page, with variously colored regions. Here the lighter color is the bottom margin.
Note: You can mouse over any element in the HTML and it will be highlighted, although you may have to scroll to see it.
![]() Click any element in the HTML portion of the developer pane.
Click any element in the HTML portion of the developer pane.
![]() Its CSS opens on the right.
Its CSS opens on the right.
Test a New Font Size

![]() In the CSS portion of the developer pane, next to font-size, double-click the value; it becomes editable.
In the CSS portion of the developer pane, next to font-size, double-click the value; it becomes editable.
![]() Increase the value.
Increase the value.
![]() The size of the element’s font changes.
The size of the element’s font changes.
Note: These changes are only in your browser, not on the site itself.
Move the Sidebar
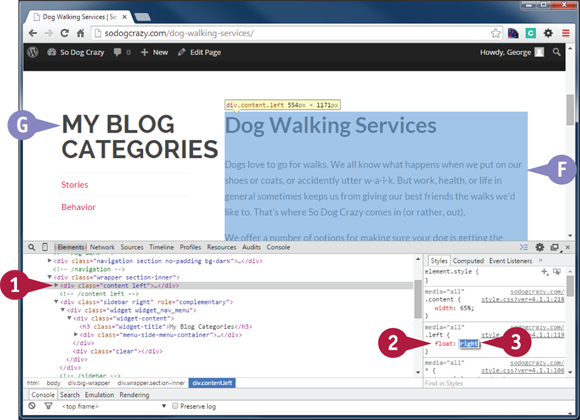
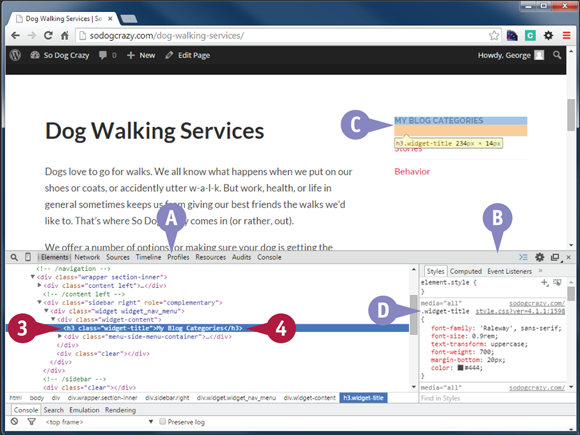
![]() Click the HTML element that contains the main content; in this case,
Click the HTML element that contains the main content; in this case, div class="content left".
![]() The content area is highlighted.
The content area is highlighted.
![]() Locate the rule that was putting the content area on the left of the sidebar. In this case it is the
Locate the rule that was putting the content area on the left of the sidebar. In this case it is the float property of the class left, so double-click the value until it becomes editable.
![]() Change the value from
Change the value from left to right.
![]() The sidebar switches places with the content area.
The sidebar switches places with the content area.
Note: It can take some time to figure out what rule or rules needs to be changed, and often a new rule is required in order to properly target the element. If you just changed the left class, all elements with that class would be floating right.
Modify Your Site’s CSS
If you are comfortable working with CSS or you have a web designer, you can modify the styles of your theme in two simple ways.
On WordPress.com, the ability to edit a theme’s CSS is a paid upgrade.
Modify Your Site’s CSS
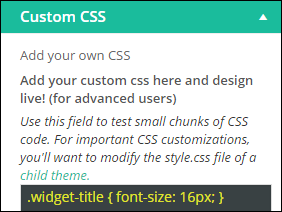
Use a Theme’s Custom CSS
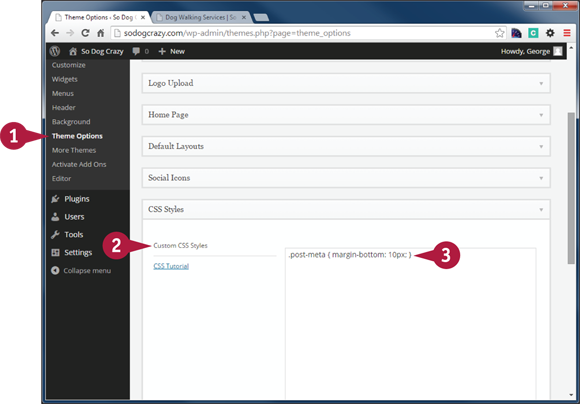
![]() Click Theme Options under Appearance in the left admin menu.
Click Theme Options under Appearance in the left admin menu.
The Theme Options screen opens.
![]() Locate the Custom CSS area. In this case, it is in its own section, but in other themes, it could be with other settings.
Locate the Custom CSS area. In this case, it is in its own section, but in other themes, it could be with other settings.
![]() In the text area, type or paste your CSS rules.
In the text area, type or paste your CSS rules.
![]() Click Save Changes.
Click Save Changes.
![]() In your browser, refresh your website for the change to take effect.
In your browser, refresh your website for the change to take effect.
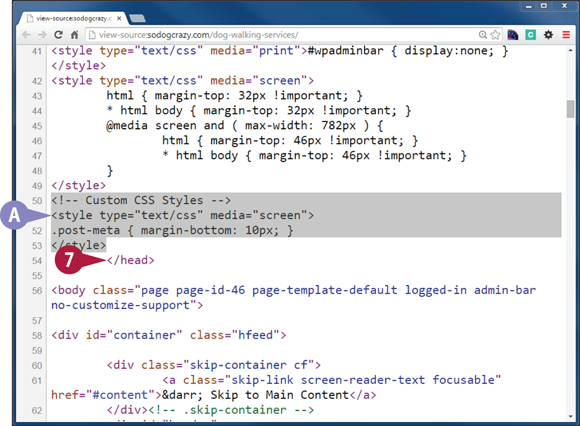
![]() Right-click anywhere and select View Source.
Right-click anywhere and select View Source.
![]() Look for the closing
Look for the closing </head> tag fairly near the top of the page.
![]() Your custom CSS should be just above that closing tag.
Your custom CSS should be just above that closing tag.
Note: The reason it needs to be in that location is so it will override any other stylesheet. If your theme is not putting the custom CSS there, you can use a plugin that will.
Use a Custom CSS Plugin on WordPress.org Sites
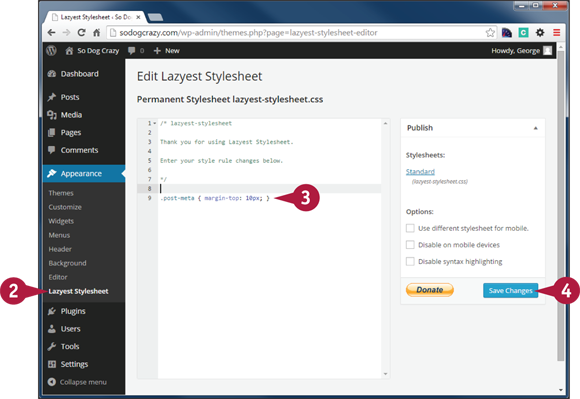
Note: This example uses a plugin called Lazyest Stylesheet.
![]() Install and activate the plugin.
Install and activate the plugin.
![]() Click Lazyest Stylesheet under Appearance in the left admin menu.
Click Lazyest Stylesheet under Appearance in the left admin menu.
![]() In the text area, after the initial comment area, type your CSS rule.
In the text area, after the initial comment area, type your CSS rule.
![]() Click Save Changes.
Click Save Changes.
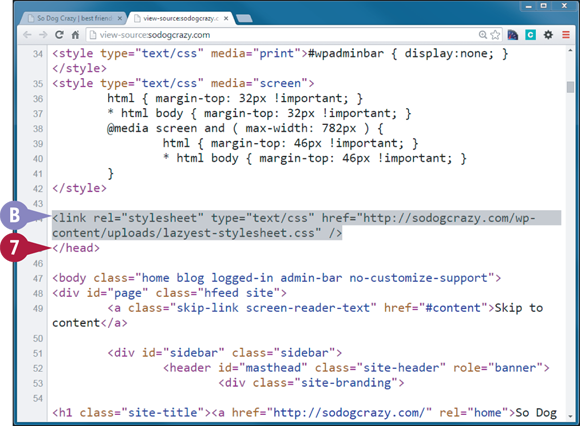
![]() In your browser, refresh your website for the change to take effect.
In your browser, refresh your website for the change to take effect.
![]() Right-click anywhere and select View Source.
Right-click anywhere and select View Source.
![]() Look for the closing
Look for the closing </head> tag fairly near the top of the page.
![]() A link to the plugin’s stylesheet is in the correct place.
A link to the plugin’s stylesheet is in the correct place.
Understand Child Themes
If you are thinking of modifying more than just a few CSS rules, a child theme could be a better option. A child theme allows you to change virtually anything about another theme, not just the CSS.
Child themes are possible only on WordPress.org sites.
The Parent-Child Relationship
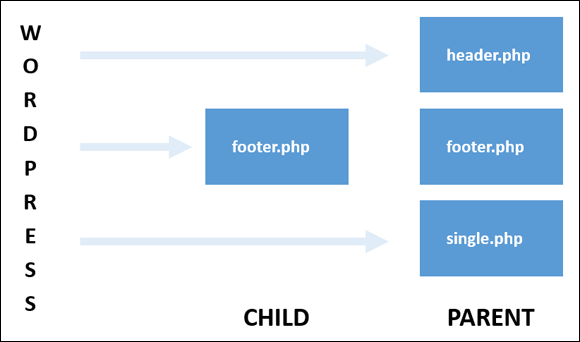
The relationship between a parent theme and a child theme is much like the human one: The parents do all the work and the child looks cute. A child theme is typically used to modify or provide the entire design of the site. In fact, the only file a child theme must contain is a stylesheet. What WordPress does is look for a template file in the child theme, and if it does not find it, goes to the parent theme.
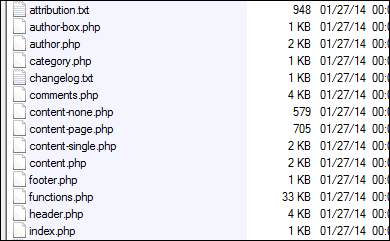
WordPress Template Hierarchy
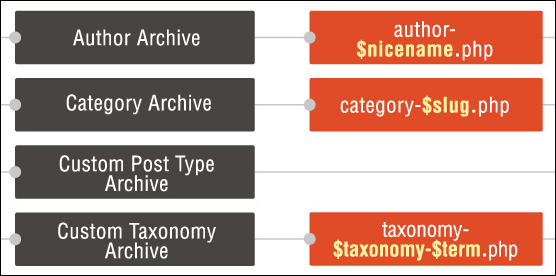
The relationship of child and parent files is part of a broader relationship called the template hierarchy. If WordPress does not find a particular file, it looks for the next one in the hierarchy, and so on, until it comes to index.php. For example, if you want to make one category look different from the others, simply name the template file category-thename.php, and WordPress will use that instead of the category.php file.
Change as Much as You Want
The important advantage of a child theme over simply customizing some CSS is that it allows you to change as much of the parent theme as you want. You could have additional page templates, a different footer area, custom layouts for category listings, and much more. You could activate WordPress functions that the parent theme does not have, or deactivate ones it has. You could also add menu locations or widget areas.
Add a Child to Any Theme
You do not have to look for themes that have child themes already — you can make a child theme for any theme. A theme requires no special coding for it to have a child theme. However, because a child theme does not have a complete set of template files, you cannot make a child theme for a child theme.
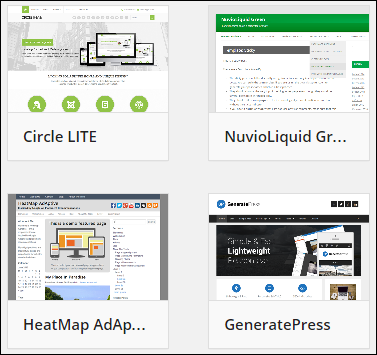
Theme Frameworks
When a theme developer makes various child themes for a single parent theme, it is referred to as a theme framework. Parent themes in this case tend to look very minimalist; the children do all the design work. One of the advantages of a theme framework is that you have to learn the backend only once, because all the children function the same way. And because child themes can themselves be tweaked, you customize the look as much as you want while having a consistent administrative interface.
When to Create a Plugin Instead
There may be some functions you want a child theme to perform that are better suited to a plugin. The question to ask yourself is: Would I want this functionality if the theme was deactivated? If so, then that functionality should be generated by a plugin. Widgets are a good example. If you customize a child theme to create a widget, you would likely want that widget even without the child or parent theme; so have it generated by a plugin instead.