CHAPTER 2
Setting Up Your WordPress.com Site
Sign Up with WordPress.com
With just a few simple steps, you can sign up with WordPress.com. A few steps more and you can have a website up and running at no cost.
Sign Up with WordPress.com
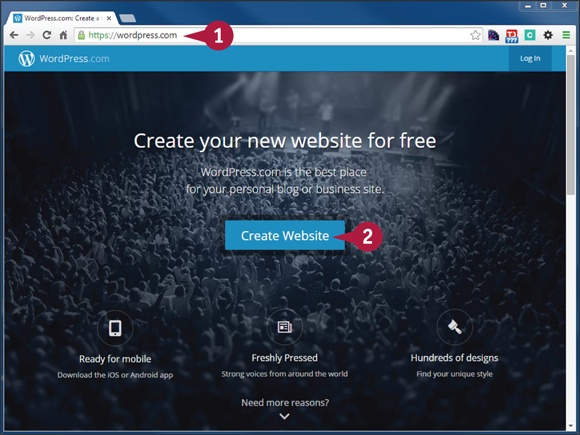
![]() Navigate to
Navigate to https://wordpress.com in your web browser.
![]() Click Create Website.
Click Create Website.
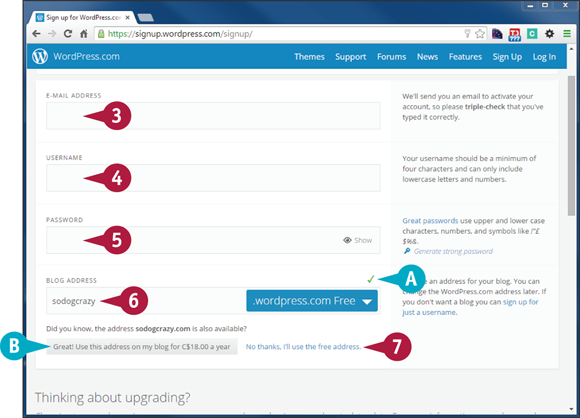
![]() Type an email address where you can receive the activation link.
Type an email address where you can receive the activation link.
Note: A green check mark appears at each stage if your entry is accepted.
![]() Type a username of lowercase letters and numbers.
Type a username of lowercase letters and numbers.
![]() Type a strong password.
Type a strong password.
![]() Type the name you want as the address of your site.
Type the name you want as the address of your site.
![]() A check mark appears if the name is available.
A check mark appears if the name is available.
![]() A dropdown offers to sell you available, similar domains as an option.
A dropdown offers to sell you available, similar domains as an option.
![]() Click No thanks, I’ll use the free address. (yourname.wordpress.com) and continue scrolling down.
Click No thanks, I’ll use the free address. (yourname.wordpress.com) and continue scrolling down.
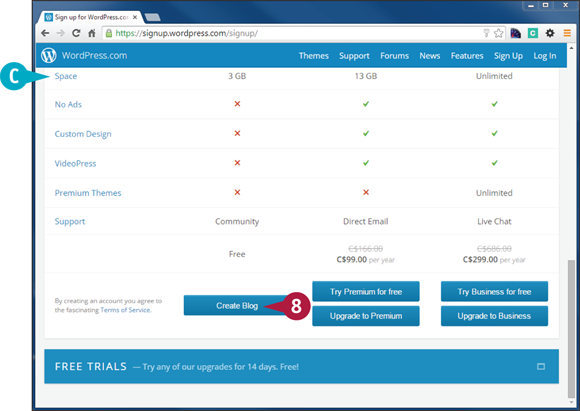
![]() A table shows you what features are available for free and for paid upgrades.
A table shows you what features are available for free and for paid upgrades.
![]() Click Create Blog to use the free website option.
Click Create Blog to use the free website option.
The next screen begins the process of setting up your site, which is covered in the next section, “Set Up Your New Site.”
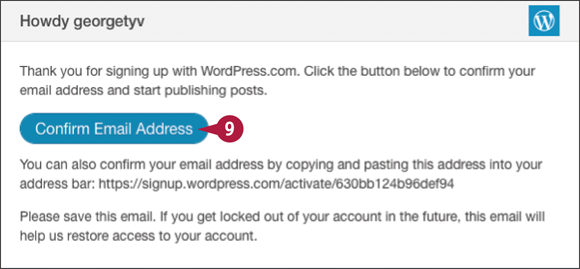
![]() Click the link in the email you receive to confirm your account.
Click the link in the email you receive to confirm your account.
If the email is opened on a different device than you are signing up with, you are asked to log in to WordPress.com.
Note: WordPress sends you a second email informing you that the account is set up and offering a link to its tutorials.
Set Up Your New Site
Even while WordPress.com is sending out your confirmation email, you can start setting up your site.
Set Up Your New Site
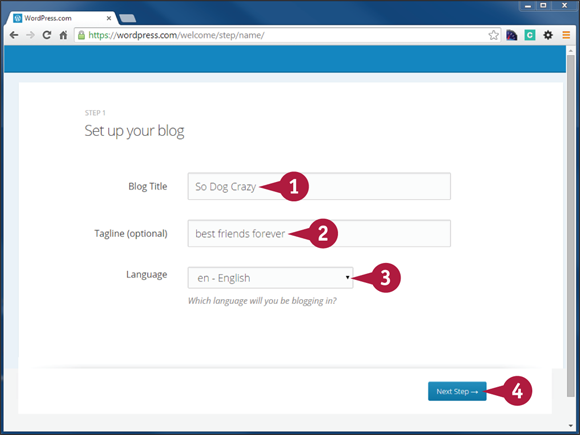
![]() Type a blog title.
Type a blog title.
The blog title appears in the header of all pages.
![]() Type an optional tagline.
Type an optional tagline.
The tagline is a few words that further describe your site. The tagline appears below your title.
![]() Click the Language
Click the Language ![]() and choose a language for your site. The default is English.
and choose a language for your site. The default is English.
![]() Click Next Step.
Click Next Step.
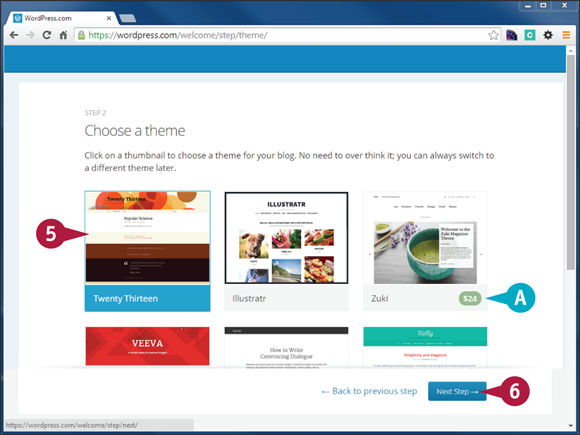
You can scroll through several hundred possible themes.
![]() When you find a theme you like, click it to highlight it.
When you find a theme you like, click it to highlight it.
![]() Some themes require payment, but most are free.
Some themes require payment, but most are free.
![]() Click Next Step.
Click Next Step.
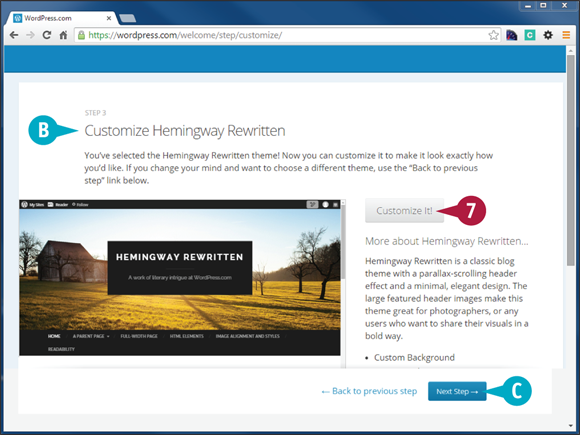
![]() You see a sample of the theme with a description and its features.
You see a sample of the theme with a description and its features.
![]() Click Customize It.
Click Customize It.
![]() If you choose not to customize at this time, you can click Next Step.
If you choose not to customize at this time, you can click Next Step.

A new screen with customization options appears.
![]() You see your site as it will look with the chosen theme.
You see your site as it will look with the chosen theme.
![]() A menu appears on the right with possible customization options for your theme.
A menu appears on the right with possible customization options for your theme.
![]() When you choose an option — in this case, Header — a new section of screen slides out. Here, you are given instructions for changing the header image.
When you choose an option — in this case, Header — a new section of screen slides out. Here, you are given instructions for changing the header image.
![]() Click Add new image and another window appears for uploading your header image. When you click Select and Crop, the window closes.
Click Add new image and another window appears for uploading your header image. When you click Select and Crop, the window closes.
![]() After you finish making all your theme customizations, click Save.
After you finish making all your theme customizations, click Save.
![]() On the Customize screen, click Next Step.
On the Customize screen, click Next Step.
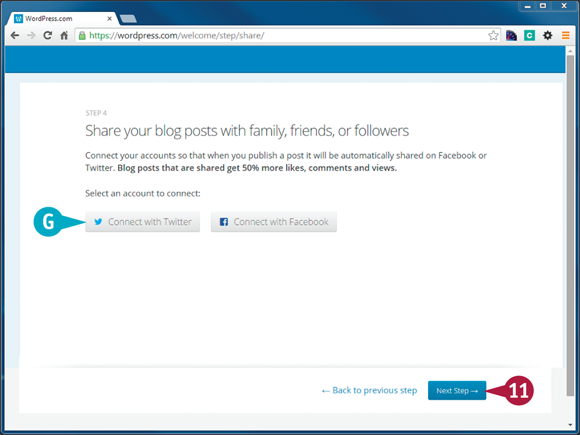
![]() You can click one of these buttons to open a dialog box for entering your account information for other social media sites.
You can click one of these buttons to open a dialog box for entering your account information for other social media sites.
![]() Click Next Step to begin entering content for your site.
Click Next Step to begin entering content for your site.
View Your New Site

![]() Address
Address
View your site by entering the site name you signed up with, followed by “.wordpress.com.”
![]() Toolbar
Toolbar
You can quickly access your WordPress.com site’s administrative screens from this toolbar.
![]() Header
Header
In addition to your site title and tagline, this area may contain a background image or your logo, depending on your theme.
![]() Menu
Menu
All themes include a navigation menu of your site’s pages.
![]() Page or Post Title
Page or Post Title
The title of the current content, whether it is a page or a post.
![]() Sidebar
Sidebar
The sidebar is comprised of widgets, which perform various functions, like this search function.
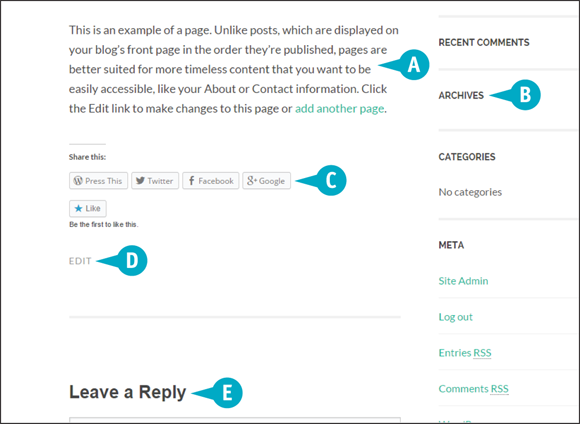
![]() Page or Post Content
Page or Post Content
This is the actual content of the page or post. It can consist of text, images, video, documents, or any combination of those.
![]() Sidebar Widgets
Sidebar Widgets
Widgets provide a wide variety of functions, such as displaying your latest posts or social media feeds.
![]() Sharing Buttons
Sharing Buttons
Your visitors can share your content with various social media.
![]() Edit
Edit
This link — visible only when you are signed in — takes you to the administrative area for the current web page. Visitors cannot see this.
![]() Comments Area
Comments Area
This title marks the start of the comments area, where visitors can leave a comment about this page or post.
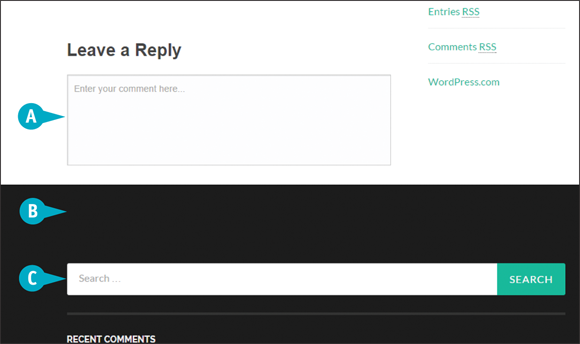
![]() Comments Box
Comments Box
The box where visitors enter their comments. Comments which you approve will appear below this box.
![]() Footer
Footer
Every theme has a footer area at the bottom of the screen. Usually it contains widgets.
![]() Footer Widget
Footer Widget
Widgets are not just for sidebars.
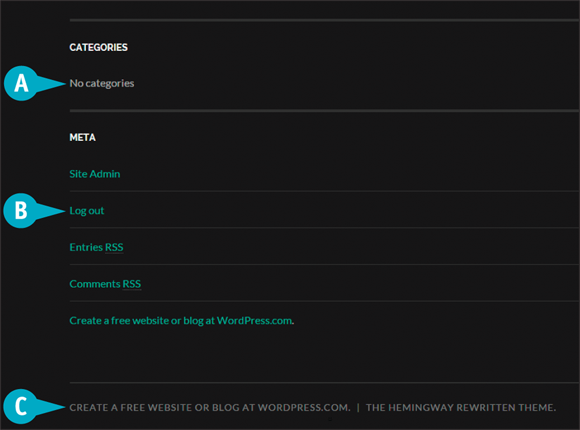
![]() Widget
Widget
Another example of a widget that automatically shows content when some is available. No categories have been created yet, so nothing appears. You can remove widgets that currently have no content and then put them back when there is.
![]() Logout/Login
Logout/Login
The Meta widget contains a link for logging in to your site, so you do not need to go to the WordPress.com home page to do that. When you are logged in, the link changes to enable you to log out.
![]() Footer Credits
Footer Credits
In the free version of WordPress.com, there is a link here encouraging visitors to get their own website.
My Site Looks Nothing Like This
WordPress themes vary a great deal, so do not worry if your site looks quite different from the screenshots on these two pages. What you will have is the same basic structure: header, content, sidebar, footer, and the toolbar at the top, so become familiar with those.
Where Is the Blog?
WordPress.com used to create a sample post as well as a sample page, but that is no longer the case. Because no posts have been entered on the So Dog Crazy site, no blog area is showing at this point. That is why the sample page is being shown here.
Get to Know Your Site’s Dashboard
The Dashboard can be thought of as the home page for the administrative area of your site. It has a number of helpful sections, like statistics, which show you the current state of your site.
When you first sign up for WordPress.com, the Dashboard displays a comprehensive Help menu to get you started, and which you can turn off when not needed.
Access Your Site’s Dashboard
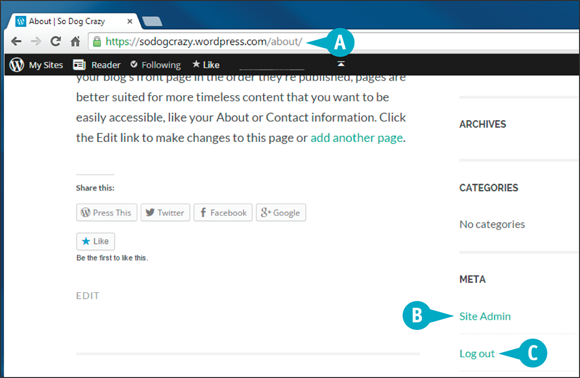
![]() In your browser’s address bar, you can add /wp-admin to your WordPress domain name, and if you are logged in, you are taken to the Dashboard. If you are not logged in, you see the login screen. In this example, you would type
In your browser’s address bar, you can add /wp-admin to your WordPress domain name, and if you are logged in, you are taken to the Dashboard. If you are not logged in, you see the login screen. In this example, you would type http://sodogcrazy.wordpress.com/wp-admin.
![]() From your website, you can click Site Admin if you are already logged in.
From your website, you can click Site Admin if you are already logged in.
![]() This Log Out link would show as Log In if you were not signed in to
This Log Out link would show as Log In if you were not signed in to WordPress.com. Note: The widget that displays the login/logout links — called the Meta widget — may not be visible on your site, but you can add it to any widget area.

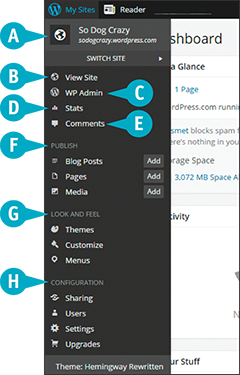
![]() When you click the My Sites link — visible all the time in the toolbar — you get a screen that looks like this.
When you click the My Sites link — visible all the time in the toolbar — you get a screen that looks like this.
![]() The
The WordPress.com site you are currently working on appears in this box. If you have more than one site, you can choose which one to administer. You can also add a new site from this box.
![]() Click WP Admin to be taken to the Dashboard of your site.
Click WP Admin to be taken to the Dashboard of your site.
Tour the Dashboard

![]() Left Admin Menu
Left Admin Menu
Every admin screen is accessible from this menu, located on the left side of the screen. When you mouse over a menu item, submenu items appear, and when you are in a menu section, the submenu items are visible. Note: You can collapse the menu to a set of icons by clicking the Collapse Menu link at the very bottom.
![]() At a Glance
At a Glance
In this box, you find a summary of how many pages, posts, drafts, and comments you have. In addition, it tells you what theme you are using and how much space your media files (images, documents, and so on) are taking up.
![]() Activity
Activity
Shows your latest posts and visitor comments on the WordPress.com website for this Dashboard.
![]() Your Stuff
Your Stuff
Shows your recent activity on any WordPress.com website, whether you are commenting on someone else’s site or publishing a post to one of your other sites. Note: Just below Your Stuff, and not visible on this screenshot, is another box, What’s Hot, that displays news from the WordPress.com team, as well as recent posts and comments from top sites on WordPress.com.
![]() Screen Options
Screen Options
Hide any of the boxes on the Dashboard and then restore them in the future.
![]() Quick Draft
Quick Draft
Had a sudden idea for a post? Enter some notes here and get a draft started right away.
![]() Stats
Stats
WordPress.com provides statistics for your website, so you know how many visitors you are getting, what posts they are reading the most, and much more.
Understand the WordPress.com Toolbar
When you are logged in at WordPress.com, the toolbar at the top of all screens provides a wealth of options. With just a click, you can start a new blog post, visit other blogs, and do a whole lot more. Some toolbar offerings vary depending on where you are on your own site or other WordPress.com sites.

![]() My Sites
My Sites
Mouse over this menu item to view a comprehensive set of administrative links, covered in detail below.
![]() Reader
Reader
The WordPress.com Reader is your guide to all the other sites on the platform. Mouse over this menu item to view links to various functions of the Reader, covered in detail below.
![]() Statistics Graph
Statistics Graph
Known as the Sparkline, this graph represents the last 48 hours of visitors viewing pages on your site. Darker lines represent nighttime page views, and if you mouse over the graph, the number you see is the highest amount of views per hour.
![]() Go Premium
Go Premium
Click this link to see your options for upgrading to a different WordPress.com plan.
![]() Add New Post
Add New Post
Click this icon to go to the Add New Post screen.
![]() My Account
My Account
Mouse over this menu icon to view links relating to your account, covered in detail below.
![]() Notifications
Notifications
Click to view a list of notifications about your activity on WordPress.com.
![]() Search
Search
Click to reveal a search box.
My Sites Submenu
![]() Current Site
Current Site
Shows the site you are administering and a Switch Site menu if you have others on WordPress.com.
![]() View Site
View Site
Click to view the front end of your site, as the public sees it.
![]() WP Admin
WP Admin
Click to go to the Dashboard of the current site.
![]() Stats
Stats
Click to view your detailed WordPress.com site statistics.
![]() Comments
Comments
Click to go to your comments management screen.
![]() Content Links
Content Links
You can view a list of your Blog Posts, Pages, or Media files. From those lists you can manage individual content items.
![]() Look and Feel Links
Look and Feel Links
You can view available Themes, Customize your current theme, or manage your Menus.
![]() Configuration Links
Configuration Links
You can manage your Sharing settings, your Users, the site’s Settings, or your Upgrades.
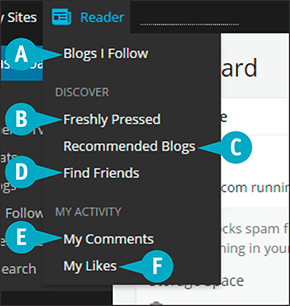
Reader Submenu
![]() Blogs I Follow
Blogs I Follow
Check what is new on sites you have chosen to follow, and not just from WordPress.com.
![]() Freshly Pressed
Freshly Pressed
See what posts the staff have picked as noteworthy from the hundreds of thousands of sites on WordPress.com.
![]() Recommended Blogs
Recommended Blogs
Browse a list of staff-recommended WordPress.com sites by topic.
![]() Find Friends
Find Friends
See which of your social media friends are on WordPress.com.
![]() My Comments
My Comments
See your most recent comments on WordPress.com sites.
![]() My Likes
My Likes
Access any posts you have liked on WordPress.com.

My Account Submenu
![]() Your Gravatar Image
Your Gravatar Image
If you uploaded an image to Gravatar.com, it appears here.
![]() Sign Out
Sign Out
Log out of your site and WordPress.com. There is also a link to your Gravatar.com account (which was automatically created when you signed up with WordPress.com).
![]() Profile Links
Profile Links
Click Account Settings to access your WordPress.com account information, such as Profile, password, security settings, and more. Click Trophy Case to view your achievements on WordPress.com (writing your first post earns you your first trophy). Click Billing to see a complete history of any billing transactions.
![]() Extras Links
Extras Links
Click Help to access the extensive support system for WordPress.com. Click Find Friends to see which of your social media friends is on WordPress.com.
Select Your General Settings
The General Settings screen enables you to control basic elements of your site identity and operation. And if you do not like your choices, you can always change them later.
Select Your General Settings
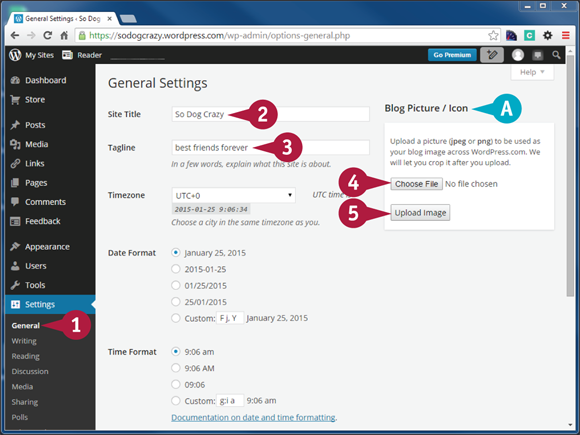
![]() On the left admin menu under Settings, click General.
On the left admin menu under Settings, click General.
![]() Change the title of your site, which you entered during setup, from here.
Change the title of your site, which you entered during setup, from here.
![]() Change the tagline of your site, also entered during setup, from here. You can leave the tagline blank if you want.
Change the tagline of your site, also entered during setup, from here. You can leave the tagline blank if you want.
![]() You can have an image or an icon associated with your site across
You can have an image or an icon associated with your site across WordPress.com.
![]() Click Choose File to select an image from your device.
Click Choose File to select an image from your device.
![]() Click Upload Image.
Click Upload Image.
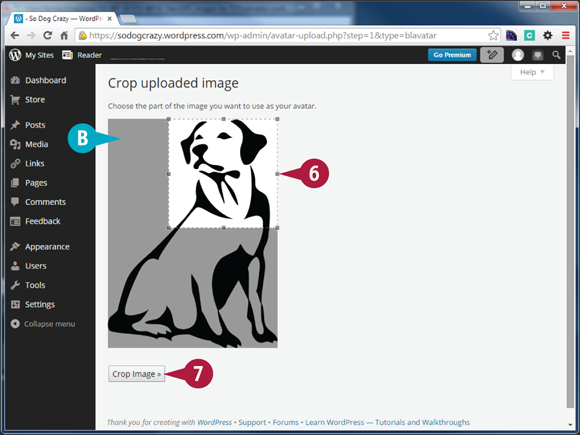
![]() The image you uploaded appears with a white crop box on a new screen.
The image you uploaded appears with a white crop box on a new screen.
![]() Resize the box by using the drag handles around the edges.
Resize the box by using the drag handles around the edges.
![]() When you have selected the area of the image you want to use, click Crop Image.
When you have selected the area of the image you want to use, click Crop Image.
Note: A confirmation screen opens to show your cropped image. Click Back to Blog Options to return to General Settings.
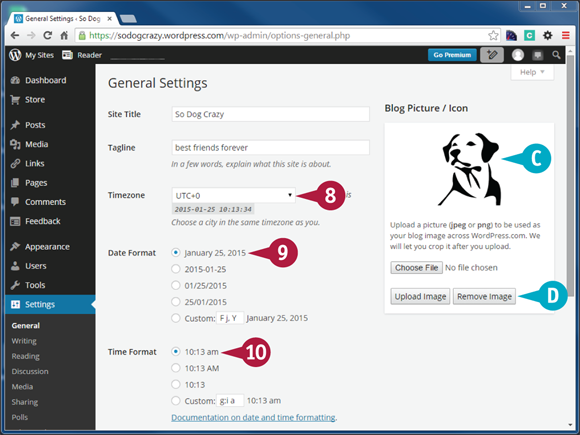
![]() The cropped image now appears at the top right of General Settings.
The cropped image now appears at the top right of General Settings.
![]() You can choose and upload a new image any time, or you can simply remove the current image.
You can choose and upload a new image any time, or you can simply remove the current image.
![]() Click the Timezone
Click the Timezone ![]() and select a city in your time zone from the dropdown or your time relative to UTC (coordinated universal time).
and select a city in your time zone from the dropdown or your time relative to UTC (coordinated universal time).
Note: Scroll up in the pop-up list to find cities. If you choose a UTC setting, you must manually reset the zone for daylight savings time.
![]() Click a date format (
Click a date format (![]() changes to
changes to ![]() ).
).
![]() Click a time format (
Click a time format (![]() changes to
changes to ![]() ).
).
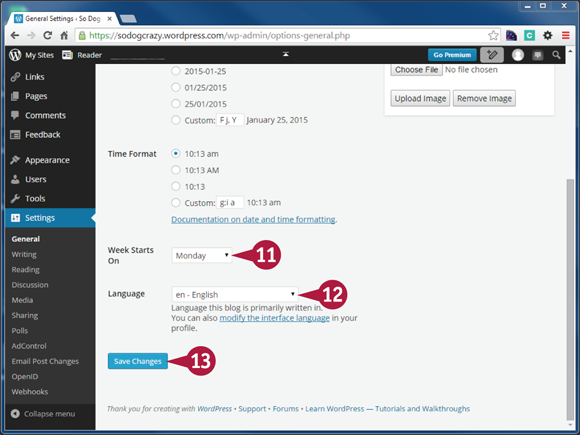
![]() Click the Week Starts On
Click the Week Starts On ![]() and change the day that WordPress uses as the start of a new week.
and change the day that WordPress uses as the start of a new week.
![]() If you plan to write in a language other than English, click the Language
If you plan to write in a language other than English, click the Language ![]() and choose it.
and choose it.
![]() Click Save Changes when you finish.
Click Save Changes when you finish.
Choose Your Personal Settings
The Personal Settings screen enables you to personalize elements of the administration area.
Choose Your Personal Settings
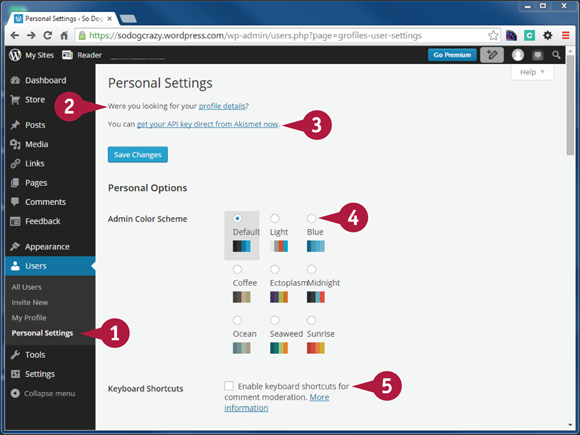
![]() On the left admin menu under Users, click Personal Settings.
On the left admin menu under Users, click Personal Settings.
![]() If you were looking for My Public Profile, click here.
If you were looking for My Public Profile, click here.
![]() Click here to get an Akismet key.
Click here to get an Akismet key.
![]() Click a color scheme for your administration area (
Click a color scheme for your administration area (![]() changes to
changes to ![]() ).
).
![]() Click Keyboard Shortcuts (
Click Keyboard Shortcuts (![]() changes to
changes to ![]() ) to enable keyboard shortcuts for comment moderation.
) to enable keyboard shortcuts for comment moderation.
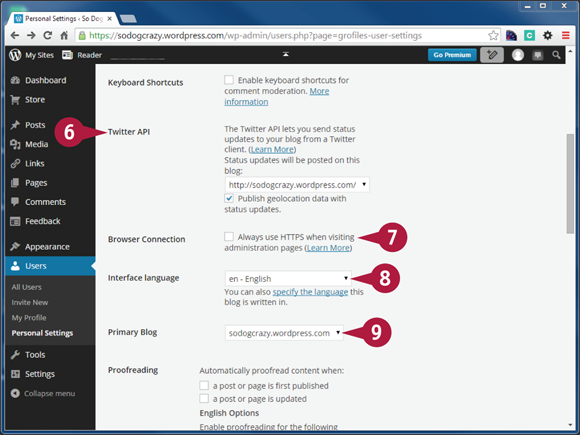
![]() Use this section to post your Twitter updates directly to your site.
Use this section to post your Twitter updates directly to your site.
![]() To use a secure browser connection (HTTPS) when working in the administration area, click this option (
To use a secure browser connection (HTTPS) when working in the administration area, click this option (![]() changes to
changes to ![]() ).
).
![]() Click the Interface Language
Click the Interface Language ![]() and choose which language to use for the administrative area.
and choose which language to use for the administrative area.
![]() If you have more than one
If you have more than one WordPress.com site, click ![]() and select which is primary (which appears by default under My Sites).
and select which is primary (which appears by default under My Sites).
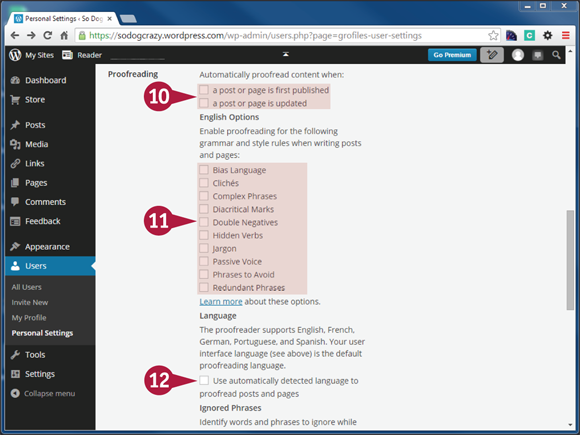
![]() Click these options to have
Click these options to have WordPress.com automatically proofread your content when you publish or update (![]() changes to
changes to ![]() ).
).
![]() Click proofreading options for English, such as checking for Clichés or Jargon (
Click proofreading options for English, such as checking for Clichés or Jargon (![]() changes to
changes to ![]() ).
).
![]() If you will be writing in different languages, click this option to have
If you will be writing in different languages, click this option to have WordPress.com automatically detect the language (![]() changes to
changes to ![]() ).
).
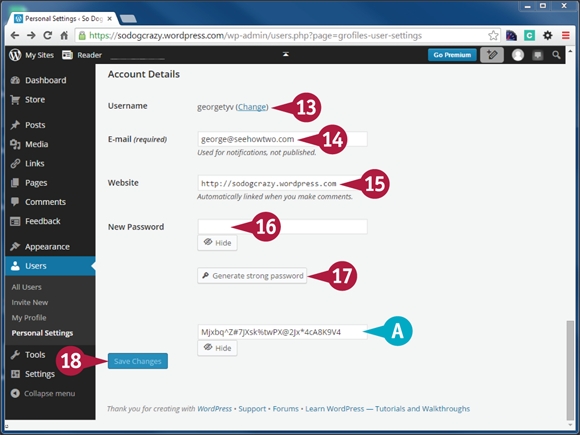
![]() Click here to change your
Click here to change your WordPress.com username. It is possible to change this, but you are warned of the consequences.
![]() Update your administrative email here.
Update your administrative email here.
![]() Update the website to which your comments are linked here.
Update the website to which your comments are linked here.
![]() Update your password here.
Update your password here.
![]() Click this button to automatically generate a strong password.
Click this button to automatically generate a strong password.
![]() This is an example of a generated password.
This is an example of a generated password.
![]() Click Save Changes when you are done.
Click Save Changes when you are done.
Create Your Public Profile
Your WordPress.com public profile allows you to tell the world who you are through words, pictures, and links. This information is shown to visitors and displayed at Gravatar.com, so do not include any information you want to keep private.
Create Your Public Profile
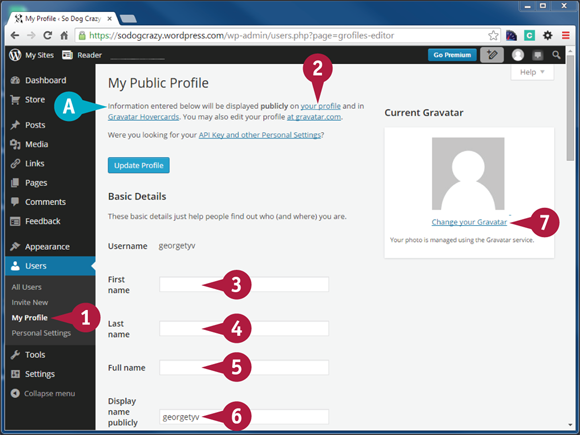
![]() On the left admin menu under Users, click My Profile.
On the left admin menu under Users, click My Profile.
![]() This area explains that the information entered here is public and where it will appear.
This area explains that the information entered here is public and where it will appear.
![]() If you were looking for Personal Settings rather than My Public Profile, click here.
If you were looking for Personal Settings rather than My Public Profile, click here.
![]() Type your first name.
Type your first name.
![]() Type your last name.
Type your last name.
![]() Type your full name.
Type your full name.
![]() Choose which version of your name you want displayed publicly.
Choose which version of your name you want displayed publicly.
![]() Click Change your Gravatar.
Click Change your Gravatar.

A new tab opens in your browser, displaying your account at Gravatar.com. The account was automatically created when you signed up with WordPress.com.
![]() You have a number of options for uploading your image, including linking to an existing image online or using your webcam.
You have a number of options for uploading your image, including linking to an existing image online or using your webcam.
You can crop the image you choose and then approve the final result. When you are done, close the tab.
![]() You should see your new Gravatar in the toolbar as well as at the top of the My Public Profile screen.
You should see your new Gravatar in the toolbar as well as at the top of the My Public Profile screen.
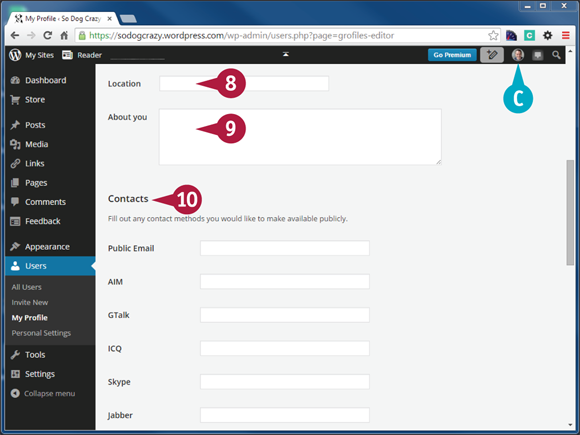
![]() Enter as much location information as you want the public to see.
Enter as much location information as you want the public to see.
![]() Enter a bit about yourself (the bit you want to be public).
Enter a bit about yourself (the bit you want to be public).
![]() Under Contacts, you can enter as many or as few methods for the public to get in touch: email, social media, and phone numbers.
Under Contacts, you can enter as many or as few methods for the public to get in touch: email, social media, and phone numbers.
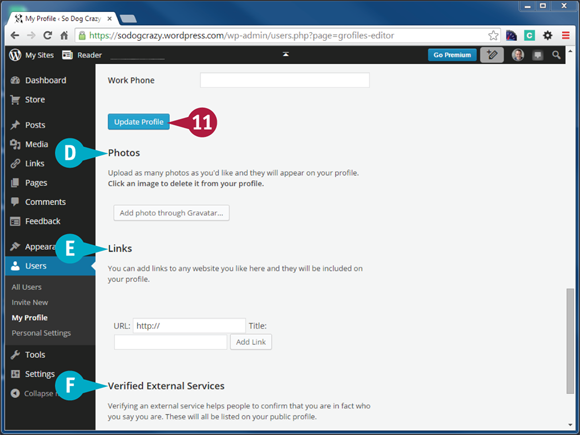
![]() Click Update Profile when you are done.
Click Update Profile when you are done.
![]() You can add more than one profile image at
You can add more than one profile image at Gravatar.com. Those additional images appear here, and you can delete any of them from here as well.
![]() You can have additional links appear on your public profile. Enter a title and the URL here and click Add Link.
You can have additional links appear on your public profile. Enter a title and the URL here and click Add Link.
![]() You can verify your accounts at various other services, such as Twitter, Vimeo, Goodreads, and others. This helps confirm you are who you say you are. Choose a service and click Verify Through
You can verify your accounts at various other services, such as Twitter, Vimeo, Goodreads, and others. This helps confirm you are who you say you are. Choose a service and click Verify Through Gravatar.com.
Consider Premium Features
Whereas a basic site at WordPress.com is free, there are a number of paid features available, either individually or bundled with several plans. These features allow you to do more with your site, such as use your own domain name, customize your theme, and even sell products or services.
You can view or order paid features using the Store link on the left admin menu or by entering https://store.wordpress.com in your browser’s address bar. Paid plans bundle a number of paid features into a single, yearly fee. Most business websites are likely going to need one or the other paid plans. You can upgrade from one plan to another at any time, and WordPress.com offers a free trial of any upgrade. Note: Prices are shown based on the country you are in.
You can also upgrade your account anytime with individual features, which are bought for a 1-year term. But if you are considering even a couple of features, it is probably worth looking at one of the bundled plans.
WordPress.com Plans
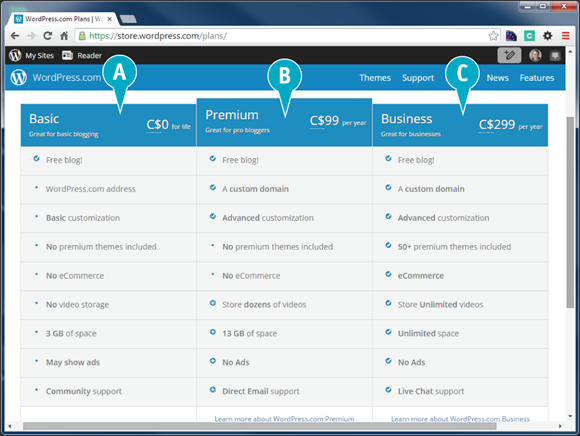
![]() Basic
Basic
This is the plan which all people get when they sign up for WordPress.com. It is free for life.
![]() Premium
Premium
The key features in addition to the Basic plan are:
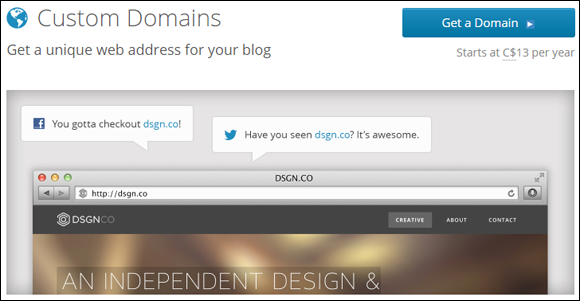
• You get your own domain name.
• You can customize fonts, colors, and even your CSS.
• You get 10GB of additional storage, including access to VideoPress, which enables you to store video files.
• Your site will never have WordPress.com ads on it.
• You get email support from WordPress.com, not just access to the support forums.
![]() Business
Business
The key features in addition to the Premium plan are:
• You get unlimited storage, including unlimited video file space.
• You can sell products on your site.
• You have access to all Premium themes (50+).
• You get live chat support.
Individual Features
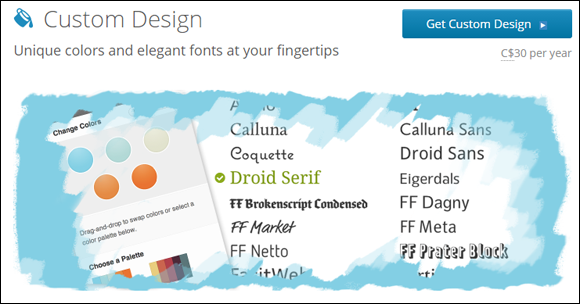
Custom Design
In addition to triggering user-friendly interfaces for changing fonts and colors, purchasing this feature enables you or your designer to change the stylesheet for your theme.
No Ads
On free websites, WordPress.com may occasionally show advertisements. Purchasing this feature ensures that your site will be ad-free.
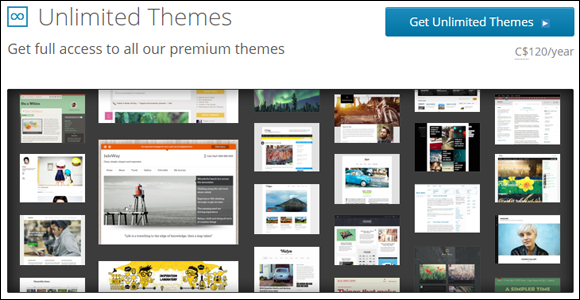
Unlimited Themes
Whereas anyone can purchase a paid theme, this feature allows you to use any paid theme and switch them as often as you want.
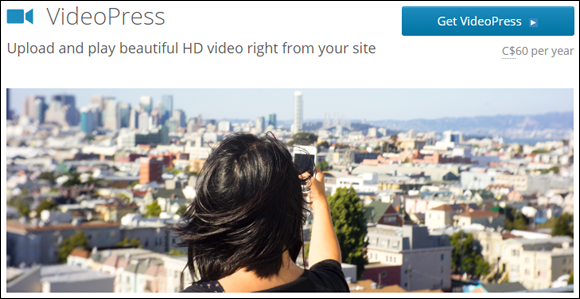
VideoPress
This service enables you to play your videos without any ads or popovers, and to let others share and embed them anywhere on the web (based on your privacy settings). You upload videos up to 1GB in size, and you get unlimited bandwidth.