
CHAPTER 3
Setting Up Your WordPress.org Site
Your self-hosted WordPress site requires a little more effort, but the payoff is in total control of the look and function of your site.
Install WordPress via Your Host’s Auto-Installer
Get an FTP Application for Manual Installation
Complete the Configuration and Installation
Troubleshoot Installation Errors
Log In to Your Site’s Administrative Area
Choose a Host for Your Site
A self-hosted WordPress site requires two things: a domain name, which was covered in Chapter 1, and a web hosting account. Choosing a good web host is important to ensure that your site is always available.
What Web Hosts Do
A web host provides a server (a computer with specialized software) that stores your site’s files and databases, and makes them available over the Internet. They also provide control panels which make it easy for you to manage a wide range of functions, such as managing site files or setting up email accounts.
WordPress Requirements
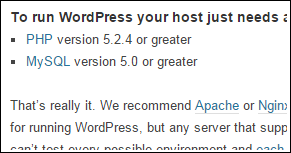
Running WordPress 4.1 requires that your web host provide two basic software packages: PHP version 5.2.4 or greater, and MySQL version 5.0 or greater. PHP is a scripting language, and MySQL is database software. Virtually any server today will meet these requirements, but it is always good to check. WordPress also recommends, but does not require, Apache or Nginx as the server software.
Your Requirements
Choosing a web host also depends on your requirements. Try to anticipate your future needs as much as possible. Will you be needing e-commerce? How many visitors are you trying to attract? Will you need to store a lot of large documents over time? Will you have the skills and time to manage your account and WordPress installation?
Types of Servers

There are three basic types of servers that web hosts offer: shared, VPS (virtual private server), and dedicated. On a shared server your site will be one of hundreds. On a dedicated server yours is the only site. VPS falls between the two: You share the server with a few other sites, but you are each separated in a way that is close to having a dedicated server. A good shared account is fine for most personal or small business sites.
Ignore Bright Shiny Hosting Objects
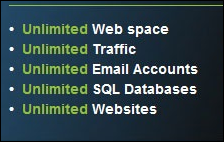
Do not pay attention to ads touting unlimited storage or bandwidth, and in particular, ignore ads with “super low” prices. Any good shared hosting account will allow you to store a lot of files and have a lot of visitors, but it is always limited. If you have an extremely large number of visitors, for example, you are asked to move up to a VPS or dedicated server. As for price, if you cannot afford $7 or more per month to promote your business, you need a new business plan. If that is too much for a personal site, consider using WordPress.com instead.
Managed WordPress Hosting

Many web hosts now offer a special type of shared hosting account aimed at WordPress users. Typically they provide automatic updating of WordPress, automatic backups, tools to ensure your site loads quickly for visitors, and specialized support for WordPress itself. These packages cost more — typically two to three times more than a regular shared hosting account — but they can save you a lot of time and potential headaches.
Checking Them Out
WordPress.org has a list of recommended hosts, which makes a good starting point. You should also search for online reviews and be sure to include “WordPress” in your search terms. Do not use hosting review sites, because many of them are just advertising; look for independent reviewers who go into the pros and cons. Then go to the support forum of a host you are interested in, and see what problems people are having and whether the problems are being resolved quickly.
What If It All Goes Wrong?
Computers break down, people make mistakes; the best web hosts sometimes have problems and maybe your website will be affected. Not to worry. If things go wrong, you simply move to a new host and point your domain name there. In fact, your new host will usually move your account for free.
Install WordPress via Your Host’s Auto-Installer
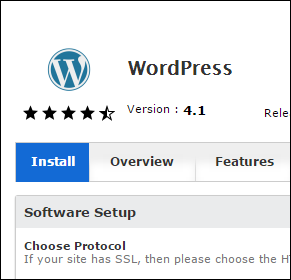
Virtually all web hosts today offer one-click installation of WordPress, so do not make this the reason for choosing a host.
In this example, the host offers an installer called Softaculous, but there are other installers, such as Simple Scripts or Fantastico.
Install WordPress via Your Host’s Auto-Installer
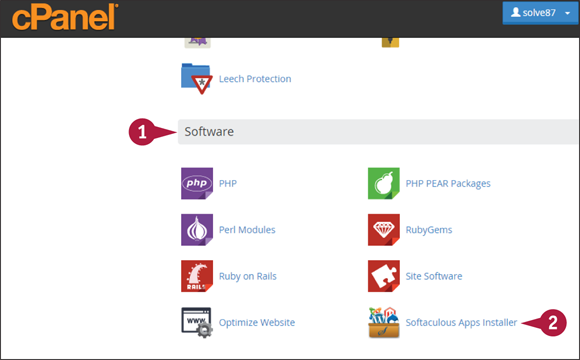
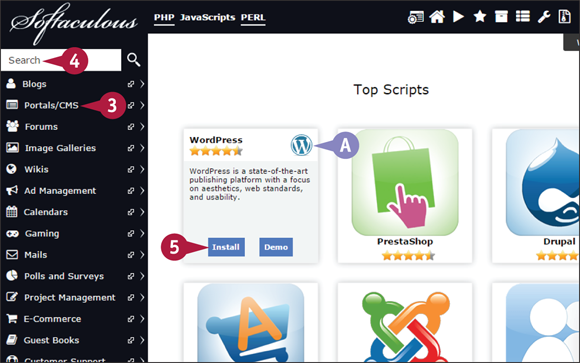
![]() After you log on to your hosting account and go to its control panel, look for a section called Software or something similar.
After you log on to your hosting account and go to its control panel, look for a section called Software or something similar.
![]() Look for and click a link to an installer; in this case, Softaculous Apps Installer. Check the help function if you are not sure.
Look for and click a link to an installer; in this case, Softaculous Apps Installer. Check the help function if you are not sure.
Note: Some hosts have a specific link for installing WordPress.
The script installer window opens.
![]() In this example, WordPress is already on the Softaculous short list.
In this example, WordPress is already on the Softaculous short list.
![]() If WordPress is not visible, look under a CMS or Blog category, depending on the installer.
If WordPress is not visible, look under a CMS or Blog category, depending on the installer.
![]() If all else fails, try searching for WordPress.
If all else fails, try searching for WordPress.
![]() After you have located WordPress, click Install.
After you have located WordPress, click Install.
![]() If you have more than one domain on this hosting account, make sure you are on the correct one.
If you have more than one domain on this hosting account, make sure you are on the correct one.
![]() Softaculous automatically inserts a directory name of “wp,” but in most cases you do not want WordPress in a special directory, so delete this.
Softaculous automatically inserts a directory name of “wp,” but in most cases you do not want WordPress in a special directory, so delete this.
![]() Type the name of the database to be created.
Type the name of the database to be created.
![]() The default prefix added to database tables is wp_. You can change this for a bit of extra security.
The default prefix added to database tables is wp_. You can change this for a bit of extra security.
![]() Type the name of the site.
Type the name of the site.
![]() Type the site description or tagline.
Type the site description or tagline.
![]() If multisite is offered, leave it unchecked.
If multisite is offered, leave it unchecked.
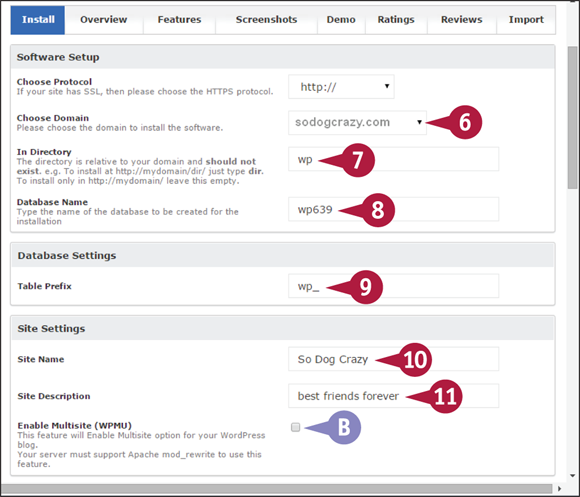
![]() Type your administrative username for logging into WordPress.
Type your administrative username for logging into WordPress.
Note: Do not use “admin.”
![]() Type your administrative password, making sure it triggers the Strong indicator.
Type your administrative password, making sure it triggers the Strong indicator.
![]() Type the administrative email.
Type the administrative email.
![]() Click
Click ![]() and choose the language for the administrative area.
and choose the language for the administrative area.
![]() Click Install.
Click Install.
The success screen has links to your new site and to the WordPress admin login.
Get an FTP Application for Manual Installation
An FTP program, or file transfer protocol program, lets you easily move files from your computer to your web host. You need it to do a manual WordPress installation. Your host may provide an FTP utility through its control panel, but using an FTP program on your computer is usually faster.
FileZilla Client is a free, open-source FTP program that works with Windows, Macintosh, and Linux computers.
Get an FTP Application for Manual Installation
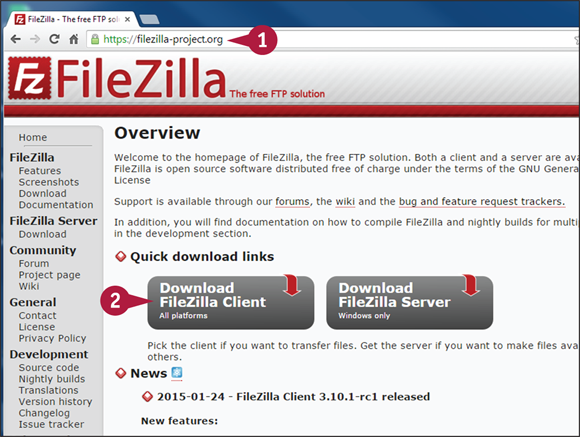
![]() After starting your web browser, go to
After starting your web browser, go to http://filezilla-project.org.
![]() Click Download FileZilla Client. Do not click on FileZilla Server.
Click Download FileZilla Client. Do not click on FileZilla Server.
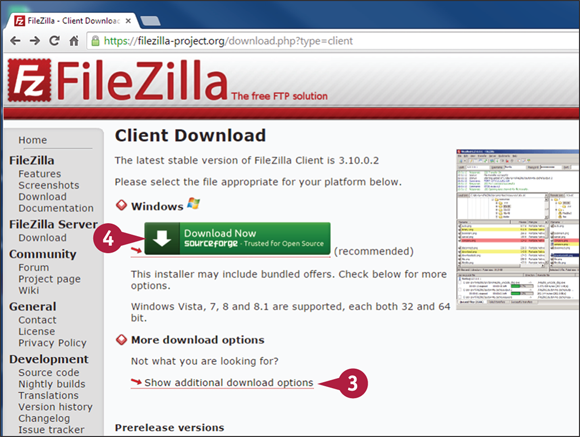
The FileZilla Client Download window opens.
![]() Review the download options to find the version for your computer’s operating system.
Review the download options to find the version for your computer’s operating system.
![]() Click the link to the version you need.
Click the link to the version you need.
A download window opens. Follow the usual steps for installing a program to your computer.
Note: You will use your FTP client to upload files to your web host by way of your FTP address. Your FTP address is probably ftp://yourdomain.com as opposed to http://yourdomain.com, which is used to view your website. Check with your web host if you are not sure.
Download WordPress Software
Before you can upload WordPress to your web host for a manual installation, you first must download the software from WordPress.org. After this simple process, you are ready to complete your manual WordPress installation.
Download WordPress Software
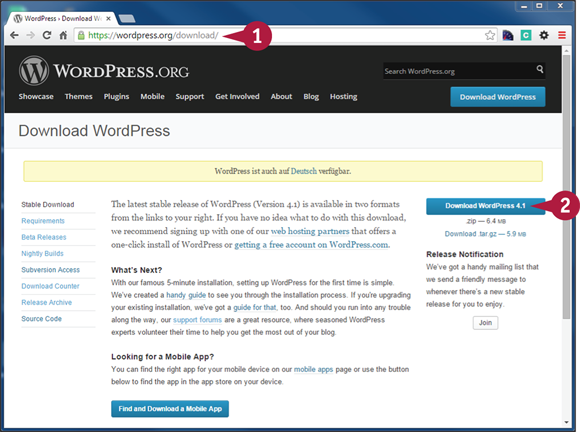
![]() In your browser, go to
In your browser, go to https://wordpress.org/download.
You can also click the Download WordPress button at the top right of every page at WordPress.org.
![]() Click Download WordPress 4.1. The button displays the most current stable version number.
Click Download WordPress 4.1. The button displays the most current stable version number.
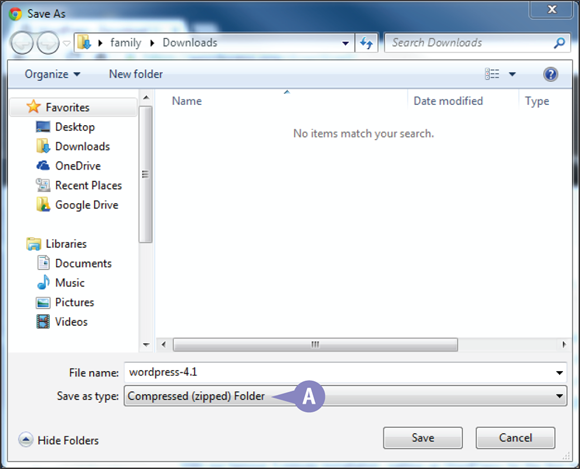
A download window, which varies with your computer’s operating system, opens.
Note: Be sure to save the file to a logical location on your computer, and make a note of that location. You will need it later during the uploading process.
![]() The file you download is a Zip file, so you will need to extract or unarchive the files, depending on your operating system.
The file you download is a Zip file, so you will need to extract or unarchive the files, depending on your operating system.
Set Up the MySQL Database
You need a MySQL database to run WordPress. No database, no site, so you need to set up the database before running a manual installation.
Go to your web host and log on to its control panel to get started. This example shows the widely used cPanel control panel, but every web host has an equivalent. Check with technical support at your host if you cannot find the appropriate link.
Set Up the MySQL Database
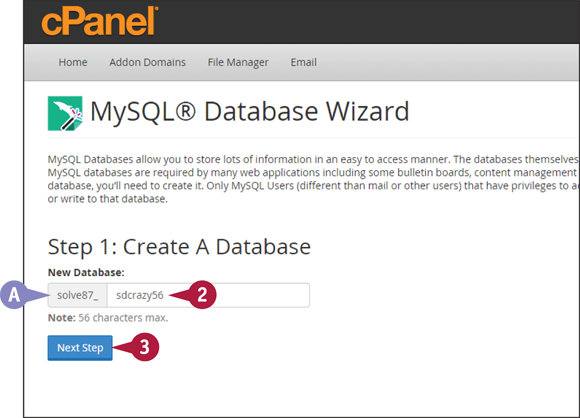
![]() Click the MySQL set-up link for your hosting control panel. For cPanel, you would click MySQL Database Wizard.
Click the MySQL set-up link for your hosting control panel. For cPanel, you would click MySQL Database Wizard.
![]() Begin by typing a name for your database.
Begin by typing a name for your database.
![]() Most shared servers have a beginning portion of the database name which you do not control. Typically, this is your hosting account’s username.
Most shared servers have a beginning portion of the database name which you do not control. Typically, this is your hosting account’s username.
Note: You need the full name (both parts) for your WordPress install.
![]() Click Next Step.
Click Next Step.
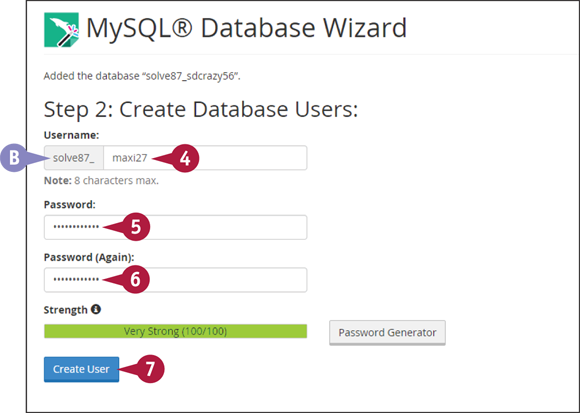
![]() Type a username.
Type a username.
![]() As with the database name in the section “Install WordPress via Your Host’s Auto-Installer” (see step 9), the first portion of the username is determined by the server.
As with the database name in the section “Install WordPress via Your Host’s Auto-Installer” (see step 9), the first portion of the username is determined by the server.
![]() Type a password, making sure it shows Strong or Very Strong in the strength indicator.
Type a password, making sure it shows Strong or Very Strong in the strength indicator.
![]() Retype the password.
Retype the password.
Note: Save looking them up later by recording the full username and password.
![]() Click Create User.
Click Create User.

![]() The next window confirms the creation of the user.
The next window confirms the creation of the user.
![]() At various points in the process, you may see the full database and usernames. If you have not yet recorded these, now is your chance.
At various points in the process, you may see the full database and usernames. If you have not yet recorded these, now is your chance.
![]() To give the user you created — that is you, the administrator — all the privileges you require to set up and operate the database, click All Privileges (
To give the user you created — that is you, the administrator — all the privileges you require to set up and operate the database, click All Privileges (![]() changes to
changes to ![]() ).
).
![]() Click Next Step at the bottom of the screen (not shown).
Click Next Step at the bottom of the screen (not shown).
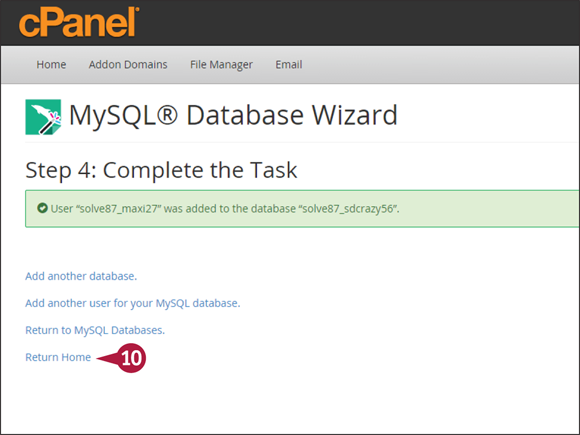
A new screen confirms the user was added to the database.
![]() Click Return Home.
Click Return Home.
You are back at the cPanel home.
Upload the WordPress Files
Time now to upload the files that you downloaded and unzipped from WordPress.org. Only after uploading these files to your server can the installation process begin.
Upload the WordPress Files
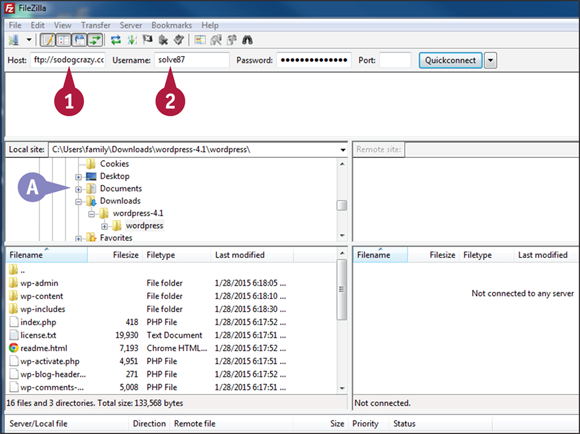
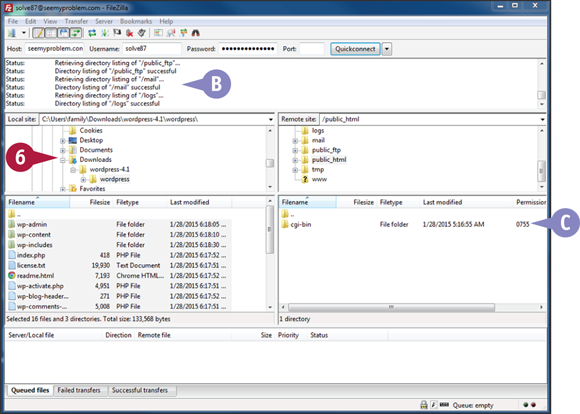
![]() When you open your FTP client, FileZilla in this example, the files on your local computer appear in the lower left panel.
When you open your FTP client, FileZilla in this example, the files on your local computer appear in the lower left panel.
![]() Type your host name into the Host field.
Type your host name into the Host field.
Note: The host is just your domain name. If that does not work, check with your host.
![]() Type your username in the Username field.
Type your username in the Username field.
Normally this is the username for your hosting account.
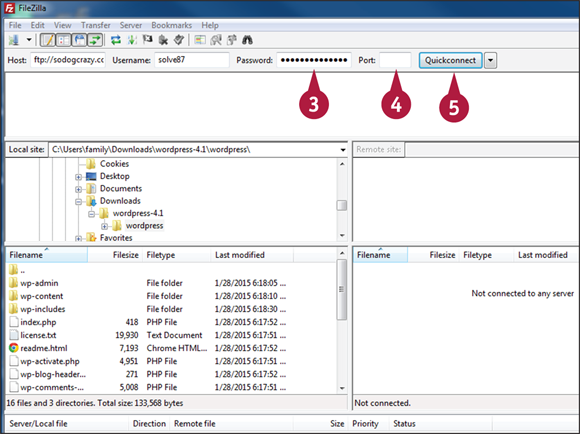
![]() Type your password in the Password field.
Type your password in the Password field.
Normally this is the password for your hosting account.
![]() The Port field can be left empty unless you want to use secure file transfer (SFTP). Check with your host for that port number.
The Port field can be left empty unless you want to use secure file transfer (SFTP). Check with your host for that port number.
![]() Click Quickconnect.
Click Quickconnect.
![]() FileZilla shows the progress of the connection.
FileZilla shows the progress of the connection.
![]() When connected, your web host directory appears in the right panel.
When connected, your web host directory appears in the right panel.
![]() Navigate in the left panel until you find the folder containing the WordPress files you downloaded and extracted, and open that folder by double-clicking it.
Navigate in the left panel until you find the folder containing the WordPress files you downloaded and extracted, and open that folder by double-clicking it.
![]() In the right panel, open the public_html folder. It will most likely be empty, except for a folder called cgi-bin.
In the right panel, open the public_html folder. It will most likely be empty, except for a folder called cgi-bin.
Note: public_html is the most common name, but another is httpdocs.
![]() In the left panel, select all the WordPress folders and files.
In the left panel, select all the WordPress folders and files.
![]() Drag the highlighted items to the right panel.
Drag the highlighted items to the right panel.
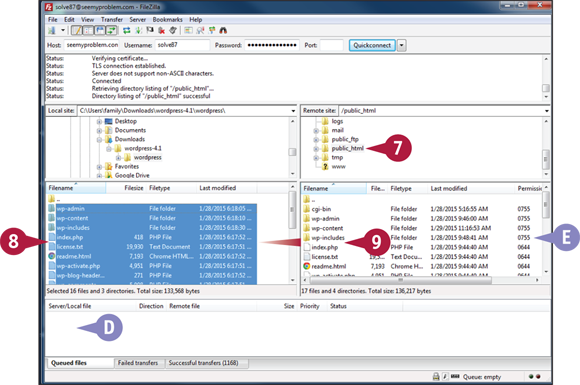
![]() The upload process takes several minutes, and you can watch the progress in the bottom pane of the FileZilla window.
The upload process takes several minutes, and you can watch the progress in the bottom pane of the FileZilla window.
![]() When uploading is complete, you see all the WordPress files in the right panel.
When uploading is complete, you see all the WordPress files in the right panel.
Complete the Configuration and Installation
So far you have been getting ready to install WordPress. Now it is time to actually do the installation.
Complete the Configuration and Installation
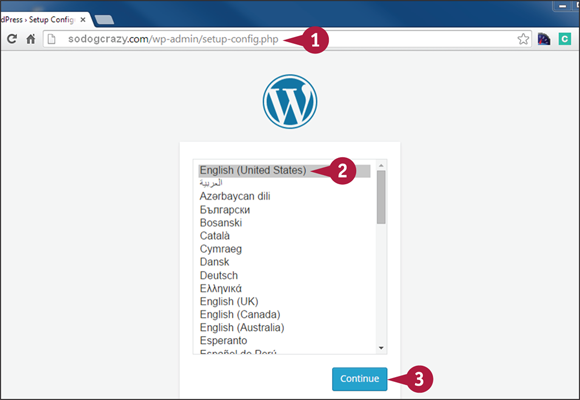
![]() Type your domain name in your browser and press
Type your domain name in your browser and press ![]() .
.
![]() Choose a language for your WordPress site by scrolling and clicking on it to highlight it.
Choose a language for your WordPress site by scrolling and clicking on it to highlight it.
![]() Click Continue.
Click Continue.
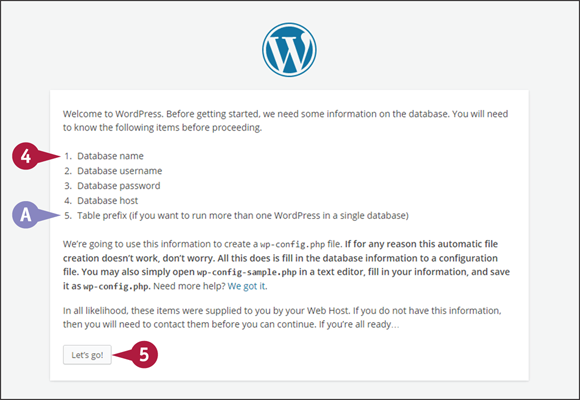
A window opens and reminds you of the information WordPress needs to create your configuration file.
![]() Review the list of needed information — which you created when you set up your MySQL database — and make sure you have it all available.
Review the list of needed information — which you created when you set up your MySQL database — and make sure you have it all available.
![]() The table prefix is an optional item if you want a bit of extra security instead of using the default wp_ prefix.
The table prefix is an optional item if you want a bit of extra security instead of using the default wp_ prefix.
![]() Click Let’s go.
Click Let’s go.
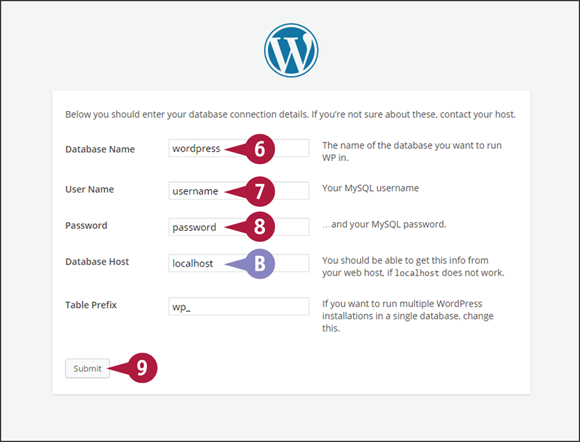
The connection details window opens.
![]() Type your MySQL database name.
Type your MySQL database name.
![]() Type your database username.
Type your database username.
![]() Type your database user password.
Type your database user password.
![]() The default localhost is fine for most servers. Check with your host if you are not sure.
The default localhost is fine for most servers. Check with your host if you are not sure.
![]() Click Submit.
Click Submit.
![]() If all went well, a confirmation appears. Click Run the install.
If all went well, a confirmation appears. Click Run the install.

The Information Needed window opens.
![]() Type your site title.
Type your site title.
![]() Type a username. Do not use “admin.”
Type a username. Do not use “admin.”
![]() Type a password, making sure it is strong.
Type a password, making sure it is strong.
![]() Type your email.
Type your email.
![]() If you do not want search engines to index your site, click this option (
If you do not want search engines to index your site, click this option (![]() changes to
changes to ![]() ).
).
![]() Click Install WordPress.
Click Install WordPress.
![]() The Success window opens and shows your WordPress username. Click Log In if you are ready.
The Success window opens and shows your WordPress username. Click Log In if you are ready.
Note: WordPress emails your username to the email address you provided.
Troubleshoot Installation Errors
Things do not always go as planned, of course. When this happens with a manual WordPress installation, a bit of troubleshooting is usually all it takes to get back on track.
Trouble Uploading Files
Although the set of WordPress files is not very large (around 17MB), you might have a slow or interrupted connection. Most FTP programs are good at picking up where they left off, but if you are not sure it finished properly, just upload again, overwriting any existing files. Make sure you have entered your hosting account login for your FTP credentials (or whatever the hosting company gave you for FTP purposes). Do not create a new FTP account for this process, or you may run into file ownership issues.
Cannot See the First WordPress Install Screen
If you navigate to your site’s URL, and instead of the first WordPress installation screen you get a message saying the site cannot be found or is under construction, you may have uploaded the WordPress folder you got from WordPress.org rather than its contents. If so, just move the files out of the folder using FileZilla or your host’s file management utility.
Cannot Select Database
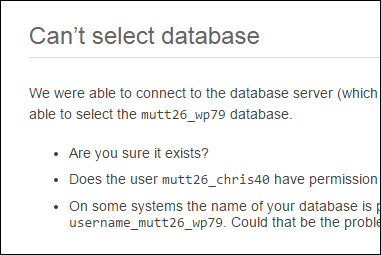
During the installation process, WordPress may let you know that it cannot connect to the database using the credentials you entered. Make sure you are correctly typing the password in particular, and that you have the correct database host name. Check with your host, or consult a list of some popular hosts’ hostnames at http://codex.wordpress.org/Editing_wp-config.php. If you think you may have copied the password incorrectly, go back to your hosting panel and re-enter the database user password.
Other Error Messages

If you complete the installation but the first time you log in to WordPress you get error messages, you are possibly missing a file or a file got corrupted on upload. Using your FTP program, upload all the WordPress files again, telling the program to overwrite the existing files. Make sure the Transfer Type is set to Auto (the default) and not to Binary or ASCii.
Never Change Permissions to 777
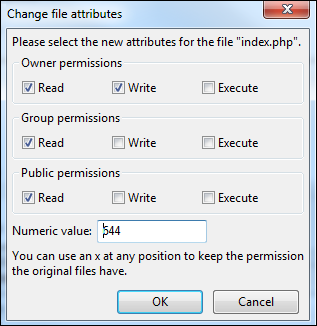
Sometimes you will read advice on the Internet to change the permissions on a file or folder to 777 in order to troubleshoot a problem. A numeric value of 777 for permissions means anyone can read, execute, or write, that is, change, a file. WordPress automatically sets all permissions during installation. Using your FTP program, it is possible to change permissions, but you should not need to and certainly never to 777.
Go Automatic
Web hosts began offering auto-installers precisely because things do occasionally go wrong for manual installations. It may be time to switch to this method of installing WordPress if you are still having issues. If your host does not offer this service, consider switching hosts.
You Can Always Start Again
If all else fails, and you still want to do a manual installation, you can delete everything, including the database, using your hosting control panel and start again. Before doing so, double-check that your host meets the WordPress requirements. If you are still having trouble and your hosting company is not providing sufficient help, you can really start again by getting a new host, pointing your domain there, and trying the install with it.
Log In to Your Site’s Administrative Area
To manage your self-hosted WordPress site, you need to log in to the administration area. This section outlines the two main ways of doing this.
Do not go to WordPress.com and try to log in. Your site is self-hosted and has nothing to do with WordPress.com.
Log In to Your Site’s Administrative Area
Log In from a URL
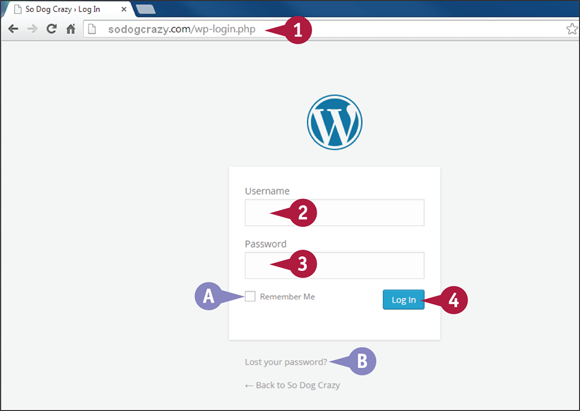
![]() In your browser, type your domain name followed by /wp-admin and press
In your browser, type your domain name followed by /wp-admin and press ![]()
The browser takes you to your WordPress Log In page.
![]() Type your WordPress username in the Username field.
Type your WordPress username in the Username field.
![]() Type your WordPress password in the Password field.
Type your WordPress password in the Password field.
![]() If you want WordPress to remember your computer for 14 days rather than 2 days, click Remember Me (
If you want WordPress to remember your computer for 14 days rather than 2 days, click Remember Me (![]() changes to
changes to ![]() ).
).
Note: Do not use this if others can access your computer.
![]() You can click the Lost your password link if you have forgotten your password.
You can click the Lost your password link if you have forgotten your password.
![]() Click Log In.
Click Log In.
The Dashboard opens.
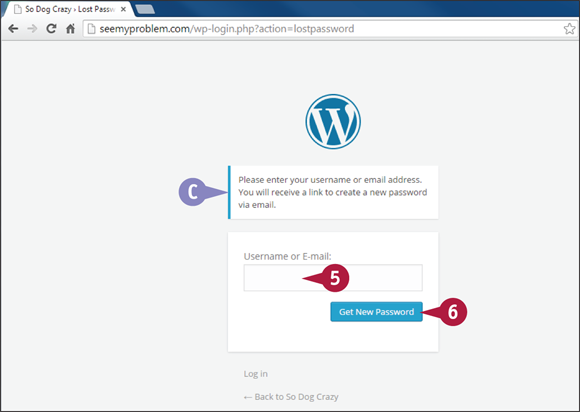
![]() The lost password screen explains the process. After completing this screen, you receive an email with a link allowing you to change your password.
The lost password screen explains the process. After completing this screen, you receive an email with a link allowing you to change your password.
![]() Type your username or administrative email.
Type your username or administrative email.
![]() Click Get New Password.
Click Get New Password.
Log In from Your Site
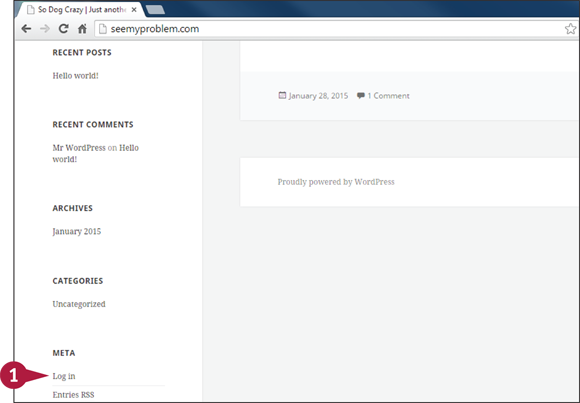
![]() Many WordPress themes have a default widget or a footer area that displays a Log In link. Click that link to get to the Login screen.
Many WordPress themes have a default widget or a footer area that displays a Log In link. Click that link to get to the Login screen.
Note: If you want a Log In link on your site and it does not appear by default, you can add it using the Meta widget that comes with WordPress.
View Your New Site
The moment you completed the installation of WordPress there is a website set up. It does not contain much at this point, but all the basics are there and it is important to become familiar with them.
Note: Not shown in this screenshot is a footer area that appears on all pages.
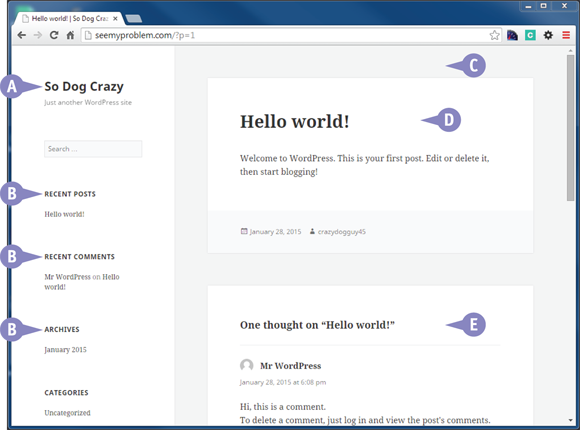
![]() The header area of the site contains items such as your site title, tagline, and possibly a header image or logo. Learn about controlling this area in Chapter 9.
The header area of the site contains items such as your site title, tagline, and possibly a header image or logo. Learn about controlling this area in Chapter 9.
![]() These are individual widgets grouped in a widget area. Learn about widgets and widget areas in Chapter 8.
These are individual widgets grouped in a widget area. Learn about widgets and widget areas in Chapter 8.
![]() Whereas the default Twenty Fifteen theme does not show a menu by default, most themes do, and it usually appears somewhere in the header area. Learn about menus in Chapter 8.
Whereas the default Twenty Fifteen theme does not show a menu by default, most themes do, and it usually appears somewhere in the header area. Learn about menus in Chapter 8.
![]() This is a post, which is one type of content, the other being WordPress pages. Learn about creating written content in Chapter 5.
This is a post, which is one type of content, the other being WordPress pages. Learn about creating written content in Chapter 5.
![]() The comments area for this post. Learn about managing comments in Chapter 11.
The comments area for this post. Learn about managing comments in Chapter 11.
Know the Administrative Screen
The power of WordPress is to enable easy management of your site content, design, and functions. This is done through a series of administrative screens, also known as admin screens, all of which share some common elements.
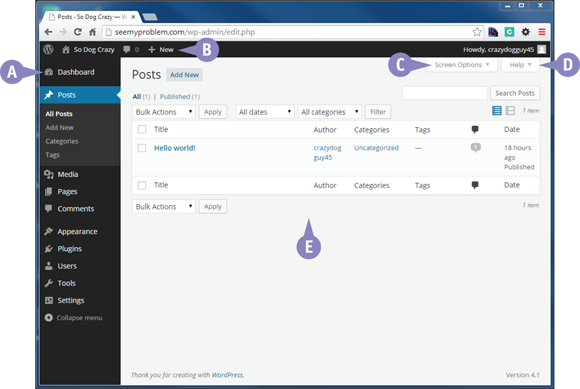
![]() The left admin menu runs the height of the left side of all screens. From here you control your content, settings, theme, plugins, widgets, comments, and more.
The left admin menu runs the height of the left side of all screens. From here you control your content, settings, theme, plugins, widgets, comments, and more.
![]() The toolbar is the black strip across the top of all admin screens and can also appear on the front end of the site while you are logged in.
The toolbar is the black strip across the top of all admin screens and can also appear on the front end of the site while you are logged in.
![]() A Screen Options link appears on most screens, allowing you to control the display of meta boxes and other elements.
A Screen Options link appears on most screens, allowing you to control the display of meta boxes and other elements.
![]() Most admin screens have a Help link which displays information about that particular screen.
Most admin screens have a Help link which displays information about that particular screen.
![]() The large gray area is where you will find the administrative tools for any particular screen. Here you see a list of all posts.
The large gray area is where you will find the administrative tools for any particular screen. Here you see a list of all posts.
Get to Know the Dashboard
The Dashboard is the administrative home page for your self-hosted, WordPress.org installation. From the Dashboard, you can get a snapshot of the state of your site as well as the WordPress community.
When starting out with WordPress, the Dashboard is an important part of getting to know the administrative area.

![]() The Welcome to WordPress box has a series of links to key functions like adding posts or pages, or managing widgets or menus. You can dismiss this box when you are comfortable finding your way around.
The Welcome to WordPress box has a series of links to key functions like adding posts or pages, or managing widgets or menus. You can dismiss this box when you are comfortable finding your way around.
![]() At a Glance gives you overall totals for various types of content, as well as listing the version of WordPress you are running and what theme is active.
At a Glance gives you overall totals for various types of content, as well as listing the version of WordPress you are running and what theme is active.
![]() Activity lists your most recent items published and the most recent comments on your site.
Activity lists your most recent items published and the most recent comments on your site.
![]() Quick Draft allows you to make a quick draft post you can return to later and finish.
Quick Draft allows you to make a quick draft post you can return to later and finish.
![]() WordPress News keeps you up to date with what is happening in the WordPress community.
WordPress News keeps you up to date with what is happening in the WordPress community.
Get to Know the Toolbar
The toolbar for self-hosted sites, visible at the top of both the back end and front end of your site when you are logged in, gives you quick access to the administrative functions you most need. You can remove the toolbar from the front end of your site, as explained in the section “Select Your Profile Settings.”
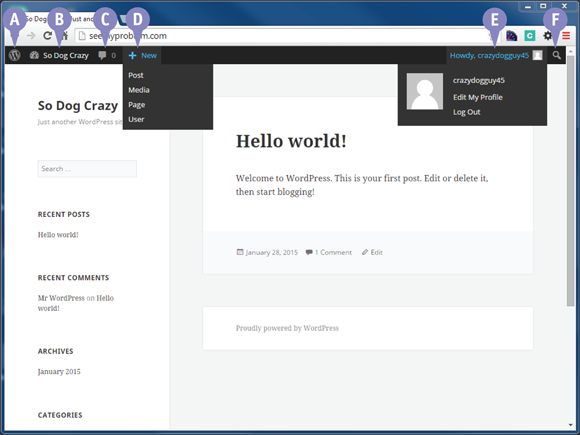
![]() Drop-down menu links to information about
Drop-down menu links to information about WordPress.org and to support.
![]() When on the front end of the site, this drop-down menu links to frequently used administrative modules. When on the back end of the site, clicking the site name takes you to the home page of the front end of the site.
When on the front end of the site, this drop-down menu links to frequently used administrative modules. When on the back end of the site, clicking the site name takes you to the home page of the front end of the site.
![]() Shows number of comments awaiting approval, if any, and goes directly to the Comments panel to moderate them.
Shows number of comments awaiting approval, if any, and goes directly to the Comments panel to moderate them.
![]() The New drop-down menu on the toolbar makes it easy to add new posts, media file(s), pages, and users.
The New drop-down menu on the toolbar makes it easy to add new posts, media file(s), pages, and users.
![]() The Profile menu on the toolbar shows your username, along with your Gravatar image (or a generic icon, as in this case). From the dropdown you can also edit your profile or log out of WordPress.
The Profile menu on the toolbar shows your username, along with your Gravatar image (or a generic icon, as in this case). From the dropdown you can also edit your profile or log out of WordPress.
![]() Clicking the magnifying glass slides out a search box.
Clicking the magnifying glass slides out a search box.
Check Your General Settings
Whereas some of your site’s general settings were entered during the installation process, there are a few more you need to check before getting started on your site.
Check Your General Settings
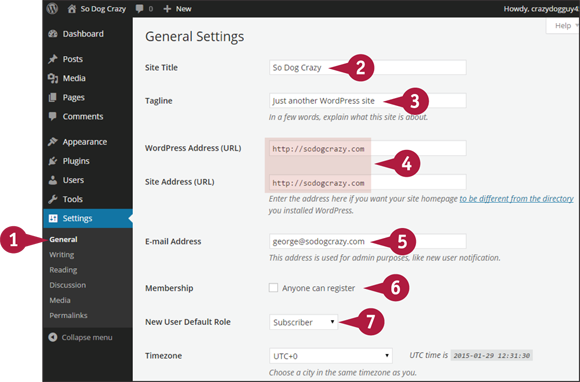
![]() On the left admin menu under Settings, click General.
On the left admin menu under Settings, click General.
![]() The site title you entered during installation can be changed from here.
The site title you entered during installation can be changed from here.
![]() If you did an auto-install (see the section, “Install WordPress via Your Host’s Auto-Installer”), the tagline should already be changed. On a manual installation, it show the default “Just another WordPress site,” which you can change from here.
If you did an auto-install (see the section, “Install WordPress via Your Host’s Auto-Installer”), the tagline should already be changed. On a manual installation, it show the default “Just another WordPress site,” which you can change from here.
![]() Do not change the WordPress address or site address unless you know what you are doing. It could break your site.
Do not change the WordPress address or site address unless you know what you are doing. It could break your site.
![]() The administrative email address entered during installation can be changed here.
The administrative email address entered during installation can be changed here.
![]() Leave the Membership option unchecked.
Leave the Membership option unchecked.
![]() Leave the New User Default Role option at Subscriber.
Leave the New User Default Role option at Subscriber.

![]() Choose a city in your time zone from the drop-down menu.
Choose a city in your time zone from the drop-down menu.
![]() Pick a date format (
Pick a date format (![]() changes to
changes to ![]() ).
).
![]() Pick a time format (
Pick a time format (![]() changes to
changes to ![]() ).
).
![]() Click
Click ![]() and choose the day the week starts on.
and choose the day the week starts on.
![]() The site language you chose during installation.
The site language you chose during installation.
![]() Click Save Changes.
Click Save Changes.
Select Your Profile Settings
Your profile contains settings that control how you view the admin screens and the way you are identified to visitors to your site.
Select Your Profile Settings
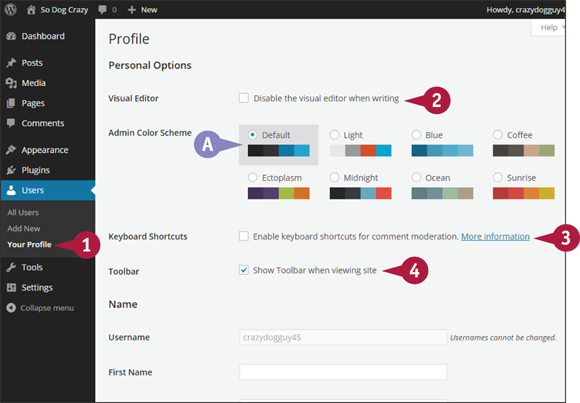
![]() Click Your Profile under Users.
Click Your Profile under Users.
Note: You can also access Your Profile from the top right of the toolbar.
![]() Click this option to disable Visual mode of the content editor during writing (
Click this option to disable Visual mode of the content editor during writing (![]() changes to
changes to ![]() ).
).
![]() Several color schemes are available for admin screens. See them in real time by clicking one (
Several color schemes are available for admin screens. See them in real time by clicking one (![]() changes to
changes to ![]() ).
).
![]() Click this option if you want keyboard shortcuts enabled when moderating comments (
Click this option if you want keyboard shortcuts enabled when moderating comments (![]() changes to
changes to ![]() ). Unless you get a lot of comments, leave this unchecked.
). Unless you get a lot of comments, leave this unchecked.
![]() Click this option to hide the toolbar while viewing your site (
Click this option to hide the toolbar while viewing your site (![]() changes to
changes to ![]() ).
).
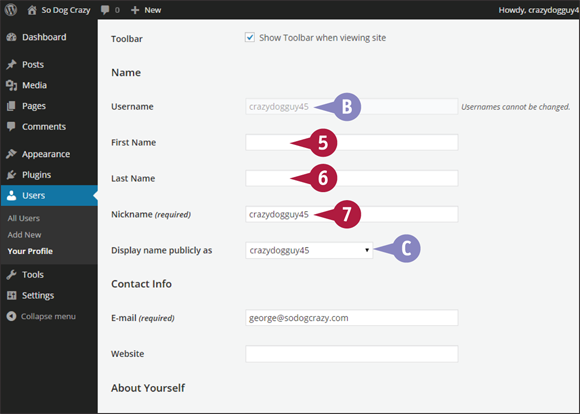
![]() Your username cannot be changed.
Your username cannot be changed.
![]() Type your first name.
Type your first name.
![]() Type your last name.
Type your last name.
![]() Type a nickname.
Type a nickname.
Note: The nickname defaults to your username; for security you should change it.
![]() The Display Name Publicly As dropdown defaults to the username.
The Display Name Publicly As dropdown defaults to the username.
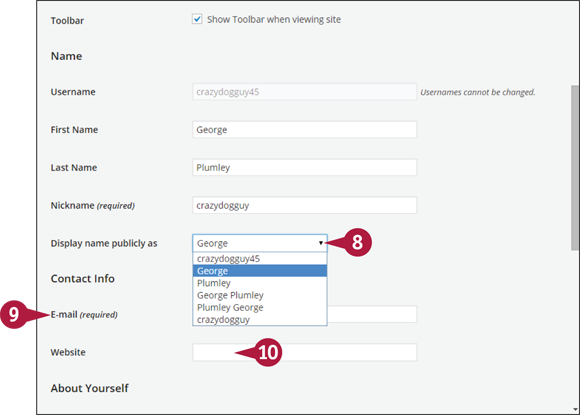
![]() Once you have entered some names, the dropdown shows your choices. Click
Once you have entered some names, the dropdown shows your choices. Click ![]() and choose the public identity you prefer.
and choose the public identity you prefer.
![]() Creating a user requires a username and an email address. You can update the email from here.
Creating a user requires a username and an email address. You can update the email from here.
![]() The website address entered here may be used by a theme when displaying site authors.
The website address entered here may be used by a theme when displaying site authors.
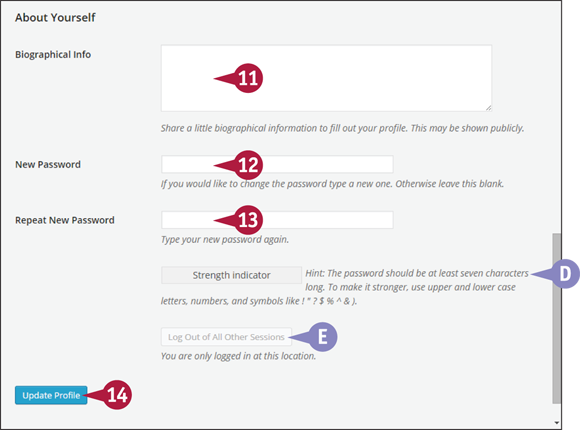
![]() The short biography entered here is sometimes used by themes when listing authors on a site.
The short biography entered here is sometimes used by themes when listing authors on a site.
![]() You can change your password here.
You can change your password here.
![]() Re-enter your new password.
Re-enter your new password.
![]() The indicator shows how strong your password is based on the instructions.
The indicator shows how strong your password is based on the instructions.
![]() If you have logged in to WordPress on multiple devices, this button becomes active and logs you out of all other instances of WordPress.
If you have logged in to WordPress on multiple devices, this button becomes active and logs you out of all other instances of WordPress.
![]() Click Update Profile.
Click Update Profile.
Your profile is saved and a confirmation message appears.
If you changed your public identity, the new name appears at the top right of the toolbar.
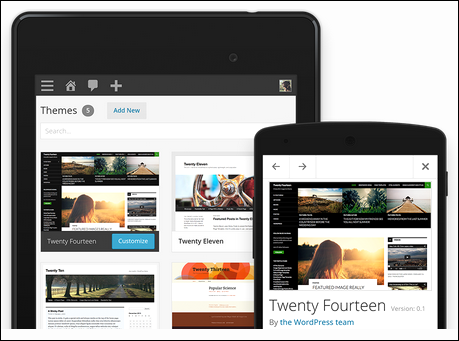
Choose a Theme
Self-hosted WordPress blogs have nearly limitless options when it comes to themes — the set of files that control the look and layout of your site. Finding a great-looking theme is easy these days, but you need to look beyond the bright shiny front ends. In this section, you find some key questions to be asked before you try or buy.
There are a couple of default themes that come with your WordPress installation. It is important to keep these in your theme library even if you are not using them. They can be important for backup or testing purposes in case of issues down the road.
Theme Types
Many themes are built to display content in specific ways or offer features that appeal to a particular kind of site owner. Consider the purpose and content of your site. If you are a photographer or ad agency, you might search for portfolio themes. If you are selling products, look for catalog/e-commerce themes. There are themes aimed at all kinds of businesses, from real estate to restaurants to bands.
It Is Not Just about Appearance
Although a theme controls the look of your site, it does much more. For example, WordPress has a menu system, but one theme may offer only a single menu location, whereas another offers three. Note: If the theme does not use the WordPress menu system, find another theme. Others do more than they should, such as search engine optimization (SEO), which is best handled by a plugin. Ask yourself if you would want the function even if you got rid of the theme; then it belongs in a plugin.
Ease of Use
Themes can take very different approaches to the way they are administered. You may find one approach easier than another. Therefore, it is important to try out the administrative side of a theme, not just view a demo of the front end. Fortunately, WordPress makes it easy to install, activate, and delete themes, so test-drive as many as you need.
Theme Frameworks
One type of WordPress theme is called a framework. The idea is that there is a parent theme common to all kinds of child themes. The parent does most of the work, and the child themes give the site its appearance. The advantage here is that you do not have to lose functionality or learn new ways of doing things when you switch the look of your site. Those are common problems today because themes vary so greatly between different makers. A framework is a way of future-proofing your WordPress site, saving you time and money.
Responsive or Not?
A responsive theme means that it adapts to the type of device the visitor is using: desktop, tablet, smartphone, and so on. Most themes created since 2013 are responsive, but you always need to check. If you find a theme you like which is not responsive, WordPress can install a plugin fairly easily that will display your theme to mobile users using a special mobile theme.
Free Themes
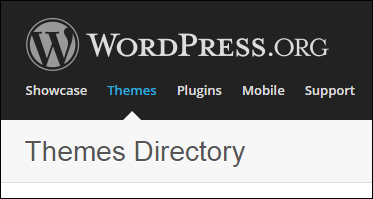
There are only two places from which you should get a free theme: the Themes Directory at http://wordpress.org/extend/themes or a reputable commercial theme maker offering a free sample. Anywhere else and you risk getting not only a poor quality theme, but one with malware. You can search the Directory right from your WordPress installation by clicking Appearance in the left admin menu and then the Install Themes button to search.
Commercial Themes
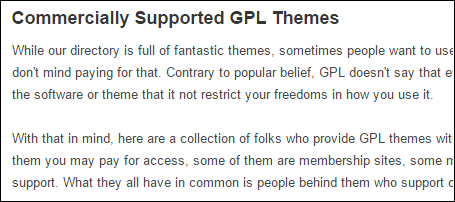
Commercial or premium themes refer to themes you pay for. In addition to high quality features and coding, you should expect to get fast support, but none of this is guaranteed, so you still need to do your homework. These themes do not appear on your site’s Appearance/Install Themes search. You can find links to commercial theme makers at http://wordpress.org/themes/commercial.
Custom Themes
You can get a custom theme in two ways: Take an existing theme and change its coding, or have a theme built from scratch. Customizing an existing theme is the less expensive and more common route to take, because typically you only need to change some aspects of design or add an additional function or two. Building a theme from scratch may be necessary, though, if you need a lot of very specific functionality. In either case, you need to hire a designer and/or developer who is experienced with WordPress.
Install Your New Theme
You can install and activate free themes from the WordPress directory more easily than you can change your clothes. Installing commercial themes is only slightly more involved.
This section assumes you already chose a theme by following the guidance in the previous section, “Choose a Theme.”
Install Your New Theme
Themes Selected through Install Themes on Your Site
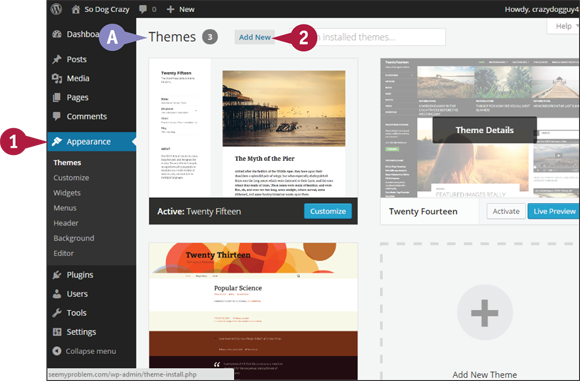
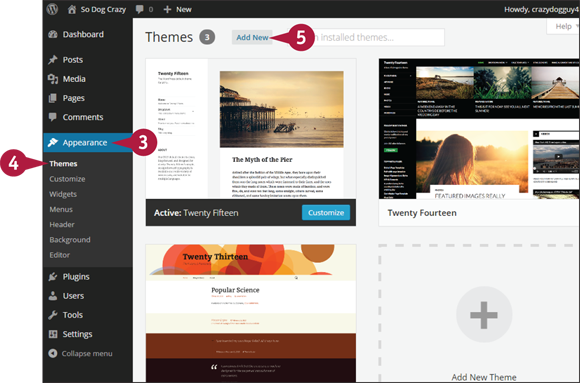
![]() Click Appearance on the left admin menu.
Click Appearance on the left admin menu.
![]() The Themes panel opens and displays all themes in your theme library. Which default WordPress themes are installed depends on the current version of WordPress.
The Themes panel opens and displays all themes in your theme library. Which default WordPress themes are installed depends on the current version of WordPress.
![]() Click Add New.
Click Add New.
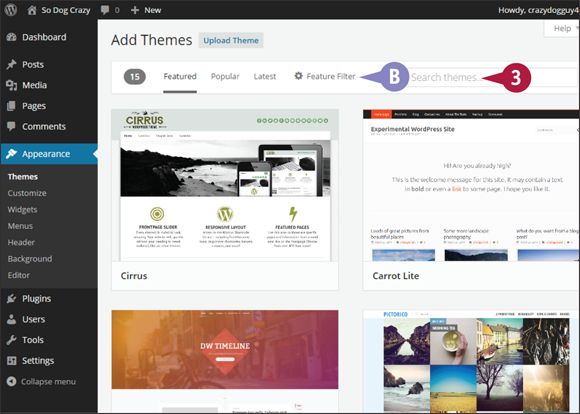
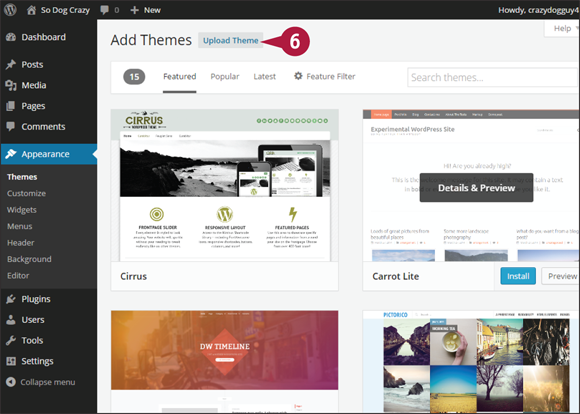
The Add Themes screen opens. You are now viewing the WordPress themes directory from within your administration area.
![]() You can search through the directory using a number of filters.
You can search through the directory using a number of filters.
Note: You see large thumbnails of each theme as you browse. Mouse over a theme and you see an Install and a Preview button. Clicking Preview shows you a demo of the theme.
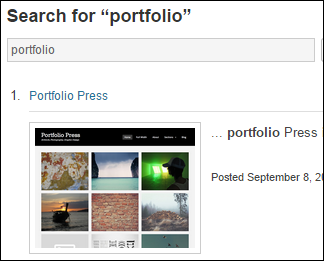
![]() Type the name of your chosen theme in the search box. When you finish typing, WordPress automatically searches.
Type the name of your chosen theme in the search box. When you finish typing, WordPress automatically searches.
This example searches for the Carrot Lite theme.
You should see a large thumbnail of your theme. Mouse over to see the Install button.
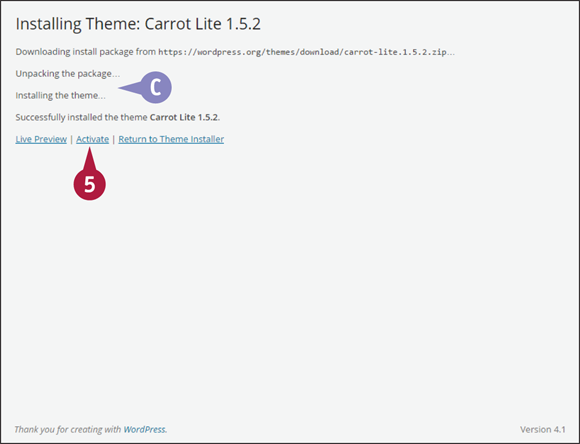
![]() Click Install.
Click Install.
![]() WordPress displays the completed steps as it installs the theme. This should take only a few seconds.
WordPress displays the completed steps as it installs the theme. This should take only a few seconds.
![]() Click Activate to make the theme active.
Click Activate to make the theme active.
WordPress activates the theme and returns you to the Themes screen.
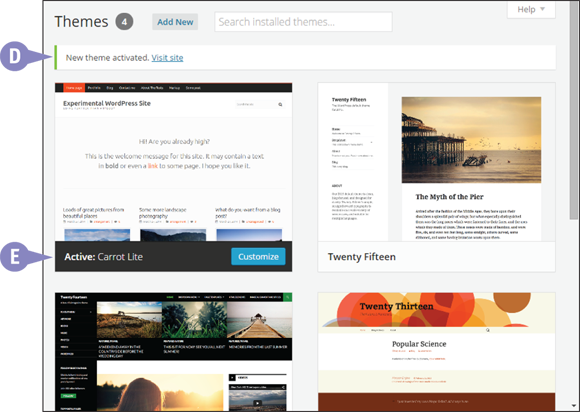
![]() A success message confirms that you have activated a new theme. Always watch for success messages when taking an action in WordPress.
A success message confirms that you have activated a new theme. Always watch for success messages when taking an action in WordPress.
![]() Your newly active theme appears at the top left of the list of installed themes.
Your newly active theme appears at the top left of the list of installed themes.
When you buy a theme or get a free theme from a commercial theme maker, you need to download the theme files and do a manual installation. Fortunately, WordPress makes the process very simple.
Themes Installed Manually
![]() Download the theme from the seller’s site, or if you have been searching at
Download the theme from the seller’s site, or if you have been searching at WordPress.org, you can download a theme there. Themes should be in a zipped file.
![]() Save the file to your computer.
Save the file to your computer.
Note: Do not extract it; leave it as a Zip file.
![]() In the left admin menu, click Appearance.
In the left admin menu, click Appearance.
![]() Click Themes.
Click Themes.
![]() Click Add New at the top of the Themes screen.
Click Add New at the top of the Themes screen.
The Add Themes screen opens.
![]() Click Upload Theme.
Click Upload Theme.
The Add Themes screen changes to allow you to choose a file for upload.
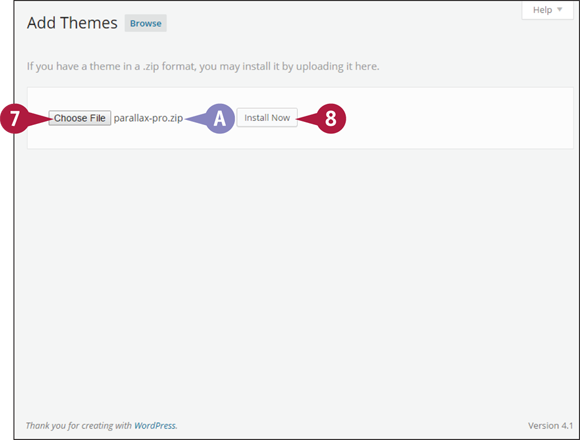
![]() Click Choose File and browse your computer to find your theme’s Zip file.
Click Choose File and browse your computer to find your theme’s Zip file.
![]() When you have selected it, the file name appears beside the Choose File button.
When you have selected it, the file name appears beside the Choose File button.
![]() Click Install Now.
Click Install Now.
WordPress lists the progress of your installation.
![]() When the theme is successfully installed, click Activate.
When the theme is successfully installed, click Activate.
The Themes screen opens with the new theme activated at the top left of all the installed themes.
When WordPress Says It Cannot Install the Theme
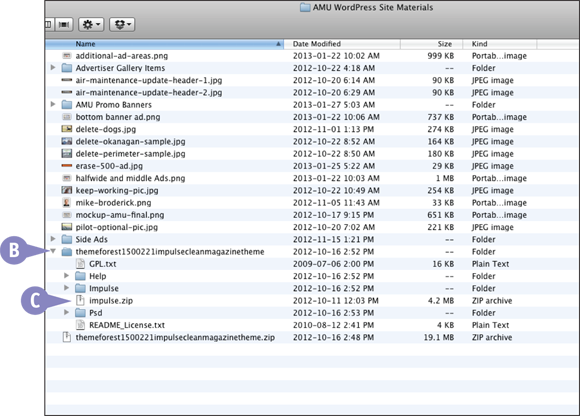
![]() Sometimes the Zip file you download from a commercial theme maker contains additional files, such as Photoshop files.
Sometimes the Zip file you download from a commercial theme maker contains additional files, such as Photoshop files.
![]() Inside that downloaded Zip file is another Zip file, which is the actual theme, and the file that you need to upload to WordPress.
Inside that downloaded Zip file is another Zip file, which is the actual theme, and the file that you need to upload to WordPress.
Note: Check inside the extracted theme folder for a ReadMe.txt file, which may have additional installation instructions.