
CHAPTER 4
Knowing Your Administration Tools
The WordPress admin screens provide the tools and information you need to manage your website.
Choose the Discussion Settings
Learn about Site Visibility Settings
Customize Admin Screens
WordPress makes it easy for you to customize the layout and organization of many admin screens so you can work more efficiently.
The boxed areas which appear on many admin screens are referred to as meta boxes.
Customize Admin Screens
Collapse Meta Boxes
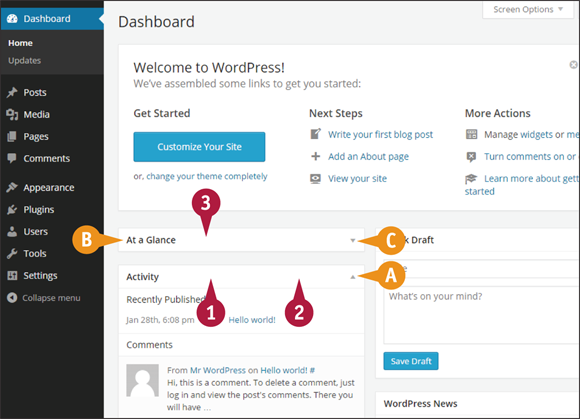
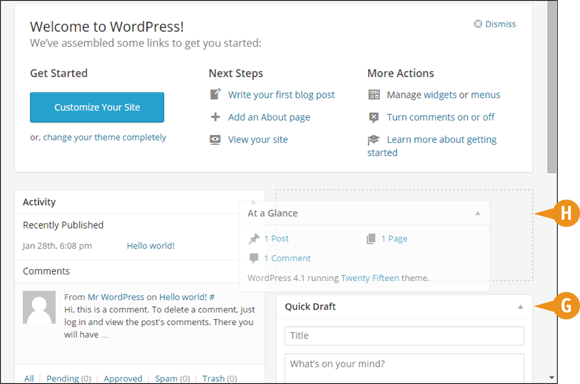
![]() Position your mouse pointer anywhere in the header area of a meta box — in this case, Activity.
Position your mouse pointer anywhere in the header area of a meta box — in this case, Activity.
![]() The arrow (
The arrow (![]() ) at the right is pointing up, indicating the meta box is open.
) at the right is pointing up, indicating the meta box is open.
![]() Click anywhere in the header to make the box collapse.
Click anywhere in the header to make the box collapse.
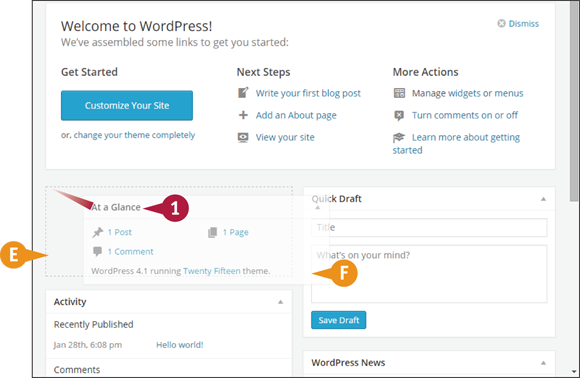
![]() The meta box collapses and only the heading appears. This meta box, At a Glance, is collapsed.
The meta box collapses and only the heading appears. This meta box, At a Glance, is collapsed.
![]() In the exploded view, the indicator arrow at the right is now pointing downward (
In the exploded view, the indicator arrow at the right is now pointing downward (![]() ).
).
![]() Click anywhere in the header to expand the meta box again.
Click anywhere in the header to expand the meta box again.
Collapse the Left Admin Menu
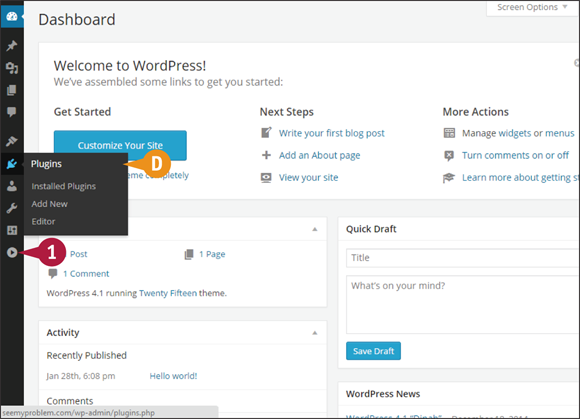
![]() Click Collapse menu at the bottom of the left admin menu to toggle between full mode and icon-only mode.
Click Collapse menu at the bottom of the left admin menu to toggle between full mode and icon-only mode.
![]() In icon-only mode, the submenus still fly out with full text.
In icon-only mode, the submenus still fly out with full text.
Rearrange Meta Boxes
![]() Click and drag in the header area of a meta box.
Click and drag in the header area of a meta box.
![]() As you drag, you see a dashed outline of the box’s original position.
As you drag, you see a dashed outline of the box’s original position.
![]() The box itself becomes transparent as you drag, so you can see what is below it on the screen.
The box itself becomes transparent as you drag, so you can see what is below it on the screen.
![]() As you drag the box around the screen, other boxes move out of the way.
As you drag the box around the screen, other boxes move out of the way.
![]() A potential new location for the box appears as a dashed outline. If that is where you want the box, let go of your mouse and the box falls into position.
A potential new location for the box appears as a dashed outline. If that is where you want the box, let go of your mouse and the box falls into position.
Here are more ways you can customize your admin screens so they match your work habits.
Change the Number of Columns
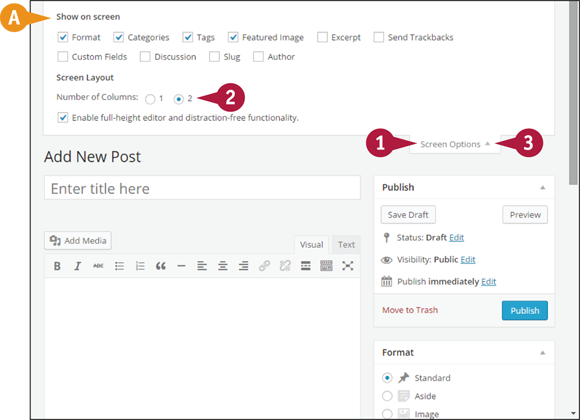
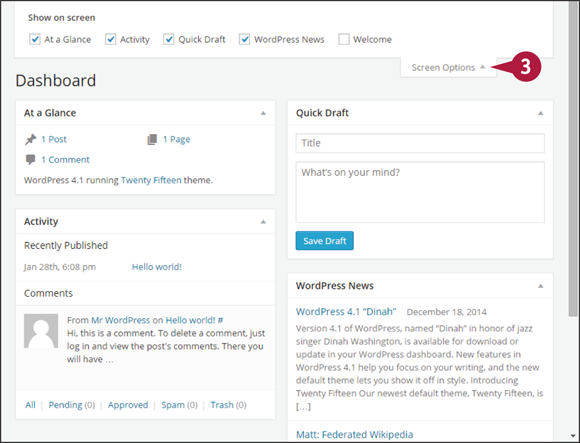
Note: Many admin screens — in this case, the Add New Post screen — have two columns of meta boxes. To reduce clutter, you can change that to one.
![]() Click Screen Options at the top right.
Click Screen Options at the top right.
![]() A drop-down area appears with ways to modify the screen.
A drop-down area appears with ways to modify the screen.
Note: What you can do in Screen Options varies with different admin screens, and not all screens have a Screen Options section.
![]() Under Screen Layout, look for Number of Columns and click 1 (
Under Screen Layout, look for Number of Columns and click 1 (![]() changes to
changes to ![]() ).
).
![]() Click Screen Options to close the dropdown.
Click Screen Options to close the dropdown.
![]() The screen now shows only one column of meta boxes.
The screen now shows only one column of meta boxes.
![]() Meta boxes like Publish or Categories are not gone; they are lined up below the Content Editor.
Meta boxes like Publish or Categories are not gone; they are lined up below the Content Editor.
Hide Meta Boxes
Note: Sometimes you simply want to get rid of a meta box, not just collapse or move it.
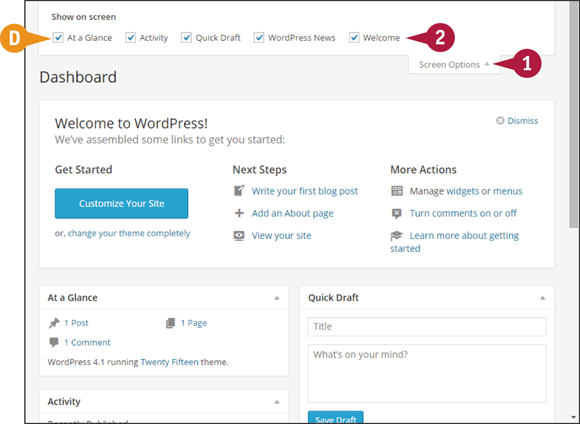
![]() Click Screen Options at the top right of the screen.
Click Screen Options at the top right of the screen.
![]() If you see the meta box listed, that means you can hide or show it. This example hides the Welcome meta box.
If you see the meta box listed, that means you can hide or show it. This example hides the Welcome meta box.
![]() Click Welcome (
Click Welcome (![]() changes to
changes to ![]() ).
).
The Welcome box is no longer visible.
![]() Click Screen Options to close the dropdown.
Click Screen Options to close the dropdown.
Note: WordPress by default hides boxes on certain admin screens to help reduce the initial clutter. Or, adding a plugin may create certain meta boxes which WordPress also hides by default. You can always see what is available by clicking Screen Options.
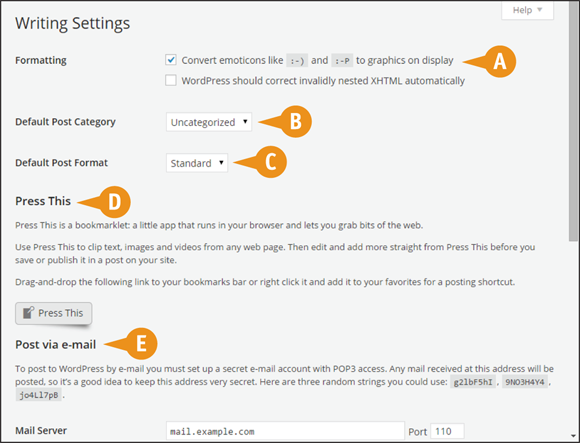
Review the Writing Settings
The writing settings you choose affect the mechanics of how you write your blog posts, whether you write directly into your WordPress interface or post by email or other means. Your writing settings also set your default blog post category. You can find Writing Settings by clicking the Writing link under Settings on the left admin menu.
On WordPress.com and WordPress.org
![]() Formatting
Formatting
Lets you select whether WordPress automatically inserts graphic emoticons as you type, such as replacing :-) with ![]() . Also lets you decide if you want WordPress to correct bad markup, such as missing closing tags.
. Also lets you decide if you want WordPress to correct bad markup, such as missing closing tags.
![]() Default Post Category
Default Post Category
If you do not choose at least one category for a post, WordPress defaults to this.
![]() Default Post Format
Default Post Format
Lets you choose the default format for posts. The choices vary by theme.
![]() Press This
Press This
Lets you instantly start a new post while viewing any web page. The title of the post will be the title of that web page and a link, along with any text or image you have highlighted, will appear in the post.
![]() Post via Email
Post via Email
Sets you up to post to your site from email.
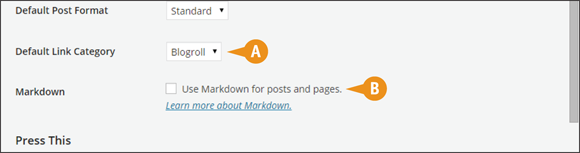
On WordPress.com Only
![]() Default Link Category
Default Link Category
If you forget to categorize a link, WordPress defaults to this.
![]() Markdown
Markdown
Lets you choose whether to use this alternative to HTML tags as a way of marking up your content (bold, lists, and so on).
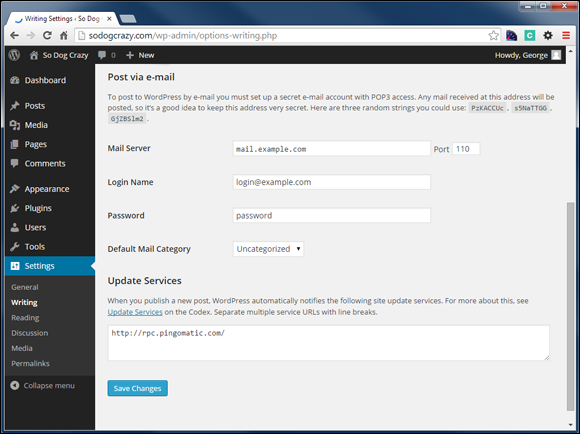
Set Up to Post by Email
Creating and publishing posts by email can be handy, particularly for smartphone users. It works by setting up a hard-to-guess email address. WordPress.com does this for you, although on self-hosted WordPress, you need to create the address through your hosting control panel.
You can find the Post by Email option by clicking the Writing link under Settings on the left admin menu.
Set Up to Post by Email

On a Self-Hosted Site
![]() After you set up a special email account — instructions are given on screen — type the mail server information for that account in the Mail Server field.
After you set up a special email account — instructions are given on screen — type the mail server information for that account in the Mail Server field.
Note: You can get server information from the provider of your special email address.
![]() Type your special email address in the Login Name box.
Type your special email address in the Login Name box.
![]() Type the email account’s password in the Password box.
Type the email account’s password in the Password box.
![]() Click
Click ![]() and select the default category for your emailed posts.
and select the default category for your emailed posts.
![]() Click Save Changes.
Click Save Changes.
When you post by email, the subject line is used as the post’s title.
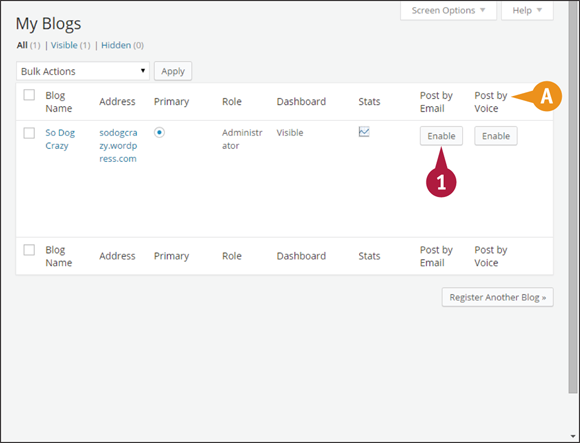
![]() After clicking My Blogs on the Writing Settings page or Dashboard menu, click Enable under Post by Email.
After clicking My Blogs on the Writing Settings page or Dashboard menu, click Enable under Post by Email.
An email address replaces the Enable button. Use that address to post via email.
![]()
WordPress.com also offers Post by Voice.
Choose the Discussion Settings
An important part of websites is interaction with visitors, and WordPress has a powerful built-in system for visitor comments. The Discussion Settings let you decide how that interaction works. Approving, or moderating, comments lets you avoid comment spam and block inflammatory comments.
You can find Discussion Settings by clicking the Discussion link under Settings on the left admin menu.
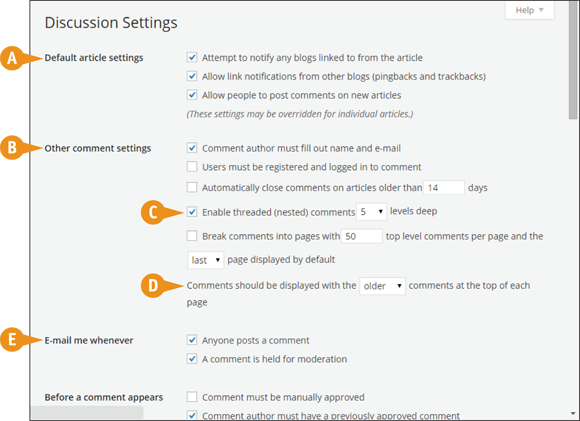
![]() Default Article Settings
Default Article Settings
Article here means posts or pages. Lets you make the default choice as to whether WordPress notifies sites you link to, accepts notice of links to your site from other sites, and — the key setting — whether to turn off comments on the site. Note: You can still turn comments off or on for individual posts or pages.
![]() Other Comment Settings
Other Comment Settings
Sets some conditions under which you allow comments and how comments will be organized.
![]() Threaded Comments
Threaded Comments
Allows readers and you to respond directly to other comments.
![]() Comment Display Order
Comment Display Order
Lets you choose whether readers see the newest comment first — or last.
![]() E-mail Me Whenever
E-mail Me Whenever
Specifies whether you receive email notification of comments posted or held for moderation. WordPress.com also offers email notifications when someone “likes” a post, reposts a post, or subscribes to your site.
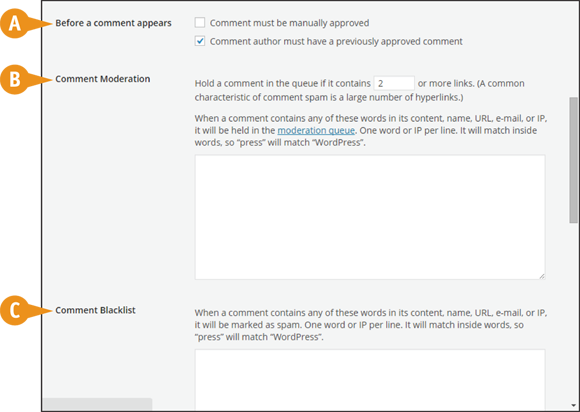
![]() Before a Comment Appears
Before a Comment Appears
Lets you review all comments or automatically accept ones from a previously approved commenter.
![]() Comment Moderation
Comment Moderation
Options include specifying the minimum number of links that trigger moderation and a box to list terms that may be signs of spam.
![]() Comment Blacklist
Comment Blacklist
Lets you list terms that automatically identify comments as spam. WordPress.com also lets you choose to respond to comments via email and to allow visitors to subscribe to comments, which notifies them of new comments to a post.
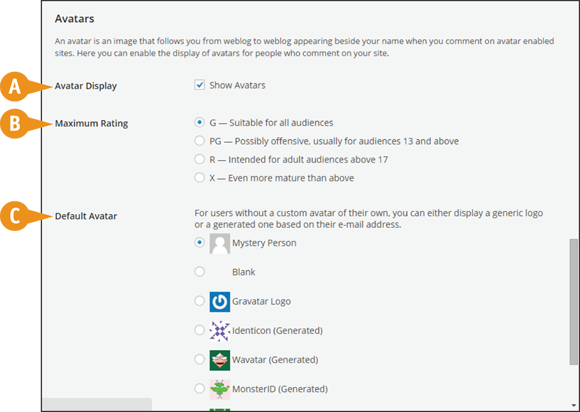
![]() Avatar Display
Avatar Display
Indicates whether to show avatars, which are like personal logos associated with comment writers. Note: WordPress.com sites have a setting to allow hovercards to pop up when you mouse over a Gravatar.
![]() Maximum Rating
Maximum Rating
Lets you choose the allowed level of rating, based on the user’s setting at Gravatar.com.
![]() Default Avatar
Default Avatar
Allows you to pick a default image when no avatar exists. The generated image changes slightly for each commenter.
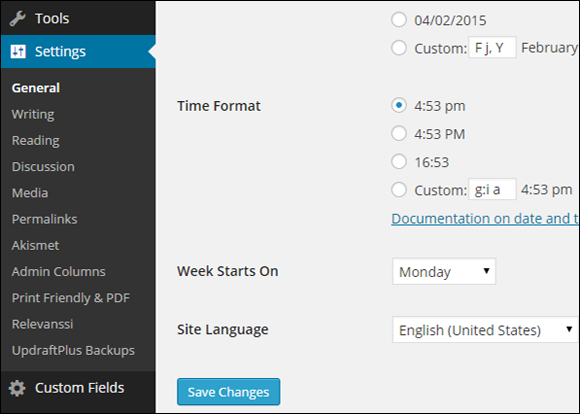
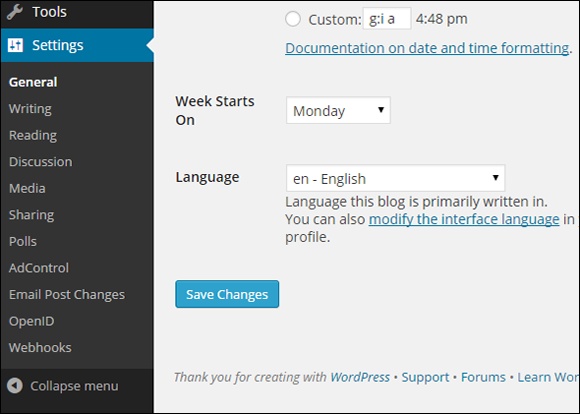
Learn about Site Visibility Settings
By default, your WordPress site is visible to the public and can be indexed by search engines. There are settings that control these two types of visibility, depending on which version of WordPress you are using.
Self-Hosted Site Visibility
On self-hosted WordPress sites, the only site visibility setting deals with indexing by search engines. Even if you choose to discourage search engines, there is no guarantee your site will not be indexed. Using plugins, it is possible to make your entire self-hosted WordPress site visible only to people who are logged in.
WordPress.com Site Visibility
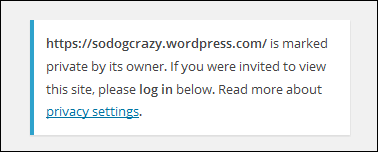
WordPress.com offers the same site visibility as self-hosted blogs as well as a third option: letting you hide your site from the general public. By making your site private, only users registered at WordPress.com, and whom you have invited, will be able to see your site. The number of invites is limited, but you can add more users for a fee.
Visibility for Individual Posts or Pages
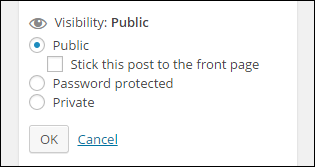
In addition to site-wide visibility settings, you can control the visibility of individual posts or pages. You could set a password just for that post or page, or you could hide it from visitors who are not logged in to WordPress. The details of those settings are covered in the section “Write and Publish Your First Post” in Chapter 5.
Select Your Site Visibility Settings
Search engines are constantly following links between web pages and websites, and indexing what they find. WordPress offers a setting which discourages them from doing this on your site. It may be that you do not want your site to be easily found, but more commonly this setting is used temporarily before the launch of a site.
You can find visibility settings through the Reading link under Settings on the left admin menu.
Select Your Site Visibility Settings
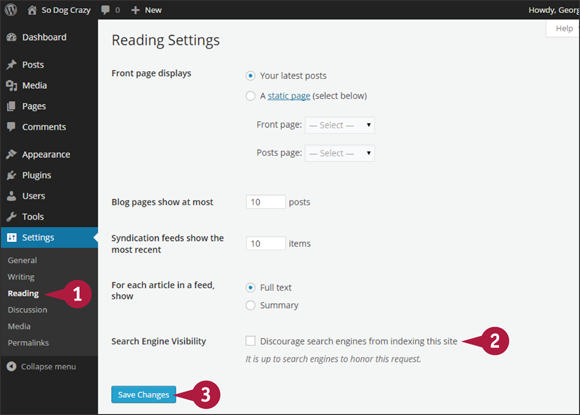
![]() Click Reading under the Settings menu in the left admin menu.
Click Reading under the Settings menu in the left admin menu.
![]() Choose to ask search engines to index your site, or to ask them not to index your site (
Choose to ask search engines to index your site, or to ask them not to index your site (![]() changes to
changes to ![]() ).
).
![]() Click Save Changes.
Click Save Changes.
Note: If you intend to block search engines only temporarily, remember to change the setting back.
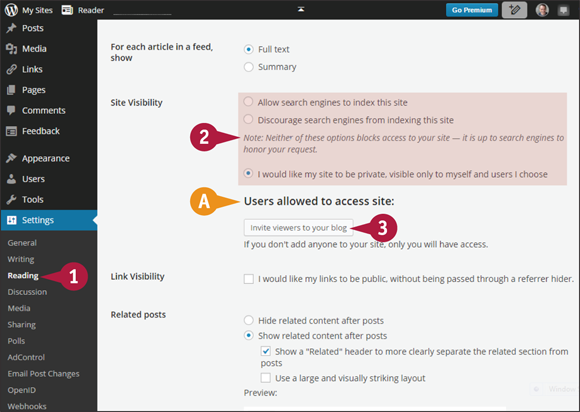
![]() Click Reading under the Settings menu in the left admin menu.
Click Reading under the Settings menu in the left admin menu.
![]() Choose to ask search engines to index your site, or ask search engines not to index your site, or make your site private (
Choose to ask search engines to index your site, or ask search engines not to index your site, or make your site private (![]() changes to
changes to ![]() ).
).
![]() If you made your site private, a new section of the screen appears.
If you made your site private, a new section of the screen appears.
![]() Click Invite viewers to your blog.
Click Invite viewers to your blog.
The Invite New Users to Your Private Blog screen opens, where you can invite only people who are registered with WordPress.com.
Set the Permalinks Structure
A permalink is short for permanent link, which means if someone links to a web page, the link always works. Every web page on a self-hosted WordPress site has a default permalink that looks something like this: http://sodogcrazy.com/?p=123.
The problem is, that URL is not very user-friendly, so self-hosted versions of WordPress enable you to choose what are referred to as Pretty Permalinks, resulting in links that look like this: http://sodogcrazy.com/about-me.
Set the Permalinks Structure

![]() Expand the Settings menu, and click Permalinks.
Expand the Settings menu, and click Permalinks.
![]() Click your preferred permalink structure (
Click your preferred permalink structure (![]() changes to
changes to ![]() ).
).
Note: For most types of websites, the best permalink setting is Post Name.
![]() The code for your selection appears in the Custom Structure code box at the bottom of the list.
The code for your selection appears in the Custom Structure code box at the bottom of the list.
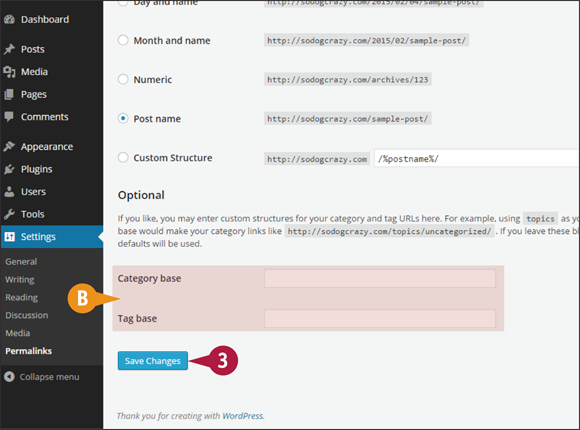
![]() You can also create a custom base structure for category and tag URLs, but for most websites, just leave these blank.
You can also create a custom base structure for category and tag URLs, but for most websites, just leave these blank.
![]() Click Save Changes.
Click Save Changes.
Note: Do not change your permalink setting after your site is launched, because that breaks any links people have made to your site.
Consider Other Settings
The default settings in WordPress are fine for most sites, and you have seen some key ones that can be changed if needed. Throughout this book some additional settings will be discussed when required, but it is important to have an overview of the Settings menu for both WordPress.org and WordPress.com.
The settings portion of the left admin menu varies greatly between self-hosted WordPress sites because as you add plugins, many of them add their own settings screens, either under Settings or elsewhere on the menu. Most but not all plugins also have a link to their settings screen in their listing under Plugins. Because the number and type of plugins you can add are virtually limitless, your Settings menu could be quite large!
Because you cannot add plugins to a WordPress.com site, the Settings menu is fixed, although new functions are added from time to time. Settings which appear here but not on default self-hosted sites are: Sharing, Polls, AdControl, Email Post Changes, Open ID, and Webhooks. See Chapter 11 for more about letting visitors share your content; for the rest, refer to the help screens at WordPress.com.