
4
Controlling Focus and Depth of Field
In This Chapter
![]() Understanding autofocusing options
Understanding autofocusing options
![]() Choosing a specific autofocusing point
Choosing a specific autofocusing point
![]() Tracking focus when shooting moving subjects
Tracking focus when shooting moving subjects
![]() Taking advantage of manual-focusing aids
Taking advantage of manual-focusing aids
![]() Using the touchscreen to set focus
Using the touchscreen to set focus
![]() Manipulating depth of field
Manipulating depth of field

To many people, the word focus has just one interpretation when applied to a photograph: Either the subject is in focus or it's blurry. But an artful photographer knows that there's more to focus than simply getting a sharp image of a subject. You also need to consider depth of field, or the distance over which other objects in the scene appear sharply focused. This chapter explains how to manipulate both aspects of an image.
The chapter begins with details of the focusing options available for viewfinder photography; following that, you can get help with focusing during Live View photography and movie recording. Just a word of warning: The two focusing systems are quite different, and mastering them takes time and practice. So don't think that you're not up for the challenge if everything doesn't sink in right away. If you start feeling overwhelmed, take a break and simplify things by following the steps laid out at the end of Chapter 1, which show you how to take a picture using the default autofocus settings and the Auto exposure mode. Then return another day to study the advanced focusing options discussed here.
Things get much easier (and more fun) at the end of the chapter, where I explain how to control depth of field. Thankfully, the concepts related to that subject apply no matter whether you're using the viewfinder, taking advantage of Live View photography, or shooting movies.
Exploring Standard Focusing Options (Viewfinder Photography)
In case you're the type who doesn't read chapter introductions (I bring this up only because I'm that type), I want to reiterate that the D5500 uses different focusing technologies depending on whether you're using the viewfinder or taking advantage of Live View. This part of the chapter deals with viewfinder photography. For help with the other half of the focusing equation, skip to the section “Focusing During Live View and Movie Shooting.”
Mastering the D5500 focus system
Assuming that your lens supports autofocusing with the D5500, the first step in taking advantage of autofocusing is to set the lens focus method to auto. On most lenses, you find a switch with two settings: A (or AF) for autofocusing and M (or MF) for Manual focusing, as shown in Figure 4-1. Some lenses, though, sport a switch with a dual setting, such as AF/M, which enables you to use autofocusing initially but then fine-tune focusing by turning the lens focusing ring. On this type of lens, select the M (or MF) setting for manual-only focusing.

Figure 4-1: On this lens, as on many Nikon lenses, you set the switch to A for autofocusing and to M for manual focusing.
 As for the camera, these settings determine focusing behavior:
- Focus mode: For autofocusing, you can set the camera to lock focus when you press the shutter button halfway; to adjust focus continually up to the moment you depress the button fully to take the picture; or to decide for you which option is best. You also get a setting that disables autofocusing so that you can focus manually.
- AF-area mode: This setting determines which focus points the camera uses to establish focus. You can tell the camera to select a point for you or to base focus on a point that you select.
You can view the current settings in the Information display, as shown in Figure 4-2. The symbols in the figure represent AF-A for the Focus mode and Auto Area for the AF-Area mode, which are the default settings for all exposure modes except for a few of the Scene modes. At these settings, the camera decides whether to lock focus when you press the shutter button halfway and also selects the focus point for you.

Figure 4-2: The Focus mode and AF-area mode settings appear here.
The next several sections explain these settings, offer advice on which combination of settings work best for different subjects, and provide step-by-step focusing recipes for shooting stationary subjects and moving subjects.
Just a note before you dig in: When you use the Night Vision Effects mode, you can use autofocusing only in Live View mode. If you use the viewfinder, you're limited to manual focusing.
Changing the Focus mode setting
First up on your list of focus settings to investigate is the Focus mode. You get three settings for tweaking autofocusing behavior and one option for manual focusing.
 Choose the Focus mode via the Information display control strip, as illustrated in Figure 4-3. Remember:
To activate the control strip, press the i
button or tap the i
symbol on the display.
Choose the Focus mode via the Information display control strip, as illustrated in Figure 4-3. Remember:
To activate the control strip, press the i
button or tap the i
symbol on the display.
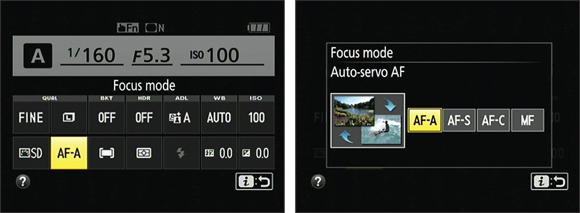
Figure 4-3: You can access all four Focus mode settings only in the P, S, A, and M exposure modes.
When the camera is in the P, S, A, or M exposure mode, you can choose from four options, which work as detailed in the following list; in other exposure modes, you can choose only the last two options (AF-A and MF). The exception, again, is the Night Vision Effects mode, which limits you to manual focusing when you use the viewfinder.
-
AF-S (single-servo autofocus): Designed for shooting stationary subjects, this setting tells the camera to lock focus when you depress the shutter button halfway.
 In this mode, the camera won't release the shutter to take a picture until focus is achieved. If you can't get the camera to lock onto your focusing target, switching to manual focusing is the easiest solution. Also be sure that you're not too close to your subject; if you exceed the minimum focusing distance of the lens, you can't focus manually, either.
 -
AF-C (continuous-servo autofocus): Geared to photographing moving subjects, this mode causes the camera to adjust focus continuously while the shutter button is pressed halfway.
 By default, AF-C mode prevents you from taking a picture until focus is achieved, just like AF-S mode. But you can tell the camera to capture the shot at the instant you fully depress the shutter button, regardless of whether focus is set. Make the call via the AF-C Priority Selection option, found in the Autofocus section of the Custom Setting menu and shown in Figure 4-4. Focus is the default setting; choose Release to allow shutter release before focus is set.
For the most part, I stick with Focus. Yes, I may miss a few shots waiting for the focus to occur, but if they're going to be out of focus, who cares? But when my subject is moving at a really rapid pace, I do unlock the shutter release. Although I may wind up with lots of wasted shots, I also increase the odds that I'll capture that split-second “highlight reel” moment. If the subject is slightly out of focus, I can probably retouch it enough to make it passable, especially if the picture content is truly special.
-
AF-A (auto-servo autofocus): This mode, which is the default, gives the camera control over whether focus is locked when you press the shutter button halfway or continuously adjusted until you snap the picture. The camera makes the decision based on whether it detects motion in front of the lens. Either way, shutter release is prevented if the camera can't focus.
AF-A mode works pretty well but can get confused sometimes. If your subject is motionless but other people are moving in the background, the camera may mistakenly switch to continuous autofocus. By the same token, if the subject is moving only slightly, the camera may not make the switch. So my advice is to choose AF-S or AF-C instead. -
MF (manual focus): Choose this setting to focus manually instead of using autofocus.
On Nikon AF-S lenses, including the 18–55mm lens featured in this book and the 18–140mm lens available in a bundle with the camera body, simply setting the switch on the lens to M automatically sets the Focus mode to MF. However, the opposite isn't true: Choosing MF as the Focus mode does not free the lens focusing ring so that you can set focus manually; you must set the lens switch to the M position. For other lenses, check the lens instruction manual for focusing details.

Figure 4-4: This setting controls whether you can take a picture before focus is achieved in the AF-C Focus mode.
Choosing an AF-area mode: One focus point or many?
The D5500 has 39 available autofocus points, which are located within the frame region indicated by the autofocus brackets in the viewfinder. Figure 4-5 shows you the approximate location of the individual points. (You don't actually see the points in the viewfinder; when you press the shutter button halfway, one or more points lights up, depending on your autofocusing settings.)

Figure 4-5: The camera's 39 autofocus points are located within the portion of the frame surrounded by the AF-area brackets.
The AF-area mode tells the camera which autofocus points to consider when establishing focus. You have these choices:
- Single Point: This mode is designed to quickly and easily lock focus on a still subject. You select a single focus point, and the camera bases focus on that point only. This option is best paired with the single-servo autofocus (AF-S) Focus mode, which is also geared to still subjects.
-
Dynamic Area: Dynamic Area autofocusing is designed for capturing moving subjects. You select an initial focus point, but if your subject moves away from that point before you snap the picture, the camera looks to surrounding points for focusing information.
To use Dynamic Area autofocusing, you must set the Focus mode to AF-C or AF-A. In fact, the Dynamic Area options don't even appear when the Focus mode is set to AF-S.You can choose from three Dynamic Area settings:
-
9-point Dynamic Area: Rather than look at all 39 autofocus points, the camera takes focusing cues from your selected point plus the 8 surrounding points. If you choose the center focus point, for example, the points shown on the left in Figure 4-6 are active. This setting is ideal when you have a moment or two to compose your shot and your subject is moving in a predictable way, making it easy to reframe as needed to keep the subject within the 9-point area.
This setting provides the fastest Dynamic Area autofocusing because the camera has to analyze the fewest number of autofocusing points. - 21-point Dynamic Area: This mode uses your selected point plus the 20 surrounding points. The right screen in Figure 4-6 shows you which points are active if you select the center point. Obviously, this setting enables your subject to move a little farther afield from your selected focus point and still remain in the target zone. So it works better than 9-point mode when you can't quite predict the path your subject will take.
- 39-point Dynamic Area: The camera makes use of the full complement of autofocus points. This mode is designed for subjects that are moving so rapidly that it's hard to keep them within the framing area of the 21-point or 9-point setting — a flock of birds, for example. The drawback to this setting is focusing time: With all 39 points on deck, the camera has to work a little harder to find a focus target.
-
-
3D Tracking: This one is a variation of 39-point Dynamic Area autofocusing. As in that mode, you start by selecting a single focus point and then press the shutter button halfway to set focus. But the goal of the 3D Tracking mode is to maintain focus on your subject if you recompose the shot after you press the shutter button halfway to lock focus.
The problem with 3D Tracking is that the camera detects your subject by analyzing the colors of the object under your selected focus point. So if not much difference exists between the subject and its background, the camera can get fooled. And if your subject moves out of the frame, you must release the shutter button and reset focus by pressing it halfway again.
As with Dynamic Area mode, if you want to use 3D Tracking autofocus, you must set the Focus mode to AF-C or AF-A. -
Auto Area: At this setting, the camera automatically chooses which of the 39 focus points to use, usually locking on the object closest to the camera.
Frankly, I don't use Auto Area mode very often unless I'm handing the camera over to someone who's inexperienced and who wouldn't know how to use the other two modes. And with a camera that costs as much as the D5500, I can think of only a few people whom I'd even trust to hand it over to. (“Oh, I'm sorry, but I'm borrowing this from my boss and I swore I wouldn't let anyone else use it.”) So I keep things nice and simple and stick with Single Point for still subjects and with one of the Dynamic Area modes for moving subjects.

Figure 4-6: The camera considers these autofocus points when you select the center focus point and use the 9-point (left) and 21-point (right) Dynamic Area modes.
You can select from the full complement of AF-area mode settings in all exposure modes except the Miniature and Night Vision Effects modes. Miniature mode always uses Single-Point mode, and autofocusing is off-limits altogether in Night Vision mode.
Here's how to dial in the AF-area setting you want to use and specify a focus point:
-
Selecting the AF-area mode setting: Get the job done via the Information display control strip, as shown in Figure 4-7.When you return to the Information display, notice the graphic labeled Autofocus points symbol in Figure 4-8. This symbol gives you information about which focus points are active. A solid gray square indicates the selected focus point. A fuzzy gray square indicates that the point is active, meaning that if the camera can't establish focus based on the selected point, it may consider the other active points. Any other points are inactive. In the figure, the symbol reflects the 9-point Dynamic Area setting, with the center point selected, for example.
-
Selecting a single focus point: To choose a focus point in the Single Area, Dynamic Area, or 3D Tracking modes, look through the viewfinder and press the shutter button halfway and release it. The currently selected point flashes red and then turns black. For example, in Figure 4-9, the point directly over the top of the clock tower is selected. Use the Multi Selector to cycle through the available focus points until the one you want to use flashes red and then turns black. You also can use the Information display Focus points symbol (see Figure 4-8) to monitor the position of the focus point; again, the selected point appears solid.
Either way, you can quickly select the center focus point by pressing OK.

Figure 4-7: Select the AF-area mode setting via the Information display control strip.

Figure 4-8: This symbol gives you more information about which autofocus points are active in the current AF-area mode.
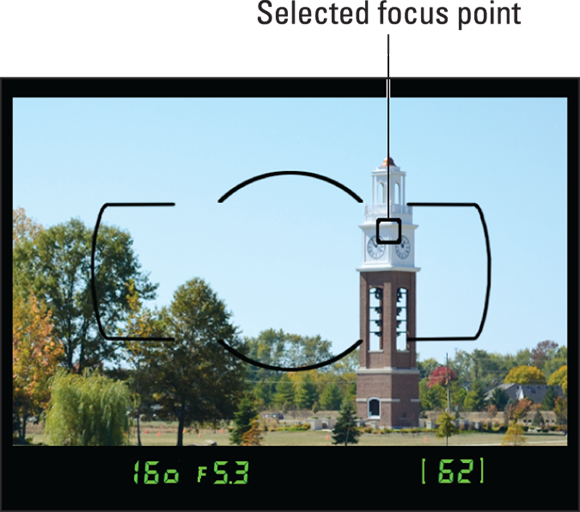
Figure 4-9: Use the Multi Selector to select the focus point that's over your subject.
A few additional tips:
-
You can reduce the number of focus points available for selection from 39 to 11. Why would you do this? Because it enables you to choose a focus point more quickly — you don't have to keep pressing the Multi Selector zillions of times to get to the one you want to use. Make the change via the Number of Focus Points option, found in the Autofocus section of the Custom Setting menu, as shown on the left in Figure 4-10. The right half of the figure shows you which autofocus points you can select at the reduced setting.
If you change the setting to 11, the Information display symbol that represents the active autofocus points changes to show the reduced number of selectable points.
- The nine autofocus points at the center of the frame are more capable than others. These points use cross-type sensors, which evaluate focus by analyzing both horizontal and vertical lines in the scene. The other points assess only horizontal lines. Cross-type sensors typically work better, especially in dim lighting, so if you're having trouble getting the camera to focus, select one of these focus points.
-
When you use spot metering, the camera bases exposure on the selected focus point. The point you choose affects the way the camera calculates flash exposure as well. See Chapter 3 for details on spot metering; see Chapter 2 for help with flash photography.
- In any exposure mode except P, S, A, or M, the camera resets the AF-area mode to the default setting if you change exposure modes. So this setting is one that you need to check before every shoot if you aren't using the P, S, A, or M modes.

Figure 4-10: You can limit the number of focus points available for selection to the 11 shown here.
Choosing the right autofocus combo
You get the best autofocus results if you pair your chosen Focus mode with the most appropriate AF-area mode, because the two settings work in tandem. Here are the combinations I suggest:
- For still subjects: AF-S and Single Point. You select a focus point, and the camera locks focus on that point when you press the shutter button halfway. (It helps to remember the s factor: For still subjects, Single Point and AF-S.)
- For moving subjects: AF-C and 39-point Dynamic Area. You still begin by selecting a focus point, but the camera adjusts focus as needed if your subject moves within the frame after you press the shutter button halfway to establish focus. (Think motion, dynamic, continuous.) Remember to reframe as needed to keep your subject within the boundaries of the autofocus points, though. And if you want speedier autofocusing, consider switching to 21-point or 9-point Dynamic Area mode — just remember that you need to keep your subject within that smaller portion of the frame for the focus adjustment to work properly.
The next two sections spell out the steps you use to set focus with both autofocus pairings.
Autofocusing with still subjects: AF-S + Single Point
For stationary subjects, the fastest, most precise autofocus option is to pair the AF-S (single-servo autofocus) Focus mode with the Single Point AF-area mode, as shown in Figure 4-11.

Figure 4-11: Select these autofocus settings for stationary subjects.
After selecting these options (via the Information display control strip), follow these steps to focus:
-
Looking through the viewfinder, use the Multi Selector to position the focus point over your subject.
The focus point is represented by a black rectangle within the AF-area brackets. You can get a look at one in Figure 4-12. The point also appears solid when you view the AF-point graphic on the Information display. (Refer to Figure 4-8.)
If the focus point doesn't respond, press the shutter button halfway and release it to wake up the camera. Then try again. -
Press the shutter button halfway to set focus.
When focus is achieved, the camera displays a green focus light in the viewfinder (refer to Figure 4-12). Unless you're using the Quiet Shutter release mode, you also hear a beep. (You can disable the sound through the Beep Options setting on the Setup menu.)
Focus remains locked as long as you keep the shutter button pressed halfway. If you're using autoexposure (any exposure mode but M), the initial exposure settings are also chosen at the moment you press the shutter button halfway, but they're adjusted as needed up to the time you take the shot.
- Press the shutter button the rest of the way to take the shot.

Figure 4-12: The camera won't take the picture until focus is achieved and the green focus indicator lights up.
If needed, you can position your subject outside a focus point. Just compose the scene initially so that your subject is under a point, press the shutter button halfway to lock focus, and then reframe. However, if you're using autoexposure, you may want to lock focus and exposure together before you reframe, by pressing the AE-L/AF-L button. Otherwise, exposure is adjusted to match the new framing, which may not work well for your subject. See Chapter 3 for more details about autoexposure lock.
Focusing on moving subjects: AF-C + Dynamic Area
To autofocus on a moving subject, select AF-C for the Focus mode and choose one of the Dynamic Area options for the AF-area mode. The earlier section “Choosing an AF-area mode: One focus point or many?” provides information to help you decide whether to use the 9-, 21-, or 39-point Dynamic Area setting.
The focusing process is the same as just outlined, with a couple exceptions:
- When you press the shutter button halfway, the camera sets the initial focusing distance based on your selected autofocus point. But if your subject moves from that point, the camera checks surrounding points for focus information.
- Focus is adjusted as needed until you take the picture. You see the green focus indicator light in the viewfinder, but it may flash on and off as focus is adjusted. The beep that you usually hear when using the AF-S Focus mode doesn't sound in AF-C mode, which is a Good Thing — otherwise, things could get pretty noisy because the beep would sound every time the camera adjusted focus.
- Try to keep the subject under the selected focus point to increase the odds of good focus. But as long as the subject falls within one of the other focus points (9, 21, or 39, depending on which Dynamic Area mode you selected), focus should be adjusted accordingly. Note that you don't see the focus point actually move in the viewfinder, but the focus tweak happens just the same. You can feel and hear the focus motor doing its thing, if you pay attention.
-
By default, the camera doesn't let you take the picture until focus is achieved. To change this behavior, head for the AF-C Priority Selection option, found in the Autofocus section of the Custom Setting menu, and change the setting to Release.
Getting comfortable with continuous autofocusing takes some time, so it's a good idea to practice before you need to photograph an important event. After you get the hang of the AF-C/Dynamic Area system, though, I think you'll really like it.
On occasion, you may want to switch to Single Point AF-area mode when using continuous autofocusing. For example, if you're photographing a tuba player in a marching band, you want to be sure that the camera tracks focus on just that musician. With Dynamic Area, it is possible that the focus may drift to another nearby band member. The difficulty with the Single Point/Dynamic Area pairing is that you must constantly reframe to keep your subject under the single point you selected. I like to use the center point with this setup; I find it more intuitive because I just reframe as needed to keep my subject in the center of the frame. (You can always crop your image to achieve a different composition after the shot.)
Using autofocus lock
When you set your camera's Focus mode to AF-C (continuous-servo autofocus), focusing is continually adjusted while you hold the shutter button halfway, so the focusing distance may change if the subject moves out of the active autofocus point or you reframe the shot before you take the picture. The same is true if you use AF-A mode (auto-servo autofocus) and the camera senses movement in front of the lens, in which case it operates as I just described. Either way, the upshot is that you can't control the exact focusing distance the camera ultimately uses.
Should you want to lock focus at a specific distance, you have the following options:
- Focus manually.
-
Change the Focus mode to AF-S (single-servo autofocus). In this mode, focus is locked when you press and hold the shutter button halfway.
-
 Lock focus with the AE-L/AF-L button. First, set focus by pressing the shutter button halfway. When the focus is established at the distance you want, press and hold the AE-L/AF-L button. Focus remains set as long as you hold down the button.
Keep in mind, though, that by default, pressing the AE-L/AF-L button also locks autoexposure. You can change this behavior, however, setting the button to lock just one or the other. Chapter 10 explains this option.
For my money, manual focusing is by far the easiest solution; the next section offers more advice on that topic.
Focusing manually
Some subjects confuse even the most sophisticated autofocusing systems, causing the camera's autofocus motor to spend a long time hunting for its focus point. Animals behind fences, reflective objects, water, and low-contrast subjects are just some of the autofocus troublemakers. Autofocus systems also struggle in dim lighting, although that difficulty is often offset by the AF-assist lamp, which shoots out a beam of light to help the camera find its focusing target.
When you encounter situations that cause an autofocus hang-up, you can try adjusting the autofocus options discussed earlier in this chapter. But often, it's easier and faster to switch to manual focusing. For the best results, follow these manual-focusing steps:
-
Adjust the viewfinder to your eyesight.
If you don't adjust the viewfinder, scenes that are in focus may appear blurry and vice versa. If you haven't already done so, look through the viewfinder and rotate the little dial near its upper-right corner. As you do, the viewfinder data and the AF-area brackets become more or less sharp. (Press the shutter button halfway to wake up the meter if you don't see any data in the viewfinder.)
-
Set the lens and camera to manual focusing.
First, move the focus-method switch on the lens to the manual position. The setting is usually marked M or MF.
Next, you need to set the camera to manual focusing by setting the Focus mode to MF. (Get the job done via the Information display control strip.) Note, though, that you can skip this step if you're using the 18–55mm or 18–140mm kit lens or certain other compatible lenses, because the camera automatically changes the Focus mode to MF as soon as you set the lens to manual focusing.
-
Select a focus point.
Use the same technique as when selecting a point during autofocusing: just press the Multi Selector right, left, up, or down until the point you want to use flashes red in the viewfinder or appears solid in the Information display focusing-point grid. (Refer to Figure 4-8.) Press OK to quickly select the center point.During autofocusing, the selected focus point tells the camera what part of the frame to use when establishing focus. And technically speaking, you don't have to choose a focus point for manual focusing — the camera focuses according to the position you set by turning the focusing ring. However, choosing a focus point is still a good idea, for two reasons: First, even though you're focusing manually, the camera provides some feedback to let you know whether focus is correct, and that feedback is based on the selected focus point. Second, if you use spot metering, an exposure option covered in Chapter 3, exposure is based on the selected focus point.
- Frame the shot so that your subject is under the selected focus point.
- Press and hold the shutter button halfway to initiate exposure metering.
-
Rotate the focusing ring on the lens to bring the subject into focus.
When the camera thinks focus is set on the object under the focus point, the green focus lamp in the lower-left corner of the viewfinder lights, just as it does during autofocusing.
- Press the shutter button the rest of the way to take the shot.
I know that when you first start working with an SLR-style camera, focusing manually is intimidating. But if you practice a little, you'll find that it's really no big deal and saves you the time and aggravation of trying to bend the autofocus system to your will when it has “issues.”
In addition to the green focus lamp, your camera offers another manual focusing aid: You can swap out the viewfinder's exposure meter with a rangefinder, which uses a similar, meter-like display, as shown in Figure 4-13, to indicate whether focus is set on the object in the selected focus point. If bars appear to the left of the 0, as shown in the left example in Figure 4-13, focus is set in front of the subject; if the bars are to the right, as in the middle example, focus is slightly behind the subject. The more bars you see, the greater the focusing error. As you twist the focusing ring, the rangefinder updates to help you get focus on track. When you see a single bar on either side of the 0, you're good to go.

Figure 4-13: The rangefinder offers manual-focusing assistance.
Before I tell you how to activate this feature, I want to point out a few things:
- You can use the rangefinder in any exposure mode except M (manual exposure). In M mode, the viewfinder always displays the exposure meter.
- In the other exposure modes, you can continue to view the exposure meter in the Information display, even with the rangefinder enabled.
- Your lens must offer a maximum aperture of f/5.6 or lower.
- With subjects that confuse the camera's autofocus system, the rangefinder may not work well either; it's based on the same system. If the system can't find the focusing target, the rangefinder display appears as shown on the right in Figure 4-13.
- The rangefinder is automatically replaced by the normal exposure meter if you switch back to autofocusing, but reappears when you return to manual focus.
Personally, I leave the rangefinder off and just rely on the focus indicator light and my eyes to verify focus. I shoot in the S and A exposure modes frequently, and I find it a pain to monitor exposure in the Information display rather than in the viewfinder. But if you want to try the rangefinder, set the Mode dial to any setting but M and then head for the Autofocus submenu of the Custom Setting menu. Change the Rangefinder option from Off to On, as shown in Figure 4-14, to enable the feature.

Figure 4-14: Enable the rangefinder via the Custom Setting menu.
Focusing During Live View and Movie Shooting
As with viewfinder photography, you can opt for autofocusing or manual focusing during Live View and movie shooting, assuming that your lens supports autofocusing with the D5500. But focus options and techniques differ from those you use for viewfinder photography.
The next several sections detail Live View and movie focusing. It's important to understand, however, that the camera typically takes longer to autofocus in Live View mode than it does during viewfinder photography — the difference is because of the type of autofocusing the camera must use when in Live View. For the fastest autofocusing response during still photography, take the camera out of Live View mode. Unfortunately, Live View is the only game in town for movie recording; you can't use the viewfinder to frame movie shots. You also need to use Live View if you want to use autofocusing in the Night Vision Effects mode; otherwise, you must focus manually.
Tap to focus: Using the Touch Shutter
The easiest way to set focus in Live View and Movie mode is to use the Touch Shutter, which is a touchscreen feature than sets focus on the area of the monitor you tap. The shutter part of the name refers to the fact that you can also set the camera to take a single, still photo immediately after you lift your finger off the screen.
In my opinion, the touch-to-focus feature is pretty cool; the touch-to-shoot option, not so much. Why? Well, first off, when you're shooting outdoors in bright light, the monitor can wash out so much that it's difficult to see your subject clearly, let alone find the precise spot on the touchscreen to tap.
Secondly, the act of tapping the screen can cause camera shake that can blur your image, which happens if the camera moves during the exposure. I find it nearly impossible to get a shake-free shot using the Touch Shutter when handholding the camera. When you use a tripod, things become much easier, of course. In fact, assuming that you tap lightly (no poking or jabbing!), you may get a steadier shot and movie footage than when you use the shutter button to set focus.
Here's what you need to know to try the Touch Shutter:
- Your lens must be set to autofocusing mode. On the kit lenses sold with the D5500 (and many other Nikon lenses), just move the A/M switch to the A position. Perhaps one day, Nikon will develop a little mechanical hand that can reach out and turn the manual focusing ring for you after you tap, but for now, you can't use either touch shutter function (focusing or releasing the shutter) in manual focus mode.
- Check the status of the Touch Controls option on the Setup menu. You must select Enable to use the touchscreen during shooting or movie recording.
- Tap the icon labeled in Figure 4-15 to toggle the image-capture function on and off. When the word Off appears on the icon, as in the figure, your tap sets focus only. If you want the shutter to release after you set focus, tap the Touch Shutter icon again, so that you see just the little finger pressing the monitor.
-
When the camera achieves focus, the focus box (refer to Figure 4-15) turns green. You also hear the same beep that occurs when you focus using the shutter button. If you set the Focus mode to AF-S, focus is locked when you lift your finger from the screen. To reset focus before the shot, just tap again.
When you use the other Live View Focus mode, AF-F, (full-time servo autofocusing) the initial focusing distance is set after you tap, but the camera adjusts focus as necessary up until the time you take the picture or stop movie recording. You can tap at any time to reset the initial focusing distance. - To access the control strip while the Touch Shutter is enabled, press the i button rather than tapping the i symbol (right side of the screen). If you don't tap directly on the right part of the i symbol, you set focus instead of activating the control strip.
- The shutter-release function doesn't work during movie recording or when the Continuous Release Mode is selected. Even if the Live View icon shows that the shutter-release function is enabled, tapping the screen only resets focus. If you want to take a still photo during movie recording, press and release the shutter button. Ditto for shooting a burst of frames when using the Continuous Release mode. (Chapter 2 discusses this and other Release Mode settings.) You get just a single photo for each touch even when Continuous Release is selected.

Figure 4-15: Tap the Touch Shutter icon to toggle the shutter-release feature on and off.
Understanding Live View autofocusing
Whether you're shooting stills or movies, you control the camera's Live View focusing performance through the same two settings as for viewfinder photography: Focus mode and AF-area mode. Again, the settings are different from those available for viewfinder photography, though; the next two sections provide details.
You can view the current settings at the top of the screen when you use the default Live View display mode, Show Photo Information, as shown in Figure 4-16, as well as in Show Movie Information mode. (Just press the Info button to change the display mode.)

Figure 4-16: During Live View shooting, the Focus mode and AF-area mode settings appear here.
Choosing a Focus mode
The Focus mode setting tells the camera whether you want the autofocus system to lock focus at the time you press the shutter button halfway (or tap the screen using the Touch Shutter function) or to continue to adjust focus until you take the picture or throughout movie recording. Or you can tell the camera that you prefer to focus manually. Choose the setting via the Live View control strip, as shown in Figure 4-17. (Press the i button or tap the onscreen i symbol to access the control strip.)

Figure 4-17: Adjust the Focus mode from the Live View control strip.
You get three Focus mode options, which work as follows:
-
AF-S (single-servo autofocus): The camera locks focus when you press the shutter button halfway or, if you're using the Touch Shutter, when you lift your finger off the monitor. This focus setting is one of the few that works the same during Live View shooting as it does during viewfinder photography. Generally speaking, AF-S works best for focusing on still subjects.
There's a hiccup in the touchscreen-focusing feature, however: Although focus will be locked when you lift your finger, the camera still goes through its autofocusing process when you press the shutter button to take the picture. Focus is reset when the button reaches the halfway point. Also remember that if the Touch Shutter feature is enabled, the camera records the shot when you lift your finger. -
AF-F (full-time servo autofocus): This option is available for all exposure modes except for the Effects modes Color Sketch, Toy Camera, and Miniature.
The main purpose of AF-F is to enable continuous focus adjustment throughout a movie recording. To use this option, frame your subject within the Live View focus frame, which looks like a red box by default. (The appearance of the frame depends on your Auto Area mode; see the section, “Stepping through the autofocusing process,” later in this chapter, for more information.) But instead of pressing the shutter button halfway or using the tap-to-focus Touch Shutter feature, keep your finger off the shutter button and monitor. Instead, just wait for the camera to lock onto the subject in the focus frame and then press the movie-record button to start recording. Focus is adjusted as needed if your subject moves through the frame or you pan the camera. If you decide to lock focus, press and hold the shutter button halfway down. As soon as you release the button, continuous autofocusing begins again. You also can tap the screen to refocus; keep your finger on the monitor to lock focus and lift your finger to restart continuous autofocusing.
Unfortunately, there's a downside that makes AF-F less than ideal. If you shoot a movie with sound recording enabled and use the internal microphone, the microphone may pick up the sound of the autofocus motor as it adjusts focus. So if pristine audio is your goal, use AF-S mode and lock focus before you begin recording, or abandon autofocus altogether and focus manually. As another option, you can attach an external microphone to the camera and place it far enough away that it doesn't pick up the camera sounds.AF-F focusing works the same way for still photography. Focus is set when the focus frame turns green, but is adjusted as needed until you take the shot. Again, you can lock focus at any time by holding the shutter button halfway down or by keeping your finger on the monitor.
-
MF (manual focus): Select this option to focus manually, by twisting the focusing ring on the lens.
With the 18–55mm and 18–140mm kit lenses and some other Nikon AF-S lenses, moving the switch on the lens to the manual-focusing position automatically selects the MF Focus mode setting. For other lenses, you need to select the Focus mode setting yourself.
Selecting the AF-area mode
Through the AF-area mode, you give the camera's autofocusing system instructions on what part of the frame contains your subject so that it can set the focusing distance correctly. For Live View photography and movie recording, the camera offers these settings:
-
 Wide Area: In this mode, the camera focuses on the area under a rectangular focusing frame. You can position the frame by tapping the screen or by using the Multi Selector. (Details on using this option and others are provided in the upcoming section “Stepping through the autofocusing process.”)
 -
 Normal Area: This mode works the same way as Wide Area autofocusing but uses a smaller focusing frame. The idea is to enable you to base focus on a very specific area. With such a small focusing frame, however, you can easily miss your focus target when handholding the camera. If you move the camera slightly as you're setting focus and the focusing frame shifts off your subject as a result, focus will be incorrect. For the best results, use a tripod in this mode.
 -
 Face Priority: Designed for portrait shooting, this mode attempts to hunt down and focus on faces. Face Priority typically works only when your subjects are facing the camera, however. If the camera can't detect a face, you see a plain red focus frame, and things work as they do in Wide Area mode. In a group shot, the camera typically focuses on the closest face.
  Subject Tracking: This mode tracks a subject as it moves through the frame and is designed for focusing on a moving subject. But subject tracking isn't always as successful as you might hope. For a subject that occupies only a small part of the frame — say, a butterfly flitting through a garden — autofocus may lose its way. Ditto for subjects moving at a fast pace, subjects getting larger or smaller in the frame (when moving toward you and then away from you, for example), or scenes in which not much contrast exists between the subject and the background. Oh, and scenes in which there's a great deal of contrast can create problems, too. My take on this feature is that when the conditions are right, it works well, but otherwise the Wide Area setting gives you a better chance of keeping a moving subject in focus.
You can't adjust this option in Auto mode or Auto Flash Off mode. In those two modes, the camera insists on using Face Priority mode. Nor do you have control in the Miniature Effects mode, which always uses Wide Area focusing. Subject Tracking mode isn’t available for the Night Vision, Toy, Color Sketch, and Selective Color Effects modes.
In other exposure modes, adjust the setting via the control strip, as shown in Figure 4-18, which shows Wide Area mode selected. Again, pressing the i
button is the most surefire way to shift to the control strip when the touch shutter is enabled, but you also can tap on the i
icon on the right side of the screen. (Be precise with where you tap, though, or the camera will think your tap is meant to set focus.)

Figure 4-18: Live View and movie autofocusing offers these AF-area mode options.
Choosing the right Live View and movie focusing pairs
To recap, the way the camera sets focus during Live View and movie shooting depends on your Focus mode and AF-area mode settings. Until you get fully acquainted with the various combinations of Focus mode and AF-area mode settings and can make your own decisions about which pairings you like best, I recommend the following settings (assuming, of course, that the exposure mode you're using permits them):
- For moving subjects: Set the Focus mode to AF-F and the AF-area mode to Wide Area. You also can try the Subject Tracking AF-area mode, but see my comments in the preceding section regarding which subjects may not be well suited to that mode.
- For stationary subjects: Set the Focus mode to AF-S and the AF-area mode to Wide Area. Or, if you're shooting a portrait, give the Face Priority AF-area option a try.
- For difficult-to-focus subjects: If the camera has trouble finding the right focusing point when you use autofocus, don't spend too much time fiddling with the different autofocus settings. Just set the camera to manual focusing and set focus yourself. Remember that every lens has a minimum focusing distance, so if you can't focus automatically or manually, you may simply be too close to your subject.
Stepping through the autofocusing process
Having laid out all the whys and wherefores of the Live View autofocusing options, I offer the following summary of the steps involved in choosing the autofocus settings and then actually setting focus:
-
Choose the Focus mode and AF-area mode.
You adjust both settings via the control strip, which you can access by pressing the i
button or tapping the touchscreen's i
icon (right side of the screen). Refer to Figures 4-17 and 4-18 if you need help locating the two options in the control strip. Remember that the camera doesn't let you access all settings in certain exposure modes; see the preceding sections for details on which modes permit which settings.If you set the Focus mode to AF-F, the autofocus system perks up and initiates focusing immediately. -
Locate the focus frame in the Live View display.
The frame appearance depends on the AF-area mode:
- Wide Area and Normal Area: You see a red rectangular frame, as shown in Figure 4-19. (The figure shows the frame at the size it appears in Wide Area mode; it's smaller in Normal Area mode.)
-
Face Priority: If the camera locates faces, you see a yellow focus frame around each one, as shown on the left in Figure 4-20. One frame sports corner brackets inside the frame — in the figure, it's the frame on the right. The brackets indicate the face that the camera will use to set focus — typically, the closest person.
If you instead see a plain red frame, the camera can't detect a face and will set focus as it would if you were using Wide Area mode.
- Subject Tracking: A focusing frame like the one shown on the right in Figure 4-20 appears.
In AF-F mode, the frame turns green when the object under the frame is in focus. The frame blinks any time focus is being reset.
-
Position the focusing frame over your subject.
For example, I moved the frame over the soup garnish in the left example in Figure 4-21.
You can use the Multi Selector to shift the focusing frame over your subject. Or, if the Touch Shutter's shooting function is disabled, you can tap to position the frame. (You see the word “Off” over the Touch Shutter icon, as shown in Figure 4-21.) If the shutter-release function is turned on, the camera takes the picture when you lift your finger.A couple of tips for positioning the frame:
-
In Face Priority mode, use the Multi Selector to move the box with the double yellow border — which indicates the final focusing point — from face to face in a group portrait. You also can tap the face — again, assuming that the shutter-release part of the Touch Shutter feature is disabled.
- In Wide Area and Normal Area modes, press OK to quickly move the focus point to the center of the frame.
-
-
In Subject Tracking AF-Area mode, press OK to initiate focus tracking.
If your subject moves, the focus frame moves with it. To stop tracking, press OK again. (You may need to take this step if your subject leaves the frame — press OK to stop tracking, reframe, and then press OK to start tracking again.)
You also can tap the OK symbol onscreen to start focusing. But on your second tap, which stops tracking, the camera will then take the picture if the shutter-release part of the Touch Shutter is enabled. If you turn off that function, tap the OK button to perform both initial focusing and to stop tracking. -
In AF-S Focus mode, press the shutter button halfway to initiate autofocusing.
Why not use the Touch Shutter? Well, you can, and the focus will lock when you lift your finger off the screen. But then when you press the shutter button to take the picture, the camera sets focus again as soon as the button reaches the halfway point.
-
Wait for the focus frame to turn green, signaling that focus has been set. (Refer to the right screen in Figure 4-21.)
The appearance of the frame depends on the AF-Area mode; the figure shows it as it looks in Wide Area mode.
What happens next depends on the Focus mode:
- AF-S: You also hear a little beep (assuming that you didn't disable the beep, which you can do via the Beep Options setting on the Setup menu). Focus is locked as long as you keep the shutter button pressed halfway. If you used the touchscreen to set focus, the camera locks focus.
- AF-F: Focus is adjusted if the subject moves. The focus frame turns back to red (or yellow or white) if focus is lost; when the frame turns green and stops blinking, focus has been achieved again. You can lock focus by pressing the shutter button halfway. In most cases, the camera resets focus on your subject when you press the button, even if the focus frame is already green.
-
 (Optional) Press the Zoom In button to magnify the display to double-check focus.
Each press gives you a closer look at the subject. A small thumbnail appears in the lower-right corner of the screen, with the yellow highlight box indicating the area that's being magnified, as shown in Figure 4-22. Press the Multi Selector to scroll the display if needed.
 To reduce the magnification level, press the Zoom Out button. If you're not using Subject Tracking mode, you can also press OK to quickly return to normal magnification.

Figure 4-19: The red box represents the focusing frame in Wide Area and Normal Area AF-Area modes.
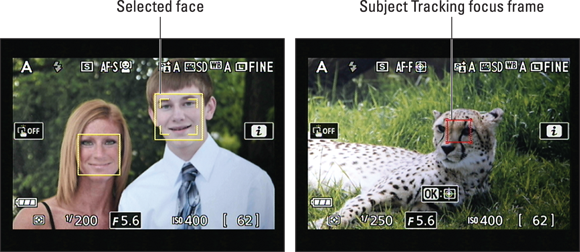
Figure 4-20: The focusing frame appears differently in Face Priority mode (left) and Subject Tracking mode (right).
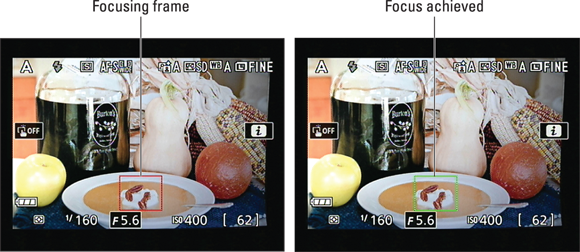
Figure 4-21: The focus frame turns green when focus is achieved.

Figure 4-22: Press the Zoom In button to magnify the display and double-check focus.
Manual focusing during Live View and movie shooting
For manual focusing with the 18–55mm lens or a similarly featured Nikon lens (including the 18–140mm kit lens), just set the A/M switch to M. The camera automatically changes the Focus mode setting to MF (manual focus). For other lenses, refer to the lens instruction manual to find out how to set the lens to manual focusing. Then rotate the lens focusing ring to bring the scene into focus. But note a few quirks:
- Even with manual focusing, you still see the focusing frame; its appearance depends on the current AF-area mode setting. In Face Priority mode, the frame automatically jumps into place over a face if it detects one. And if you press OK when Subject Tracking mode is enabled, the camera tries to track the subject under the frame until you press OK again. I find these two behaviors irritating, so I always set the AF-area mode to Wide Area or Normal Area for manual focusing.
-
The focusing frame doesn't turn green to indicate successful focusing as it does with autofocusing.
- You can press the Zoom In button to check focus in manual mode just as you can during autofocusing. Refer to Step 7 in the preceding section for details. Press the Zoom Out button to reduce the magnification level.
Manipulating Depth of Field
Getting familiar with the concept of depth of field is one of the biggest steps you can take to becoming a better photographer. I introduce you to depth of field in Chapter 3, but here's a quick recap:
- Depth of field refers to the distance over which objects in a photograph appear acceptably sharp.
- With a shallow, or small, depth of field, distant objects appear more softly focused than the main subject (assuming that you set focus on the main subject, of course).
- With a large depth of field, the zone of sharp focus extends to include objects at a distance from your subject.
Which arrangement works best depends on your creative vision and your subject. In portraits, for example, a classic technique is to use a short depth of field, as I did for the photo on the left in Figure 4-23. This approach increases emphasis on the subject while diminishing the impact of the background. But for the photo shown on the right, I wanted to emphasize that the foreground figures were in St. Peter's Square, so I used a large depth of field, which kept the background buildings sharply focused and gave them equal weight in the scene.

Figure 4-23: A shallow depth of field blurs the background (left); a large depth of field keeps both foreground and background in focus (right).
Depth of field depends on the aperture setting, lens focal length, and distance from the subject, as follows:
- Aperture setting (f-stop): The aperture is one of three main exposure settings, all explained fully in Chapter 3. Depth of field increases as you stop down the aperture (by choosing a higher f-stop number). For shallow depth of field, open the aperture (by choosing a lower f-stop number). Figure 4-24 offers an example; in the f/22 version on the left, focus is sharp all the way through the frame; in the f/2.8 version on the right, focus softens as the distance from the flag increases. I snapped both images using the same focal length and camera-to-subject distance, setting focus on the flag.
-
Lens focal length: In lay terms, focal length determines what the lens “sees.” As you increase focal length, measured in millimeters, the angle of view narrows, objects appear larger in the frame, and — the important point for this discussion — depth of field decreases. Additionally, the spatial relationship of objects changes as you adjust focal length. As an example, Figure 4-25 compares the same scene shot at a focal length of 127 mm and 183 mm. I used the same aperture and camera-to-subject distance for each shot, setting focus on the parrot.
Whether you have any focal length flexibility depends on your lens: If you have a zoom lens, you can adjust the focal length by zooming in or out. If you have a prime lens — that is, not a zoom lens — the focal length is fixed, so scratch this means of manipulating depth of field.
For more details about focal length, flip to Chapter 1 and explore the sidebar related to that topic.
- Camera-to-subject distance: As you move the lens closer to your subject, depth of field decreases. This statement assumes that you don't zoom in or out to reframe the picture, thereby changing the focal length. If you do, depth of field is affected by both the camera position and focal length.

Figure 4-24: A lower f-stop number (wider aperture) decreases depth of field.

Figure 4-25: Zooming to a longer focal length also reduces depth of field.
Together, these three factors determine the maximum and minimum depth of field that you can achieve, as follows:
- To produce the shallowest depth of field: Open the aperture as wide as possible (the lowest f-stop number), zoom in to the maximum focal length of your lens, and get as close as possible to your subject.
- To produce maximum depth of field: Stop down the aperture to the highest possible f-stop number, zoom out to the shortest focal length (widest angle) your lens offers, and move farther from your subject.
A few final tips related to depth of field:
- Aperture-priority autoexposure mode (A) enables you to easily control depth of field while enjoying exposure assistance from the camera. In this mode, you rotate the Command dial to set the f-stop, and the camera selects the appropriate shutter speed to produce a good exposure. The range of available aperture settings depends on your lens.
- For greater background blurring, move the subject farther from the background. The extent to which background focus shifts as you adjust depth of field also is affected by the distance between the subject and the background.
-
In Live View mode, depth of field doesn't change in the preview as you change the f-stop setting. The camera can't display the effect of aperture on depth of field properly because the aperture doesn't actually open or close until you take the photo. However, you can gauge the depth of field produced by the focal length and subject-to-camera distance in the preview.