
2
Reviewing Five Essential Picture-Taking Options
In This Chapter
![]() Selecting an exposure mode
Selecting an exposure mode
![]() Changing the shutter-release mode
Changing the shutter-release mode
![]() Choosing the right Image Size (resolution) setting
Choosing the right Image Size (resolution) setting
![]() Understanding the Image Quality setting: JPEG or Raw?
Understanding the Image Quality setting: JPEG or Raw?
![]() Adding flash
Adding flash

Every camera manufacturer strives to ensure that your initial encounter with the camera is a happy one. To that end, the D5500's default settings are designed to make it easy to take a good picture the first time you press the shutter button. The camera is set to the Auto exposure mode, which means that all you need to do is frame, focus, and shoot, as outlined at the end of Chapter 1.
Although the default settings deliver acceptable pictures in many cases, they don't produce optimal results in every situation. You may be able to take a decent portrait in Auto mode, for example, but by tweaking a few settings, you can turn that decent portrait into a stunning one.
This chapter helps you start fine-tuning the camera settings by explaining five basic picture-taking options: exposure mode, shutter-release mode, image size, image quality, and flash. They're not the most exciting features (don't think I didn't notice you stifling a yawn), but they make a big difference in how easily you can capture the photo you have in mind. You should review these settings before each photo outing.
Choosing an Exposure Mode
The first setting to consider is the exposure mode, which you select via the Mode dial, shown in Figure 2-1. Your choice determines how much control you have over two critical exposure settings — aperture and shutter speed — as well as many other options, including those related to color settings and flash photography.

Figure 2-1: The Mode dial determines how much input you have over exposure, color, and other picture options.
Your choices fall into three categories: fully automatic, semiautomatic, and manual. The next three sections provide the background you need to choose the option.
Fully automatic exposure modes
My guess is that you bought this book for help with using the camera's advanced exposure modes, so that's what the rest of this book covers. But until you have time to digest that information — or if you just need a break from thinking about the advanced options — you can take advantage of the following point-and-shoot modes:
- Auto and Auto Flash Off: The camera analyzes the scene and selects what it considers the most appropriate settings to capture the image. The only difference between the two modes is that the Auto Flash Off setting, labeled in Figure 2-1, disables flash. In Auto mode, you can choose from several Flash modes, which I detail later in this chapter. Chapter 1 shows you how to use the Auto Flash Off setting as well as plain ol' Auto.
-
Scene modes: You also get a batch of automatic modes designed to capture specific subjects in ways deemed best according to photography tradition. For example, in Portrait mode, skin tones are manipulated to appear warmer and softer, and the background appears blurry to bring attention to your subject, as shown on the left in Figure 2-2; in Landscape mode, greens and blues are intensified, and the camera tries to maintain sharpness in both near and distant objects, as shown on the right in the figure.
 To experiment with Scene modes, set the Mode dial to Scene. An icon representing the current Scene mode appears in the upper-left corner of the screen, as shown on the left in Figure 2-3. Rotate the Command dial to shift to the scene selection screen, as shown on the right; keep spinning the dial or tap the left/right scroll arrows to cycle through the Scene types. (The figures show how things look when you're using the viewfinder to frame shots; the display looks slightly different in Live View mode, but you adjust the setting using the same technique.) To lock in your setting and return to shooting mode, press the shutter button halfway and release it.
 After you exit the selection screen, you can tap the question mark icon in the lower left corner of the monitor (or press the Zoom Out button) to display a Help screen with more information about the chosen mode.
For the most part, the process of taking pictures in the Scene modes is the same as for shooting in Auto mode. For a few Scene modes, however, some variations come into play:
-
Close Up, Candlelight, and Food: In Auto mode (and in most Scene modes), the camera selects the focus point, typically focusing on the object closest to the lens. But in these three modes, the center focus point is used by default, so frame the picture with your subject under that point. To choose a different focus point, look through the viewfinder and then press the Multi Selector left/right/up/down until the point you prefer is highlighted. (You may need to give the shutter button a quick half-press to wake up the camera before you can do so.)
 In Food mode, you also control whether the flash fires. If you want to use flash, press the flash button on the left side of the camera to raise the built-in flash. Close the flash unit to go flash free.
 -
Sports and Pet Portrait: Again, the center focus point is selected by default, and you can choose a different point by using the Multi Selector. Start by framing your subject under the focus point, and then press and hold the shutter button halfway. If the subject leaves the selected focus point, the camera looks to the other focus points for focusing information, adjusting focus as necessary up to the time you press the button the rest of the way to take the shot.
Sports mode and Pet Portrait mode also use the Continuous High shutter-release setting, which means that the camera records a burst of images as long as you hold down the shutter button. See the later section “Setting the Release Mode” for more about this setting.
-
- Effects: This mode works like Auto except that the camera applies one of ten special effects to the picture. Chapter 11 provides details on Effects mode and also explains how you can apply effects to existing pictures by using options on the Retouch menu.

Figure 2-2: Portrait mode produces pleasant skin tones and a soft background; Landscape mode delivers vivid colors and keeps both foreground and background objects sharp.

Figure 2-3: After setting the Mode dial to Scene, rotate the Command dial to scroll through additional Scene types.
 Because all these modes are designed to make picture-taking simple, they prevent you from accessing many camera features. You can control the rest of the settings covered in this chapter and also adjust certain aspects of the camera's autofocusing behavior (Chapter 4 tells you how), but that's about it. Options that are off-limits appear dimmed on the menus and Information and Live View displays. If you press a button that leads to an advanced setting, the monitor displays a message telling you that the option is unavailable.
Semiautomatic exposure modes (P, S, and A)
To take more creative control but still get some exposure assistance from the camera, choose one of these exposure modes, all detailed in Chapter 3:
- P (programmed autoexposure): The camera selects the aperture and shutter speed necessary to ensure a good exposure. But you can rotate the Command dial to choose from different combinations of the two to vary the creative results. For example, you might use a fast shutter speed to freeze action, or you might go in the other direction, choosing a shutter speed slow enough to blur the action, which creates a heightened sense of motion.
- S (shutter-priority autoexposure): You select the shutter speed, and the camera selects the proper aperture to properly expose the image. This mode is ideal for capturing moving subjects because it gives you direct control over the shutter speed. The fastest way to adjust the shutter speed is to rotate the Command dial.
- A (aperture-priority autoexposure): In this mode, you rotate the Command dial to choose the aperture, and the camera automatically chooses a shutter speed to properly expose the image. Because aperture affects depth of field (the distance over which objects in a scene remain acceptably sharp), this setting works well for portraits because you can select an aperture that results in a soft, blurry background, putting the emphasis on your subject. For landscape shots, on the other hand, you might choose an aperture that keeps the entire scene sharply focused so that both near and distant objects have equal visual weight.
You also can use the touchscreen to adjust the shutter speed or aperture setting: Tap the arrow box set to the right of the setting and then tap the left and right arrows that appear to change the value. See Figure 2-4, in the next section, for a look at the position of these controls. Frankly, though, using the Command dial is easier because you can keep your eye up to the viewfinder while changing the setting.

Figure 2-4: Tap the box next to the setting you want to change (left); then tap the left/right arrows to change the value.
P, S, and A modes give you access to all camera features. So even if you're not ready to explore aperture and shutter speed, go ahead and set the Mode dial to P if you need to access a setting that's off-limits in the fully automated modes. The camera then operates pretty much as it does in Auto mode but doesn't limit you to the most basic picture-taking settings.
Manual exposure mode (M)
In Manual mode, you take the exposure reins completely, selecting both aperture and shutter speed as follows:
-
To set the shutter speed: Rotate the Command dial.
 To set the aperture: Press the Exposure Compensation button while rotating the Command dial.
You also can adjust the two values via the touchscreen:
 Viewfinder photography: Tap the arrow box under the shutter speed or aperture setting icon (see Figure 2-4) to access the touch controls for adjusting that value. The Information screen displays a pair of arrows at either side of the selected setting, as shown on the right in the figure; tap the right arrow to raise the value, tap left to lower it. Tap the exit icon (labeled in the figure), to return to the Information screen.
- Live View photography: The shutter speed and f-stop appear in boxes at the bottom of the screen. Tap either box to display arrows that you can tap to change the current value. After adjusting the setting, tap the exit arrow to return to the normal Live View display.
Even in Manual exposure mode, the camera offers an assist by displaying an exposure meter to help you dial in the right settings. (See Chapter 3 for details.) You have complete control over all other picture settings, too.
One important and often misunderstood aspect of Manual exposure mode: Setting the Mode dial to M has no bearing on focusing. You can still choose manual focusing or autofocusing, assuming that your lens offers autofocusing. Just set the lens switch to the focusing method you prefer.
Setting the Release Mode
By using the Release mode setting, you tell the camera whether to capture a single image each time you press the shutter button; to record a burst of photos as long as you hold down the shutter button; or to use Self-Timer mode, which delays the image capture until a few seconds after you press the shutter button. You also get two options related to wireless remote control shooting and Quiet Shutter mode, which dampens the normal shutter-release sounds.
 Why Release mode? It's short for shutter-release mode. Pressing the shutter button tells the camera to release the shutter — an internal light-control mechanism — so that light can strike the image sensor and expose the image. Your choice of Release mode determines when and how that action occurs.
On the Information screen and Live View display, the current Release mode is indicated by the icons labeled in Figure 2-5. In the figure, the S represents the Single Frame mode. (See the next several sections for a look at the icon representing each mode.) Note that the Live View screen in the figure shows the default data-display mode; if your screen shows a different assortment of data, press the Info button to cycle through the available display modes.

Figure 2-5: This S represents the Single Frame shutter-release option, which produces one picture for each press of the shutter button.
Also pay attention to the status of the Touch Shutter when you shoot in Live View mode. The Touch Shutter has two settings: On and Off. When the icon appears as shown on the right in Figure 2-5, the Touch Shutter is on. At this setting, the camera sets focus when you touch the screen and releases the shutter button when you lift your finger from the screen. Tap the icon to turn off the shutter-release portion of the feature; you can then tap your subject to set focus on that part of the screen and use the shutter button to record the picture. You can use the Touch Shutter to record only one photo at a time; the burst mode options (Continuous High and Continuous Low) aren't compatible with the Touch Shutter.
To adjust the Release mode setting, use these methods:
-
 Release Mode button: Press this button, labeled in Figure 2-6, to display the selection screen shown in Figure 2-7. Then tap the setting you want to use. Or, if the touchscreen is disabled, use the Multi Selector to highlight a setting and then press OK. For even faster results, press and hold down the Release Mode button. When the selection screen appears, rotate the Command dial to highlight a setting. Then release the button to return to shooting mode.
 - Shooting menu: Scroll to the second page of the menu to find the setting, as shown in Figure 2-8.

Figure 2-6: The Release Mode button offers the fastest access to the setting.

Figure 2-7: After this screen appears, tap the Release Mode option you want to use.

Figure 2-8: The Release Mode option is also found on the Shooting menu.
With those basics out of the way, the next few sections explain how each Release mode works.
Single Frame and Quiet Shutter Release modes
![]() Single Frame Release mode captures one picture each time you release the shutter, whether you're using the Touch Shutter in Live View mode or the plain old shutter button. Single Frame is the default setting for all exposure modes except the Sports and Pet Portrait Scene modes.
Single Frame Release mode captures one picture each time you release the shutter, whether you're using the Touch Shutter in Live View mode or the plain old shutter button. Single Frame is the default setting for all exposure modes except the Sports and Pet Portrait Scene modes.
![]() Quiet Shutter mode works just like Single Frame mode but makes less noise as it goes about its business. First, the camera disables the beep that it emits by default when it achieves focus. Additionally, Quiet Shutter mode affects the operation of the internal mirror that causes the scene coming through the lens to be visible in the viewfinder. Normally, the mirror flips up when you press the shutter button and then flips back down after the shutter opens and closes. This mirror movement makes some noise. In Quiet Shutter mode, you can prevent the mirror from flipping back down by keeping the shutter button fully pressed after the shot. Or, if you use the Touch Shutter, keep your finger on the monitor. This way, you can delay the sound made by the final mirror movement to a moment when the noise won't be objectionable.
Quiet Shutter mode works just like Single Frame mode but makes less noise as it goes about its business. First, the camera disables the beep that it emits by default when it achieves focus. Additionally, Quiet Shutter mode affects the operation of the internal mirror that causes the scene coming through the lens to be visible in the viewfinder. Normally, the mirror flips up when you press the shutter button and then flips back down after the shutter opens and closes. This mirror movement makes some noise. In Quiet Shutter mode, you can prevent the mirror from flipping back down by keeping the shutter button fully pressed after the shot. Or, if you use the Touch Shutter, keep your finger on the monitor. This way, you can delay the sound made by the final mirror movement to a moment when the noise won't be objectionable.
Even in Quiet mode, the camera beeps when you tap the touchscreen. To turn that sound effect off, set the Beep Options setting on the Setup menu to Off (touch controls only).
Continuous (burst mode) shooting
Continuous Low and Continuous High enable burst mode shooting. That is, the camera records a continuous series of images for as long as you hold down the shutter button, making it easier to capture fast-paced action. Remember that these two modes don't play nice with the Touch Shutter function available in Live View mode; you must use the shutter button to trigger the shutter release.
Here's how the two modes differ:
-
 Continuous Low: The camera can capture as many as 3 frames per second (fps).
  Continuous High: Records as many as 5 fps, depending on the Image Quality setting, which I cover later in this chapter. If you select the Image Quality setting that produces 14-bit Raw (NEF) files, the maximum frame rate is 4 fps.
A few critical details about these two Release modes:
- You can't use flash. Continuous mode doesn't work with flash because the time that the flash needs to recycle between shots slows down the capture rate too much. If flash is enabled, you get one shot per each press of the shutter button, as in Single Frame mode.
-
Images are stored temporarily in the memory buffer. The camera has some internal memory — a buffer — where it stores picture data until it has time to record all the photos in a burst of shots to the memory card. The number of pictures the buffer can hold depends on certain camera settings, such as Image Quality. When you press the shutter button halfway, the shots remaining value in the lower-right corner of the viewfinder and Live View display changes to show an estimate of how many pictures will fit in the buffer.
After shooting a burst of images, wait for the memory card access light to go out before turning off the camera. (The light is in the lower-right corner of the camera back.) That's your signal that the camera has moved all data from the buffer to the memory card. Turning off the camera before that happens may corrupt the image file. - Your mileage may vary. The number of frames per second depends on several factors, including shutter speed. To achieve the highest rate, the shutter speed must be 1/250 second or faster. Additionally, although you can capture as many as 100 frames in a single burst, the frame rate can drop if the buffer gets full.
-
Continuous Low is enough for all but the fastest action. Unless you're shooting a subject that's moving at a really fast pace, not too much changes between frames when you shoot at 5 fps. So, when you use Continuous High, you typically wind up with lots of shots that show the exact same thing, wasting space on your memory card. Continuous Low usually gives you plenty of frames to capture the shot without the unnecessary file bloat.
Self-timer shooting
![]() You're no doubt familiar with Self-Timer mode, which delays the shutter release for a few seconds after you release the shutter button or, in Touch Shutter mode, when you lift your finger from the monitor. After you take that step, the AF-assist lamp on the front of the camera starts to blink, and the camera emits a series of beeps (assuming that you didn't disable its voice via the Beep Options setting on the Setup menu). A few seconds later, the camera captures the image.
You're no doubt familiar with Self-Timer mode, which delays the shutter release for a few seconds after you release the shutter button or, in Touch Shutter mode, when you lift your finger from the monitor. After you take that step, the AF-assist lamp on the front of the camera starts to blink, and the camera emits a series of beeps (assuming that you didn't disable its voice via the Beep Options setting on the Setup menu). A few seconds later, the camera captures the image.
By default, the camera waits ten seconds after you press the shutter button and then records a single image. But you can tweak the delay time and capture as many as nine shots at a time. Set your preferences by using the Self-Timer option, found in the Timers/AE Lock section of the Custom Setting menu and shown in Figure 2-9. Here's what you need to know about the two settings:
- Self-Timer Delay: Choose a delay time of 2, 5, 10, or 20 seconds. The selected delay time appears with the Self-Timer symbol in the Information and Live View displays.
- Number of Shots: Specify how many frames you want to capture with each press of the shutter button; the maximum is nine. When you record multiple frames, shots are taken at 4-second intervals.

Figure 2-9: You can adjust the self-timer capture delay and the number of frames taken with each press of the shutter button.
Two more points about self-timer shooting:
- You must reselect the Self-Timer setting for each picture (or series of frames) you want to shoot. After the specified number of shots are captured, the camera exits Self-Timer Release mode and then returns to the Release mode you used before your Self-Timer shot(s). Turning off the camera also resets the Release mode.
- Cover the viewfinder during self-timer shooting. Otherwise, light may seep into the camera through the viewfinder and affect exposure. You may want to purchase the optional Nikon DK-5 eyepiece cap, made just for this purpose. The cap costs around $4.
Wireless remote control modes
Two other Release mode settings relate to the Nikon ML-L3 wireless remote control and work as follows:
-
 Delayed Remote: After you press the shutter-release button on the remote unit, the AF-assist lamp blinks for about two seconds, and then the camera takes the picture.
  Quick Response Remote: The image is captured immediately. In this mode, the AF-assist lamp blinks after the shot is taken.
Normally, the camera cancels out of the remote control modes if it doesn't receive a signal from the remote after about one minute. You can adjust this timing by using the Remote On Duration option, located on the Timers/AE Lock submenu of the Custom Setting menu. The maximum delay time is 15 minutes; keep in mind that a shorter delay time saves battery life. After the delay time expires, the camera resets itself to either Single Frame, Quiet Shutter, or Continuous Low or Continuous High mode, depending on which mode you last used. The Release mode is also reset to one of those modes if you turn off the camera.
As with self-timer shooting, it's a good idea to cover the viewfinder when you're using these modes, to prevent exposure problems that can be caused by light entering the camera through the viewfinder.
These Release modes are not meant to be used with a wired remote control (which you connect to the Accessory terminal port on the left side of the camera). Select one of the other Release mode settings, and then press the shutter-release button on the remote to trigger the shutter. Wired or wireless, see your remote's operating guide for more details on using the unit.
Additionally, if you own a smartphone or tablet, you can connect it to the camera via Wi-Fi and then use the device to trigger the shutter release. Chapter 9 details this feature.
Investigating other shutter-release options
In addition to the official Release mode setting, your camera offers two other features related to triggering the shutter release: Exposure Delay Mode and Interval Timer Shooting. Check them out in the next two sections.
Exposure Delay Mode
One component of a dSLR camera is a mirror that moves every time you press the shutter button. The vibration caused by the mirror action can cause a small amount of blur when you use a very slow shutter speed, shoot with a long telephoto lens, or take extreme close-ups.
To cope with that issue, some cameras offer mirror-lockup shooting, which delays opening the shutter until after the mirror movement is complete. Although the D5500 doesn't offer mirror-lockup shooting — its mirror-lockup function is provided solely for the purpose of accessing the sensor for cleaning — it does offer another solution: Exposure Delay Mode. When you enable this feature, the camera waits about 1 second after the mirror is raised to release the shutter, ensuring that the mirror movement is complete before the image is recorded.
Look for the Exposure Delay Mode option in the Shooting/Display section of the Custom Setting menu, as shown in Figure 2-10. You can use Exposure Delay Mode with any Release mode. Just don't forget that you enabled the feature or else you'll drive yourself batty trying to figure out why the camera isn't responding to your shutter-button finger. I say this from experience… .
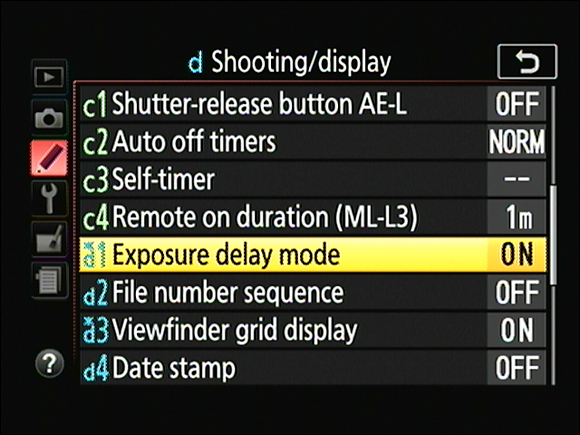
Figure 2-10: Exposure Delay Mode helps ensure that the movement of the camera's internal mirror doesn't create image blur.
Interval Timer Shooting
With Interval Timer Shooting, you can set the camera to automatically release the shutter at intervals ranging from seconds to hours apart. This feature enables you to capture a subject as it changes over time — a technique commonly known as time-lapse photography — without having to stand around pressing the shutter button the whole time.
Be aware that you can't take advantage of this feature during Live View photography or when the Autobracketing or HDR options are enabled. (Chapter 3 explains autobracketing and HDR photography.)
Assuming those restraints aren't in place, here's how to set up the camera for time-lapse photography:
-
Set the Release mode to Single Frame or Quiet Shutter.
The fastest way to access the setting is to press the Release Mode button on the front-left side of the camera. -
Display the Shooting menu and select Interval Timer Shooting (as shown on the left in Figure 2-11).
The screen on the right in Figure 2-11 appears.
-
To begin setting up your capture session, select Start Options as shown on the right in Figure 2-12.
You get two choices:
- Now: Select this option to begin capturing frames after you complete the shooting setup.
- Choose start day and start time: Select this setting, as shown on the right in Figure 2-12, to delay the start of the interval shooting session. On the next screen, use the touchscreen or Multi Selector to set the date, hour, and minute that you want the interval captures to begin. Tap OK or press the OK button to lock in your choices.
The Start Time option is based on a 24-hour clock, as is the Interval option (explained next). The current time appears in the lower-right corner of the screen and is based on the date/time information you entered when setting up the camera. -
Set the Interval and Number of Times options.
Access these options via the initial Interval Timer screen (right screen in Figure 2-11). A few points to note:
- Interval: This setting determines the delay time between each capture. The left column box is for the hour setting; the middle, minutes; and the right, seconds. Make sure that the delay time between frames is longer than the shutter speed you plan to use.
- Number of times: Slightly misnamed, this option determines how many frames the camera records during a single interval-timing shooting session.
Remember to tap OK or press the OK button after adjusting each setting.
-
Enable or disable Exposure Smoothing.
The final option, Exposure Smoothing, tells the camera to try to match the exposure of each shot to the one taken previously. Obviously, if your goal is a series of frames that show how the subject appears as the sun rises and falls, you should turn this option off, as it is by default. You may want to enable it, however, if you're shooting a subject that will be illuminated with a consistent light source throughout the entire shooting time or if the light may change only slightly, such as when recording a hummingbird at a feeder during an afternoon.
The Exposure Smoothing option doesn't work in the M (manual) exposure mode unless you enable Auto ISO Sensitivity, which gives the camera permission to increase the ISO setting as necessary to maintain a consistent exposure. You can locate that option via the ISO Sensitivity Settings item on the Shooting menu. (The next chapter explains this setting, which determines how much the camera reacts to light.) -
Verify the interval setup and then choose Start to begin the capture setting.
Your selected timer settings appear at the bottom of the main Interval Timer Shooting screen, as shown in Figure 2-13.
If you selected Now as the Start Time option in Step 3, the first shot is recorded about 3 seconds after you select Start. If you set a delayed start time, the camera displays the message Timer Active for a few seconds.

Figure 2-11: The Interval Timer Shooting feature enables you to do time-lapse photography.

Figure 2-12: You can specify the starting time of the interval captures.

Figure 2-13: Your chosen capture settings appear at the bottom of the main Interval Timer Shooting screen.
A few final factoids:
-
Interval Timer Shooting isn't available for Live View photography or Effects exposure mode. The menu option is disabled any time Live View is enabled or the Mode dial is set to Effects.
- The card access light blinks while Interval Timer Shooting is in progress. It's the little light just above the Delete button on the back of the camera.
- You can't adjust camera settings while the interval sequence is in progress. Make sure that everything is set up to your liking before you begin the interval-shooting session.
- If you're autofocusing, be sure that the camera can focus on your subject. The camera initiates focusing before each shot. See Chapter 4 for details about autofocusing.
-
To pause or cancel interval timing, press the OK button.
You then see a screen similar to the one in Figure 2-14. Choose from three options:
- Restart shooting immediately: Select Restart.
- Restart at a later date/time: Select Start Options. Then choose Start Day and Start Time and enter the date and time that you want to resume interval shooting. Return to the screen shown in Figure 2-14 and choose Restart.
- Exit interval shooting: Select Off. Or just turn the camera off or change the Mode dial setting.
- To prevent exposure miscues, cover the viewfinder. This prevents light from entering the viewfinder and fooling the exposure meter.
- When the interval sequence is complete, the Interval Timer Shooting menu option is reset to Off. The card access light stops blinking shortly after the final image is recorded to the memory card.

Figure 2-14: Press the OK button to pause or cancel interval photography.
One final piece of advice for this section: The camera battery may not contain enough juice for time-lapse photography sessions that span many hours. If you do a lot of this kind of shooting, you may want to invest in the AC power supply. Also be sure that your memory card has enough empty space to hold all your interval shots. If the camera runs out of card space, the interval countdown will continue but no shots will be recorded until you insert a new memory card.
Checking Image Size and Image Quality
Your preflight camera check should also include a look at the Image Size and Image Quality settings. The first option sets picture resolution; the second, file type.
The names of these settings are a little misleading, though, because the Image Size setting also contributes to picture quality, and the Image Quality setting affects the file size of the picture. Because the two work in tandem to determine quality and size, it's important to consider them together. The next few sections explain each option; following that, I offer a few final tips and show you how to select the settings you want to use.
Also check out the section related to ISO in Chapter 3; very high ISO settings can also reduce image quality. In this case, a defect known as noise can give the picture a speckled appearance.
Considering the Image Size setting (resolution)
The Image Size setting determines how many pixels are used to create your photo. Pixels are the square tiles from which digital images are made; you can see some pixels close up in the right image in Figure 2-15, which shows a greatly magnified view of the eye area in the left image.

Figure 2-15: Pixels are the building blocks of digital photos.
Pixel is short for picture element.
The number of pixels in an image is referred to as resolution. You can define resolution in terms of either the pixel dimensions — the number of horizontal pixels and vertical pixels — or total resolution, which you get by multiplying those two values. This number is usually stated in megapixels (or MP, for short), with one megapixel equal to 1 million pixels.
Your camera offers three Image Size options: Large, Medium, and Small. Table 2-1 lists the resolution values for each setting. (Megapixel values are rounded off.)
Table 2-1 Image Size (Resolution) Options
|
Setting |
Resolution |
|
Large |
6000 x 4000 (24.0MP) |
|
Medium |
4496 x 3000 (13.5MP) |
|
Small |
2992 x 2000 (6.0MP) |
However, if you select Raw (NEF) as the Image Quality setting, images are captured at the Large setting. You can vary the resolution only for pictures taken in the JPEG format. The upcoming section “Understanding Image Quality options (JPEG or Raw)” explains file formats.
To choose the right Image Size setting, you need to understand the three ways that resolution affects your pictures:
-
Print size: Pixel count determines the size at which you can produce a high-quality print. When an image contains too few pixels, details appear muddy, and curved and diagonal lines appear jagged. Such pictures are said to exhibit pixelation.
Depending on your photo printer, you typically need anywhere from 200 to 300 pixels per linear inch, or ppi, for good print quality. To produce an 8 x 10 print at 200 ppi, for example, you need a pixel count of 1600 x 2000, or about 3.2 megapixels.
Even though many photo-editing programs enable you to add pixels to an existing image — known as upsampling — doing so doesn't enable you to successfully enlarge your photo. In fact, upsampling typically makes matters worse.To give you a better idea of the impact of resolution on print quality, Figures 2-16, 2-17, and 2-18 show you the same image at 300 ppi, at 50 ppi, and then resampled from 50 ppi to 300 ppi (respectively). As you can see, there's no way around the rule: If you want quality prints, you need the right pixel count from the get-go.
- Screen display size: Resolution doesn't affect the quality of images viewed on a monitor or television or another screen device the way it does for printed photos. Instead, resolution determines the size at which the image appears. This issue is one of the most misunderstood aspects of digital photography, so I explain it thoroughly in Chapter 9. For now, just know that you need way fewer pixels for onscreen photos than you do for prints. In fact, even the Small resolution setting creates a picture too big to be viewed in its entirety in many e-mail programs.
-
File size: Every pixel increases the amount of data required to create the picture file. So a higher-resolution image has a larger file size than a low-resolution image.
Large files present several problems: - You can store fewer images on the memory card, on your computer's hard drive, and on removable storage media such as DVDs.
- The camera needs more time to process and store the image data on the memory card after you press the shutter button. This extra time can hamper fast-action shooting.
- When you share photos online, larger files take longer to upload and download.
- When you edit photos in your photo software, your computer needs more resources and time to process large files.

Figure 2-16: A high-quality print depends on a high-resolution original.

Figure 2-17: At 50 ppi, the image has a jagged, pixelated look.
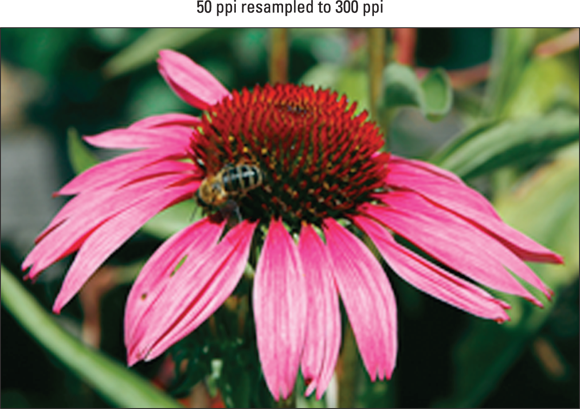
Figure 2-18: Adding pixels in a photo editor doesn't rescue a low-resolution original.
As you can see, resolution is a bit of a sticky wicket. What if you aren't sure how large you want to print your images? What if you want to print your photos and share them online? I take the better-safe-than-sorry route, which leads to the following recommendations:
- Always shoot at a resolution suitable for print. You then can create a low-resolution copy of the image for use online. In fact, your camera offers a built-in resizing option that I cover in Chapter 9.
- For everyday images, Medium is a good choice. I find Large to be overkill for casual shooting, creating huge files for no good reason. Keep in mind that even at the Small setting, the pixel count (2992 x 2000) gives you enough resolution to produce an 8 x 10-inch print at 200 ppi.
-
Choose Large for an image that you plan to crop or print very large, or both. The benefit of maxing out the resolution is that you have the flexibility to crop your photo and still generate a decently sized print of the remaining image. Figure 2-19 offers an example. When I was shooting this photograph, I couldn't get close enough to fill the frame with my main interest — the two juvenile herons at the center of the scene. But because I had the resolution cranked up to Large, I could later crop the shot to the composition you see on the right and still produce a great-looking print. In fact, I could have printed the cropped image at a much larger size than fits here.
- Reduce resolution if shooting speed is paramount. If the camera takes too long after you take one shot before it lets you take another, dialing down the resolution may help.

Figure 2-19: A high-resolution original (left) enabled me to crop the photo and still have enough pixels to produce a quality print (right).
Understanding Image Quality options (JPEG or Raw)
If I had my druthers, the Image Quality option would instead be called File Type because that's what the setting controls. Here's the deal: The file type, sometimes also known as a file format, determines how your picture data is recorded and stored. Your choice does affect picture quality, but so does the Image Size setting, as described in the preceding section, and the ISO setting, covered in the next chapter. In addition, your choice of file type has ramifications beyond picture quality.
At any rate, your camera offers two file types: JPEG and Camera Raw — or Raw, for short, which goes by the specific moniker NEF (Nikon Electronic Format) on Nikon cameras. The next couple of sections explain the pros and cons of each format. If your mind is already made up, skip ahead to the section “Setting Image Size and Image Quality,” to find out how to make your selection.
Don't confuse file format with the Format Memory Card option on the Setup menu. That option erases all data on your memory card; see Chapter 1 for details.
JPEG: The imaging (and web) standard
Pronounced “jay-peg,” this format is the default setting on your D5500, as it is on most digital cameras. JPEG is popular for two main reasons:
- Immediate usability: All web browsers and e-mail programs can display JPEG files, so you can share pictures online immediately after you shoot them. You also can get a JPEG file printed at any retail photo outlet. The same can't be said for Raw (NEF) files, which must be converted to JPEG for online sharing and to JPEG or another standard format, such as TIFF, for retail printing.
- Small files: JPEG files are smaller than Raw files. And smaller files consume less room on your camera memory card and in your computer's storage tank.
The downside (you knew there had to be one) is that JPEG creates smaller files by applying lossy compression. This process actually throws away some image data. Too much compression produces a defect called JPEG artifacting. Figure 2-20 compares a high-quality original (left photo) with a heavily compressed version that exhibits artifacting (right photo).

Figure 2-20: The reduced quality of the right image is caused by excessive JPEG compression.
Fortunately, your camera enables you to specify how much compression you're willing to accept. You can choose from three JPEG settings, which produce the following results:
- JPEG Fine: The compression ratio is 1:4 — that is, the file is four times smaller than it would otherwise be. Because very little compression is applied, you shouldn't see many compression artifacts, if any.
- JPEG Normal: The compression ratio rises to 1:8. The chance of seeing some artifacting increases as well. This setting is the default.
- JPEG Basic: The compression ratio jumps to 1:16. That's a substantial amount of compression that brings with it a lot more risk of artifacting.
Note, though, that even the Basic setting doesn't result in anywhere near the level of artifacting you see in the right image in Figure 2-20. I've exaggerated the defect in that example to help you recognize artifacting and understand how it differs from the quality loss that occurs when you have too few pixels (refer to Figures Figures 2-16 through 2-18). In fact, if you keep the image print or display size small, you aren't likely to notice a great deal of quality difference between the Fine, Normal, and Basic compression levels. It's only when you greatly enlarge a photo that the differences become apparent.
Given that the differences between the compression settings aren't that easy to spot until you enlarge the photo, is it okay to stick with the default setting — Normal — or even drop down to Basic to capture smaller files? Well, only you can decide what level of quality your pictures demand. For me, the added file sizes produced by the Fine setting aren't a huge concern, given that the prices of memory cards fall all the time. Long-term storage is more of an issue; the larger your files, the faster you fill your computer's hard drive and the more DVDs or CDs you need for archiving purposes. But in the end, I prefer to take the storage hit in exchange for the lower compression level of the Fine setting. You never know when a casual snapshot will be so great that you want to print or display it large enough that even minor quality loss becomes a concern. And of all the defects that you can correct in a photo editor, artifacting is one of the hardest to remove.
If you don't want any risk of artifacting, change the file type to Raw (NEF). Or consider your other option, which is to record two versions of each file — one Raw and one JPEG. The next section offers details.
Raw (NEF): The purist's choice
The other picture file type you can create is Camera Raw, or just Raw (as in uncooked), for short.
Each manufacturer has its own flavor of Raw. Nikon's is NEF, for Nikon Electronic Format, so you see the three-letter extension NEF at the end of Raw filenames.
Raw is popular with advanced, very demanding photographers for three reasons:
- Greater creative control: With JPEG, internal camera software tweaks your images, adjusting color, exposure, and sharpness as needed to produce the results that Nikon believes its customers prefer. With Raw, the camera simply records the original, unprocessed image data. The photographer then copies the image file to the computer and uses special software known as a Raw converter to produce the actual image, making decisions about color, exposure, and so on at that point. Nikon ViewNX 2, available for free download from Nikon’s website, offers a Raw converter, and the D5500 also has a built-in Raw converter. I cover both options in Chapter 9.
-
Higher bit depth: Bit depth is a measure of how many distinct color values an image file can contain. JPEG files restrict you to 8 bits each for the red, blue, and green color components, or channels, that make up a digital image, for a total of 24 bits. That translates to roughly 16.7 million possible colors. On the D5500, you can set the camera to capture either 12 or 14 bits per channel when you shoot in the Raw format.
Although jumping from 8 to 12 or 14 bits sounds like a huge difference, you may never notice any difference in your photos — that 8-bit palette of 16.7 million values is more than enough for superb images. Where the extra bits can come in handy is if you adjust exposure, contrast, or color in your photo-editing program. When you apply extreme adjustments, the extra bits sometimes help avoid a problem known as banding or posterization, which creates abrupt color breaks where you should see smooth, seamless transitions. (A higher bit depth doesn't always prevent this problem, however.)
- Best picture quality: Because Raw doesn't apply the destructive compression associated with JPEG, you don't run the risk of the artifacting that can occur with JPEG.
But Raw isn't without its disadvantages:
- You can't do much with your pictures until you process them in a Raw converter. You can't share them online or put them into a text document or multimedia presentation. You can view and print them immediately if you use Nikon ViewNX 2 software, but most other photo programs require you to convert the Raw files to a standard format first, such as JPEG or TIFF. Ditto for retail photo printing.
- Raw files are larger than JPEGs. Unlike JPEG, Raw doesn't apply lossy compression to shrink files. In addition, Raw files are always captured at the maximum resolution. For both reasons, Raw files are significantly larger than JPEGs, so they take up more room on your memory card and on your computer's hard drive or other picture-storage device.
Whether the upside of Raw outweighs the down is a decision that you need to ponder based on your photographic needs and on whether you have the time to, and interest in, converting Raw files.
You do have the option to capture a picture in the Raw and JPEG formats at the same time. In this scenario, you wind up with two files: one in the Raw format and one in the JPEG format. The JPEG file can be set to either Fine, Normal, or Basic. I often take this route when I'm shooting pictures I want to share right away with people who don't have software for viewing Raw files. I upload the JPEGs to a photo-sharing site where everyone can view them, and then I process the Raw versions when I have time.
My take: Choose JPEG Fine or Raw (NEF)
At this point, you may be finding all this technical goop a bit overwhelming, so allow me to simplify things for you. Until you have the time or energy to completely digest all the ramifications of JPEG versus Raw, here's a quick summary of my thoughts on the matter:
- If you require the absolute best image quality and have the time and interest in doing the Raw conversion, shoot Raw.
- If great photo quality is good enough and you don't have time to spend processing images, stick with JPEG Fine.
- If you don't mind the added file-storage space requirement and want the flexibility of both formats, choose a Raw+JPEG option, which stores one copy of the image in each format. Set the JPEG version to Fine, Normal, or Basic depending on how you plan to use the JPEG image. Again, for top quality, choose Fine.
- If you go with JPEG only, stay away from JPEG Normal and Basic. (Remember, Normal is the default setting on your camera.) The trade-off for smaller files isn't, in my opinion, worth the risk of compression artifacts.
Setting Image Size and Image Quality
To sum up the Image Size and Image Quality information laid out in the preceding sections:
- Both options affect picture quality and file size.
- Choose a high Image Quality setting — Raw (NEF) or JPEG Fine — and the maximum Image Size setting (Large) for top-quality pictures and large file sizes.
- Combining the lowest Quality setting (JPEG Basic) with the lowest Size setting (Small) greatly shrinks files, enabling you to fit lots more pictures on your memory card, but it also increases the chances that you'll be disappointed with the quality of those pictures, especially if you make large prints.
Now for the lowdown on how to monitor and adjust the setting: First, to see which options are currently in force, check the Information screen or Live View display, in the areas labeled in Figure 2-21.

Figure 2-21: The current Image Quality and Image Size settings appear here.
To adjust the settings, you have two choices:
-
 Information display control strip: Press the i
button or tap the i
icon on the Information screen to access the control strip. Choose the option you want to change — Image Size or Image Quality — to display a screen showing the available settings. For example, choosing the Image Quality option, as shown on the left in Figure 2-22, takes you to the screen shown on the right, where you can select the setting you want to use. Notice that in the screen shown on the right in Figure 2-22, the left side of the display shows the file size that will result from your selected setting along with the number of pictures that will fit on the memory card at that size (8.6MB and 133 images, in the figure). Keep in mind that certain other factors also affect the file size, such as the level of detail and color in the subject.
Information display control strip: Press the i
button or tap the i
icon on the Information screen to access the control strip. Choose the option you want to change — Image Size or Image Quality — to display a screen showing the available settings. For example, choosing the Image Quality option, as shown on the left in Figure 2-22, takes you to the screen shown on the right, where you can select the setting you want to use. Notice that in the screen shown on the right in Figure 2-22, the left side of the display shows the file size that will result from your selected setting along with the number of pictures that will fit on the memory card at that size (8.6MB and 133 images, in the figure). Keep in mind that certain other factors also affect the file size, such as the level of detail and color in the subject. - Shooting menu: As an alternative, you can adjust the settings via the Shooting menu, as shown in Figure 2-23. If you select the Image Size setting from the menu, the options screen shows the pixel counts for each setting, as shown on the right in the figure.

Figure 2-22: You can adjust both settings quickly via the Information display control strip.

Figure 2-23: You also can set Image Size and Image Quality via the Shooting menu.
When you choose the Raw (NEF) option, all pictures are automatically captured at the Large resolution setting. However, if you choose one of the Raw+JPEG settings, the JPEG version is captured at the selected Image Size setting.
In addition, you can specify the bit depth of Raw files. Make the call through the NEF (RAW) Recording option on the Shooting menu, as shown in Figure 2-24. You can choose 12 or 14 bits. If you opt for 14 bits, which enables the file to contain more color data, understand that doing so increases the file size. A 12-bit Raw file has a size of 19.7MB; a 14-bit file, 24.4MB. See the earlier section “Raw (NEF): The purist's choice” for more information about bit depth.
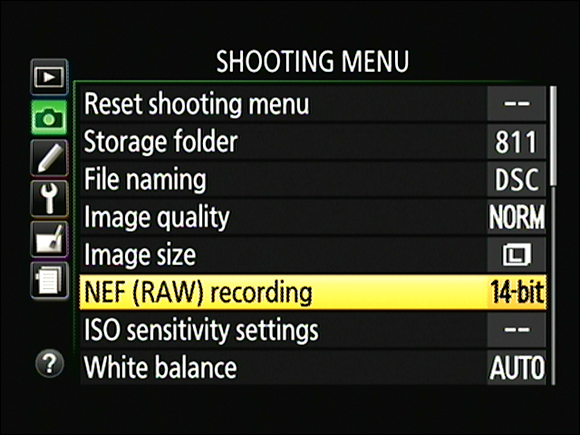
Figure 2-24: For Raw files, you can specify how many bits of color data you want to record.
Adding Flash
Another basic picture-taking option to consider is whether you want to use the built-in flash to illuminate your subject.
However, whether you can use the built-in flash depends on your exposure mode: The flash isn't available in Auto Flash Off mode and the following Scene modes: Landscape, Sports, Beach/Snow, Night Landscape, Sunset, Dusk/Dawn, Candlelight, Blossom, and Autumn Colors. All Effects modes except Super Vivid, Pop, Photo Illustration, and Toy Camera Effect also disable the built-in flash.
If you do a lot of flash photography, you may want to invest in an external flash head, which attaches to the hot shoe on top of your camera. When you use an external flash head, you can use flash in exposure modes that disable the built-in flash, with the exception of Auto Flash Off mode.
The rest of this chapter concentrates on taking advantage of the built-in flash. For help with an external flash, I need to point you to the flash manual because different flash units provide different flash settings.
Enabling and disabling flash
In certain exposure modes, flash is set by default to fire automatically if the camera thinks that the ambient light is insufficient; in other modes, you have to manually enable flash. Here's the breakdown:
-
Auto mode; all Scene modes that permit flash except Food mode; and Toy Camera Effect mode: Flash is set to Auto by default. After you press the shutter button, the camera assesses the available light and automatically pops up the built-in flash if it finds that light lacking.
If you don't want to use flash, you may be able to disable it via the Flash mode setting. See the next section for how-tos. -
Photo Illustration Effects mode: Flash is disabled by default, but you can override that setting by changing the Flash mode setting.
-
P, S, A, and M modes and the Food Scene mode: There's no such thing as automatic flash in these modes. Instead, if you want to use the built-in flash, press the Flash button on the side of the camera, labeled in Figure 2-25. Don't want flash? Just press down gently on the top of the flash to close the unit.
The camera does give you a little flash input, though: You see a blinking question mark or a flash symbol, or both, in the displays if the camera thinks you need flash. Tap the question mark symbol on the display or press the Zoom Out button, and a message appears recommending that you use flash.

Figure 2-25: In P, S, A, and M modes (and the Food Scene mode), raise the built-in flash by pressing the Flash button.
Choosing a Flash mode
The Flash mode determines how and when the flash fires. The next section introduces the various options; following that, you can find details on how to adjust the setting.
Sorting through your Flash mode options
Your camera offers the following Flash modes, represented in the Information and Live View displays by the symbols you see in the margins here. (Skip to Figure 2-29 to see where to find the symbols in the Information and Live View displays.)
-
 Auto: The camera decides whether the flash fires. This mode isn't available in the P, S, A, M modes or the Food Scene mode.
 -
 Flash Off: In Auto exposure mode or the Scene and Effects modes that permit flash, choose this Flash mode to prevent the flash from firing. (In the P, S, A, and M modes and the Food Scene mode, simply close the flash unit if you don't want to use flash.)
 -
 Fill Flash: You can think of this mode, available in P, S, A, M and Food Scene modes, as normal flash. You may also hear this mode called force flash because the flash fires no matter the amount of available light. Although most people think of flash as an indoor lighting option, adding flash can improve outdoor photos, too. After all, your main light source — the sun — is overhead, so although the top of the subject may be adequately lit, the front typically needs additional illumination. As an example, Figure 2-26 shows a floral image taken both with and without a flash. The small pop of light provided by the built-in flash is also beneficial when shooting subjects that happen to be slightly shaded. For outdoor portraits, a flash is even more important to properly illuminate the face; the section on shooting portraits in Chapter 6 discusses that subject and offers a look at the difference flash can make. Shooting with flash in bright light involves a couple of complications, however; see the sidebar “Using flash outdoors,” later in this chapter, for help.
 -
 Red-Eye Reduction: Red-eye is caused when flash light bounces off a subject's retinas and is reflected back to the camera lens, making the subjects appear possessed by a demon. This flash mode is designed to reduce the chances of red-eye.
When you use Red-Eye Reduction mode, the AF-assist lamp on the front of the camera lights briefly before the flash fires. The subject's pupils constrict in response to the light, allowing less flash light to enter the eye and cause that glowing red reflection. Be sure to warn your subjects to wait for the flash, or else they may step out of the frame or stop posing after they see the light from the AF-assist lamp.
In Auto exposure mode as well as in certain other Scene and Effects modes that permit flash, red-eye reduction flash is just a variation of the regular Auto flash setting. That is, if the camera sees the need for flash, it fires the flash with red-eye reduction engaged. In this case, you see the word Auto next to the red-eye symbol. Additionally, a few Scene modes use a variation of red-eye reduction, combining that feature with a slow shutter speed. This flash mode displays the little eye icon plus the words Auto Slow. It's important to use a tripod and ask your subject to remain still during the exposure to avoid a blurry picture. -
Slow-Sync and Rear-Sync: In the flash modes listed so far, the flash and shutter are synchronized so that the flash fires at the exact moment the shutter opens.
Your camera also offers these four special sync modes: Technical types call this flash arrangement front-curtain sync, which refers to how the flash is synchronized with the opening of the shutter. Here's the deal: The camera uses a type of shutter involving two curtains that move across the frame. When you press the shutter button, the first curtain opens, allowing light to strike the image sensor. At the end of the exposure, the second curtain draws across the frame to once again shield the sensor from light. With front-curtain sync, the flash fires when the front curtain opens.-
 Slow-Sync: This mode, available only in the P and A exposure modes, also uses front-curtain sync but allows a shutter speed slower than the 1/60 second minimum that's in force when you use Fill Flash and Red-Eye Reduction flash. Because of the longer exposure, the camera has time to absorb more ambient light, which has two benefits: Background areas that are beyond the reach of the flash appear brighter; and less flash power is needed, resulting in softer lighting. The downside of the slow shutter speed is, well, the slow shutter speed. Any movement of your camera or subject during the exposure can blur the picture, and the slower the shutter speed, the greater the chances of camera or subject motion. A tripod is essential to a good outcome, as are subjects that can hold very, very still. I find that the best practical use for this mode is shooting nighttime still-life subjects like the one you see in Figure 2-27. However, if you're shooting a nighttime portrait and you have a subject that can maintain a motionless pose, slow-sync flash can produce softer, more flattering light. Even though the official Slow-Sync mode appears only in the P and A exposure modes, you can get the same result in the M and S modes by simply using a slow shutter speed and the normal, Fill Flash mode. You can use a shutter speed as slow as 30 seconds when using flash in those modes. In fact, I prefer using those modes when I want the slow-sync look because I can directly control the shutter speed.
 -
 Rear-Curtain Sync: In this mode, available only in shutter-priority (S) and manual (M) exposure modes, the flash fires at the end of the exposure, just before the shutter closes. The classic use of this mode is to combine the flash with a slow shutter speed to create trailing-light effects like the one you see in Figure 2-28. With Rear-Curtain Sync, the light trails extend behind the moving object (my hand, and the match, in this case), which makes visual sense. If instead you use slow-sync flash, the light trails appear in front of the moving object.
You can set the shutter speed as low as 30 seconds and as high as 1/200 second in this Flash mode.
 Slow-Rear: Hey, not confusing enough for you yet? This mode enables you to produce the same motion trail effects as with Rear-Curtain Sync, but in the P and A exposure modes. The camera automatically chooses a slower shutter speed than normal after you set the f-stop, just as with regular Slow-Sync mode.
- Slow-Sync with Red-Eye Reduction: In P and A exposure modes, you can also combine a slow-sync flash with the red-eye reduction feature. The symbol that represents this mode is the normal red-eye eyeball combined with the word Slow.
-

Figure 2-26: Adding flash resulted in better illumination and a slight warming effect.

Figure 2-27: Slow-sync flash produces softer, more even lighting than normal flash in nighttime pictures.

Figure 2-28: I used Rear-Curtain Sync Flash to create this candle-lighting image.
Setting the Flash mode
You can view the current Flash mode in the Information and Live View displays, as shown in Figure 2-29. (In Live View mode, press the Info button to cycle through the various data-display modes to get to the one shown in the figure.) The lightning bolt shown in the figures represents the Fill flash (normal flash) mode.
In the viewfinder as well as in the lower-right corner of the Live View display, you see a single lightning bolt. This symbol simply tells you that the flash is ready to fire. (You can't view the Flash mode in the viewfinder.) The symbol blinks if the camera thinks you need to add flash.
As for the TTL symbol, highlighted on the left in Figure 2-29, it represents the current setting of the Built-in Flash Cntrl (Control) option on the Custom Setting menu. TTL, which stands for through the lens, represents the normal flash metering operation: The camera measures the light coming through the lens and sets the flash output accordingly. Your other option is to set the flash output manually, as explained in the last section of this chapter. If you take that route, the letter M appears in place of TTL. You can choose between the two settings only when the Mode dial is set to P, S, A, or M.

Figure 2-29: An icon representing the Flash mode appears in the displays.
To change the Flash mode, you can use these techniques:
-
Flash button + Command dial: As soon as you press the button, the Flash mode option in the Information display becomes selected, as shown in Figure 2-30. The same thing happens in the Live View display, but the related symbol is at the top of the screen (refer to Figure 2-29). Either way, keep the Flash button pressed while rotating the Command dial to cycle through the available Flash modes.
- Information display control strip: Press the i
button or tap the i
icon on the monitor to activate the control strip in the Information and Live View displays. Select the Flash mode option, as shown on the left in Figure 2-31, to display a screen listing the mode settings, as shown on the right in the figure. Remember that the available Flash modes depend on the exposure mode.

Figure 2-30: The fastest way to change the Flash mode is to hold down the Flash button and rotate the Command dial.

Figure 2-31: You also can adjust the Flash mode by using the normal control-strip method; press the i button or tap the on-screen i symbol to activate the control strip.
Adjusting the flash output
In the P, S, A, or M exposure modes, as well as in certain other modes that permit flash, you have some control over flash power, even if you stick with the default, TTL (through the lens) automatic flash metering. If you want a little more or less flash light than the camera thinks is appropriate, you can adjust the flash output by using Flash Compensation.
Flash Compensation settings are stated in terms of exposure value (EV) numbers. A setting of EV 0.0 indicates no flash adjustment; you can increase the flash power to EV +1.0 or decrease it to EV –3.0.
As an example of the benefit of this feature, look at the carousel images in Figure 2-32. The first image shows a flash-free shot. Clearly, I needed a flash to compensate for the fact that the horses were shadowed by the roof of the carousel. But at normal flash power, as shown in the middle image, the flash was too strong, creating glare in some spots and blowing out the highlights in the white mane. By dialing the flash power down to EV –1.0, I got a softer flash that straddled the line perfectly between no flash and too much flash.

Figure 2-32: When normal flash output is too strong, dial in a lower Flash Compensation setting.
As for boosting the flash output, you may find it necessary on some occasions, but don't expect the built-in flash to work miracles even at a Flash Compensation of +1.0. The built-in flash has a maximum range of about 12 feet; it simply can't illuminate faraway objects. In other words, don't even try taking flash pictures of a darkened recital hall from your seat in the balcony — all you'll wind up doing is annoying everyone.
The current Flash Compensation setting appears in the Information display, as shown on the left in Figure 2-33. If this readout is dimmed, Flash Compensation isn't available in your current exposure mode. One quirk: Some modes that disable the built-in flash make the Flash Compensation setting available. What gives? The option is provided solely for use with an external flash head. Any adjustment you make to the camera's flash-exposure setting is added to flash-power changes you make using the controls on the flash head. The built-in flash won't fire no matter what Flash Compensation value you select.

Figure 2-33: These symbols represent Flash Compensation.
In the Live View display, you see only a symbol indicating that Flash Compensation is enabled, as shown on the right side of the figure. Note that if the feature is turned off (set to EV 0.0), the symbol doesn't appear in the Live View display.
To adjust the amount of Flash Compensation, use either of these tricks:
-
Two-button-plus-Command-dial maneuver: First, press the Flash button to pop up the built-in flash. Then press and hold the Flash button and the Exposure Compensation button simultaneously. When you press the buttons, the Flash Compensation value becomes highlighted in the Information and Live View displays, as shown in Figure 2-34. In the viewfinder, the current setting takes the place of the usual Frames Remaining value. While keeping both buttons pressed, rotate the Command dial to adjust the setting. I find that any technique that involves coordinating this many fingers a little complex, but you may find it easier than I do.
- Information or Live View display control strip: Activate the strip by tapping the i
icon on the monitor or by pressing the i
button. Select the Flash Compensation setting, as shown on the left in Figure 2-35, to display a screen where you can set the compensation amount, as shown on the right in the figure.

Figure 2-34: Rotate the Command dial while pressing the Flash and Exposure Compensation buttons to adjust the flash power.

Figure 2-35: You also can adjust the setting by using the Information display control strip.
When you use one of the Scene modes, the Flash Compensation setting is reset to 0.0 when you turn off the camera or switch to a different Scene mode. In other exposure modes, the flash-power adjustment remains in force until you reset the value, even if you turn off the camera. So be sure to check the setting before you next use the flash.
Controlling flash output manually
If you're experienced in the way of the flash, you can manually set flash output via the Flash Cntrl for Built-in Flash option, found in the Bracketing/Flash section of the Custom Setting menu. The normal setting is TTL (for automatic, through-the-lens metering), but if you select Manual, as shown on the left in Figure 2-36, you can access the power settings, which range from Full to 1/32 power.

Figure 2-36: Using this option, you can control the flash output manually.
When flash is set to manual control, the TTL icon that normally appears in the upper-right corner of the Information display (refer to Figure 2-29) is replaced by the letter M. In the viewfinder, an icon that looks like the Information screen's Flash Compensation icon (a lightning bolt with a plus-minus sign) blinks.