
Chapter 3
Running Programs
IN THIS CHAPTER
![]() Compiling and running a program
Compiling and running a program
![]() Editing your own Java code
Editing your own Java code
![]() Working with a workspace
Working with a workspace
If you’re a programming newbie, for you, running a program probably means clicking a mouse. You want to run Microsoft Word, so you double-click the Microsoft Word icon. That’s all there is to it.
When you create your own programs, the situation is a bit different. With a new program, the programmer (or someone from the programmer’s company) creates the program’s icon. Before that process, a perfectly good program may not even have an icon. So what do you do with a brand-new Java program? How do you get the program to run? This chapter tells you what you need to know.
Running a Canned Java Program
The best way to get to know Java is to do Java. When you’re doing Java, you’re writing, testing, and running your own Java programs. This section prepares you by describing how you run and test a program. Instead of writing your own program, you run a program that I’ve already written for you. The program calculates your monthly payments on a home mortgage loan.
The mortgage-calculating program doesn’t open its own window. Instead, the program runs in Eclipse’s Console view. The Console view is one of the tabs in the lower-right part of the Eclipse workbench. (See Figure 3-1.) A program that operates completely in this Console view is called a text-based program.

FIGURE 3-1: A run of this chapter’s text-based mortgage program.
 You may not see a Console tab in the lower-right part of the Eclipse workbench. To coax the Console view out of hiding, choose Window ⇒ Show View ⇒ Other. In the resulting Show View dialog box, expand the General branch. Finally, within that General branch, double-click the Console item.
For more information about the Console view (and about Eclipse’s workbench in general), see the “Views, editors, and other stuff” section, later in this chapter.
 You can see GUI versions of the program in Figure 3-1, and of many other examples from this book, by visiting the book’s website (
http://allmycode.com/BeginProg).
Actually, as you run the mortgage program, you see two things in Eclipse’s Console view:
- Messages and results that the mortgage program sends to you: Messages include things like
How much are you borrowing?, and results include lines likeYour monthly payment is $552.20. - Responses that you give to the mortgage program while it runs: If you type 100000.00 in response to the program’s question about how much you’re borrowing, you see that number echoed in Eclipse’s Console view.
Here’s how you run the mortgage program:
Make sure that you’ve followed the instructions in Chapter 2 — instructions for installing Java, for installing and configuring Eclipse, and for getting this book’s sample programs.
Thank goodness! You don’t have to follow those instructions more than once.
Launch Eclipse.
The Eclipse Workspace Launcher dialog box appears. (See Figure 3-2.)
A workspace is a folder on your computer’s hard drive. Eclipse stores your Java programs in one or more workspace folders. Along with these Java programs, each workspace folder contains some Eclipse settings. These settings store things like the version of Java that you’re using, the colors that you prefer for words in the editor, and the size of the editor area when you drag the area’s edges. You can have several workspaces with different programs and different settings in each workspace.
By default, the Workspace Launcher offers to open whatever workspace you opened the last time you ran Eclipse. You want to open the workspace that you used in Chapter 2, so don’t modify the stuff in the Launcher’s Workspace field.
In the Workspace Launcher dialog box, click OK.
The big Eclipse workbench stares at you from your computer screen. (See Figure 3-3.)
In Figure 3-3, the leftmost part of the workbench is Eclipse’s Package Explorer, which contains numbers like 03-01, 04-01, and so on. Each number is actually the name of an Eclipse project. Formally, a project is a collection of files and folders inside a workspace. Intuitively, a project is a basic work unit. For example, a self-contained collection of Java program files to manage your CD collection (along with the files containing the data) may constitute a single Eclipse project.
Looking again at the Package Explorer in Figure 3-3, you see projects named 03-01, 04-01, and so on. My project 03-01 holds the code for Listing 3-1 (the first and only listing in this chapter, Chapter 3). Project 06-02 contains the Java program in Listing 6-2 (the second code listing in Chapter 6 of this book). Project names can include letters, digits, blank spaces, and other characters; for the names of this book’s examples, I stick with digits and dashes.
To read more about topics like Eclipse’s Package Explorer, see the upcoming section “What’s All That Stuff in Eclipse’s Window?”
 When you launch Eclipse, you may see something different from the stuff in Figure 3-3. You may see Eclipse’s Welcome screen with only a few icons in an otherwise barren window. You may also see a workbench like the one in Figure 3-3, but without a list of numbers (03-01, 04-01, and so on) in the Package Explorer. If so, you may have missed some instructions on configuring Eclipse in Chapter 2. Alternatively, you may have modified the stuff in the Launcher’s Workspace field in Step 2 of this section’s instructions.
In any case, make sure that you see numbers like 03-01 and 04-01 in the Package Explorer. Seeing these numbers assures you that Eclipse is ready to run the sample programs from this book.
In the Package Explorer, click the
03-0-Mortgagebranch.The
03-0-Mortgageproject is the only project whose name isn’t two digits, a dash, and then two more digits. You may want to see a sneak preview of some Java code. To see the Java program that you’re running in Project 03-0-Mortgage, expand the03-0-Mortgagebranch in the Package Explorer. Inside the03-0-Mortgagebranch, you find asrcbranch, which in turn contains a(default package)branch. Inside the(default package)branch, you find theMortgage.javabranch. ThatMortgage.javabranch represents my Java program. Double-clicking theMortgage.javabranch makes my code appear in Eclipse’s editor.Choose Run ⇒ Run As ⇒ Java Application from the main menu, as shown in Figure 3-4.
When you choose Run As ⇒ Java Application, the computer runs the project’s code. (In this example, the computer runs a Java program that I wrote.) As part of the run, the message
How much are you borrowing?appears in Eclipse’s Console view. (The Console view shares the lower-right area of Eclipse’s workbench with the Problems view, the Javadoc view, the Declaration view, and possibly other views. Refer to Figure 3-1.)Click anywhere inside Eclipse’s Console view and then type a number, like 100000.00, and press Enter.
When you type a number in Step 6, don’t include your country’s currency symbol and don’t group the digits. (U.S. residents: Don’t type a dollar sign and don’t use any commas.) Things like $100000.00 and 1,000,000.00 cause the program to crash. You see a NumberFormatExceptionmessage in the Console view.Grouping separators vary from one country to another. The run shown in Figure 3-1 is for a computer configured in the United States where 100000.00 (with a dot) means “one hundred thousand.” But the run might look different on a computer that’s configured in what I call a “comma country” — a country where 100000,00 (with a comma) means “one hundred thousand.” If you live in a comma country and you type 100000.00 exactly as it’s shown in Figure 3-1, you probably get an error message (an
InputMismatchException). If so, change the number amounts in your file to match your country’s number format. When you do, you should be okay.After you press Enter, the Java program displays another message (
What’s the interest rate?) in the Console view. (Again, refer to Figure 3-1.)In response to the interest rate question, type a number, like 5.25, and press Enter.
After you press Enter, the Java program displays another message (
How many years … ?) in the Console view.Type a number, like 30, and press Enter.
In response to the numbers that you type, the Java program displays a monthly payment amount. Again, refer to Figure 3-1.
Disclaimer: Your local mortgage company charges fees of all kinds. To get a mortgage in real life, you pay more than the amount that my Java program calculates. (A lot more.)
When you type a number in Step 8, don’t include a decimal point. Numbers like 30.0 cause the program to crash. You see a NumberFormatExceptionmessage in the Console view. Occasionally, you decide in the middle of a program’s run that you’ve made a mistake of some kind. You want to stop the program’s run dead in its tracks. Simply click the little red square above the Console view. (See Figure 3-5.)

FIGURE 3-2: The Eclipse Workspace Launcher.

FIGURE 3-3: The Eclipse workbench.

FIGURE 3-4: One of the ways to run the code in Project 03-0-Mortgage.

FIGURE 3-5: How to prematurely terminate a program’s run.
If you follow this section’s instructions and you don’t get the results that I describe, you can try three things. I list them in order from best to worst:
- Check all the steps to make sure that you did everything correctly.
- Send an email to me at
[email protected], post to my Facebook wall (/allmycode), or tweet to the Burd (@allmycode). If you describe what happened, I can probably figure out what went wrong and tell you how to correct the problem. - Panic.
Typing and Running Your Own Code
The previous section is about running someone else’s Java code (code that you download from this book’s website). But eventually, you’ll write code on your own. This section shows you how to create code with the Eclipse IDE.
Separating your programs from mine
In Chapter 2, you download this book’s examples from my website. Then you create an Eclipse workspace and import the book’s examples into your workspace.
You can create your own projects in the same workspace. But if you want to separate your code from mine, you can create a second workspace. Here are two ways to create a new workspace:
When you launch Eclipse, type a new folder name in the Workspace field of Eclipse’s Workspace Launcher dialog box.
If the folder doesn’t already exist, Eclipse creates the folder. If the folder already exists, Eclipse’s Package Explorer lists any projects that the folder contains.
On the Eclipse workbench’s main menu, choose File ⇒ Switch Workspace. (See Figure 3-6.)
When you choose File ⇒ Switch Workspace, Eclipse offers you a few of your previously opened workspace folders. If your choice of folder isn’t in the list, select the Other option. In response, Eclipse reopens its Workspace Launcher dialog box.

FIGURE 3-6: Switching to a different Eclipse workspace.
Writing and running your program
Here’s how you create a new Java project:
- Launch Eclipse.
From Eclipse’s menu bar, choose File ⇒ New ⇒ Java Project.
A New Java Project dialog box appears.
In the New Java Project dialog box, type a name for your project and then click Finish.
In Figure 3-7, I type the name
MyFirstProject. If you click Next instead of Finish, you see some other options that you don’t need right now. To avoid any confusion, just click Finish.
Clicking Finish brings you back to Eclipse’s workbench, with
MyFirstProjectin the Package Explorer, as shown in Figure 3-8.The next step is to create a new Java source code file.
Select your newly created project in the Package Explorer.
To create Figure 3-8, I selected
MyFirstProjectinstead ofSomeOtherProject.In Eclipse’s main menu, choose File ⇒ New ⇒ Class.
Eclipse’s New Java Class dialog box appears. (See Figure 3-9.)
 Java programmers normally divide their code into one or more packages. A typical package has a name like
 java.utilororg.allyourcode.images. In Figure 3-9, Eclipse is warning me that I’m not naming a package to contain my project’s code. So the code goes into a nondescript thing called Java’s default package. Java’s default package is a package with no name — a catchall location for code that isn’t otherwise packaged. Packages are great for managing big programming projects, but this book contains no big programming projects. So, in this example (and in all of this book’s examples), I choose to ignore the warning. For more info about Java packages, see Chapter 18. Like every other windowed environment, Eclipse provides many ways to accomplish the same task. Instead of choosing File ⇒ New ⇒ Class, you can right-click MyFirstProjectin the Package Explorer in Windows (or control-clickMyFirstProjectin the Package Explorer on a Mac). From the resulting context menu, choose New ⇒ Class. You can also start by pressing Alt+Shift+N in Windows (or Option+⌘ +N on a Mac). The choice of clicks and keystrokes is up to you.In the New Java Class dialog box’s Name field, type the name of your new class.
In this example, I use the name
MyFirstJavaClass, with no blank spaces between any of the words in the name. (Refer to Figure 3-9.) The name in the New Java Class dialog box cannot have blank spaces. And the only allowable punctuation symbol is the underscore character (_). You can name your classMyFirstJavaClassorMy_First_Java_Class,but you can’t name itMy First Java ClassorJavaClass,MyFirst.Put a check mark in the
public static void main(String[] args)check box.Your check mark tells Eclipse to create some boilerplate Java code.
Accept the defaults for everything else in the New Java Class dialog box. (In other words, click Finish.)
You can even ignore the “Default Package Is Discouraged” warning near the top of the dialog box.
Clicking Finish brings you back to Eclipse’s workbench. Now
MyFirstProjectcontains a file namedMyFirstJavaClass.java. For your convenience, theMyFirstJavaClass.javafile already has some code in it. Eclipse’s editor displays the Java code. (See Figure 3-10.)Replace an existing line of code in your new Java program.
Type a line of code in Eclipse’s Editor. Replace the line
// TODO Auto-generated method stubwith the line
System.out.println("Chocolate, royalties, sleep");Copy the new line of code exactly as you see it in Listing 3-1.
- Spell each word exactly the way I spell it in Listing 3-1.
- Capitalize each word exactly the way I do in Listing 3-1.
- Include all the punctuation symbols — the dots, the quotation marks, the semicolon — everything.
- Distinguish between the lowercase letter
land the digit1. The wordprintlntells the computer to print a whole line. Each character in the wordprintlnis a lowercase letter. The word contains no digits.
Java is case-sensitive, which means that system.out.printLnisn’t the same asSystem.out.println. If yOu tyPesystem.out.printLn, your progrAm won’t worK. Be sUre to cAPItalize your codE eXactLy as it is in LiSTIng 3-1. If you copy and paste code from an ebook, check to make sure that the quotation marks in the code are straight quotation marks (""“ ”). In a Java program, straight quotation marks are good; curly quotation marks are troublesome.If you typed everything correctly, you see the stuff in Figure 3-11.
If you don’t type the code exactly as it’s shown in Listing 3-1, you may see jagged red underlines, tiny rectangles with X-like markings inside them, or other red marks in the editor. (See Figure 3-12.)
The red marks in Eclipse’s editor refer to compile-time errors in your Java code. A compile-time error (also known as a compiler error) is an error that prevents the computer from translating your code. (See the talk about code translation in Chapter 1.)
The error marker in Figure 3-12 appears on line 5 of the Java program. Line numbers appear in the editor’s left margin. To make Eclipse’s editor display line numbers, choose Window ⇒ Preferences (in Windows) or Eclipse ⇒ Preferences (on a Mac). Then choose General ⇒ Editors ⇒ Text Editors. Finally, put a check mark in the Show Line Numbers check box.To fix compile-time errors, you must become a dedicated detective. You join an elite squad known as Law & Order: Java Programming Unit. You seldom find easy answers. Instead, you comb the evidence slowly and carefully for clues. You compare everything you see in the editor, character by character, with my code in Listing 3-1. You don’t miss a single detail, including spelling, punctuation, and uppercase-versus-lowercase.
Eclipse has a few nice features to help you find the source of a compile-time error. For example, you can hover the mouse pointer over the jagged red underline. When you do, you see a brief explanation of the error along with some suggestions for repairing the error — some quick fixes. (See Figure 3-13.)
In Figure 3-13, a pop-up message tells you that Java doesn’t know what the word system means — that is, system cannot be resolved. Near the bottom of the figure, one of the quick fix options is to change system to System.
When you click that Change To ’System’ (
java.lang) option, Eclipse’s editor replaces system with System. The editor’s error markers disappear, and you go from the incorrect code in Figure 3-12 to the correct code back in Figure 3-11.Make any changes or corrections to the code in Eclipse’s editor.
When at last you see no jagged underlines or blotches in the editor, you’re ready to try running the program.
- Select
MyFirstJavaClasseither by clicking inside the editor or by clicking theMyFirstProjectbranch in the Package Explorer. From Eclipse’s main menu, choose Run ⇒ Run As ⇒ Java Application.
That does the trick. Your new Java program runs in Eclipse’s Console view. If you’re running the code in Listing 3-1, you see the
Chocolate, royalties, sleepmessage in Figure 3-14. It’s like being in heaven!

FIGURE 3-7: Getting Eclipse to create a new project.

FIGURE 3-8: Your project appears in Eclipse’s Package Explorer.

FIGURE 3-9: Getting Eclipse to create a new Java class.

FIGURE 3-10: Eclipse writes some code in the Editor.

FIGURE 3-11: A Java program, in the Eclipse editor.
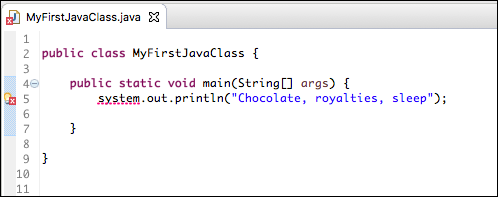
FIGURE 3-12: A Java program, typed incorrectly.

FIGURE 3-13: Eclipse offers some helpful suggestions.

FIGURE 3-14: Running the program in Listing 3-1.
LISTING 3-1 A Program to Display the Things I Like
public class MyFirstJavaClass {

    public static void main(String[] args) {
        System.out.println("Chocolate, royalties, sleep");

    }

}
What’s All That Stuff in Eclipse’s Window?
Believe it or not, an editor once rejected one of my book proposals. In the margins, the editor scribbled, “This is not a word” next to things like can’t, it’s, and I’ve. To this day, I still do not know what this editor did not like about contractions. My own opinion is that language always needs to expand. Where would we be without a new words — words like dot-com, infomercial, and vaporware?
Even the Oxford English Dictionary (the last word in any argument about words) grows by more than 4,000 entries each year. That’s an increase of more than 1 percent per year. It’s about 11 new words per day!
The fact is, human thought is like a big high-rise building: You can’t build the 50th floor until you’ve built at least part of the 49th. You can’t talk about spam until you have a word like email. With all that goes on these days, you need verbal building blocks. That’s why this section contains a bunch of new terms.
In this section, each newly defined term describes an aspect of the Eclipse IDE. So before you read all this Eclipse terminology, I provide the following disclaimers:
- This section is optional reading. Refer to this section if you have trouble understanding some of this book’s instructions. But if you have no trouble navigating the Eclipse IDE, don’t complicate things by fussing over the terminology in this section.
- This section provides explanations of terms, not formal definitions of terms. Yes, my explanations are fairly precise, but no, they’re not airtight. Almost every description in this section has hidden exceptions, omissions, exemptions, and exclusions. Take the paragraphs in this section to be friendly reminders, not legal contracts.
- Eclipse is a very useful tool. But Eclipse isn’t officially part of the Java ecosystem. Although I don’t describe details in this book, you can write Java programs without ever using Eclipse.
Understanding the big picture
Your tour of Eclipse begins with a big Burd’s-eye view.
- Workbench: The Eclipse Desktop. (Refer to Figure 3-3.) The workbench is the environment in which you develop code.
- Area: A section of the workbench. The workbench in Figure 3-3 contains five areas. To illustrate the point, I’ve drawn borders around each of the areas. (See Figure 3-15.)
- Window: A copy of the Eclipse workbench. With Eclipse, you can have several copies of the workbench open at once. Each copy appears in its own window.
- Action: A choice that’s offered to you — typically, when you click something. For example, when you choose File ⇒ New on Eclipse’s main menu bar, you see a list of new things that you can create. The list usually includes Project, Folder, File, and Other, but it may also include things like Package, Class, and Interface. Each of these things (each item on the menu) is called an action.
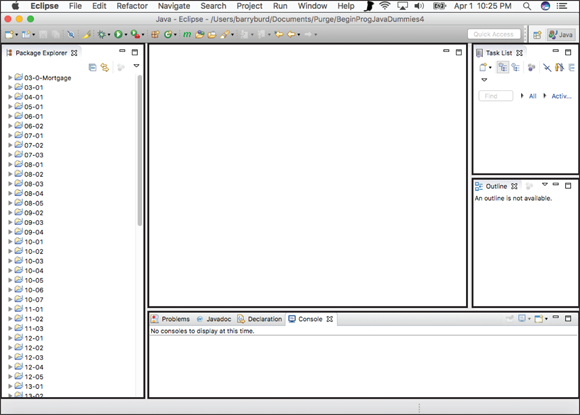
FIGURE 3-15: The workbench is divided into areas.
Views, editors, and other stuff
The next bunch of terms deals with things called views, editors, and tabs.
You may have difficulty understanding the difference between views and editors. (A view is like an editor, which is like a view, or something like that.) If views and editors seem the same to you and you’re not sure that you can tell which is which, don’t be upset. As an ordinary Eclipse user, the distinction between views and editors comes naturally as you gain experience using the workbench. You rarely have to decide whether the thing you’re using is a view or an editor.
If you ever have to decide what a view is as opposed to an editor, here’s what you need to know:
View: A part of the Eclipse workbench that displays information for you to browse. In the simplest case, a view fills up an area in the workbench. For example, in Figure 3-15 the Package Explorer view fills up the leftmost area.
Many views display information as lists or trees. For example, in Figure 3-10 the Package Explorer view contains a tree.
You can use a view to make changes to things. For example, to delete the
03-01project listed on the left side in Figure 3-15, right-click the03-01branch in the Package Explorer view. (On a Mac, control-click the03-01branch.) Then, on the resulting context menu, choose Delete. When you use a view to change something, the change takes place immediately. For example, when you choose Delete on the Package Explorer’s context menu, whatever item you’ve selected is deleted immediately. In a way, this behavior is nothing new. The same kind of thing happens when you recycle a file using Windows Explorer or trash a file using the Macintosh Finder.Editor: A part of the Eclipse workbench that displays information for you to modify. A typical editor displays information in the form of text. This text can be the contents of a file. For example, an editor in Figure 3-11 displays the contents of the
MyFirstJavaClass.javafile. When you use an editor to change something, the change doesn’t take place immediately. For example, look at the editor in Figure 3-11. This editor displays the contents of the MyFirstJavaClass.javafile. You can type all kinds of things in the editor. Nothing happens toMyFirstJavaClass.javauntil you choose File ⇒ Save from Eclipse’s menu bar. Of course, this behavior is nothing new. The same kind of thing happens when you work in Microsoft Word or in any other word processing program. Like other authors, I occasionally become lazy and use the word view when I really mean view or editor. When you catch me doing this, just shake your head and move onward. When I’m being very careful, I use the official Eclipse terminology. I refer to views and editors as parts of the Eclipse workbench. Unfortunately, this “parts” terminology doesn’t stick in people’s minds very well.
An area of the Eclipse workbench might contain several overlapping views or overlapping editors. To bring one view or editor to the forefront, you click a tab. Most Eclipse users get along fine without giving this “several views” business a second thought (or even a first thought). But if you care about the terminology surrounding tabs and active views, here’s the scoop:
Tab: Something that’s impossible to describe except by calling it a tab. That which we call a tab by any other name would move us as well from one view to another or from one editor to another. The important thing is, views can be stacked on top of one another. Eclipse displays stacked views as though they’re pages in a tabbed notebook. For example, Figure 3-14 displays one area of the Eclipse workbench. The area contains five views (the Problems view, the Javadoc view, the Declaration view, the Search view, and the Console view). Each view has its own tab.
A bunch of stacked views is called a tab group. To bring a view in the stack to the forefront, you click that view’s tab.
And, by the way, all this stuff about tabs and views holds true for tabs and editors. The only interesting thing is the way Eclipse uses the word editor. In Eclipse, each tabbed page of the editor area is an individual editor. For example, the Editor area in Figure 3-16 contains three editors (not three tabs belonging to a single editor).
Active view or active editor: In a tab group, the view or editor that’s in front.
In Figure 3-16, the
MyFirstJavaClass.javaeditor is the active editor. TheMortgage.javaandThingsILike.javaeditors are inactive.

FIGURE 3-16: The editor area contains three editors.
What’s inside a view or an editor?
The next several terms deal with individual views, individual editors, and individual areas.
- Toolbar: The bar of buttons (and other little things) at the top of a view. (See Figure 3-17.)
- Menu button: A downward-pointing arrow in the toolbar. When you click the Menu button, a drop-down list of actions appears. (See Figure 3-18.) Which actions you see in the list varies from one view to another.
- Close button: A button that gets rid of a particular view or editor. (See Figure 3-19.)
- Chevron: A double arrow indicating that other tabs should appear in a particular area (but that the area isn’t wide enough). The chevron in Figure 3-20 has a little number 2 beside it. The 2 tells you that, in addition to the two visible tabs, two tabs are invisible. Clicking the chevron brings up a hover tip containing the labels of all the tabs.
- Marker bar: The vertical ruler on the left edge of the editor area. Eclipse displays tiny alert icons, called markers, inside the marker bar. (For an example, refer to Figure 3-12.)

FIGURE 3-17: The Package Explorer view’s toolbar.

FIGURE 3-18: Clicking the Package Explorer view’s Menu button.

FIGURE 3-19: An editor’s Close button.

FIGURE 3-20: The chevron indicates that two editors are hidden.
Returning to the big picture
The next two terms deal with Eclipse’s overall look and feel:
Layout: An arrangement of certain views. The layout in Figure 3-3 has seven views, of which four are easily visible:
- At the far left, you see the Package Explorer view.
- On the far right, you have the Task List view and the Outline view.
- Near the bottom, you get the Problems, Javadoc, Declaration, and Console views.
Along with all these views, the layout contains a single editor area. Any and all open editors appear inside this editor area.
Perspective: A very useful layout. If a particular layout is really useful, someone gives that layout a name. And if a layout has a name, you can use the layout whenever you want. For example, the workbench of Figure 3-3 displays Eclipse’s Java perspective. By default, the Java perspective contains six views in an arrangement very much like the arrangement shown in Figure 3-3.
The Console view appears in Figure 3-3, but the Console view doesn’t always appear as part of the Java perspective. Normally, the Console view appears automatically when you run a text-based Java program. If you want to force the Console view to appear, choose Window ⇒ Show View ⇒ Other. In the resulting Show View dialog box, expand the General branch. Finally, within that General branch, double-click the Console item.Along with all these views, the Java perspective contains an editor area. (Sure, the editor area has several tabs, but the number of tabs has nothing to do with the Java perspective.)
You can switch among perspectives by choosing Window ⇒ Open Perspective in Eclipse’s main menu bar. This book focuses almost exclusively on Eclipse’s Java perspective. But if you like poking around, visit some of the other perspectives to get a glimpse of Eclipse’s power and versatility.
 Here are some things for you to try to help you understand the material in this chapter. If trying these things builds your confidence, that’s good. If trying these things makes you question what you’ve read, that’s good too. If trying these things makes you nervous, don’t be discouraged. You can find answers and other help at this book’s website (
www.allmycode.com/BeginProg). You can also email me with your questions ([email protected]).
Eclipse basics
Follow the instructions in this chapter’s earlier section “Running a Canned Java Program.” Then try the following tasks:
- Make sure you can see the mortgage-calculating program’s code in Eclipse’s editor. If you don’t see it, look for
03-0-Mortgagein the Package Explorer view on the left side of the Eclipse workbench. Expand the03-0-Mortgagebranch until you see a branch labeledMortgage.java. Double-click theMortgage.javabranch. - In Eclipse’s editor, make any change to the text in the mortgage-calculating program. After making the change, undo the change by selecting Edit ⇒ Undo from Eclipse’s main menu.
- Look for Eclipse’s Console tab in the lower portion of the Eclipse workbench. If you don’t see that tab, make the Console view appear by selecting Window ⇒ Show View ⇒ Console from Eclipse’s main menu. (If Window ⇒ Show View ⇒ Console doesn’t work, try Window ⇒ Show View ⇒ Other. In the resulting dialog box, double-click the General ⇒ Console item.)
- The Eclipse workbench has several areas. Use the mouse to drag the boundaries between the areas (and thus resize each of the areas). To get the areas back to the way they were before resizing, select Window ⇒ Perspective ⇒ Reset Perspective from Eclipse’s main menu.
- The Eclipse workbench has several different perspectives. In this book, you use the Java perspective. Switch temporarily to the Debug perspective by selecting Window ⇒ Perspective ⇒ Open Perspective ⇒ Debug in Eclipse’s main menu. Notice how the areas and views in the Eclipse workbench change. Switch back to the Java perspective by selecting Window ⇒ Perspective ⇒ Open Perspective ⇒ Java from Eclipse’s main menu. (If, for some reason, Java isn’t among the choices when you select Window ⇒ Perspective ⇒ Open Perspective, select Other and look for Java in the resulting dialog box.)
Experimenting with error messages
Follow the instructions in this chapter’s earlier section "Running a Canned Java Program." Look for the 03-01 branch in Eclipse’s Package Explorer. As you expand that 03-01 branch, look for a branch labeled MyFirstJavaClass.java. When you double-click the MyFirstJavaClass.java branch, the code for MyFirstJavaClass appears in Eclipse’s editor.
In Eclipse’s editor, change the lowercase letter
cin the wordclassto an uppercase letterC. When you do this, notice that some red marks appear. These red marks indicate that your program has a compile-time error. Java is case-sensitive. So, in a Java program, the wordClass(with an uppercase letterC) doesn’t mean the same thing as the wordclass(with a lowercase letterc).There are a few places in Project
03-01where changing the capitalization doesn’t cause errors. But for most of the text, a change in capitalization causes red error warnings to appear in the Eclipse editor.- In Eclipse’s editor, change
System.out.println("You’ll love Java!");to
System.out.println(6/0);No error markers appear in Eclipse’s editor. But, when you try to run the program, you see red text in Eclipse’s Console view. The red text indicates that a runtime exception has occurred. The exception occurs because Java can’t divide a number by 0.