
Chapter 2
Starting to See Like a Photographer
IN THIS CHAPTER
Exploring the basics of composition
Drawing the eye to your subject
Understanding depth of field
Deciding whether to blur motion
Looking for the light
Seeking out new and unusual subjects
When I started mingling with professional photographers, I noticed that they often used the term “making a photograph” instead of “taking a photograph.” At first, I assumed this was just a bit of artistic posturing — after all, isn't producing a photograph simply a matter of pressing a shutter button?
But as I learned more about photography, I realized that pressing the shutter button is actually the last in a series of steps a good photographer takes to create an image. Before that moment, you need to consider several creative issues, such as composition, depth of field (how much of the surrounding area should be as sharply focused as your subject), whether you want to blur or freeze action, and lighting. For the most part, you can control these aspects of your photograph even when shooting with basic cameras, although advanced models give you a few additional tools for varying depth of field, motion blur, and lighting.
This chapter helps you understand these creative choices so that you can start creating stronger images. Also check out Chapter 7 for additional tips specific to shooting better portraits, landscapes, close-ups, and action photos.
Exploring Composition Basics
Not everyone agrees on the best ways to compose an image — art being in the eye of the beholder and all that. But the tips laid out in this section are generally accepted as tried-and-true ways to give your photos more visual appeal. For every “rule,” however, you can find great-looking images that prove the exception, so don't be afraid to experiment with other artistic ideas.
Positioning elements in the frame
When framing a scene, try positioning your subject and other elements according to one of these three guidelines:
- Rule of Thirds: Perhaps the best-known composition strategy is to divide the frame into horizontal and vertical thirds and position your subject at a spot where two lines intersect. Notice the placement of the bee in Figure 2-1, for example.
- Golden Ratio: This concept follows the same idea as the rule of thirds, but the framing lines are spaced a little differently, as shown in Figure 2-2.
- Golden Triangle: Yet another variation on the theme, this arrangement divides the frame into triangles, as shown on the left in Figure 2-3. The sweet spots for your subject are, again, at the points where those lines intersect.
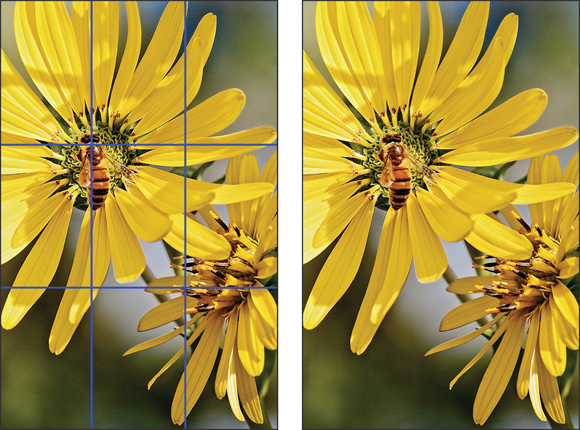
FIGURE 2-1: One rule of composition is to divide the frame into thirds and position the main point of interest at the spot where two lines intersect.

FIGURE 2-2: A variation of the rule of thirds, the Golden Ratio divides the frame using slightly different spacing of the intersecting lines.
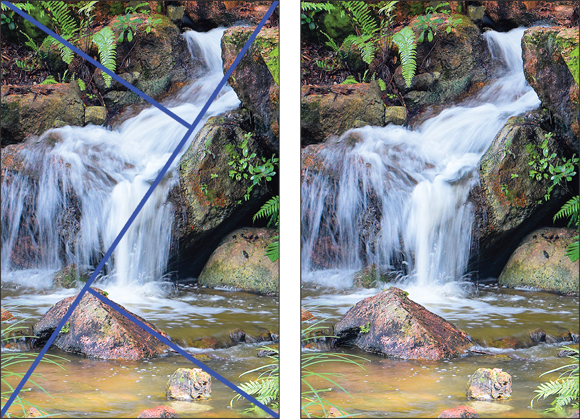
FIGURE 2-3: A third compositional concept divides the frame into triangles.
 Notice the one characteristic all three framing guides have in common: None puts the center of interest smack-dab in the middle of the frame. If you take away only one lesson from this section, remember that moving your subject off center can greatly improve the composition. In the first image in Figure 2-4, for example, I positioned the horizon line halfway down the frame. Most people would be happy with that shot, especially given the stunning shades of the sunset. But compare that photo with the one on the right, and you can see that reframing to shift the horizon line down creates a more dynamic composition.
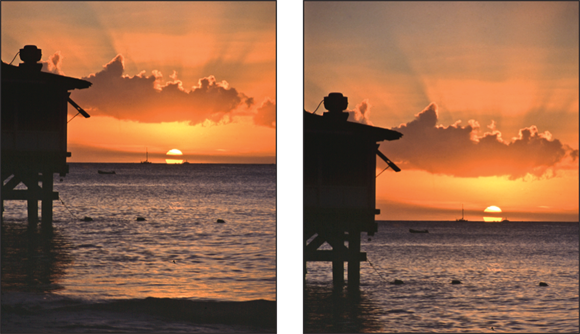
FIGURE 2-4: Positioning the horizon line halfway down the frame makes for a dull image (left); reframing to move that line off center leads to a more dynamic shot (right).
What about portraits, where the goal is to fill the frame with your subject — such as in a senior portrait? The same concept applies: Assuming that you're shooting the person's face (or full body, with face visible), the eyes are the most important component of the image, so place them at one of the intersecting lines suggested by the framing guidelines you choose to follow.
You can find other proven compositional guides if you do an online search for the term image composition. Don't worry about whether you land on a page devoted to paintings or drawings instead of photography — the principles are the same no matter what your creative medium.
Creating movement through the frame
To add life to your images, compose the scene so that the viewer’s eye is led naturally from one edge of the frame to the other or even entirely around the frame. You can create these leading lines with shapes, patterns of color, or variations of light and shadow.
Figure 2-5, which I captured after climbing at least a million steps to the top of a lighthouse, shows an obvious example of this concept. The strong curve of the railing on the left leads the eye into the frame, and the spiral formed by the stairs carries the movement to the bottom of the lighthouse. Light plays a role, too: Notice that the areas of sunlight and shadow create additional paths for the eye to follow.
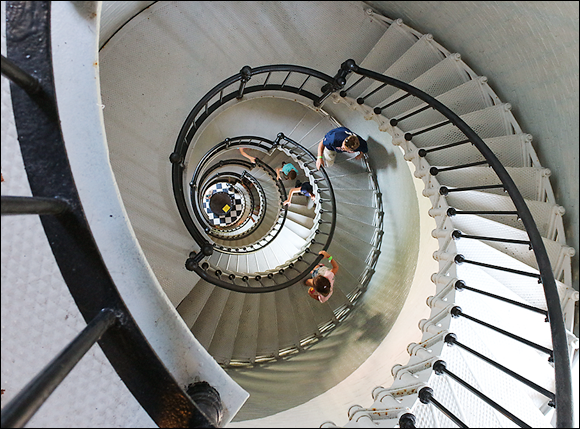
FIGURE 2-5: The spiraling stairs, along with the patterns of light and dark, lead the eye from the top of the stairs to the bottom.
In Figure 2-6, the diagonal lines created by the oars and the blue and white areas of the boats lead the eye from left to right. In the left image in Figure 2-7, the winding canal takes the eye from the boat in the foreground to the back of the frame. In the right image, color and form create the movement. The eye is drawn from the bright pink tail feathers of the right flamingo, around the curves of the second bird, down to the reflections in the water, and then up again to those first tail feathers.
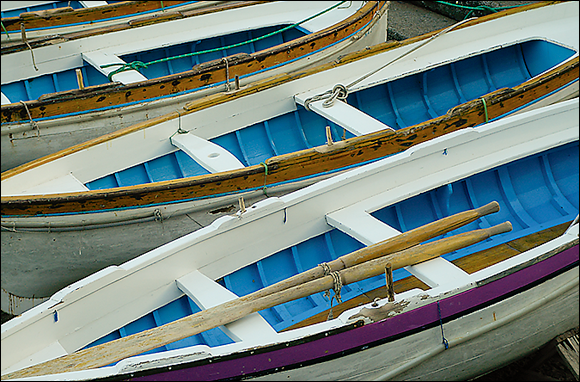
FIGURE 2-6: You also can use strong diagonal lines to create movement.
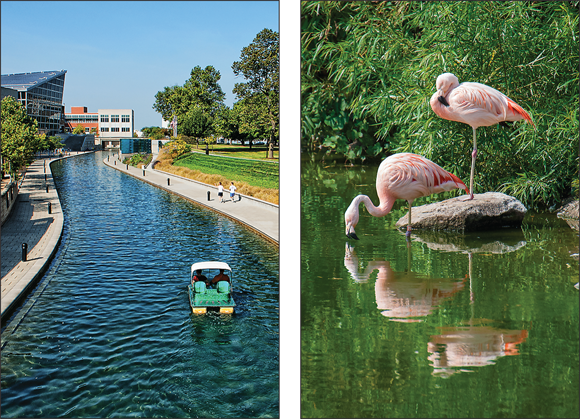
FIGURE 2-7: In these images, movement is created by the colors and curves of the canal water (left) and flamingoes and their reflections (right).
Eliminating clutter
Do you know that claustrophobic feeling you get when you walk in a store that is jam-packed to the rafters with goods — so cluttered that you can't even move down the aisles? That's the same reaction most people have when looking at a photo like the one in Figure 2-8: There's simply too much going on. The eye doesn't know where to look, except away.

FIGURE 2-8: This shot looks chaotic because there's too much going on for the eye to land on any single subject.
As a photographer, you must decide what you want your main subject to be and then try to frame the shot so that distracting elements aren't visible. For example, in Figure 2-9, reframing the shot to include just a portion of the ride creates a much better image. All the energy of the fair is captured in the whirling chairs, and the composition is such that the eye moves around the curve of the frame to take it all in.
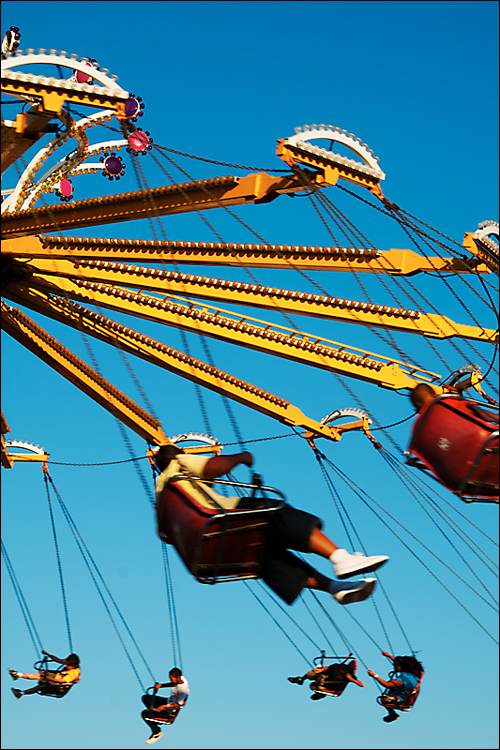
FIGURE 2-9: Concentrating on just a small portion of the ride captures its energy without all the distracting background.
 Being aware of the subject's surroundings is especially critical in portraits. If you're not paying attention, you can wind up with plant-on-the-head syndrome, as illustrated in Figure 2-10. The window blinds and computer monitor further distract from the subject's beautiful face in this picture.

FIGURE 2-10: Scan the background for distracting objects to avoid plant-on-the-head syndrome in portraits.
Leaving some head room
When shooting a portrait — or any subject, for that matter — don't frame your images so tightly that your subject looks cramped. Instead, allow what photographers refer to as head room, which means leaving a small margin of empty background at the top of the frame. When shooting a subject in profile, also leave extra padding in the direction that the subject's eyes are focused, as shown in Figure 2-11. This helps the eye follow the focus of the subjects across the frame and then causes the viewer to imagine what is just out of sight.

FIGURE 2-11: Leaving extra space on the right causes the viewer to follow the subject's glance across the frame.
For action shots, you may need to increase the amount of background margin on the side of the frame where the subject is headed. As an example, see Figure 2-12. I left plenty of empty space on the right, according to the direction the biker is riding. Otherwise, it appears that there's nowhere for the subject to go.
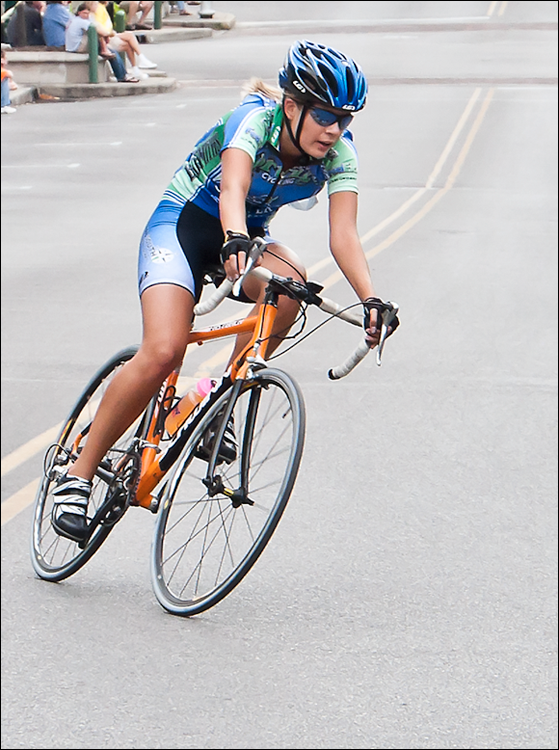
FIGURE 2-12: Give moving subjects somewhere to go in the frame.
Using Depth of Field to Artistic Advantage
When you set focus on your subject, you establish the distance at which the image appears sharpest. Depth of field refers to how far that sharp focus zone extends in front of and behind that point.
Figure 2-13 shows examples of both treatments. In the left image, the sharp focus region extends only a few inches in front of and behind my subject, the butterfly. Notice that the leaf in front of the butterfly appears just slightly blurry, and the background objects become progressively blurrier as the distance from the butterfly — the focus point — increases. The right image features a landscape that has a very large depth of field. I set focus on the hut on the left side of the walkway, but everything in front of and behind that structure remains sharp for quite a distance.
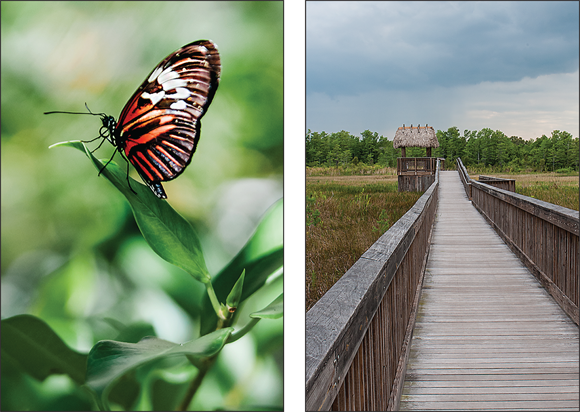
FIGURE 2-13: A short depth of field causes foreground and background objects to blur (left); a long depth of field extends the range of focus over a greater distance (right).
Skilled photographers vary depth of field for two main reasons:
-
Assign visual weight to the various elements of a scene. Viewers typically look first at the parts of a photo that are in sharpest focus. So a short depth of field draws the eye to a specific portion of the frame, and a long depth of field prompts the eye to consider all objects in the scene together.
Consider the photos in Figure 2-14, for example. In both cases, I set focus on the gecko. In the left image, the depth of field is large enough that the pink flower behind the gecko subject is sharp, giving it and the gecko equal visual weight. In the right image, a shallow depth of field blurs the flower, which in turn emphasizes the gecko. Neither treatment is right or wrong; this use of depth of field is completely up to your artistic discretion.
- Diminish the impact of distracting background and foreground objects by using a short depth of field. In my butterfly image, for example, blurring the foreground and background greenery prevents them from grabbing attention from the butterfly.
- Visually separate your subject from a similarly colored background. I used this tactic for the photo shown in Figure 2-15, which features a caterpillar munching away on my milkweed plant (a trade I offer willingly in exchange for photo ops and, eventually, butterflies). The only angle I could get for this shot was against a background that was very similar in color to the white and yellows of the caterpillar. So that those areas didn't make it difficult to distinguish the caterpillar, I shortened depth of field as much as possible. The difference in focus between background and subject creates a distinct boundary between the two.
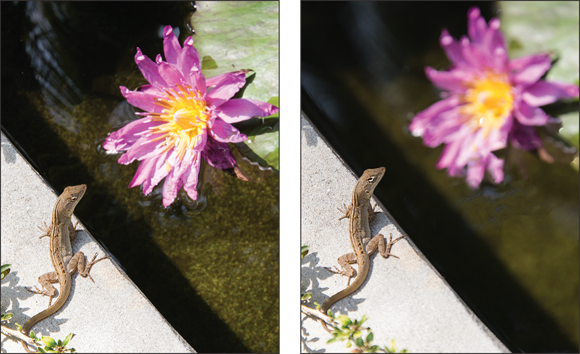
FIGURE 2-14: With a long depth of field, the flower and gecko have equal visual weight (left); shortening the depth of field makes the gecko the star of the shot (right).
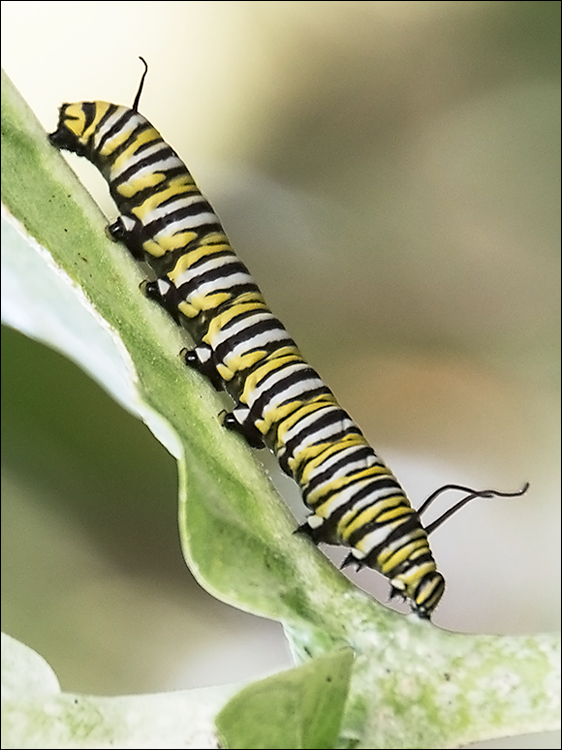
FIGURE 2-15: A short depth of field helps a subject stand out from a similarly colored background.
Enough theory; I think you get the idea. The question now is, how do you control this important aspect of your photos? Depending on your camera, you can use some or all of the following techniques:
- Change the distance between your subject and the objects in the background or foreground. Remember that depth of field determines how far the sharp focus zone stretches in front of or behind your subject. So if you want more blurring of the background, for example, move your subject farther in front of it.
- Move the camera closer to or farther from your subject. For less depth of field, move closer to the subject; for greater depth of field, back up. Of course, moving the camera also changes the angle of view of the photo. The farther you are from the subject, the more of the surrounding area you include in the scene.
-
Vary the lens focal length. If your camera has a zoom lens, you can increase depth of field by zooming out to the shortest focal length. Go the other direction to reduce depth of field. For example, if you're shooting with an 18–55mm lens, you get more depth of field at 18mm than at 55mm.
With an interchangeable lens camera, you can also just swap out lenses according to whether you're after a short or long depth of field. But again, keep in mind that changing the focal length also changes the angle of view; a shorter focal length delivers a wider view than a longer focal length. (The Chapter 1 section related to lenses talks more about focal length.)
-
Adjust the aperture (f-stop) or use an automatic Scene mode designed to produce the depth of field you want. If your camera enables you to specify the aperture setting, dial in a low f-stop number for shallow depth of field; raise the f-stop number to increase depth of field. Before you go this route, though, explore Chapter 5, which explains how adjusting aperture also affects image exposure.
If you don't have the option to set the f-stop or you don't want to get involved with exposure settings, you may be able to manipulate depth of field by using certain common Scene modes:
- Use Portrait mode for shallow depth of field. Because the traditional portrait look is a sharp subject against a blurred background, this shooting mode automatically uses a low f-stop setting to achieve that effect.
- Try Landscape mode for long depth of field. This mode takes the aperture setting in the other direction, using a high f-stop number to extend the zone of sharp focus over a large area.
Be aware, though, that Portrait mode also warms colors (emphasizes reds and yellows) and softens contrast in order to produce a more flattering portrait. And Landscape mode boosts cools tones (blues and greens) and typically increases contrast, producing the traditional bold, crisp look popular among landscape photographers. In addition, whether the camera can use the f-stop setting that creates the intended depth of field depends on the available light: The correct exposure is given more weight than depth of field in the camera's f-stop decision, so in very bright or very dim lighting, you may not enjoy short depth of field in Portrait mode or long depth of field in Landscape mode. See Chapter 3 for more about using these Scene modes.
- Look for other automated shooting modes that enable you to adjust depth of field. Cameras that offer a guided shooting mode, which takes you step by step through setting up the shot, usually ask you to specify the type of subject you want to shoot and then ask whether you want a blurred or sharp background.
Keep in mind that the camera-to-subject distance, subject-to-background (or foreground) distance, focal length, and f-stop setting combine to determine the final depth of field. So for maximum depth of field, use the shortest focal length and highest f-stop setting possible, move farther from your subject, and, if possible, position your subject closer to foreground and background objects. For minimum depth of field, do the opposite.
Capturing Motion: To Blur or Not to Blur?
Any time you're photographing a moving subject, whether it's an athlete on the field, a toddler taking those first steps, or a flower blowing in the wind, you have two choices:
- Freeze time. In other words, capture a split second in time, such as the moment a tennis racquet hits the ball, or, as is the case in Figure 2-16, the moment a drop of water falls from an icicle. This image, by the way, is not a black-and-white photo; the day I shot the melting ice was simply devoid of color. You should also know that it took many, many frames to get the timing of the shot just right, capturing the drop of water at the position you see it in the figure. On a personal note, it was this ice storm, which kept me housebound for four days, that convinced me to relocate from Indiana to south Florida. I do miss my friends in the Midwest, but at my age, photographing palm trees and sunny beaches is a little more appealing than standing in the bitter cold and snapping images of icicles.
- Allow the moving object to appear blurry. A little blur can emphasize movement, as shown in Figure 2-17. Notice that the iguana's raised arm is just a tad out of focus, and that blur helps tell the viewer that the iguana was moving toward the camera. You also can blur the object so much that you create an abstract field of color, as I did in Figure 2-18. The subject for this picture was a whirling carnival ride.
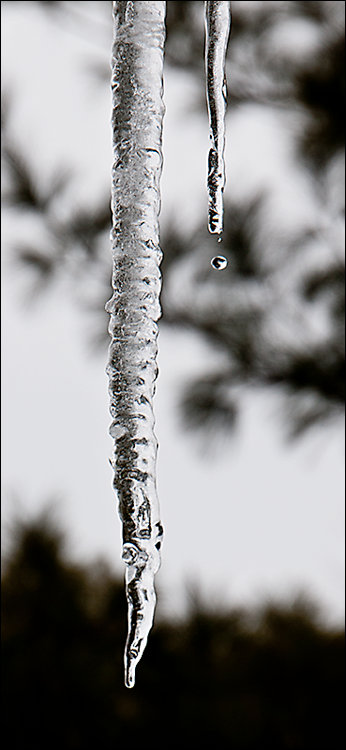
FIGURE 2-16: I used a fast shutter speed to capture a melting drop of water in midair.
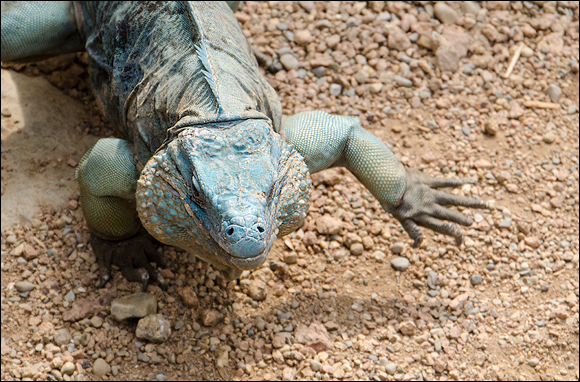
FIGURE 2-17: The slight blur of the iguana's arm emphasizes that the creature is in midstride.

FIGURE 2-18: Allowing a colorful moving object to blur completely produces a fun abstract image.
Here's what you need to know to take control over this aspect of your photos:
- Shutter speed determines whether a moving object appears blurry. Shutter speed, measured in seconds (or fractions of seconds), determines how long light is allowed to strike the image sensor, which helps determine image exposure and also affects motion blur. I explain the role of shutter speed in image exposure in Chapter 5, but for the purpose of controlling motion blur, all you need to know is that a fast shutter speed freezes motion and a slow shutter speed blurs it.
-
The shutter speed you need to blur or freeze action depends on the speed of your subject. For my icicle image, I set the shutter speed to 1/500 second; for the iguana, 1/250 second; and for the carnival ride, 1/5 second. But don't mistake the speeds I used in my examples as one-speed-fits-all recipes; you need to experiment to find out which shutter speed works best for the amount of blur (or lack thereof) you have in mind for your subject.
To give you a general guideline, though, you can usually freeze a moderately paced subject, such as a person walking, at about 1/320 second. For faster subjects, such as birds flapping their wings or dogs bounding across a yard, go higher — about 1/640 second should get you close to where you need to be. To blur motion, I start at about 1/20 second. But again, it's important to take test shots at different shutter speeds, check the results, and then go with a higher number (faster shutter speed) or lower number (slower speed) if you're not happy with the results.
- If your camera offers shutter-priority autoexposure mode, try using that mode when controlling motion blur is important. In this shooting mode, you set the shutter speed, and the camera selects the f-stop (aperture size) needed to properly expose the image at the current ISO (the setting that determines the light sensitivity of the image sensor). You also can adjust shutter speed in manual exposure mode, but if you go that route, you have to adjust the f-stop setting yourself. (Again, see Chapter 5 for more about these settings and general exposure information.)
- You also can achieve different motion effects with certain automatic scene modes. To freeze action, try Sports mode, which tells the camera to select the fastest shutter speed possible that will produce a good exposure. Achieving intentional motion blur is a little more difficult. If your camera offers a nighttime landscape or nighttime portrait mode, give those modes a try; both typically force a slow shutter speed. Some cameras also offer a waterfall mode designed to slow the shutter enough to blur the water, producing the classic misty water effect that you can see earlier, in Figure 2-3.
-
When using a slow shutter speed, use a tripod to avoid camera shake. Any movement of the camera during the exposure blurs the entire image, not just the elements that are in motion.
- How fast or slow a shutter speed you can use depends on the light and your other exposure settings. Specifically, you may need to adjust the f-stop (aperture setting) and ISO setting (light sensitivity) to get a good exposure at the shutter speed you have in mind.
- If your camera offers a continuous shutter-release setting, try using that option to capture fast action. In this mode, the camera clicks off a continuous series of frames as long as you keep the shutter button depressed, increasing the odds that you'll capture that highlight-reel moment in time. I talk more about this setting in Chapter 4.
Becoming a Student of Light
Creating a photograph requires light — the word photograph, in fact, stems from the Greek words photo (light) and graph (writing.) Chapter 5 explains how to adjust your camera settings to get a proper exposure in any light — although, frankly, today's autoexposure systems handle that job fairly well with little input from you. Just as important, though, is becoming aware of the following characteristics of light and how they affect your images:
- Quality of light: Is the light soft and diffuse, touching everything evenly and creating very little shadow, as you might see on an overcast day? Or is the light harsh and narrowly focused, creating what photographers call contrasty light — leaving some parts of the scene very bright and others very dark?
-
Color of light: Every light source infuses a scene with its own color cast. For example, just before sunset and just after sunrise, the sun paints the scenery with a beautiful yellow orange tint, which is why photographers refer to these times of day as the golden hours. And the period just after sunset and just before sunrise is called the blue hours because the light takes on a cool, bluish tint at that time.
 Don't fret if you can't wait for golden-hour light; if you like the golden color cast, you can create it artificially via your digital camera's White Balance control, which I discuss in Chapter 6. Ditto for blue-hour light. On the flip side, if you prefer to neutralize the color of the light source, you can use the White Balance control to make that shift.
 - Direction of light: The angle at which the light hits a subject is also important. Most people gravitate toward front lighting because it provides the greatest degree of subject illumination. But you often can get more interesting results with side lighting, which brings out the texture in a subject, or back lighting, which you can use to either photograph your subject in silhouette or bring out details that emerge when light shines through translucent objects.
Figures 2-19 and 2-20 offer two examples to get you to start thinking more about how these attributes of light affect your images. In the first image, the sun is striking the buildings from directly overhead, telling the viewer what time of day the shot was taken. Bright daylight is nearly white, lending no additional color to the scene, and making the skies appear a brilliant blue in contrast.
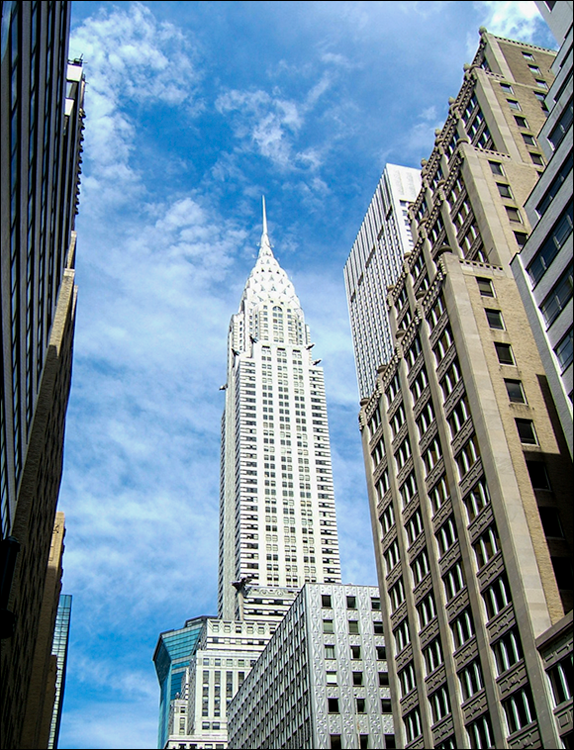
FIGURE 2-19: The midday sun strikes a New York street with bright, neutral light.
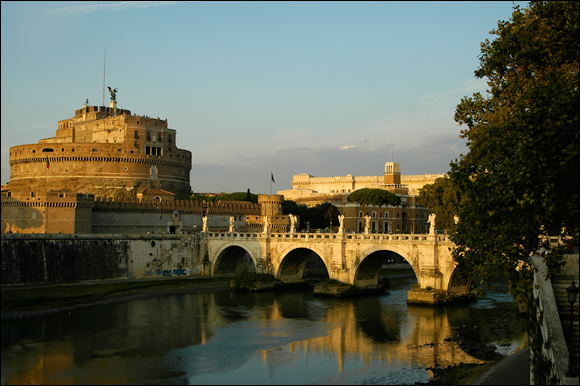
FIGURE 2-20: The fading sunlight in this scene lends a soft, golden tone to the image; the direction of the light creates interesting reflections in the water beneath the bridge.
In Figure 2-20, the soft, warm light bathes everything in that lovely golden-hour light, telling you that the shot was taken just before sunset. Yet the direction of the light is such that the bridge reflects in the water — an important element in this scene.
A side note regarding Figure 2-19: The buildings seem to lean toward each other because of the lens phenomenon called convergence, which occurs any time you point your camera lens up at a building (or down, if you're standing on a nearby rooftop). You can buy a special tilt-shift lens to avoid this issue or correct the leaning structures in a photo editor. But in this case, I like the result because they suggest the somewhat caged-in feeling I get when I actually walk among skyscrapers.
Again, Chapter 5 explores the topic of light, including how to achieve a brighter or darker exposure than the camera's autoexposure system thinks is ideal. You also can find tips for using flash and other artificial light sources in that chapter.
Exploring New Subjects and Angles
One more piece of advice I can give to help you make the shift from picture-taker to photographer is to look for the subject or subject angle that sets your photo apart from the ones that everyone else snaps. Here are a few ideas to help you achieve this goal:
- Find a new perspective. Figure 2-21 shows two views of an architectural ruin located in a park in Indianapolis. My guess is that about 90 percent of park visitors who photograph the ruin capture the wide-angle front view shown on the left. Technically, it's fine — in focus, nice colors, and so on — but there's nothing compelling about the image. Compare that photo with the one on the right side of the figure, which gives you an entirely different take on the scene. In this close-up view, you can see the details that make this structure so intriguing when you see it in person: the expression on the man's face, the rough texture of his body, and even the veins in his foot.
- Look for interesting reflections, patterns, and textures. Figures 2-22 and 2-23 offer two examples. I was attracted to the first scene by the way the hard, straight edges of the lines in the side of the building emphasize the distortions of the lines in the reflected buildings. In the second photo, the rough texture and pattern of the brick walkway provides an interesting contrast to the soft petals and curving leaves of the flower.
-
Search beyond the usual suspects. Most people focus their cameras on the obvious: When in Rome, for example, everyone takes a picture of Trevi Fountain, and if you go to the beach, photographing the sunset or sunrise is pretty much a requirement. I'm not saying that you should ignore those subjects, but if you want your photographs to stand out, search for scenes that most people wouldn't think of as photographic opportunities. If you keep your eyes open, subjects often present themselves when and where least expected. That was the case with the photo featured in Figure 2-24.
The story: I went to a butterfly garden with the intention of filling up my camera's memory card with images of those winged beauties. But it was summer in south Florida, and the heat and humidity got to me faster than I anticipated. I knew that I had enough butterfly pictures to have made the trip worthwhile, so I headed toward the parking lot. Luckily for me, the path to the exit leads past a large, decorative pool. As I stood for a moment debating how much trouble I would get into if I jumped into the water to cool off, I noticed the feather and the flower petals floating on the surface. Whatever part of my creative brain that wasn't shut down by the heat kicked into gear, excited by the mixture of colors and textures in the pool.
The result was the image that I considered the most successful shot of the day. Why? Because it was different. I'm fairly certain that almost everyone who took a picture at those gardens came home with at least one or two good butterfly images, but I suspect that I may be the only person who captured this colorful collage.
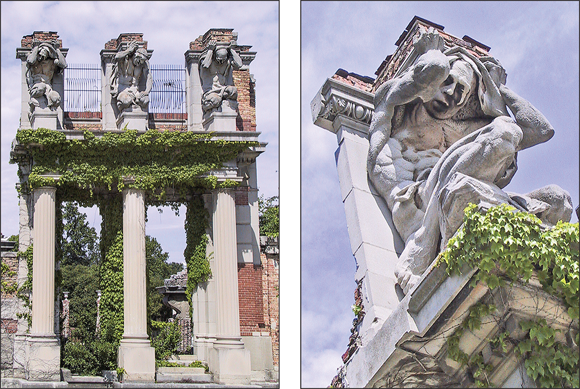
FIGURE 2-21: The left image is a technically fine rendition of the scene, but the right image provides a more interesting angle and reveals details not visible in the wide-angle view.
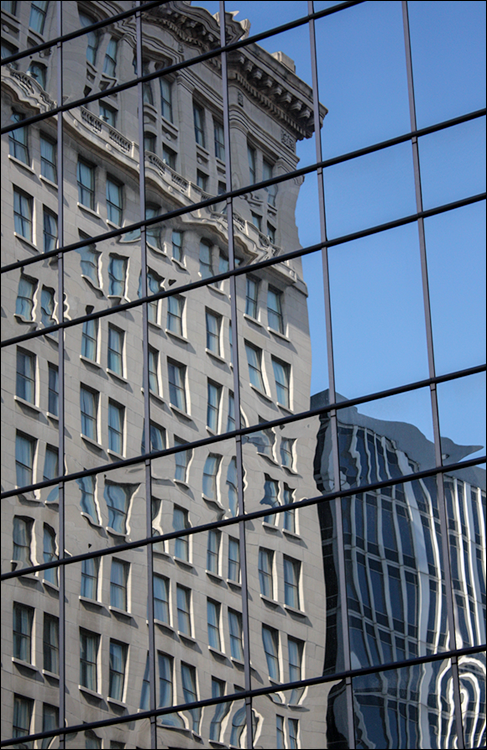
FIGURE 2-22: When shooting in the city, look for interesting reflections in windows.
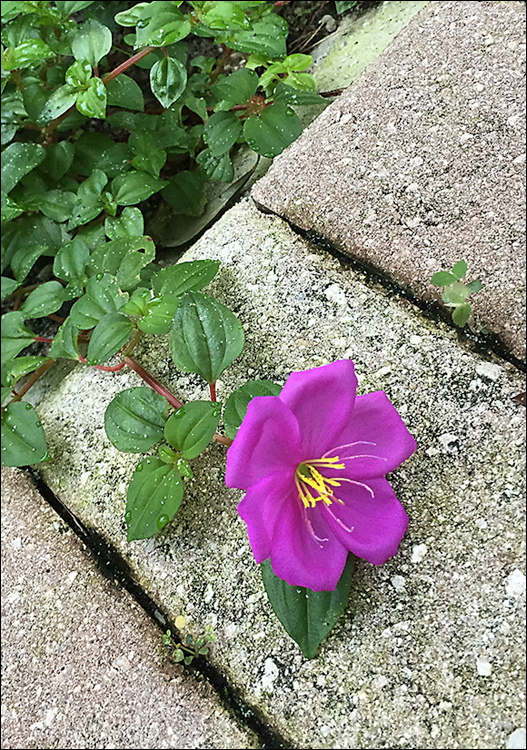
FIGURE 2-23: Here, the softness of the flower provides interesting contrast to the rough texture of the brick.
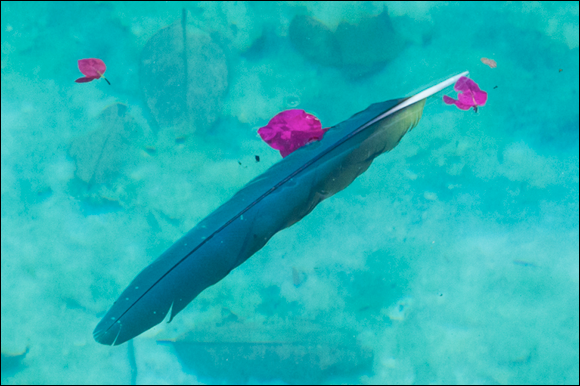
FIGURE 2-24: A feather, a few flower petals, and a watery background create a colorful image, enhanced by the leaf shapes visible at the bottom of the pool.