Chapter 6
Mastering Color Controls
IN THIS CHAPTER
Exploring white balance and its effect on color
Creating custom White Balance settings
Bracketing white balance
Experimenting with the Picture Style option
Compared with understanding certain aspects of digital photography — resolution, aperture, shutter speed, and so on — making sense of your camera’s color options is easy-breezy. First, color problems aren’t that common, and when they are, they’re usually simple to fix by changing the White Balance setting. And getting a grip on color requires learning only a few new terms, an unusual state of affairs for an endeavor that often seems more like high-tech science than art.
This chapter explains the White Balance control along with other features that enable you to fine-tune colors, whether you’re shooting photos or recording movies.
Understanding the White Balance Setting
Every light source emits a particular color cast. The old-fashioned fluorescent lights found in most public restrooms, for example, put out a bluish-green light, which is why our reflections in the mirrors in those restrooms look so sickly. And if you think that your beloved looks especially attractive by candlelight, you aren’t imagining things: Candlelight casts a yellow-red glow that’s flattering to the skin.
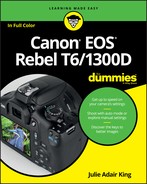
 Science-y types measure the color of light, or color temperature, on the Kelvin scale, which is named after its creator. You can see an illustration of the Kelvin scale in Figure 6-1.

FIGURE 6-1: The Kelvin scale measures the color temperature of light sources.
When photographers talk about “warm light” and “cool light,” though, they aren’t referring to the position on the Kelvin scale — or at least not in the way we usually think of temperatures, with a higher number meaning hotter. Instead, the terms describe the visual appearance of the light. Warm light, produced by candles and incandescent lights, falls in the red-yellow spectrum you see at the bottom of the Kelvin scale; cool light, in the blue-green spectrum, appears at the top of the scale.
At any rate, most of us don’t notice these fluctuating colors of light because our eyes automatically compensate for them. Except in extreme lighting conditions, a white tablecloth appears white to us no matter whether we view it by candlelight, fluorescent light, or regular house lights. Similarly, a digital camera compensates for different colors of light through a feature known as white balancing. Simply put, white balancing neutralizes light so that whites are always white, which in turn ensures that other colors are rendered accurately. If the camera senses warm light, it shifts colors slightly to the cool side of the color spectrum; in cool light, the camera shifts colors in the opposite direction.
Your camera’s Automatic White Balance (AWB) setting tackles this process well in most situations. If your subject is lit by a variety of light sources, however, the camera may stumble, resulting in an unwanted color cast. Whether you can adjust camera settings for better results on your next shot depends on your exposure mode, as follows:
- Auto and Flash Off: Sorry, you can’t access any color adjustments in these modes.
- Scene modes: In all scene modes except Food, you can use the Shoot by Ambience option to make colors warmer or cooler. Food mode offers a Color Tone slider that provides the same warming or cooling adjustment. In Portrait, Close-up, Sports, and Landscape modes, you can do further color tweaking via the Shoot by Lighting or Scene Type setting. I detail these options in Chapter 3.
- Creative Auto: This mode gives you access to the Shoot by Ambience option.
- P, Tv, Av, and M: Instead of providing the features I just mentioned, these exposure modes enable you to choose a setting other than Auto for the White Balance option. You also get a number of ways to fine-tune any white-balance setting. The next few sections explain these choices.
Adjusting the White Balance setting
An icon representing the current White Balance setting appears in the Shooting Settings and Live View displays, in the areas labeled in Figure 6-2. Figure 6-3 offers a guide to the symbols used to represent each setting.

FIGURE 6-2: AWB stands for Auto White Balance.

FIGURE 6-3: These symbols represent the available White Balance settings.
Upcoming sections provide details on a quirk regarding the Auto setting and how to create a custom setting. For now, familiarize yourself with the ways you can access the White Balance setting. For viewfinder photography — that is, Live View is not engaged — you can use either of the following methods:
- Press the WB button (down cross key, labeled in Figure 6-4): You see the selection screen shown on the camera monitor in the figure. Use the cross keys or Main dial to scroll through the available settings. The text label atop the row of symbols tells you the name of each setting. In some cases, as in the figure, you also see the approximate Kelvin value that the setting is designed to handle.
 Use Quick Control screen: Press the Q button to shift to Quick Control mode and then highlight the White Balance option (refer to Figure 6-2). The name of the current setting appears at the bottom of the screen. You can either rotate the Main dial to change the setting or press the Set button to access the same selection screen shown in Figure 6-4.

FIGURE 6-4: The WB button takes you to the White Balance setting screen but isn’t available for Live View photography or Movie recording.
 During Live View shooting, the WB button performs a function related to focusing, so you must use the Quick Control screen to change the setting. But Live View gives you a White Balance feature not available for viewfinder shooting: As you adjust White Balance, the monitor updates to show you the effect of the setting on the subject colors. So go this route if you’re not sure which White Balance option will produce the best results. (You can always switch back to viewfinder mode to take the picture.)
A few other details to remember:
-
 Your selected White Balance setting remains in force until you change it. So this is one option you should check before each shoot. I usually start out in Auto mode, take a test shot, and then modify the setting if needed.
 - If your scene is lit by several sources, choose the White Balance setting that corresponds to the strongest one.
- When your light source is in the incandescent color range — some household bulbs fit this category — the default Auto mode may leave colors slightly warmer than neutral. See the next section to find out why and, more importantly, how to resolve the issue.
- If none of the settings produce accurate colors, try using the advanced White Balance options outlined in the next three sections. You can create a custom setting and store it in the camera’s memory or fine-tune any of the existing settings.
Changing the Auto “priority” setting
As if your photographic life weren’t complicated enough, Canon recently added a wrinkle to its automatic white-balancing system. On your camera, you can set the Auto option to perform in one of two ways; the difference matters only when you shoot in incandescent lighting or other types of light that have a similar Kelvin temperature (color cast). (Refer to the Kelvin chart in Figure 6-1.) The two settings are Ambience Priority Auto and White Priority Auto. They work as follows:
-
Ambience Priority Auto retains a little of the warm color cast that can occur when you shoot in incandescent lighting. The idea, I suppose, is that the warming of colors is usually flattering to skin tones, which makes people happier with portraits they shoot by indoor light. At any rate, this setting produces the same results that Auto mode delivered in previous versions of Canon dSLR cameras, which is why it’s the default setting for the P, Tv, Av, and M exposure modes and also used for all other exposure modes except Food.
-
White Priority Auto eliminates the warm color cast created by incandescent lighting. In other words, this setting produces the results that most people expect from Auto mode, which is an accurate rendition of colors. Whites appear white instead of slightly yellow, for example. This mode is used by the Food scene mode, which is part of the reason that Food mode makes your meal look “bright and appetizing,” per the Canon instruction manual.
If you use flash, though, the White Priority deal is off. Even if the Auto option is set to White Priority, the camera uses the same color-compensating formula as it does in Ambience Priority mode. Oh, and just to confuse matters more, the settings displays still indicate that White Priority is in effect.
The good news is that in most cases, the Auto setting you select won’t make a whit of difference. Again, it only tweaks colors if you’re shooting in incandescent lighting. Even then, how much your picture is affected depends on your subject, the intensity of the incandescent light, and whether any other lights that have different color temperatures are also hitting the subject. In Figure 6-5, the orchid was lit only by incandescent light, so the Ambience Priority example (left image) does have warmer colors than the White Priority example (right image). Yellow parts of the petals became more so, and the white and red areas take on a slight golden cast as well. But sometimes, it’s difficult to detect any difference between the results of the two settings.

FIGURE 6-5: When you shoot in incandescent light, the Ambience Priority Auto setting may result in warmer colors than the White Priority Auto setting.
To specify which priority you want the Auto setting to use, first select Auto from the White Balance setting screen, as shown on the left in Figure 6-6. You can get to this screen by pressing the WB button (viewfinder shooting only) or by displaying the Quick Control screen, highlighting Auto, and pressing the Set button. Then press the DISP button to bring up the screen shown on the right in Figure 6-6. (Notice the label at the bottom of the left screen in the figure; it reminds you to use the DISP button to access the AWB adjustment screen.) After you get to the adjustment screen, called Detail Settings (huh?), highlight your choice and press Set. You’re returned to the main settings screen; press Set again to exit to the Quick Control screen. To return to shooting, press the shutter button halfway and release it.

FIGURE 6-6: With the Auto setting selected, press the DISP button to access the control for setting the Auto mode to White Priority or Ambience Priority.
Creating a custom White Balance setting
Through the Custom White Balance option, you can create a White Balance setting that’s based on the color of the light hitting your subject, whether that light comes from one or many sources. To use this technique, you need a piece of card stock that’s either neutral gray or absolute white — not eggshell white, sand white, or any other close-but-not-perfect white. (You can buy reference cards made for this purpose in many camera stores.)
The following steps take you through the process of creating a custom White Balance setting for still photography:
- Position the reference card in the lighting you plan to use for your subject.
-
Set the camera to the P, Tv, Av, or M exposure modes.
You can’t use this feature in other modes.
-
Take a picture of the reference card.
Frame the shot so that the reference card fills the viewfinder or, if you’re using Live View, the monitor. For best results, focus manually. (The camera may not be able to autofocus because the reference card is all one color.)
- Display Shooting Menu 2 and highlight Custom White Balance, as shown on the left in Figure 6-7.
-
Press Set to display the screen shown on the right in Figure 6-7.
The reference image you just captured should appear in the display, along with a message that tells you that the camera will display only that image and others that are compatible with the Custom White Balance option. If your picture doesn’t appear on the screen, press the right or left cross key to scroll to it.
-
Press Set to select the displayed image as the basis for your custom White Balance reference.
You’re asked to confirm that you want to use the image to create the Custom White Balance setting.
-
Press the right cross key to highlight OK and then press Set.
A message tells you that the custom setting is stored. The little icon in the message area represents the custom setting. (Refer to Figure 6-3.)
- Press Set one more time to finalize things.

FIGURE 6-7: Use a photo of a gray card, shot in the light you plan to use for your subject, as the basis for your custom White Balance setting.
You can use your custom setting when shooting movies as well; just select the Custom option as the White Balance setting. If you want to create a new custom setting for your movie lighting, however, use this variation on the process: Follow Steps 1–3 to take your reference picture. Then set the Mode dial (top of the camera) to Movie mode, bring up Movie Menu 3, and select Custom White Balance on that menu. From there, continue on with Steps 5–8.
Either way, your custom setting remains stored until the next time you work your way through the steps.
Using White Balance Correction to fine-tune settings
In addition to creating a custom White Balance setting, you can tell the camera to shift all colors toward a particular part of the color spectrum no matter what White Balance option is in force. If you think that your camera overdoes reds in all your pictures, for example, you can implement this feature to eliminate some of that red bias. Just remember that the adjustment you make applies to all White Balance settings, even a custom setting that you create.
With that warning in mind, follow these steps to use the fine-tuning feature:
- Set the Mode dial to P, Tv, Av, or M.
-
Display Shooting Menu 2 and highlight WB Shift/Bkt, as shown on the left in Figure 6-8.
The first two numbers next to the option name indicate the current amount of fine-tuning, or shift, and the second value represents the amount of White Balance Bracketing enabled. (See the next section for details on that topic.)
-
Press Set to display the screen you see on the right in Figure 6-8.
The screen contains a grid that’s oriented around two color pairs: green and magenta (represented by the G and M labels) and blue and amber (represented by B and A). The little white square indicates the amount of White Balance Shift. When the square is dead center in the grid, as it is initially, no shift is applied.
-
Use the cross keys to move the shift indicator marker in the direction of the shift you want to achieve.
As you do, the Shift area of the display tells the amount of color bias you’ve selected. For example, in Figure 6-8, the shift is two levels toward amber and two toward magenta.
If you’re familiar with traditional lens filters, you may know that the density of a filter, which determines the degree of color correction it provides, is measured in mireds (pronounced “my-reds”). The White Balance grid is designed around this system: Moving the marker one level is the equivalent of adding a filter with a density of 5 mireds. -
Press Set to apply the change and return to the menu.
After you apply White Balance Correction, the shift amount appears alongside the WB Shift/Bkt setting on Shooting Menu 2, as shown on the left in Figure 6-9. You also see a +/– sign next to the White Balance symbol in the Shooting Settings display, as shown on the right in the figure. The same symbol appears in the viewfinder, right next to the ISO value. The Live View display offers no such symbol to indicate that the shift is in force, but the onscreen colors update to show you the impact of your change.
You can see the exact shift values in the Camera Settings display. To activate that display, display any menu and then press the DISP button.
Your adjustment remains in force for all advanced exposure modes until you change it. And again, remember that the correction is applied no matter which White Balance setting you choose. Check the monitor or viewfinder before your next shoot; otherwise, you may forget to adjust the white balance for the current light. -
To cancel White Balance Correction, repeat the steps, set the marker to the center of the grid, and then press Set.
After you get to the screen shown on the right in Figure 6-8, you can press the DISP button to clear your settings. However, doing so also cancels White Balance Bracketing, which I explain in the next section.
Before leaving the grid screen, be sure to press Set to lock in your change.

FIGURE 6-8: White Balance Correction fine-tunes the current White Balance setting.

FIGURE 6-9: The +/– symbol lets you know that White Balance Shift is being applied.
Bracketing shots with White Balance
Chapter 4 introduces you to Automatic Exposure Bracketing, which enables you to easily record the same scene with three different exposure settings. Similarly, the camera offers White Balance Bracketing, which records the same image three times, using a slightly different white balance adjustment for each one.
Note a couple of things about this feature:
- Because the camera records three images each time you press the shutter button, White Balance Bracketing reduces the maximum capture speed that’s possible. Only one photo is taken; however, it’s processed and saved three times. This can affect shooting speed no matter what Drive mode you have engaged. (See Chapter 2 for more about Drive modes.) Recording three images instead of one also eats up more space on your memory card.
- White Balance Bracketing is designed around the same grid used for White Balance Correction, explained in the preceding section. As a reminder, the grid is based on two color pairs: green/magenta and blue/amber.
- When White Balance Bracketing is enabled, the camera records the first of the three bracketed shots using a neutral White Balance setting — or, at least, what it considers neutral, given its measurement of the light. The second and third shots are recorded using the specified shift along either the green/magenta or the blue/amber axis of the color grid.
If all that is as clear as mud, take a look at Figure 6-10 for an example. These images were shot using a tungsten studio light and the candlelight. White Balance Bracketing was set to work along the blue/amber color axis, with a +3 bias in each direction. As you can see, even at the maximum shift (+/–3), the difference to the colors is subtle.

FIGURE 6-10: With White Balance Bracketing enabled, the camera recorded one neutral image, one with a blue bias, and one with an amber bias.
To enable White Balance Bracketing, follow these steps:
- Set the Mode dial to P, Tv, Av, or M.
- Display Shooting Menu 2 and highlight WB/Shift Bkt, as shown on the left in Figure 6-11.
- Press Set to display the grid shown on the right in Figure 6-11.
-
Rotate the Main dial to set the amount and direction of the bracketing shift.
Rotate the dial as follows to specify whether you want the bracketing applied across the horizontal axis (blue to amber) or the vertical axis (green to magenta).
- Blue to amber bracketing: Rotate the dial right.
- Green to magenta bracketing: Rotate the dial left.
As you rotate the dial, three markers appear on the grid, indicating the amount of shift that will be applied to your trio of bracketed images. You can apply a maximum shift of plus or minus three levels of adjustment.
The Bracket area of the screen also indicates the shift. For example, in Figure 6-11, the display shows a bracketing amount of plus and minus three levels on the blue/amber axis.
 If you want to get truly fancy, you can combine White Balance Bracketing with White Balance Shift. To set the amount of White Balance Shift, press the cross keys to move the square markers around the grid. Then use the Main dial to adjust the bracketing setting.
 -
Press Set to apply your changes and return to the menu.
On Shooting Menu 2, the value after the slash shows you the bracketing setting, as shown on the left in Figure 6-12. (The two values to the left of the slash indicate the White Balance Shift direction and amount — zero for each, in the figure.) The Shooting Settings screen also contains a White Balance Bracketing symbol (as shown on the right in the figure), as does the Camera Settings display, which you bring up by pressing DISP when any menu is visible. In the Live View display, the White Balance setting symbol blinks to indicate the bracketing is enabled.

FIGURE 6-11: These settings represent the maximum (+3) bracketing amount on the Blue to Amber axis.

FIGURE 6-12: These symbols indicate that White Balance Bracketing is turned on.
Bracketing remains in effect until you turn off the camera. You can also cancel bracketing by revisiting the grid screen shown in Figure 6-11. Either rotate the Main dial until you see only a single grid marker or press the DISP button. (The DISP button clears any White Balance shift that’s in force, too, however.) To wrap up, press Set.
Although White Balance Bracketing is a fun feature, if you want to ensure color accuracy, creating a custom White Balance setting is more reliable than bracketing white balance; after all, you can’t be certain that shifting white balance a couple steps is going to produce accurate colors.
Taking a Quick Look at Picture Styles
Picture Styles give you an additional way to tweak image colors. But this feature also affects color saturation, contrast, and image sharpening.
Sharpening is a software process that adjusts contrast in a way that creates the illusion of slightly sharper focus. Emphasis on the word slightly: Sharpening cannot remedy poor focus, but instead produces a subtle improvement to this aspect of your pictures.
The camera offers the following Picture Styles:
- Auto: The camera analyzes the scene and determines which Picture Style is the most appropriate. (This setting is the default.)
- Standard: Produces the image characteristics that Canon considers as suitable for the majority of subjects.
- Portrait: Reduces sharpening slightly to keep skin texture soft. Color saturation, on the other hand, is slightly increased, and colors become slightly warmer.
- Landscape: Emphasizes greens and blues and amps up color saturation and sharpness.
- Neutral: Reduces saturation and contrast slightly compared to how the camera renders images at the Standard setting.
- Faithful: Renders colors as closely as possible to how the human eye perceives them.
-
Monochrome: Produces black-and-white photos.
If you set the Quality option to Raw (or Raw+Large/Fine), the camera displays your image on the monitor in black and white during playback. But during the Raw conversion process, you can go with your black-and-white version or view and save a full-color version. Or even better, you can process and save the image once as a grayscale photo and again as a color image. If you don’t capture the image in the Raw format, you can’t access the original image colors later. In other words, you’re stuck with only a black-and-white image.
The extent to which Picture Styles affect your image depends on the subject, the exposure settings you choose, and the lighting conditions. Figure 6-13 offers a test subject shot at each setting except Auto to give you a general idea of what to expect. As you can see, the differences are subtle, with the exception of the Monochrome option, of course. Note that in Auto mode, the camera will never select Monochrome, so if you do want a black-and-white capture, you have to select that setting yourself.

FIGURE 6-13: Each Picture Style produces a slightly different take on the scene.
You have control over the Picture Style setting only in the P, Tv, Av, M, and Movie modes. In the Shooting Settings screen and Live View display, you see a symbol representing the current Picture Style, as shown in Figure 6-14. (In Movie mode, the symbol appears in the same spot as in Live View still-photography mode.)

FIGURE 6-14: This symbol represents the Picture Style.
To change the setting, use these methods:
-
Quick Control screen: After highlighting the Picture Style icon, as shown on the left in Figure 6-15, rotate the Main dial to cycle through the available styles. The label at the bottom of the screen indicates the current setting. The numbers that appear with the style name at the bottom of the screen represent the four characteristics applied by the style: Sharpness, Contrast, Saturation, and Color Tone, in that order. Sharpness values range from 0 to 7; the higher the value, the more sharpening is applied. At 0, no sharpening is applied. For the other options, a value of 0 represents the default setting for the selected Picture Style. (Using certain advanced options, you can adjust all four settings; more on that momentarily.)
To see all available styles, press Set to display the screen you see on the right in Figure 6-15. Highlight the style you want to use, and the four style values appear along with the style name, as shown in the figure. Press Set to finish up.
- Shooting Menu 2 (P, Tv, Av, or M modes) or Movie Menu 3 (Movie mode): Select Picture Style from the menu (the left image in Figure 6-16 shows Shooting Menu 2) and press Set to display the screen shown on the right. This screen also shows the four characteristics for each style. Highlight a Picture Style and press Set to exit that screen. Not all the styles fit on the screen; use the up/down cross keys to scroll the screen to reveal hidden settings.

FIGURE 6-15: You can quickly select a Picture Style by using the Quick Control screen.

FIGURE 6-16: You also can access these options by choosing Picture Style on Shooting Menu 2 or Movie Menu 3.
Unless you’re tickled pink by the prospect of experimenting with Picture Styles, I recommend that you stick with the default setting (Auto). First, you have way more important camera settings to worry about — aperture, shutter speed, autofocus, and all the rest. Why add one more setting to your list, especially when the impact of changing it is minimal? Second, if you want to mess with the characteristics that the Picture Style options affect, you’re much better off shooting in the Raw (CR2) format and then making those adjustments on a picture-by-picture basis in your Raw converter.
In Canon Digital Photo Professional, which comes free with the camera, you can even assign any of the existing Picture Styles to your Raw files and then compare how each one affects the image. The camera tags your Raw file with whichever Picture Style is active at the time you take the shot, but the image adjustments are in no way set in stone or even in sand — you can tweak your photo at will. (The selected Picture Style does affect the JPEG preview that’s used to display the Raw image thumbnails in Digital Photo Professional and other photo software.)
For these reasons, I opt in this book to present you with just this brief introduction to Picture Styles to make room for more details about functions that do make a big difference in your daily photography life. However, I do want to let you know that the camera does offer the following advanced Picture Style features:
- You can modify a style, varying the sharpness, contrast, saturation, and color tone adjustment that the style produces.
- You can create and store three custom Picture Styles, which are named User Defined 1, 2, and 3.
- Picture Style übergeeks (you know who you are) can use Canon Picture Style Editor, a free program that enables you to create and save Picture Style files to your heart’s content. You then download the styles to your camera via the memory card. I’d be remiss if I didn’t also mention that some Canon user groups swap Picture Styles with each other online. (I’d be equally remiss if I didn’t warn you to play at your own risk any time you download files from persons unknown to you.)
For details on all these features, check the camera instruction manual. You need to download the electronic user manual from the Canon website, though; the paper manual that ships with your camera covers just basic features, and Picture Style information didn’t make the cut.
Taking a look at the Shoot by Ambience options
In the scene modes, the Quick Control screen offers access to a feature named Shoot by Ambience, which enables you to adjust certain picture characteristics on your next shot. The following list describes Shoot by Ambience choices available in scene modes other than Food:
- Standard: Consider this the “off” setting. When you select this option, the camera makes no adjustment to the characteristics normally produced by your selected scene mode.
- Vivid: Increases contrast, color saturation, and sharpness.
- Soft: Creates the appearance of slightly softer focus.
- Warm: Warms (adds a reddish-orange color cast) and softens.
- Intense: Boosts contrast and saturation (color intensity) even more than the Vivid setting.
- Cool: Adds a cool (blue) color cast.
- Brighter: Lightens the photo.
- Darker: Darkens the photo.
- Monochrome: Creates a black-and-white photo, with an optional color tint.
In Food mode, you’re limited to Standard, Brighter, Darker, and Monochrome. You can make colors warmer or cooler, through, through the Color Tone option, detailed in the next section.