
Chapter 7
The Adobe Camera Raw Plug-In
IN THIS CHAPTER
![]() Understanding “Raw”
Understanding “Raw”
![]() Using the Camera Raw plug-in
Using the Camera Raw plug-in
When we first started capturing digital photos in a Raw file format, it required an investment of tens of thousands of dollars in equipment. The wonderful thing about the Raw file format is that you use it to record unprocessed image data, which gives you incredible control over the final appearance of your image. These days, however, cameras that cost only a few hundred dollars can capture images “in the Raw.” Some smartphones can capture Raw, too. If you don’t have a Raw-capable camera now, after reading this chapter, you might decide that you need to have Raw capability.
In this chapter, I explain how Raw differs from other image file formats and why those differences can be important. I show you how to determine whether you have what you need to capture in Raw and whether Photoshop’s Adobe Camera Raw plug-in is capable of handling your camera’s image files. Most of the rest of the chapter looks at the Camera Raw interface and what all those sliders do for you and your image.
Understanding the Raw Facts
The Raw file format at its heart is nothing but unprocessed image data. It comes in a number of variations — one or several for each camera manufacturer. Each has its own file extension (such as .crw, .cr2, or .nef), and many have their own special features that are totally incompatible with each other and even incompatible with Raw images from different camera models that use the same file extension. And those camera manufacturers love to tinker with their proprietary formats, changing them regularly. But each of the formats, at the basic level, is Raw. (Check your camera’s User Guide to see whether it’s capable of recording image data in a format other than JPEG or TIFF. If so, it’s probably a variation of Raw.)
Thankfully, Adobe updates the Camera Raw plug-in for Photoshop (as shown in Figure 7-1) on a regular basis, adding the capability to work with the newest cameras shortly after they’re available. (Plug-ins, like Camera Raw and most of Photoshop’s filters, extend the program’s capabilities. Updating your plug-ins regularly ensures that you have the greatest capabilities.) Be warned, however, that purchasing a new camera model the day it comes on the market might mean using the camera’s own software for a while until Camera Raw is updated.
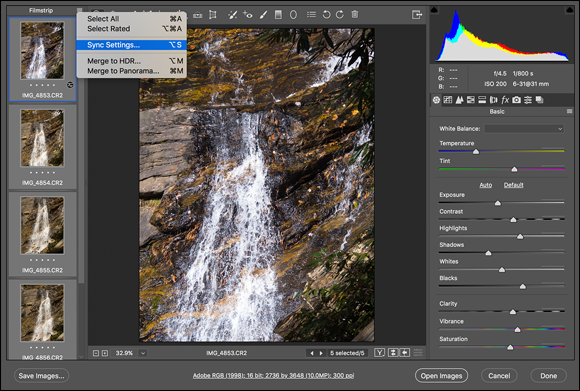
FIGURE 7-1: The impressive Camera Raw window.
 In the Camera Raw window in Figure 7-1, notice the thumbnails stacked to the left. Select multiple Raw images in the Photoshop File ⇒ Open dialog box or in Bridge and they all open in Camera Raw together. Click a thumbnail to work on that particular image. If you open images that all need a similar correction, adjust one and then open the menu to the right of Filmstrip and choose Select All. Open the menu again and choose Sync Settings.
Adobe also offers the free DNG Converter software for converting supported Raw files to the open source DNG file format. (Open source means that anyone can freely use it. The DNG format is also known as “digital negative.”) Although some camera manufacturers have adopted the DNG format for their cameras, it’s more commonly used “to promote archival confidence, since digital imaging software solutions will be able to open raw files more easily in the future” (Adobe). (Of course, if sometime in the future Adobe drops Camera Raw support an “archival” Raw format, simply use DNG Converter then.)
What’s the big deal about Raw?
Cameras that record images using the Raw format save unprocessed image data. When recording as JPEG or TIFF, the camera manipulates the image data, processing it in a variety of ways. So what’s the big deal with unprocessed — Raw — image data? Assuming that you’re as hungry for food as for knowledge, I’ll use a cooking analogy.
Say you purchase frozen lasagna and heat it up in your microwave oven. It probably tastes good and fulfills your needs (“Food!”). However, the chef who designed this prepared meal and the good folks who churn it out use a specific recipe designed to appeal to a large number of people, hopefully offending very few. When you reheat your lasagna in the microwave, you have some choices. For example, you decide how warm to make it (generally following the package’s reheating instructions). Perhaps you’ll add some pepper or hot sauce.
What you can’t do with that frozen lasagna is take out some of the salt or fat in it from the recipe designed by the chef and prepared by the good folks. You can’t substitute olive oil for butter. You can’t cut back on the garlic a bit (just in case your date goes well). You’re pretty much restricted by what the original chef and his good folks prepared. Sure, you could pour a half-bottle of blue food coloring over it, creating a special effect, but you’re not likely to turn that microwavable lasagna into a gourmet dinner. So if you’re just hungry and your demands aren’t too severe, no problem — shoot JPEG (the digital photo equivalent of a microwave meal).
The gourmet dinner is what Raw is all about! If you consider yourself a gourmet chef of the camera, creating art from light, Raw is the format for you. Avoid the limitations put on your image editing by preprocessing and dive right in with the greatest flexibility. (And you don’t even have to go down to the farmers’ market for fresh tomatoes.)
Working in Raw
There’s one critical difference between working with Raw images and working with JPEGs or TIFFs: You never actually make changes to the Raw file. Instead, you record your adjustments in the image’s metadata (non-image data recorded with the image data) or in a sidecar file (a separate file in which Camera Raw records any information that can’t be recorded in the metadata). If you work with the DNG format, the metadata is saved inside the DNG file. Because adjustments are recorded separately rather than applied to the images, the original image data remains unchanged, waiting for you to create again and again, all from the same unprocessed, un-degraded image data.
 Sidecar files have the same name as the image file, but they use the
 .xmp file extension. Keep each sidecar file in the same folder as the image with which it is associated. If you move the image file without taking the sidecar file along for the ride, the information stored in the sidecar file won’t be available when you reopen the image file, so you’ll need to adjust the image’s appearance all over again.
When capturing in Raw, you can basically ignore all the camera’s settings other than aperture, shutter speed, ISO, and (of course) focus. Everything else can be adjusted in the Camera Raw plug-in. However, because Raw devotes significantly more resources to recording highlights than shadows, it’s not a bad idea to concentrate on those highlights when shooting. When the highlights are great to start with, you can reallocate some of the image’s tonal range to the deprived shadows, thus reducing unwanted digital noise and increasing detail.
Keep in mind that in addition to the Photoshop Camera Raw plug-in, you also have available the software that came with your camera. And you might even have additional software packages available, such as Adobe Lightroom. And now there are Photoshop- and Lightroom-related apps for use on your smartphone or tablet. Which package is best? As usual, “best” is a relative term. For example, Nikon’s proprietary software does a great job with sharpness when processing .nef files, but it lacks some of Camera Raw’s features. If sharpness is your overriding requirement, you might prefer the Nikon software. (Remember that your Raw file can’t be processed by both the camera’s software and then by Camera Raw, but you can process the data with either and then further refine your image in Photoshop itself.)
 While working in Camera Raw, keep in mind that what happens when you move the image from Camera Raw to Photoshop (or save your adjustments and close with Camera Raw’s Done button) is governed by Camera Raw’s Workflow Options. Discussed later in this chapter, Workflow Options controls the color space, color depth, pixel dimensions, and resolution of the image after you’re done in Camera Raw. Workflow Options is where you also control whether the formerly Raw file opens into Photoshop as an image or a Smart Object and whether a sharpening preset is applied.
Photoshop’s Save As dialog box offers you the option of the Photoshop Raw file format. Photoshop Raw is not compatible with the Camera Raw plug-in and does not provide you with the benefits of using the Raw format with your digital camera. It is, however, necessary for certain high-end graphics and animation programs into which someone, somewhere, sometimes places images from Photoshop.
Working in the Camera Raw Plug-In
The cornerstone of Photoshop’s Raw capability is the Camera Raw plug-in. After an image is open in Photoshop itself, you manipulate the pixels directly, rather than manipulating the metadata. When you work in the Camera Raw plug-in, you never change the image itself, only the adjustments recorded in the file’s metadata (or in a sidecar file). As shown previously in Figure 7-1, the Camera Raw window is filled with tools and sliders. Even though you might not work with all the Camera Raw features, here’s the lowdown on the features you find there.
Camera Raw can also be used with any 8- or 16-bit RGB or Grayscale image that’s already open in Photoshop, on pixel layers, rasterized type and shape layers, and on layer masks. You can access Camera Raw through Photoshop’s Filter menu. Keep in mind, however, that the true power of Camera Raw isn’t there when used as a filter — the image data has already been processed and Camera Raw as a filter is simply another adjustment tool. Understand that the Camera Raw filter doesn’t suddenly “un-process” your image data and make it a Raw file, it simply lets you use Camera Raw’s adjustments as you would with, for example, a sharpening or noise reduction filter, or a Curves adjustment. Also keep in mind that you can select one or more layers and convert them to a Smart Object (Layer ⇒ Smart Objects ⇒ Convert to Smart Object) and use Camera Raw as a Smart Filter, which enables you to return to the filter and changes settings later.
Tools and preview options
Across the top of the Camera Raw window are thirteen tools and three buttons (as shown in Figure 7-2) for manipulating your image and the workspace. Starting from the left, the tools are Zoom, Hand, White Balance, Color Sampler, Targeted Adjustment, Crop, Straighten, the new Transform tool, Spot Removal, Red Eye Removal, Adjustment Brush, Graduated Filter, and the Radial Filter. To the right of the tools are buttons to open Camera Raw’s Preferences as well as two rotation buttons.

FIGURE 7-2: Camera Raw offers 13 tools for perfecting your images and up to nine color samplers.
Before and After
As you can see to the lower-right of the image preview in Figure 7-1, there are four buttons. The first button allows you to see the before and “after” (actually “current”) version of the image. (The views is always labeled Before and After in all views using this button.) When you click the button (keyboard shortcut Q), the original image is shown next to the current adjustment. Click a second time and you get before and after without the dividing line. Click a third time and you get before and after views stacked rather than side by side. Another click removes the dividing line. Another click removes the Before image. With Before and After showing, the second button (shortcut P) swaps the before and after adjustments. The third button (shortcut Option/Alt+P) copies the current settings to the Before image, enabling you to save where you are in your work and then continue making changes that you may or may not want to keep. The fourth button (shortcut ⌘ +Option+P/Ctrl+Alt+P) toggles between the current settings and the default settings for the panel in which you’re working. Note that if you have multiple images open in the Filmstrip column, you can add the Shift key to the first three buttons’ shortcuts to apply Before and After to all selected images. Of course, if you haven’t yet made adjustments to those other selected images, you won’t see any difference.
Regardless of which tool is selected, positioning the cursor over the Before image automatically activates the Zoom tool. You can, of course, drag in the image to reposition it when zoomed in. The Zoom tool enables you to zoom in and you can “scrubby” zoom by holding down the mouse button (or trackpad) and dragging the tool in the window. With the Zoom tool, you can hold down ⌘ /Ctrl and drag a rectangle to zoom in to a specific area.
Trash
When multiple images are open in Camera Raw, you also have the Trash icon available to the right of the rotation buttons. With one or more image thumbnails selected, click the Trash button to mark the files for deletion. When you click the Done or Open Images button, marked images are sent to your computer’s Trash or Recycle Bin. Mark images for deletion only when you’re sure you have no use for them.
Zoom, Hand, and White Balance
These three tools function as you would expect — they zoom in and out and reposition a zoomed-in image in the window, and you can click with the White Balance tool on something in the image that should be gray (not something that is already gray, but that should be gray) to automatically adjust the Temperature and Tint sliders. It’s a one-click way to neutralize any color cast and correct the color balance. If you get an unexpected result, click elsewhere. And, of course, afterward you can still tweak the Temperature and Tint sliders as desired.
Color Sampler
When you add color samplers (a maximum of nine) to the image preview area (click with the Color Sampler tool), their values are displayed below the tools, as you see in Figure 7-2. When you haven’t added color samplers, that area is collapsed, leaving more room for the preview area. Color samplers in Camera Raw function the same as they do in Photoshop (see Chapter 6). Color samplers are visible as numbered targets in the preview area, strategically located in critical areas of the photo. You can use the Color Sampler tool to drag existing color samplers to new locations or delete them by Option/Alt+clicking on the sampler. Clicking the Clear Samplers button deletes all existing color samplers. Remember, too, that the position of the cursor can function as an additional color sampler — the RGB values are shown below the histogram.
Targeted Adjustment
Designed for on-image adjustments, you click the Targeted Adjustment tool (shown in Figure 7-3), hold down the mouse button, select the type of adjustment you want to make, and then click directly in the image preview. Drag up or down and left or right to adjust the image’s appearance. Whether you elect Parametric Curve, Hue, Saturation, Luminance, or Grayscale Mix, the appropriate pane opens to the right so that you can monitor (and fine-tune) the adjustment. If you select Parametric Curve and click in a light area in the image, the Highlights or Lights sliders are adjusted; if you click in a dark area, Shadows or Darks are adjusted. With the other four options for the Targeted Adjustment tool, you’re adjusting a specific range of color — based on the color on which you click — as you drag.

FIGURE 7-3: Click in the image and drag with the Targeted Adjustment tool to adjust the image.
Crop and Straighten
Click and hold the Crop tool icon to select an aspect ratio (relationship between width and height), as shown in Figure 7-4. Drag the Crop tool to create a bounding box, which will automatically adjust to Landscape or Portrait orientation as you drag. You can then adjust the size of the bounding box by dragging its anchor points. You can also rotate an image while cropping: Position the tool just outside the bounding box and drag to rotate.

FIGURE 7-4: The Crop tool can ensure perfect aspect ratio.
If you drag the Straighten tool (found to the right of the Crop tool) along a line in the image that should be horizontal or vertical — perhaps the intersection of two walls or the horizon — a crop bounding box is created with that alignment. Using the Crop tool’s Custom option enables you to specify the resulting image’s dimensions in aspect ratio, pixels, inches, or centimeters. Keep in mind that the Straighten tool uses the aspect ratio currently selected for the Crop tool, so pick the aspect ratio before dragging the Straighten tool.
When you have the Crop tool’s bounding box just right and you’ve finished adjusting the image’s appearance, click the Open or Done button. Should you change your mind about cropping even after leaving Camera Raw, re-open the image into Camera Raw, click the Crop tool, hold down the mouse button to show the menu, and select Clear Crop. Or you can eliminate the bounding box (when the Crop tool is active) by pressing Delete (Mac) or Backspace (Windows).
Transform
 The new Transform tool, which is used to correct perspective, has several options: Auto, Level Correction Only, Level and Vertical Perspective Correction, Full Correction, and Guided (drag two or more lines in the image to define what should be vertical and horizontal). You also have seven sliders to correct everything from Vertical and Horizontal to Offset X and Offset Y. An optional grid can be overlaid and you can adjust the size of the grid with a slider. Best of all, however, is when you click a button and see the message “No Upright correction found.” Congrats! You took a good photo!
Spot Removal
The Spot Removal tool gives you the ability to make minor corrections right in the Camera Raw dialog box. As shown in Figure 7-5, it offers capabilities similar to the Healing Brush and the Clone Stamp, including an Opacity slider. It can be used to either heal or clone. However, the Spot Removal tool’s behavior is quite different. To use the Spot Removal tool, follow these steps:
- Set the size of the brush and click the area that you want to heal or clone over.
-
Drag to expand the tool’s diameter.
You can also set the diameter using the Size slider to the right.
-
Position the source (green) and destination (red) circles.
When you release the mouse button after setting the tool’s diameter, a pair of circles appears. Click within the green circle and drag it over the element from which you want to clone or heal. You can also drag the red circle to fine-tune the location of the destination. You can click the edge of either circle and drag to resize them both (or use the Size slider).
-
Repeat, accept, or clear.
Clicking outside the circles accepts the change and starts the next healing/cloning process. Changing tools and continuing with your adjustments accepts the changes. Clicking the Clear All button (just above Camera Raw’s Done button) deletes the changes you made with the Spot Removal tool.

FIGURE 7-5: Camera Raw’s Spot Removal tool offers both healing and cloning modes.
Pressing the forward slash key jumps the source circle to someplace that the tool thinks might be a good place from which to heal or clone. Press it repeatedly and you’ll see that the “auto patch” is more like “random patch.” It’s your image; you should decide the source location according to your artistic vision.
The Visualize Spots option at the bottom shows you a black and white version of the image, the better to see problem areas.
Red Eye Reduction
To use the Red Eye Reduction tool, drag a rectangle around the entire eye, including some surrounding skin. (See Figure 7-6.) It automatically tries to hunt down and eliminate any suspicious red eye in the rectangle. You might need to adjust the Pupil Size and Darken sliders (in the area to the right, under the Histogram) to fine-tune the adjustment, but you can also simply click and drag the edges of the box created by the Red Eye Removal tool.
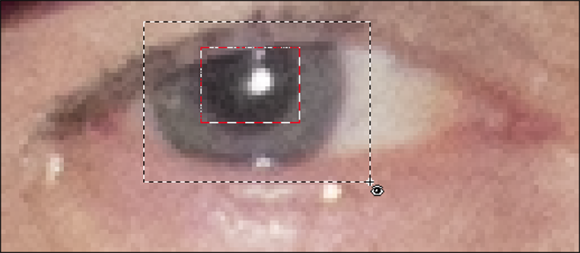
FIGURE 7-6: Minimize the haunted red eye effect right in Camera Raw.
Adjustment Brush
To make localized adjustments in specific areas of your image, select the Adjustment Brush (shown in Figure 7-7), drag the sliders, and paint in the image. You can paint a number of different adjustments (use the New button) or paint the same adjustment in different areas (use the Add button). And remember that these adjustments are only recorded in the metadata, and therefore can be changed any time down the road. It’s not quite the same as duplicating layers and using layer masks in Photoshop, but it’s still a great non-destructive way to paint adjustments!

FIGURE 7-7: Paint to make adjustments to exposure, brightness, contrast, and more.
Graduated Filter
The Graduated Filter tool enables you to set the adjustment in the area to the right, and then drag the tool in the image window. The adjustment is applied at full strength in the area before your first click, and is gradually faded through the area where you dragged (see Figure 7-8). You can add more than one graduated adjustment if necessary. Note that in the menu shown to the right in Figure 7-8, Graduated Filter also has sliders for Temperature, Tint, Exposure, and Contrast above the Highlights slider.
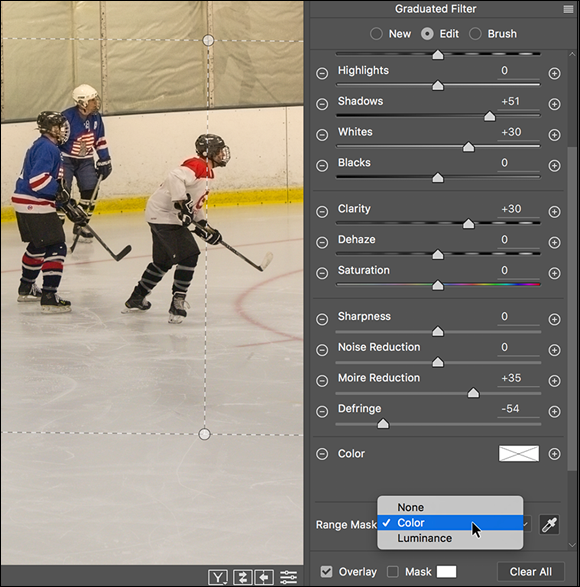
FIGURE 7-8: Like using a graduated filter when shooting, but with more control!
New is the Brush option, which enables you to paint (and erase) adjustments in the image. In addition, near the bottom of the Graduated Filter and Radial Filter options, is the new Range Mask feature. You can set it to concentrate the adjustment(s) based on luminance or color, and use sliders to control the effect. Consider, for example, adjusting the saturation of the sky behind a tree. Drag the Gradient Filter tool and you make changes to the sky and those parts of the tree within the adjustment. Range Mask can be used either to set Color or Luminance to darken the tree limbs to mask them out of the adjustment.
The Radial Filter works in much the same way as the Graduated Filter. However, as you can probably guess by its name, it uses circular or oval areas of adjustment rather than linear adjustments. Like the Graduated Filter, the Radial Filter enables you to add more than one area of adjustment. The Radial Filter also now has the Brush and Range Mask options, and the same sliders as the Graduated Filter, as well as a Feather slider that enables you to soften the edges of the adjustment.
Camera Raw Preferences
To the right of the tools are Camera Raw’s buttons to quickly open Camera Raw’s Preferences (the same as using the keyboard shortcut ⌘ +K/Ctrl+K) and to rotate the image in 90 degree increments in either direction.
Here are some options in the Preferences that you might want to consider:
- Save settings in sidecar files. This is already the default, and it’s a good one. When Camera Raw can’t record data directly to the image file’s existing metadata, you can either save everything in one central location — which means you lose everything if that database is damaged or lost — or each image you adjust can have its own
.xmpfile to hold your adjustments. Keep in mind that the DNG file format holds metadata within the DNG file itself. - Make defaults specific to camera serial number. If you shoot with more than one camera, you can use separate defaults for each of them. You can also make defaults that change based on the ISO setting with which each image was captured. Camera Raw tracks which camera is which by the serial number embedded in the image’s metadata.
- Update DNG previews. If you work with Adobe’s DNG Converter and make DNG copies of your images, doesn’t it make sense that you’d want the latest adjustments reflected in the file’s preview? (The JPEG preview is used by your computer’s operating system and other programs that can’t read DNG files.) And those previews might as well be full size, eh?
You’ll also find options in Camera Raw’s Preferences for opening JPEG and TIFF files into Camera Raw. Keep in mind that after you open an image in either format using Camera Raw, you’ll have to go through Camera Raw every time you open that image (unless, of course, you disable all support for JPEG and TIFF files in Camera Raw’s Preferences). If you ever decide you don’t want to open a particular image through Camera Raw again, use Photoshop’s Save As command to create a new copy of the picture. Or simply use Photoshop’s Filter ⇒ Camera Raw from within Photoshop for such images.
The histogram
Because of the unprocessed nature of Raw images, the histogram you see in the upper-right corner of the Camera Raw window (refer to Figures 7-1 and 7-3) is generally far more important than the Histogram panel in Photoshop itself. By keeping an eye on the histogram while you adjust sliders, you can ensure that you’re not blowing out the highlights (when the very right end of the histogram starts crawling up the edge) or clogging the shadows (the left edge gets too tall). The RGB values that you see just below the histogram represent the values of the pixel directly under the cursor when the cursor is in the preview area of the window. To toggle a preview of any “clipping” in your image, click the triangles in the upper left (shadows) and upper right (highlights) of the histogram. Any place where the shadows are being forced to pure black, losing detail that you could retain, you see a bright blue overlay. Use the Shadows and Blacks sliders to correct the problem. Anywhere that the highlights are being blown out to pure white, again losing valuable detail, click the triangle to the right and you see a bright red overlay. Use the Highlights and Whites sliders to bring the problem under control. (Using the individual sliders is discussed later in the chapter.) You can hide these clipping warnings by again clicking the triangles. The triangles change color to tell you what’s wrong or which colors are causing the problem. You might want to hide the overlays when creating special effects. (I readily admit that I often intentionally clog shadows and blow out highlights to produce special effects and to focus attention on the subject of my photos.)
The preview area
As shown previously in Figure 7-1, the bulk of the Camera Raw window is filled with the image preview, giving you the best possible view of your work. Remember that you can drag a corner or edge of the Camera Raw window to resize it. The preview area benefits/suffers from the changes that you make as you enlarge/shrink the window. To the lower left are a pop-up menu with preset zoom factors, and a pair of buttons to zoom in or out. (Don’t forget about the Zoom tool!) Camera Raw’s maximum zoom percentage is 1600%.
Workflow Options and presets
Just below the preview area in Camera Raw is a line of information including the file’s color space, color depth, dimensions, file size, and resolution. Click that line to open the Workflow Options dialog box.
Workflow Options enables you to change any of the specifications you saw in the line you clicked, add a sharpening preset, and the option to open images from Camera Raw into Photoshop as Smart Objects by default.
-
Space: Camera Raw offers the four major color spaces — Adobe RGB, ColorMatch RGB, ProPhoto RGB, and sRGB — as well as other profiles available in Photoshop. Color spaces (read about them in Chapter 6) determine which colors are available in an image.
Using the ProPhoto RGB color space gives you the widest gamut (the largest number of possible colors), which minimizes the chance of colors getting squished into each other as you work with your image. If your image has extreme colors, use ProPhoto and 16-bit color in Camera Raw, and then, if your printer can’t handle ProPhoto as a color space, choose Edit ⇒ Assign Profile to change to your required profile (Adobe RGB for inkjet printers or sRGB for images being sent to a photo lab). Select Relative Colorimetric as the rending intent. - Depth: Because a greater color depth means more possible variations in color, generally you want to select 16-bit color and either keep the image in that color depth or switch to 8-bit color later in Photoshop by choosing Image ⇒ Mode ⇒ 8-Bits/Channel. Use 8-bit color for any image that must be saved in JPEG format (including web images), or when the file size overwhelms your printer. You might also opt for 8-bit color if storage space is limited. (Chapter 6 includes a detailed explanation of color depth.) When working with a 16-bit image and in the Save As dialog box you select JPEG, Photoshop will automatically convert the image to 8-bit color when you click Save. However, you won’t see an estimate of the saved file’s size. If that’s important, convert to 8-bit color before opening Save As.
- Image Sizing: Select Resize to Fit and you can specify the resulting image size in a number of ways: Width & Height, Dimensions, Long Side, Short Side, megapixels, and Percentage.
- Resolution: Resolution is simply an instruction to a printing device about what size to make each pixel. It can be assigned in Camera Raw or later in Photoshop’s Image Size dialog box (with Resample deselected). Generally speaking, 300 ppi (now, finally, the default) is a more appropriate resolution for images that will be printed.
- Sharpen For: The Sharpen For menu provides you with presets designed for specific purposes, including on-screen presentation, inkjet prints on glossy paper, and prints on matte paper. Each category includes Low, Standard, and High options. This sharpening is in addition to the sharpening you add on Camera Raw’s Detail tab. (Generally I leave this set to None and sharpen each image according to the image’s content in Photoshop.)
- Open in Photoshop as Smart Objects: This option enables you to automatically open your Raw image into Photoshop as a Smart Object. Smart Objects, which are discussed in Chapter 10, can be scaled and transformed multiple times with minimal degradation of the image quality. And, as explained in Chapter 15, you can apply Smart Filters — filters that can be re-opened and changed — to Smart Objects.
On the subject of workflow, let me also suggest two ways that you can save loads of time when working with Camera Raw: Create your own defaults and use saved settings. If you use the same settings almost all the time, or at least start with those settings, click the button to the right of Preset at the top and select Custom. You can set up a number of different presets for various purposes.
Here’s my recommendation:
-
Open one of your typical images.
Open an image that’s well exposed and typical for what and how you shoot. Don’t open some wild image that’s three-quarters wrecked and in need of emergency surgery.
-
Adjust the image to make it look perfect.
The various adjustments are discussed in the following sections. Make all the necessary adjustments, including noise reduction and camera calibration if required.
-
Save as your new defaults.
Open the Presets menu and select Custom to create a new set of default settings.
Now when you open one of your images into Camera Raw, you’ll already have a good correction established and you’ll need to tweak the settings only a bit to adjust for the peculiarities and vagaries of that particular shot.
Remember, too, that you can save settings for each individual shoot by using Preset’s Custom option. Say, for example, that you shot on-location under difficult lighting circumstances. Rather than adjusting each image, adjust one, save the settings, and load (or apply) those settings for each additional image from that shoot that needs to be processed.
The Basic panel
When it comes to actually adjusting your images in Camera Raw, the meat-and-potatoes portion is the Basic panel. Click the leftmost of the eight adjustment tabs directly below the histogram area to open the Basic panel, which is shown in Figure 7-9.

FIGURE 7-9: The Basic panel is where you do the bulk of your image correction.
Here are some general guidelines for working in the Basic panel (but remember that each image has its own particular requirements):
- First adjust the white point. Generally, you adjust the white point (the Temperature and the Tint sliders) by clicking with the White Balance tool in some area that should be neutral and close to white. If the image doesn’t look right, click elsewhere or manually adjust the Temperature and Tint sliders.
- Adjust the exposure. Drag the Exposure slider right or left to spread the histogram across most of the space available. (Remember, these are general guidelines for typical images, not “rules.”)
- Fine-tune the shadows and highlights. Use the Highlights and Shadows sliders to adjust the relationship between the brightest pixels and the midtones and between the darkest pixels and the midtones. You can fine-tune the highlights a bit more with the Whites slider and touch up the shadows with the Blacks slider.
- Fine-tune the contrast. Drag the Contrast slider to the right to increase contrast or to the left to flatten out the image’s contrast.
- Make the image “pop” with the Clarity slider. Drag the Clarity slider to the right to increase the contrast among neighboring areas of color. Somewhat akin to sharpening, this slider can do a great job of adding life to most images.
- Tweak the colors. Using the Vibrance slider in conjunction with the Saturation slider, adjust the appearance of the color in your image. Remember that the Saturation adjustment is applied to all colors in the image, while Vibrance works primarily with the near-neutral colors.
Double-click any slider control to reset that slider to its default value. This works not only for sliders in the Basic panel, but also for sliders anywhere in Camera Raw.
As you work, the best adjustments are those that make the image look great to you and meet your creative goals. The order of adjustments and the histogram suggestions here are not appropriate for all images. Let your artistic sense be your guide.
The Tone Curve panel
The second tab in Camera Raw, just to the right of the Basic tab, presents you with a pair of ways to adjust the histogram using curves. (See Figure 7-10.) In the Tone Curve panel, you have two tabs: Parametric and Point. The first thing to know about the Tone Curve adjustments is that they are in addition to changes you make on the Basic tab. All changes are cumulative — dragging sliders in the Parametric panel, for example, won’t change the sliders on the Basic tab.
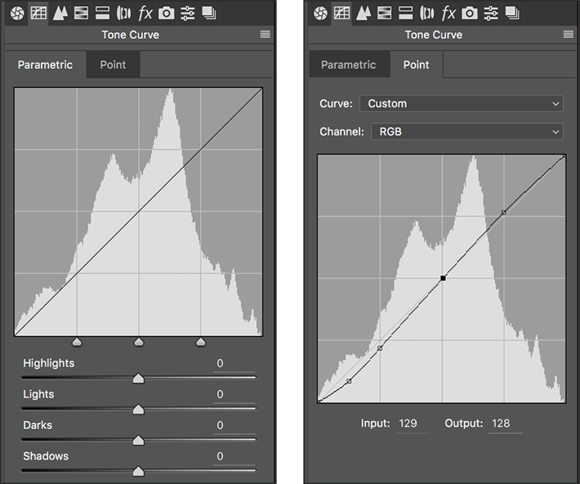
FIGURE 7-10: You make changes to tonality on the Tone Curve tab.
In the Parametric panel, you adjust four sliders to control various parts of the tonal range. The three sliders immediately below the curve itself govern the pivot points around which the sliders bend the curve. The two outer sliders govern what part of the tonal range is affected by the Shadows and Highlights sliders, and the middle slider controls the relationship between the Darks and Lights sliders.
The Point panel of the Tone Curve tab is quite similar to the Curves adjustment in Photoshop: Click the curve to add an anchor point; drag up and down to adjust that part of the tonal range. You can add up to 14 separate points to the curve. Click an anchor point to make it active (it appears as a solid point rather than hollow), and you can use the Input and Output fields to adjust the point numerically, or use the arrow keys to change the point’s location. You can also choose a preset from the Curve menu as a starting point and, if desired, adjust each of the RGB channels individually.
So, you might ask yourself, “Should I use the Basic tab, the Tone Curve tab, or both?” And the answer is, “Yes, you should use the Basic tab, or the Tone Curve tab, or both.” You might find that you’re more comfortable using one curve or the other rather than the Blacks, Brightness, and Contrast sliders on the Basic tab. Or you might find that for one particular image, you want to make large adjustments with one set of sliders and fine-tune with the other.
The Detail panel
Nine sliders on the Detail tab (as shown in Figure 7-11) control sharpness and noise in your image. I suggest that as soon as you click the Detail tab, you zoom in to 200% or even 400% on an area of shadow in your image and drag the sliders all the way to the left, setting them to 0 (zero). Rather than working from the top down, as you do in most Camera Raw panels, I generally suggest reducing noise before sharpening. Drag the Color Noise Reduction slider slowly to the right until all red/green/blue specks in the shadows disappear. Next, drag the Luminance slider to the right until the bright specks in your shadows are reduced but not so far to the right that detail in your image is damaged. Use the Luminance Detail, Luminance Contrast, and Color Detail sliders in conjunction with the Luminance and Color sliders to minimize the loss of detail. Note the new Color Smoothness slider that keeps the color and color detail adjustments from becoming too sharp (or sharper).
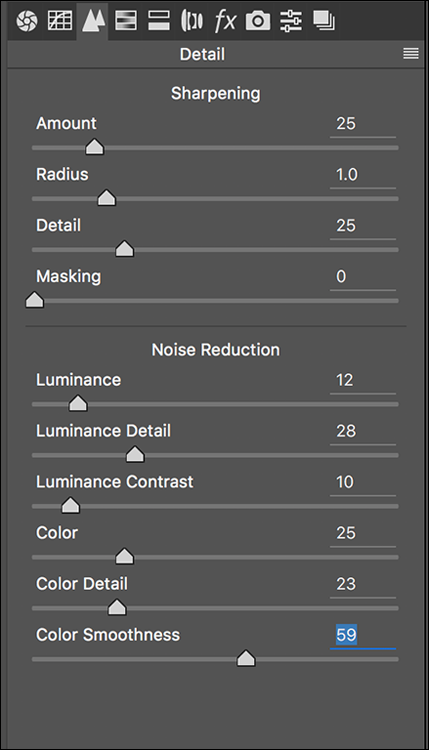
FIGURE 7-11: Reducing noise and smoothing luminance can greatly improve shadow areas.
Sharpening in Camera Raw has developed so much that it’s actually perhaps better than sharpening in Photoshop. Rather than a single slider, you now have four sliders with which to perfect your images:
- Amount: The Amount slider is the basic how-much-sharpening-am-I-adding slider. You might consider “sharpening” to be creating bright and dark “halos” along edges in the image. Amount refers to the brightness/darkness of those halos. The slider ranges from zero to 150.
- Radius: The Radius slider controls the width of the “halos” along the edges. Higher is wider, up to a maximum of 3 pixels.
- Detail: Use the Detail slider to control how large an edge has to be to get included in the sharpening process. Leave it at zero and only major edges in the image are sharpened. Drag the slider all the way to the right, to 100, and everything in the image gets sharpened, every pore, each grain of sand — even the remains of any digital noise you want to hide.
- Masking: The Masking slider, used in conjunction with the Detail slider, can help protect the smallest detail in the image from becoming over-sharpened and garish. The farther to the right you drag the slider, the more tiny detail is excluded.
Here’s the coolest part: Zoom in to at least 100% and hold down the Option/Alt key while dragging any of the Sharpening sliders — you’ll see a grayscale preview of what you’re actually doing to your image!
Figure 7-12 shows three views of the same image: The unsharpened original (top), the Sharpening sliders set to Amount–85, Radius–1.0, Detail–55, and Masking–5 (middle), and the preview of the Detail adjustment (bottom).

FIGURE 7-12: Hold down the Option/Alt key while dragging to preview the sharpening.
HSL, grayscale, and split toning
Working with options on three tabs, Camera Raw’s HSL/Grayscale feature gives you incredible control over hue, saturation, and luminance (HSL) of specific color ranges in your image. Need to perk up the reds in your image? Not a problem — just boost the Reds slider in Saturation and Luminance! Yellows a bit too garish? Tone ’em down with the Yellows slider. Maybe the green grass looks a bit yellow. Drag the Greens slider halfway to the right on the Hue tab. You can control each of the eight major color ranges independently (as shown in Figure 7-13).

FIGURE 7-13: Grayscale greenery contrasts nicely with highly saturated blooms.
A fourth tab, Grayscale Mix, appears only when the Convert to Grayscale check box is selected. With the Convert to Grayscale option selected, you control the contribution of each range of color to the final grayscale image. Use the Basic tab’s Exposure, Blacks, Brightness, and Contrast sliders to control the overall appearance of the image.
The Saturation tab also enables you to create partial grayscale images quite easily. Drag some sliders to the left to make those areas of color grayscale; drag others to the right to enhance the remaining colors. Figure 7-13 shows an excellent candidate for this partial-grayscale technique.
The Split Toning tab is generally used in conjunction with the Convert to Grayscale option HSL/Grayscale tab. (Although you can use it to make adjustments to highlights or shadows, you would generally remove or introduce a color cast on the Basic tab with the Temperature and Tint sliders.) Think of split toning as creating a sepia or Duotone version of an image. As you can see in Figure 7-14, you have separate controls for adjusting the highlights and shadows. Select a different hue for each and adjust the saturation independently. The Balance slider allows you to control what part of the tonal range is considered a highlight or shadow.

FIGURE 7-14: A photo of a bland building in front of an overcast sky is improved with split toning.
To create a sepia effect, start with a value of 40 in both of the Highlights fields and perhaps +30 for Balance. Use a Shadow saturation value of 0 (and because saturation is set to 0, it doesn’t matter what value you select for the Hue slider). Remember, too, that you can select the same hue for both Highlights and Shadows to create a monochrome effect.
Compensating with Lens Corrections
Use the Lens Corrections tab’s controls to compensate for certain undesirable characteristics of your lens. (See Figure 7-15.) Click the Profile tab within Lens Corrections, select the Enable Profile Corrections check box and let Camera Raw fine-tune your image based on a database of lenses. You can further adjust for pin cushioning (the center of the image looks too far away) and barrel distortion (the center seems to be bulging) with the Distortion slider. The Vignetting slider is used for excessive shadowing or brightening in the corners of the image. (Use this slider only to correct for unwanted vignetting. If you want to add a vignette, use the Post Crop Vignetting section of the Effects pane, discussed in the next section.)

FIGURE 7-15: Correct aberrations created by a lens using a preset and/or manually.
The Manual tab in the Lens Corrections panel can be used when there’s no profile available. It can also supplement auto corrections made on the Profile tab. It offers sliders for adjusting distortion, fringing, and vignetting. Both the Profile and Manual tabs have the option of showing a grid over the image as you make your adjustments.
Adding special effects
The Effects pane of Camera Raw, shown in Figure 7-16, is used to dehaze (remove any fog-like softening of the image), add simulated film grain and vignette effects. Instead of using Photoshop’s Artistic ⇒ Film Grain or Texture ⇒ Grain filters, you may choose to simulate grain in Camera Raw. (Or perhaps you won’t add any film grain. Ever. Especially after you worked so hard to minimize noise in your images. Your digital images.) The Post Crop Vignetting sliders are used to add a dark or light vignette effect (unlike the Vignette slider discussed in the preceding section, which is used to remove a vignette.) You can add a vignette before or after working with the Straighten and Crop tools. For both Grain and Post Crop Vignetting, adjust the Amount slider first to activate the other sliders. Experiment with the three options in the Style menu to see which type of vignette best suits your artistic vision.

FIGURE 7-16: Simulate film grain and vignettes in the Effects panel.
Camera profiles, presets, and snapshots
Generally you’ll skip the Camera Calibration tab completely, with one exception: Make sure that the Process menu is set to the latest version, “Version 4 (Current)” (or later when an update is available), to take advantage of the improvements in this version of Camera Raw. You might, however, want to use the Camera Calibration tab to compensate for what you perceive to be regular and consistent deviation in your particular camera’s behavior. You might, under some circumstances, want to use the sliders on the Camera Calibration tab (see Figure 7-17) to reduce a color cast, an unwanted color tint in the image. Use very small adjustments!

FIGURE 7-17: The Camera Calibration sliders might be useful for correcting a color cast.
If your particular camera model has had multiple profiles created, you’ll see them listed in the Name menu. These camera profiles correlate to the in-camera settings you may have selected when capturing the image. (The content of the menu varies from one camera model to the next.)
Camera Raw’s Presets tab simply stores a convenient list of your saved presets. Any time you use the Save Settings command from the menu to the right of the tabbed area or click the New Preset button in the lower-right of the Presets panel, your preset is added to the list for convenient one-click application. To use Saved Settings, open an image in Camera Raw, open the Presets panel, click the preset and click Open Image/Open Object or Done. Click the Trash button in the lower right to delete any no-longer-needed preset.
You may find the Snapshots panel to be very useful, especially when you’re working on perfecting a particularly difficult image. While you’re working on an image, if you think you’ve reached a good spot but want to continue playing around with the image, open the Snapshots panel and click the New Snapshot button to the lower right. Name the snapshot (using a name that will actually mean something to you later) and then continue adjusting the image. If later you decide to return to the snapshot, simply select it in the panel. The snapshots are saved in the file’s metadata, so you can always open the image into Camera Raw and select them sometime down the road. Snapshots are also a great way to save variations of an image for different purposes! (Remember to hold down the Option/Alt key and click Open Copy if you’ve monkeyed around with a great-looking image and don’t want to override the saved settings.)
The Camera Raw buttons
In the lower-left and lower-right corners of Camera Raw are four buttons, three of which have hidden features that you access by pressing the Option/Alt key:
- Save Image …/Save Image: After making your adjustments, click the Save Image … button to save a copy of the image as a DNG, JPEG, TIFF, or PSD file. Option/Alt+click to bypass the Save Options dialog box and simply save the image using the most recently selected options. If more than one image is open, the buttons are Save Images … /Save Images.
- Open Image/Open Copy (or Open Object/Open Copy): After making your adjustments, click Open to update the file’s metadata and open the image in Photoshop itself. Holding down Option/Alt changes the button to Open Copy, which opens the image without updating the metadata. You might use Open Copy when creating a second version of the image while preserving your exactingly precise original adjustments. (Remember that a simple change in the Workflow Options — which you open by clicking the blue information line under the preview — enables you to automatically open an image from Camera Raw into Photoshop as a Smart Object.) If more than one image is open, the buttons show the plurals, Images, Objects, and Copies.
- Cancel/Reset: Clicking Cancel closes the Camera Raw window without making any changes to the image’s metadata. Holding down the Option/Alt key changes the button to Reset, which restores the settings seen when you first opened the image in Camera Raw.
- Done: The Done button, with or without the Option/Alt key, simply updates the image’s metadata with the adjustments you’ve made and closes Camera Raw without opening the image.