
Chapter 5
Taking Advantage of the Proofing Tools
IN THIS CHAPTER
![]() Fixing spelling and grammatical errors
Fixing spelling and grammatical errors
![]() Finding text — and replacing it if you want
Finding text — and replacing it if you want
![]() Looking for a better word in the thesaurus
Looking for a better word in the thesaurus
![]() Working with and translating foreign language text
Working with and translating foreign language text
I was going to call this chapter “Foolproofing Your Work,” but that seemed kind of presumptuous because keeping every error from slipping into your work is well-nigh impossible. Still, you can do a good job of proofing your work and eliminating errors by using the tools that Word provides for that purpose. This chapter describes how to proof your work for spelling and grammatical errors. It shows how to find text, and if you’re so inclined, find and replace text. You also discover how to translate text and proof foreign language text. The proofing tools are not foolproof, but they’re close to it.
 The F7 key is the key to the kingdom when it comes to proofing Word documents. Here is the magic of pressing F7 and various key combinations:
- F7: Run a spell check.
- Alt+F7: Scroll to the next misspelling.
- Shift+F7: Open the Thesaurus.
Correcting Your Spelling Errors
Word keeps a dictionary in its hip pocket, which is a good thing for you. Who wants to be embarrassed by a spelling error? Word consults its dictionary when you enter text in a document. To correct misspellings, you can either address them one at a time or start the spell checker and proof many pages simultaneously.
 Don’t trust the smell checker to be accurate all the time. It doesn’t really locate misspelled words — it locates words that aren’t in its dictionary. For example, if you write “Nero diddled while Rome burned,” the spell checker doesn’t catch the error. Nero fiddled while Rome burned, but because diddle is a legitimate word in the spelling dictionary, the spell checker overlooks the error. The moral: Proofread your documents carefully and don’t rely on the spell checker to catch all your smelling errors.
Correcting misspellings one at a time
One way to handle misspelled words is to use the one-at-a-time method of spell checking. As shown in Figure 5-1, you can right-click each word that is underlined in red and choose a correct spelling from the Spelling shortcut menu. After you choose a word from the shortcut menu, it replaces the misspelling that you right-clicked.

FIGURE 5-1: Right-click a word underlined in red to correct a typo or repeated word.
You can also click Ignore All on the Spelling shortcut menu to tell Word when a word is correctly spelled and shouldn’t be flagged, or click Add to Dictionary, which adds the word to the Office spelling dictionary and declares it a correctly spelled word.
Words entered twice are also flagged in red, in which case the Spelling shortcut menu offers the Delete Repeated Word option so that you can delete the second word (see Figure 5-1).
Running a spell check
Instead of correcting misspellings one at a time, you can run a spell check on your work. Start your spell check with one of these methods:
- Press F7.
- Go to the Review tab and click the Check Document button.
- On the status bar, click the Proofing Errors button. (Move the pointer over this button to see a pop-up message that tells you whether Word has found proofing errors in your document.)
You see the Editor task pane. Under Corrections, it declares how many spelling and grammar errors are in your document. Select Spelling in the task pane to see suggestions for correcting a misspelling, as shown in Figure 5-2.

FIGURE 5-2: Correcting a misspelling in the Editor task pane.
Here are options for correcting known misspellings in the Editor task pane:
- Select the correct spelling.
- Click in the page you’re working on and correct the misspelling there; then click the Resume button in the Editor task plane.
If the word in question isn’t a misspelling, tell Word how to handle the word by choosing one of these options:
- Ignore Once: Ignores this instance of the misspelling but stops on it again if the same misspelling appears later.
- Ignore All: Ignores the misspelling throughout the document you’re working on and in all other open documents as well.
- Delete Repeated Word: Deletes the second word in a pair of repeating words.
- Add to Dictionary: Adds the misspelling to the Office spelling dictionary. By choosing this option, you tell Word that the misspelling is a legitimate word or name.
 Word offers the Change All option to correct a misspelling that occurs throughout a document. In the Editor task pane, open the drop-down menu on a spelling suggestion and choose Change All on the shortcut menu to correct all instances of a misspelling. The Change All option is also available when you right-click a misspelled word. On the menu that appears when you right-click, open a spelling suggestion’s shortcut menu and choose Change All.
Office programs share the same spelling dictionary. For example, words you add to the spelling dictionary in Word are deemed correct spellings in PowerPoint presentations, Excel spreadsheets, Publisher publications, Access databases, and Outlook emails.
Preventing text from being spell checked
Spell checking address lists, lines of computer code, and foreign languages such as Spanglish for which Microsoft doesn’t offer foreign language dictionaries is a thorough waste of time. Follow these steps to tell the spell checker to ignore text:
- Select the text.
In the Review tab, click the Language button and choose Set Proofing Language on the drop-down list.
You see the Language dialog box.
- Select the Do Not Check Spelling or Grammar check box.
- Click OK.
Correcting Grammatical Errors
Much of what constitutes good grammar is, like beauty, in the eye of the beholder. Still, you can do your best to repair grammatical errors in Word documents by getting the assistance of the grammar checker. The grammar checker identifies grammatical errors, explains what the errors are, and gives you the opportunity to correct the errors.
Word identifies grammatical errors by underlining them in blue. To correct grammatical errors:
- Correct errors one at a time. Right-click and choose an option on the Grammar shortcut menu, as shown in Figure 5-3.
- Open the Editor task pane. Press F7, click the Check Document button on the Review tab, or click the Proofing Errors button on the status bar. The Editor task pane opens. Select Grammar in the task pane and select an option under Suggestions.

FIGURE 5-3: Fix grammatical errors with the grammar checker.
If you want to fine-tune how Word runs its grammar checker, go to the File tab and choose Options, and in the Word Options dialog box, go to the Proofing category. Under When Correcting Spelling and Grammar in Word, choose whether to mark grammatical errors with blue lines, and in the Writing Style drop-down list, how stringent you want the rules of grammar to be.
Finding and Replacing Text
Use the Find command to locate a name or text passage. Use its twin, the powerful Replace command, to find and replace a name or text passage throughout a document. For an idea of how useful the Replace command is, imagine that the company you work for just changed its name and the old company name is in many different places. By using the Replace command, you can replace the old company name with the new name throughout a long document in a matter of seconds.
The basics: Finding stray words and phrases
To locate stray words, names, text passages, and formats, follow these basic steps:
Press Ctrl+F or go to the Home tab and click the Find button.
The Navigation pane appears so that you can enter search criteria in the Results tab, as shown in Figure 5-4.
Enter the word or phrase in the Search text box.
After you enter the word or phrase, the Navigation pane lists each instance of the term you’re looking for and the term is highlighted in your document wherever it is found (see Figure 5-4).
If you want to conduct a narrow search, click the Search for More Things button — located to the right of the Search text box in the Navigation pane — and make a choice on the drop-down list.
Later in this chapter, “Narrowing your search” explains how to make searches more efficient by choosing options on this drop-down list.
Click an instance of the search term in the Navigation pane to scroll to a location in your document where the search term is located.
To go from search term to search term, you can also scroll in the Navigation pane, click the Previous button or Next button (located below the Search text box), or press Ctrl+Page Up or Ctrl+Page Down.
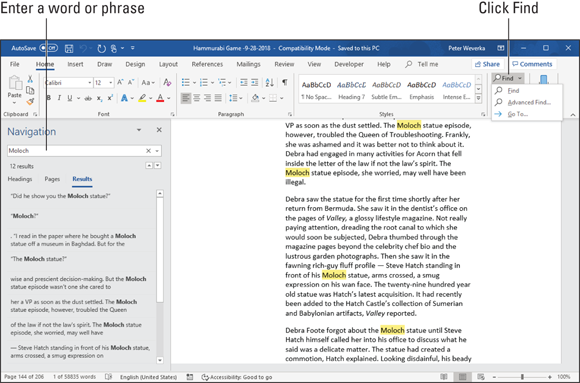
FIGURE 5-4: Conducting a Find operation in Word.
Narrowing your search
To narrow your search, click the Search for More Things button in the Navigation pane, as shown in Figure 5-5. Then choose an option on the drop-down list:
- Options: Opens the Find Options dialog box so that you can select options to narrow your search. Table 5-1 explains these options.
- Advanced Find: Opens the Find tab of the Find and Replace dialog box so that you can select options to narrow the search. Table 5-1 explains these options. (You can also open this dialog box on the Home tab by opening the drop-down menu on the Find button and choosing Advanced Find.) Choose Advanced Find if you want to search using font, paragraph, and other formats as well as advanced search criteria. By clicking the Format button and Special button, you can search for text that was formatted a certain way, as well as for special characters such as paragraph marks and page breaks.
- Find (Graphics, Tables, Equations, Footnotes/Endnotes, Comments): Search for a particular object type. For example, choose Tables to search for tables.

FIGURE 5-5: Conducting a narrow search.
TABLE 5-1 Search Options in the Find Options and Find and Replace Dialog Box
Option |
Description |
Match Case |
Searches for words with upper- and lowercase letters that exactly match those in the search text box. When the Match Case option is selected, a search for bow finds bow, but not Bow or BOW. |
Find Whole Words Only |
Normally, a search for bow yields elbow, bowler, bow-wow, and all other words with the letters b-o-w (in that order). Choose this option and you get only bow. |
Use Wildcards |
Choose this option to use wildcards in searches. (See “Using wildcard operators to refine searches,” later in this chapter.) |
Sounds Like |
Search for words that sound like the one in the Search text box. A search for bow with this option selected finds beau, for example. However, it doesn’t find bough. This command isn’t very reliable. |
Find All Word Forms |
Takes into account verb conjugations and plurals in searches. With this option, you get bows, bowing, and bowed as well as bow. |
Highlight All1 |
Highlights search results on the page. (Click the Reading Highlight button in the Find and Replace dialog box.) |
Incremental Find1 |
Searches for and highlights text as you type it in the Search text box. |
Match Prefix |
A prefix is a syllable appearing before the root or stem of a word to alter its meaning. For example, co, mid, non, and un are prefixes in the words coauthor, midtown, nonviolent, and unselfish. Choose this option and enter a prefix in the Find What text box to locate words that begin with the prefix you enter. |
Match Suffix |
A suffix is a syllable or two appearing at the end of a word that alters its meaning. For example, age, ish, and ness are suffixes in the words spillage, smallish, and darkness. Choose this option and enter a suffix in the Find What text box to find words that end with the same suffix. |
Ignore Punctuation Characters |
Search in text for word phrases without regard for commas, periods, and other punctuation marks. For example, a search for Yuma Arizona finds Yuma, Arizona (with a comma) in the text. |
Ignore White Space Characters |
Search in text for word phrases without regard for white space caused by multiple blank spaces or tab entries. |
Format (button)2 |
Search for text formatted a certain way. For example, search for boldface text. After you click the Format button in the Find and Replace dialog box, you can choose a format type on the drop-down list — Font, Paragraph, Tabs, Language, Frame, Style, or Highlight. A Find dialog box opens so that you can describe the format you’re looking for. Select options in the dialog box to describe the format and click OK. |
Special (button)2 |
Search for special characters such as paragraph marks and em dashes. (See “Searching for special characters,” later in this chapter.) |
1Find Options dialog box only
2Find and Replace dialog box only
Click the More button in the Find and Replace dialog box to see all the search options.
After you finish conducting a search for formatted text, don’t forget to click the No Formatting button in the Find and Replace dialog box. (You can’t conduct a normal search again unless you turn format searching off.)
Using wildcard operators to refine searches
Word permits you to use wildcard operators in searches. A wildcard operator is a character that represents characters in a search expression. Wildcards aren’t for everybody. Using them requires a certain amount of expertise, but after you know how to use them, wildcards can be invaluable in searches and macros. Table 5-2 explains the wildcard operators that you can use in searches. Click the Use Wildcards check box if you want to search using wildcards.
TABLE 5-2 Wildcards for Searches
Operator |
What It Finds |
Example |
? |
Any single character |
b?t finds bat, bet, bit, and but. |
* |
Zero or more characters |
t*o finds to, two, and tattoo. |
[xyz] |
A specific character, x, y, or z |
t[aeiou]pper finds tapper, tipper, and topper. |
[x-z] |
A range of characters, x through z |
[1-4]000 finds 1000, 2000, 3000, and 4000, but not 5000. |
[!xy] |
Not the specific character or characters, xy |
p[!io]t finds pat and pet, but not pit or pot. |
< |
Characters at the beginning of words |
<info finds information, infomaniac, and infomercial. |
> |
Characters at the end of words |
ese> finds these, journalese, and legalese. |
@@ |
One or more instances of the previous character |
sho@@t finds shot and shoot. |
{n} |
Exactly n instances of the previous character |
sho{2}t finds shoot but not shot. |
{n,} |
At least n instances of the previous character |
^p{3,} finds three or more paragraph breaks in a row, but not a single paragraph break or two paragraph breaks in a row. |
{n,m} |
From n to m instances of the previous character |
10{2,4} finds 100, 1000, and 10000, but not 10 or 100000. |
You can’t conduct a whole-word-only search with a wildcard. For example, a search for f*s not only finds fads and fits but also all text strings that begin with f and end with s, such as for the birds. Wildcard searches can yield many, many results and are sometimes useless.
To search for an asterisk (*), question mark (?), or other character that serves as a wildcard search operator, place a backslash () before it in the text box.
Searching for special characters
Table 5-3 describes the special characters you can look for in Word documents. To look for the special characters listed in the table, enter the character directly in the text box or click the Special button in the Find and Replace dialog box, and then choose a special character from the pop-up list. Be sure to enter lowercase letters. For example, you must enter ^n, not ^N, to look for a column break. Note: A caret (^) precedes special characters.
TABLE 5-3 Special Characters for Searches
To Find/Replace |
Enter |
Manual Formats That Users Insert |
|
Column break |
^n |
Field1 |
^d |
Manual line break (↵) |
^l |
Manual page break |
^m |
No-width non break |
^z |
No-width optional break |
^x |
Paragraph break (¶) |
^p |
Section break1 |
^b |
Section character |
^% |
Tab space (→) |
^t |
Punctuation Marks |
|
1/4 em space |
^q |
Caret (^) |
^^ |
Ellipsis |
^i |
Em dash (—) |
^+ |
En dash (–) |
^= |
Full-width ellipses |
^j |
Nonbreaking hyphen |
^~ |
Optional hyphen |
^- |
White space (one or more blank spaces) 1 |
^w |
Characters and Symbols |
|
Foreign character |
You can type foreign characters in the Find What and Replace With text boxes. |
ANSI and ASCII characters and symbols |
^nnnn, where nnnn is the four-digit code |
Any character1 |
^? |
Any digit1 |
^# |
Any letter1 |
^$ |
Clipboard contents2 |
^c |
Contents of the Find What box2 |
^& |
Elements of Reports and Scholarly Papers |
|
Endnote mark1 |
^e |
Footnote mark1 |
^f |
Graphic1 |
^g |
1 For use in find operations only
2 For use in replace operations only
Before searching for special characters, go to the Home tab and click the Show/Hide ¶ button. That way, you see special characters — also known as hidden format symbols — onscreen when Word finds them.
Creative people find many uses for special characters in searches. The easiest way to find section breaks, column breaks, and manual line breaks in a document is to enter ^b, ^n, or ^l, respectively, and start searching. By combining special characters with text, you can make find-and-replace operations more productive. For example, to replace all double hyphens (--) in a document with em dashes (—), enter -- in the Find What text box and ^m in the Replace With text box. This kind of find-and-replace operation is especially useful for cleaning documents that were created in another application and then imported into Word.
Conducting a find-and-replace operation
Conducting a find-and-replace operation is the spitting image of conducting a find operation. Figure 5-6 shows the Replace dialog box, the place where you declare what you want to find and what to replace it with. Do the options and buttons in the dialog box look familiar? They do if you read the previous handful of pages about searching because the Replace options are the same as the Find options.

FIGURE 5-6: Using the powerful Replace command.
The key to a successful find-and-replace operation is making sure you find exactly what you want to find and replace. One way to make sure that you find the right text is to start by running a find operation. If the program finds precisely the text you want, you’re in business. Click the Replace tab in the Find and Replace dialog box and then enter the replacement text.
To locate and replace words, names, or text passages with the Find command, follow these steps:
Press Ctrl+H or go to the Home tab and click the Replace button.
The Find and Replace dialog box appears (see Figure 5-6).
Describe the text that needs replacing.
Earlier in this chapter, “The basics: Finding stray words and phrases” explains how to construct a search. Try to narrow your search so you find only the text you’re looking for.
Click the Find Next button.
Did your program find what you’re looking for? If it didn’t, describe the search again.
Enter the replacement text in the Replace With text box.
You can select replacement text from the drop-down list.
Either replace everything simultaneously or do it one at a time.
Click one of these buttons:
- Click Replace All to make all replacements in an instant.
- Click Find Next and then either click Replace to make the replacement or Find Next to bypass it.
Click the Replace All button only if you are very, very confident that the thing your program found is the thing you want to replace.
Be sure to examine your document after you conduct a find-and-replace operation. You never know what the powerful Replace command will do. If the command makes a hash of your document, click the Undo button.
Finding the Right Word with the Thesaurus
If you can't find the right word or if the word is on the tip of your tongue but you can't quite remember it, you can always give the Thesaurus a shot. To find synonyms for a word, start by right-clicking the word and choosing Synonyms on the shortcut menu, as shown in Figure 5-7. With luck, the synonym you’re looking for appears on the submenu, and all you have to do is click to enter the synonym. Usually, however, finding a good synonym is a journey, not a Sunday stroll.

FIGURE 5-7: Searching for a synonym by right-clicking.
To search for a good synonym, click the word in question and open the Thesaurus task pane with one of these techniques:
- Press Shift+F7.
- Right-click the word and choose Synonyms ⇒ Thesaurus.
- Go to the Review tab and click the Thesaurus button.
The Thesaurus task pane opens, as shown in Figure 5-8. It offers a list of synonyms and sometimes includes an antonym or two at the bottom. Now you’re getting somewhere:
- Choosing a synonym: Move the pointer over the synonym you want, open its drop-down list, and choose Insert.
- Finding a synonym for a synonym: If a synonym intrigues you, click it. The task pane displays a new list of synonyms.
- Searching for antonyms: If you can’t think of the right word, type its antonym in the text box and then look for an “antonym of an antonym” in the task pane.

FIGURE 5-8: Searching for a synonym in the Thesaurus task pane.
Proofing Text Written in a Foreign Language
In the interest of cosmopolitanism, Word gives you the opportunity to make foreign languages a part of documents. To enter and edit text in a foreign language, start by installing proofing tools for the language. With the tools installed, you tell Word where in your document a foreign language is used. After that, you can spell check text written in the language.
To spell check text written in Uzbek, Estonian, Afrikaans, and other languages apart from English, French, and Spanish, you have to obtain additional proofing tools from Microsoft. These can be obtained at the Microsoft Download Center at www.microsoft.com/en-us/download (enter proofing tools in the Search box). Proofing tools include a spell checker, grammar checker, thesaurus, hyphenator, AutoCorrect list, and translation dictionary, but not all these tools are available for every language.
Telling Office which languages you will use
Follow these steps to inform Word that you will use a language or languages besides English in your documents:
On the Review tab, click the Language button and choose Language Preferences.
The Word Options dialog box opens to the Language category.
- Open the Add Additional Editing Languages drop-down list, select a language, and click the Add button to make that language a part of your documents.
Click OK.
A message box tells you to restart Office. Better do what it says.
Marking text as foreign language text
The next step is to tell Office where in your document you’re using a foreign language. After you mark the text as foreign language text, Office can spell check it with the proper dictionaries. Follow these steps to mark text so that Office knows in which language it was written:
- Select the text that you wrote in a foreign language.
- Go to the Review tab.
Click the Language button and choose Set Proofing Language on the drop-down list.
You see the Language dialog box, as shown in Figure 5-9.
- Select a language and click OK.

FIGURE 5-9: Identifying foreign language words for spell checking.
The status bar along the bottom of the screen tells you which language was assigned to text in a document. Click a word and glance at the status bar if you aren’t sure which language was assigned to text.
Translating Foreign Language Text
Office offers a gizmo for translating words and phrases from one language to another. The translation gizmo gives you the opportunity to translate single words and phrases as well as entire documents, although, in my experience, it is good only for translating words and phrases. To translate an entire document, you have to seek the help of a real, native speaker.
Follow these steps to translate foreign language text:
- Select the word or phrase that needs translating.
On the Review tab, click the Translate button and choose a Translate option on the drop-down list.
Office offers these ways to translate words:
- Translate Selected Text: The Translator task pane opens, as shown in Figure 5-10. Click the Insert button to replace the original text with the translated text. If Word failed to detect the language that needs translating, open the From drop-down menu and choose a different language.
- Translate Document: The Translator task pane opens, and if Word is able, the translation is made and entered into a new document. If Word can’t detect the language that needs translating, open the From drop-down menu, choose a language, and click the Translate button.

FIGURE 5-10: Use the Translator task pane to translate a word or phrase.