
Chapter 3
Entering the Text
IN THIS CHAPTER
![]() Entering and changing the font, size, and color of text
Entering and changing the font, size, and color of text
![]() Creating text boxes and text box shapes
Creating text boxes and text box shapes
![]() Creating bulleted and numbered lists
Creating bulleted and numbered lists
![]() Placing footers and headers on slides
Placing footers and headers on slides
This chapter explains how to change the appearance of text, create text boxes, and create text box shapes. I solve the riddle of what to do when text doesn’t fit in a text box or text placeholder frame. You also discover how to align text, handle bulleted and numbered lists, and put footers and headers on all or some of the slides in your presentation.
By the time you finish reading this chapter, if you read it all the way through, you will be one of those people others turn to when they have a PowerPoint question about entering text on slides. You’ll become a little guru in your own right.
Entering Text
No presentation is complete without a word or two, which is why the first thing you see when you add a new slide to a presentation are the words “Click to add text.” As soon as you “click,” the words of instruction disappear, and you’re free to enter a title or text of your own. Most slides include a text placeholder frame at the top for entering a slide title; many slides also have another, larger text placeholder frame for entering a bulleted list.
As shown in Figure 3-1, the easiest way to enter text on slides is to click in a text placeholder frame and start typing. The other way is to switch to Outline view and enter text in the Slides pane (see Figure 3-1).

FIGURE 3-1: Ways of entering text.
Enter text on slides the same way you enter text in a Word document — by wiggling your fingers over the keyboard. While you’re at it, you can change fonts, the font size of text, and the color of text, as the following pages explain. (Chapter 1 of this minibook describes how to get the text for slides from the headings in a Word document; Book 1, Chapter 2 explains everything a sane person needs to know about handling fonts.)
Choosing fonts for text
If you aren’t happy with the fonts in your presentation, you have two ways to remedy the problem:
- Dig in and choose new fonts on a slide-by-slide basis. Select the text, go to the Home tab, and choose a font from the Font drop-down list or the Font dialog box.
- Choose a new font on a master slide to change fonts throughout your presentation. Chapter 2 of this minibook explains master slides and how you can use them to change formats simultaneously on many slides. In Slide Master view, select a master slide and change its fonts on the Home tab.
 Embed the fonts in your presentation if you intend to share it with others and you want to preserve the fonts you chose. To embed fonts, go to the File tab and choose Options. On the Save tab of the Options dialog box, select Embed Fonts in File. As well, select Embed All Characters if others co-edit your file and you don’t want them to override your font selections.
Changing the font size of text
For someone in the back row of an audience to be able to read text in a PowerPoint presentation, the text should be no smaller than 28 points. Try this simple test to see whether text in your presentation is large enough to read: Stand five or so feet from your computer and see whether you can read the text. If you can’t read it, make it larger.
Go to the Home tab and select the text whose size you want to change. Then use one of these techniques to change font sizes:
- Font Size drop-down list: Open this list and choose a point size. To choose a point size that isn’t on the list, click in the Font Size text box, enter a point size, and press Enter.
- Font dialog box: Click the Font group button to open the Font dialog box. Then either choose a point size from the Size drop-down list or enter a point size in the Size text box and click OK.
- Increase Font Size and Decrease Font Size buttons: Click these buttons (or press Ctrl+Shift+> or Ctrl+Shift+<) to increase or decrease the point size by the next interval on the Font Size drop-down list. Watch the Font Size list or your text and note how the text changes size. This is an excellent technique when you want to ”eyeball it” and you don’t care to fool with the Font Size list or Font dialog box.
Changing the look of text
For the daring and experimental, PowerPoint offers about a hundred different ways to change the look of text. You can change colors, make the text glow, and make the text cast a shadow, among other things.
Select the text that needs a makeover and then use one of these techniques to change its appearance:
- Changing color: On the Home tab, open the drop-down list on the Font Color button and choose a color. You can also click the Font group button to open the Font dialog box and choose a color there.
- Choosing text fills, outlines, and effects: On the Design tab, click the Format Background button and then select Text Options in the Format Shape pane. As shown in Figure 3-2, the Format Shape pane offers many ways to change the appearance of text:
- Text Fill: Show the text in gradients, textures, or patterns. You can assign a transparent color to text by choosing a color and dragging the Transparency slider.
- Text Outline: Change the text outline — the outermost lines that form the letters and numbers. Try this: Under Text Fill, choose the No Fill option, and then choose a solid line as the text outline (refer to Figure 3-2).
- Text Effects: Give the letters and numbers a shadow, a reflection, a glow, a softer edge, or another dimension. Before you experiment with these commands, try choosing an option on the Presets menu. Preset options demonstrate what these text effects can do and give you a head start in fashioning a text effect.
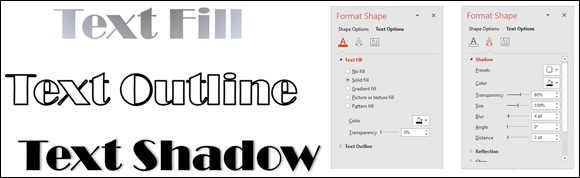
FIGURE 3-2: The Format Shape pane offers many commands for changing the look of text.
Before you change the look of text, peer into your computer screen and examine the background theme or color you selected for your slides. Unless the text is a different color from the background, the audience can’t read the text. As you experiment with changing the look of text, make sure that your audience can still read the text.
Fun with Text Boxes and Text Box Shapes
Text boxes give you an opportunity to exercise your creativity. They add another element to slides. Use them to position text wherever you want, annotate a chart or equation, or place an announcement on a slide. You can even create a vertical text box in which the text reads from top to bottom instead of left to right, or turn a text box into a circle, arrow, or other shape. Figure 3-3 shows examples of text boxes and text box shapes.

FIGURE 3-3: Examples of text boxes and text box shapes.
In Office terminology, a PowerPoint text box is an object. Book 8, Chapter 4 explains all the different techniques for handling objects, including how to make them overlap and change their sizes. Here are the basics of handling text boxes in PowerPoint:
- Creating a text box: On the Insert tab, click the Text Box button and move the pointer to a part of the slide where you can see the text box pointer, a downward-pointing arrow. Then click and start dragging to create your text box, and enter the text.
- Filling a text box with color: On the (Drawing Tools) Format tab, choose a style on the Shape Styles gallery or click the Shape Fill button and select a color. You can also go to the Design tab, click the Format Background button, and select a color, picture, pattern, or gradient in the Format Shape pane.
- Rotating a text box (text included): Use one of these techniques to rotate a text box along with the text inside it:
- Drag the rotation handle, the circle above the text box.
- On the (Drawing Tools) Format tab, click the Rotate button and choose a Rotate or Flip command on the drop-down list.
- On the (Drawing Tools) Format tab, click the Size group button (you may have to click the Size button first) and, in the Format Shape pane, enter a measurement in the Rotation box.
- Changing the direction of text: On the Home tab, click the Text Direction button and choose a Rotate or Stacked option.
- Turning a shape into a text box: Create a shape, and then click in the shape and start typing. (Book 8, Chapter 4 explains how to create a shape.)
- Turning a text box into a shape: Right-click the text box and choose Format Shape. In the Format Shape pane, go to the Size & Properties tab. Then, under Text Box, select the Do Not AutoFit option button. Next, on the (Drawing Tools) Format tab, click the Edit Shape button, choose Change Shape on the drop-down list, and choose a shape on the Change Shape submenu.
Many people object to the small text boxes that appear initially when you create a text box. If you prefer to establish the size of text boxes when you create them, not when you enter text, change the AutoFit setting and then create a default text box with the new setting. The next section in this chapter explains how to change the AutoFit settings.
Controlling How Text Fits in Text Frames and Text Boxes
When text doesn’t fit in a text placeholder frame or text box, PowerPoint takes measures to make it fit. In a text placeholder frame, PowerPoint shrinks the amount of space between lines and then it shrinks the text itself. When text doesn’t fit in a text box, PowerPoint enlarges the text box to fit more text. PowerPoint handles overflow text as part of its AutoFit mechanism.
How AutoFit works is up to you. If, like me, you don’t care for how PowerPoint enlarges text boxes when you enter the text, you can tell PowerPoint not to “AutoFit” text, but instead to make text boxes large from the get-go. And if you don’t care for how PowerPoint shrinks text in text placeholder frames, you can tell PowerPoint not to shrink text. These pages explain how to choose AutoFit options for overflow text in your text frames and text boxes.
Choosing how AutoFit works in text frames
When text doesn’t fit in a text placeholder frame and PowerPoint has to “AutoFit” the text, the AutoFit Options button appears beside the text box. Click this button to open a drop-down list with options for handling overflow text, as shown in Figure 3-4. The AutoFit options — along with a couple of other techniques, as I explain shortly — represent the “one at a time” way of handling overflow text. You can also change the default AutoFit options for handling overflow text, as I also explain if you’ll bear with me a while longer and quit your yawning.

FIGURE 3-4: The laundry list of AutoFit options.
“AutoFitting” the text one frame at a time
 When text doesn’t fit in a text placeholder frame, especially a title frame, the first question to ask is, “Do I want to fool with the integrity of the slide design?” Making the text fit usually means shrinking the text, enlarging the text frame, or compromising the slide design in some way, but audiences notice design inconsistencies. Slides are shown on large screens where design flaws are easy to see.
Making text fit in a text frame usually means making a compromise. Here are different ways to handle the problem of text not fitting in a text frame. Be prepared to click the Undo button when you experiment with these techniques:
- Edit the text: Usually when text doesn’t fit in a frame, the text needs editing. It needs to be made shorter. A slide is not a place for a treatise. Editing the text is the only way to make it fit in the frame without compromising the design.
- Enlarge the frame: Click the AutoFit Options button and choose Stop Fitting Text to This Placeholder on the shortcut menu (see Figure 3-4). Then select the frame and drag the bottom or top selection handle to enlarge it.
- Decrease the font size: Select the text, go to the Home tab, and choose a smaller Font Size measurement. You can also click the Decrease Font Size button (or press Ctrl+<) to decrease the font size.
- Decrease the amount of spacing between lines: On the Home tab, click the Paragraph group button to open the Paragraph dialog box and decrease the After measurement under Spacing.
- Change the frame’s internal margins: Similar to a page, text frames have internal margins to keep text from getting too close to a frame border. By shrinking these margins, you can make more room for text. Right-click the text frame and choose Format Shape. Then, in the Format Shape pane, go to the Size & Properties tab, and under the Text Box settings, enter smaller margin measurements.
- Create a new slide for the text: If you’re dealing with a list or paragraph text in a body text frame, the AutoFit Options drop-down list offers two ways to create a new slide (refer to Figure 3-4). Choose Continue on a New Slide to run the text onto another slide; choose Split Text Between Two Slides to divide the text evenly between two slides. I don’t recommend either option, though. If you need to make a new slide, do it on your own and then rethink how to present the material. Inserting a new slide to accommodate a long list throws a presentation off-track.
Choosing default AutoFit options for text frames
Unless you change the default AutoFit options, PowerPoint shrinks the amount of space between lines and then shrinks the text itself to make text fit in text placeholder frames. Follow these steps if you want to decide for yourself whether PowerPoint “auto-fits” text in text frames:
Open the AutoFormat As You Type tab in the AutoCorrect dialog box.
Here are the two ways to get there:
- Click the AutoFit Options button (refer to Figure 3-4) and choose Control AutoCorrect Options on the drop-down list.
- On the File tab, choose Options to open the PowerPoint Options dialog box. In the Proofing category, click the AutoCorrect Options button.
- Deselect the AutoFit Title Text to Placeholder check box to prevent auto-fitting in title text placeholder frames.
- Deselect the AutoFit Body Text to Placeholder check box to prevent auto-fitting in text placeholder frames apart from title frames.
- Click OK.
Choosing how AutoFits works in text boxes
PowerPoint offers three options for handling overflow text in text boxes:
- Do Not AutoFit: Doesn’t fit text in the text box but lets text spill out
- Shrink Text on Overflow: Shrinks the text to make it fit in the text box
- Resize Shape to Fit Text: Enlarges the text box to make the text fit inside it
Follow these steps to tell PowerPoint how or whether to fit text in text boxes:
- Select the text box.
Right-click the text box and choose Format Shape.
The Format Shape dialog box pane opens.
- Go to the Size & Properties tab.
- Display the Text Box options.
- Choose an AutoFit option: Do Not AutoFit, Shrink Text on Overflow, or Resize Shape to Fit Text.
Positioning Text in Frames and Text Boxes
How text is positioned in text frames and text boxes is governed by two sets of commands: the Align Text commands and the Align commands. These commands are located on the Home tab. By choosing combinations of Align and Align Text commands, you can land text where you want it in a text frame or text box. Just wrestle with these two commands until you land your text where you want it to be in a text frame or box:
- Align commands control horizontal (left-to-right) alignments. On the Home tab, click the Align Left (press Ctrl+L), Center (press Ctrl+E), Align Right (press Ctrl+R), or Justify button.
- Align Text commands control vertical (up-and-down) alignments. On the Home tab, click the Align Text button and choose Top, Middle, or Bottom on the drop-down list, as shown in Figure 3-5.

FIGURE 3-5: Choose an Align Text and an Align command to position text in text frames and boxes.
Handling Bulleted and Numbered Lists
What is a PowerPoint presentation without a list or two? It’s like an emperor without any clothes on. This part of the chapter explains everything there is to know about bulleted and numbered lists.
Lists can be as simple or complex as you want them to be. PowerPoint offers a bunch of different ways to format lists, but if you’re in a hurry or you don’t care whether your lists look like everyone else’s, you can take advantage of the Numbering and Bullets buttons and go with standard lists. Nonconformists and people with nothing else to do, however, can try their hand at making fancy lists. The following pages cover that topic, too.
Creating a standard bulleted or numbered list
In typesetting terms, a bullet is a black, filled-in circle or other character that marks an item on a list. Many slide layouts include text frames that are formatted already for bulleted lists. All you have to do in these text frames is “Click to add text” and keep pressing the Enter key while you enter items for your bulleted list. Each time you press Enter, PowerPoint adds another bullet to the list. Bulleted lists are useful when you want to present the audience with alternatives or present a list in which the items aren’t ranked in any order. Use a numbered list to rank items in a list or present step-by-step instructions.
Follow these instructions to create a standard bulleted or numbered list:
- Creating a bulleted list: Select the list if you’ve already entered the list items, go to the Home tab, and click the Bullets button. You can also right-click, choose Bullets on the shortcut menu, and choose a bullet character on the submenu if you don’t care for the standard, black, filled-in circle.
- Creating a numbered list: Select the list if you’ve already entered the list items, go to the Home tab, and click the Numbering button. You can also right-click, choose Numbering on the shortcut menu, and select a numbering style on the submenu.
- Converting a numbered to a bulleted list (or vice versa): Drag over the list to select it, go to the Home tab, and then click the Bullets or Numbering button.
To remove the bullets or numbers from a list, select the list, open the drop-down list on the Bullets or Numbering button, and choose None.
Choosing a different bullet character, size, and color
As Figure 3-6 demonstrates, the black filled-in circle isn’t the only character you can use to mark items in a bulleted list. You can also opt for what PowerPoint calls pictures (colorful bullets of many sizes and shapes) or symbols from the Symbol dialog box. While you’re at it, you can change the bullets’ color and size.

FIGURE 3-6: Examples of characters you can use for bulleted lists.
If you decide to change the bullet character in your lists, be consistent from slide to slide. Unless you want to be goofy, select the same bullet character throughout the lists in your presentation for the sake of consistency. You don’t want to turn your slide presentation into a showcase for bullets, do you?
To use pictures or unusual symbols for bullets, start by selecting your bulleted list, going the Home tab, and opening the drop-down list on the Bullets button. Do any of the bullets on the drop-down list tickle your fancy? If one does, select it; otherwise, click the Bullets and Numbering option at the bottom of the drop-down list. You see the Bulleted tab of the Bullets and Numbering dialog box, as shown in Figure 3-7. Starting there, you can customize your bullets:
- Using a picture for bullets: Click the Picture button and search for a bullet in the Insert Pictures dialog box.
- Using a symbol for bullets: Click the Customize button and select a symbol in the Symbol dialog box.
- Changing bullets’ size: Enter a percentage figure in the Size % of Text box. For example, if you enter 200, the bullets are twice as large as the font size you choose for the items in your bulleted list.
- Changing bullets’ color: Click the Color button in the Bullets and Numbering dialog box and choose an option on the drop-down list. Theme colors are considered most compatible with the theme design you chose for your presentation.

FIGURE 3-7: The Bullets and Numbering dialog box.
Choosing a different list-numbering style, size, and color
PowerPoint offers seven different ways of numbering lists. As well as choosing a different numbering style, you can change the size of numbers relative to the text and change the color of numbers. To select a different list-numbering style, size, or color, begin by selecting your list, going to the Home tab, and opening the drop-down list on the Numbering button. If you like one of the numbering-scheme choices, select it; otherwise choose Bullets and Numbering to open the Numbered tab of the Bullets and Numbering dialog box (refer to Figure 3-7). In this dialog box, you can customize list numbers:
- Choosing a numbering scheme: Select a numbering scheme and click OK.
- Changing the numbers’ size: Enter a percentage figure in the Size % of Text box. For example, if you enter 50, the numbers are half as big as the font size you choose for the items in your numbered list.
- Changing the numbers’ color: Click the Color button and choose a color on the drop-down list. Theme colors are more compatible with the theme design you chose than the other colors are.
Putting Footers (and Headers) on Slides
A footer is a line of text that appears at the foot, or bottom, of a slide. Figure 3-8 shows a footer. Typically, a footer includes the date, a company name, and/or a slide number, and footers appear on every slide in a presentation if they appear at all. That doesn’t mean you can’t exclude a footer from a slide or put footers on some slides, as I explain shortly. For that matter, you can move slide numbers, company names, and dates to the top of slides, in which case they become headers. When I was a kid, “header” meant crashing your bike and falling headfirst over the handlebars. How times change.

FIGURE 3-8: An example of a footer.
These pages explain everything a body needs to know about footers and headers — how to enter them, make them appear on all or some slides, and exclude them from slides.
Some background on footers and headers
PowerPoint provides the Header & Footer command to enter the date, a word or two, and a slide number on the bottom of all slides in your presentation. This command is really just a convenient way to enter a footer on the Slide Master without having to switch to Slide Master view. As Chapter 2 of this minibook explains, the Slide Master governs the formatting and layout of all slides in your presentation. The Slide Master includes text placeholder frames for a date, some text, and a slide number. Anything you enter on the Slide Master, including a footer, appears on all your slides.
If a date, some text, and a slide number along the bottom of all the slides in your presentation is precisely what you want, you’ve got it made. You can enter a footer on every slide in your presentation with no trouble at all by using the Header & Footer command. However, if you’re a maverick and you want your footers and headers to be a little different from the next person’s — if you want the date, for example, to be in the upper-right corner of slides or you want footers to appear on some slides but not others — you have some tweaking to do. You may have to create a nonstandard footer or remove the footer from some of the slides.
Putting a standard footer on all your slides
A standard footer includes the date, some text, and the page number. To put a standard footer on all the slides in your presentation, go to the Insert tab and click the Header & Footer button. You see the Header and Footer dialog box, as shown in Figure 3-9. Choose some or all of these options and click the Apply to All button:
- Date and Time: Select this check box to make the date appear in the lower-left corner of all your slides. Then tell PowerPoint whether you want a current or fixed date:
- Update Automatically: Select this option button to make the day’s date (or date and time) appear in the footer, and then open the drop-down list to choose a date (or date and time) format. With this option, the date you give your presentation always appears on slides.
- Fixed: Select this option button and enter a date in the text box. For example, enter the date you created the presentation. With this option, the date remains fixed no matter when or where you give the presentation.
- Slide Number: Select this check box to make slide numbers appear in the lower-right corner of all slides.
- Footer: Select this check box, and in the text box, enter the words that you want to appear in the bottom, middle of all the slides.

FIGURE 3-9: Entering a standard footer.
Creating a nonstandard footer
As “Some background on footers and headers” explains earlier in this chapter, you have to look elsewhere than the Header and Footer dialog box if you want to create something besides the standard footer. Suppose you want to move the slide number from the lower-right corner of slides to another position? Or you want to fool with the fonts in headers and footers?
Follow these steps to create a nonstandard footer:
Create a standard footer if you want your nonstandard footer to include today’s date and/or a slide number.
If you want to move the slide number into the upper-right corner of slides, for example, create a standard footer first (see the preceding topic in this chapter). Later, you can move the slide number text frame into the upper-right corner of slides.
On the View tab, click the Slide Master button.
You switch to Slide Master view. Chapter 2 of this minibook explains this view and how to format many slides at once with master slides.
- Select the Slide Master, the topmost slide in the Slides pane.
Adjust and format the footer text boxes to taste (as they say in cookbooks).
For example, move the slide number text frame into the upper-right corner to put slide numbers there. Or change the font in the footer text boxes. Or place a company logo on the Slide Master to make the logo appear on all your slides.
Click the Close Master View button to leave Slide Master view.
You can always return to Slide Master view and adjust your footer.
Removing a footer from a single slide
On a crowded slide, the date, footer text, page number, and other items in the footer can get in the way or be a distraction. Fortunately, removing one or all of the footer text frames from a slide is easy:
- Switch to Normal view and display the slide with the footer that needs removing.
On the Insert tab, click the Header & Footer button.
The Header and Footer dialog box appears.
- Deselect check boxes — Date and Time, Slide Number, and Footer — to tell PowerPoint which parts of the footer you want to remove.
Click the Apply button.
Be careful not to click the Apply to All button. Clicking this button removes footers throughout your slide presentation.