
Chapter 1
Introducing Access
IN THIS CHAPTER
![]() Understanding how databases work
Understanding how databases work
![]() Looking at tables, queries, forms, and other database objects
Looking at tables, queries, forms, and other database objects
![]() Creating a database
Creating a database
![]() Designing the tables, queries, forms, and the other parts of a database
Designing the tables, queries, forms, and the other parts of a database
The word database is prone to making most people feel kind of queasy. Can you blame them? Database terminology — record, field, and filter — is the worst of the worst. It even puts other computer terminology to shame. Databases intimidate most people. Even brave souls with a considerable amount of experience in Word and Excel shy away from Access, the Office 365 database program. However, Access can be invaluable for storing and organizing customer lists, inventories, addresses, payment histories, donor lists, and volunteer lists.
This chapter introduces databases and the concepts behind databases. It shows you how to create a database and database tables for storing information. The second half of this chapter explains how to design databases. Sorry, but you have to know about database design before you can start fooling with databases. You can’t jump right in as you can with the other Office programs.
 Access offers a practice database called Northwind that you can experiment with as you get to know your way around databases. To open this database, click the File tab and choose New. Then, in the New window, enter Northwind in the Search box and click the Start Searching button.
What Is a Database, Anyway?
You may not know this, but you’re no stranger to databases. The address book on your computer is a database. The telephone directory in the desk drawer is, too. A recipe book is also a database, in that recipes are categorized under different headings. If you ever arranged a CD collection in a certain way — in alphabetical order or by musical genre, for example — you created a database of CDs, one that makes finding a particular CD easier. Any place where information is stored in a systematic way can be considered a database. The only difference between a computerized database and a conventional database, such as a telephone directory, is that storing, finding, and manipulating data is much easier in a computerized database.
Imagine how long it would take to find all the New York addresses in an address list with 10,000 entries. In Access, you can query a 10,000-entry database and find all New York addresses in a matter of seconds. For that matter, you can query to find all the addresses in a certain ZIP code. You can put the list in alphabetical order by last name or in numerical order by ZIP code. Doing these chores without a computer requires many hours of dreary, monotonous labor.
Tables, Queries, Forms, and Other Objects
One problem with getting to know a database program — and the primary reason that people are intimidated by databases — is that you can’t jump right in. You have to know how data is stored in a database and how it is extracted, to use database terminology. You have to know about objects, Access’s bland word for database tables, queries, forms, and all else that makes a database a database. To help you get going, these pages offer a crash course in databases. They explain the different objects — tables, queries, forms, and reports — that make up a database. Fasten your seatbelt. If you complete the crash course without crashing, you’re ready to create your first database.
Database tables for storing information
Information in databases is stored in database tables like the one in Figure 1-1. In a database table, you include one field for each category of information you want to keep on hand. Fields are the equivalent of columns in a table. Your first duty when you create a database table is to name the fields and tell Access what kind of information you propose to store in each field. The database table in Figure 1-1 is for storing employee information. It has eight fields: ID, First Name, Last Name, E-mail Address, Business Phone, Company, Job Title, and Home Phone.

FIGURE 1-1: A database table.
A database can comprise one database table or many different tables that are linked together. If you’re dealing with a lot of information, storing data in more than one table is to your advantage. Later in this chapter, “Separating information into different database tables” explains why storing data across several database tables is advantageous.
Forms for entering data
After you create the fields in the database table, you can start entering the records. A record describes all the data concerning one person or thing. Although you can enter records straight into a database table, the easiest way to enter a record is with a form. Similar to a dialog box, a form has convenient text boxes and drop-down lists for entering information, as shown in Figure 1-2. On a form, you can see clearly what kind of information needs entering in each field.

FIGURE 1-2: A form for entering data.
Queries for getting the data out
Figure 1-3 shows a simple query for finding out which employees in the database table shown in Figure 1-1 are Sales Representatives. A query is a question you ask of a database. The question here is, “Who is a Sales Representative?” Notice the criterion “Sales Representative” in the Job Title field on the Query grid.

FIGURE 1-3: Querying a database.
In an address database, you can use a query to find all the people in a particular ZIP code or state. If information about contributions is stored in the database, you can find out who contributed more than $500 last year. Queries can get very complex. For example, you can find all the people in a particular city who contributed between $50 and $500 and volunteered more than eight hours in the past year. You can construct the query so that it produces each person’s name and telephone number, or you can construct it so that all the information you have concerning each person appears in the query results.
When you get junk mail, it likely comes to your mailbox as the result of a database query. Companies routinely buy and sell customer databases. They query these databases to gather the names of people who they believe are well-disposed to purchasing the products they sell. Next time you get junk mail solicitation, study the letter and ask yourself, “How did I get in this database, and which database query produced my name?” The junk mailer is probably targeting extraordinarily beautiful, intelligent people.
After you create a query, you can save it and run it again. You can use it as the basis for constructing new queries. The information in database tables usually changes over time. Customers change addresses. New products come online, and others are discontinued. But no matter how much the data changes, you can find out exactly what you want to know from a database by running a well-crafted query.
Reports for presenting and examining data
Figure 1-4 shows a report. Reports can be made from database tables or from the results of queries. Reports are usually read by managers and others who don’t get their hands dirty in databases. They’re meant to be printed and distributed so that the information can be scrutinized and analyzed. Access offers many attractive reports. Don’t worry: The program does most of the layout work for you, and exporting reports to a Word file is easy.

FIGURE 1-4: A report gathers data for scrutiny and analysis.
Macros and modules
Macros and modules aren’t covered in this minibook, but they are also database objects. A macro is a series of commands. You can store macros for running queries and doing other Access tasks. A module is a collection of Visual Basic procedures and declarations for performing tasks in Access.
Creating a Database File
Creating a database is a lot of work, at least in the beginning. You have to design the database (a subject that I explain shortly). You have to enter the raw information into the tables. You have to construct queries that allow yourself and others to read meaning into the data (see Chapter 4 of this minibook). By contrast, creating a database file for storing the information is the easy part.
Access offers two ways to create a new database file. You can do it from scratch or get the help of a template. With a template, some of the work is done for you. The template comes with prefabricated queries, forms, and reports. However, templates are for people who already know their way around Access databases. To make use of a template, you have to know how to modify a preexisting database.
 Before you create a database file, start by deciding where in your computer to store it. Unlike other Office programs, Access requires you to save and name a new database file as soon as you create it.
Creating a blank database file
Follow these instructions to create a blank database file:
On the File tab, choose New.
The New window appears.
Click the Blank Desktop Database icon.
A dialog box appears for choosing the folder where you will store your new database.
Click the Browse button.
You see the File New Database dialog box.
- Select the folder where you want to keep the database file, enter a name in the File Name text box, and click OK.
Click the Create button.
The Navigation pane and a blank table appear. Later in this chapter, “Finding Your Way around the Navigation Pane” explains what this pane is all about. I suggest you go there without delay or deferral.
Getting the help of a template
As I explain earlier, templates are wonderful if you have the wherewithal to modify them. Access offers prefabricated databases for tracking assets, keeping inventory, scheduling resources, and doing other things. Unfortunately, the only way to find out whether one of the templates is worthwhile is to go to the trouble to create a database from a template, open the database file, and look around.
Follow these steps to create a database file from a template:
On the File tab, choose New.
The New window opens.
Select a template or use the Search box to obtain a template online from Microsoft.
Templates showing the globe icon are applications, not databases. Access applications are designed for use with web browsers.
Click the Browse button.
The File New Database dialog box opens.
- Select the folder where you want to keep the database file, enter a name in the File Name text box, and click OK.
Click the Create button.
The Navigation pane and a blank table appear. Read on to find out how to find your way around the Navigation pane.
Finding Your Way around the Navigation Pane
The first thing you see when you open most database files is a Navigation pane like the one in Figure 1-5. This is the starting point for doing all your work in Access. From here, you can select an object — that horrible word again! — and begin working. Tables, queries, and other objects you create are added to the Navigation pane when you create them.
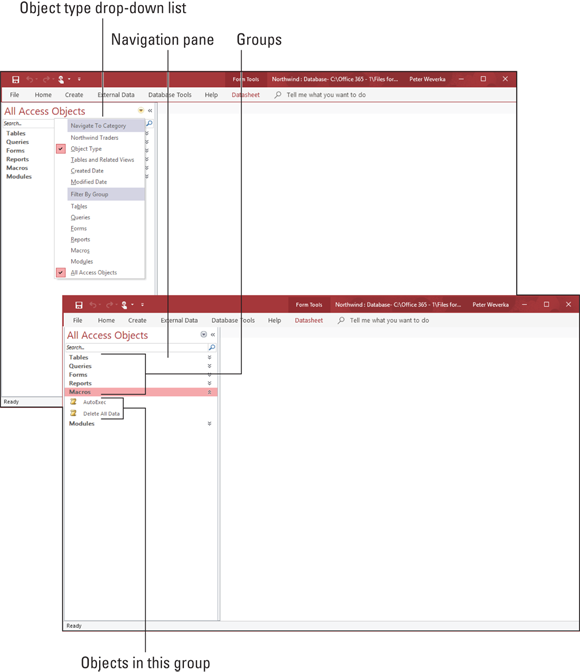
FIGURE 1-5: Finding and selecting objects with the Navigation pane.
Here are shorthand instructions for doing this, that, and the other thing in the Navigation pane:
- Choosing an object type: Select a group (Tables, Queries, Forms, Reports, and so on) from the Object Type drop-down list at the top of the Navigation pane, or select All Access Objects to see all the groups, as shown in Figure 1-5.
- Creating a new object: Go to the Create tab and choose what type of object you want to create. When creating new forms and reports, click a table or query in the Navigation pane to base the new form or report on a table or query.
- Opening an object: To open a database table, query, form, or report, do one of the following: Double-click it; select it and press Enter; or right-click it and choose Open on the shortcut menu.
- Opening an object in Design view: The task of formulating database tables, forms, and queries is done in Design view. If an object needs reformulating, right-click it and choose Design View on the shortcut menu.
- Finding objects: Use the Search bar (located at the top of the Navigation pane) to search for objects.
- Opening and closing the Navigation pane: Click the Shutter Bar Open/Close button on upper-right corner of the Navigation pane (or press F11) when you want to shrink it and get it out of the way. You can also resize this pane by clicking the far right edge and dragging it left or right.
Designing a Database
Being a database designer isn’t nearly as glamorous as being a fashion designer, but it has its rewards. If you design your database carefully and correctly, it can be very useful to you and others. You can enter information accurately. When the time comes to draw information from the database, you get precisely the information you need. These pages explain everything you need to consider when designing a database. Pay close attention to “Separating information into different database tables,” later in this chapter, because the hardest part about designing a database is deciding how to distribute information across database tables and how many database tables to have.
Deciding what information you need
The first question to ask yourself is about the kind of information you want to get out of the database. Customer names and addresses? Sales information? Information for inventory tracking? Interview your coworkers to find out what information could be helpful to them. Give this matter some serious thought. Your goal is to set up the database so that every tidbit of information your organization needs can be recorded.
A good way to find out what kind of information matters to an organization is to examine the forms that the organization uses to solicit or record information. These forms show precisely what the organization deems worthy of tracking in a database. Figure 1-6, for example, shows the paper form that players fill out to sign up for a baseball league whose database tables appear in Figure 1-7. Compare Figure 1-6 with Figure 1-7 and you can see that the Players, Teams, and Divisions database tables all have fields for entering information from this form.

FIGURE 1-6: Paper forms also have fields.

FIGURE 1-7: Plans for database tables and field names.
Separating information into different database tables
After you know the information you want to record in the database, think about how to separate the information into database tables. Many are tempted to put all the information into a single database table, but because Access is a relational database, you can query more than one table at a time, and in so doing, assemble information from different tables.
To see how it works, consider the simple database, as shown in Figure 1-7. The purpose of this little database and its four tables is to store information about the players, coaches, and teams in a baseball league. The Team Name field appears in three tables. It serves as the link among the tables and permits more than one to be queried. By querying individual tables or combinations of tables in this database, you can assemble team rosters, make a list of coaches and their contact information, list teams by division, put together a mailing list of all players, find out which players have paid their fee, and list players by age group, among other things. This database comprises four tables:
- Players: Includes fields for tracking players’ names, addresses, birthdays, which teams they’re on, and whether they paid their fees
- Coaches: Includes fields for tracking coaches’ names, addresses, and the names of the teams they coach
- Teams: Includes fields for tracking team names and which division each team is in
- Divisions: Includes fields for tracking division numbers and names
Deciding how many database tables you need and how to separate data across the different tables is the hardest part of designing a database. To make the task a little easier, do it the old-fashioned way with a pencil and eraser. Here are the basic rules for separating data into different tables:
- Restrict a table to one subject only: Each database table should hold information about one subject only — customers, employees, products, and so on. This way, you can maintain data in one table independently from data in another table. Consider what would happen in the Little League database (refer to Figure 1-7) if coach and team data were kept in a single table, and one team’s coach was replaced by someone new. You would have to delete the old coach’s record, delete information about the team, enter information about the new coach, and reenter information about the team that you just deleted. But by keeping team information separate from coach information, you can update coach information and still maintain the team information.
- Avoid duplicate information: Try not to keep duplicate information in the same database table or duplicate information across different tables. By keeping the information in one place, you have to enter it only once, and if you have to update it, you can do so in one database table, not several.
Entire books have been written about database design, and this book can’t do the subject justice. You can, however, store all your data in a single table if the data you want to store isn’t very complex. The time you lose entering all the data in a single table is made up by the time you save not having to design a complex database with more than one table.
Choosing fields for database tables
As I explain earlier, fields are categories of information. Each database table needs at least one field. If the table itself is a subject, you could say that its fields are facts about the subject. An Address database table needs fields for recording street addresses, cities, states, and ZIP codes. A Products database table needs fields for product ID numbers, product names, and unit prices. Just the facts, ma’am. Within the confines of the subject, the database table needs one field for each piece of information that is useful to your organization.
When you’re planning which fields to include in a database table, follow these guidelines:
- Break up the information into small elements. For example, instead of a Name field, create a First Name field and a Last Name field. This way, you can sort database tables by last name more easily.
- Give descriptive names to fields so that you know what they are later. A more descriptive name, such as Serial Number, is clearer than SN.
- Think ahead and include a field for each piece of information your organization needs. Adding a field to a database table late in the game is a chore. You have to return to each record, look up the information, and enter it.
- Don’t include information that can be derived from a calculation. As I explain in Chapter 4 of this minibook, calculations can be performed as part of a query or be made part of a table. For example, you can total the numbers in two fields in the same record or perform mathematical calculations on values in fields.
Deciding on a primary key field for each database table
Each database table must have a primary key field. This field, also known as the primary key, is the field in the database table where unique, one-of-a-kind data is stored. Data entered in this field — an employee ID number, a part number, a bid number — must be different in each record. If you try to enter the same data in the primary key field of two different records, a dialog box warns you not to do that. Primary key fields prevent you from entering duplicate records. They also make queries more efficient. In a query, you tell Access what to look for in database tables, Access searches through the tables, and the program assembles information that meets the criteria. Primary key fields help Access recognize records and not collect the same information more than once in a query.
Social security numbers make good primary key fields because no two people have the same social security number. Invoice numbers and serial numbers also make excellent primary key fields. Returning to the sample baseball league database (refer to Figure 1-7), which fields in the Little League database tables are primary key fields? In the Teams table, Team Name can be the primary key field because no two teams have the same name. Division Number can also be a primary key field because divisions in the league are numbered and no two divisions have the same number.
The Players and Coaches database tables, however, present a problem when it comes to choosing a primary key field. Two players might have the same last name, which rules out Last Name as a primary key field. A brother and sister might have the same telephone number, which rules out a Telephone No. field. Because no field holds values that are certain to be different from record to record, I introduce fields called Player Number and Coach Number. For the purpose of this database, players and coaches are assigned numbers. (Chapter 2 in this minibook explains how Access can assign sequential numbers for you in a database table.)
Mapping the relationships between tables
If your database includes more than one table, you have to map how the tables relate to one another. Usually, relationships are formed between the primary key field in one table and the corresponding field in another, called the foreign key. Figure 1-8 shows the relationships between the tables in the Little League database. Because these tables are linked by common fields, you can gather information from more than one table in a query or report. Chapter 2 in this minibook takes up the subject of linking tables in more detail. For now, when you design your database, consider how to connect the various tables with common fields.

FIGURE 1-8: Table relationships.