
Chapter 1
Introducing Publisher
IN THIS CHAPTER
![]() Understanding frames
Understanding frames
![]() Creating and designing a publication
Creating and designing a publication
![]() Changing your view of the Publisher window
Changing your view of the Publisher window
![]() Putting grid guides and rulers on pages
Putting grid guides and rulers on pages
Welcome to Publisher 365. Not long ago, creating professional publications like the kind you can create with Publisher required sophisticated printing equipment and a background in graphic design. However, even a novice can now create professional-looking publications with Publisher. As long as you rely on a publication design — a template that comes with Publisher — most of the layout work is done for you. All you have to do is enter the text and the other particulars.
“A Print Shop in a Can”
Publisher has been called “a print shop in a can” because the program is great for creating prefabricated brochures, business cards, calendars, newsletters, resumes, posters, and the like. To make these publications without going to a great deal of trouble, however, you have to stick to the template. Each template provides you with a ready-made brochure, calendar, and so on.
Chances are, you can find a suitable template for whatever kind of publication you want to create. Figure 1-1 shows examples of newsletter templates. Templates include placeholders for graphics and text. To create a publication, you choose a template, choose a design, enter graphics and text in the publication where the placeholders are, and tweak the publication to your liking.
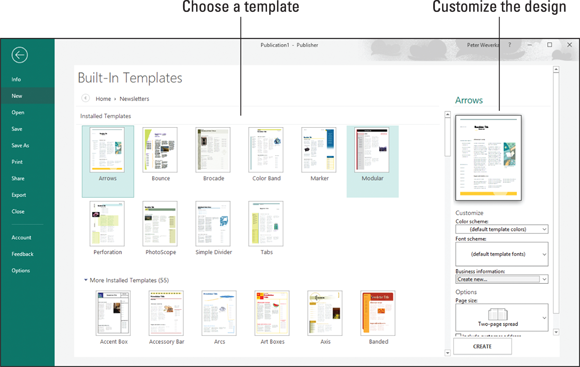
FIGURE 1-1: Creating a publication in the Built-In Templates window.
Striking out on your own and designing publications like those in Figure 1-1 can be done, but you need a thorough knowledge of Publisher and a full head of hair. You need the hair because much of it will have been pulled out in frustration by the time you finish your design. I venture to say that the people who invented Publisher expect everyone to work from ready-made templates. Designing publications from scratch is simply too difficult. Don’t be discouraged, however, because you can almost always find a publication design for whatever you want to communicate.
Introducing Frames
The publications that you make with Publisher are composed of frames. A frame is a placeholder for text, a graphic, or a table. Complex publications have dozens of frames; simple publications have only a few. Frames keep text and graphics from overlapping. They make sure that everything stays on the page where it should be. As you create a publication, you enter text or graphics in frames.
The publication in Figure 1-2 is made up of several frames that were stitched together to form a poster. On the left side of the figure, I selected the frames, and you can see the frame boundaries; the right side of the figure shows what the poster looks like after it is printed. Frames make laying out publications easier. When you want to move text, a picture, a table, or an image, you simply drag its frame to a new location. After you select a frame, the commands you give apply to the text or graphic in the frame. Frames do not appear in the finished product; they are meant strictly to help with laying out text and graphics.

FIGURE 1-2: A poster with frames showing (left); the poster as it looks when printed (right).
Creating a Publication
To create a new publication, go to the File tab and choose New (or press Ctrl+N). You see the New window, where you create a publication with any of these techniques:
- Search online for a template: In the Search for Online Templates text box, enter the name of a publication type and click the Start Searching button (or press Enter). Select a category and click a template to examine it in a preview screen. Click the Create button to create a publication.
- Choose a featured template: On the Featured tab, select a template. A preview screen opens so that you can examine the template. Click Create to create a publication.
- Choose a built-in template: On the Built-In tab (refer to Figure 1-1), select the icon representing a category (Brochures, Business Cards, and so on). You see a dozen or more templates. Scroll through the list, select a template, and click Create.
 As you search for a template, you can click the Back or Home button to retrace your search in the New window.
 After you select a built-in template in the New window, you can choose a color scheme, font scheme for your publication, and other options on the right side of the window. But I suggest waiting until you’ve created your publication before choosing colors and fonts. You can study your publication more closely after you create it. You can look through it and decide what you want it to look like. What’s more, choosing new colors and fonts for a publication isn’t as hard as all that, as I explain shortly.
Redesigning a Publication
 Make your design choices carefully. In theory, you can change publication designs, color schemes, and design options when you are well along in a project, but in practice, changing these designs can have unforeseen consequences. If you change the color of a headline, for example, and then choose a new color scheme, the headline might be swallowed or rendered invisible by a background color in the new scheme. If you enter a bunch of text, change the size of a few frames, and then choose a new template for your publication, you may turn your publication into corned-beef hash and have to start over.
To redesign a publication, go to the Page Design tab. As shown in Figure 1-3, this tab offers opportunities for changing templates, the orientation and size of pages, color schemes, and font schemes. If your publication has more than one page, click page thumbnails in the Pages pane to visit different pages and see what they look like. (If you don’t see the Pages pane, go to the View tab and select the Page Navigation check box.)

FIGURE 1-3: Go to the Page Design tab to change templates, color schemes, font schemes, color schemes, and page options.
Choosing a different template
Not happy with the template you chose when you created your publication? To exchange it for a new one, go to the Page Design tab and click the Change Template button. You see the Change Template window, where you can select a different template (refer to Figure 1-1).
Choosing a color scheme
To choose a different color scheme for your publication, go to the Page Design tab and select a scheme in the Schemes gallery (refer to Figure 1-3). If you’re daring, choose Create New Color Scheme at the bottom of the gallery and fashion your own color scheme in the Create New Color Scheme dialog box.
Choosing a font scheme
You will be glad to know that most of the text formats that are available in Word are also available in Publisher on the Home tab. To boldface text, select it and click the Bold button. To change font sizes, choose an option on the Font Size drop-down list.
To avoid going to the trouble of formatting text, you can choose a font scheme, a pair of fonts for the headings and body text in a publication. Font schemes spare you the trouble of having to format the text on your own. The schemes were designed by people who know what they’re doing. They look good.
To choose a font scheme, go to the Page Design tab, click the Fonts button, and select a scheme on the drop-down list. If you really know what you’re doing, you can choose Create New Font Scheme on the drop-down list and select fonts for heading text and body text in the dialog box that appears.
Setting up your pages
On the Page Design tab, visit the Page Setup group to determine the margin size, orientation, and page size of your publication:
- Margins: Click the Margins button and choose an option on the drop-down list or click Custom Margins to enter margin measurements in the Layout Guides dialog box.
- Orientation: Click the Orientation button and choose Portrait or Landscape on the drop-down list to stand your publication upright or turn it on its side.
- Size: Click the Size button and select a page size on the drop-down list. You can choose Create New Page Size in the list to open the Create New Page Size dialog box and declare a page size of your own. Decide right away which page size to use for your publication. How large or small the page is determines how the headings, graphics, and text fit on the pages.
Getting a Better View of Your Work
Because seeing the little details as well as the big picture matters so much in a publication, Publisher offers many tools for changing views of your work. Figure 1-4 shows what these tools are. They are described in the following pages.

FIGURE 1-4: Go to the View tab to change views of your work.
Zooming in and out
Apart from the standard Zoom controls found in most Office programs (Book 1, Chapter 3 describes the Zoom controls that appear in the lower-right corner of the screen), Publisher offers a handful of other commands for zooming in or out. Go to the View tab and take advantage of these techniques as you refine your publication:
- Make the page fit squarely in the window: Click the Whole Page button (or press Ctrl+Shift+L) to make the entire page fit in the window. The lower-right corner of the window also offers a Whole Page button; you can click it when you’re not working in the View tab.
- Make the width of the page fit in the window: Click the Page Width button.
- Focus on objects: Select an object (a text frame or graphic, for example) or a handful of objects and click the Selected Objects button to zoom in on what you selected. Being able to focus this way is very helpful when you’re working on a publication that is crowded with words and images.
- View your publication at its actual size: Click the 100% button.
Viewing single pages and two-page spreads
On the View tab, click the Two-Page Spread button to see facing pages in newsletters, brochures, and other publications with more than one page (refer to Figure 1-4). Choose this command early and often. It permits you to see what readers of your publication will see when they view facing pages. Click the Single Page button to see a single page in the window.
Going from page to page
Use these techniques to get from page to page in a publication:
- Pages pane: In a publication with more than one page, go from page to page by clicking thumbnail pages in the Pages pane (refer to Figure 1-4). To display this pane, visit the View tab and select the Page Navigation check box.
- The Go To Page dialog box: On the Home tab, open the drop-down list on the Find button and choose Go To Page (or press Ctrl+G). Then enter a page number in the Go To Page dialog box.
To help you identify pages, you can name them. When you move the pointer over a page thumbnail in the Pages pane, the name appears in a pop-up box. To name a page, right-click its thumbnail in the Pages pane and choose Rename on the shortcut menu. In the Rename Page dialog box, enter a descriptive name.
Understanding and Using the Layout Guides
Making frames, graphics, and lines of text line up squarely on the page is essential if your publication is to look smart and snappy. Readers tend to go cockeyed when they see side-by-side columns with the text in one column slightly askew of the text in the column beside it. A graphic or text frame that spills into the margin is a breach of etiquette punishable by death. A row of graphics has to be just that — a row, not a crooked line. To keep pages neat and tidy, Publisher offers several types of layout guides, as the following pages explain.
Making use of layout guides
As shown in Figure 1-5, Publisher offers margin guides, grid guides, ruler guides, and baselines to help you lay out frames, graphics, and other objects on the pages of your publications. Use these layout guides early and often.

FIGURE 1-5: Layout guides (left to right): margin guides, grid guides, ruler guides, and baselines.
Margin guides
Margin guides are blue lines that clearly show where page margins begin and end (refer to Figure 1-5). Use the margin guides to make sure that objects don’t stray too far into the margin.
Margin guides appear on the page as long as the Guides check box on the View tab is selected. Where the margin guides appear depends on the Margin setting you chose for your publication. (On the Page Design tab, click the Margins button and select a setting.)
Grid guides
Grid guides are blue lines that appear in grid form across the page (refer to Figure 1-5). Frames and objects can be made to “snap to the grid” (see “Snapping objects to ruler and grid lines,” later in this chapter). Because the objects snap, you’re spared the trouble of aligning them because they line up on grid guides.
To determine where gridlines are and display them on pages, go to the Page Design tab, click the Guides button, and choose Grid and Baseline Guides on the drop-down list. You see the Grid Guides tab of the Layout Guides dialog box, as shown in Figure 1-6. Do the following and click OK:
- Enter numbers to determine how many rows and columns form the grid.
- Enter Spacing measurements to determine how close objects can come to grid guides. Think carefully about entering a number less than .2 in the Spacing boxes. If you enter 0, for example, objects and frames will touch each other when they snap to the grid.
- Select the Add Center Guide between Columns and Rows check box if you want to draw a line between the lines formed by columns and rows in the grid.
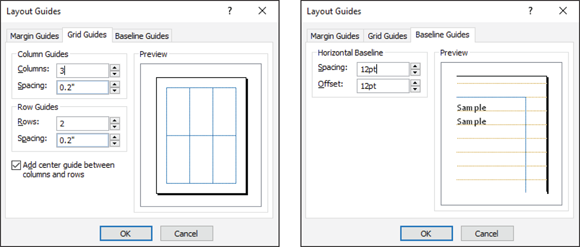
FIGURE 1-6: Creating grid guides and baselines in the Layout Guides dialog box.
To remove grid guides, return to the Grid Guides tab of the Layout Guides dialog box and enter 1 in the Columns text box and 1 in the Rows text box. You can also go to the View tab and deselect the Guides check box to temporarily remove grid guides.
Ruler guides
Ruler guides are green horizontal and vertical lines that you can place on the page for assistance in aligning frames and objects (refer to Figure 1-5). You can draw ruler guides where you need them and remove the guides very easily when they get in the way. Whereas grid guides appear on every page in a publication, ruler guides appear on one page. You can, however, place the same ruler guides on every page by drawing the ruler guides on the master page. (Chapter 3 of this minibook describes master pages.)
Go to the Page Design tab and use one of these techniques to place ruler guides on a page:
- Built-in ruler guides: Click the Guides button and choose a built-in ruler guide option on the drop-down list to place many ruler guides on a page.
- Drawn ruler guides: Click the Guides button and choose Add Horizontal Ruler Guide or Add Vertical Ruler Guide. A ruler guide appears horizontally or vertically across the center of the page. Click and drag the ruler guide across the page to a new location.
- Ruler Guides dialog box: Click the Guides button and choose Ruler Guides. You see the Ruler Guides dialog box. Enter horizontal or vertical measurements for the guides and click OK.
You can also place a ruler guide on a page by copying a ruler guide that is already there. Hold down the Ctrl key and drag an existing ruler guide to create a new guide.
To remove ruler guides from a page, go to the Page Design tab, click the Guides button, and choose No Ruler Guides on the drop-down list. You can temporarily remove ruler guides by deselecting the Guides check box on the View tab.
Baselines
Baselines are brown, dotted, horizontal lines that appear on the page to help with aligning frames, objects, and lines of text (refer to Figure 1-5). To make baselines appear, go to the View tab and select the Baselines check box.
To decide the frequency of baselines, go to the Page Design tab, click the Guides button, and choose Grid and Baseline Guides on the drop-down list. The Layout Guides dialog box appears. On the Baseline Guides tab, enter Spacing measurements to determine how tight or loose the lines are, and enter Offset measurements to determine how far off the margin settings the lines are. Figure 1-6 shows the Baseline Guides tab of the Layout Guides dialog box.
Snapping objects to ruler and grid lines
On the Page Design tab, the commands in the Layout group make frames and objects snap to ruler guides or grid guides. Snapping helps to make objects line up squarely. On the Page Design tab, select the Guides check box to make objects snap to the guides; select the Objects check box to make objects snap to other objects on the page.