
Chapter 3
Handling Graphics and Photos
IN THIS CHAPTER
![]() Understanding the different graphic file formats
Understanding the different graphic file formats
![]() Placing a graphic in a Word document, PowerPoint slide, or Excel worksheet
Placing a graphic in a Word document, PowerPoint slide, or Excel worksheet
![]() Recoloring, cropping, and otherwise altering a picture
Recoloring, cropping, and otherwise altering a picture
![]() Compressing graphics
Compressing graphics
A picture, so they say, is worth a thousand words. Whether it’s worth a thousand words or merely 950 is debatable. What is certain is that visuals help people remember things. A carefully chosen image in a PowerPoint presentation, Word document, or Excel worksheet helps others understand you better. The image reinforces the ideas or information that you’re trying to put across.
This chapter explains how you can make pictures — photographs and graphics — part of your Word documents, PowerPoint presentations, and Excel worksheets. It looks into graphic file formats and other issues pertaining to graphics as well as how to touch up graphics in an Office application.
All about Picture File Formats
Graphics and photographs come in many different file formats, and as far as Office is concerned, some are better than others. These pages explain what you need to know about graphic files to use them wisely in Office files. Here, you find out what bitmap and vector graphics are, what resolution and color depth are, and how graphic files are compressed.
Bitmap and vector graphics
All graphic images fall into either the bitmap or vector category:
- A bitmap graphic is composed of many thousands of tiny dots called pixels that, taken together, form an image (the term “pixel” comes from “picture element”). A photograph is a bitmap graphic.
- A vector graphic is drawn with the aid of computer instructions that describe the shape and dimension of each line, curve, circle, and so on.
The difference between the two formats is that vector graphics do not distort when you enlarge or shrink them, whereas bitmap graphics lose resolution when their size is changed. Furthermore, vector images do not require nearly as much disk space as bitmap graphics. Drop a few bitmap graphics in a file and soon you’re dealing with a file that is close to 750K in size.
Table 3-1 describes popular bitmap graphic formats; Table 3-2 lists popular vector graphic formats.
TABLE 3-1 Popular Bitmap (Photograph) File Formats
Extension |
File Type |
Color Depth |
Compression |
BMP, BMZ, DIB |
Microsoft Windows Bitmap |
To 24-bit |
None |
GFA, GIF |
Graphics Interchange Format |
To 8-bit |
Lossy |
JPEG, JPG, JFIF, JPE |
JPEG File Interchange Format |
24-bit and above |
Lossy |
PICT |
Macintosh PICT |
To 32-bit |
None |
PNG |
Portable Network Graphics |
To 48-bit |
Lossless |
RLE |
Bitmap File in RLE Compression Scheme |
24-bit and above |
None |
TIF, TIFF |
Tagged Image File Format |
24-bit and above |
Lossless |
TABLE 3-2 Popular Vector File Formats
Extension |
File Type |
CDR |
CorelDRAW |
CGM |
Computer Graphics Metafile |
EMF |
Enhanced Windows Metafile |
EMZ |
Windows Enhanced Metafile |
EPS |
Encapsulated PostScript |
PCT |
Macintosh PICT |
WMF |
Windows Metafile |
WPG |
WordPerfect Graphics |
Resolution
Resolution refers to how many pixels comprise a bitmap image. The higher the resolution, the clearer the image. Resolution is measured in dots per inch (dpi), sometimes called pixels per inch (ppi). Images with more dots — or pixels — per inch are clearer and display more fineness of detail. When you scan an image, the scanner permits you to choose a dots-per-inch setting.
High-resolution images look better but require more disk space than low-resolution images. Figure 3-1 illustrates the difference between a high-resolution and low-resolution photograph.

FIGURE 3-1: A high-resolution photo (left) and the same photo at low resolution (right).
Compression
 Compression refers to an algorithm by which bitmap graphic files can be made smaller. In effect, compression enables your computer to store a bitmap graphic with less disk space. Some bitmap graphic types can’t be compressed; other bitmap graphic types are compressed using either lossless or lossy compression:
- Lossless compression: To maintain the picture’s integrity, the same number of pixels are stored in the compressed file as in the original. Because the pixels remain intact, you can change the size of a file that has undergone lossless compression without losing picture quality.
- Lossy compression: Without regard for the picture’s integrity, pixel data in the original picture is lost during compression. Therefore, if you try to enlarge a picture that has undergone lossy compression, the picture loses quality.
Color depth
Color depth refers to the number of colors that can be displayed in a graphics file. The larger the color depth, the larger the number of colors that can be displayed, the richer the graphic looks, and the larger its file size is. Color depth is measured in bits. To get technical on you, color depth is measured in the number of bits that are needed to describe each pixel’s color in the image. A bit, or “binary digit,” is the smallest unit of data measurement in computing. These are the color-depth measurements:
Bit Size |
Color Depth |
1-bit |
Black and white only |
8-bit |
256 colors |
16-bit |
65,536 colors |
24-bit |
16,777,216 colors |
32-bit |
4,294,967,296 colors |
To look like photographs and not cartoons, photographs require a color depth of at least 16-bits. Sometimes color depth is described in terms of a color palette. For example, a graphic format with an 8-bit color depth is said to have a 256-color palette.
Choosing file formats for graphics
 One of the challenges of using photographs and graphics in Office files is keeping file sizes to a minimum. A file that is loaded down with many photographs can take a long time to load and send over the Internet.
The trick is to find a balance between high-quality, high-resolution graphics and the need to keep file sizes low. Here are some tips for choosing graphic file formats:
- Consider sticking with vector graphics if you’re including graphics in your file strictly for decoration purposes. Vector images are easy to come by, don’t require very much disk space, and can be edited in Office.
- For photographs, make PNG your first choice for graphics. PNG images have a fairly high resolution and don’t require very much disk space.
- If you’re dealing with black-and-white photos or resolution doesn’t matter, use GIF files. These files eat up the least amount of disk space.
Inserting a Picture in an Office File
After you’ve weighed the merits of different kinds of graphics and decided which one is best for you, you can insert it. To insert a picture, either use one stored on your computer or get one from the Internet.
 After a picture lands in a file, it becomes an object. Chapter 4 of this minibook explains how to manipulate objects — how to move them, change their size, and change their borders. Later in this chapter, “Touching Up a Picture” looks into various ways to change the appearance of graphics.
Inserting a picture of your own
Inserting a picture stored on your computer (or computer network) is as simple as choosing it in the Insert Picture dialog box. Follow these steps to insert a picture on a PowerPoint slide, Word document, or Excel worksheet:
- Go to the Insert tab.
Click the Pictures button.
You see the Insert Picture dialog box, as shown in Figure 3-2. In PowerPoint, you can also open this dialog box by clicking the Pictures icon in a content placeholder frame.
Select a file in the Insert Picture dialog box.
As Figure 3-2 shows, you can choose a View option to see what a graphic looks like.
 You can click the File Types button to open a drop-down list and choose a file type to locate files of a certain type in the dialog box. This button is located above the Insert and Cancel buttons.
Click the Insert button.
Go to the (Picture Tools) Format tab to see all the different ways you can manipulate a picture after you insert it.

FIGURE 3-2: You can preview a picture file before you insert it.
If you chose the wrong picture, don’t fret because you can exchange one picture for another. On the (Picture Tools) Format tab, click the Change Picture button and select a different picture in the Insert Picture dialog box.
Obtaining a picture online
Don’t have a suitable picture on your computer? You can obtain a picture online. As shown in Figure 3-3, the Online Pictures dialog box gives you the opportunity to obtain a picture from these places:
- The Internet: Search the Internet for pictures using the Bing search engine.
- A OneDrive folder: Obtain a picture from a folder you maintain or share at OneDrive (Book 10 explains OneDrive).
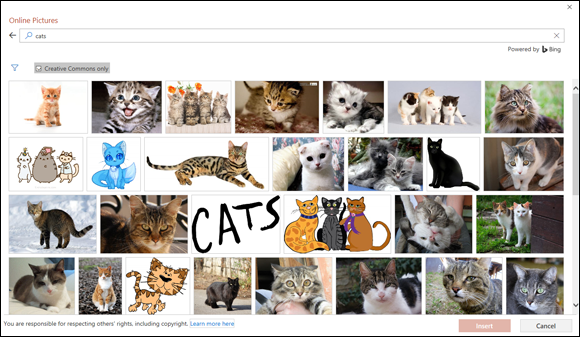
FIGURE 3-3: A picture search in the Online Pictures dialog box.
Follow these steps to obtain a picture from the Internet:
- Go to the Insert tab.
Click the Online Pictures button.
The Online Pictures dialog box opens (see Figure 3-3). In PowerPoint, you can also open this dialog box by clicking the Online Pictures icon in a content placeholder frame.
Direct your search to the Internet or a OneDrive folder.
You have come to a junction in the road:
- The Internet: Enter a search term in the Search box and press Enter. Next, scroll through the search results, select a picture, and click Insert.
- A OneDrive folder: Click the OneDrive to open your OneDrive folder and its subfolders. Then locate the picture you want and click Insert.
Your next task is to move the image into position and perhaps change its size. Chapter 4 of this minibook explains how to manipulate pictures and other objects.
Touching Up a Picture
Every picture can be a collaboration. You can do the following to make a picture your own as well as the work of the original artist:
- Softening and sharpening: Mute or polish a picture. See “Softening and sharpening pictures,” later in this chapter.
- Changing the brightness and contrast: Adjust a picture’s tone. See “Correcting a picture’s brightness and contrast.”
- Recoloring: Give your picture a brand-new set of colors or gray shades. See “Recoloring a picture.”
- Choosing an artistic effect: Take your picture for a walk on the wild side. See “Choosing an artistic effect.”
- Choosing a picture style: Present your picture in an oval fame, soft-edged frame, or other type of frame. See “Selecting a picture style.”
- Cropping: Cut out the parts of a picture that you don’t want. See “Cropping off part of a picture.”
- Removing picture areas: Keep the essentials of a picture and remove the rest. See “Removing the background.”
If you regret experimenting with your picture and you want to start all over, go to the (Picture Tools) Format tab and click the Reset Picture button. Then, on the drop-down list, choose Reset Picture to restore the picture to its original appearance, or choose Reset Picture & Size to restore the picture to its original appearance and size.
Softening and sharpening pictures
Figure 3-4 shows the effects of the softening/sharpening settings. These settings mute a picture or make it look more succinct. To soften or sharpen a picture, select it and use one of these techniques:
- On the (Picture Tools) Format tab, click the Corrections button and choose a Sharpen and Soften option on the drop-down list.
- Open the Format Picture task pane and drag the Sharpness slider or enter a negative or positive number in the text box. Negative numbers soften the picture; positive numbers sharpen it. To open the Format Picture task pane, click the Corrections button and choose Picture Corrections Options on the drop-down list.

FIGURE 3-4: Effects of the Sharpen/Soften settings.
Correcting a picture’s brightness and contrast
Figure 3-5 shows a picture that has been made over several times with the Brightness and Contrast settings. Brightness settings govern the overall brightness of a picture; contrast settings determine how distinguishable the different parts of the picture are from one another. Change a picture’s brightness and contrast to make it fit better on a page or slide. Select your picture and use one of these techniques:
- On the (Picture Tools) Format tab, click the Corrections button and choose a Brightness and Contrast option on the drop-down list.
- Open the Format Picture task pane and change the Brightness and Contrast settings. Negative Brightness settings make a picture darker; positive settings make it brighter. Negative Contrast settings mute the differences between the parts of a picture; positive settings heighten the differences. To open the Format Picture task pane, click the Corrections button and choose Picture Corrections Options on the drop-down list.

FIGURE 3-5: Effects of the Brightness and Contrast settings.
Recoloring a picture
Recolor a picture to give it a makeover. Figure 3-6 shows examples of Recolor options. As well as recoloring a picture, you can change its color saturation and color tone settings. Color saturation refers to the purity and intensity of the colors; color tone determines the degree of lightness and darkness. Recoloring is useful for giving a picture a uniform appearance. Select your picture and use these techniques to recolor it:
- On the (Picture Tools) Format tab, click the Color button and choose a Color Saturation, Color Tone, or Recolor option on the drop-down list. You can choose More Variations at the bottom of the list and choose a color on the sublist.
- Open the Format Picture task pane and change the Color Saturation and Color Tone settings. Change the Saturation setting to mute or bring out the colors; change the Temperature setting to make the color tones darker or lighter. To open the Format Picture task pane, click the Color button and choose Picture Color Options.

FIGURE 3-6: Examples of Recolor options.
Live-previewing really comes in handy when you’re recoloring a graphic. As you change Color Saturation and Color Tone settings, you can see the effect of your choices on the picture.
Choosing an artistic effect
Figure 3-7 demonstrates four of the 23 artistic effects that you can apply to a picture: Pencil Sketch, Glow Diffused, Glass, and Glow Edges. To experiment with the artistic effects and maybe find one to your liking, select your picture and use one of these techniques:
- Go to the (Picture Tools) Format tab, click the Artistic Effects button, and choose an effect on the drop-down list.
- Open the Format Picture task pane and choose an artistic effect. To open the Format Picture dialog box, click the Artistic Effects button and choose Artistic Effects Options.

FIGURE 3-7: Examples of artistic effects.
Selecting a picture style
A picture style is way of presenting or framing a picture. Figure 3-8 shows examples of picture styles. Picture styles include Simple Frame, Soft Edge Rectangle, Perspective Shadow, and Reflected Bevel. To choose a picture style for a picture, select it, go to the (Picture Tools) Format tab, open the Picture Styles gallery, and choose a style.

FIGURE 3-8: Examples of picture styles.
If you don’t like the picture style you chose (or you don’t care for any change you made to a picture), click the Reset Picture button to reverse all your format changes and start over.
If you like the picture styles, you may be enamored as well with the picture effects. On the (Picture Tools) Format tab, click the Picture Effects button and experiment with the options on the drop-down list and sublists.
Cropping off part of a picture
Cropping means to cut off part of a picture. I’m afraid you can’t use the Office cropping tool like a pair of scissors or an X-Acto knife to zigzag cut around the edges of a picture or cut a hole in the middle. You can, however, cut strips from the side, top, or bottom. In Figure 3-9, the cropping tool is being used to cut off extraneous parts of a picture.

FIGURE 3-9: Cropping off parts of a picture.
Select your picture, go to the (Picture Tools) Format tab, and use one of these techniques to crop it:
- Crop manually. Crop the picture by dragging its cropping handles. Click the Crop button. Cropping handles appear around the picture, as in Figure 3-9. Drag cropping handles to lop off a part or parts of the picture. Click the Crop button again or press Esc after you finish cropping.
- Crop to a shape. Crop the picture to a rectangle, circle, or other shape. Open the drop-down list on the Crop button, choose Crop to Shape, and select a shape in the Shapes gallery.
- Crop to proportions. Crop the picture to a proportional size setting. Open the drop-down list on the Crop button, choose Aspect Ratio, and choose a ratio. For example, choose 1:1 to crop to a perfect square with the width and height the same size.
- Crop by filling. For placing an image in a picture placeholder, crop the image to make it fit in the placeholder box. Open the drop-down list on the Crop button and choose Fill.
- Crop by fitting. For placing an image in a picture placeholder, shrink the picture to make it fit. Open the drop-down list on the Crop button and choose Fit.
With the cropping handles showing, you can drag the picture left, right, up, or down to determine where it is cropped.
When you crop a picture, you don’t cut off a part of it — not as far as your computer is concerned. All you do is tell Office not to display part of a graphic. The graphic is still whole. You can, however, compress a graphic after you crop it, and in so doing truly shave off a part of the graphic and thereby decrease the size of the file you’re working with, as “Compressing Pictures to Save Disk Space” explains later in this chapter.
Removing the background
Yet another way to diddle with pictures is to use the Remove Background command. This command endeavors to locate the unessential parts of a picture so that you can remove them. In Figure 3-10, I removed the sky and then placed a rainbow image behind the skyline.
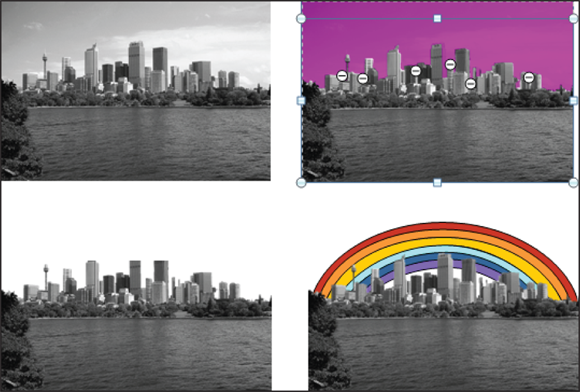
FIGURE 3-10: Removing parts of a picture (in this case the sky).
Select a picture and follow these steps to test-drive the Remove Background command:
On the (Picture Tools) Format tab, click the Remove Background button.
The Background Removal tab opens and the parts of your picture that Office wants to remove turn a lurid shade of magenta, which you could see in Figure 3-10 if this book were in color.
On the Background Removal tab, indicate what you want to keep and remove.
Keep your eye on what’s magenta and what’s not as you use these techniques, and consider zooming to 200 percent or more so that you can get a good look at your picture:
- Changing the size of the box: Drag the side and corner handles of the box to capture what you want to keep or remove.
- Marking what you want to keep: Click the Mark Areas to Keep button. The pointer changes into a pencil. Click your picture to indicate what you want to keep. Each time you click, a keep mark (a plus sign icon) appears on your picture.
- Marking what you want to remove: Click the Mark Areas to Remove button. The pointer changes to a pencil. Click your picture to indicate what you want to remove. When you click, a remove mark (a minus sign) appears.
Of course, you can click the Undo button to backtrack as you work. If you get thoroughly lost on the Background Removal tab, click the Discard All Changes button and start all over.
Click the Keep Changes button when you finish marking what you want to keep and remove.
How do you like your picture now? If it needs more work, click the Remove Background button again and diddle some more on the Background Removal tab. Click the Discard All Changes button if you want your original picture without the background removed.
Compressing Pictures to Save Disk Space
By compressing pictures, you reduce their file size and consequently the size of the file you’re working on. Not all pictures can be compressed, as the “Compression” section explains, earlier in this chapter, and some types of graphics lose their integrity when they’re compressed. You can’t resize lossy-compressed graphics without their looking odd.
Compress pictures to make files load faster and make email messages with file attachments travel faster over the Internet. Compressing a picture file reduces its pixels per inch (ppi) setting. Follow these steps to compress pictures:
Optionally, select the picture or pictures you want to compress if you want to compress only one or two; otherwise, select any picture.
The Compress Pictures command compresses all the graphics in a file unless you select graphics first.
- Go to the (Picture Tools) Format tab.
Click the Compress Pictures button.
You see the Compress Pictures dialog box, as shown in Figure 3-11.
- Select the Apply Only to This Picture check box if you selected graphics in Step 1 that you want to compress.
Click the Delete Cropped Areas of Pictures check box if you want to delete the unused portions of pictures you cropped.
As “Cropping off part of a picture” explains, earlier in this chapter, Office crops graphics in name only. It retains the cropped part of the graphic in case you want it back, but you can remove the cropped part as well by selecting this check box.
Choose a target output for the pictures.
These options tell Office which pixels-per-inch (ppi) setting to use when compressing graphics. Which setting you choose depends on where you intend to show your graphics.
- Click OK.

FIGURE 3-11: Compress pictures to reduce file sizes.