
Chapter 4
Drawing and Manipulating Lines, Shapes, and Other Objects
IN THIS CHAPTER
![]() Drawing, modifying, and manipulating lines and shapes
Drawing, modifying, and manipulating lines and shapes
![]() Creating WordArt images and 3-D models
Creating WordArt images and 3-D models
![]() Changing the color and border around an object
Changing the color and border around an object
![]() Selecting, resizing, moving, aligning, overlapping, rotating, and grouping objects
Selecting, resizing, moving, aligning, overlapping, rotating, and grouping objects
Office 365 comes with drawing commands for drawing lines, arrows, shapes, block arrows, stars, banners, and callout shapes. And Office provides numerous ways to manipulate these objects after you draw them. The drawing commands are meant to bring out the artist in you. Use them to make diagrams, fashion your own ideagrams, and illustrate difficult concepts and ideas. Lines and shapes give you a wonderful opportunity to exercise your creativity. A picture is worth a thousand words, so they say, and the drawing commands give you a chance to express yourself without having to write a thousand words.
In this chapter, you discover the many ways to manipulate lines, shapes, text boxes, icons, 3-D model images, WordArt images, and graphics. You discover how to lay out these objects on a page or slide, flip them, change their colors, resize them, move them, and otherwise torture them until they look just right. You discover how to make lines and arrows, draw by freehand, draw connections between shapes, and draw ovals, squares, other shapes, and WordArt images.
Use the techniques I describe in this chapter to bring something more to your Word documents, PowerPoint presentations, and Excel worksheets: originality. With the techniques I describe in this chapter, you can bring the visual element into your work. You can communicate with images as well as words and numbers.
The Basics: Making Lines, Arrows, and Shapes
Figure 4-1 demonstrates how you can use lines, arrows, and shapes (not to mention text boxes) to illustrate ideas and concepts. Sometimes, saying it with lines and shapes is easier and more informative than saying it with words. Even in Excel worksheets, you can find opportunities to use lines, arrows, and shapes. For example, draw arrows and lines on worksheets to illustrate which cells are used to compute formulas.

FIGURE 4-1: Exercise your creativity by including lines, arrows, and shapes in your work.
Follow these basic steps to make a line, arrow, or shape:
Go to the Insert tab.
 In Word, you must be in Print Layout view to draw and see lines and shapes.
Click the Shapes button to open the Insert Shapes gallery.
As shown in Figure 4-2, the Shapes gallery appears. The shapes are divided into several categories, including Lines, Basic Shapes, and Block Arrows, as well as a category at the top of the gallery where shapes you chose recently are shown. (PowerPoint also offers a Shapes gallery on the Home tab.)
- Select a line, arrow, or shape in the Shapes gallery.
Drag on your page, slide, or worksheet.
As you drag, the line, arrow, or shape appears before your eyes.
To alter your line, arrow, or shape — that is, to change its size, color, or outline — go to the (Drawing Tools) Format tab.
This tab offers many commands for manipulating lines and shapes. (Those commands are explained throughout this chapter.) You must select a line or shape to make the (Drawing Tools) Format tab appear.
In the upper-left corner of the (Drawing Tools) Format tab is another Shapes gallery for creating new shapes to go along with the one you created.

FIGURE 4-2: To make a line, arrow, or shape, choose it in the Shapes gallery.
Handling Lines, Arrows, and Connectors
Earlier in this chapter, Figure 4-1 shows examples of how you can use lines and arrows to present ideas. As well as lines and arrows, the Insert Shapes gallery offers connectors, the special lines that link shapes and can bend and stretch as you move shapes around. Use connectors along with lines and arrows to describe the relationships between the people or things in a diagram. These pages explain how to handle lines, arrows, and connectors.
Changing the length and position of a line or arrow
To change anything about a line or arrow, start by clicking to select it. You can tell when a line has been selected because round selection handles appear at either end. Follow these instructions to move a line or adjust its length or angle:
- Changing the angle of a line: Drag a selection handle up, down, or sideways. You can see where your line will be when you release the mouse button.
- Changing the length: Drag a selection handle away from or toward the opposite selection handle.
- Changing the position: Move the pointer over the line itself and click when you see the four-headed arrow. Then drag the line to a new location.
Changing the appearance of a line, arrow, or connector
What a line looks like is a matter of its color, its weight (how wide it is), its dash status (it can be filled out or dashed), and its cap (its ends can be rounded, square, or flat). To change the appearance of a line, start by selecting it, going to the (Drawing Tools) Format tab, and opening the drop-down list on the Shape Outline button (this button is in the Shape Styles group). As shown in Figure 4-3, you see a drop-down list with commands for handling the appearance of lines, arrows, and connectors:
- Color: Select a color on the drop-down list (refer to Figure 4-3).
- Width: Choose Weight on the drop-down list (refer to Figure 4-3) and then choose a line width on the submenu. You can also choose More Lines on the submenu to open the Format Shape task pane and change the width there. Enter a Width setting in points to make the line heavier or thinner.
- Dotted or dashed lines: Choose Dashes on the drop-down list and then choose an option on the submenu. Again, you can choose More Lines to open the Format Shape task pane and choose from many dash types and compound lines (refer to Figure 4-3).
- Line caps: Click the Shape Styles group button to open the Format Shape task pane (refer to Figure 4-3). Then select a cap type (Square, Round, or Flat).

FIGURE 4-3: Change the appearance of lines on the Shape Outline drop-down list and Format Shape task pane.
 You can also change the appearance of a line on the (Drawing Tools) Format tab by opening the Shape Styles gallery and selecting a style.
Attaching and handling arrowheads on lines and connectors
Arrows, of course, have arrowheads, and arrowheads on lines and connectors can go on either side or both sides of a line. What’s more, arrowheads come in different sizes and shapes. To handle arrowheads on lines and connectors, select your line or connector and go to the (Drawing Tools) Format tab. Then use one of these techniques to handle the arrowheads:
- Open the drop-down list on the Shape Outline button, choose Arrows (refer to Figure 4-3), and select an arrow on the submenu.
- Click the Shape Styles group button to open the Format Shape task pane. Then choose Arrow settings to describe where you want the arrowheads to be, what you want them to look like, and what size you want them to be.
To attach an arrowhead or arrowheads to a line or connector you’ve already drawn, select the line and proceed as though you were attaching arrowheads to a line that already has an arrow.
Connecting shapes by using connectors
Under Lines, the Shapes gallery offers six different connectors. Use connectors to link shapes and text boxes to form a diagram. Connectors differ from conventional lines in an important way: After you attach one to a shape, it stays with the shape when you move the shape. You don’t have to worry about remaking all the connections after you move a shape. You can move shapes at will and let the connectors between shapes take care of themselves.
Figure 4-4 shows three types of connectors in action. (By the way, if you came here to explore how to make a diagram, be sure to check out Chapter 2 of this minibook as well. It explains Office SmartArt diagramming.)
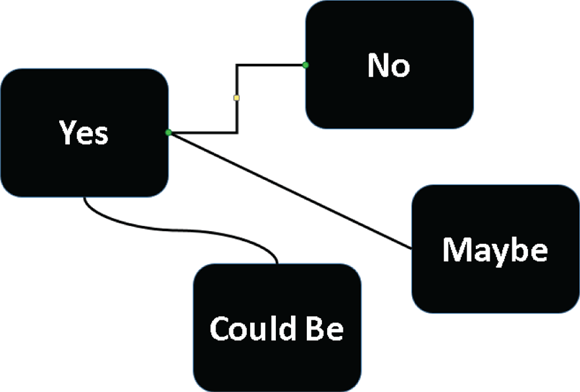
FIGURE 4-4: The three types of connectors (from top to bottom): elbow, straight, and curved.
 To connect shapes in Word, the shapes must be on the drawing canvas. Book 2, Chapter 6 describes the Word drawing canvas. (On the Insert tab, click the Shapes button and choose New Drawing Canvas to create one.)
Making the connection
Before you draw the connections, draw the shapes and arrange them on the slide where you want them to be in your diagram. Then follow these steps to connect two shapes with a connector:
Select the two shapes that you want to connect.
To select the shapes, hold down the Ctrl key and click each one.
- On the (Drawing Tools) Format tab, open the Shapes gallery.
- Under Lines, select the connector that will best fit between the two shapes you want to link together.
- Move the pointer over a selection handle on one of the shapes you want to connect.
Click and drag the pointer over a selection handle on the other shape, and when you see selection handles on that shape, release the mouse button.
When you click a connector, you see round, green selection handles on the shapes that are joined by the connector. These round handles tell you that the two shapes are connected and will remain connected when you move them.To delete a connector, click to select it and press Delete.
If your connector is attached to the wrong shape, don’t despair. Select the connector, and on the (Drawing Tools) Format tab, click the Edit Shape button and choose Reroute Connectors. Then move the pointer over the green handle on the side of the connector that needs to be attached elsewhere, click, drag the connector elsewhere on the other shape, and release the mouse button when you see the green selection handles.
Adjusting a connector
Chances are, your connector needs adjusting to make it fit correctly between the two shapes. Click to select your connector and follow these techniques to adjust it:
- Changing the shape of a connector: Drag the circle (or circles) on the connector. As you drag, the connector assumes different shapes.
- Changing the connector type: Right-click the connector, choose Connector Types, and choose Straight Connector, Elbow Connector, or Curved Connector on the submenu.
- Handling arrows on connectors: If the arrows on the connector aren’t there, are pointing in the wrong direction, or shouldn’t be there, change the arrowheads around using the same techniques you use with standard arrows. See “Attaching and handling arrowheads on lines and connectors,” earlier in this chapter.
Make sure that the connector lines in your diagram are consistent with one another. Give them the same style and appearance, or else it will be hard to make sense of your diagram.
Handling Rectangles, Ovals, Stars, and Other Shapes
Figure 4-5 illustrates how shapes can come in very handy for illustrating concepts and ideas. You can combine shapes to make your own illustrations. Apart from the standard rectangle and oval, you can draw octagons and various other “-agons,” arrows, stars, and banners. You are hereby encouraged to make shapes a part of your work, and you’ll be glad to know that drawing shapes is not difficult. These pages explain how to draw a shape, exchange one shape for another, change a shape’s symmetry, and enter words on a shape.

FIGURE 4-5: An example of using shapes (and connectors) to convey an idea.
In Word, you must be in Print Layout view to draw and handle shapes. If you intend to draw more than one shape in Word, create a drawing canvas to hold the shapes (on the Insert tab, click the Shapes button and choose New Drawing Canvas). Book 2, Chapter 6 describes the drawing canvas in Word.
Drawing a shape
Follow these steps to draw a shape:
On the Insert tab, click the Shapes button to open the Shapes gallery.
You can also insert shapes from the Shapes gallery on the (Drawing Tools) Format tab.
Select a shape in the gallery.
If you’ve drawn the shape recently, you may be able to find it at the top of the gallery under Recently Used Shapes.
Click and drag slantwise to draw the shape, as shown at the top of Figure 4-6.
Hold down the Shift key as you drag if you want the shape to retain its proportions. For example, to draw a circle, select the Oval shape and hold down the Shift key as you draw.
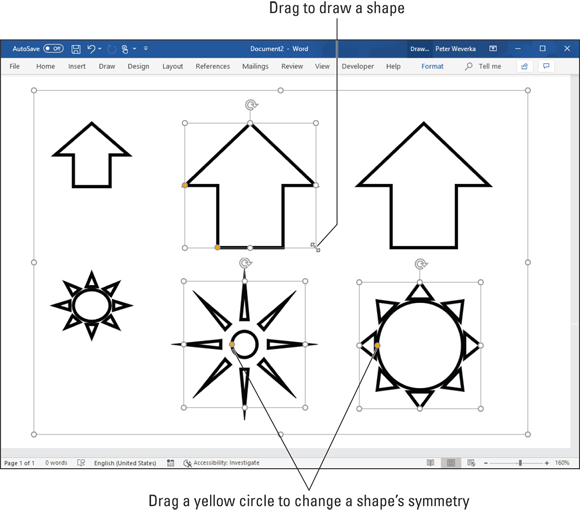
FIGURE 4-6: Drag to draw a shape (top); drag a yellow circle to change a shape’s symmetry (bottom).
Changing a shape’s size and shape
Selection handles appear on the corners and sides of a shape after you select it. With the selection handles showing, you can change a shape’s size and shape:
- Hold down the Shift key and drag a corner handle to change a shape’s size and retain its symmetry.
- Drag a side, top, or bottom handle to stretch or scrunch a shape.
Choosing a different shape
To exchange one shape for another, select the shape and follow these steps:
On the (Drawing Tools) Format tab, click the Edit Shape button.
You can find this button in the Insert Shapes group.
- Choose Change Shape on the drop-down list.
- Select a new shape in the Shapes gallery.
Changing a shape’s symmetry
A yellow circle, sometimes more than one, appears on some shapes. By dragging a circle, you can change a shape’s symmetry. Figure 4-6 (shown previously), for example, shows the same shape (the Sun shape) altered to show different symmetries. Notice where the yellow circles are. By dragging a yellow circle even a short distance, you can do a lot to change a shape’s symmetry.
Using a shape as a text box
Here’s a neat trick: Rather than use the conventional rectangle as a text box, you can use a shape. Figure 4-7 shows examples of shapes being used as text boxes. By placing words on shapes, you can make the shapes illustrate ideas and concepts.

FIGURE 4-7: Shapes can do double duty as text boxes.
Follow these instructions to handle text box shapes:
- Entering the text: Click in the shape and start typing. In Word, you can right-click and choose Add Text if you have trouble typing in the shape.
- Editing the text: Click in the text and start editing. That’s all there is to it. If you have trouble getting inside the shape to edit the text, select the shape, right-click it, and choose Edit Text on the shortcut menu.
- Changing the font, color, and size of text: Select the text, right-click the text, and choose Font. Then, in the Font dialog box, choose a font, font color, and a font size for the text.
- Allowing the shape to enlarge for text: You can allow the shape to enlarge and receive more text. On the (Drawing Tools) Format tab, click the Shape Styles group button, and in the Text Options/Text Box category of the Format Shape task pane, select the Resize Shape to Fit Text option button.
Drawing by Freehand
Visit the Draw tab in Word, PowerPoint, or Excel to draw by freehand. If you have a steady hand, you can draw on a page, slide, or worksheet. These pages explain how to draw lines, erase lines, and otherwise fool with a drawing until it is just so. They also explain how to draw math equations. The Draw tools work much better on a touchscreen, but if yours isn’t a touchscreen, you can still draw by dragging the mouse.
To draw by freehand in Word, you must be in Print Layout view and you must draw on a drawing canvas. Click the Drawing Canvas button on the Draw tab to create a drawing canvas. Book 2, Chapter 6 describes the drawing canvas in Word.
Freehand drawing with a pen or highlighter
Follow these steps to draw on a page, slide, or worksheet with a pen, pencil, or highlighter:
- Go to the Draw tab.
In the Pens gallery, choose a pen, pencil, or highlighter.
As shown in Figure 4-8, use one of these techniques:
- Tap or click the pen or highlighter you want.
- Tap or click the down-arrow on a pen or highlighter. From the menu that appears, choose a line thickness and line color.
Drag onscreen with your finger or the mouse.
As you make your drawing, you can return to the Pens gallery and choose different drawing tools, colors, and lines types.
- Press Esc when you finish drawing by freehand.

FIGURE 4-8: Visit the Draw tab to make freehand drawings.
To add a drawing tool to the Pens gallery, tap or click the Add Pen button. Then choose Pencil, Pen, or Highlighter on the drop-down menu and select a line thickness and color. To remove a drawing tool, open its drop-down menu and choose Delete.
Changing the look of freehand drawings
Not that you necessarily want to open this can of worms, but you can edit drawings. Starting on the Draw tab, here are instructions for changing the look and appearance of drawings:
- Selecting a line: Tap or click the line. Round selection handles appear to show the line is selected.
- Selecting more than one line: Hold down the Ctrl key and tap or click lines. In PowerPoint and Excel, you can also tap or click the Lasso Select button and drag slantwise across the drawing.
- Erasing a line: Tap or click the Eraser button and then tap or click the line. When you finish erasing, tap or click the Eraser button again (or press Esc). In PowerPoint, you can open the drop-down list on the Eraser button to choose erasers of different sizes.
- Changing a line’s color and thickness: Select a line and then choose a different option in the Pens gallery.
- Resizing: After you select a line, use one of these techniques to resize it:
- Drag a corner handle to change a shape’s size and retain its symmetry.
- Drag a side, top, or bottom handle to stretch or scrunch it.
- Moving: After you select a line, move the pointer on top of it. When you see the four-headed arrow, start dragging.
- Rotating: Select a line and drag its Rotate button.
- Deleting: Select a line and press Delete.
Drawing a math expression
The Insert tab offers the Equation Editor (click the Equation button) for writing mathematical equations, and you’re welcome to give it a spin, but much more useful than the Equation Editor is another tool on the Draw tab called Math Input Control. As shown in Figure 4-9, you can use it to construct mathematical expressions.
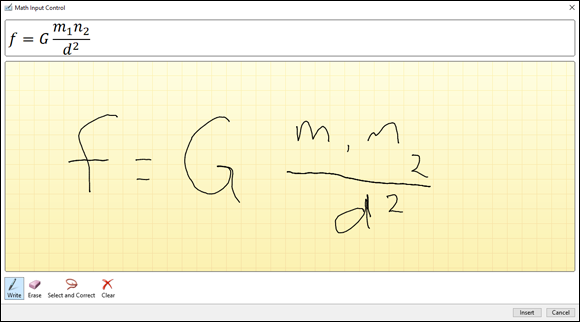
FIGURE 4-9: Writing a math expression.
To write a math expression, go to the Draw tab and tap or click the Ink to Math button. The Math Input Control dialog box appears (refer to Figure 4-9). Keep your eye on the Preview area while you follow these instructions to construct your equation:
- Writing: Tap or click the Write button and drag onscreen to write your expression.
- Erasing numbers and symbols: Tap or the Erase button and drag to erase a number or symbol.
- Correcting errors: If the Ink Equation Editor enters the wrong number or symbol, tap or click the Select and Correct button and then tap or click the part of the expression that is incorrect. A drop-down menu appears. If the correct number or symbol is on the menu, select it.
- Erasing the expression: Tap or click the Clear button to wipe the slate clean and start anew.
Click the Insert button to land the equation on an Excel worksheet, Word page, or PowerPoint slide.
Decorating Your Work with Icons
Does your Word page, PowerPoint slide, or Excel worksheet need decorating? If it does, consider tossing in a decorative icon like the ones shown in Figure 4-10. Office offers dozens of them.

FIGURE 4-10: Icons aplenty in the Insert Icons dialog box.
To insert an icon, go to the Insert tab and click the Icons button. The Insert Icons dialog box appears (refer to Figure 4-10). Select an icon and click the Insert button.
Treat your icon as you would any other object — a shape, a photo, or a graphic. Later in this chapter, “Manipulating Lines, Shapes, Art, Text Boxes, and Other Objects” explains how to resize, reshape, and reposition objects, icons included.
Inserting a 3-D Model
In Office lingo a 3-D model is a kind of graphic that you can rotate, turn, and present from different angles. Figure 4-11 shows an example of a 3-D model. By dragging the rotation icon, you can view the 3-D model in different ways.

FIGURE 4-11: An example of a 3-D model.
If you want to experiment with 3-D models, go to the Insert tab, click the 3D Models button, and choose From Online Sources on the drop-down list. The 3D Models dialog box appears. Select a 3-D model and click the Insert button.
WordArt for Embellishing Letters and Words
WordArt gives you the opportunity to decorate letters and words like letters and words on a birthday cake. Figure 4-12 shows the WordArt gallery, where WordArt is made, and an example of WordArt in action. After you insert WordArt, you can fool with the WordArt Styles buttons on the (Drawing Tools) Format tab and embellish the word or phrase even further.

FIGURE 4-12: A WordArt image.
Creating WordArt
Follow these steps to create WordArt:
On the Insert tab, click the WordArt button.
A drop-down list with WordArt styles appears.
Select a WordArt style.
Don’t worry about selecting the right style; you can choose a different one later on.
Enter text in the WordArt text box.
Congratulations. You just created WordArt.
Editing WordArt
Usually, you have to wrestle with WordArt before it comes out right. Select the words, go to the (Drawing Tools) Format tab, and use these techniques to win the wrestling match:
- Editing the words: Click in the WordArt text box and edit the text there.
- Choosing a new WordArt style: Open the WordArt Styles gallery and choose a style.
- Changing the letters’ color: Click the Text Fill button and choose a color on the drop-down list.
- Changing the letters’ outline: Click the Text Outline button and make choices to change the letters’ outline.
To apply color or an outline to some of the letters or words, select the letters or words before choosing options on the (Drawing Tools) Format tab.
Manipulating Lines, Shapes, Art, Text Boxes, and Other Objects
After you insert a shape, line, text box, image, graphic, diagram, chart, or embedded object in a file, it ceases being what it was before and becomes an object. Figure 4-13 shows eight objects. I’m not sure whether these eight objects resent being objectified, but Office objectifies them. As far as manipulating these items in Office is concerned, these are just objects.

FIGURE 4-13: Examples of objects.
The techniques for manipulating objects are the same whether you’re dealing with a line, shape, graphic, diagram, or text box. The good news from your end is that you have to master only one set of techniques for handling these objects. Whether you want to move, change the size of, change the color of, or change the outline of a text box, graphic, or shape, the techniques are the same.
In the remainder of this chapter are instructions for doing these tasks with objects:
- Selecting: Before you can do anything to objects, you have to select them. See “Selecting objects so that you can manipulate them.”
- Making use of the rulers and grid: Rulers (in Word, PowerPoint, Excel, and Publisher) and the grid (in Word and PowerPoint) can be very helpful for aligning and placing objects. See “Hiding and displaying the rulers and grid.”
- Changing an object’s size and shape: You can enlarge, shrink, stretch, and scrunch objects to make them wider or taller. See “Changing an Object’s Size and Shape.”
- Applying color: Changing an object’s color makes it stand out. You can apply patterns to some objects. See “Changing an Object’s Color, Outline Color, and Transparency.”
- Moving and positioning: You can land objects with precision in a Word document, PowerPoint slide, or Excel worksheet. See “Moving and Positioning Objects.”
- Aligning and distributing: Another way to move and position objects is to realign or redistribute them across a page, slide, or worksheet. See “Tricks for aligning and distributing objects.”
- Overlapping: When you’re dealing with several objects, they’re bound to overlap — and sometimes overlapping objects make for an interesting effect. On the right side of Figure 4-13, for example, several objects overlap and give the impression that they were “dropped there.” See “When objects overlap: Choosing which appears above the other,” later in this chapter, to handle overlapping objects.
- Rotating and flipping: Viewers turn their heads when they see an object that has been flipped or rotated. You can rotate and flip shapes, lines, text boxes, graphics, and WordArt images. See “Rotating and flipping objects.”
- Grouping: To make working with several different objects easier, you can group them so that they become a single object. After objects have been grouped, manipulating them — manipulating it, I should say — is easier. See “Grouping objects to make working with them easier,” later in this chapter.
If you sighed after you finished reading this long list, I don’t blame you. But be of good cheer: Most of these commands are easy to pick up, and including lines, shapes, text boxes, WordArt images, and graphics in your work is a good way to impress your friends and intimidate your enemies.
Selecting objects so that you can manipulate them
Before you can move or change the border of a graphic, text box, or other object, you have to select it. To select an object, simply click it. Sometimes, to align or decorate several objects simultaneously, you have to select more than one object at the same time. To select more than one object:
- Ctrl+click them. In other words, hold down the Ctrl key as you click the objects.
- On the Home tab, click the Select button and choose Select Objects on the drop-down list. Then click on one side of the objects you want to select and drag the pointer across the other objects.
- Display the Selection pane. It lists objects on the drawing canvas (Word), slide (PowerPoint), or worksheet (Excel). You can click or Ctrl+click object names in the pane to select objects. Figure 4-14 shows the Selection pane. Use these techniques to open it:
- On the (Drawing Tools) Format tab or (Picture Tools) Format tab, click the Selection Pane button.
- On the Home tab, click the Select button and choose Selection Pane on the drop-down list. (You may have to click the Editing button first, depending on the size of your screen.)

FIGURE 4-14: Click an object in the Selection pane to select it.
After you select an object, its selection handles appear. Objects have eight selection handles, one at each corner and one at each side. To tell whether an object is selected, look for its selection handles.
Hiding and displaying the rulers and grid
Word, PowerPoint, and Excel offer two rulers, one along the top of the window and one along the left side. Use the rulers to help place and align objects. To display or hide these rulers, use one of these techniques:
- On the View tab, click the Ruler check box. (You may have to click the Show button first, depending on the size of your screen.) To see the rulers, you must be in Print Layout view In Word and Page Layout view in Excel.
- In PowerPoint, you can also hide or display rulers by right-clicking a slide (but not an object or frame) and choosing Ruler on the shortcut menu.
In Word and PowerPoint, the grid can come in very handy for aligning objects. On the View tab, click the Gridlines check box to see the grid. (You may have to click the Show button first.) The grid settings in PowerPoint are quite sophisticated (see Book 4, Chapter 4 for details).
By the way, fans of the metric system will be pleased to know that you can display centimeters (or millimeters, points, or picas) on the ruler instead of inches. On the File tab, choose Options. In the Options dialog box, go to the Advanced category, open the Show Measurements in Units Of drop-down list, and choose a unit of measurement.
Changing an Object’s Size and Shape
Usually when an object arrives onscreen, you have to wrestle with it. You have to change its size (and sometimes its shape as well). Figure 4-15 demonstrates how to resize an object. Select your object and use one of these methods to change its size and shape:
- “Eyeball it”: Hold down the Shift key and drag a corner selection handle to make the object larger or smaller but maintain its proportions. Drag a selection handle on the side to stretch or crimp an object and change its shape as well as its size.
- Enter height and width measurements: On the Format tab, enter measurements in the Height and Width boxes (see Figure 4-15). Depending on the size of your screen, you may have to click the Size button before you can see these boxes.
- Open the Format task pane or Layout dialog box: Click the Size group button on the Format tab to open the Format task pane (in PowerPoint and Excel) or the Layout dialog box (in Word). Then change the Height and Width settings (see Figure 4-15).
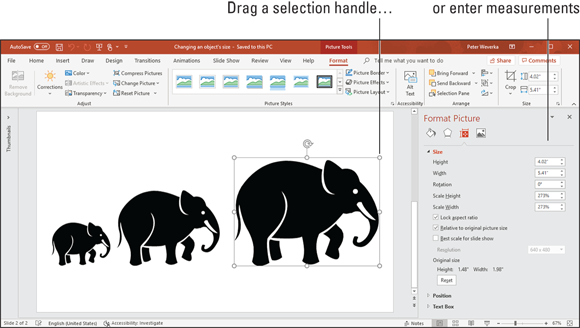
FIGURE 4-15: Ways to resize an object.
Whether you can change an object’s shape as well as its size depends on whether the object’s aspect ratio is locked. If you’re wrestling with an object and it won’t do your bidding — if it refuses to change shape or it changes shape, and you don’t want it to do that — unlock its aspect ratio setting. Click the Size group button, and in the task pane or dialog box that appears, select or deselect the Lock Aspect Ratio check box. When an object’s aspect ratio is locked, it maintains its shape as you change its size, but when it’s unlocked, you can change its shape as well as its size.
You can change the size and shape of several objects at one time by selecting all the objects before giving a command to change sizes. Being able to change objects’ size this way is convenient when you want to change the size of many objects but maintain their relationships to one another.
Changing an Object’s Color, Outline Color, and Transparency
If an object’s color doesn’t suit you, you have the right to change colors. For that matter, you can opt for a “blank” object with no color or make the object semitransparent. As the saying goes, “It’s a free country.”
Office has its own lingo when it comes to an object’s color. Remember these terms when you make like Picasso with your shapes, text boxes, and graphics:
- Fill colors: The color that fills in an object is called the fill. You can apply fill color to shapes, text boxes, and WordArt, but not pictures. Besides colors, you can use a picture, gradient, or texture as the fill. (See the next topic in this chapter, “Filling an object with color, a picture, or a texture.”)
- Outline colors: The line that goes around the perimeter of an object is called the outline. You can choose a color, style, and line width for outlines. (See “Putting the outline around an object,” later in this chapter.)
The easiest way to decorate a shape, text box, or WordArt image is to visit the Format tab and make a selection in the Styles gallery. These ready-made gallery selections can spare you the work of dealing with fill color and outlines. Just remember not to mix and match different Style options; use them with consistency.
Filling an object with color, a picture, or a texture
Shapes, text boxes, and WordArt images are empty when you first create them, but you can fill them with a color, picture, gradient, or texture by following these basic steps:
- Select the object that needs a facelift.
Apply a color, picture, gradient, or texture to the object.
Use one of these application techniques:
- On the Format tab, click the Shape Fill button. Then, on the drop-down list, choose a color, picture, gradient, or texture.
- Click the Shape Styles group button to open the Format task pane, as shown in Figure 4-16. Then choose a color, picture, gradient, or texture.
Click the Shape Fill button and choose No Fill to remove the color, picture, gradient, or texture from an object.

FIGURE 4-16: Shape fills (from left to right): color, picture, gradient, and texture.
Figure 4-16 shows the same object filled with a color, picture, gradient, and texture. Which do you prefer? Your choices are as follows:
- Color: Applies a single color to the object.
- Picture: Places a picture in the object. You see the Insert Picture dialog box. Choose a picture and click the Insert button.
- Gradient (Word and PowerPoint only): Applies gradient color shading to the object. You can choose between various shading styles.
- Texture: Offers 24 patterns meant to simulate various surfaces. The choices include Granite, Paper Bag, and Pink Tissue Paper. Be sure to use the scroll bar to see all the choices.
- Pattern: Applies a pattern to the object. Select Pattern Fill in the Format task pane and then choose a pattern.
Making a color transparent
A transparent color is like gauze because instead of being solid, it shows what’s behind it. Transparent colors are especially useful in text boxes because the text shows through and can be read easily. Follow these steps to make the fill color in a text box, shape, or WordArt image transparent or semi-transparent:
Right-click the object and choose Format.
The Format task pane opens (see Figure 4-16).
In the Fill category, drag the Transparency slider to choose how transparent a color you want.
At 100%, the color is completely transparent and, in fact, not there; at 1%, the color is hardly transparent at all.
You can also make a graphic transparent by recoloring it. See Chapter 3 of this minibook.
Putting the outline around an object
The outline is the line that runs around the perimeter of an object. Put an outline color around an object to give it more definition or make it stand out. Figure 4-17 shows examples of outlines. What a shape outline looks like has to do with the color, width, and dash style you choose for it.

FIGURE 4-17: An object’s outline has to do with its color, width, and dash type.
Follow these steps to change an object’s outline:
- Select the object.
Change the outline.
Use one of these techniques to change the outline:
- On the Format tab, click the Shape Outline button. Then, on the drop-down list, choose a color, weight, and dash type.
- Click the Shape Styles group button to open the Format task pane (see Figure 4-17). Then, under Line, choose a color, width, and dash type.
To remove the outline from an object, click the Shape Outline button and choose No Outline or choose No Line in the Format task pane.
Moving and Positioning Objects
Moving objects is considerably easier than moving furniture. Select the object you want to reposition and use one of these techniques to land it in the right place:
- Dragging: Move the pointer over the perimeter of the object, click when you see the four-headed arrow, and drag the object to a new location. Hold down the Shift key as you drag to move an object either horizontally or vertically in a straight line.
- Using a task pane or dialog box (in PowerPoint and Word): On the Format tab, click the Size group button. (Depending on the size of your screen, you may have to click the Size button first.) You see the Format task pane or Layout dialog box. On the Position category or tab, enter Horizontal and Vertical position measurements to place the object on the slide or page.
- Nudging: If you can’t quite fit an object in the right place, try using a Nudge command. Nudge commands move objects up, down, left, or right. Press one of the arrow keys (↑, ↓, ←, →) to move the object a little bit. Hold down the Ctrl key as you press an arrow key to make the object move by tiny increments.
Use the task pane or dialog box method of positioning objects when you want objects to be in the exact same position on different pages or slides.
Tricks for aligning and distributing objects
When several objects appear in the same place, use the Align and Distribute commands to give the objects an orderly appearance. You can make your Word page, PowerPoint slide, or Excel worksheet look tidier by aligning the objects or by distributing them so that they are equidistant from one another. Office offers special commands for doing these tasks.
Aligning objects
The Align commands come in handy when you want objects to line up with one another. Suppose you need to align several shapes. As shown in Figure 4-18, you can use an Align command to line up the shapes with precision. You don’t have to tug and pull, tug and pull until the shapes are aligned with one another. In the figure, I used the Align Top command to line up the shapes along the top. In Word and PowerPoint, besides aligning objects with respect to one another, you can align objects or with respect to the page (in Word) or the slide (in PowerPoint). For example, you can line up objects along the top of a slide.

FIGURE 4-18: Use the Align commands to align objects. These objects are aligned along the top.
Follow these steps to line up objects:
Move the objects where you roughly want them to be, and if you want to align objects with respect to one another, move one object to a point that the others will align to.
When Office aligns objects with respect to one another, it aligns them to the object in the leftmost, centermost, rightmost, topmost, middlemost, or bottommost position, depending on which Align command you choose.
Select the objects you want to align.
Earlier in this chapter, “Selecting objects so that you can manipulate them” looks at selection techniques.
Go to the Format tab.
You can also go to the Layout tab in Word.
Click the Align button, and on the drop-down list, choose whether to align the objects with respect to one another or with respect to the page or page margin (in Word) or a slide (in PowerPoint).
Depending on the size of your screen, you may have to click the Arrange button to get to the Align button.
- Click the Align button again and choose an Align command — Left, Center, Right, Top, Middle, or Bottom.
If necessary, drag the objects on the page.
That’s right — drag them. After you give an Align command, the objects are still selected, and you can drag to adjust their positions.
Distributing objects so that they are equidistant
The Distribute commands — Distribute Horizontally and Distribute Vertically — come in handy for laying out objects on a page or slide. These commands arrange objects so that the same amount of space appears between each one. Rather than go to the trouble of pushing and pulling objects until they are distributed evenly, you can simply select the objects and choose a Distribute command.
Figure 4-19 demonstrates how the Distribute commands work. In the figure, I chose the Distribute Horizontally command so that the same amount of horizontal (side-by-side) space appears between the objects. Distributing objects such as these on your own is a waste of time when you can use a Distribute command.

FIGURE 4-19: The Distribute commands rearrange objects so that the same amount of space is between them.
Follow these steps to distribute objects horizontally or vertically on a page or slide:
Arrange the objects so that the outermost objects — the ones that will go on the top and bottom or left side and right side — are where you want them to be.
In other words, if you want to distribute objects horizontally across a page, place the leftmost object and rightmost object where you want them to be. Office will distribute the other objects equally between the leftmost and rightmost object.
- Select the objects.
Go to the Format tab.
You can also go to the Layout tab in Word.
Click the Align button and choose a Distribute option on the drop-down list.
To find the Align button, you may have to click the Arrange button first, depending on the size of your screen.
When objects overlap: Choosing which appears above the other
On a page or slide that is crowded with text boxes, shapes, and graphics, objects inevitably overlap, and you have to decide which object goes on top of the stack and which on the bottom. In a Word document, you have to decide as well whether text appears above or below objects.
Objects that deliberately overlap can be interesting and attractive to look at. On the right side of Figure 4-20, for example, a graphic image and text box appear in front of a shape. Makes for a nice effect, no? These pages explain controlling how objects overlap with the Bring and Send commands and the Selection pane.

FIGURE 4-20: An example of objects overlapping.
Controlling overlaps with the Bring and Send commands
Word, PowerPoint, and Excel offer these commands for handling objects in a stack:
- Bring Forward: Moves the object higher in the stack
- Bring to Front: Moves the object in front of all other objects in the stack
- Send Backward: Moves the object lower in the stack
- Send to Back: Moves the object behind all other objects
Word offers these additional commands:
- Bring in Front of Text: Moves the object in front of text on the page
- Send Behind Text: Moves the object behind text on the page so that the text appears over the object
Select an object and use one of these techniques to give a Bring or Send command:
On the Format tab, click the Bring Forward or Send Backward button, or open the drop-down list on one of these buttons and choose a Bring or Send command (refer to Figure 4-20). Depending on the size of your screen, you may have to click the Arrange button before you can get to a Bring or Send command.
In Word, the Bring and Send commands are also available on the Layout tab; in Excel, they are available on the Page Layout tab; in PowerPoint, they are also available on the Home tab, although you may have to click the Arrange button first, depending on the size of your screen.
- Right-click an object and choose a Bring or Send command on the shortcut menu.
In Word, you can’t choose a Bring or Send command unless you’ve chosen a text-wrapping option apart from In Line with Text for the object. Select your object, go to the Format tab, click the Text Wrap button, and choose an option on the drop-down list apart from In Line with Text. Book 2, Chapter 6 looks at text wrapping in Word.
If an object on the bottom of the stack shows through after you place it on the bottom, the object on the top of the stack is transparent or semi-transparent. Transparent objects are like gauze curtains — they reveal what’s behind them. If you want to make the object on the top of the stack less transparent, see “Making a color transparent,” earlier in this chapter.
Controlling overlaps with the Selection pane
Another way to control how objects overlap is to open the Selection pane, select an object, and click the Bring Forward or Send Backward button as necessary to move the object up or down in the stack. Earlier in this chapter, “Selecting objects so that you can manipulate them” explains the Selection pane. (On the Format tab, click the Selection Pane button to open it.)
Rotating and flipping objects
Rotating and flipping objects — that is, changing their orientation — is a neat way to spruce up a page or slide, as Figure 4-21 demonstrates. You can rotate and flip these kinds of objects: lines, shapes, text boxes, graphics, and WordArt images. To flip or rotate an object, select it and do one of the following:
- Roll your own: Drag the object’s rotation handle, the semicircle that appears after you select it. Hold down the Shift key as you drag to rotate the shape by 15-degree increments.
- Choose a Rotate or Flip command: On the Format tab, click the Rotate button and choose an option on the drop-down list (refer to Figure 4-21). The Rotate commands rotate objects by 90 degrees; the Flip commands flip objects over. The Rotate button is also found on the Layout tab (in Word), the Page Layout tab (in Excel), and the Home tab (in PowerPoint). You may have to click the Arrange button to see the Rotate button, depending on the size of your screen.
- Open the Format task pane or Layout dialog box: On the Rotate drop-down list, choose More Rotation Options to open the Format task pane or Layout dialog box. Enter a degree measurement in the Rotation text box.

FIGURE 4-21: Members of an audience turn their heads when objects are rotated or flipped.
To rotate several objects simultaneously, Ctrl+click to select each object and then give a rotation command.
Grouping objects to make working with them easier
Consider the graphic image, shape, and text box in Figure 4-22. To move, resize, or reshape these objects, I would have to laboriously move them one at a time — that is, I would have to do that if it weren’t for the Group command.

FIGURE 4-22: You can move, resize, and reshape grouped objects as though they were a single object.
The Group command assembles different objects into a single object to make moving, resizing, and reshaping objects easier. With the Group command, you select the objects that you want to “group” and then you wrap them into a bundle so that they become easier to work with.
Grouping objects
Select the objects and do one of the following to group them into one happy family:
- On the Format tab (or the Layout tab in Word, the Page Layout tab in Excel, and the Home tab in PowerPoint), click the Group button and choose Group on the drop-down list. Depending on the size of your screen, you may have to click the Arrange button to get to the Group button.
- Right-click one of the objects you selected and choose Group⇒ Group.
After objects are grouped, they form a single object with the eight selection handles.
To add an object to a group, select the object and the grouped objects by Ctrl+clicking and then choose the Group command.
Ungrouping objects
To ungroup an object and break it into its components parts, perhaps to fiddle with one of the objects in the group, select the object, go to the Format tab, click the Group button, and choose Ungroup.