
Chapter 14
Digging into Teams Administration
IN THIS CHAPTER
![]() Discovering the most common tasks in Teams administration
Discovering the most common tasks in Teams administration
![]() Getting familiar with Teams settings for your entire organization
Getting familiar with Teams settings for your entire organization
![]() Creating policies for Teams apps
Creating policies for Teams apps
![]() Managing devices
Managing devices
Whether you’ve found yourself as an “accidental admin” or you signed up be the Microsoft Teams administrator for your organization, you need to dig deep and get familiar with the Teams Admin Center. Even if you aren’t an administrator, it is a good idea to be familiar with the settings and options that cause Teams to behave in a certain way. Are you not seeing what you expect to see in the navigation in Teams? There is a setting that controls that. Are you unable to delete messages in a channel? There is a setting for that, too. There are more settings than can possibly be covered in this book, but I cover some of the most common ones in this chapter.
In this chapter, you dig deeper into the Teams Admin Center and learn how to perform common tasks such as configuring teams, messages, and other settings across your entire organization. You learn how to configure policies for apps and Teams navigation as well as manage devices such as desk and conferences phones.
Configuring Teams
It can be awkward to say that you are configuring a Teams team in the Teams Admin Center. But that is exactly what you are doing. As you have learned throughout the book, a team is a group of people in Microsoft Teams, and it is core to how you use and interact with others in your organization. You can manage how teams work and set policies for them in the Teams Admin Center via the Teams option in the left navigation pane.
To manage the settings for a team in your organization, select Teams from the left navigation pane and then choose Manage Teams. A listing of all the teams in your organization will be displayed, as shown in Figure 14-1. To view the settings for a team, click the name of the team you want to view (see Figure 14-2).
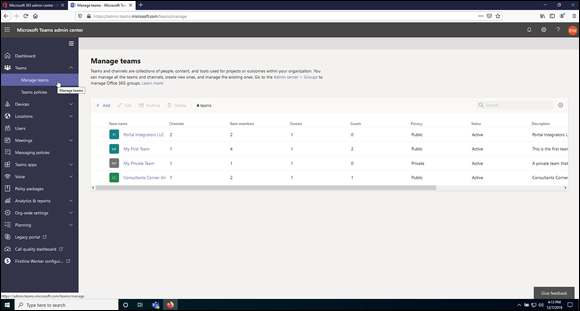
FIGURE 14-1: Select Manage Teams to see a list of the teams in your organization.
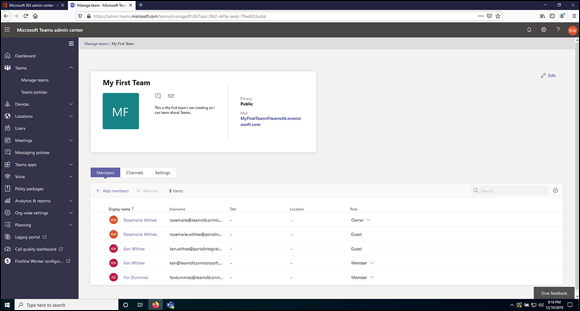
FIGURE 14-2: Viewing the settings for a team in the Teams Admin Center.
 By default, anyone in your organization can create new teams. You can keep an eye on how many teams are being created and if they are public or private via the Manage Teams option. When I am helping roll out Microsoft Teams to an organization, I work with the administrators to build a habit of keeping tabs on how many teams pop up across the organization.
 Currently, there isn’t a setting to disable the creation of new teams. In order to do so you have to go into the settings of the Microsoft 365 or Office 365 tenant and disable group creation.
When viewing the details about a team, you can select tabs to see the members of the team as well as any channels associated with the team. There is also a tab for the team’s general settings where you can view the configuration of channels and conversations. To edit these settings, click the Edit link that appears in the top-right corner of the screen. Alternatively, you can go immediately to these general settings by selecting a team in the main list (when you first open the list of teams) and then clicking Edit, as shown in Figure 14-3. Here you can allow people to be able to delete or edit their messages as well as be able to create or delete channels in the team.
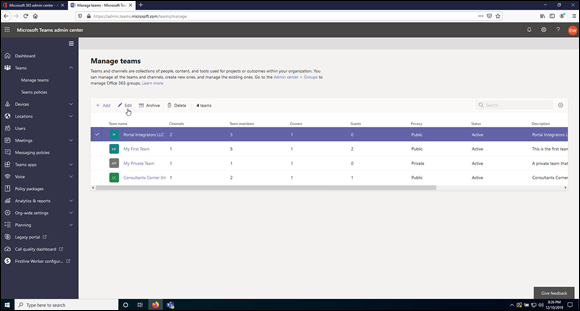
FIGURE 14-3: Selecting a team and then clicking Edit to view a team’s general settings.
Notice the Archive button in Figure 14-3. It is to the right of the Edit button. When a team is not needed anymore, you can archive it and then bring it back if you ever need it again. I cover how to archive a team in Chapter 16.
Making Configuration Changes for Meetings
You can fine-tune several settings to make Teams meetings fit the needs of your organization. Under Meetings in the left navigation pane, you will find options to adjust the settings and policies for conference bridges, meetings, and live events.
Conference bridges
A conference bridge is a phone number you can use for large meetings that allows people to call into using a traditional phone. You can add toll and toll-free numbers and require callers to record their names and announce themselves to everyone in the meeting if you choose. You will find conference bridge settings under the Meetings tab in the left navigation pane. However, if you have not signed up for a voice license then you won’t see the conference bridge option in the navigation.
When you select Bridge Settings, a list of the conference bridges currently in use is displayed. Selecting Bridge Settings at the top of the list of numbers opens a dialog box where you can configure conference bridge behavior, as shown in Figure 14-4. Selecting Add lets you add a new conference bridge phone number.
Check out Chapters 11 and 12 for more information about conference bridges and adding new phone numbers to Teams.
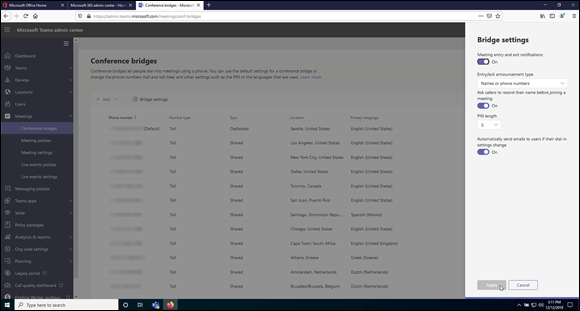
FIGURE 14-4: Configuring the behavior of a conference bridge.
Meeting policies
Policies are a common theme in Teams. A policy is a grouping of settings that you create and then assign to teams, users, or channels. Throughout the Teams Admin Center, you will find areas where you can create policies. For example, in the Meetings section, you can create policies that relate to meetings. You will also find policies for teams, messaging, calling, and many others. Whenever you see an area of the Teams Admin Center to set a policy, think of it as a way to define a group of settings that you can apply in Teams.
Microsoft has already set several default policies for you, and you can tweak them or create new ones from scratch. I walk through creating a setup policy to change Teams navigation later in this chapter.
Meeting settings
One area you will want to review and spend time understanding is the Meeting Settings option. The Meeting Settings screen lets you set up exactly how meetings behave for Teams users. For example, you can allow or disallow anonymous people to join meetings, configure how meeting invites are formatted and sent, and configure how meetings work with the network. The Meetings settings screen is shown in Figure 14-5.
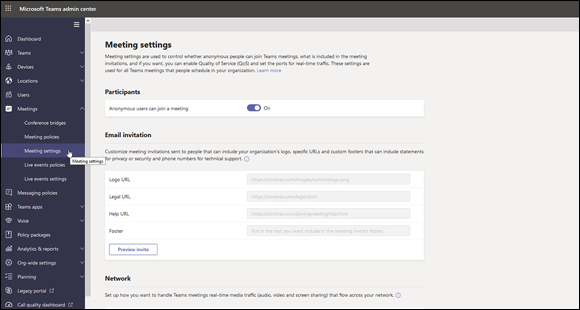
FIGURE 14-5: Configuring how meetings work in Teams.
Live events policies
Live events allow you to broadcast meetings and presentations to many people at once. Think of giving a webinar where you have people sign up for the webinar and you demonstrate or discuss a product or service or walk through a presentation. Some of the well-known products that compete in this area are GoToMeeting (www.gotomeeting.com) and WebEx (www.webex.com). I have used other server products, too, but I prefer using Teams Live Events now because it is part of my existing subscription, and I have not had any issues with people being able to join my broadcast events from many different devices.
As a Teams administrator, you can configure how Live Events work with the members of your organization. Microsoft has already created a default policy for you, and you can tweak it or create new ones. When you create a new policy, you can allow scheduling of live events, allow a transcription of the event for attendees, and set who can join scheduled events and who can record. Figure 14-6 shows setting up a new policy that only specific users or groups in Teams can join. The other options are to allow everyone in the world to join, or only everyone within your organization.

FIGURE 14-6: Configuring a new live events policy and setting who can join.
Live events settings
In addition to creating live event policies, you can also configure settings that apply to all live events regardless of the policy they are set to use. You can configure a custom web address that people attending a live event can use in order to obtain support and also set up third-party video distribution providers, as shown in Figure 14-7.
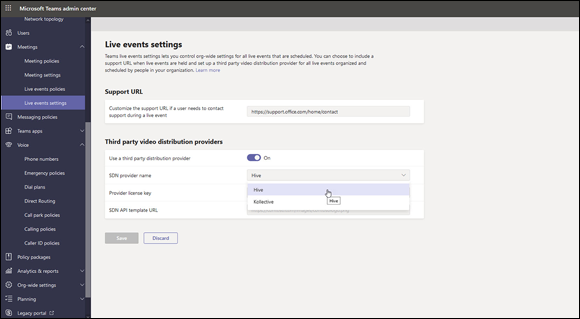
FIGURE 14-7: Configuring a third-party video distribution provider for all live events in the organization.
Adjusting Settings for the Entire Organization
You can configure some settings that affect the behavior of Teams in general and across your entire organization. For example, you can allow guests to join teams and configure what they can do. (I cover this in detail in Chapter 7.)
One particularly useful setting is integrating email with Teams channels. When this setting is configured, you can send email to a special email address, and the email message will appear in a team’s channel. You will find this setting in the Email integration section of the Teams Settings screen, as shown in Figure 14-8. The email address is auto-generated, and you can obtain the email address for each channel by selecting Get Email Address from the ellipsis drop-down menu that appears next to a channel name, as shown in Figure 14-9.
To avoid spam and unwanted email appearing in your Teams channels, you can filter to allow only certain domains to be able to send email to the channel. I like to set the domain of the organization I am working with so that outside members cannot send email to the channel by default.
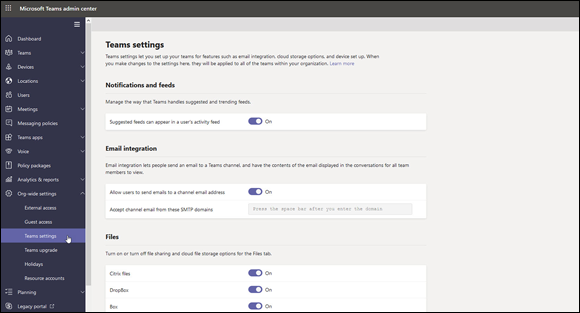
FIGURE 14-8: Setting up email integration with Teams channels.
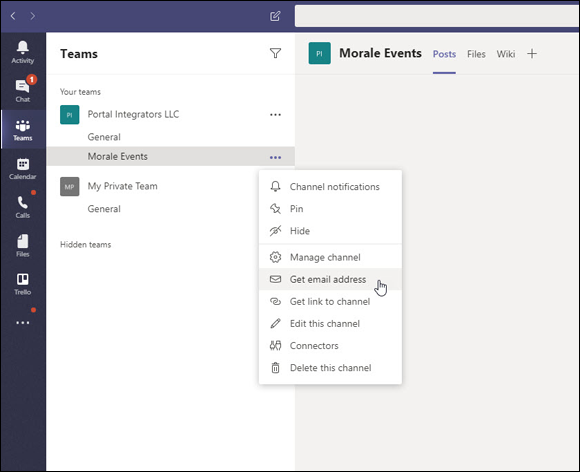
FIGURE 14-9: Getting the email address for a channel.
Identifying Locations of Offices and Buildings
The nature of the Internet is that if you are connected to it, you can be anywhere in the world and still use all the services it has to offer. Phone systems that work using the Internet, like Teams, create a conundrum. How do you keep track of an organization’s physical locations like offices and other types of buildings if its members use Internet-based services like Teams? Team members could be using Teams and calling in from anywhere in the world. The Teams Admin Center has a navigational component called Locations that you can use to set physical locations for users as well as addresses for emergency services.
To provide emergency services with critical information in times of emergency, it is important to keep emergency addresses up-to-date and accurate. You can add physical locations such as an individual office or open workspace on a specific floor of the building so that emergency services will know exactly where to go in times of emergency.
To add a physical location to a Teams user, follow these steps:
- Open your web browser and log in to the Teams Admin Center at
https://admin.teams.microsoft.com. - In the left navigation pane, expand the Locations option and select Emergency Addresses.
- Select +Add to add a new emergency address, as shown in Figure 14-10.
- Enter a name, a description, and the address.
Select Save to save the location.
The location will now appear anywhere you need to assign a location for a user. For example, you can set the location for a phone number, as shown in Figure 14-11. I cover working with phone numbers in Chapter 12.
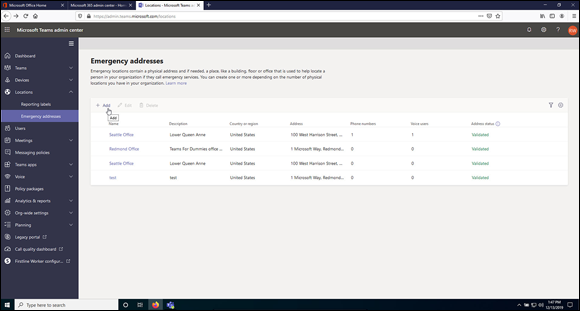
FIGURE 14-10: Adding a new emergency address for a Teams user.

FIGURE 14-11: Setting a physical location for a phone number.
Adding Default Teams Apps
In Chapter 5, you learn how apps can be installed into Teams in order to extend Teams and add functionality. As a Teams administrator, you can control which apps are available to your organization and install apps that will appear for users automatically.
Six default apps are pinned to the left navigation pane in Teams. These include: Activity, Chat, Teams, Calendar, Calling, and Files. These apps directly relate to the apps that appear in the global default org-wide setup policy.
You can add a new default app that will appear in the navigation pane for all users in your organization by adding it to the global default org-wide policy. Trello (https://trello.com) is a popular task management system used by many organizations. Let's add it as an app to the default setup policy so it shows up for every user.
To add an app to the default setup policy for every Teams user, follow these steps:
- Open your web browser and log in to the Teams Admin Center at
https://admin.teams.microsoft.com. - In the left navigation pane, expand the Teams Apps option and select Setup Policies.
Select the Global (Org-Wide Default) policy by clicking on its name.
The setup policy will open and you will see the default apps.
Select Add Apps from the menu bar.
The Add Pinned Apps panel appears on the right side of your screen.
Type Trello in the search panel, and then select Add, as shown in Figure 14-12.
You can configure which apps are available in Teams using Permissions Policies. You will find the settings for this in the Teams apps area of the navigation.
FIGURE 14-12: Adding the Trello app to the Global (Org-Wide Default) setup policy.
- Select Add at the bottom of the dialog to add the Trello app to the Global (Org-Wide Default) setup policy.
Select Save to save the policy.
The policy now includes the Trello app in the left navigation pane, as shown in Figure 14-13.
 It can take time for changes in policy to take effect, sometimes as long as 24 hours. I usually come back the next day after making a change and find things are working as expected. For example, after following the procedure to add the Tello app, the app did not show up in the Teams navigation right away.
In addition to making org-wide changes to the apps available to all Teams members, you can change the app setup policy for individual users, too. These changes are done on the Users settings page in the Teams Admin Center. When you change the setup policy, the navigation items the user sees in the left navigation pane in Teams will be updated to match the policy assigned.
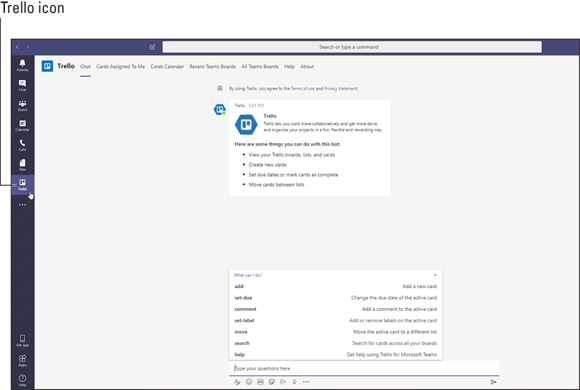
FIGURE 14-13: The Trello app in the Teams navigation is part of the setup policy.
To update the setup policy for an individual Teams user, follow these steps:
From the Teams Admin Center, select the Users option in the left navigation pane.
A list of all Teams users appears in the main screen.
- Select a user, and then select the Policies tab to show the user’s information.
- Select the Edit button and then choose any policy you have created, as shown in Figure 14-14.
You can develop your own custom apps, or have someone develop them for you, and then upload and add them to the default navigation for all Teams users. You will find the option to do this in the Teams Admin Center in Teams Apps under Setup Policies. Open the Global (Org-Wide Default) policy and upload your custom app.
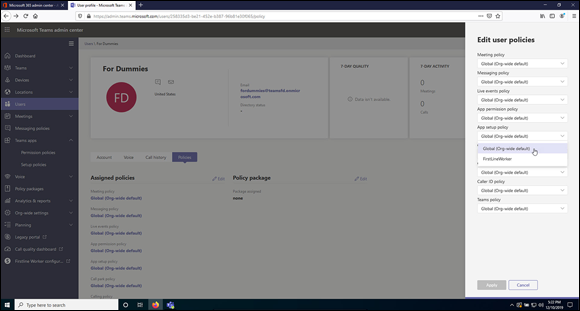
FIGURE 14-14: Changing a user’s setup policy changes the navigation items the user sees in Teams.
Setting Policies for Chat and Channels
Teams also includes settings specifically for messages in channels and chats. (I cover chat and channels in detail in Chapter 4.) These settings are like many other settings you explore in this chapter. You configure the settings in a policy and then assign that policy to actions in Teams that relate to that policy. For meetings, the policies are called Messaging Policies, and you will find them in the left navigation pane.
Messaging policies allow you to configure how chats and channels work in Teams. You can set such options as allowing messages to be deleted, allowing previews to appear when someone pastes a URL into a message, and turning on or off receipts so others know when a message has been read.
Like most policies in Teams, every Teams user is automatically assigned the Global (Org-Wide Default) messaging policy. Selecting this default policy opens it so you can edit and adjust settings, as shown in Figure 14-15. You can also create a new messaging policy and assign it to specific users or teams by selecting Add at the top of the messaging policies list. Figure 14-16 shows me adding myself to a new messaging policy I created. There is a column in the list of policies that states whether it is a custom policy or not.
For large organizations, it is common to create lots of custom policies and fine-tune how people use Teams. Smaller organizations usually stick with the default policy.
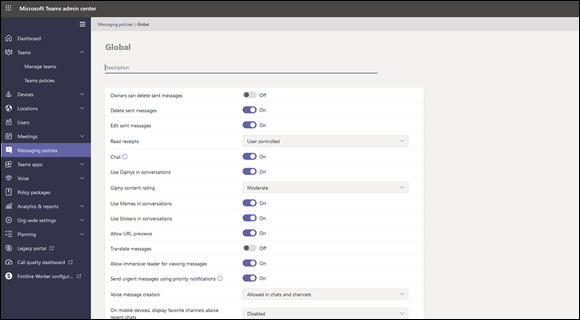
FIGURE 14-15: Configuring a messaging policy.
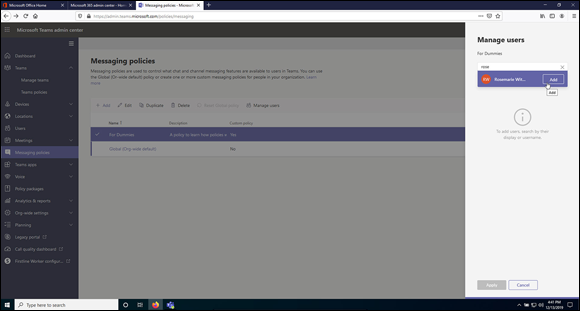
FIGURE 14-16: Adding a Teams user to a custom messaging policy.
Managing Devices for Your Organization
In Chapter 10, I cover Teams devices such as conference phones and desk phones. You can manage the devices that are used in your organization through the Teams Admin Center.
Using a phone designed for Teams is essentially using a computer that looks like a phone. You turn on the phone and connect it to the network and sign into it directly using your Office 365 credentials. You are essentially signing into the phone and bypassing your computer. These phones are ideal for people who don’t work on a computer on a day-to-day basis. They can use the large screen on the phone to attend Teams meetings and view presentations without needing another computer.
When someone plugs in a Teams-certified phone and logs in to the device for the first time, the phone will start appearing in the device management area of the Teams Admin Center. You access the list of devices associated with your Teams service in the Devices option of the left navigation pane. Select Phones, and you will see a listing of all devices. You can manage these devices here and perform several different tasks. For example, you can create custom configurations and upload them to the device and install security and other software updates. Regardless of whether you are part of a small or large organization, the device management center is a great place to keep track of all the Teams devices in use in your organization.
It is important to make sure any device you want to use with Teams is a certified Teams device. Check out Chapter 10 for more information on using devices with Teams.