Chapter 9
Shrink That Puppy and Slap a Label on It
IN THIS CHAPTER
![]() Downsizing audio files with MP3 compression
Downsizing audio files with MP3 compression
![]() Understanding bitrates and sample rates
Understanding bitrates and sample rates
![]() Dissecting ID3 tags: They’re not just for music anymore
Dissecting ID3 tags: They’re not just for music anymore
You’ve finished your final edit (and if you think we’re skirting blasphemy whenever we use the E word, trust us — creativity sometimes demands a sacrifice). At last you’re ready to compress your mondo-super-sized AIFF or WAV file down to the format that invokes traumatic memories from RIAA representatives everywhere: MP3.
The MP3 format was designed to reduce the amount of data (via compression) required for digitized audio while still retaining the quality of the original recording. MP3 files are the best way to keep the audio small enough in size to make it a quick-and-easy download, and it’s this format that podcasting uses to get content efficiently from podcaster to podcatching client. Although creating MP3s is a simple enough process, you do need to make some tradeoffs between quality and compression.
A Kilobit of Me, and a Whole Lot of You: Understanding Kbps
The compression process begins with proper bitrate settings, measured in Kbps (kilobits per second). Bitrate is a method of measuring data transmission from one point to the next. The higher the Kbps value, the more data being transferred between two points. The more data being transferred per second, the better the quality of information. With each rate of data transfer offered by recording applications, you can digitally reproduce the various qualities of audio:
- 8 Kbps, matching the vocal quality of a telephone conversation
- 32 Kbps, yielding audio quality similar to AM radio
- 96 Kbps, yielding audio quality similar to FM radio
- 128 Kbps, matching audio CD quality, and the most common Kbps used for MP3 compression of music
- 192 Kbps, a “Higher Quality” setting Kbps used for MP3 compression of music; better audio sound, but larger data files
You aren’t married to this listing of Kbps by any stretch of imagination. Tweak ’til you find the Kbps best suited for your podcast.
As you can see throughout Podcasting For Dummies, we’re leaning heavily on Audacity as your audio solution. There’s a good reason for that: It’s a rock of reliability. While it is not a perfect application, guess what? No application is perfect. Audacity has been around since the beginning of podcasting and has only gotten better over time. In this chapter, we go deeper into what you can do with audio on a more technical level.
Changing bitrates in Audacity was once a multistep process, but with recent releases, creating MP3 files has become incredibly easy:
- Import your audio (a WAV or an AIFF of your edited and polished audio file) into Audacity.
- Choose File ⇒ Export ⇒ Export as MP3.
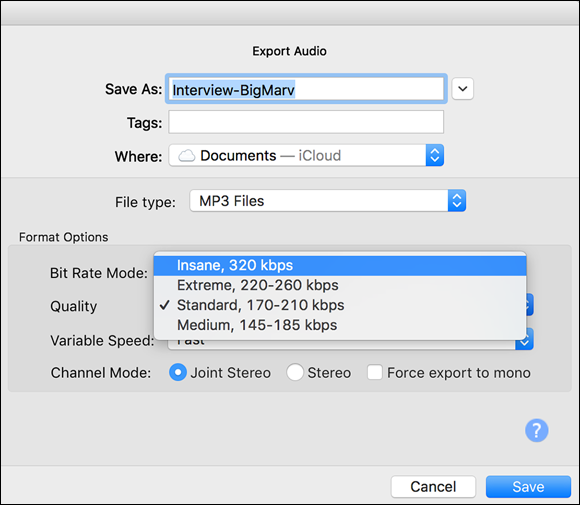
Select from the Format Options section (see Figure 9-1) one of the following Quality settings:
- Medium (145–185 Kbps)
- Standard (170–210 Kbps)
- Extreme (220–260 Kbps)
- Insane (320 Kbps)
You can use a setting higher than the Standard setting but that will only make a difference if you are using higher-end (professional grade) headphones for listening.
 Saving at a higher quality like Extreme or Insane also means any faults or hiccups in your audio are preserved. If you are editing and reviewing your audio on pro-level equipment, you are more than okay exporting your podcast’s MP3 at the Standard level.
FIGURE 9-1: You find a wide variety of bitrates for compressing your podcast to MP3 with Audacity.
Confirm that your Variable Speed is set at Fast, and your Channel mode is set to Joint Stereo.
These settings are the default when you initially install and launch Audacity. These settings remain the best for your audio.
 Bit Rate Mode (Constant) and Channel Mode (Joint Stereo) are two final details you should take a moment to set up. Constant Bitrate ensures the bits are output at a steady (constant) rate despite the audio that is being used (including silence). Variable Bitrate attempts to do a bit of compression — for example, the bitrate of a complex music sample would take more space than that of the same length of time in a spoken piece with several pauses. Although variable length audio sounds good on the surface, it can present problems to the listener — actual playback times may not be correct, causing problems when people pause a long podcast. Joint Stereo refers to a technique that saves some space. For more information, refer to the sidebar “Rocking the podcast joint with Joint Stereo.”
- In the Save As field, name your file.
- Click the Save button.
When prompted, fill out your ID3 Tags (as seen in Figure 9-2).
For more on ID3 Tags, see our ID3 Tag section at the end of this chapter.

FIGURE 9-2: Fill out your ID3 Tags.
After you set the bitrate for this one file, it’s one-and-done — your settings are automatically applied to other MP3 files created from this point. Only when you go into the Options for MP3 files will you change bitrates.
Care for a Sample, Sir? (Audio Sample Rates)
When you have a grasp of bitrates, you're ready to move on to sample rates. This may strike you as a tad redundant, particularly when you see the list of common audio-sample rates. A strange déjà vu makes you wonder whether you’re in the real world or exist merely as part of The Matrix. No biggie — sometimes technology is redundant.
As we discuss in the previous section, bitrate is a measurement of how much audio data is transferred between two points, such as the computer and your headset. The sampling rate determines the maximum sound frequency that can be reproduced — the value you set is twice the frequency value. For example, a 44.1 kHz sample rate can reproduce sounds up to 22.05 kHz, which is slightly above the range of human hearing.
Here are a number of audio sampling rates found in MP3 encoders:
- 8,000 Hz/8 kHz, matching the audio quality of a telephone conversation
- 22,050 Hz/22 kHz, matching audio quality similar to AM radio
- 32,000 Hz/32 kHz, matching audio quality similar to FM radio
- 44,100 Hz/44 kHz, matching audio CD quality
- 48,000 Hz/48 kHz, matching digital TV and film audio, and maximum sound quality on professional-grade audio/video recording
As with your audio-recording applications, you have a range of sampling rates available — and you can type in your own custom sampling rates.
Sample rates are located in the Preferences window and it is extremely simple to either change or customize to your podcast’s personal needs. Follow these steps to customize sample rates in Audacity:
Choose Audacity ⇒ Preferences (Mac OS) or Edit ⇒ Preferences (Windows).
The Preferences window appears.
- Click the Quality option in the left column.
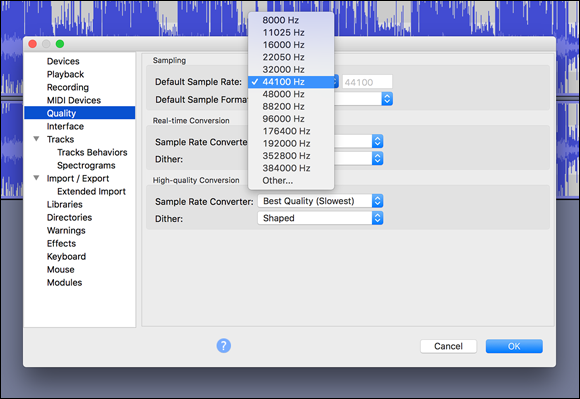
Select your desired bitrate from the Default Sample Rate drop-down menu (as shown in Figure 9-3) or enter your own custom sampling rate by selecting the Other option and entering a number.
 If you’re entering a custom sampling rate, make sure you enter the rate in hertz (Hz) and not kilohertz (kHz). For example, if you decide your sampling rate is 44.1 kHz, you have to enter 44100, not 44.
- Click OK.

FIGURE 9-3: Changing your audio sampling rate in Audacity.
Is it soup yet? Not quite yet. You may have heard us talk about ID3 tags, but what exactly are they? That’s the final step before you upload the podcast to your website, and some podcasters — and we’re talking experienced podcasters from the early days — still refuse to tend to this detail.
While the rebels in us really admire their digging in the heels and not conforming to the rules of ID3 tags, we as long-time podcasters have something to say to you who defiantly refuse to tend to this final detail: Enjoy netcasting, you nimrods.
And thank you for buying our book and attending our TED Talk.
Yes, ID3 tags matter. This batch of details tells other podcasters who you are, tells listeners what your podcast is all about, and gives a quick overview for which episode they’re listening to at the moment. ID3 Tags do a lot to give your podcast a touch of flair, a hint of polish, and not only include details on your episode, but showcase the artwork unique to your podcast.
The next section takes a look at exactly what they are.
ID3 Tags: The 411 of Podcasting
ID3 Tags are a final detail, some podcasters either skip it or just don’t care how they tag their podcasts. As you can see in the preceding section, we take exception with extreme prejudice about that. ID3 tags, when ignored, obliterates any hope for listeners to effectively organize podcasts in a computer’s media player or remind drivers of what they are listening to while on their commute. The bigger platforms, like Spotify and Apple Podcasts, are now insisting that ID3 tags are completed.
So yeah … it’s not just us OPs (original podcasters) saying this.
While we totally get you want to get your content out to the fans ASAP without taking the time to implement these tags, we entreat you: Stop the madness, stop the insanity, and stop the monkeys. Proclaim your true self for the sake of media players everywhere — implement your ID3 tags!
Tell me about yourself: All about ID3 tags
First created in 1996, ID3 tags were designed to be added to audio files in order to have the artist, album, and track title displayed in a computer’s MP3 player when the file is played back. Current ID3 tags now include composer, bitrate, album art, and even genre.
Of course, another question that comes to mind is why would a podcaster want to even bother with ID3 tags?
Take a look at a podcast you’re listening to, regardless of whether you are old schooling it on a portable MP3 player or listening through your desktop computer. Your podcast app probably organizes your various feeds by the date downloaded, either with the most recent show at the bottom or at the top of your playlist, depending on the player’s preferences. Each individual podcast has an episode title, an artist, and a podcast (show) title. If the podcaster working with the ID3 tags is particularly savvy, artwork associated with your show is also displayed.
Now hop from podcast to podcast in your MP3 player, and you can tell which people care — or don’t — about identifying their shows. Some podcasts simply use obscure numbers that could be a date, but when you hear two episodes of the podcast back to back, you find out the number and the date read at the intro of the show (provided there is one) don’t match up (confusing). With ID3 tags in place, you can now look at your player and get an idea of exactly what you’re listening to.
When you add ID3 tags to your podcast, you set apart individual podcasts from one another, making each one unique but keeping it grouped with your podcast show.
IDentity crisis: Making ID3 tags work for podcasting
Some ID3 tags really don’t work for podcasting. Album? Track number? Composer? You're podcasting, not producing music. Your responsibility (as a podcaster) is to redefine the following tags we have found useful for the podcasting medium:
- Artist Name: This one is pretty self-explanatory. You’re the artist behind this podcast, so let people know who you and your group are. Put in your name (or at least the pseudonym you're using as a podcaster) or the name of your podcasting team. For example,
Philippa Ballantine,August Grappin, andD.J. Steve Boyett. - Track Title: This should be the name or number of your episode. Examples are
Show #19, Episode 3: One of Those Faces, BOOK THREE: Chapters 39 & 40. - Album Title: Here is the name of your show, your show's website, or your network if you are part of a podcast network. Good examples are
The Shared Desk,Destiny Community Podcast, andPodrunner. - Album Artist: Many times left blank, this tag can be a bit tricky for users. You can use it to refer to the show artwork artist, the production studio, or the creator of the podcast. Examples are
Imagine That! StudiosandTime Magazine. - Track Number: Purely optional, this ID3 tag allows you to make sure your podcasts remain in some kind of sequential order. For podcast novelists, the track numbers coincide with the chapter numbers. If podcasts follow a season of multiple episodes, the Track Number coincides with the episode in that season.
- Year: The year this podcast episode was produced.
Genre: The genre Podcast wasn't offered in drop-down menus of MP3 creators, but with the growing popularity of the medium, it’s becoming more and more common.
 When using Audacity, if you don’t see the Podcast genre, you can manually type Podcast into the field.
- Comments: Similar to comments you leave in XML, you can give a quick two or three lines of show notes for your podcasts. This field is a great place to put in any Creative Commons notices, websites for more information of the show and its hosts, and special dedications.
If you are using another app for your ID3 tags, you may also be asked to complete additional tags, including:
- Composer: This tag can be used to feature the name of your producer or head editor. You can enter your engineer’s name, or the studio where the show is produced. For example, The Shared Desk artists is listed as
Imagine That! Studiosbut the composers areTee Morris & Pip Ballantineas the show is co-produced and co-hosted. - Grouping: This tag may remain blank until you're affiliated with a network or distribution hub of some kind. A good example would be
QuickAndDirtyTips.comwhere podcasting superstar Mignon Fogarty leads a team of podcasters all offering sound advice and quick life hacks. - BPM: If you are into staying fit and are producing a workout podcast, you want to fill in this ID3 tag as BPM is for Beats Per Minute. BPM is also good if your podcast is a house music-dance mix podcast. A good example of a podcast showing off BPM is any one mixed by D.J. Steve Boyett (
https://podrunner.com).
Reminiscent of John Cleese’s “Adapt, and improve. That’s the motto of the Round Table” aside in the Monty Python robbery sketch; we podcasters must adapt these ID3 tags to our podcasts to improve how they appear in our players. On playback, the ID3 tags appear on the listeners’ interfaces, offering a quick glance at the content of the podcast. Figure 9-4 shows how this blast from the past appears on Tee’s dashboard.

FIGURE 9-4: How a properly tagged podcast appears on a car’s stereo system.
Creating and editing ID3 tags
Audacity lets you set up a template for the ID3 tags that gets applied when MP3 files are created. To create this template, open Audacity, import a file or a project that is ready for ID3 compression, and follow these steps:
Choose Edit ⇒ Metadata from Audacity’s main menu.
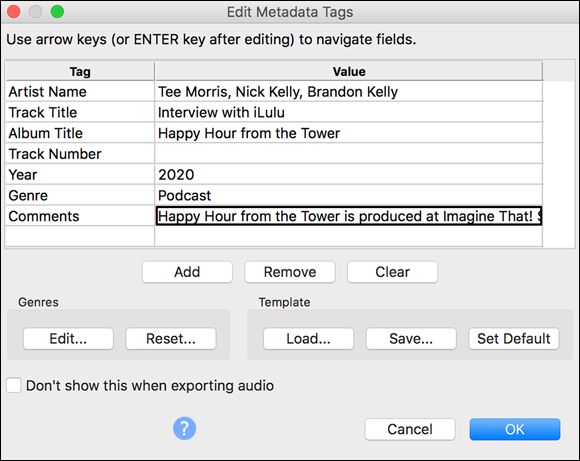
The Edit Metadata Tags (ID3 Tags) window opens (see Figure 9-5).
 You can also create ID3 tags and ID3 tag templates by choosing File ⇒ Export ⇒ Export as MP3. After setting Bit Rate, Quality, and other technical details, click the Save button. The ID3 tag window appears automatically.
FIGURE 9-5: The Edit ID3 Tags (for MP3 Exporting) window in Audacity.
- Fill in these fields:
- Artist Name: The podcaster or name of the podcasting crew.
- Track Title: The episode name and/or number.
- Album Title: The show’s name or website.
- Track Number: The field is optional, unless numerical order is a priority in your podcast.
- Year: The podcast publication’s year.
- Genre: Type
Podcastinto this field. - Comments: Type or paste into this field the following: [TITLE OF YOUR PODCAST] is produced by [PRODUCER OR PRODUCTION STUDIO] and is protected by a Creative Commons 3.0 license. You can find out more about this license at
creativecommons.organd visit our website at [PODCAST WEBSITE] for more information.
- After proofreading your ID3 tags, go to the Template section of the Metadata Tags window and click the Save button.
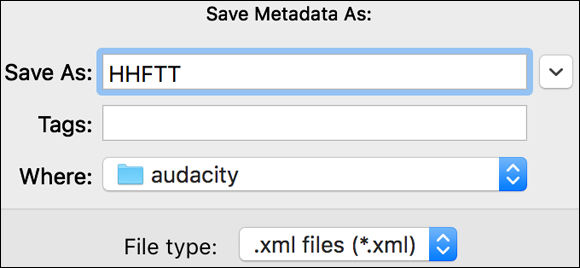
Name for your ID3 tags (see Figure 9-6).
Make the name of your template an acronym from your podcast's full title. For example, the Happy Hour from the Tower podcast is HHFTT and the Geek Wolfpack Podcast becomes GWP.
- Click the Save button to create the template.
With a final check of your ID3 tags, click the OK button.
And that’s it! When Audacity generates your MP3, your show is tagged and ready for uploading.

FIGURE 9-6: Name your ID3 tags.
And when you get to your next project …
- After you finish editing and saving a new project, choose Edit ⇒ Metadata from Audacity’s main menu.
- Go to the Template section of the Metadata Tags window and click the Load button.
- Find the XML file with the name of the podcast you are working on and click it.
- Click the Open button to create the template.
- Go to Track Title and change the title to reflect the subject matter of the current episode.
- With a final check of your ID3 tags, click the OK button.
After you tag everything properly, there’s one more piece of identity to apply to your spectacular creation — artwork. We cover artwork in Chapter 10 because it’s one of the files you’ll need to move to your server.
