
Chapter 17
One Giant Leap for Podcasting: Streaming Content
IN THIS CHAPTER
![]() Discovering the obstacles of video podcasting
Discovering the obstacles of video podcasting
![]() Introducing streaming
Introducing streaming
![]() Finding out what you need to make a stream
Finding out what you need to make a stream
![]() Creating a workflow from streaming to podcasting
Creating a workflow from streaming to podcasting
![]() Working with HitFilm Express to edit video
Working with HitFilm Express to edit video
Mutation: It is the key to our evolution. It has enabled us to evolve from a single-celled organism into the dominant species on the planet. This process is slow, and normally taking thousands and thousands of years. But every few hundred millennia, evolution leaps forward.
— PROFESSOR CHARLES XAVIER, X-MEN (2000)
Even when you read the preceding quote, you can hear Sir Patrick Stewart’s voice. Or is that just us?
We open with that prologue to the original X-Men film because the same thing can be said about podcasting and what we are talking about in this chapter: streaming. To understand how streaming impacts podcasting, it helps to look at how podcasting first dabbled with video and even “live” podcasting in the beginning.
In the Beginning: The Early Days of Video Podcasting and Live Broadcasts
In its first year, podcasting established itself as an exciting audio option. It was truly “The People’s Radio” for your computer, promising a fresh alternative to cookie-cutter corporate radio. A few innovative podcasters took a closer look at the way RSS 2.0 worked and thought, “Wait a second — if we can do this with audio, what about video?” These brave few decided to put moving pictures to their podcasts; and while people to this day still search for just the right term (vidcast, vodcast, vodblog, vlogging, and so on), video podcasting came to be.
Light, cameras, and say what: The unexpected demands of video podcasting
While video podcasting presented incredible possibility for filmmakers of all levels, those new to the medium discovered that video production was not easy. Some of the downfalls to working with video are:
- A learning curve: Despite what the commercials for laptops of all makes insinuate, editing video is not and never has been a push-button technology. A lot goes into video, even on the most basic of levels. With current video podcasts like The Joe Rogan Experience (
https://podcasts.joerogan.net), Technorama (https://www.chuckchat.com/technorama), Happy Hour from the Tower (http://www.happyhourfromthetower.com), and Universe Today (https://www.universetoday.com), or digging deep into the archives with original video podcasts like Tiki Bar TV or Ask a Ninja, the bar to run with the big boys and girls of video podcasting is pretty high. - More production time: With audio, the aim is to create the cleanest, best polished auditory experience. When you work in video, as seen in Figure 17-1, you have a lot more to contend with than just unwanted noise pollution. Now you wrestle with lighting, camera angles, wardrobe, make-up, and so on. Editing also proves more difficult because you can’t just cut a flub out without the host seemingly jumping around. Podcasting audio can prove daunting in its production needs, but video demands a great deal of time, attention, and resources.
- Episode frequency: The added demands of production also makes posting of new content a real challenge. Even a biweekly posting schedule poses an incredible undertaking with casting, pre-production, filming, editing, and post-production all while maintaining a day job that is probably financing your ambitious video podcast. And if your cast and crew are strictly volunteer, even a monthly posting schedule looks daunting.

FIGURE 17-1: Unlike in audio production where you are working against unwanted noise, video production incorporates additional factors, such as lighting, wardrobe, location, and camera angles.
- Audio or nothing: Some mobile apps recognize video episodes but are unable to play them back, and some platforms will not approve your feed if you feature video episodes. Spotify stipulates, at the time of writing this edition, that it syndicates only audio feeds. So while video is tempting in so many ways, you may find yourself creating content that goes unseen.
Say that you decide to take on the task of video podcasting. You’ve created video projects on your computer before and found out “I … LIKE IT!” Contending with the preceding obstacles, you may edit your video with Apple iMovie, Apple Final Cut Pro, HitFilm Express, or Adobe Premiere to create your next podcast.
And once the episode is ready and done, you’ll face a whole new set of challenges.
- File size: A 1-minute video clip shot at a high definition resolution (1920 x 1080 pixels) comes out to roughly 50MB, give or take a few megabytes. 50MB for one minute of HD video. And you want to create a 15-20 minute video episode. “How do I get my file size smaller?” podcasters asked on various discussion boards about video. Although the reply may have come across as snarky, it was the only available answer: “Make a shorter episode.” That old idiom of “You can’t fit 25 pounds of sugar into a 5-pound bag …” applies aptly to video podcasting.
- Bandwidth demands: Bandwidth, especially if your podcast is 500MB per episode (and remember, that’s 10 minutes of video), can prove to be costly to content creators. If you garner 1,000 listeners, for example, you’ve gone through 50GB of bandwidth just for that episode. It’s even heftier if your podcast is a runaway success. If you have 2,000 subscribers in your second week, you have burned through nearly 1000TB of your monthly bandwidth just for your first episode. What about the weeks — and the listeners — to come? What does your webhost offer, and can it handle this kind of traffic for your podcast?
Video podcasting still happens in various stages, but most of the productions going live are usually backed by major studios or production houses. Some incredibly innovative filmmakers are creating some amazing productions, but these podcasts are few and far between.
Going live (if you’re lucky): Early attempts at live podcasting
Alongside video podcasting, even more ambitious podcasters wanted to attempt live podcasting. These hosts wanted the ability to connect with their audiences and interact with them in real-time, and some ambitious vendors promised podcasters the ability to take voice calls, interact with viewers, and export everything straight to a compressed video format or MP3 audio.
That is what was promised, anyway.
Live podcasting in the early years (pre-2010), either audio or video, was incredibly unreliable and dependent on your computer’s processing power. Even with cutting-edge hardware, results may not be what you would expect. Tee still recalls when asking about a vendor’s software not working properly, the response their rep gave him was “You need a better Mac.” This was 2007, and Tee’s Mac ran a 3GHz quad-core processor with 32GB of RAM, Apple’s top of the line computer at the time. But, according to the vendor, he needed a better Mac.
Yeah. Okay, Boomer.
For those who could afford it, streaming services were available, and the bill for these services were somewhere in the six-and-seven figures. Even then, watching these streams were device-dependent, meaning if you had a slow Internet connection or older computer, you would have to continuously refresh your browser and then maybe — maybe — the live stream would right itself. Any live events on the Internet remained reserved for production companies with deep pockets, and only those with high performance computers could watch and interact with the hosts.
Streaming Media: Podcasting Evolved
The same year Tee was told to get a better computer, Justin Kan, Emmett Shear, Michael Seibel, and Kyle Vogt created Justin.tv, a website to allow anyone to broadcast video online. Justin.tv laid the groundwork for what is known today as streaming, striking a balance between data compression rates, bandwidth, and ISP upload and download rates. This opened the door for anyone to stream content live and interact with viewers. User accounts were called channels, and channels were encouraged to broadcast a wide variety of live video content. It was in the summer of 2011, Justin.tv decided to spin off a new streaming service that focused on video games, from their General Interest platform. This spin-off was rebranded as Twitch (https://twitch.tv, pictured in Figure 17-2) and quickly eclipsed Justin.tv in popularity. Eventually, Justin.tv and Twitch merged; and today Twitch is returning to its roots, still known for streaming video game content but also growing in popularity are streams featuring everyday life, special events, cooking classes, and yes — podcasting.

FIGURE 17-2: Twitch.tv (https://twitch.tv) is a platform known for video games like Sea of Thieves, but has recently begun a return to its roots, offering podcasters a platform to connect with listeners and interact with them in real time.
A less technical definition of streaming would be a platform offering consumption or broadcasting of content, either time-shifted or in real time, on a global platform. (Sounds familiar, doesn’t it?) With the development of broadband and technology able to handle robust data streams, streaming services now offer both audiences and content creators broadcast-quality entertainment online. Twitch is not alone in streaming platforms. In recent years, other streaming platforms have gone live and are now popular with content creators of all backgrounds. These platforms include
- Periscope / Twitter Live (
https://periscope.tv) — The first mobile streaming platform to appear, Periscope launched in March 2015 fully integrated with Twitter. When you go live on the app, you can send a quick notification to everyone in your network that you are live and streaming. A few years later, Twitter’s mobile app offered a live feature that notifies your network that you are streaming. - YouTube (
https://youtube.com) — Powered by Google, YouTube was the original hub for creative video works. Everything from simple home movies to ambitious filmmakers creating all kinds of incredible, independent works (likehttps://bit.ly/PunisherDLandhttps://bit.ly/PNEshort), but with the ability to stream either directly from your smartphone or mobile device, or from a studio in your home or office, YouTube made streaming original content (including a recording of your podcast) possible. - Facebook Live / Facebook Gaming (
https://facebook.com) — The success of Twitch and Periscope laid the groundwork for Facebook launching (in August 2015) Facebook Live, a streaming platform fully integrated with the largest social media platform in the world. Like Periscope, Facebook Live will notify your network when you go live, even offering a tiny inset video in the lower corner of your app or browser window, taking you to the stream with a single click. Facebook Gaming, a variation of Facebook Live, grants viewers the ability to interact with gamers similar to Twitch.
You may want to launch a streaming channel for a lot of reasons, but the simplest reason to stream, is that it’s just plain fun! Tee began his own Twitch channel on September 6, 2017, and through all the breaks, the changes, and the modest numbers he’s seen, he still relishes the moment he goes live, as seen in Figure 17-3.
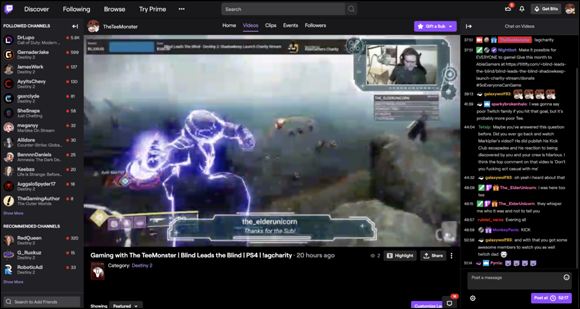
FIGURE 17-3: Tee takes his love of video games, writing, cooking, and podcasting to his own Twitch channel at https://twitch.tv/theteemonster.
All this is interesting, you’re probably thinking, but where are we going with all this? This is a book on podcasting. And yes, this is a book about podcasting and how podcasting and streaming work hand-in-hand in creating content and how streamlining your workflow is worth your time and attention. Tee wondered what took him so long in incorporating streaming with his own podcasting routine.
So how does one stream content? More importantly, how does one record a podcast on a stream?
Good news: If you’re streaming, most of the hard work is done.
Going Live … for Realz This Time: Streaming Your Podcast
A couple of things you need to know about what’s covered in this chapter. We are making the bold assumption that you have set up your podcasting studio and are ready to record video. The steps from here are Twitch-centric, but they are easily applied to other platforms like YouTube or Facebook.
You need a few things set up and ready to go for your first stream:
- Camera (or multiple cameras) installed
- An active account on a streaming platform
- OBS or Streamlabs OBS installed
If you are thinking “Wait, what?” then we recommend you pick up a copy of Tee’s Twitch For Dummies, which goes in to more detail on what you need to make video happen, such as cameras, streaming software, and additional computer upgrades.
The first step: Setting up a streaming account
As we are talking about Podcasting For Dummies, there is a possibility — especially if you are starting from the beginning — that you are not set up on a streaming account. If you are, good on ya for being ahead of the curve! Don’t worry if you aren’t. We’re going to get you started on this adventure in streaming content by setting yourself up on Twitch. In a few minutes, you will be up and running.
Go to
http://twitch.tvand from the top-right corner of your browser window select the Sign Up option. You can still watch Twitch streams without being signed up with the platform. However, if you want to take advantage of the Chat features, you need an account.
Come up with a username for yourself on Twitch.
Your username is how you will appear in Chat. Your username can be a nickname you go by, a play on words, or your own name. You can approach the username in a lot of different ways. Just make sure that you are not violating any Terms of Service when you create it.
Create a password or a passphrase and confirm it.
While passwords should be difficult to crack but easy to remember, passphrases are now recommended by cybersecurity experts as upping the difficulty level for being hacked. More characters are involved in passphrases, and if you take something easy like “I am a podcaster” and rework it as “!am@p0dcasteR” for your password field as seen in Figure 17-4, you have created a very strong password that meets many platforms’ criteria.
Enter in your birthday.
Again, the date you enter is based on an honor system, but the birthday is there to verify your age, which is within the Terms of Service (TOS) as established by Twitch. For more on Twitch’s TOS, visit
https://www.twitch.tv/p/legal/terms-of-service/.
FIGURE 17-4: Setting up a Twitch channel takes only a few minutes and is free.
Enter a valid email.
This email is where all notifications and any news from Twitch are sent.
After reviewing the Terms of Service and the Privacy Policy, click on Sign Up to complete the application.
Congratulations! Your Twitch account is now active.
Technically, from here, you are ready to start streaming. You have a place on Twitch, but presently the state of your Twitch account is a lot like the state of a Twitter account newly launched where the profile and bio are blank. You will want to take some time to complete your profile and set up a channel with all the unique bells and whistles needed to make the best first impressions when people show up. (For details, see Twitch For Dummies.) With a basic account up and running, we recommend taking a tour of Twitch. Pay a visit to live streamers running your favorite video game, hosting an open chat session, or recording a podcast, to get an idea of this new platform.
Setting the stage: Working with Streamlabs OBS
In Twitch For Dummies, Tee talks in depth about Open Broadcaster Software or OBS (http://obsproject.com/), an open source application that turns your computer and any audio-video components associated with it into your own broadcast studio. In this edition of Podcasting For Dummies, we're focusing on Streamlabs OBS (http://streamlabs.com), a variation on OBS where a variety of add-ons are waiting to be implemented and a dashboard that tracks the activity of your live stream.
Incorporating a template
Along with all of the many add-ons you can implement, Streamlabs also offers up overlay templates that range in themes, moods, applications, and colors, as seen in Figure 17-5. With just a few clicks, your stream is transformed from the basics to breathtaking; and, if you have the processing power to back it, your overlays and widgets can be animated, adding an even more dynamic look to your channel.
 OBS and Streamlabs OBS are not the same application. While Streamlabs did develop from OBS, the latest version of OBS has different features and functionality from Streamlabs.
The best attribute of Streamlabs is how insanely easy it is to get cracking with it.
- Go to
http://streamlabs.comand click on the Download Streamlabs button. Launch Streamlabs OBS once it’s downloaded onto your PC or Mac.
Shortly after you launch Streamlabs, log in with Twitch, YouTube, or some other streaming service.
Log in with your platform.
The Streamlabs applications syncs with the website.
- In the top-left section of the Streamlabs OBS application, click on the Themes option.
Find a theme for your stream either by searching through the various templates offered or by using the Scene Theme Category located on the left-hand side.
You can click on a template’s preview image to see a full-screen preview of it.
Streamlabs offer Scene Theme Category filters that narrow down search parameters to templates matching your mood. If you are known for streaming adventure or FPS games or if you are hosting a talk show, filters make the decision process a little easier.
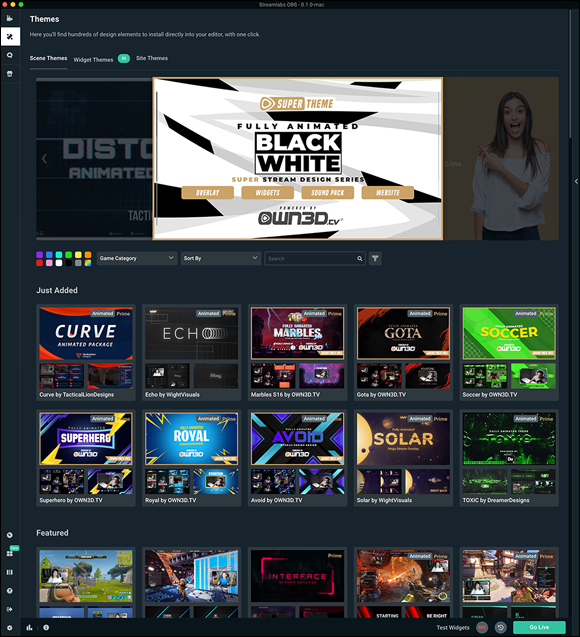
FIGURE 17-5: Streamlabs OBS Themes section offers you a variety of moods, looks, and atmospheres for your stream. All of these themes are customizable, too.
- Once you find a theme you like, click on the Install Overlay button at the top, right-hand side of the template’s preview.
You now have a template in place.
Adding sources in your template
After you have a template, you need to populate it with all your incoming video and audio sources in order to get your stream up and running. This is something Streamlabs makes incredibly easy by knowing where your resources are in your setup and a series of clicks.
Click on the Editor option in the upper-left section of Streamlabs OBS.
If you have multiple templates installed in Streamlabs, you can access all of them from the drop-down menu pictured in Figure 17-6, which will show the current active template.
The template, if it has a Starting Soon scene, begins with an introduction screen. As seen in Figure 17-7, under the name of the template, you see other items or Scenes listed. Scenes are the various stages of your stream. From introduction images to intermission placards, scenes should follow a progress for your Twitch channel.
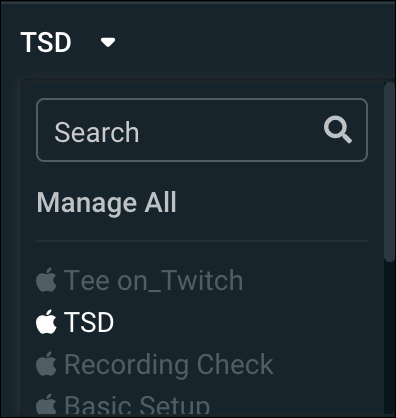
FIGURE 17-6: The current active template.
- Click on the Live Scene scene (or what the template calls the scene where your stream will happen) to edit it.
Look into the Sources window and select the Background source.
You see the background image surround itself with a bounding box.
Sources are exactly what they sound like: sources of audio and video needed to make your stream happen. Instead of the console managing it, you and Streamlabs are managing all sources independently of one another and using Streamlabs as something like a mixer.
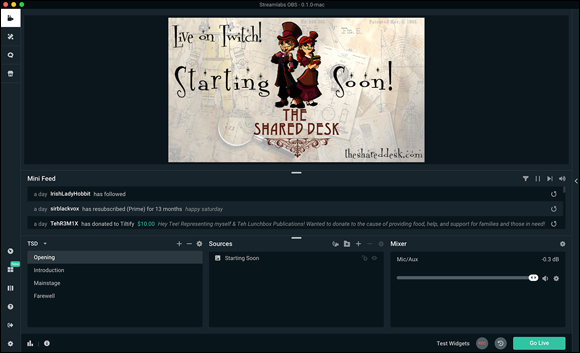
FIGURE 17-7: Scenes are different segments of your stream, and in OBS, you segue from one to the next whenever you want to go to different segments.
Click the + to add a source to this Live Scene scene.
The Add Source window appears.
- Select the Video Capture Device option and click on the Add Source button.
In the Add New Source field, type Host Camera for the name of the source and click on the Add New Source button.
This is your Properties window to tell Streamlabs where the signal source is coming from.
From the Device drop-down list, select your webcamera and click the Done button.
When Streamlabs detects a signal, it drops the source directly into your scene’s layout. You can adjust this in the next step.
- Grab the bottom-right handle of the video you have made live in this scene and click and drag the video to resize it.
- In the Sources window, click and drag Host Camera to the top of the list of your sources.
Repeat Steps 5 through 9 to incorporate any additional cameras and audio sources.
If you are using a mixer, you would have your mixer as incoming audio. Otherwise, it would be your USB microphones.
In bringing your podcast into this template, you also have an idea of how to customize your template to your own specifications. Personalize this template by editing the various labels provided. From here, you can tinker around with various elements to bring more depth to your productions. The more you dive into Streamlabs, the more possibilities there are for you. It’s now a matter of what you want to accomplish and how you want to present yourself on stream.
And we’re live! Podcasting in the moment
After you have your podcast set up to stream, you’re ready to go live. If you are working with friends remotely or even with friends in your studio, you will want to have everyone ready to go 15 to 30 minutes before your scheduled go time in order to run final checks with audio and video. Your pre-show prep should also cover any notes you or others in your show want to talk about.
With everything agreed upon, questions answered, and equipment checked, it is now time to hit your Go Live button:
Launch your recording software.
Part of your pre-show prep should also be making sure your DAW is recording and ready to go.
- Start recording on your audio recording software.
Go to your Streamlabs and confirm that you are in your Starting Soon scene; click the Go Live button in the lower-right corner of the app.
Instead of starting a stream straightaway at the scheduled time, streamers tend to launch a stream a few minutes before in order to give people time to receive notifications and arrive on your channel. Tee usually gives his Stream Starting Soon slate 10 minutes before fading down his introduction music and beginning his podcast.- Begin podcasting, making sure to check your Chat window during the show for any comments or questions that may come up.
- When you sign off on your podcast, wish your Chat audience farewell and thanks for hanging out on your live stream; then end your stream.
- Stop your recording software.
Welcome to the podcasting workflow that includes streaming. You have an audio recording of your podcast, but you also have a video stream that can be downloaded and edited either as a special video episode or stripped of its audio and edited as a backup recording.
It’s a stream, it’s a podcast. It’s a stream and a podcast!
So what exactly does streaming the recording of your podcast bring to your production? Why exactly is going live with video essential to an audio podcast?
- Live interaction with your audience: The element of a live audience adds a level of excitement and energy to your production. Something you or one of your co-hosts say can spark commentary from your audience. A special guest with a background interest (gaming developer, Fantasy author, voice actors) may inspire questions. This is the ride you take with interaction that a live audience provides by streaming.
- A platform where a new audience will find you: As we mention in Chapters 12 and 13, we are always looking to expand our listener base, and you may find that with streaming. New visitors to your Chat may want to catch up with previous shows, find out how your show began, and how far you have come in your own experience with what your podcast is all about. And bringing an audience into the show is a great way to attract new listeners.
- Video featuring bonus content: Once your stream is concluded, streaming platforms offer options for the exporting of streams to other media platforms like YouTube (seen in Figure 17-8) or Vimeo. You can offer these uploads as embedded videos in your show notes. The raw footage may include footage not found in the final podcast. You may want to consider this as a potential incentive for your audience to attend the live stream.
FIGURE 17-8: Streaming podcast recordings bring your audience right into the moment, and unedited episodes can be featured in show notes.
- Automatic backup recording: Redundancies are a beautiful thing, as some of the close scares documented in this title only legitimize. Too often, wonderful once-in-a-lifetime interviews and engaging discussions with co-hosts are completely lost when a recording fails. By incorporating streaming into your podcast’s workflow, you immediately create a backup recording ready for production, if needed.
If you like, you can use the audio from your stream as your podcast file as well. To retrieve audio from your stream:
Go to your streaming platform and access your directory of previous broadcasts after your stream is done.
On the Twitch platform, this is the Video Producer section. You can access previous broadcasts for two weeks. After that time period, Twitch erases the broadcasts from its servers.
- Find your podcast stream and access the option, seen in Figure 17-9, to download the episode on to your computer.

FIGURE 17-9: Twitch offers content creators the option to download streams when they are available in your video directory.
Once the episode is downloaded, import the episode into a media player or video editor you are familiar with.
A common media player available as a free download for both Windows and Macintosh operating systems is QuickTime.
Export the podcast stream as Audio Only from the media player or video editor you are using.
For QuickTime, this process is as simple as opening the episode into the app and then choosing File ⇒ Export ⇒ Audio Only.
- Import the stream audio into your digital audio workstation.
- Edit and save your podcast.
When streaming your podcast, especially if you are on location, make sure you are aware of your surroundings. It is far too easy to lose your footing, bump into someone, or find yourself in a rather precarious (if not dangerous) situation. Be careful!
Streaming platforms make what was once promised back in the early days of podcasting not only a reality, but also an easy and stress-free option to video podcasting. Working with live video feels less like a leap between mediums and more of a logical and seamless addition to your workflow. Streaming a podcast may appear as if you are making a serious upgrade to your studio; but much like your early steps with podcasting, your upgrades don’t have to break the bank.
And if you want to look more into how to stream content, don’t worry — Tee’s got it covered with Twitch For Dummies, a deep dive into his own amazing journey into streaming content.