
Chapter 5
Keep in Touch: Using Apple Watch for Calls, Messages, Texts, Walkie-Talkie, Emails, and More
IN THIS CHAPTER
![]() Accepting and placing calls on your Apple Watch
Accepting and placing calls on your Apple Watch
![]() Handing off calls to your iPhone
Handing off calls to your iPhone
![]() Receiving and sending messages, including the Scribble feature
Receiving and sending messages, including the Scribble feature
![]() Sending emojis, Animojis and Memojis
Sending emojis, Animojis and Memojis
![]() Sharing stickers, handwritten messages, voice clips, taps, heartbeats, and more
Sharing stickers, handwritten messages, voice clips, taps, heartbeats, and more
![]() Using the Walkie-Talkie feature
Using the Walkie-Talkie feature
![]() Receiving and managing emails
Receiving and managing emails
Apple Watch isn’t used just for information — such as the time, the weather, and sports scores — but it’s also ideal for keeping in touch with those who matter.
In other words, your smartwatch isn’t just about knowledge; it’s also about communication. That’s precisely what this chapter is all about. On one hand, if you can pardon the pun, you’ve got the same familiar ways to connect as you do on your iPhone. Specifically, your Apple Watch can place and accept calls as well as send messages and emails. Although Apple Watch was designed for quick interactions, it supports many of the same chatting features as your smartphone.
In fact, if you own one of the Apple Watch models with GPS + Cellular — such as Apple Watch Series 6 or Apple Watch SE — and have set up a wireless plan with your phone provider, you don’t even need your iPhone nearby to place or accept a call or text message! But it can also be used to reach out to others in new and unique ways, such as sending someone a tap or your heartbeat, which he or she feels on his or her wrist (that is, if that person is wearing an Apple Watch, which he or she must to feel these sensations). You can also send a finger-drawn sketch to someone special.
Accepting and Placing a Call on Apple Watch
If you want to be like Dick Tracy and take calls on your wrist, Apple Watch lets you do just that. Or you can make a call by pressing the Digital Crown button and asking Siri to call someone.
You have two ways to do this, depending on which model Apple Watch you have:
- With cellular connectivity: Whether you initiate the call or accept it, as long as you have a cellular plan on a supported Apple Watch (GPS + Cellular model), you can chat through your smartwatch’s microphone and hear the other person through the small speaker. When your watch connects to a cellular network, four green dots appear in the watch’s Control Center.
- Without cellular connectivity: If you don’t have an Apple Watch that supports cellular connectivity, you can still use your Apple Watch to chat with others. You handle this via Bluetooth technology with your nearby iPhone — up to a few dozen feet away — or even farther than that over Wi-Fi. As long as your iPhone is connected to the same wireless network — such as at home or at the office — your watch rings at the same time as your phone, and you can choose which one to answer (or not).
Incoming calls
This is the easy one.
If a call comes in to your phone number, your Apple Watch rings just like your iPhone — unless you choose to disable that feature in the Apple Watch app on your iPhone, which you can find out how to do in Chapter 11.
Assuming you didn’t mess with the default settings, you hear your ring tone emanate through your watch’s speaker and see a screen pop up with the name of the person calling (or just a phone number if that person isn’t in your Contacts). Tap the big green icon (“Answer” the call) in the bottom right of your watch’s screen to answer the call.
If you don’t want to answer the call, tap the big red (“Hang Up”) icon in the lower left of your Apple Watch. Alternatively, you can swipe up from the bottom of your watch to send a preset message back to the person trying to reach you, such as “Call you later,” “In a meeting,” or “I’m driving.” Just make sure that call is coming from a mobile phone or else the caller may not see it.
Figure 5-1 shows a couple preset messages you can send back if you’re unable (or unwilling) to speak.
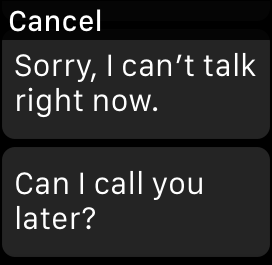
FIGURE 5-1: You can respond to incoming calls by sending a customized reply in the Apple Watch app on your iPhone.
You can customize these preset replies by going into the Settings ⇒ Messages area of the Apple Watch app on your iPhone; see Chapter 11 for more on doing this. But as infomercial guru Ron Popeil once famously said: “But wait — there’s more!”
- Transfer it. You can transfer your call to your iPhone, a Bluetooth headset, or a car’s speakerphone. See the “Handing Off a Call to Your iPhone or via Bluetooth” section for more on this.
- Stop your wrist from ringing. Perhaps you’re in a crowded elevator and you’re getting dirty looks from someone. You can silence an incoming call by simply covering Apple Watch with your other hand. You can try to cover it with the same hand the watch is on, but that may prove a tad difficult.
- Mute the ring. The Phone app screen on Apple Watch also lets you mute your microphone by tapping the microphone with a slash through it (in case you don’t want other participants in a conference call to hear you sneeze!). At the top of the watch screen, you can also increase or decrease the volume coming through the watch’s speaker.
Outgoing calls
While certainly not difficult, outgoing calls through your Apple Watch requires a little more work. And that’s assuming you actually want to make a call through your wrist.
A few considerations: It may not be too comfortable to hold up your wrist for an extended period of time; the quality of the call won’t be as good as on a phone; your conversations may be heard because it’s a speakerphone (unless you’re wearing a Bluetooth headset); and, oh, you might look a little silly too.
The Apple website also suggests you might not want to talk for long on Apple Watch anyway: “Use the built-in speaker and microphone for quick chats, or seamlessly transfer calls to your iPhone for longer conversations.” With that in mind, you can place a call on your Apple Watch in a few ways:
 First approach: Press the Digital Crown button to go to your Home screen and then tap the Phone icon. Go ahead and dial the number in the Keypad section, or pull up someone in Contacts, Recents, or Favorites (see Figure 5-2). Swipe down or twist the Digital Crown to access one more option: Voicemail.
Figure 5-3 shows you the other options that appear when you pull up a contact in the Phone app. When you’re in the Contacts part of the Phone app, you can see the icons here for placing a call, texting (SMS) someone, or sending an email. Under that is Notes, if you’ve ever filled out that section on your iPhone. Yes, remember your Contacts info is synced with the Contacts app on your iPhone!
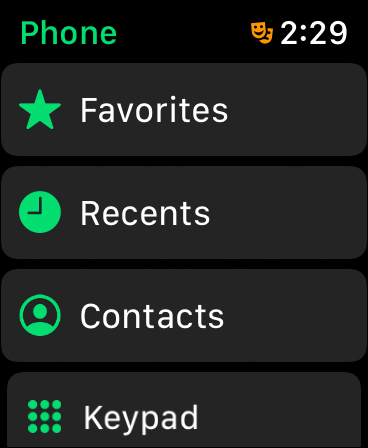
FIGURE 5-2: When you open the Phone app, you see the main screen.
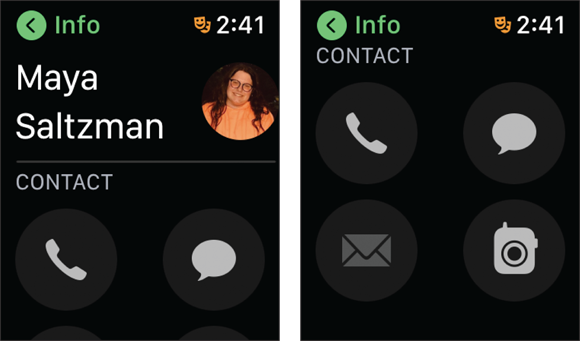
FIGURE 5-3: Pulling up a contact in the Phone app reveals icons to call or text (left) as well as to email or view notes (right).
- Second approach: Press the side button to bring up Dock and then twist the Digital Crown button or swipe up and down to get to the Phone section (if you’ve recently used the watch to make a call or set the Phone app as one of your favorite Dock apps). Tap the Call icon for a given contact, as shown in Figure 5-4.
- Third approach: Lift your wrist and say “Hey, Siri” into your watch, followed by “Call ____ (person’s name)” (if that person is in your phone’s Contacts list) or “Dial ____ (phone number).” Or you can press and hold the Digital Crown button to activate Siri. Or you can just say “Hey, Siri, make a call” and wait for it to ask you to name someone or provide a number, as shown in Figure 5-5.
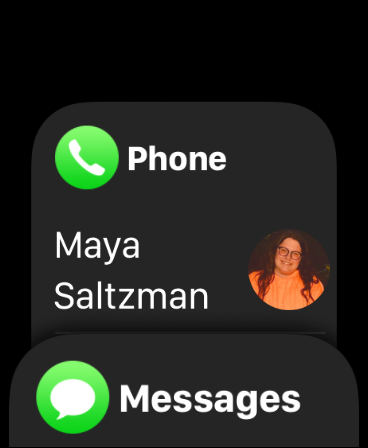
FIGURE 5-4: Access the Phone section of Apple Watch by pressing the side button.
Outgoing calls with FaceTime audio
You can’t make video calls from your wrist — er, yet — but you can use FaceTime to place an audio call, if you like. You may be in a Wi-Fi hotspot and prefer to call over FaceTime (which uses data) over a cellular connection. Or the person you’re calling may be on an iPad, and it’s the only way to call them (see Figure 5-6). I whited out the phone numbers for this contact for privacy reasons, but you get the gist.
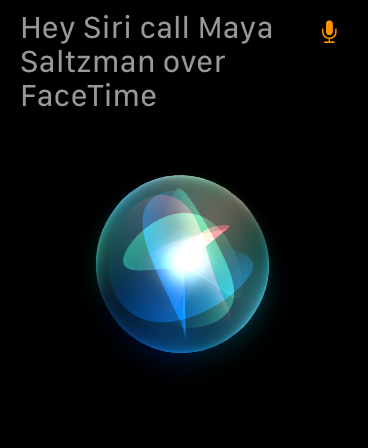
FIGURE 5-5: The fastest way to make a call? Use Siri to dial a contact or phone number (actual phone number blocked out).
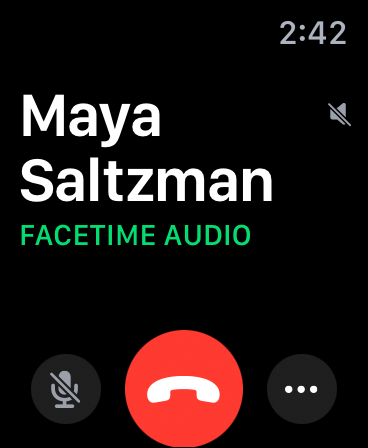
FIGURE 5-6: It’s super easy (and frankly, fun) to place a FaceTime audio call from your wrist. If the person you’re calling has FaceTime, it will appear as an option.
To place a FaceTime call using the Phone app on your Apple Watch, follow these instructions:
- Open the Phone app on your Apple Watch (per preceding section).
-
Tap Contacts.
Tap on the contact you want to call.
-
Tap the Phone icon.
You may see an option for FaceTime Audio (if your contact has FaceTime).
- Tap the option for FaceTime Audio.
Alternatively, you can summon Siri and ask her to place a FaceTime audio call with someone too! Siri is the easiest. To recap, with examples: Raise your wrist or say “Siri,” followed by:
- “Call Mom”
- “Dial 800 555 1212”
- “Call Pete FaceTime audio”
 If you ever want to turn the Apple Watch screen off or silence any sounds coming from it, simply cup your hand over the face and it should go dark and silent.
Not too confusing, right? You can always revert back to smoke signals or Morse code if all this technology is making your head spin!
Handing Off a Call to Your iPhone or via Bluetooth
You probably don’t want to talk for long periods of time through your Apple Watch, if only because it eats up the battery. The solution to this is wirelessly handing off the call to your iPhone.
By the way, this “handoff” feature is available in other apps too, and not just for phone calls. It’s ideal for when you want to transfer what you’re doing to another compatible and nearby iOS device (iPhone, iPad, or iPod touch) or Mac computer. It’s part of Apple’s Continuity feature over Wi-Fi and includes such apps as Calendar, Reminders, Messages, Mail, Contacts, Maps, and more.
Handoff should already be enabled on your Apple Watch, but if it isn’t for whatever reason, Figure 5-7 shows the Apple Watch app on your iPhone and where in the Settings you can enable the feature: My Watch ⇒ Settings ⇒ General. Simply flick the tab to green where it says Enable Handoff.
If an Apple Watch app can be “handed off” to your iPhone, you should see the Handoff option inside the watch app, and once selected, you can simply tap the icon in the lower-left corner of the iPhone screen to complete the handoff to your phone.
Apple says this about a handoff: “When this is on, your iPhone will pick up where you left off with apps on your Apple Watch. Apps that support this feature appear on the lower-left corner of your iPhone lock screen.”
To use Bluetooth for handing off a call, when a call comes in, slide up from the bottom of the watch screen for a list of options, including handing a call off to another Bluetooth-enabled device — be it the iPhone itself, a hands-free Bluetooth headset, or perhaps a Bluetooth-enabled stereo in your vehicle. Doing this transfers the call to the desired device.
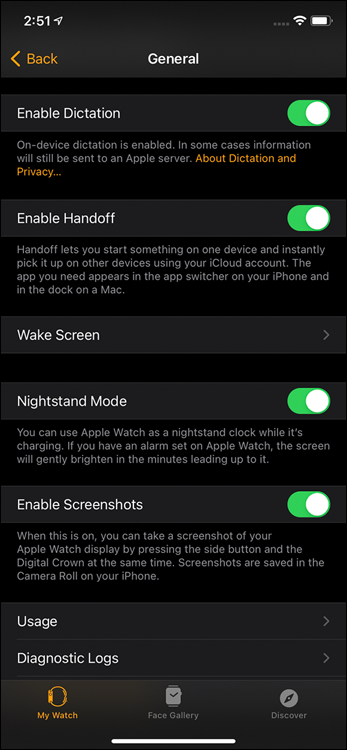
FIGURE 5-7: You can tweak a number of options in the Apple Watch app on your iPhone, including transferring activities to other Apple products.
Making Apple Watch Calls over Wi-Fi
If your carrier supports Wi-Fi calling — as many today do — then you can place and receive calls over Wi-Fi rather than a cellular network. This is especially handy if you don’t own an Apple Watch with GPS + Cellular because you can still use your Apple Watch to make calls, even if your iPhone isn’t nearby. As long as you’re in a Wi-Fi network, you’re good to go.
To get going:
-
On your iPhone, go to Settings ⇒ Phone, tap Wi-Fi Calling, then turn on both Wi-Fi Calling and Add Wi-Fi Calling for Other Devices.
See Figure 5-8. If you can turn this on, your carrier supports it.
- Enable Wi-Fi calling on your Apple Watch by opening the Apple Watch app on your iPhone, tapping My Watch, then Phone, then turning on Wi-Fi Calls.
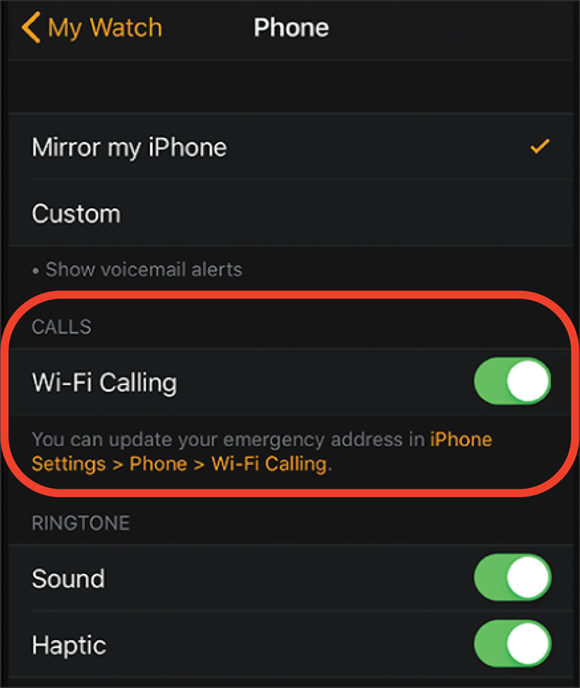
FIGURE 5-8: Enabling Wi-Fi calling on both your iPhone and Apple Watch lets you place or accept calls over a Wi-Fi network.
It’s recommended to make emergency calls over a cellular connection rather than Wi-Fi because your location information is more accurate. To err on the side of caution, make sure your emergency address is up to date: On your iPhone, go to Settings ⇒ Phone ⇒ Wi-Fi Calling, then tap Update Emergency Address.
Beginning in the fall of 2019, Apple announced that cellular models of Apple Watch can make international calls to emergency services regardless of where the device was originally purchased or whether the cellular plan had been activated.
Ideal for world travelers, international emergency calling also works with fall detection, if enabled, to automatically place an emergency call if Apple Watch senses the user has taken a hard fall and remains motionless for about a minute (see Chapter 8).
Receiving and Sending Messages
Many millions of iPhone users send messages from one iPhone to another device, whether it’s a standard text (SMS) message or through Apple’s own iMessage service. That might be a bit confusing because the app itself is called Messages, but iMessage is part of it, along with regular texting. The main advantage to iMessage over texting is it’s free for you and anyone writing over Wi-Fi, and it’s unlimited, so you can type and upload media as much as you want.
Apple Watch also houses a Messages app — supporting iMessage and text messages — although unlike the iPhone, you don’t have a keyboard for you to type words on the watch.
Although you can’t type on Apple Watch, you can send messages through voice dictation (or send the audio clip instead), tap on preset responses based on the context of messages you’ve received, or send animated emojis (cute and customizable icons) or your location on a map.
Receiving and responding to messages
You can keep your iPhone tucked away yet still correspond with important people in your life. When a message comes in (via iMessage or a text message), your Apple Watch vibrates on your wrist (and dings) to let you know you have a new message waiting to be read. (You can disable tactile feedback and sound in the Settings area of the Apple Watch app on your iPhone, as discussed in Chapter 11.)
Acknowledging a message
To receive, reply, and initiate a message to someone via your Apple Watch, follow these steps:
-
If you feel a pulse and hear a tone, raise your wrist to see the message.
As shown in Figure 5-9, you should see a screen showing whom the message is from, what he or she wrote, and perhaps an integrated image. You can scroll up and down by twisting the Digital Crown button if the message is longer than what’s on the screen.
-
To dismiss the message, lower your wrist or tap Dismiss at the bottom of the message.
Do this if you don’t want to reply — or at least not right now. You can exit the Messages app and return later.
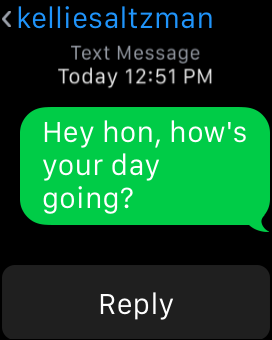
FIGURE 5-9: An incoming message on Apple Watch.
-
If you want to reply to the message, tap Reply at the bottom of the screen and you should see several options (see Figure 5-10).
Apple Watch suggests some preset words to reply with based on the context of the conversation, along with some preset responses you can choose from (such as Not Sure, Can’t Talk Now, Talk later?). Twist the Digital Crown button to see all the responses and then tap one you like. To create a custom response in the Apple Watch app on your iPhone, see Chapter 11.
Replying to a message
If you want to reply to a message with your voice, follow these steps in the Messages app:
-
Tap the microphone icon to speak (dictate) your reply and have it transcribed into text or sent as an audio clip.
Speak clearly into your wrist and you should see the words typed as you say them.
You will see a preview of the words before you send them. You can’t change the words if something isn’t correct, so you have to tap Cancel in the top left and then speak again (perhaps slower and clearer!).
FIGURE 5-10: You can use several preset replies to while sending someone a message.
-
Tap Send in the top right of the screen.
If you don’t see an option to send your message as a voice clip, go to Settings ⇒ Messages on the Apple Watch app on your iPhone (Figure 5-11) and select whether you want your watch to transcribe your voice into text, send it as a voice recording, or give you the option on your watch after you speak into it.
See the section “Responding with an audio clip” for more on sending an audio clip.
Responding with emojis or Memojis
To reply to a message with an emoji or animated Memoji (which you can also create), follow these steps:
-
Instead of replying with a preset message, tap the smiley face on the Apple Watch screen to launch the emoji selection list (some examples are shown in Figure 5-12).
A number of emojis are listed to choose from to express yourself in a more playful way.
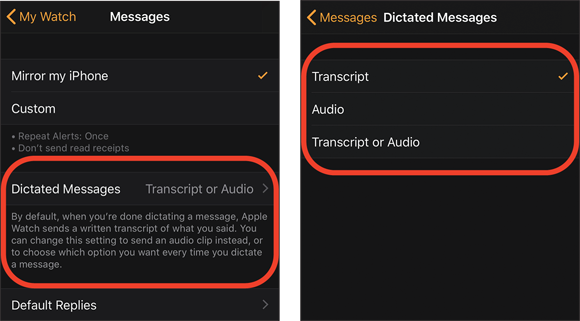
FIGURE 5-11: Want to use your voice to reply to messages? The Messages area on the Apple Watch app (left) allows you to either send dictated text or a voice recording (right).
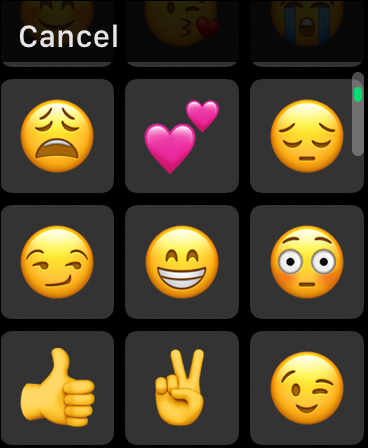
FIGURE 5-12: Tap the emoji icon to send a playful smiley face or another emoji instead of (or in addition to) your words.
-
Twist the Digital Crown button to select the right emoji or Memoji that conveys your message or feelings, whether it’s a smile, a silly tongue hanging out, a sad face, a heart, or something else.
The small green bar in the top right of the screen shows you where your list of options starts and ends. Leave the emoji on the screen for a moment to see how it’ll animate once someone else receives it.
-
When you find an emoji or Memoji that fits the bill — maybe an animated thumbs-up or thumbs-down — tap Send in the top right of the screen to send it to the recipient.
Figure 5-13 shows more examples. If you decide against sending the emoji or Memoji, tap Cancel in the top-left corner of the watch screen.
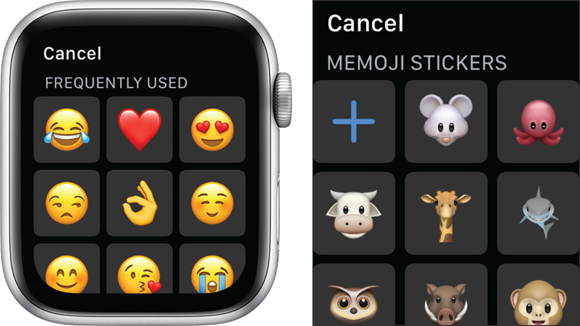
FIGURE 5-13: Select a regular emoji (left) or an animated Memoji (right).
Replying with Scribble
If you don’t feel like dictating your reply to a Message, you can use the Scribble feature to handwrite your words — letter by letter — using your fingertip.
To use the Scribble feature:
-
Tap an incoming message.
A number of options appear.
- Tap the one that looks like a little finger swiping (left image of Figure 5-14).
-
Use your fingertip to write letters and numbers and the text version appears above it (right image of Figure 5-14).
Tap the back button to go back one character or tap space for the spacebar. Tap Cancel in the lower right of the screen to cancel and start again.
- When you’re done, tap Send in the top-right corner.
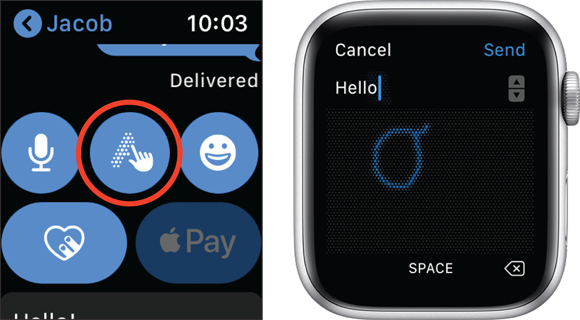
FIGURE 5-14: Select Scribble to write your message. Using your fingertip, write each letter or number and you’ll see the text version on top of the screen.
Responding with an audio clip
Unless you want to handwrite your response to a message using Scribble — which takes some time to do — you’re likely to dictate a reply and hit Send. As covered previously in this chapter, if you’re not in a place that prevents talking (such as an important board meeting) you can review your words before you send a reply.
But wait, there’s another option! As I touch on in earlier sections, you can speak your reply to a message and send it as a voice clip. This is particularly useful for those times you want the recipient to hear your voice, like a kind of voicemail message.
Here’s how to do it:
-
Enable the voice recording feature.
As shown back in Figure 5-11, you enable this feature on your iPhone’s Apple Watch app. Simply tap to open the app, go to Settings, and then Messages. Here you can select whether you want your watch to transcribe your voice into text only (Transcript), send everything as voice recordings (Audio), or enable prompts to give you either option after you reply to a message (Transcript or Audio).
- Read the message someone sent you by tapping on the green Messages app on your Apple Watch.
-
Tap the microphone icon and start talking.
When you’re done, tap Done (easy, huh?).
Now the screen says “Send as Audio,” or, if you opted for both, it says “Send as Audio” or “Send as Text.” Figure 5-15 shows what your message looks like before you send it, as well as what your recipient sees.
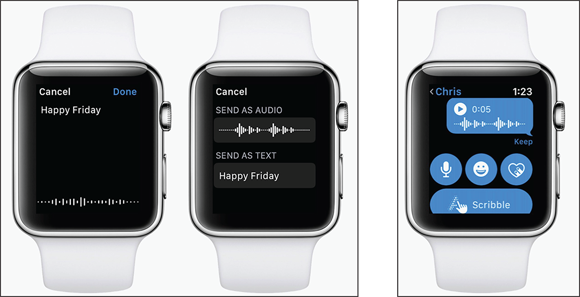
FIGURE 5-15: How a message appears as a voice recording or transcribed text (left and middle) and what your recipients see after they tap the message (right).
Sending a message
 You can send a new message through Apple Watch in two ways: from the Messages app or by using Siri.
If you have an Apple Watch with cellular support, you don’t need your iPhone nearby. If you don’t, you will!
To send a message from your Apple Watch by using the Messages app, follow these steps:
- Press the Digital Crown button to go to the Home screen.
-
Tap the Messages app.
The Messages app launches, where you can read previously sent or received messages.
-
To send a new message, press and hold the screen until the words New Message pop up — as shown in Figure 5-16 — and then tap them.
Now you’re ready to start a new message to someone.
- Tap Add Contact to select whom to send the message.
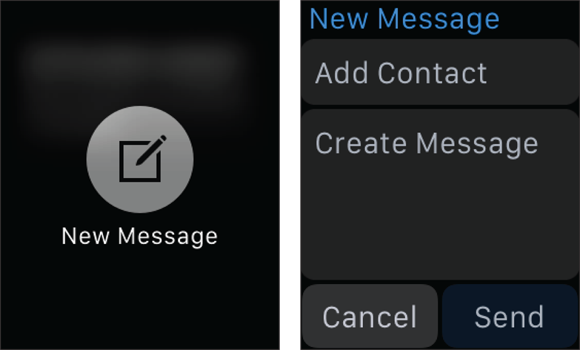
FIGURE 5-16: Once you tap New Message (left) and choose a contact to whom to send a message, you can tap Create Message to compose the message (right).
-
Tap Create Message, which lets you dictate your message, as also shown in Figure 5-16.
Again, you have an option for Apple Watch to transcribe your words into text, or you can send your message as a voice clip.
To send a message on your Apple Watch using Siri, follow these steps:
-
Lift your wrist and say “Hey, Siri” into your watch, followed by “Message ____ (person’s name or number).”
You can also press and hold the Digital Crown button to activate Siri. Figure 5-17 shows a request example.
-
The Messages app opens, and you should see the person to whom you want to send a message.
Dictate your message by tapping the microphone icon.
-
Tap Send when you’re done recording your message.
After a few moments, the person you’re messaging with receives the text or audio clip.
 A superfast way to send a message to someone through Apple Watch is to raise your wrist and say “Hey, Siri, message ____ (person’s name)” and then say “______ (message).” Siri shows you the message before you send it. See Chapter 7 for more ways to use Siri to help you perform tasks with your Apple Watch.
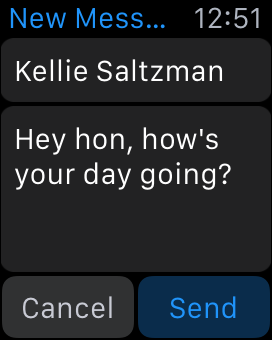
FIGURE 5-17: Impress your friends by sending a message effortlessly — all by using your voice.
You can also start a message on Apple Watch and continue it on your iPhone. As you can with calls and emails, it’s easy to transfer messages to your iPhone, where you can pick up right where you left off. Apple Watch is meant for quick interactions, not lengthy ones. See the “Handing Off a Call to Your iPhone or via Bluetooth” section to find out more about handing off calls to your iPhone from your Apple Watch.
Creating custom replies
If you find it convenient to select one of the many Smart Replies to someone through Apple Watch — such as “Call you later” or “Thanks!” — keep in mind that you can create your own custom replies. You’ll need your iPhone for this.
To customize a reply:
- Open the Apple Watch app on your iPhone and tap the My Watch tab.
-
Choose Messages ⇒ Default Replies, and tap a default reply to change it.
Or tap Add reply at the bottom of the screen to create your own.
-
To remove a default reply or change the order, tap Edit.
That’s it!
Sharing your location from Apple Watch
Say you’re chatting with a friend who you’re supposed to meet up with but he or she can’t seem to find you. Did you know Apple Watch lets you instantly share your location with someone? As shown in Figure 5-18, it’s as easy as pressing down on your Apple Watch screen while in a messaging conversation with that person, and then tapping Send Location.
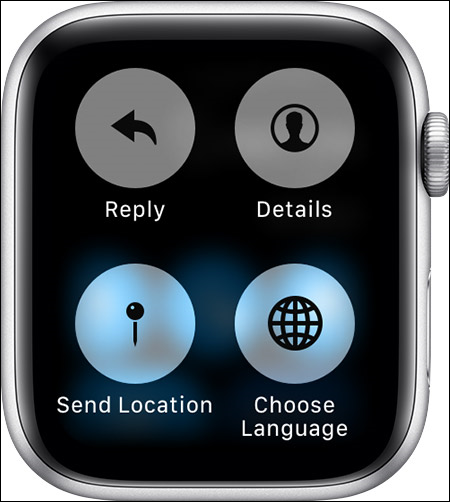
FIGURE 5-18: Instantly share your geographical location via Apple Maps by pressing down on the screen while chatting and selecting Send Location.
Your other options are Reply (send message back to them), Details (the Contacts info of the person you’re chatting with), and Choose Language (to select from any preloaded languages).
Deleting a conversation from Apple Watch
It doesn’t take up much room on your Apple Watch’s storage, but if you want to remove a conversation after you’ve had it, it’s quite simple, as shown in Figure 5-19.
- To delete a conversation, swipe left on the message.
- Tap the red Trash bin icon.
- Tap Trash again to confirm.
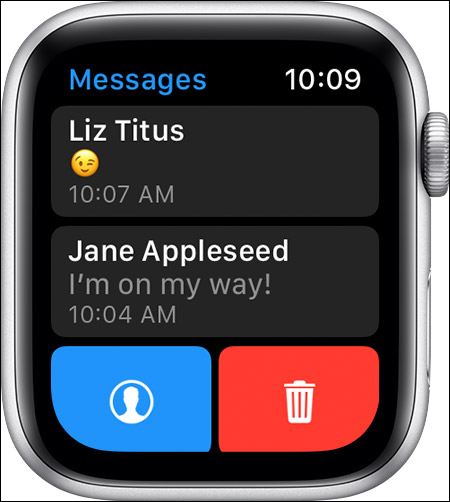
FIGURE 5-19: Delete conversations from Apple Watch by swiping to the left on a message and tapping the Trash can.
Sending Stickers, Taps, Kisses, Heartbeats, and More
Just like with your iPhone, Apple Watch lets you communicate via phone and text, but it can also do some things your smartphone can’t do. Collectively, these actions fall under the Digital Touch features, available exclusively to Apple Watch.
Call it wrist-to-wrist communication.
Digital Touch allows Apple Watch wearers to connect with other Apple Watch wearers in fun, unique, and spontaneous ways. Specifically, Digital Touch offers six options, all shown in Figure 5-20.
- Sketch: Draw something with your finger and the person you’re sending it to sees it animate on his or her Apple Watch.
- Tap: Send gentle (and even customizable) taps to someone to let that person know you’re thinking about him or her.
- Kisses: Send your sweetheart some virtual kisses directly to his or her Apple Watch by tapping the screen.
- Show anger: Just like you can share your broken heart — wrist to wrist — you can also convey anger on your Apple Watch. Oooh, I know you want to try this one!
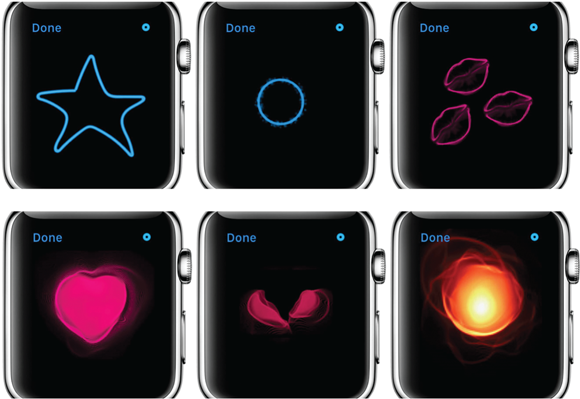
FIGURE 5-20: Use “Digital Touch” options to communicate from one Apple Watch to another. Clockwise starting at top left: Sketch, Tap, Kisses, Show anger, Heartbreak, and Heartbeat.
- Heartbreak: Want to tell your lover you’ve been hurt? Your Apple Watch can do this for you with an animated broken heart.
- Heartbeat: Your built-in heart rate monitor information is captured and sent to someone special so that person can feel it on his or her wrist.
Sketch
You can draw on your Apple Watch screen and then share your creation — a sketch — with another Apple Watch owner. Apple Watch is little more than two square inches; therefore, don’t expect to paint a masterpiece, but sketches are fun and creative ways to reach out to others. The person who receives a sketch can reply with one too, and you can chat back and forth like this to your heart’s content.
To create and send a sketch from your Apple Watch, follow these steps:
- Tap the Messages app and then select someone’s name to reply to.
-
Select the icon that looks like a heart, with two fingers inside.
This is for the half-dozen Digital Touch options.
-
Sketch something with your fingertip and when you lift up, it sends the sketch to the other person.
You can draw a smiley face, a star, a heart, a flower, a sun, a fish, written-out words, or anything else you can think of. See Figure 5-21 for an example. Because your friend is wearing an Apple Watch, that person sees the drawing appear on his or her wrist just as you drew it. He or she knows it’s from you because your name is in the top-left corner (which is the same for a tap and a heartbeat).
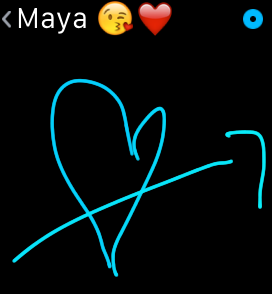
FIGURE 5-21: This is a (poorly drawn!) example of what you can sketch and send to a friend’s Apple Watch.
When sending a sketch, you can tap the small circle at the top right of the Apple Watch screen to change colors. See Figure 5-22 for a look at the seven colors offered in the palette.
Tap
Another unique way to use Digital Touch on Apple Watch is to send a tap to someone. As with the other Digital Touch features, that person needs to have an Apple Watch too. A tap is similar to a tactile version of a Facebook “poke” — a kind of “Hey, I’ve been thinking about you” type of notification.
To send a tap from your Apple Watch, follow these steps:
- Tap the Messages app and then select someone’s name to reply to.
-
Select the icon that looks like a heart, with two fingers inside.
This is for the half-dozen Digital Touch options.

FIGURE 5-22: You’re not limited to just one color for a sketch. Tap the small circle, select another color, and then draw away.
-
Tap the screen one or more times, such as two quick taps in the top-left corner and a single press on the bottom right of the screen.
Tap the small circle in the top right to change the color. Stop tapping to send.
After you complete those taps, the person you’re tapping sees and feels the tap on his or her Apple Watch — visually presented as small and large rings that disappear (as shown in Figure 5-23) — and he or she knows it’s from you because your name is in the top-left corner (which is the same for a sketch and a heartbeat).
The recipient can “play” the pattern again by tapping in the upper-right corner. If and when the person you’re tapping with replies with a Digital Touch, he or she can choose to reply with something else, such as a sketch or a heartbeat instead of another tap.
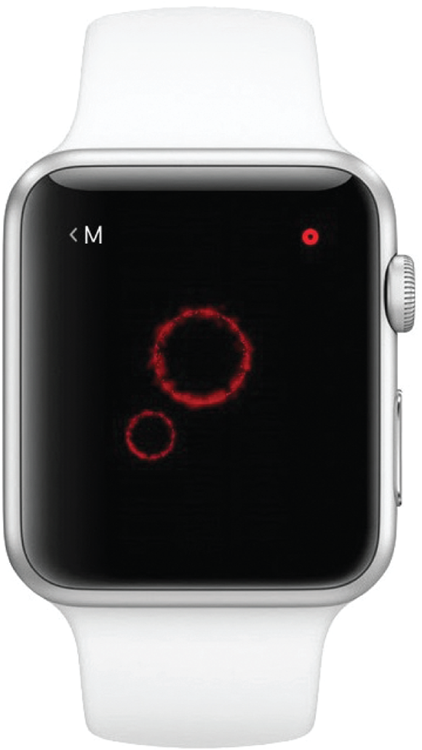
FIGURE 5-23: Send a custom tap to someone else that has an Apple Watch and that person should see and feel it on his or her wrist.
Heartbeat
Sending your heartbeat is another way to reach out and flirt with someone — from your Apple Watch to another person’s Apple Watch. Is that romantic or what!
To send a heartbeat from your Apple Watch, follow these steps:
- Tap the Messages app and then select someone’s name to reply to.
-
Select the icon that looks like a heart, with two fingers inside.
This is for the half-dozen Digital Touch options.
-
Press two fingers on the screen at the same time.
Apple Watch’s heart rate monitor (which is underneath the watch) immediately starts calculating your heart rate.
After a few seconds, your heartbeat — as shown in Figure 5-24 — is sent to (and felt by) your significant other or friend. He or she knows it’s from you because your name is in the top-left corner (which is the same for a sketch and a tap).
Okay, this might sound a little gimmicky, but it might just brighten up your friend’s or loved one’s day if he or she is having a rotten one. Just don’t send it to the wrong person, such as your boss or your best friend’s spouse — in case someone gets the wrong idea.

FIGURE 5-24: Send your heartbeat to a friend’s or your better half’s Apple Watch, which they’ll see as a beating heart. You just need two fingers to do so.
A few more Digital Touch options
Didn’t see what you wanted to send your friends and loved ones in the previous sections? Try the following options:
- Send a kiss: Similar to Heartbeat, tell someone you’re thinking of them by sending kisses. Follow the instructions in “Sending a message” to select a person to message with, tap the Digital Touch icon, and to send kisses, tap two fingers on the screen one or more times. Stop tapping to send.
- Break a heart: Time to channel your inner Taylor Swift and tell someone they’ve broken your heart (yes, I went there). Follow the instructions in the “Sending a message” section to select a person to message with, tap the Digital Touch icon, and then place two fingers on the screen until you see and feel your heartbeat. Drag down to send.
- Show anger: Don’t know how to communicate your fury? Apple Watch to the rescue. Follow the instructions “Sending a message” to select a person to message with, tap the Digital Touch icon, and then touch and hold one finger on the display until you see a flame. Lift to send.
Stickers (including Animojis, Memojis), handwritten messages, and tapback
As you can tell, Apple went all-out with its Messages app for Apple Watch. There’s even more you can do, if you can believe it. Here are a couple of extra goodies to play around with.
Stickers
Want to send someone a fun sticker to make their day? It’s quick and easy.
- Tap someone’s name in your Messages app and tap Reply.
- Tap the smiley icon, which has emojis inside.
-
Scroll to the bottom by swiping down or twisting Digital Crown, and select the word Stickers.
Recent stickers and handwritten messages sent from your other devices appear here (swipe sideways to see your Recent ones) so you can send them again (or to someone else) from Apple Watch. Figure 5-25 shows an example.

FIGURE 5-25: Send fun stickers or handwritten messages from other Apple devices right from Apple Watch.
Animojis and Memojis stickers
As you likely know from your iPhone, Animojis — short for animated emojis — uses the iPhone’s front-facing camera to create a cartoon emoji that mimics your facial expressions in real time. Memojis, on the other hand, are customizable Animojis, after you’ve tweaked your head shape, facial features, hair, and more.
Adding Animojis/Memojis to messages on Apple Watch is as easy as adding a regular sticker, but you need to make sure your Apple Watch is running watchOS 6 or later (Settings ⇒ General ⇒ Software Update). When you scroll down the list of available stickers — by swiping down the screen or turning the Digital Crown — you see the Animojis (the left side of Figure 5-26) and Memojis (if you’ve created any) just below the regular stickers (the right side of Figure 5-26). Tap which one you want to send. That’s it!
Tapback
You can respond to someone’s message without typing out a full response. Think of tapbacks as messaging shortcuts. To quickly send one:
- Open the Messages app on Apple Watch.
- Double-tap a message.
- Choose a Tapback, like thumbs-up or a heart (see Figure 5-27).

FIGURE 5-26: Have fun exchanging Animojis (pictured here) or custom-made Memojis inside of Apple Watch’s Messages app.
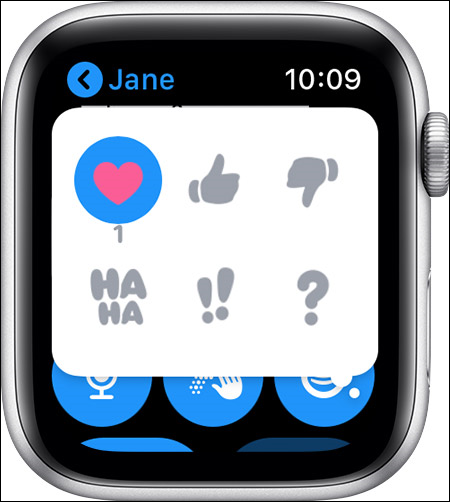
FIGURE 5-27: Thumbs up? Thumbs down? You can choose from many Tapback options.
Enabling and Using the Walkie-Talkie Feature
 Walkie-Talkie is a fun way to communicate between Apple Watch wearers. As you might expect, it lets you quickly chat with someone, wrist to wrist, using your voice (see Figure 5-28).
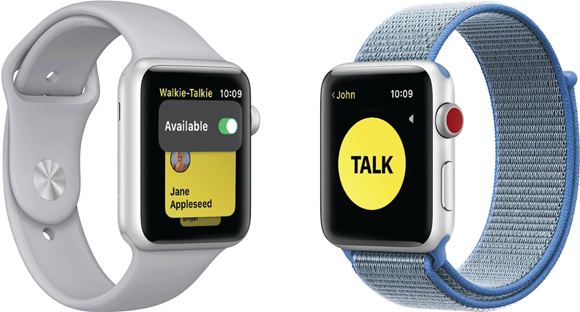
FIGURE 5-28: 10-4, good buddy? You can use the Walkie-Talkie feature to chat with someone via their Apple Watch.
The Walkie-Talkie app isn’t available in all countries or regions. But no, you don’t need to be near each other like old-school walkie-talkies (like in the Stranger Things TV show)!
To get going, you have to fulfill two requirements:
- You and your friend both need any version of Apple Watch, as long as you have the watchOS 5 operating system or later.
- You also both need to set up the FaceTime app on your iPhone and be able to make and receive FaceTime audio calls. See the earlier section in this chapter “Outgoing calls with FaceTime audio.”
Adding friends to Walkie-Talkie
To do so:
- Open the Walkie-Talkie app on your Apple Watch (it’s yellow and black).
-
Press the yellow “+” sign and choose a contact.
Wait for your friend to accept the invitation. The contact card stays gray and is labeled “invited” until your friend accepts.
-
After he or she accepts, the contact’s card turns yellow and you and your friend can now talk instantly.
See Figure 5-29 for what this looks like.
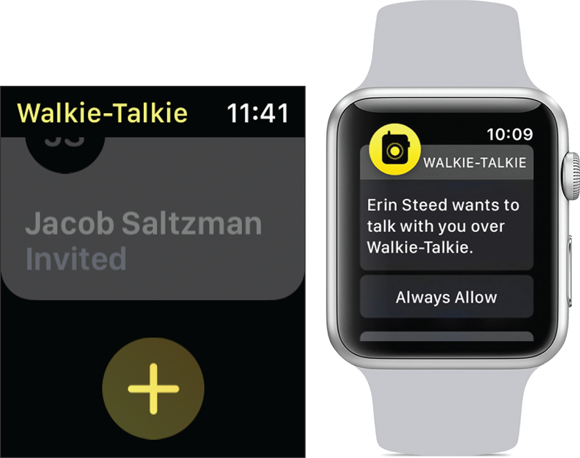
FIGURE 5-29: Send an invite to someone over Walkie-Talkie (left) and your friend’s wrist displays your request (right).
To remove a friend, open the Walkie-Talkie app, swipe left on the friend, and tap the red X. Alternatively, you can open the Apple Watch app on your iPhone, tap Walkie-Talkie ⇒ Edit, tap the red - (minus), and then tap Remove to confirm.
Starting a Walkie-Talkie conversation
Now for the fun stuff:
- Open the Walkie-Talkie app on your Apple Watch.
- Tap a friend’s contact.
-
Touch and hold the talk button, and then say something.
You might see the word connecting on the screen as the watches are attempting to wirelessly connect. After the connection is made, your friend can hear your voice and talk with you instantly.
-
To talk over Walkie-Talkie, touch and hold the talk button, and say something; when you’re done, let go.
Your friend instantly hears what you said. To change the volume, turn the Digital Crown.
Need a little peace and quiet? To turn Walkie-Talkie off, open the app and turn Available off or on.
Sending, Receiving, and Managing Emails on Apple Watch
Apple Watch would be a half-baked product if you could only use it for reading messages and not email. Thankfully, it delivers a decent mail experience right on your wrist. You can read and manage your mail, reply, or even compose a response to an email.
Apple Watch’s inbox is synced with your iPhone, so you can browse by date, sender name, titles, contents, and attachment/VIP status or by the default All Inboxes, as shown in Figure 5-30. This is especially important for those who rely on email communication for work.

FIGURE 5-30: You can manage your inbox from your wrist.
Before you can read, reply, and manage your email on Apple Watch, you’ll want to ensure it’s synced with the mail account(s) on your iPhone. As shown in Figure 5-31, open the Apple Watch app on iPhone, tap Mail, and ensure your accounts are listed. Here you can also tell your iPhone how you’d like to be notified of new emails on your Apple Watch (tap Custom).
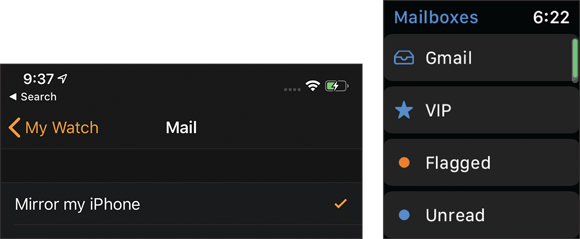
FIGURE 5-31: The Mirror My iPhone option on the Apple Watch app.
Reading and acting on an email
To read and act on an email message, follow these steps:
- Press the Digital Crown button to go to the Home screen.
 Tap the Mail app.
Or raise your wrist and say “Hey, Siri, Mail.” Either action launches the Mail app and takes you right to your inbox.
-
Use the Digital Crown button or your fingertip to scroll up and down through your emails — as shown in Figure 5-32 — and then tap the subject line to open one.
The email you selected fills up your Apple Watch screen, hiding the others.
-
Once in an email, scroll down to the bottom of the message and tap Reply, as shown in Figure 5-33.
You can also turn the Digital Crown to scroll to the bottom. You can also press and hold Reply to see more options: Reply, Flag, Unread (mark as unread), or Archive (save for later).

FIGURE 5-32: Navigating your inbox using the Digital Crown button.
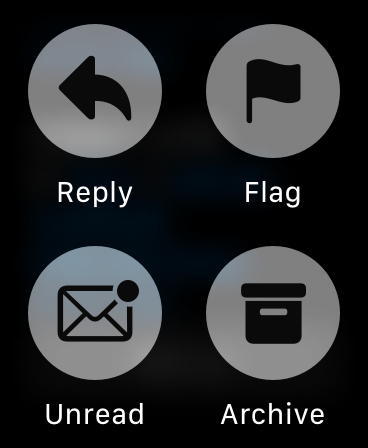
FIGURE 5-33: Swipe down in an email message to get to the bottom and then tap Reply (left). Pressing and holding Reply pulls up these additional options (right).
Replying to an email
If you want to reply to an email, you’ve got a few choices, as shown in Figure 5-34:
- Microphone: To dictate your email reply, tap this option. It transcribes your voice into text. Tap Done. If you see that the words onscreen look good, tap Send. If not, hit Cancel.
- Scribble: Reply using the Scribble feature, which means you can use your finger to write a reply. See the section “Replying with Scribble” for full instructions.
- Emojis: Select the smiley face to open the many emoji examples for you to send.
- Default replies: Tap one of the preset phrases for a quick reply. You can edit these on your iPhone, in the Apple Watch ⇒ MyWatch ⇒ Mail area.
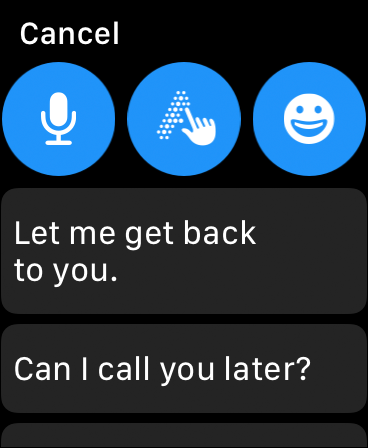
FIGURE 5-34: Tap Reply at the end of an email message and you’ve got some options here: microphone (voice-to-text), Scribble, emojis, or default replies.
Composing an email
Although this feature wasn’t available when the Apple Watch first debuted, you can now create an email from scratch on Apple Watch! And you might not know it’s even available because there isn’t a “Compose Email” option, nor does Apple cover it on the web pages devoted to Apple Watch.
No worries: I’ve got your back! Here’s how to compose an email on Apple Watch:
-
Open the Mail app.
You likely see emails in your inbox.
- Press and firmly hold the screen and you’ll feel a slight vibration.
- Tap New Message.
- As shown in Figure 5-35, tap to add a Contact, Subject line, and Message.
- For Contacts, choose the recipient from your Contacts, or verbally say a name, as shown in the left image of Figure 5-36.
- Tap Subject, and you have the option to dictate, Scribble, use an emoji, or choose from a preset/default list of Subject lines, as shown on the right image of Figure 5-36.
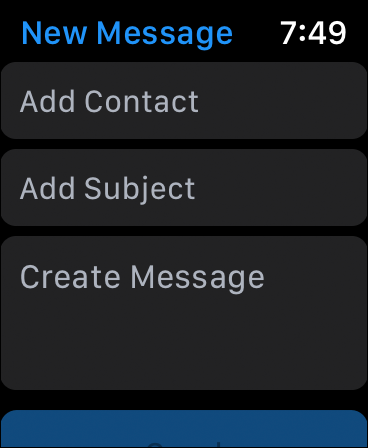
FIGURE 5-35: Composing an email on Apple Watch is as easy as pressing and holding the screen in the Mail app. Tap New Message and then fill out the rest.
- Tap Create Message and you see similar options to those in Step 4.
- When you like what you see, press Send.
That’s it!
Oh, wait, you say. What about Siri? Can’t you raise your wrist and ask Siri to compose an email right from Apple Watch? Regrettably, no. If you try that, you’ll hear Siri say she can help you compose an email on your iPhone, if you like. But not on Apple Watch — or perhaps, not yet.

FIGURE 5-36: Options to send an email include transcribing/choosing a contact (left). Options for the Subject line and Message body are just like messaging options (right). Cool, huh?