Chapter 5
Watching Over-the-Air and Live TV
IN THIS CHAPTER
![]() Watching over-the-air signals captured by your antenna
Watching over-the-air signals captured by your antenna
![]() Setting up a DVR to record over-the-air TV shows
Setting up a DVR to record over-the-air TV shows
![]() Getting your over-the-air TV fix using a smart TV
Getting your over-the-air TV fix using a smart TV
![]() Tuning in to over-the-air TV channels using a streaming media device
Tuning in to over-the-air TV channels using a streaming media device
![]() Watching live TV without an antenna
Watching live TV without an antenna
Whether you're looking to watch today's big game, this afternoon's classic soap, or tonight's prime-time drama, your antenna is (presumably) ready to pull down the channel of your choice. And that choice is what this chapter is all about. Here I finally put the OTA pedal to the TV metal and show you how to watch over-the-air programming — on not only a regular TV but also a smart TV and a streaming media device. Talk about choices!
You also explore the world of recording over-the-air shows using DVR devices and software. If you've turned your back on cable, the combination of watching and recording over-the-air shows is sure to allay any post-cord-cutting regret you might be experiencing.
Finally, if you decided not to go with an antenna for over-the-air access, this chapter also lets you investigate the world of live TV streamed over the Internet. A fistful of live TV streaming services are available at every price range, so there's bound to be one that's right for you. Let's see.
Watching Over-the-Air TV Using a Regular TV
Assuming you have your HDTV antenna connected to your TV's antenna jack (which might be labeled Antenna, Antenna In, Ant, or Cable; see Chapter 4), you're ready to watch over-the-air TV. The next few sections explain the details.
Changing the TV input source
If you pull out your TV and take a look at the back (and sometimes also the side), you'll see a panel (or two) bristling with ports and jacks and connectors of various sizes and shapes (see Figure 5-1).
On any modern TV, you're likely to see one or more of the following connector types for video input:
- Antenna: A jack F connector for the coaxial cable from your HDTV antenna
- HDMI: A high-definition media input connector for input from a media gadget such as a streaming device, DVR, Blu-ray player, or computer
- Component: Red, green, and blue RCA connectors for video input
- Composite: A yellow RCA connector for video input
- S-Video: A round connector for Separate Video input
- Computer: A DVI or VGA connector for input from a computer monitor (although the vast majority of modern monitors connect via HDMI)

FIGURE 5-1: The back of a typical modern TV is festooned with connectors.
So, how do you tell your TV which of these connectors has the content you want to view onscreen? You need to change the input source, which is the connector type that the TV uses to display incoming content. If you want to watch over-the-air TV, you switch to the antenna input source; if you want to watch shows using a streaming media device or DVR, you switch to the HDMI input source.
The method you use to change the input source depends on your TV. The most common case is to use the TV's remote. Look for a button named Input (or sometimes Source), as shown in Figure 5-2, and then use one of the following methods to switch to a different input source:
- Each time you press Input, the TV displays the next input source: Keep pressing Input until you get to the input source you're looking for.
- When you press Input, a menu of input sources appears: Use the remote’s navigation ring or navigation buttons to select the source you want to view.

FIGURE 5-2: For most TVs, you use the remote's Input button to change the input source.
 If you don’t see a button named Input (or Source) on your remote or you don’t have a remote, look on the TV itself, which should have an Input (or Source) button.
Watching over-the-air TV
Checking out what's currently being broadcast over-the-air is so straightforward that I can describe it in a mere two steps:
Change your TV's input source to Antenna.
The name of this input source varies depending on the TV, so if you don't see Antenna, look for TV.
Use the TV remote's Channel Up and Channel Down buttons to surf the available channels.
Alternatively, if you know a station's virtual channel number (see Chapter 3), you can use the remote's numeric keypad to enter the channel number.
 When you enter the virtual channel number, remember to include the decimal. For example, if the virtual channel number is 4.1, you need to press 4, a period (or a hyphen on some TVs), and then 1.
Where's the TV guide?
The basic over-the-air TV watching experience involves surfing up and down through the available channels until you find something entertaining, interesting, or diverting enough to put down the remote.
Channel surfing is a classic way to watch TV, but it gets old in a hurry. What's the solution? Right: Some sort of guide to what's on now and what's coming up. Fortunately, plenty of free online services provide a TV listing based on your location. Here are a few to check out:
- NoCable: Provides over-the-air TV listings for any address in the United States, as
www.nocable.com/tv-guide/ - On TV Tonight: Provides OTA TV listings (for morning and afternoon, as well as night) for cities in the United States, Canada, United Kingdom, Australia, and Ireland at
www.ontvtonight.com/ - TitanTV: Provides over-the-air TV listings for any ZIP code in the United States at
www.titantv.com/ - TV Passport: Provides over-the-air TV listings for cities and ZIP or postal codes in the United States and Canada at
www.titantv.com/
Quite a few mobile device apps can also provide local TV listings. The best of these is the TV Guide app, which is available for both iOS and Android.
Recording over-the-air TV
It will probably take you less than ten minutes to stumble upon the biggest problem with watching TV shows over-the-air: commercials, so many commercials. In your cable days, you likely solved that problem by recording your favorite shows and then skipping over the commercials during playback. Too bad you can't do that with over-the-air TV, right?
Wrong! Devices and software are available that let you set up a roll-your-own DVR setup. The next couple of sections run through the most popular options.
Recording over-the-air TV for free
As I describe in the next section, the best over-the-air DVR experience requires a subscription, which gives you sweet features such as scheduled recordings and recording only new episodes of a show.
However, if you're not fussy about DVR features — or your budget is tight — there are ways to record over-the-air TV without paying a monthly subscription. These free DVR solutions are usually restrictive — for example, they might support only manual recordings or your recordings might be playable only on a single device — but, hey, whaddya want for nothing?
Here are some free DVR setups to check out:
- Tablo: Most people use the Tablo Dual or Tablo Quad DVR with a subscription (see the next section) to get its abundant features, but these Tablo devices also offer basic recording capabilities without a subscription. How basic? Well, you get just one day of TV guide data; you get no program info, and you can't record by series. I show you how to configure a Tablo DVR a bit later in this chapter (see “Setting up a Tablo DVR”).
Fire TV Recast: If your home is a dedicated Amazon Fire TV shop, Fire TV Recast is for you. Recast is an over-the-air TV that connects to your home's Wi-Fi network, where it can then be accessed by any Fire TV device. Fire TV Recast includes either two tuners and 500GB of internal storage, or four tuners and 1TB of storage.
As I write this, Fire TV Recast is available only in the United States.- Live Channels: This is a Google-created Android app, so it works on any Android TV device. The app is free to download and requires no subscription. If your Android TV box doesn't come with a built-in tuner (such as you get with AirTV and Channel Master Stream+), you need to buy a tuner (such as the HAUPPAUGE WinTV-DualHD tuner). You'll also need a USB hard drive to store the recordings.
- AirTV Player: This option comes with free DVR capabilities via either the AirTV app or the Sling TV app. It has a tuner, but you need to attach a USB hard drive before you can record anything.
- Digital converter box: This inexpensive device is designed to convert digital over-the-air signals so they can be displayed on analog TVs. However, they work perfectly well with any TV, include a tuner, and also offer extremely basic (and extremely free) recording capabilities.
Recording over-the-air TV with a subscription
If you want the nicest DVR experience for your over-the-air shows, you need to shell out a few dollars a month for a DVR subscription service. Those dollars get you features such as a multiday TV guide (usually 14 days' worth of listings); scheduled and manual recordings; series info; series-based recording; adjustable recording start and stop times; channel filters (such as showing only movies or sports); and automatic commercial skipping.
Here are three subscription-based DVRs to consider:
Tablo: The Table Dual (two tuners) and Table Quad (four tuners) are whole-home DVRs, meaning they connect to your Wi-Fi router and then other devices — such as a streaming media device, smart TV, mobile device, or computer — access the DVR over Wi-Fi using the Tablo app. Most Tablo DVRs require you to add a hard drive for storing your recordings. Basic recording is free (see the preceding section), but you'll need a subscription ($4.99 per month) to unlock all the DVR features. See the next section for the details on how to set up a Tablo DVR.
The more tuners you get, the more options you have when it comes to simultaneously watching live TV and recording shows. For example, with two tuners, you can simultaneously watch one show and record another or record two shows; with four tunes, you can watch and record up to four shows at once.- Channels: You install the Channels software on a computer, connect an HDTV tuner to the same computer, get a Channels Plus subscription ($8 per month), and then start watching and recording over-the-air TV. For more details, surf to
https://getchannels.com/plus/. - Plex: You install Plex Media Server on your computer, add a compatible tuner, and then subscribe to a Plex Pass ($4 per month), which enables you to watch and record over-the-air TV. You can access recordings on any networked device. For more info, see
www.plex.tv/tv/.
Setting up a Tablo DVR
Tablo DVRs are by far the most popular option for cord cutters who are doing the over-the-air TV thing. If you decide to go the Tablo route, here are the general steps to follow to set up most Table DVRs:
- Connect your HDTV antenna's coaxial cable to the Antenna jack F connector on the back of the Tablo.
If your Tablo doesn't come with a built-in hard drive, connect an external USB hard drive to the USB port on the back of the Tablo.
Some Tablo models also accept an internal SATA hard drive. If you're using this method, remove the screw on the bottom of the Tablo that holds the cover for the SATA compartment in place, insert the drive into the SATA connector, and then reattach the SATA compartment cover.
- Access the Tablo app with the device you want to use to set up the Tablo:
- If you're using a PC or Mac, browse to the Tablo web app at
http://my.tablotv.com/. - If you're using an iOS or Android mobile device, install the Tablo app.
- If you're using a PC or Mac, browse to the Tablo web app at
- Connect your Tablo to your Wi-Fi network:
- If your antenna and your Wi-Fi router are close to each other, attach one end of the supplied Ethernet cable to the Tablo's Ethernet port and the other end of the cable to any available Ethernet port on your router. Skip to Step 7.
- If your antenna and Wi-Fi router are too far apart for a direct connection, you need to use Wi-Fi, so select the app's Add via WiFi command. Your Tablo sets up its own wireless network with a name along the lines of Tablo_1234.
- Use your computer or mobile device to connect to the Tablo wireless network.
Use the Tablo app to select your home Wi-Fi network and enter the network password.
This step connects your Tablo to your network.
- Follow the instructions provided by the Tablo DVR Setup Wizard.
- If you also use a smart TV or streaming media device, use that device to install the Tablo app so that you can access Tablo content on the device.
Watching Over-the-Air TV Using a Smart TV
If you have a smart TV — such as an Amazon Fire TV Edition set, a Roku TV, an Android TV, or a Samsung Smart TV — in many cases you can watch over-the-air TV just by connecting your HDTV antenna to the device.
Most smart TVs have the input source selection built right into the TV's interface. For example, on Fire TV Edition televisions, the Home screen (as well as the Live screen) offers an Inputs section, as shown in Figure 5-3. You use this section to choose the input source you want to view. For over-the-air TV, you'd select the Antenna input source.

FIGURE 5-3: With smart TVs, you use the TV interface to select the input source.
After you select the input source for your antenna, you usually see what's playing on the current OTA channel. The interface typically provides a button to display a channel guide like the one shown in Figure 5-4.
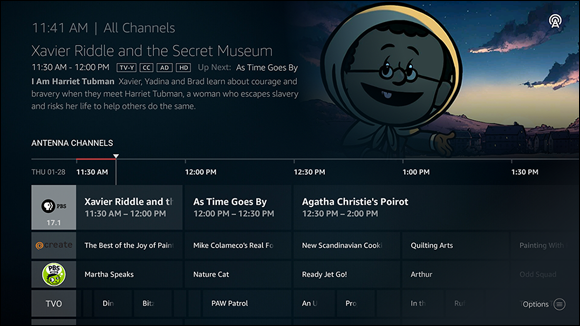
FIGURE 5-4: Smart TVs offer a channel guide.
Watching Over-the-Air TV Using a Streaming Device
If you have a media streaming device such as Roku, Fire TV, or Chromecast, can you use that device to watch over-the-air TV? Not directly. Instead, you need either a DVR or an HDTV tuner that will send your antenna's OTA signals via Wi-Fi to the streaming device, and then you use the DVR or tuner app to watch the signal.
If you want to use a DVR, any of the following will do the trick (see my descriptions of these DVRs earlier in the “Recording over-the-air TV” section):
- Tablo
- Fire TV Recast
- AirTV
If you just want to use an HDTV tuner, here are a couple to investigate:
- HDHomeRun: Connect your antenna's coaxial cable to the back of this device. Then connect the HDHomeRun to your Wi-Fi network, either directly using an Ethernet cable or by using a temporary wireless network.
- ClearStream TV: Connect your antenna's coaxial cable to the jack F connector on this device, and then use the ClearStream TV app to connect the tuner to your Wi-Fi network.
Look, Ma, No Antenna! Streaming Live TV
In the three chapters in Part 2 (Chapters 3, 4, and 5), I make a big assumption: Your post-cable life includes over-the-air TV brought into your home using an HDTV antenna. That's an attractive proposition because most folks can pick up one or two dozen stations broadcasting in crystal-clear HD, all for the price of an antenna and some coaxial cable. Sweet!
But over-the-air TV slurped up by an antenna isn't for everyone:
- Perhaps you live in an area that has very few over-the-air broadcast signals.
- Perhaps the only way you can get a reasonable number of channels is to use an outdoor antenna, and you don't want to bother with the effort or expense of installing one.
- Perhaps you really want DVR capabilities, but you find the do-it-yourself route of installing and configuring a DVR such as a Tablo or Fire TV Recast too complicated.
Whatever the reason, does it mean you have to give up on watching or recording live TV? Not even close. Tons of streaming services offer live TV, meaning local channels broadcast in real time. You use the service's app to access the live TV feed. In most cases, you can use the app on any of the following device types:
- A desktop or notebook computer (PC or Mac)
- iOS and Android mobile devices
- Gaming consoles, particularly Xbox and PlayStation
- Streaming media devices, such as Roku, Fire TV, Apple TV, and Chromecast
- Smart TVs, such as Fire TV Edition sets, Roku TV, Android TV, and Samsung TV
Many live TV streaming services provide access to dozens of channels and offer some sort of cloud DVR, which refers to a digital video recorder that stores recordings online. The services range from free to eyebrow-raisingly expensive, but there's bound to be something that fits what you’re looking for. To find out, check out the most popular services, listed here:
- AT&T TV Now: $69.99. Offers more than 65 channels of live TV. Includes 20 hours of cloud DVR storage. You can get 500 hours of cloud DVR storage for an extra $10 per month. Go to
www.att.com/tv/. - Hulu + Live TV: $64.99. Gives you access to more than 65 live channels (plus the rest of the massive Hulu library). A cloud DVR is included, but you can upgrade to the Enhanced Cloud DVR for an extra $9.99 per month. Visit
www.hulu.com/live-tv. - fuboTV: $64.99 to $79.99. Offers more than 100 live channels with an emphasis on sports. A cloud DVR is included. See
www.fubo.tv/. - Locast: Free. A not-for-profit that offers live, local broadcast TV in selected US cities (with more cities added somewhat regularly). For details, go to
www.locast.org/. - Paramount Plus: $5.99 or $9.99. Gives you live access to CBS programming. The $9.99 option is commercial-free. See
www.paramountplus.com/. - Philo: $20. Offers more than 60 channels and unlimited cloud recording. Visit
www.philo.com/. - Pluto TV: Free. Offers 250 or so channels, many of which are broadcast live. Go to
https://pluto.tv/live-tv/. - Sling TV: $35. Provides two different packages — one with about 45 news and entertainment channels, and the other with about 30 sports and family channels — for the same price. 50 hours of cloud DVR storage is included, but you can get 200 hours for an extra $5 per month. Visit
www.sling.com/. - YouTube TV: $64.99. Offers more than 85 channels of live TV and comes with unlimited DVR cloud storage. Visit
https://tv.youtube.com/.