
Chapter 4
Getting to Know Microsoft Word
IN THIS CHAPTER
![]() Introducing word processing
Introducing word processing
![]() Understanding the various ways to view your documents onscreen
Understanding the various ways to view your documents onscreen
![]() Navigating documents by mouse or keyboard
Navigating documents by mouse or keyboard
![]() Tips for shortening your learning curve
Tips for shortening your learning curve
According to the dictionary built into Word’s own Smart Lookup tool, a word processor is
… a program or machine for storing, manipulating, and formatting text entered from a keyboard and providing a printout.
We’ve come a long way from the days of typewriters, when ensuring that you had clean, error-free, good-looking documents took a great deal of time and labor (and a wee bit of luck).
The word processor changed all that. Using a word processor, you can go back and change anything you’ve typed at any time you like. You can save documents and reuse or modify them later. You can use dozens of different font faces, sizes, and weights (though you should probably limit yourself to no more than a handful per document). You can change the size of margins; add, resize, or modify pictures and drawings; and create multiple columns or tables (grids) in your documents with just a few clicks or keystrokes.
In other words, a word processor gives you nearly complete control over the contents of a document and the way the document looks. With a word processor, you can do all of this (and more):
- Save, reuse, and print documents you create or receive from others
- View and edit multipage documents
- Make unlimited changes to the contents and formatting of documents
- Add images to documents
- Search for specific words or phrases in documents
- Check the spelling of every word in documents
In this chapter, we introduce the basic aspects of Microsoft Word (which is itself the gold standard of word processors), starting with the various views you can switch among so that you can work most effectively depending on the task at hand. Then it’s on to basic navigation using the mouse and keyboard. Finally, we share a pair of tips to make life easier when you add text and graphics to your documents in later chapters.
Using a Variety of Versatile Views
Word has many ways to look at your document: the print layout, web layout, outline, draft, focus, immersive reader, and full screen views. Word also has many ways to change the view, but some methods aren't available to all views:
- View tab: Click an icon on the View tab to change to any of the views except full screen view.
- View menu: Choose the View menu and then choose any view — except immersive reader view — by name. A check mark in front of a name indicates that the view is active.
- Icons at the bottom of a document window: You can select five of these views — all except immersive reader and full screen — by clicking the appropriate icon at the bottom of any document window. See Figure 4-1.
To change the view of a document, choose the view by name from the View menu (a check mark in front of its name indicates that the view is active) or from the View tab.
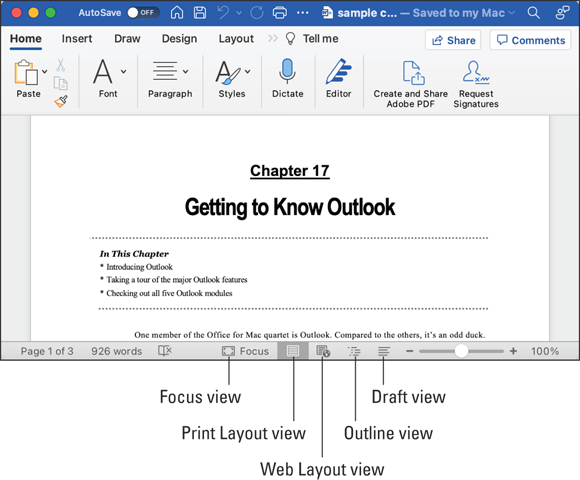
FIGURE 4-1: You can switch among these views by clicking their icons.
The following sections briefly describe each view.
Print layout view
Print layout view — which is Word’s default — is a What You See Is What You Get (WYSIWYG, pronounced “wiz-ee-wig”) view that shows you exactly what your printed document will look like, as shown in Figure 4-2.
Most users prefer to work in print layout view, but if your Mac is older or slower, you may be happier using draft view for composing and editing and then switching to print layout view just before printing a document.
Web layout view
Web layout view, shown in Figure 4-3, simulates the way your page will look when viewed in a web browser if you were to use Word’s File ⇒ Save As ⇒ Web Page command to save the page as an HTML document. The document has no page breaks because web pages have no page breaks. The text continues until the end of the page, regardless of the amount of text.
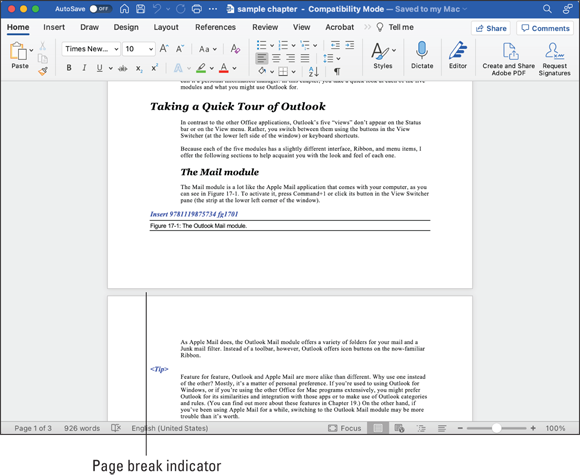
FIGURE 4-2: Print layout view shows exactly what your document will look like when printed.
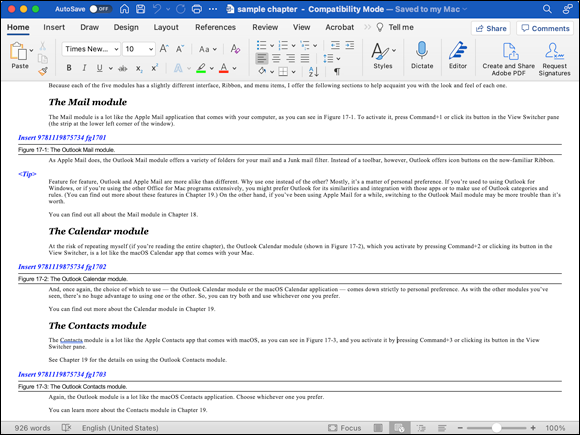
FIGURE 4-3: Web layout view displays your page as if it were in a web browser.
Also, note that the document in Figure 4-3 does not have left or right margins. That’s because text on web pages saved by Word fills the page from left to right. If you were to resize this window, the text would reflow, expanding or contracting so that each line is exactly the width of the window.
Outline view
Outline view, shown in Figure 4-4, is helpful for creating an outline or organizing a long document.
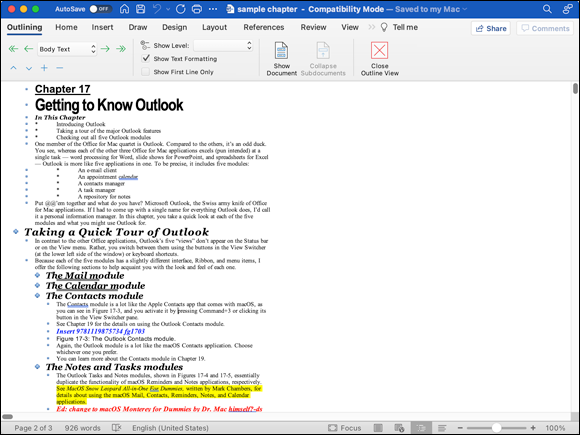
FIGURE 4-4: Outline view displays your document as an outline.
You can collapse and expand text below a heading or subheading in outline view by double-clicking the plus sign to its left; we’ve collapsed the text below the subheads “The Mail module” and “The Calendar module” in Figure 4-4. Note that these two subheads have plus signs to their left and are partially underlined. These visual cues indicate that both subheads have subordinate text or sub-subheads.
The other helpful feature of outline view is that you can drag a heading or subheading and the text below it to another location in your document by just clicking and dragging the plus sign, a feature that’s particularly convenient in longer documents.
Draft view
Draft view, shown in Figure 4-5, is the view formerly known as normal view. It’s your quick-and-dirty “just get it done” view, useful for basic typing and editing tasks, or for any time you don’t need text to appear in What You See Is What You Get (WYSIWYG) form on your screen. This view is the one that many Word jockeys prefer for completing most tasks.
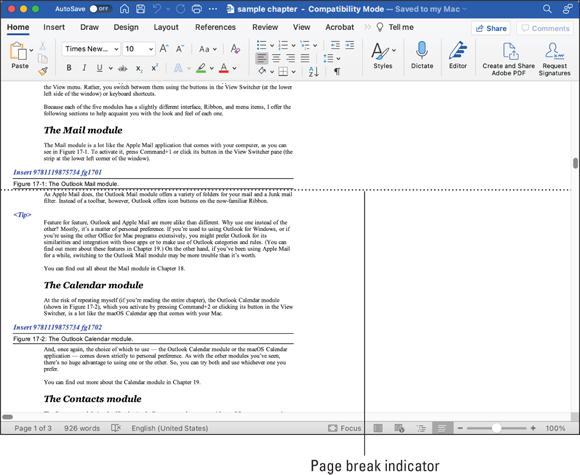
FIGURE 4-5: Draft view is the simplest view.
Note that the page break between pages 1 and 2 is denoted only by a thin dotted line. Compare Figure 4-5 to Figure 4-2, which also shows a WYSIWYG view.
 The older and slower your Mac’s processor, the faster draft view feels in comparison with layout views like Print Layout — another reason to consider using this view most of the time.
Focus view
We’ve tested word-processing and other types of writing programs that help people focus on work by blacking out everything on the screen except the document. We like the feature, but after using Word for so long, no other writing program felt right.
So you can understand why Word’s focus view, shown in Figure 4-6, has become a favorite view for many Word aficionados.
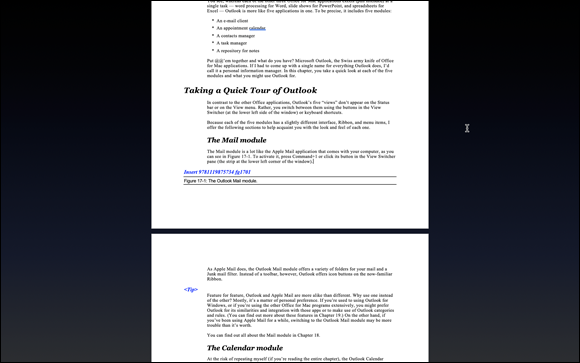
FIGURE 4-6: Focus view shows your document and little to nothing else.
See what we mean? You see nothing but the document — as shown in Figure 4-6. And as you can see, Word uses dark mode when in focus view.
Plus, the focus view is available in combination with other viewing formats. Simply select Draft, Outline, Web Layout, or Print Layout by clicking their respective icons in the bottom right of the window or by selecting them from the View menu or View tab on the ribbon. While in focus view, you’ll need to hover your cursor near the very bottom of the screen to see the view icons (see Figure 4-7).
You can enable or disable Focus in the following ways:
- Press ⌘ +Control+Shift+F on your keyboard (you might find it easier to use two hands).
- Click the Focus icon at the bottom of your document window.
- Press the Escape (esc) key on your keyboard.
- Click the Exit button in the upper left of the document window.
- Choose View ⇒ Focus.
FIGURE 4-7: The toolbar and ribbon are accessed by hovering the cursor near the top of the screen.
 Hover the cursor at the top of the screen to reveal the toolbar and ribbon.
Full screen view
Full screen view is exactly as advertised — it displays the Word document in which you’re currently working across the entire expanse of your screen’s real estate. This view removes any other distractions on your screen, such as the dock or the Music app’s MiniPlayer.
You can enable or disable full screen view by
- Pressing Fn F on your keyboard (or ⌘ +Control+F if your keyboard doesn’t have Fn keys)
- Clicking the green dot in the upper-left corner of the document window
- Pressing the Escape (esc) key on your keyboard
- Choosing View ⇒ Enter (or Exit) Full Screen
If you need to see the items and menus in the toolbar, hover the cursor at the top of the screen to reveal them.
Immersive reader view
Immersive reader view is a unique reading and listening experience with several tools and tricks to help you access a document's contents with ease. Options such as Column Width and Read Aloud make it simple (and dare we say a bit fun) to read documents in Word.
To enable immersive reader view, which is shown in Figure 4-8, click the View tab on the ribbon and then click the Immersive Reader icon.
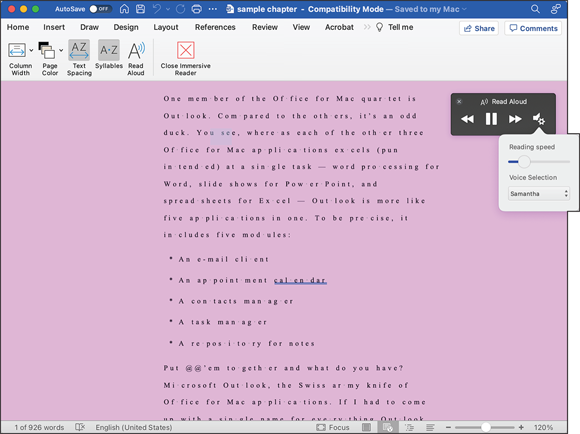
FIGURE 4-8: Immersive reader view with several of its tools activated.
The Immersive Reader tab on the ribbon has the following tools:
- Column Width: Select the column width. Figure 4-8 displays a Moderate column width.
- Page Color: Select from a range of page background colors. Orchid was selected for Figure 4-8.
- Text Spacing: Increase the text's legibility by adding extra space between the characters and using a clean font. Enable Text Spacing is shown in Figure 4-8.
- Syllables: Display break points in words to indicate syllables, as shown in Figure 4-8.
- Read Aloud: Click to have Word read the text aloud and open the Read Aloud playback controls, shown in Figure 4-8. Click the gear icon to select a different playback speed and use a different voice. The word being read is highlighted as the reading progresses so that you can follow along visually.
- Close Immersive Reader: Exit immersive reader view and return to the previous view you were using.
Remember that immersive reader view is meant to be a help, not a hindrance. If some of its options or tools disrupt your reading experience, you aren’t obliged to use them.
Zoom, zoom, zoom
You can make elements onscreen look bigger or smaller. There are three ways to zoom in or out of your document:
- Click the Zoom icon in the View ribbon to open the Zoom dialog.
- Choose View ⇒ Zoom and select an option from the list.
- Use the zoom slide control in the lower-right corner of windows in Draft, Outline, Web Layout, and Print Layout mode.
All three are shown in Figure 4-9.
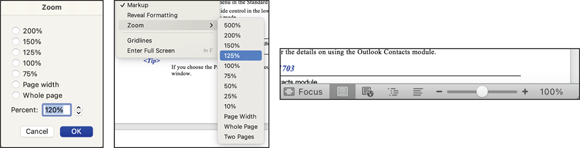
FIGURE 4-9: Use the Zoom dialog (left), Zoom menu (middle), or zoom slide control (right) all to enlarge or reduce onscreen elements.
If you choose the Page Width option in the Zoom dialog or Zoom menu, your text grows and shrinks automatically as you resize the window. Remember, though, that it’s the zoom that’s changing, not your font size.
Getting around in Your Document
When you begin filling your formerly blank Word document with text and images, which you can find out how to do in Chapter 5, it’s good to know how to move around effectively within the file. This section tells you how to do just that, using the mouse, trackpad, and keyboard keys. (Most people use a combination.)
A scroll new world: Navigating by using the mouse or trackpad
One way to move around in your document is to use the scroll bars and scroll arrows that appear at the sides and bottom of the Word window, as shown in Figure 4-10.
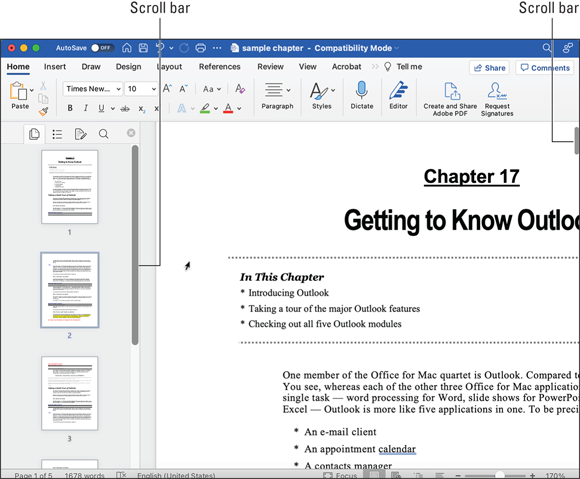
FIGURE 4-10: Use scroll bars to get around in your document.
If your mouse has a scroll wheel, scroll ball, or Multi-Touch surface (like Apple’s Magic Mouse), you can also use it to navigate your document.
Using the wheel or ball scrolls your document vertically (up or down). If you press the Shift key before you turn the wheel or ball, some mice then scroll horizontally (left or right). Try it with your mouse to see whether this method works for you.
Another way to move in your document is to use the Thumbnail pane (shown in Figure 4-11), which you display or hide by choosing View ⇒ Sidebar ⇒ Thumbnail. This action (or selecting anything else in View ⇒ Sidebar) also displays the sidebar on the left side of the document window.
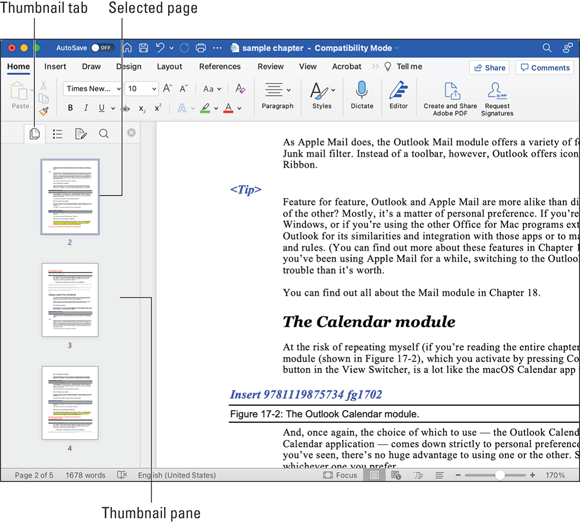
FIGURE 4-11: Click a thumbnail in the Thumbnail pane to move to that page.
You can also move around in your document using the Document Map (shown in Figure 4-12). Click the Document Map tab in the sidebar or select View ⇒ Sidebar ⇒ Navigation to open the tool. The Document Map lists the headings in your document in the sidebar; simply click a heading to jump right to the page it’s on.
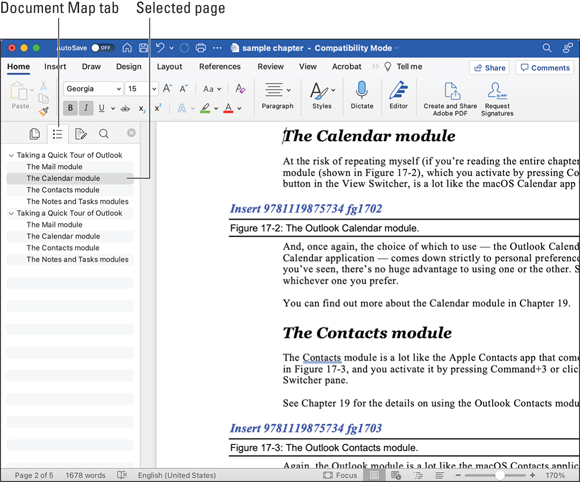
FIGURE 4-12: View and navigate your document by using headings in the Document Map.
Navigating by using keyboard navigation
You can move the cursor around a document without even touching the mouse, if you want. And, if you really want to become a whiz in Word, memorize most or all of the shortcuts in the following table, which shows how to move the cursor around a document by using only the keyboard.
To Move to This Destination | Press This |
|---|---|
One character to the left | Left arrow |
One character to the right | Right arrow |
One word to the left | Option+left arrow |
One word to the right | Option+right arrow |
One line up | Up arrow |
One line down | Down arrow |
To the end of a line | ⌘ +right arrow or End |
To the beginning of a line | ⌘ +left arrow or Home |
One paragraph up | ⌘ +up arrow |
One paragraph down | ⌘ +down arrow |
One screen up (scroll) | Page Up |
One screen down (scroll) | Page Down |
To the top of the next page | ⌘ +Page Down |
To the top of the previous page | ⌘ +Page Up |
To the end of the document | ⌘ +End |
To the beginning of the document | ⌘ +Home |
To select (highlight) text as you move the cursor using these shortcuts, just hold down the Shift or ⌘ key. Chapter 5 tells you more about selecting text and why you need to do so to format text, copy and paste it, and perform other tasks in your document.
Some keys, such as End, Home, Page Up, and Page Down, may not be on all keyboards, especially small profile keyboards like those on laptops or iMacs.