
Chapter 8
This and That: Advanced and Collaboration Features
IN THIS CHAPTER
![]() Using styles
Using styles
![]() Customizing Word
Customizing Word
![]() Creating a table of contents, an index, and more
Creating a table of contents, an index, and more
![]() Understanding Word’s collaboration features
Understanding Word’s collaboration features
![]() Working with envelopes and labels
Working with envelopes and labels
![]() Saving documents as web pages
Saving documents as web pages
In this, the final chapter in this part on Word, we show you some of its more advanced features and its collaboration features. By advanced features, we mean that they’re mostly features you don’t have to use. But if you choose to use them, these features can make Word easier to use and help you get more done in less time. And by collaboration features, we mean tools for people who work on documents with others, such as writers and editors, or co-authors in different geographic locations.
In this chapter, you find out about assigning styles to text elements. If you master only one feature in this chapter, this is the one to choose. Styles let you easily create documents with consistent formatting throughout. You’ll never have to look back in your document to try to figure out which font you used for subheads or what size the body text is. Instead, using Word styles, all it takes are a few clicks to format the text the same as all other similar text. Styles make all your chapter titles look the same, your figure captions match, and your bullet lists look alike throughout a document.
You also discover how to customize some of your most frequently used elements, such as the ribbon and the Quick Access toolbar. We show you how to automatically generate a table of contents, an index, and other types of tables. Then you discover Word’s excellent features for collaborating with others in composing and polishing your documents. Finally, we show you how easily you can use Word to address and print envelopes, create labels, and save documents as web pages (though the latter isn’t one of Word’s best features).
Going in Style: Defining Styles for Easy Formatting
Word styles let you apply formatting to selected text quickly and easily. For example, you might want every chapter title in your novel to appear in 36-point Helvetica font, bold, italic, centered, with 72 points of space above it and 72 points of space below it. Remembering all those characteristics, not to mention choosing and applying them every time you start a new chapter, would be quite a hassle.
Letting you skip all that hassle is what styles are for. Just create a style for chapter titles and you can format them exactly the way you like with one click.
The easy way: Defining a style by example
The easy way to define a style is to format a paragraph exactly the way you want the style to appear. When you’re satisfied with the way the paragraph looks, select it (be sure to select everything that you want to include in the new style, including any intentional spaces or blank lines), click the Home tab on the ribbon (if it’s not already selected), click the Styles Pane button to open the Styles pane on the right side of the window, and then click the New Style button. The Create New Style from Formatting dialog appears, as shown in Figure 8-1.
 Another way to access the Create New Style from Formatting dialog is to choose Format ⇒ Style and click the New button in the Style dialog that opens.
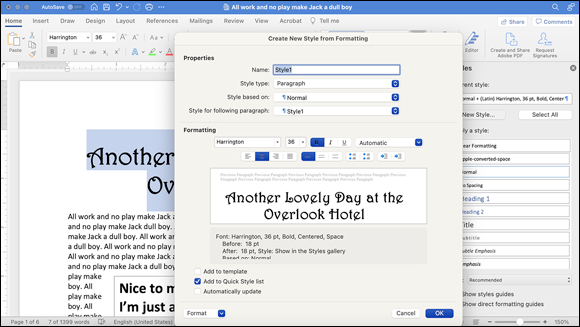
FIGURE 8-1: The selected text is formatted as a chapter title.
The following list describes the items in the Create New Style from Formatting dialog:
- Name: Type a name for your newly created style. We named this style Jack’s Chapter Titles.
- Style Type: Your choices are Paragraph, Character, Linked (paragraph and character), Table, and List. Choose whichever is appropriate for the style you’re creating. (In this section’s example, it’s Paragraph.)
- Style Based On: You don’t have to worry about this option when you create a new style by example, as we're doing here. We tell you more about it in the next section.
-
Style for Following Paragraph: If you’re creating a paragraph that follows a chapter title, for example, you might want it to be styled as body text with the Normal style. You select Normal from this menu and then, whenever you type Return after a paragraph formatted in the Chapter Title style, the next paragraph you type is automatically formatted as Normal.
The Style for Following Paragraph feature is powerful and useful. If you don’t make a selection from this menu, the next paragraph looks the same as the current one. In other words, it’s formatted with the Chapter Title style instead of Normal (body text). If you know that a certain paragraph style is always followed by a different paragraph style (such as a Chapter Title, which is always followed by Normal), specifying it on this menu saves you time and effort later. -
Formatting: As you can see, the formatting options describe the style being used in this section’s example: Harrington font, 36 points, bold, centered, with 18 points of space above and 18 points of space below. Because we formatted the sample text (“Another Lovely Day at the Overlook Hotel”) just the way we want all the chapter titles to appear, we don’t have to make any adjustments in this section of the dialog.
Note that if you make changes to any item in the Formatting section, those changes are reflected immediately in the sample text shown in the white box below the Formatting items. Sadly, these changes aren’t reflected in the document until you click the OK button. - Add to Template: Select this check box if you want the style to be available in future documents. The style is added to whichever template is used by this document, which is the Normal template by default.
-
Add to Quick Style List: Select this check box if you want the newly created style to appear in the Quick Style list.
The Quick Style list, on the ribbon’s Home tab, is a convenient way to apply styles. But because it has a bashful disclosure arrow, like the Table Styles button in Chapter 7, we feel obliged to call it to your attention, which we do (quite nicely, we might add) in Figure 8-2.To recap, the disclosure arrow that summons the Quick Styles list appears only when the cursor hovers over the Quick Styles button.
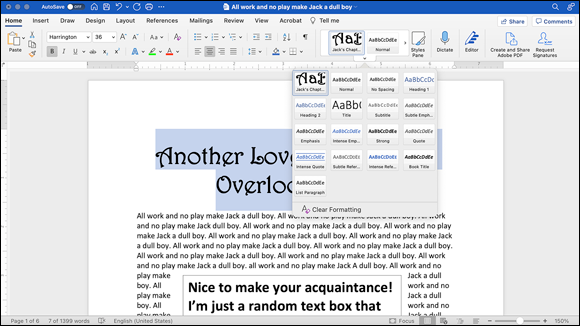
FIGURE 8-2: Click the bashful disclosure arrow to use the Quick Styles list to apply a style to selected text.
- Automatically Update: Select this check box if you want the Chapter Title style to update itself automatically if you change it. For example, if you select this check box and later decide that you want your chapter titles to appear in the Courier font instead of Helvetica, when you change the font of any paragraph with the Chapter Title style, the style is changed so that all paragraphs assigned the Chapter Title style appear in Courier instead of in Helvetica.
So now you know the easy way to define a style: Create a paragraph with the attributes you want for the style, select the paragraph, click the Styles Pane button on the Home tab of the ribbon, click the New Style button in the Styles pane, do your thing in the Create New Style from Formatting dialog, and click OK.
Now, to assign your style to a paragraph, place the insertion point anywhere in the appropriate paragraph and choose the style name from the list of styles in the Styles pane or the aforementioned Quick Style list on the ribbon’s Home tab.
The harder way: Defining a style by dialog
The harder way to define a style is by choosing Format ⇒ Style, clicking the New button in the Style window, and then making selections in the Create New Style from Formatting dialog. You start from scratch and define the style by clicking and choosing its attributes.
 If you want to format an existing paragraph of text, do it the easy way, as described in the earlier section “The easy way: Defining a style by example.” But if you decide to try the harder way, be sure to place the insertion point in an empty paragraph before you begin or else you’ll format the paragraph it’s in with your new style. (If you want to format a paragraph of existing text, it’s easier to format it first and then define the style the easier way, by example.)
This is where the Style Based On item in the Create New Style from Formatting dialog can come in handy. For example, you might want to create a subhead style that’s similar to, but not exactly the same as, the Chapter Title style. If you choose Chapter Title from the Style Based On menu, the New Style dialog populates itself with the formatting from the Chapter Title style. You can then modify it as you like.
Customizing Interface Elements
In contrast to some apps, the programs in the Office suite are extremely customizable. You’re free to modify the included ribbon tabs and menus by adding or deleting items. You can also create your own ribbon tabs from scratch and even add or change keyboard shortcuts for most commands.
Customizing ribbon tabs and menus
As described in Chapter 3, you can add or delete commands from any ribbon tab or menu. To get started, follow these steps:
- Choose Word ⇒ Preferences to open the Word Preferences dialog.
- Click the Ribbon & Toolbar button.
-
Select the Ribbon tab near the top of the dialog.
As shown in Figure 8-3, the dialog is divided into two sections: Choose Commands From and Customize the Ribbon.
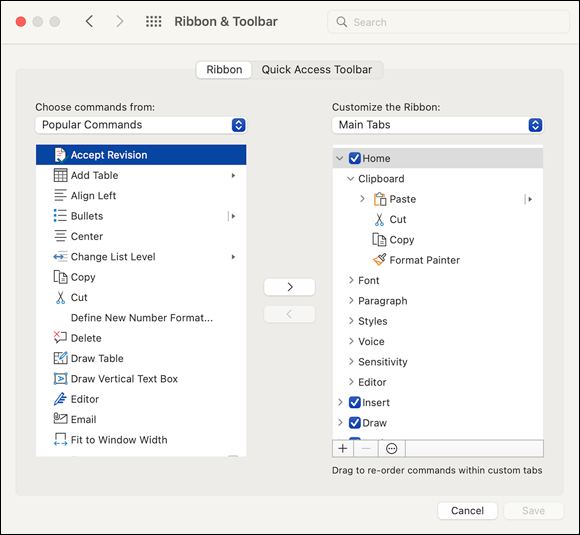
FIGURE 8-3: Add commands to or remove them from ribbon tabs with ease.
- Select an option in the Choose Commands From pop-up menu, scroll through the list of available commands, and then click to select the one you want.
- Select an option in the Customize the Ribbon pop-up menu, and then select the tab to which you want to add the command you chose in Step 4.
-
Click > in the middle of the dialog to add the selected command to the selected ribbon tab.
To remove a command from a tab, simply select it under the Customize the Ribbon list and click < in the middle of the dialog to send it back to the commands list on the left. -
To save your changes, click the Save button in the lower right.
You should now find your new command listed on the ribbon tab you chose for it to appear under.
Note in Figure 8-3 that the main tabs in the tabs list may also include tab groups, which are basically subcategories within the tab. For example, in Figure 8-3, we expanded the Home tab so you can see the Clipboard, Font, Paragraph, and other tab groups listed below it. Simply click > next to a tab group to expand its contents. You can place commands within tab groups by selecting the tab group in Step 5 instead of the main tab itself.
What if you’d like to move a command to a different location in a tab or tab group, or move it to another tab or tab group altogether? Good ol’ tried and true drag-and-drop, at your service! Just click the command you want to move, drag it to the new location where you want it to reside, and then drop it right in.
Display or hide ribbon tabs and tab groups by selecting or deselecting, respectively, the check box to the left of their names.
Create ribbon tabs and tab groups
A cool trick is to create your own ribbon tabs and tab groups to suit your specific needs, as opposed to working within the confines of the predefined tabs. You can make tabs and tab groups that help you work efficiently on certain types of projects, or that contain your favorite commands in one easy-to-reach spot. Customize to your heart’s content.
To do so:
- Choose Word ⇒ Preferences to open the Word Preferences dialog.
- Click the Ribbon & Toolbar button.
- Select the Ribbon tab near the top of the dialog.
- Click the + button at the bottom of the tabs list on the right, as shown in Figure 8-4, and choose New Tab from the menu that appears.
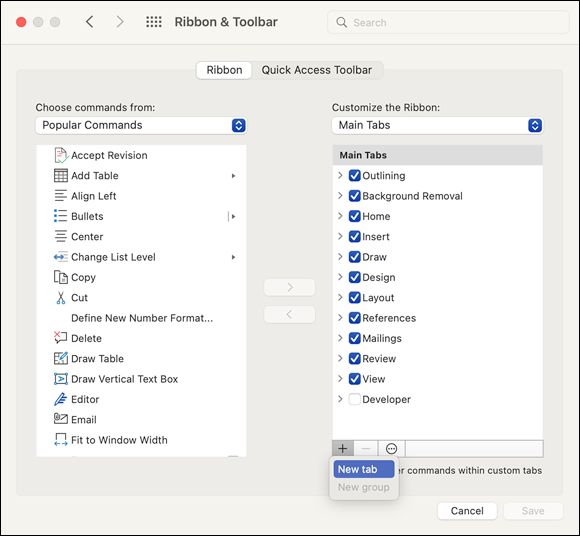
FIGURE 8-4: Create your own ribbon tab by clicking the + button.
- Select the New Tab entry that now appears in the tabs list.
- Click the Options button (three dots) at the bottom of the tabs list and select Rename from the menu, as shown in Figure 8-5.
- In the Display Name field, enter the desired name and then click the Save button.
- To add new tab groups to your new tabs in the same manner, repeat Steps 4-6 but choose New Tab Group instead of New Tab in Step 4.
Changes you make to menus, toolbars, and keyboard shortcuts (which we get to in a moment) are saved in the Normal document template by default, which is automatically applied to new documents you create.
Customizing the Quick Access toolbar
The Quick Access toolbar is a holding place for tools you need quick access to in any document. While the toolbar may sound somewhat like the ribbon, the ribbon is something you can show or hide, or you may use a different set of ribbon tabs in certain types of documents. The tools in the Quick Access Toolbar, however, are the same in every window.

FIGURE 8-5: It’s important to rename your tabs and tab groups so you can easily tell them apart.
You can find the Quick Access toolbar, shown in Figure 8-6, at the top of every Word document window, just above the ribbon and to the immediate right of the red, yellow, and green buttons on the left side of every Mac window.

FIGURE 8-6: The Quick Access toolbar gives you quick access to common tools.
As with the other items we’ve discussed thus far, the Quick Access toolbar is customizable, too. Follow these steps to make modifications:
- Choose Word ⇒ Preferences to open the Word Preferences dialog.
- Click the Ribbon & Toolbar button.
- Select the Quick Access Toolbar tab near the top of the dialog.
- Select an option in the Choose Commands From pop-up menu, scroll through the list of available commands, and then click to select the one you want.
-
Click > in the middle of the dialog, shown in Figure 8-7, to add the selected command to the Customize Quick Access Toolbar commands list.
To remove a command from the Quick Access toolbar, simply select it under the Customize Quick Access Toolbar list and click < in the middle of the dialog. The command returns to the commands list on the left.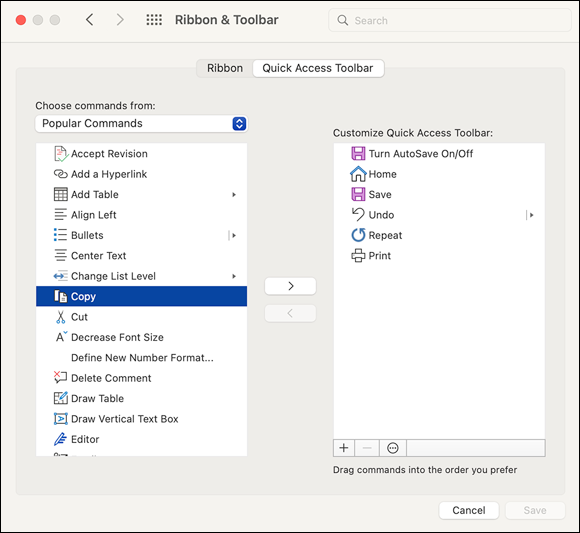
FIGURE 8-7: Customize the Quick Access toolbar easily in Preferences.
- Drag and drop commands in the order you would prefer them to appear in the Quick Access Toolbar, if you like.
-
Click the Save button in the lower right to save your changes.
Any changes you made appear in the Quick Access toolbar.
Customizing keyboard shortcuts
Sometimes, Word doesn’t have a keyboard shortcut for a task you perform regularly, or maybe you prefer to use a combination of keypresses that’s different from the ones Word has. No problem: You can simply add or change the keyboard shortcut for any command:
- Choose Tools ⇒ Customize Keyboard to open the Customize Keyboard dialog, shown in Figure 8-8.
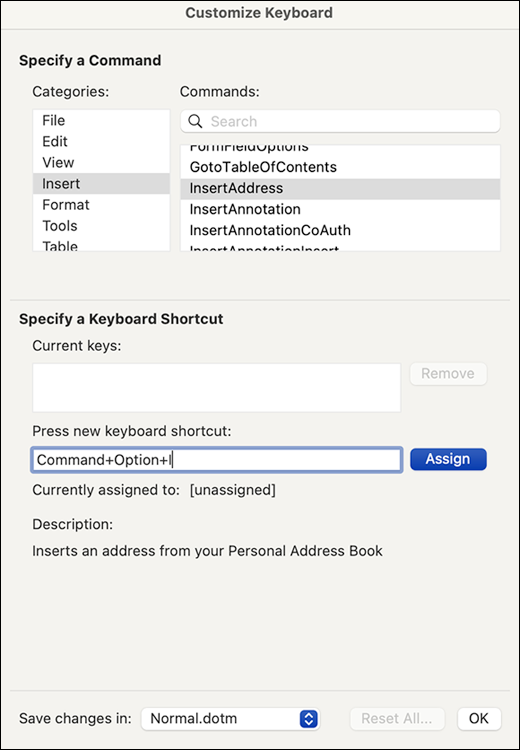
FIGURE 8-8: Assigning the keyboard shortcut ⌘ +Option+I to the InsertAddress command.
-
Select a command to assign a keyboard shortcut to.
To do so, you can either search for a command using the search field or select a category and scroll through the list of commands it contains.
-
In the Press New Keyboard Shortcut box, enter the key combination you want for that command by actually pressing the keys on your keyboard.
As you press the keys, the box populates with the new shortcut.
- To assign the shortcut to the command, click the Assign button.
-
When you’re finished, click OK.
If the shortcut you’re trying to assign is already in use by another command, you see which command it’s assigned to just below the shortcut. If you still prefer to use the shortcut with this new command, go ahead and click the Assign button anyway.
You don’t want to use a keyboard shortcut that’s already in use by macOS, such as ⌘ +Option+D for Hide/Show Dock or ⌘ +Shift+Q for Log Out. Check the Keyboard Shortcuts pane in the macOS Keyboard System Preferences pane to avoid conflicts.
Creating a Table of Contents Automatically
Word can automatically create a table of contents (TOC) from a document. All that’s required is to use styles consistently throughout your document. For example, you might choose to have four levels of headings (one that serves as the heading for a main topic and lower-level headings that divide your text into subtopics). To make all four heading levels appear in your table of contents, you assign a heading style to each one throughout the document. For example, the various headings that appear in the document shown in Figure 8-9 are styled as Heading 1, Heading 2, and Heading 3 (not pictured). If we tell Word to generate a table of contents, these styles will correspond to the heading and subheading levels that appear in it.
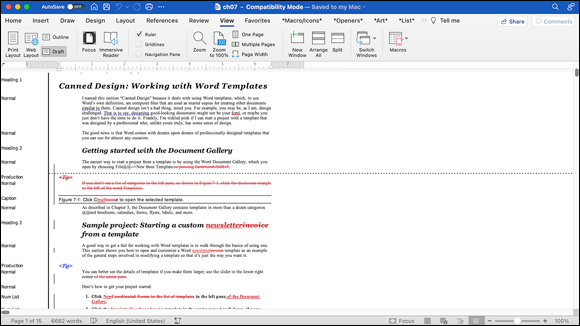
FIGURE 8-9: Draft view of a document with its style names on the left.
 To assign a style to a paragraph, place the insertion point anywhere in the paragraph and choose the style name from the list of styles on the Home tab’s Styles pane.
If you want to see the names of the styles listed to the left of any text formatted in that style (refer to Figure 8-9), choose View ⇒ Draft. If you don’t see them in draft view, open the Word Preferences dialog (choose Word ⇒ Preferences), click the View icon, and type 1.5 in the Style Area Width field near the bottom of the pane. This action tells Word to show those styles in a column that’s 1.5 inches wide, which is what you see in Figure 8-9. The Styles Area remains visible in draft view until you either change this setting or click the line between the Styles Area and the body of the document and drag it to the left until the Styles Area disappears.
To generate a table of contents, follow these steps:
-
Click at the beginning of the document so that the insertion point is placed before the document text begins.
You do this so that the table of contents will be inserted before the document text starts.
-
Choose Insert ⇒ Index and Tables.
The Index and Tables dialog appears.
-
Click the Table of Contents tab and then click the Options button.
The Table of Contents Options dialog appears.
- Assign the appropriate Table of Contents level to each of the styles you want included in your table of contents, as shown in Figure 8-10.
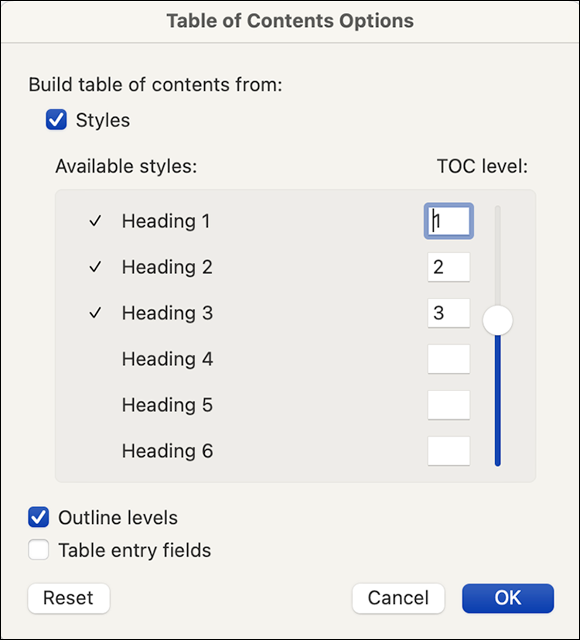
FIGURE 8-10: Assigning three styles to a table of contents (on the left) with the TOC level assigned to each one (on the right).
-
Click the OK button.
The Table of Contents Options dialog closes and the Index and Tables dialog reappears.
-
Select a format for your table of contents.
The Formal format is selected in Figure 8-11.
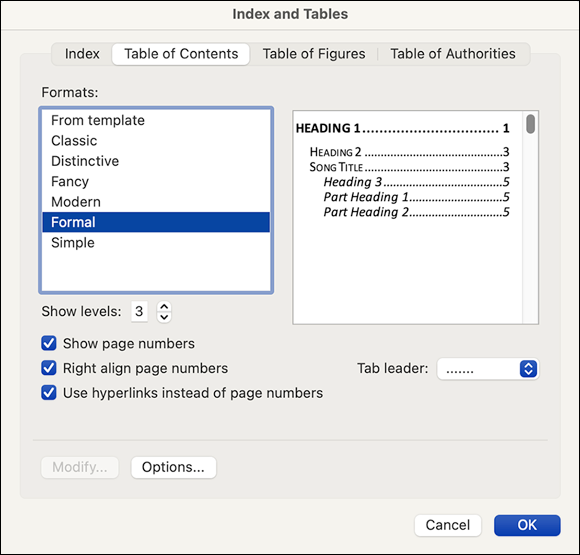
FIGURE 8-11: Word builds a formal table of contents that will look just like the preview shown here.
-
Click the OK button.
Word instantly builds the table of contents, as shown in Figure 8-12.
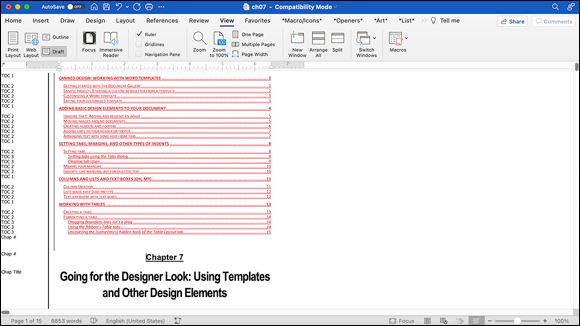
FIGURE 8-12: A table of contents, automatically generated in Word.
Consider how much time and effort it would take to assemble that table of contents manually!
Think about the table of contents as you compose a document and assign styles to headings and subheadings. If you plan the table of contents properly from the start, creating it is a snap.
As you may have noticed, Word can also help you create these elements:
- Table of figures: If you’ve assigned the same style to all figure captions in the document, you can automatically compile a table of figures (illustrations) in the same way you create a table of contents.
- Table of authorities: Ditto for creating a table of authorities.
- Index: You use this item to compile an index for a document.
Click the appropriate tab in the Index and Tables dialog to access these features.
Using Collaboration Features
Between the two of us, we’ve written more than 120 books and composed every one of them in Microsoft Word. The reason isn’t that our publishers are Bill Gates devotees, but rather because Word offers excellent features for collaborating with other people.
Here’s how it works: We turn in a chapter to our editor as a Word file. The editor makes changes and adds comments and then sends the chapter back to us. When we reopen the document, all the editor’s changes and comments are highlighted on the screen so that it’s clear what text has changed since we submitted the file.
Figure 8-13 shows a Word document with an editor’s changes and comments marked up. Changes appear in color.
Looking at the figure, here’s how to interpret those changes and comments made in the file by another Word user:
- The black vertical bar on the far left side denotes a line with changes. When someone changes a single character in a line, you see a black bar next to that line to alert you to the change.
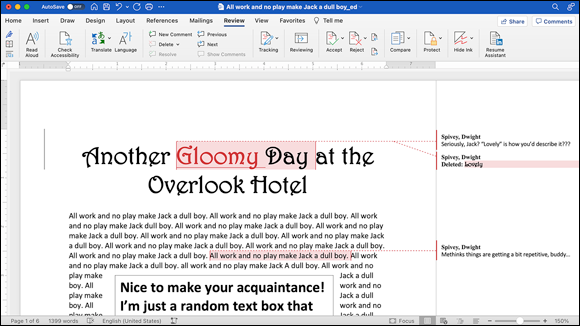
FIGURE 8-13: The changes made by an editor show up in light red onscreen.
- Deletions and comments appear in the markup area to the right of the text. For example, the original chapter title was changed from “Another Lovely Day at the Overlook Hotel” to the more appropriate and accurate “Another Gloomy Day at the Overlook Hotel,” and you can see the deletion in the Comment box on the right. You can also see the other comments inserted by the other user.
Turning on the Track Changes feature
To make collaboration magic happen in your documents, follow these steps:
- Choose Tools ⇒ Track Changes ⇒ Highlight Changes.
-
In the Highlight Changes dialog that appears (see Figure 8-14), select the Track Changes while Editing check box.
The Highlight Changes dialog has three additional check boxes. Select them if you want to keep track of moved text or see changes in color on your screen or when you print:
- Track Moves while Tracking Changes
- Highlight Changes on Screen
- Highlight Changes in Printed Documents
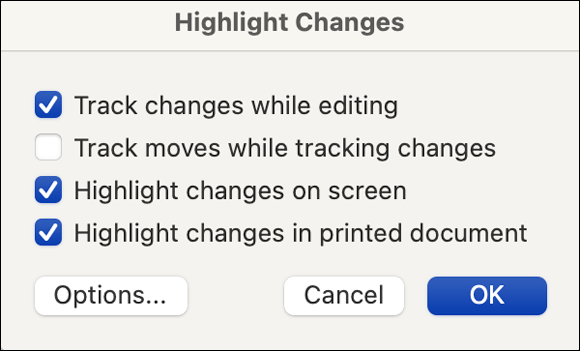
FIGURE 8-14: These options help you determine how to view changes made to your document.
- (Optional) Click the Options button to open the Track Changes preference pane, shown in Figure 8-15, and change the colors used and the types of changes to be flagged.
- When you’re done, click OK to close the Highlight Changes dialog.
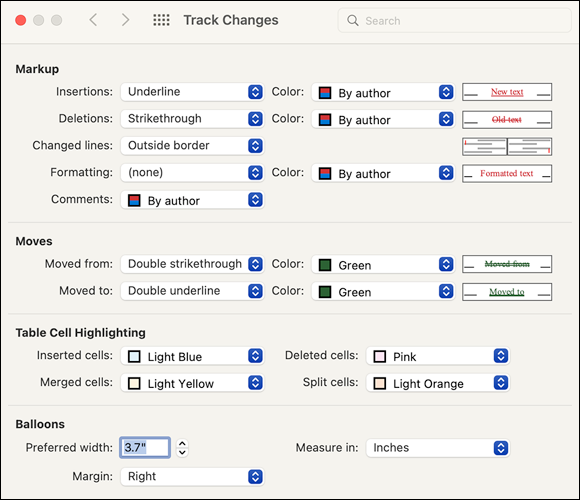
FIGURE 8-15: Customize the colors used to indicate changes, especially if the default colors don’t help you discern changes quickly and clearly.
To see comments in the markup area to the right of the document (refer to Figure 8-13), you need to be in print layout or full screen view. You still see the changes in the document in draft view, but you don’t see the markups or the additional information they offer (Deleted or Comment, for example, and the name of the reviser, date, and time).
You can, however, see much of the same information if you hover the cursor over the changed content. Hold the cursor still for a second or two and a tooltip appears with information about that change.
Never fear: On the ribbon, click the Reviewing button to display the Reviewing pane, shown on the far left side of Figure 8-16. Unlike seeing the markups, you can see the Review pane in any of Word’s views.
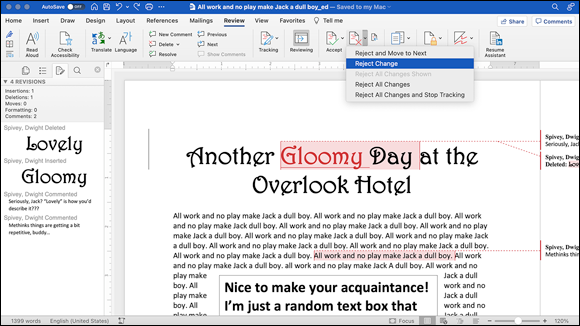
FIGURE 8-16: The Review pane, which is on the left, shows changes that have been made.
Accepting or rejecting changes
The reviewing topic is so important that an entire tab on the ribbon is dedicated to nothing but. When you need more editing oomph than the Highlight Changes dialog can provide, the ribbon’s Review tab is there for you.
To review the changes in a document, first click the Review tab and then click at the beginning of the text you want to review. Use the Next or Previous button to move to the next or previous change, respectively, which is highlighted onscreen. Then use the Accept and Reject buttons to accept or reject that change.
Note that clicking the Accept or Reject button accepts or rejects (respectively) the current change, but both buttons also have menus containing time-saving options (refer to Figure 8-16).
Here’s a quick rundown of some of the other buttons on the Review tab:
-
Comments section:Comments are notes from one author or reviewer to the others. If you select text before you create a new comment, the text it refers to is highlighted in pink (by default). If you don’t select any text, the comment is placed at the insertion point.
To see a comment, hover the cursor over the highlighted text and the comment appears in a pop-up, as shown in Figure 8-17, in the Review pane, or in the markup area to the right of the document.
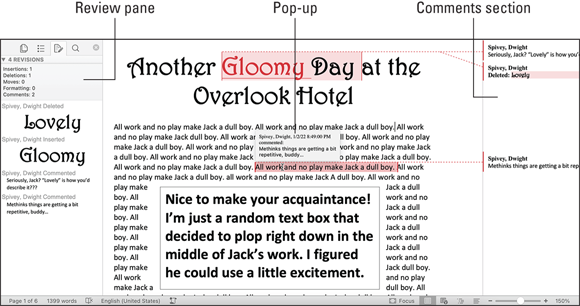
FIGURE 8-17: This comment is displayed three ways: as a pop-up, in the Review pane, and in the markup area.
- Tracking section: Turn revision tracking on and off and control what appears on the screen while you work.
- Track Changes switch: Click to turn revision tracking on or off.
-
Display menu: You have four options for viewing the document: Simple Markup, All Markup, No Markup, and Original.
We frequently open a second document window (choose Window ⇒ New Window) and view Final text in one window and Final Showing Markup text in the other. Give it a try! - Markup Options menu: Select the types of edits you want to see (comments, insertions and deletions, or formatting) as well as which reviewer’s comments are shown (if the document has more than one reviewer).
If you prefer other options instead of using the Next and Previous buttons, right-click (or Control-click) the changed text and choose either Accept Change or Reject Change from the contextual menu.
Addressing Envelopes and Creating Labels
Two types of documents that can be tricky to create and print are envelopes and labels. Sometimes, you need to be able to just whip out a printed envelope to a single recipient, though doing this with a computer can seem like a formidable task. (These are the times when you wish you had a typewriter sitting around.) Or you need to prepare a mailing for a bunch of recipients and the last thing you feel like doing is spending hours trying to set up address labels.
Fortunately, Word includes special tools that let you easily create addresses for both single envelopes and labels.
Creating and printing an envelope
To create an envelope, just follow these steps:
- Open a new, blank document by choosing File ⇒ New Blank Document or by pressing ⌘ +N.
- Choose Tools ⇒ Envelopes to open the Envelope dialog, shown in Figure 8-18.
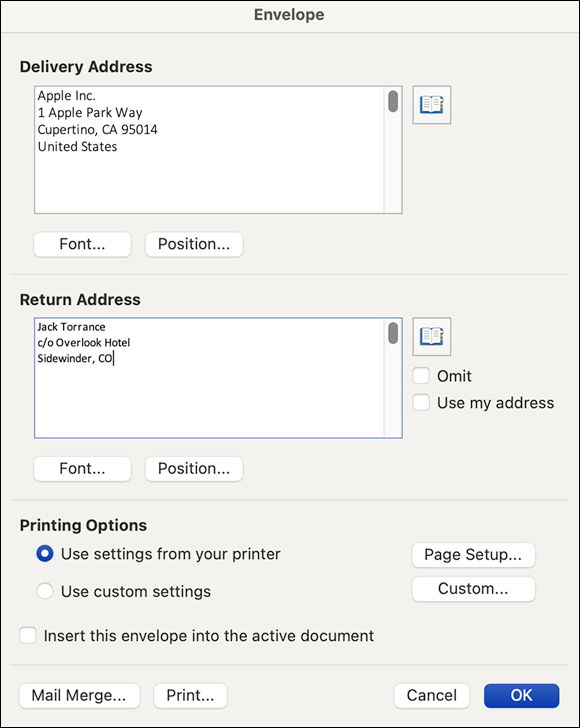
FIGURE 8-18: The Envelope dialog makes making an envelope nice and easy.
-
In the Delivery Address field, type the name and address of your recipient.
If the address of the person you’re sending this envelope to has been entered in Microsoft Outlook (see Part 5 for more about Outlook), you can click the little address book next to the Delivery Address field and choose that person’s name. You can also allow Word access to your Apple Contacts when prompted.
The Position button next to both addresses opens a dialog in which you can position that address on the envelope. Use the dialog to reposition either address higher or lower or to the left or right.
-
In the Return Address field, type your own address.
If you’ve entered your personal information in the Word Preferences User Information pane and want to use it as your return address, select the Use My Address check box.
Use the Font button next to either field to change the font.
To print your envelope now, click the Print button. Otherwise, click the OK button, and a preview of your envelope will appear, as shown in Figure 8-19.
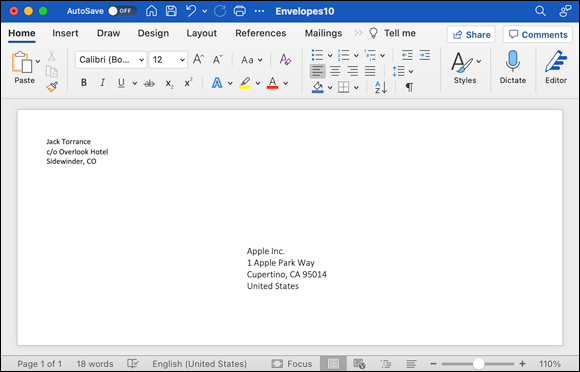
FIGURE 8-19: An envelope document, awaiting editing or printing.
The document shown in Figure 8-19 is editable, so if you want to change its font or any of its information, just select the appropriate text and go for it.
If either address doesn’t appear where you expect it when you print, use the Position button next to either field in the Envelope dialog to adjust the position of that item. If you can’t get it to print properly that way, click the Custom button in the Envelope dialog to choose alternative envelope sizes or feed methods that may work better with your printer.
Creating labels
Making labels is as easy as making an envelope, and the process works much the same way. To create labels, follow these steps:
- Open a new, blank document by choosing File ⇒ New Blank Document or by pressing ⌘ +N.
- Choose Tools ⇒ Labels to open the Labels dialog, shown in Figure 8-20.
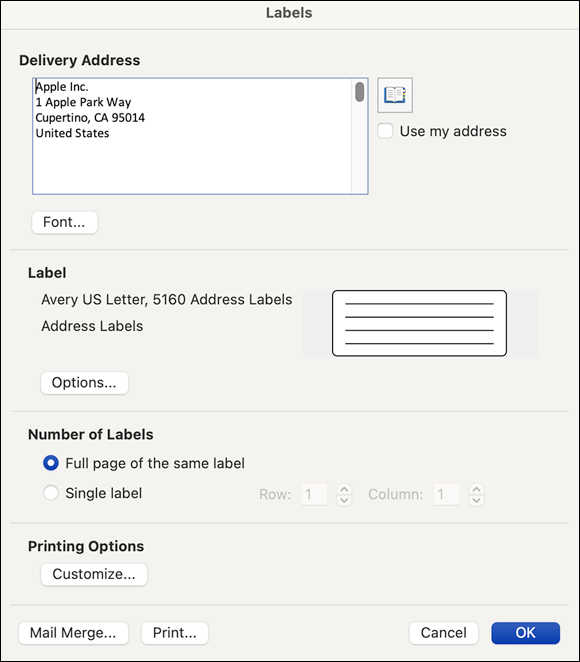
FIGURE 8-20: Making labels is a breeze with the Labels dialog.
-
In the Address field, type the name and address.
If you've used Microsoft Outlook to enter the address, click the little address book next to the Address field, choose the person’s name in the Office Address Book dialog that appears, and then click the Insert button. You can also use addresses of contacts in your Apple Contacts app.
-
In the Label section, click the Options button.
The Label Options dialog appears, as shown in Figure 8-21.
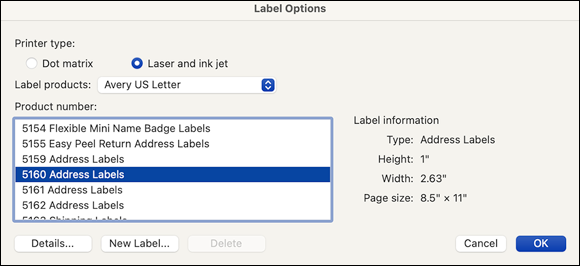
FIGURE 8-21: Word knows how to create hundreds of different types of labels.
-
Select the type of label you want to print. Or, if you don't find a label you want:
- Click the New Label button to open the Label Details dialog, shown in Figure8-22.
- Name your new label and fill in all the fields to set it up.
- Click OK to save the label and return to the Label Options dialog.
Although the Labels dialog (refer to Figure 8-20) offers only one field for the contents of your labels, and that field is named Delivery Address, rest assured that you can create many other types of labels by using the Label Options dialog (refer to Figure 8-21). In fact, Word enables you to use hundreds of different labels by Avery and several other manufacturers. (Click the Label Products pop-up menu to see more manufacturers.) You can create name badge, file folder, ID card, and many other types of labels with a single click. But, regardless of the kind of label you’re making, you still type the information in a field named Delivery Address in the Labels dialog.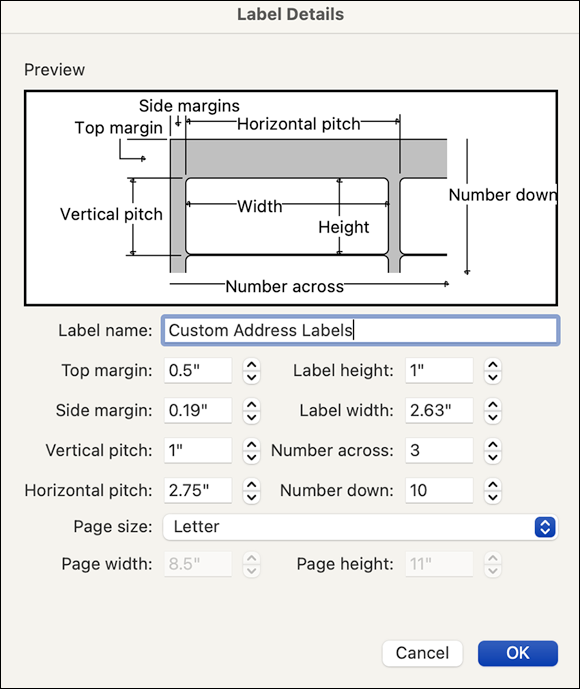
FIGURE 8-22: If Word doesn’t know how to create the label you want, you can teach it how in the Label Details dialog.
- Click OK to dismiss the Label Options dialog.
-
In the Number of Labels section of the Labels dialog, choose to print either a full page of the same label or a single label at the specified position.
Refer to Figure 8-20, which shows the Full Page of the Same Label option selected. If you want to print a single label, select the Single Label option and enter the row and column number where you want the single label printed.
-
To print your labels immediately, click the Print button in the Labels dialog.
Or click the OK button to see your labels onscreen, as shown in Figure 8-23.
The document shown in Figure 8-23 is editable, so if you want to change the font or any information in a label, just select the appropriate text and go for it.
And that’s how you create a sheet of labels.
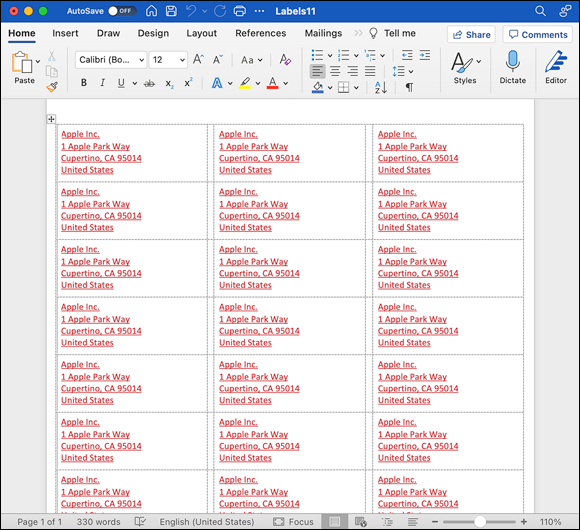
FIGURE 8-23: The result of clicking OK when you use the settings shown in Figure 8-20.
Creating Web Pages
Word lets you save any document as a web page. This feature was unreliable in previous versions of Word, but now it may be the fastest, easiest way to get Word files onto web pages!
We say that the Save as Web Page option in Word has improved, but it’s still not the best choice for anything but the simplest of web pages. For “real” websites, any other tool — Dreamweaver, Wix, or WordPress, to name a few — is probably a better bet.
For what it’s worth, most web page development apps, including Dreamweaver, can import Word documents, and all of them support copy-and-paste. Unless your web page is simple and your site is small, we think you’ll get better results with another program.
That said, if you want to save a document as a web page in Word, just choose File ⇒ Save as Web Page. A Save sheet appears, and you can save the document as an .htm file that any web browser can open. Figure 8-24 shows a Word document displayed alongside its web page version, which we opened using Safari.
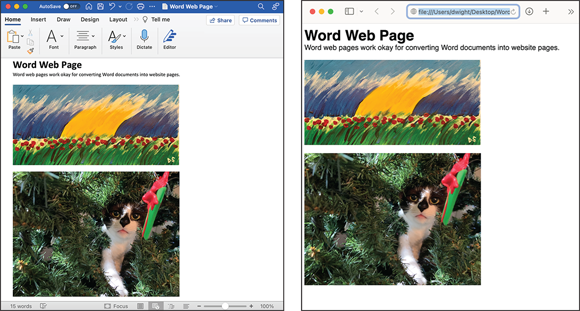
FIGURE 8-24: The original document (left) and its web page preview (right).
If you need a quick page or two, give this command a try. And if you have tried it in the past and been disappointed, you might be surprised by how much better it is now.