
Chapter 11
Making Your Slide Shows Sing
IN THIS CHAPTER
![]() Working with transitions
Working with transitions
![]() Custom animation and effects
Custom animation and effects
![]() Printing presentations and handouts
Printing presentations and handouts
![]() Exporting presentations to various file formats
Exporting presentations to various file formats
In this chapter, you find out how to put the finishing touches on your slide show by adding transitions between slides and animation effects to objects on slides. Then we show you what should probably be the last thing you do before you take your show on the road (or the stage or wherever): printing handouts and exporting your presentation to share with others digitally.
By the time you’re at the point of adding transitions or animations, your slides should have all the content your presentation needs. The content may still need to be tweaked, but for the most part, the words should be on the slides and the slides should be in the proper order.
Before you dig into this chapter, we suggest that you review your presentation one more time and make sure that all the points you need to cover are covered, that the slides are in the order you want, and that everything looks consistent.
Using Transitions to Create a Polished-Looking Presentation
Transitions are animations that appear between slides when you advance from one slide to the next during your presentation. Examples include a slide dissolving into the next slide, a slide pushing the previous slide offscreen, and stripes or checkerboard patterns that reveal the next slide. PowerPoint includes more than 30 different transitions, ranging from subtle and classy to garish and ugly. It’s up to you to use transitions judiciously.
 You should generally try to use the same transition throughout your presentation, to not only give your presentation consistency but also make it look more professional. If you use a bunch of different transitions or (gasp) a different transition for every slide change, you’re essentially screaming “I'm a presentation newbie” to your audience.
The exception to this rule is that many presentations have one slide that deserves to have attention called to it. Sometimes, it makes sense to use a different transition to introduce that special slide. But, most of the time, you look more professional if you use only one transition throughout your presentation.
If a slide in your presentation is followed immediately by a similar slide, a transition may be helpful in alerting your audience that you’re covering new material.
You can also decide to use no transitions between slides. If you don’t use a transition, when you click to advance to the next slide, the next slide replaces the current slide instantly with no animation.
Applying transitions
You can apply transitions to slides in normal view (choose View ⇒ Normal) or slide sorter view (choose View ⇒ Slide Sorter).
Either way, the first thing you need to do is select the slides that you want to enhance with the transition. To select multiple slides, you click the first slide and then hold down either the Shift key (to select contiguous slides) or the ⌘ key (to select noncontiguous slides).
After you click any slide, you can select the rest of the slides in the presentation at one time by choosing Edit ⇒ Select All or by pressing ⌘ +A. If you’re using normal view and objects on your slide are selected, instead of all the slides in the left pane, click a slide in the left pane before you choose Edit ⇒ Select All (or before you press ⌘ +A).
As mentioned, we strongly recommend that you use the same transition on all your slides, so we encourage you to select them all before you continue.
With some or all of your slides selected, click the Transitions tab on the ribbon.
 Applying a transition to a slide directly affects the slide before it. For example, if you apply a fade to slide 5, slide 4 will fade out during the transition while slide 5 fades in.
Click a thumbnail and the theme is applied to all slides that are selected, as shown in Figure 11-1. When you click a thumbnail, you see a thumbnail-size preview of the transition on each of the selected slides. And slides that have transitions applied to them display a little star icon to their left.
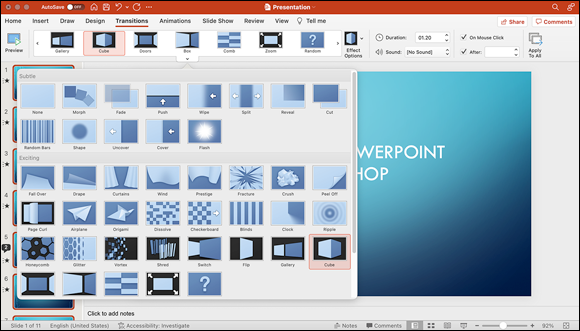
FIGURE 11-1: We’ve applied the Cube transition to all slides in our presentation.
Transitions work much the same as themes and layouts. Click a thumbnail to apply the transition (or theme or layout) to the selected slides.
To see how your transition will look to your audience, click the Preview button all the way to the left on the Transitions tab on the ribbon.
If you didn't apply this transition to all your slides, do so now, or at least apply another transition to the remaining slides.
Again, you don’t absolutely have to have a transition between slides. But we think that almost any transition looks better than no transition. If you don’t believe us, remove the transition (by clicking the None thumbnail) and then click the Preview button again.
That’s pretty much it for applying transitions. Select some slides, click a thumbnail, and you’re done.
Transition options
After you’ve applied transitions to slides, you have several options, which are, not surprisingly, also found on the Transitions tab.
To apply transition options, follow these steps:
-
Choose View ⇒ Normal or choose View ⇒ Slide Sorter.
If the presentation has a lot of slides, it’s probably easier to apply these options in slide sorter view. - Select the slides to which you want apply the options.
- Click the Transitions tab.
- Select one or more transition options:
- Effect Options: This pop-up menu lets you choose or change a transition effect. If you chose a transition from the thumbnail strip for the selected slides, the entries on the Effect Options menu are specific to that transition — for example, in Figure 11-2, these menu items correspond to the direction in which the Cube transition, which we selected earlier, should rotate. If you haven’t yet assigned a transition to the selected slides, the Effect Options menu is disabled.
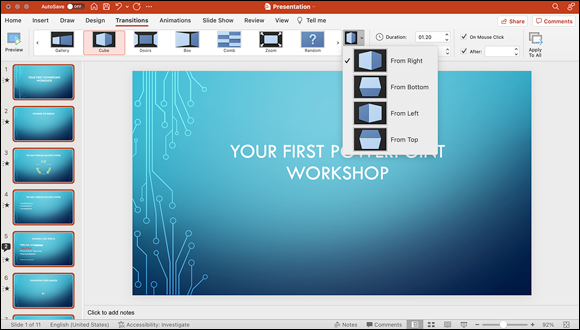
FIGURE 11-2: Selecting an Effect option.
- Duration: Use this text box to choose the speed of the transition. The higher the number, the slower the transition.
-
Sound: Choose a sound from the pop-up menu. The sound plays when you advance to the slide. Or select the Loop Until Next Sound item (at the end of the Sound pop-up menu) if you want the sound to repeat until you advance to the next slide.
The sound you choose doesn’t play when you select it from this menu. You have to click the Preview button in the Transitions tab to hear it. That’s lame.
- Advance Slide: You usually want to advance to the next slide by clicking the mouse or trackpad, so the On Mouse Click check box is selected by default. But if you want a presentation to play automatically, select the After option and specify the number of seconds each slide should stay on the screen.
- Apply to All: Click to apply all the settings you’ve made in the Transitions tab to each of your slides in the presentation.
- Effect Options: This pop-up menu lets you choose or change a transition effect. If you chose a transition from the thumbnail strip for the selected slides, the entries on the Effect Options menu are specific to that transition — for example, in Figure 11-2, these menu items correspond to the direction in which the Cube transition, which we selected earlier, should rotate. If you haven’t yet assigned a transition to the selected slides, the Effect Options menu is disabled.
- When you’re finished, click Apply to All to apply the options to all slides in this presentation.
To see how your transitions will look to your audience with the options applied, click the Preview button on the left side of the Transitions tab.
Using Custom Animation
One cool PowerPoint feature is its capability to animate any object on any slide. Used judiciously, animation can help the audience focus on the point you’re making and prevent people from reading ahead while you speak. Overused, however, animation can get really annoying really fast.
As with transitions, you usually should judiciously use the same animation effects throughout your presentation. Using the same animation effect gives your presentation consistency and makes it look more professional. If you use a bunch of different animation effects or (even worse) a different animation on every slide, your presentation will end up chaotic and hard to follow. So try to keep it simple and classy.
Animating text or graphics
To apply an animation effect to any object (text box, image, movie, or SmartArt graphic, for examples), select the object and then click the Animations tab on the ribbon. Next, select an effect from one of the three Effects strips on the Animations tab — namely, Entrance Effects, Emphasis Effects, and Exit Effects.
These three types of effects do what you expect them to, based on their names:
- Entrance effects animate the way the object first appears on (enters) the slide.
- Emphasis effects animate what an object does after it appears.
- Exit effects animate the way the object disappears from (exits) the slide.
For this demonstration, we pulled down the Entrance Effects menu and selected the Fly In entrance effect so that it was applied to the bulleted text.
When effects are applied to elements in the slide, a numbered box appears next to those elements. Click the numbered box next to an element with an effect applied to it. Or in the case of text in an entire text box (as in this example), click the text box. The Automations task pane opens on the right side of the slide.
PowerPoint calls the text box surrounding these bullet points Content Placeholder 2 and automatically creates a subitem for each bullet point in the text box, which you can see in the Automations task pane in Figure 11-3.
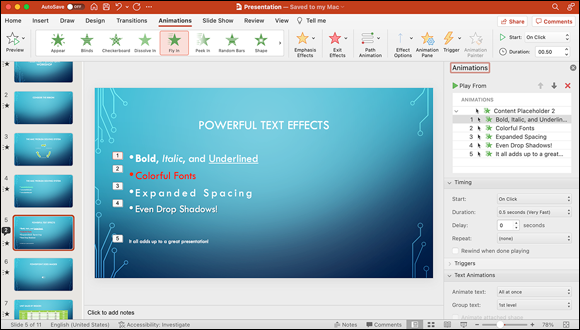
FIGURE 11-3: The Automations task pane appears to the right of your active slide.
After you’ve applied an effect, you can use the settings in the Animations pane to fine-tune the animation:
- Timing section of the Animations pane:
- Start: This pop-up menu appears in the Animations pane (and also on the far right of the Animations tab). In Figure 11-3, On Click is selected, so the subitems appear one at a time when you click. This option means that you have to click once to make each subitem appear. The two other options on this menu are With Previous and After Previous. Both options trigger the animation as soon as the slide appears and require no clicking. With Previous animates all subitems simultaneously, so all subitems would appear at one time. After Previous animates the subitems sequentially, so you see the first, and then the second, and then the third, and so on.
- Duration: This pop-up menu determines how quickly the animation effect plays (in seconds).
- Delay: This field lets you specify a delay (0 is selected in Figure 11-3) before the animation begins.
- Repeat: This pop-up menu lets you repeat the animation as many as ten times, until the next click, or until the end of the slide, or not repeat the animation.
- Rewind When Done Playing: This check box plays the animation backward after it finishes playing.
- Triggers section of the Animations pane: Options in this section let you designate when individual effects should begin in the slide.
- Text Animations section of the Animations pane:
- Animate Text: This pop-up menu lets you choose to animate text all at one time, by the word, or by the letter. You can also choose to animate text in reverse order.
- Group Text: This pop-up menu determines how subitems are to be grouped.
- Effects Options section of the Animations pane:
- Sound: This pop-up menu lets you select a sound and have it play when this animation starts.
- After Animation: This item determines the color (if any) that each subitem changes to after its animation concludes. Other choices include Don’t Dim (no change), Hide after Animation, and Hide On Next Mouse Click.
- Smooth Start/End: These check boxes make animations look more natural by accelerating and decelerating them at the start or end, rather than playing them at the same speed all the way through.
The Effect Options button on the ribbon’s Animations tab lets you decide where on the slide an animation effect begins. The options available depend on which effect is being utilized. For the example in Figure 11-4, options are From Top, From Bottom (selected in Figure 11-4), From Left, From Right, From Top-Left, From Top-Right, From Bottom-Left, and From Bottom-Right.

FIGURE 11-4: Tweaking the Entrance effect options.
Note that some animations, such as Appear and Fade, don’t require a starting point because the animation occurs with the item already in place. The Direction items don’t appear on the Effect Options menu when you choose animations that don’t require direction.
We clicked the Preview button to the left on the ribbon’s Animations tab to preview our animation, and it looked good to us.
And so, based on the settings we made, here’s how the slide appeared onscreen in slide show mode: The bullet points appear one at a time when we click, they fly in from the bottom of the slide, and they move very fast. No sound is associated with this animation. The animation starts and ends smoothly, starts without delay, and doesn’t repeat or rewind. The bullet points fly in all at one time (not one word or one letter at a time). Finally, the Group text menu determines how many bullet point levels fly in at one time, but because this slide has only one level of bullet points, this setting is irrelevant.
Unfortunately, when you preview an animation by clicking the Preview button on the ribbon’s Animations tab, the slide’s animation plays from start to finish automatically — you don't have to click. To make sure that the bullets respond to your clicks as expected, you have to look at them in an actual slide show: Choose View ⇒ Slide Show and click, click, click.
In this case, everything worked as expected; every time we clicked, a bullet point flew in from the bottom of the screen.
You add emphasis and exit effects the same way you add entrance effects: Select the object you want to animate and then choose an appropriate effect from the appropriate drop-down menu.
You see the first few effects in each category from the strip controls on the Animations tab. But dozens of entrance, emphasis, and exit effects are available. To see more, click the arrow to the right of the strip or hover your mouse over the strip and click the down arrow that appears to display the entire menu, as shown in Figure 11-5.
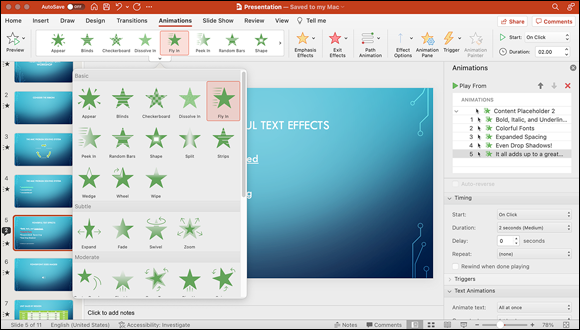
FIGURE 11-5: You can display all effects in a category by clicking the down arrow.
Last but not least, you can change the order in which individual bullets appear on the screen when you animate a bulleted list. Using the bulleted list in Figure 11-5 as an example, when we selected the text object that contains the bullet items and applied an animation effect to it with all paragraphs selected on the Group Text pop-up menu in the Animations pane, only one item appeared in the Animation Order list, as shown in Figure 11-6, on the left.
But when we chose 1st Level in the Group Text pop-up menu, PowerPoint automatically created subitems below Content Placeholder 2 — one for each first-level bullet point — as shown on the right in Figure 11-6.
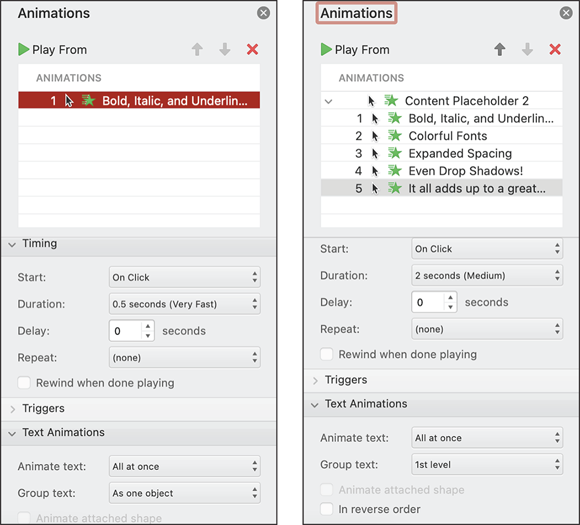
FIGURE 11-6: Animate the bullets all at once (left) or one at a time (right).
Each of the subitems corresponds to one of the bullet points on the slide.
To determine which subitem is associated with which bullet point, click its name in the Animation Order list and choose Play From above the list, as shown in Figure 11-7. The subitem is associated with the bullet item that animates.
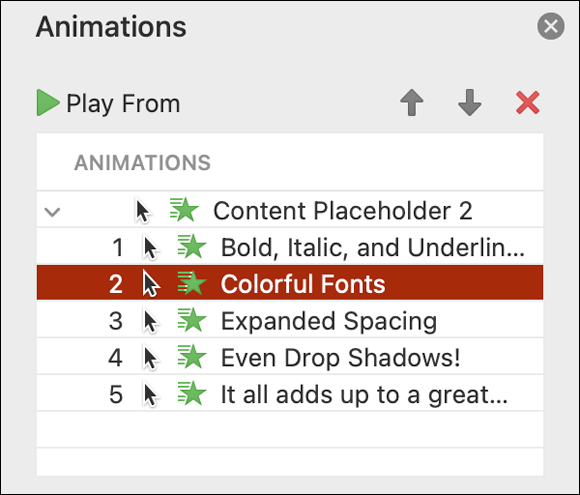
FIGURE 11-7: Select an item and click the up or down arrow to change its order in the list.
To change the order in which the bullets appear on the slide, merely select the item in the list that represents the bullet whose order you want to change and then use the up- or down-arrow above the list to move it higher or lower in the list.
Animating a chart or SmartArt graphic
Animating a chart or SmartArt graphic works much the same as animating a text object, but with one little twist. By default, when you select a chart or SmartArt graphic and apply an animation effect to it, the entire object is animated all at one time. But you have the option of having each element in the chart or SmartArt graphic animated individually.
Here’s how it works with a chart: When you select a chart on a slide and apply an entrance, emphasis, or exit effect, the last panel in the Animations pane changes from Text Animations to Chart Animations. It contains the Group Graphic pop-up menu, which offers options specific to the type of chart being used.
Figure 11-8 shows the Boomerang entrance animation for a pie chart with By Category selected on the Group Graphic pop-up menu.
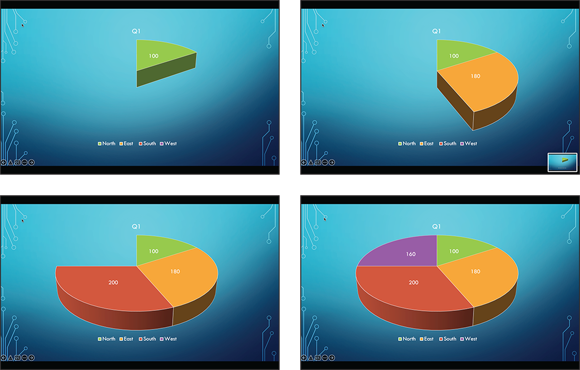
FIGURE 11-8: One pie slice appears each time we click.
Had we selected the As One Object option instead, all four slices of the pie chart would have appeared at one time.
Again, when you preview your animation by clicking the Preview button on the Animations tab, the slide’s animation plays from start to finish automatically without your having to click. Therefore, to make sure that the pie slices (or whatever) respond to your clicks as expected, you have to look at them in an actual slide show. So choose View ⇒ Slide Show and click your heart out. (Well, maybe don’t be quite that dramatic or you might get some quizzical looks from other folks in the vicinity.)
Creating Interactivity with Action Buttons
Action buttons let you add interactivity button and navigation buttons to your slide shows. You can add them to an individual slide or to your slide master, if you want them to appear on all slides.
You choose a button design from the Action Buttons submenu (Insert ⇒ Action Buttons), as shown in Figure 11-9.
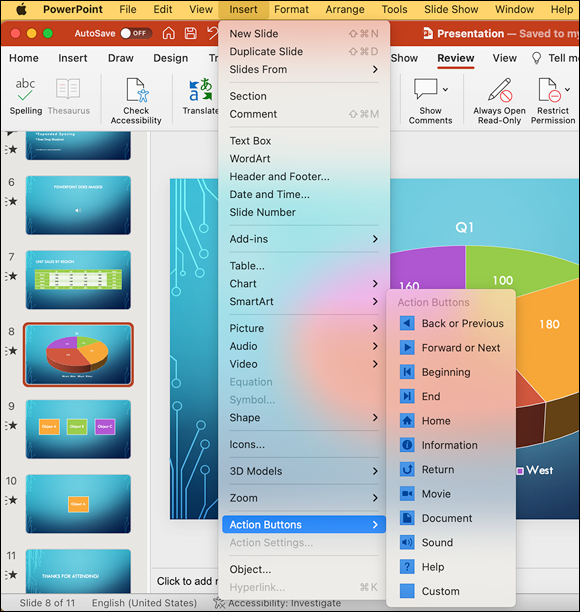
FIGURE 11-9: The Action Buttons menu.
To select and place an action button, follow these steps:
-
With a slide open, choose Insert ⇒ Action Buttons ⇒ button name (where button name is the name of the button you want to place).
The cursor turns into a crosshair to indicate that you can now click and drag to create the button.
-
Click and drag on your slide or slide master to place the button.
Because a button is just another object on your slide or slide master, you can move it and resize it. Click it once to select it; drag one of its handles to enlarge or shrink it.
When you add an action button to a slide or slide master, the Action Settings dialog appears, as shown in Figure 11-10. There are two tabs, but the options they contain are identical. The first one, Mouse Click, specifies what happens when you click the button with the mouse or trackpad; the second, Mouse Over, specifies what happens when you hover the cursor over the button.
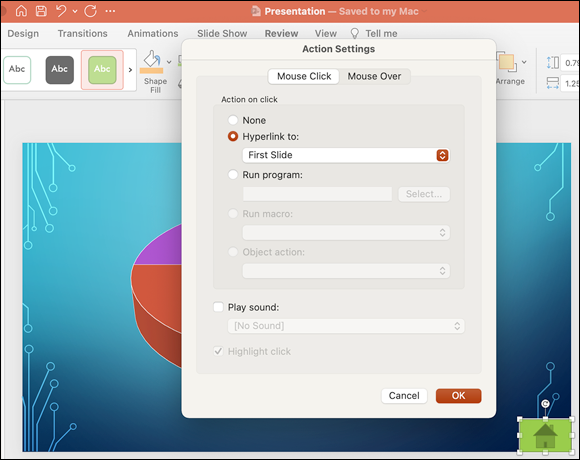
FIGURE 11-10: From the Action Settings dialog, specify what your button does when it’s clicked.
You usually choose an action from the Hyperlink To pop-up menu, which contains options to hyperlink to Next Slide, Previous Slide, First Slide, Last Slide, and others.
Why would you want to place an action button on a slide or on all your slides? Well, you might want to be able to jump to a specific slide during your presentation. Or you might want to show a web page at a certain point in your slide show. It would also be a handy feature for others with whom you might be sharing this presentation; the action buttons would give them a mechanism for moving from slide to slide.
Share and Share Alike
Handouts can serve as an effective way to bolster your presentation’s effect on your audience. You may also want to share your presentation with your audience electronically, as a PDF or movie or another digital file. In this section, you can explore some of the options you have for sharing your finished slide shows with other people.
Printing hard copy
PowerPoint gives you numerous options for printing presentations. You can print them as slides, handouts, notes, or outlines. You can print in color, grayscale, or black-and-white. You can even print all or just part of your presentation. All these options become available when you choose File ⇒ Print or press ⌘ +P to open the Print dialog.
 What you see in the Print dialog may differ from the figures in this chapter. For one thing, we use macOS Monterey. If you’re using a different version of macOS, your Print dialog may look slightly different. The other variable is the type of printer you have connected to your Mac. Your printer may have different features and capabilities that affect the way your Print dialog looks. So, if something you see in your Print dialog looks slightly different from what you see in this book, don’t worry about it.
Printing slides
When it comes to printing your presentation, one option you have is to print only what appears on the screen during your presentation, one slide per page. Other options include printing multiple slides on each page, only certain slides or pages, or pages with handouts or notes included.
To print one slide per page, follow these steps:
-
Choose File ⇒ Print or press ⌘ +P to open the Print dialog, shown in Figure 11-11.
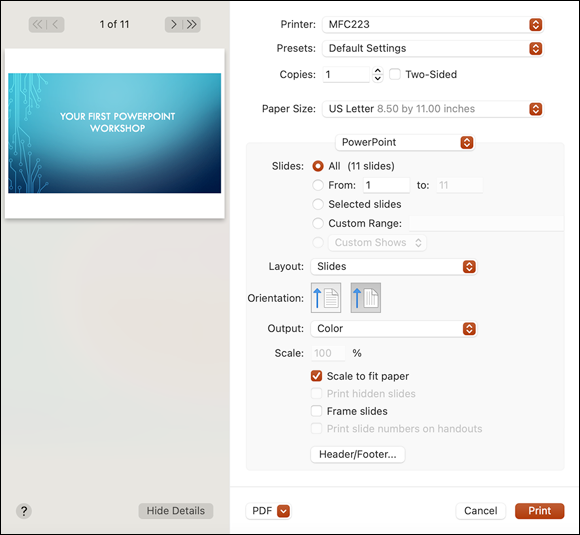
FIGURE 11-11: The Print dialog, ready to print all eleven slides in this presentation.
You might need to click the Show Details button to see all the settings in your Print dialog. -
In the Copies field, specify the number of copies of each slide you want to print. (The default is 1, but you can change it, if you want.)
The Collated check box matters only when you’re printing multiple copies. When you print two or more copies of, say, a 12-page document, selecting this box causes your presentation to print each copy in its entirety before beginning to print the next copy. (That is, you print pages 1 to 12 and then print pages 1 to 12 again.) If this box is deselected, all copies of each page are printed together. (That is, if you specify two copies, your document prints as follows: page 1, page 1, page 2, page 2, page 3, page 3, and so on.)
-
To print some (but not all) of your slides, do one of the following:
- To print a range of contiguous slides (such as Slides 6 to 9 or Slides 2 to 11), select the From radio button and specify the starting and ending slide numbers in the From and To fields.
- To print noncontiguous slides (such as Slides 1, 2, 5, 6, 8, and 11), select the slides you want to print before you choose File ⇒ Print. Then select the Selected Slides radio button in the Print dialog.
The default for the Layout drop-down menu is Slides, so you don’t have to change it.
- Choose an option from the Output menu (Color, Grayscale, or Black & White).
-
Select the Scale to Fit Paper check box to print your slide as big as the paper in your printer allows.
If you often swap paper of different sizes, you might need to set the page size in the File ⇒ Page Setup dialog — before you choose File ⇒ Print — to match the paper that’s loaded in your printer.
- Select the Frame Slides check box if you want a hairline frame drawn around each slide.
-
Click the Print button.
Your chosen slides or full presentation print with one slide per page.
Printing handouts
If you want to print more than one slide on a page, refer to the steps for printing in the previous section, but click the Layout drop-down menu and choose a Handouts item. Your choices are 2, 3, 4, 6, or 9 slides per page. After you make your selection, the preview area displays a thumbnail of your page.
We like the three-to-a-page layout a lot because it's the only one that includes space for the recipient to jot notes.
Printing notes
If you like to add notes to your slides, as we do (see Chapter 10 for more details about the Notes feature), you might be glad to know that you can print slides and notes together. Here are two reasons to consider adding notes to your slides:
- You can refer to them on your screen during the presentation. (We like that.)
- Because you should keep your bullet points short on your slides, notes make your handouts more useful to your audience.
To print a handout showing a slide and notes, choose Notes from the Layout drop-down menu in the Print dialog. Only one format is available — one slide and its notes per page — but that’s probably what we’d choose, even if we had other options.
Printing an outline
In Chapter 9, we wax poetic about what a good idea it is to start your presentation by creating an outline. If you decide to put together an outline, you can print it by choosing Outline from the Layout drop-down menu in the Print dialog.
This technique isn't fancy, but if you want to see only your words, thereby avoiding being distracted by your graphics or wasting paper, printing your slide show as an outline is the way to go. Figure 11-12 shows a basic outline in the Print dialog.
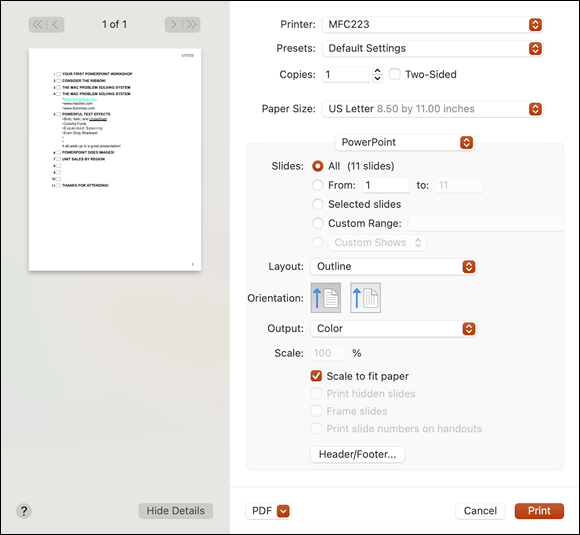
FIGURE 11-12: Printing an outline gives you just your words with no frills.
Exporting (saving) your presentations as files
Perhaps you consider ink on paper to be too “old school” and prefer to offer your presentation as an electronic file that can be emailed, downloaded, copied to a thumb drive, shared on a network or via the cloud, or even accessed as web pages. Well, we have good news: PowerPoint offers a number of digital export options so that you can save your presentation as a digital file in a variety of formats. These formats include movies, picture files, or PDF files. You can also save your presentation to your Microsoft OneDrive or a SharePoint library.
Read on to see how it all works.
Exporting a presentation as a movie
Sometimes, you can’t be there to present a slide show but you want to share it, anyway. If you know for sure that the recipients have a copy of PowerPoint and know how to use it, you could send them the actual PowerPoint file. But this strategy assumes that they have the same version of PowerPoint as yours, have the same fonts installed, and won’t screw up your slide show before they get a chance to view it.
The answer is to export the presentation as a movie file. Here’s how:
-
Choose File ⇒ Export.
The Export As dialog appears.
-
Click the File Format pop-up menu near the bottom of the Export As dialog, and select MP4 or MOV.
Whether you select MP4 or MOV is up to you, but MP4 is more compatible with slightly more devices than MOV (which is the native QuickTime video format Macs have used forever).
The movie options appear below the File Format menu, as shown in Figure 11-13. The options are the same regardless of whether you select MP4 or MOV.
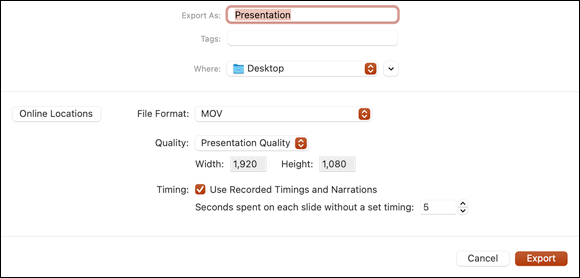
FIGURE 11-13: These are your options when you save your presentation as a movie.
- Do the following:
- From the Quality pop-up menu, choose an optimization. Your options are Presentation Quality (best), Internet Quality (better), and Low Quality (good, but not too good).
- If you want to include the timing between slides and any narrations, select the Use Recorded Timings and Narrations option in the Timing section.
- If you don’t have timings recorded in your presentation and you want to set a default timing for the exported movie, use the up and down arrows to the right of the Seconds Spent on Each Slide without a Set Timing option.
- Click the Export button to begin the process of exporting your movie file.
 Any narrated audio in your presentation will be in the exported movie file, but no other embedded media files will play.
Exporting slides as individual picture files
Another option is to export the slides as individual picture files. Then you can import them into Photos, iMovie, or an editor such as Photoshop Elements, where you can create slide shows and movies, respectively, with more control over the way things look. For example, in Photos, you can use the Ken Burns effect, which simulates movement by panning and zooming on still images. And you can choose music from your Music library and use a different song every time you show the slide show. In iMovie, you can create titles, add transitions between slides, and include multiple soundtracks, and then export a movie.
To save slides as individual picture files, follow these steps:
-
Choose File ⇒ Export.
The Export As dialog appears.
-
In the File Format pop-up menu, choose a file format for your picture files, as shown in Figure 11-14.
Note that only five items on this menu — JPEG, PNG, GIF, BMP, and TIFF — are graphics file formats. If you intend to modify your slides using a graphics editor such as Photoshop, you should use one of these formats. Because the TIFF format is well-supported on both Macs and PCs (and TIFF images, unlike JPEGs, don’t lose quality after repeated editing), we always recommend TIFF format.
- Choose whether to export every slide in your presentation or the just the currently active one.
-
Click Export.
PowerPoint creates a folder with the same name as your presentation (unless you changed the name in the Export As field at the top of the Export As dialog). In that folder, you find an individual file for each slide in the presentation.
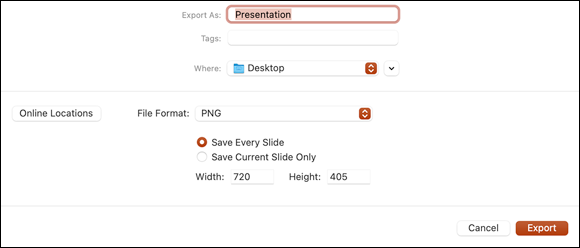
FIGURE 11-14: Choose a file format and click Export, and you’re done.
Exporting a presentation as a PDF file
PDF, as you may already know, stands for Portable Document Format — the file format created by Adobe Systems for exchanging documents without regard for hardware, software, operating system, or installed fonts. So, a PDF file you create on a Mac will look exactly the same, regardless of the type of hardware, software, or operating system that's used to view it.
The PDF feature is built into macOS and is available in any app that has a Print dialog. The good news is that you have the same options as you have when printing hard copy. So, you can export a PDF file of slides, handouts (2, 3, 4, 6, or 9 slides per page), notes, or an outline. You can also select a subset of your slides and create a PDF that contains only those slides.
Exporting a PDF file couldn’t be easier. To export your presentation as a PDF, follow these steps:
-
Choose File ⇒ Print.
The Print dialog appears.
-
Set any print options in the Print dialog, as described in the preceding section.
You’re not going to print the presentation, but this is what you need to do to specify the following for your PDF file:
-
To include some (but not all) of your slides in the PDF, do one of the following:
To include a range of contiguous slides (such as Slides 6 to 9 or Slides 2 to 11), select the From radio button and specify the starting and ending slide numbers in the From and To fields.
To include noncontiguous slides (such as Slides 1, 2, 5, 6, 8, and 11), select the slides you want to print before you choose File ⇒ Print. Then select the Selected Slides radio button in the Print dialog.
- Choose one of the options on the Output menu (Color, Grayscale, or Black & White).
- If you want a hairline frame drawn around each slide, select the Frame Slides check box.
-
- Click the PDF button at the bottom of the Print dialog.
-
In the PDF pop-up menu, choose Save as PDF.
The Save As dialog appears, as shown in Figure 11-15.
- Click Save.
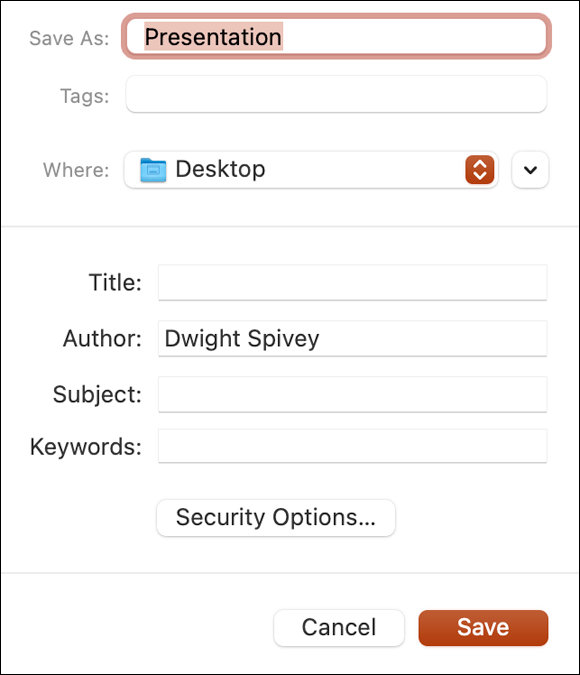
FIGURE 11-15: Click Save in the Save As dialog to create your PDF.
Your PDF file doesn’t include any fancy stuff, such as animations or transitions.
Saving your presentation online
Of course, you can save your PowerPoint presentation to any storage device on your home or office network, as long as you have the proper permissions — but saving that same presentation file to OneDrive and sharing it with others on the web involves cloud computing.
The basic OneDrive feature is offered by Microsoft for free, and it's pretty much Microsoft’s version of another service you (as an Apple fan) probably already have: iCloud. Essentially, your OneDrive is much like a hard drive that exists online, which you can connect to from any PC or Mac with an internet connection. Think of the possibilities: You can access your Office files from just about anywhere in the world, just as though they reside on the computer you’re using.
To save your presentation to your OneDrive, follow these steps:
- Click the Share button in the upper-right of your presentation’s window to open the Share dialog, shown in Figure 11-16.
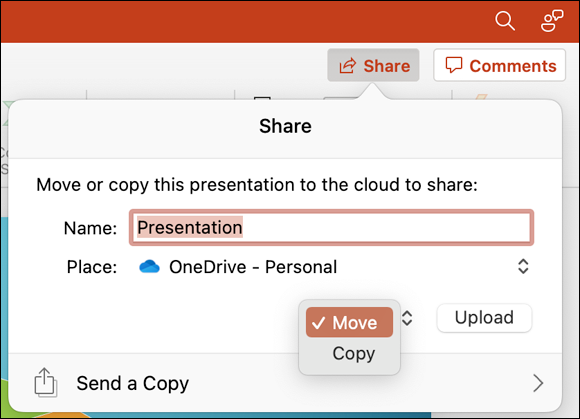
FIGURE 11-16: Saving a presentation to OneDrive.
- (Optional) Type a new filename for your presentation.
- If you have more than one account (such as one for personal and one for business), click the destination OneDrive account for the file.
-
On the pop-up menu to the immediate left of the Upload button, choose Move or Copy.
Move will move the file from its present location to your OneDrive account, and Copy will make a copy of it instead.
- To upload the file to your OneDrive, click Upload.
To share your uploaded presentation with others, follow these steps:
-
Click the Share button in the upper-right corner of your presentation’s window to open the Share dialog, shown in Figure 11-17.
Note that the Share dialog offers different options than it did in Figure 11-16 because the file has already been uploaded to OneDrive.
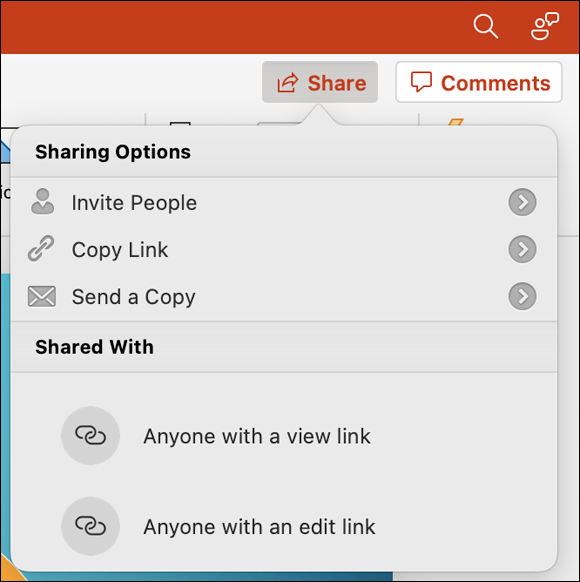
FIGURE 11-17: You can share your uploaded file with others via OneDrive.
- Choose a method for sharing your file with others:
- Invite People: Click this option and you see the screen shown in Figure 11-18. Enter the names of people in your Apple Contacts app or type their email addresses. Add a message if you like. If you want them to be able to edit your presentation, be sure to select the Can Edit box. Then click the Share button.

FIGURE 11-18: Check the Can Edit box if you want your collaborator to edit your slides.
- Copy Link: Copies a link for the shared file to your Mac’s clipboard. You can then paste the link into documents, emails, websites, and more. Click Copy Link, then select View-Only (which allows others to only view the slides) or View and Edit (to allow others to edit the slides).
- Send a Copy: Lets you send a copy of the presentation file as a PowerPoint file or as a PDF to others via email.
- Invite People: Click this option and you see the screen shown in Figure 11-18. Enter the names of people in your Apple Contacts app or type their email addresses. Add a message if you like. If you want them to be able to edit your presentation, be sure to select the Can Edit box. Then click the Share button.