
Chapter 3
Common Features in All Office Apps
IN THIS CHAPTER
![]() Understanding menus
Understanding menus
![]() Using ribbons, toolbars, and palettes
Using ribbons, toolbars, and palettes
![]() Customizing toolbars, menus, ribbons, and keyboard shortcuts
Customizing toolbars, menus, ribbons, and keyboard shortcuts
![]() Finding out how to set your app preferences
Finding out how to set your app preferences
![]() Saving and editing documents on your OneDrive space in the cloud
Saving and editing documents on your OneDrive space in the cloud
![]() Helping yourself with Help
Helping yourself with Help
The Office apps share elements that are similar or the same in most or all of its programs. For example, the gallery appears by default whenever you launch any of the three major apps (Word, PowerPoint, or Excel) and works the same in all three. Opening and saving files works the same everywhere. Menus, ribbons, and toolbars work much the same in all apps they appear in. And so on.
In this chapter, you’ll find tips, techniques, and how-to’s that you can apply to all Office apps.
Using Menus in Office Apps
Each Office app has around a dozen menus in its menu bar. Some, such as the Apple, File, Edit, View, Window, and Help menus, are mostly the same as their namesakes in other Office programs (and macOS) and contain the usual commands. Others, such as the Format, Tools, and Insert (Word, Excel, and PowerPoint) menus, offer different options in different programs. And some menus, such as Word’s Table menu, Excel’s Data menu, and PowerPoint’s Arrange and Slide Show menus, are exclusive to a particular app.
We discuss many of the commands on these menus throughout the rest of this book; in this chapter, we cover some general information about using commands and features that are mostly the same in all Office apps.
First, although many menu commands work only after you’ve selected (highlighted) some text or another object, a number of menu commands don’t require text selection. For example, all items on the View menu work, regardless of whether text is selected when you choose them. Many items on the Insert menu operate based on the location of the insertion point in your document and, in fact, blow away any text that’s selected when you choose them.
 Be careful about selecting text. Although many commands require you to select text first, other commands replace the selected text with something completely different. For example, if you choose Insert ⇒ Chart (or one of many other items on the Insert menu) while text is selected, the selected text is replaced by the chart. (Chapter 5 covers text selection in more detail.)
 Fortunately, the Office apps let you perform an almost unlimited number of undo actions, so you can undo what you did even after you’ve performed other actions in the meantime. Just choose Edit ⇒ Undo as many times as necessary to restore the text you just replaced. It wouldn’t hurt to memorize its keyboard shortcut, ⌘ +Z. By the way, this shortcut for Undo works in almost every program on your Mac.
Another thing to know about Office app menus is that an item that ends with an ellipsis ( … ) opens a dialog rather than performs an action immediately. Nothing happens unless or until you click OK or another action button. When you click OK, the appropriate action is performed either on the selected text, at the insertion point, or to the entire document, depending on the menu command.
If you accidentally choose a menu item that opens a dialog, either click the Cancel button or press the Esc key on your keyboard to dismiss the dialog without making any changes to your document.
An arrow on the right side of a menu item, such as the ones next to Insert, Delete, and Select on Word’s Table menu, shown in Figure 3-1, means that you see a submenu when you select that item.
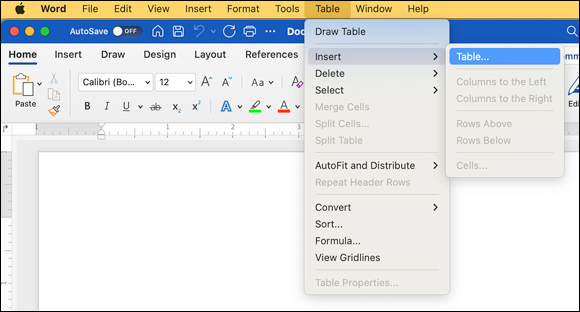
FIGURE 3-1: An arrow indicates that a menu item has a submenu; dimmed text indicates that an item isn’t available now.
When an item on a menu is dimmed, such as Split Table, Merge Cells, and Split Cells on the Table menu (refer to Figure 3-1), you can’t select the item because that command isn’t available at this time.
Why would an item be unavailable? In Figure 3-1, the items that are dimmed are available only when you’ve placed a table in your document and either the table is selected or the insertion point is somewhere in the table.
If you see a dimmed menu command, look at your document and ask yourself why it’s dim. Usually, the answer is a logical one, such as the command works only on a table or requires a text selection.
Toolbars, Ribbons, and Panes: Think “Visual” Menus
The big three Office apps (Word, Excel, and PowerPoint) offer at least one toolbar, one pane, and the ribbon (Outlook employs only a toolbar and the ribbon). Think of all three as visual menus. They make tasks easier and more convenient because you don’t have to remember a command name or which menu it’s on. Instead, you click a button or pull down a menu to execute the command.
Furthermore, some items on ribbons, toolbars, and panes can do more than meets the eye. You start with a look at how some of these items which may appear on ribbons, toolbars, and panes, work.
We flipped a coin and PowerPoint won, so it’s the PowerPoint ribbons, toolbars, and panes you see in the next section. We cover the specific items in them later in this book; for now, we introduce you to them and show you a bit about how they work.
The Quick Access toolbar
Word, Excel, PowerPoint, and Outlook all include the Quick Access toolbar, which provides super quick access (as its name implies) to common commands.
The Quick Access toolbar, shown in Figure 3-2, appears by default at the top of every document window. It can’t be moved or resized, so it’s said to be docked.
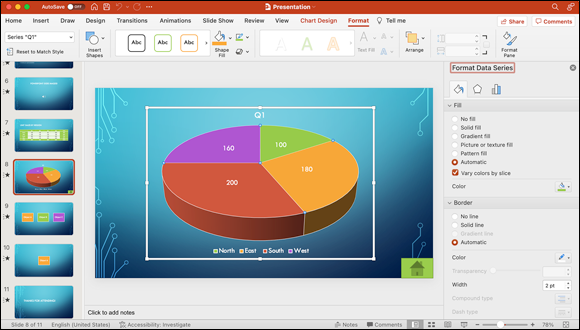
FIGURE 3-2: The Quick Access toolbar, shown here in PowerPoint.
To find out what any button on a toolbar does (or on a ribbon or pane, for that matter), move the mouse cursor directly over it and then don’t move the cursor for a few seconds. The button’s name then appears in the little tooltip box.
Reveling in the ribbon
Think of a ribbon as a group of context-sensitive toolbars designed to make your life easier. Each ribbon has multiple tabs; each tab contains tools suited for specific tasks.
You can, of course, click any tab to activate it, but the ribbon is context-sensitive. Note in Figure 3-2 that the PowerPoint ribbon has 11 tabs, including Home, Transitions, Animations, Chart Design, and Format. That’s because a chart in one of the slides is selected; were the chart not selected, you wouldn’t see the Chart Design and Format tabs.
Compare this ribbon with the one shown in Figure 3-3, where we've selected a text box instead of a chart. Note that the new tab, Shape Format, now appears on the ribbon and that the Format tab and the Chart Design tab have been removed, indicating that we’re no longer working with a selected chart but are working with a text box.
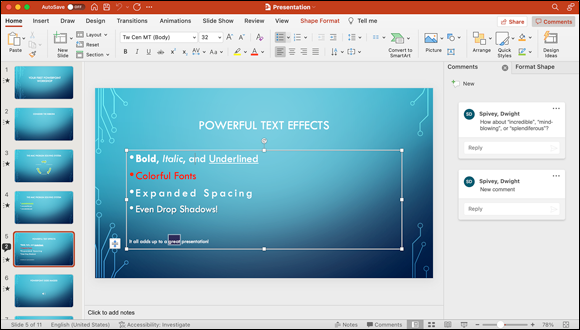
FIGURE 3-3: Notice the Chart Design and Format tabs on the ribbon have been replaced with the Shape Format tab.
Click the tab that’s already selected on the ribbon to hide it and leave only its tabs showing. You can also choose View ⇒ Ribbon on the menu at the top of the screen to toggle between hiding and showing ribbon tabs.
That’s really all you need to know to get started with ribbons. Trust us, there’s much more to come throughout the rest of the book.
You can add or delete commands from the preconfigured tabs and menus or create your own custom tabs from scratch. We show you just how to do so for each app in the coming chapters.
Panes are anything but a pain
In addition to toolbars, Word, Excel, and PowerPoint have numerous panes, which are basically like windows within the main window of your document, workbook, or slide. In PowerPoint, for example, some of these panes include Comments, Format Shape, Design Ideas, Format Picture, and Stock Images.
Each pane opens on the right side of the current window; you can have multiple panes open at once, with each one represented by a tab that you can select to navigate between them. Most panes have a number of panels, often nested within subtabs, that you can hide or disclose by clicking the little arrow to the left of their names. To close a pane, click the x in its upper-right corner (or on the pane’s tab if multiple panes are open).
In Figure 3-4, the Format Picture pane (in PowerPoint) is displaying its tabs — Fill & Line, Effects, Size & Properties, and Picture, each represented with an icon — with the Picture tab selected. The Picture Color panel is open, or disclosed; note that the gray arrow to the left of its name points downward. The three other panels — Picture Corrections, Picture Transparency, and Crop — are closed, so their disclosure arrows point to the right rather than down.

FIGURE 3-4: The Format Picture pane has multiple tabs you can use to work with your selected image.
We discuss various panes, subtabs, and panels throughout the rest of this tome, but because describing every item on every menu, pane, or ribbon tab is beyond the purview of this book, we urge you to take a few minutes to familiarize yourself with the items on each one in all the Office apps.
Customizing the Quick Access Toolbar, Ribbon Tabs, and Keyboard Shortcuts
Customizing elements in the Office apps is something of a pastime for the aficionados we know; we’ll admit, it can be fun and even empowering to make things appear and work the way you want (or need) them to. You can add, delete, and rearrange many items to your liking. You can even create ribbon tabs from scratch and add or change the keyboard shortcuts for most commands.
Customize the Quick Access toolbar
The Quick Access toolbar is a great place for tools you routinely need fast access to in any document, workbook, or slide, and it can be customized to suit your tastes.
Once you customize the tools in the Quick Access toolbar for one document, workbook, or slide, they’re the same in every new window in that app going forward.
Follow these steps to customize the Quick Access toolbar in Word, Excel, or PowerPoint (Outlook doesn’t apply here, we're afraid):
- Choose App Name ⇒ Preferences to open the Preferences dialog.
- Click the Ribbon & Toolbar button.
- Near the top of the Ribbon & Toolbar dialog, select the Quick Access Toolbar tab.
- Select an option in the Choose Commands From pop-up menu, scroll through the list of available commands, and then click to select the one you want.
-
Click > in the middle of the dialog, shown in Figure 3-5, to add the selected command to the Customize Quick Access Toolbar commands list.
To remove a command from the Quick Access Toolbar, select it under the Customize Quick Access Toolbar list and click < in the middle of the dialog. -
(Optional) Drag-and-drop commands in the order you would prefer them to appear in the Quick Access toolbar.
If you want to revert to the original Quick Access toolbar, click the options icon (three dots in a circle) under the Customize Quick Access Toolbar list and select Reset Only Quick Access Toolbar. -
To save your changes, click Save in the lower right.
Changes appear in the Quick Access toolbar immediately.
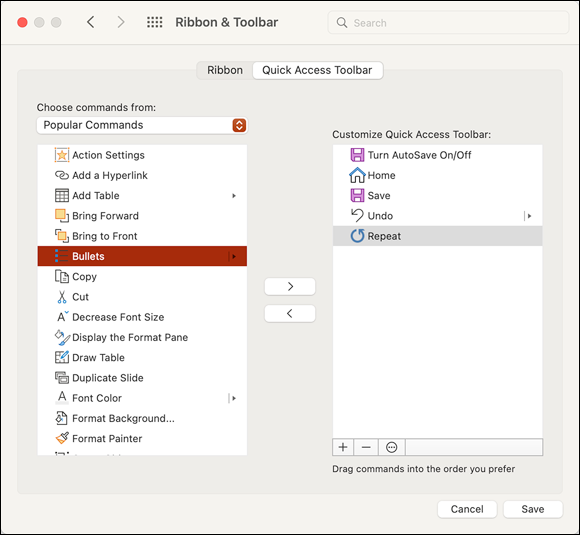
FIGURE 3-5: The Quick Access toolbar is highly customizable in Word, Excel, and PowerPoint.
Customize ribbon tabs and menus
The Quick Access toolbar isn’t the only way to have a whirlwind of a time customizing and modifying. The ribbon likes — one could almost say it begs — to be tinkered with, too.
To modify existing ribbon tabs and menus:
- Choose App Name ⇒ Preferences to open the Preferences dialog.
- Click the Ribbon & Toolbar button.
- Select the Ribbon tab near the top of the Ribbon & Toolbar dialog.
- Select an option in the Choose Commands From pop-up menu, scroll through the list of available commands, and then click to select the one you want.
- Select an option in the Customize the Ribbon pop-up menu, and then click to select the tab and tab group to which you want to add the command you chose in Step 4.
-
Click > in the middle of the dialog to add the selected command to the selected ribbon tab.
To remove a command from a tab, select it under the Customize the Ribbon list and click < in the middle of the dialog to send it packing. Show or hide ribbon tabs and tab groups by selecting or deselecting the check box to the left of their names. -
Click the Save button to save your changes.
Your new command can now be found in the ribbon tab you added it to.
As shown in Figure 3-6, the main tabs in the tabs list often include tab groups, which are subcategories within the tab. (For example, the Edit Master subtab is listed under the Slide Master tab.) Click > next to a tab group to expand it. You can place commands within tab groups by selecting the tab group in Step 5 instead of the main tab itself.
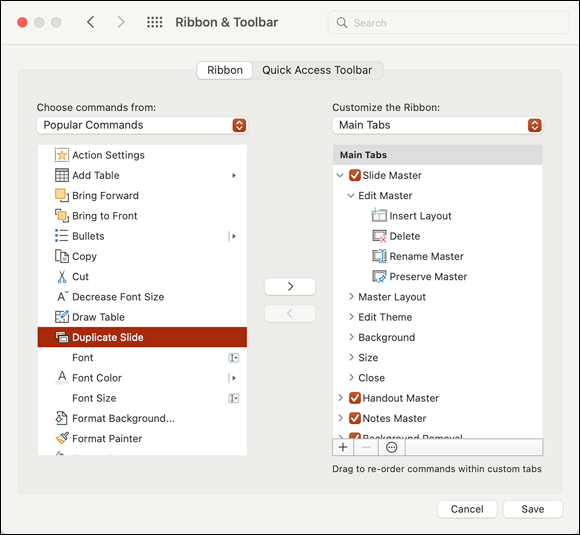
FIGURE 3-6: Ribbon tabs and menus just love to be modified in the Preferences dialog of Word, Excel, and PowerPoint.
As with commands in the Quick Access toolbar, you can drag and drop commands to customize their locations in the ribbon tab, too.
Creating ribbon tabs and tab groups
One feature we adore in the latest edition of Office for Mac is the ability to create ribbon tabs and tab groups, instead of being stuck with only the predefined tabs and groups. Why do this? Perhaps you use a set of commands all the time; instead of clicking various tabs and tab groups, keep them in one place for easier access and rejoice in the time you save.
Follow these steps:
- Choose App Name ⇒ Preferences to open the Preferences dialog.
- Click the Ribbon & Toolbar button in the Preferences dialog.
- Select the Ribbon tab near the top of the dialog.
- Click the + button at the bottom of the tabs list on the right and choose New Tab from the menu that appears.
- In the tabs list, select New Tab (Custom).
- Click the options icon (three dots in a circle) at the bottom of the tabs list and then select Rename from the menu.
- In the Display name field, enter the desired name and then click Save.
Add new tab groups to your new tabs in the same way. Repeat Steps 4–7, but choose New Tab Group instead of New Tab in Step 4.
Customizing keyboard shortcuts
You add or change keyboard shortcuts for commonly used menu commands in Word and Excel. Follow these steps:
- Choose Tools ⇒ Customize Keyboard to open the Customize Keyboard dialog, shown in Figure 3-7.
-
Select a command to assign a keyboard shortcut to.
The Categories list (in the upper left) groups all menus and command categories that contain commands to which you can assign a keyboard shortcut. You can select a category and scroll through the list of commands it contains or you can search for a command by typing it in the search field.
If you’re not sure which category to choose, choose the All Commands category, near the end of the scrolling Categories list, to display all available commands.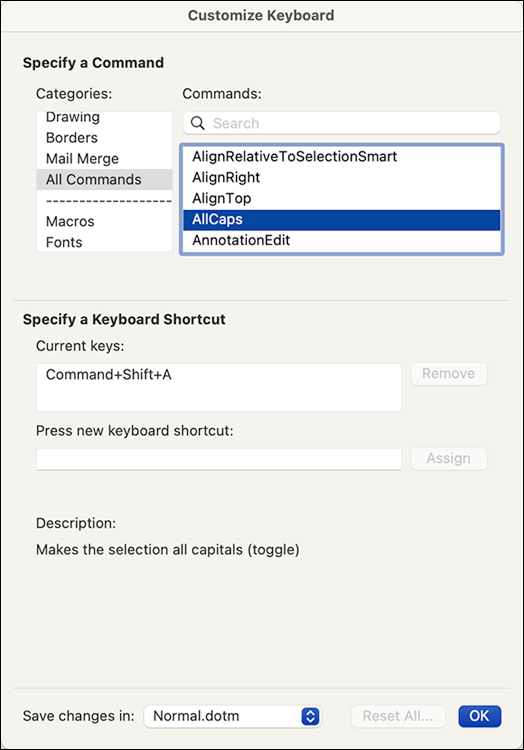
FIGURE 3-7: Create your own or modify existing keyboard shortcuts.
-
In the Press New Keyboard shortcut box, enter the key combination you want for that command by pressing the keys on your keyboard.
As you press the keys, the box will populate with the new shortcut. If the shortcut you’re trying to assign is in use by another command, you'll see which command it’s assigned to just below the shortcut you typed.
- To assign the shortcut to the command, click the Assign button.
- When you’re finished, click OK.
Clicking the Reset All button restores all shortcuts to their factory settings.
We advise against using a keyboard shortcut that’s already in use by macOS. Check the Keyboard Shortcuts pane in the macOS Keyboard System Preferences pane to avoid conflicts. You can avoid most conflicts if you combine modifier keys. The ⌘ and Control keys combine well and avoid conflicts with most settings. Using ⌘ and Option works almost as well (though Microsoft already uses this combination for a few commands).
Creating and Saving Documents
Word, Excel, and PowerPoint are document-centric apps, which means that their main purpose is to create documents you save on your computer. These saved documents are known in computer parlance as files.
In this section, you discover how to
- Create a new, blank document from scratch
- Create a document from a template
- Save a document to your computer in an appropriate file format
- Turn on and manage the AutoRecover function
To create a new, blank document in Word choose File ⇒ New Document; in Excel choose File ⇒ New; and in PowerPoint choose File ⇒ New Presentation. To create a new, blank document in Outlook, choose File ⇒ New and then select E-Mail, Meeting, Appointment, Group, Contact, Contact List, Task, Note, Email from Template, Folder, or Main Window from the submenu.
You have three ways to open an existing Office document file:
- From Finder: Double-click any document created by an Office app, and that app launches and opens the document.
- Choose File ⇒ Open: Use this command after you’ve launched whichever Office app you want to work in. (You can also press ⌘ +O.)
- Use the gallery: The gallery multipurpose dialog can serve as the starting point for new Office documents and as a quick way to find documents you’ve worked on recently. To open the gallery, choose File ⇒ New from Template (or press ⌘ +Shift+P).
Using the gallery to open templates or recent documents
The multipurpose gallery dialog, available in all Office apps, makes it easier than ever to choose a template for a new document or to open a recently used file. The Word Document gallery is shown in Figure 3-8, and the Excel and PowerPoint galleries look almost the same.
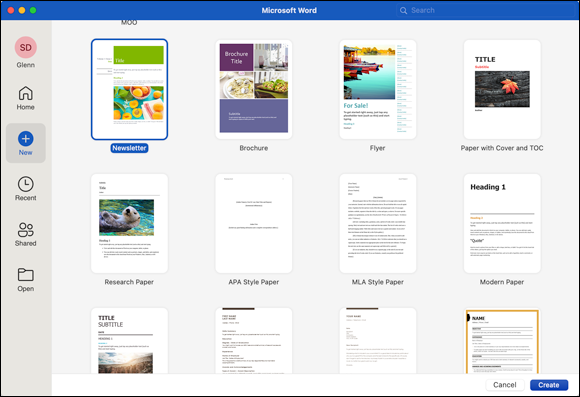
FIGURE 3-8: You can start a new, blank document in the gallery or choose a document template or theme.
If the gallery doesn’t appear automatically when you launch an Office app, choose File ⇒ New from Template (or press ⌘ +Shift+P) to open it.
The gallery dialog contains the following elements:
- New: Click New in the left pane to see templates and categories. In Figure 3-8, the selected category is Newsletter.
-
Recent: Click Recent in the left pane to see a list of the most recent documents you’ve opened, listed according to the last time they were opened.
Many users like to have the gallery open automatically when they launch an Office program, which is how its set by default. If for some strange reason the gallery doesn’t always open automatically when you launch an Office app, here’s what to do: Open the app’s preferences, click the General icon at the top of the Preferences window, and then click the Show Document/Workbook/Presentation Gallery When Opening Word/Excel/PowerPoint check box.
- Shared: Click Shared in the left pane to see documents, workbooks, or presentations that are being shared with you by others.
- Open: Click Open to browse local and online storage to find and open documents quickly.
- Home: Click Home to view a mashup of the New, Recent, and Shared tabs.
- Search field: Type a word or words in the search field at the top right of the gallery window to find files that contain that word or those words.
To open an item in the gallery, you can, of course, select the item by clicking it and then click the Create (for new documents) or Open (for existing documents) button. But simply double-clicking the item is faster and easier.
Finally, if you don’t see anything you want to open in the gallery, click Cancel. The gallery window disappears, but the app remains open (though it may have no document windows open at this time). To close the gallery and quit the app, choose File ⇒ Quit.
Saving a document
Saving a document in any Office app works the same way as in almost every other Mac program. The unique Office wrinkles involve saving files automatically and choosing a file format for your saved document.
We start by describing how to save a file. Saving a document file involves two tasks: saving the file for the first time and resaving the file every so often.
Part I: The initial save
For the first save, select a folder to save the file in and give the file a meaningful name. To do that, choose File ⇒ Save or File ⇒ Save As (or press ⌘ +S). Either way, the standard macOS Save As dialog appears in front of your document, as shown in Figure 3-9.
If your Save As dialog doesn’t look similar to Figure 3-9, click the disclosure arrow to the right of the current folder’s name to expand it.
To save the file, navigate to the folder you want to save the document in (the current folder is Word Docs in Figure 3-9) and name the file (Getting Started in Figure 3-9).
Part II: The resave
After you save a file for the first time, you’re not done with saving — not by a long shot. You still need to resave the document often so that if the app or your Mac crashes, you lose only the work you’ve done since the last time you saved.
This part is much easier than Part I. After you save and name a file, for subsequent saves, you merely need to choose File ⇒ Save or press ⌘ +S.
Save your file. Do it early. Do it often. Just do it, and do it a lot.
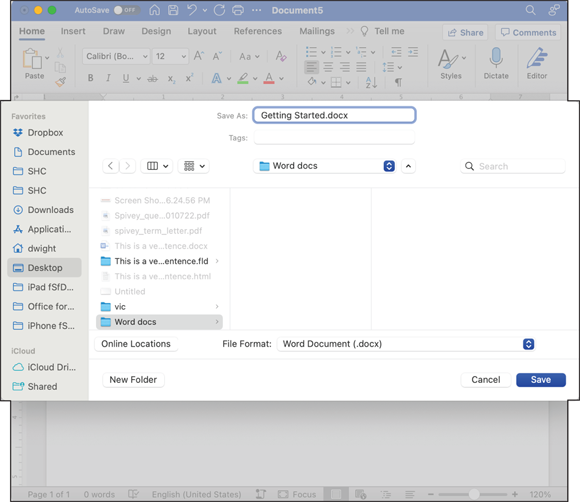
FIGURE 3-9: The Save As dialog for a Word document.
A-U-T-O-matic Recovery
AutoRecover is a feature (enabled by default) in Word, Excel, and PowerPoint that attempts to preserve your document contents in the event of a catastrophic event (like a computer crash or power outage). You can disable this feature (don’t do it, we implore you) or re-enable it by opening Preferences in the app, clicking the Save button in the Preferences dialog, and deselecting or selecting the Save AutoRecover Info box (it’s labeled Enable AutoRecover in Excel).
When the Save AutoRecover Info setting is enabled, you usually don’t lose any work after a crash. AutoRecover generally recovers all your work, right up to the moment of the crash, even if you haven’t saved the document or haven’t saved it in a while.
Despite the preceding tip, be aware that AutoRecover doesn’t always work. So, even if you enable it, resave your documents regularly. Train your fingers to issue the ⌘ +S keyboard shortcut every few minutes, whether you think you need to or not.
Saving and Using Documents in the Cloud
In addition to saving files to your local hard disk(s), as we describe in the section “Creating and Saving Documents,” earlier in this chapter, you can also save documents to a OneDrive or SharePoint location in the cloud. The service is especially useful for documents you'll be collaborating on with others, but you can also use it for backup copies of the file, just in case.
OneDrive and SharePoint are similar cloud-based file storage systems. The difference between them is that OneDrive is publicly available from Microsoft at no cost and SharePoint is privately maintained. If you work for an enterprise, your IT department may provide a SharePoint server. For everyone else, there’s OneDrive.
The more important the file, the more places you should back it up.
If you don't have a OneDrive (or SharePoint) service, this section may not make sense.
Saving a file on a OneDrive or SharePoint location
Saving a file using the OneDrive (or SharePoint) service is a little different than saving a file locally. To save a file in the cloud, choose File ⇒ Save or File ⇒ Save As.
A Save As dialog drops from the title bar. Click the Online Locations button in the dialog box, just to the left of the File Format menu (refer to Figure 3-9). The Save As field is now called Name; type a name for the document in that field. Select a OneDrive or SharePoint location on the left side of the dialog (as we did in Figure 3-10), choose a folder for saving the document, and then click the Save button.
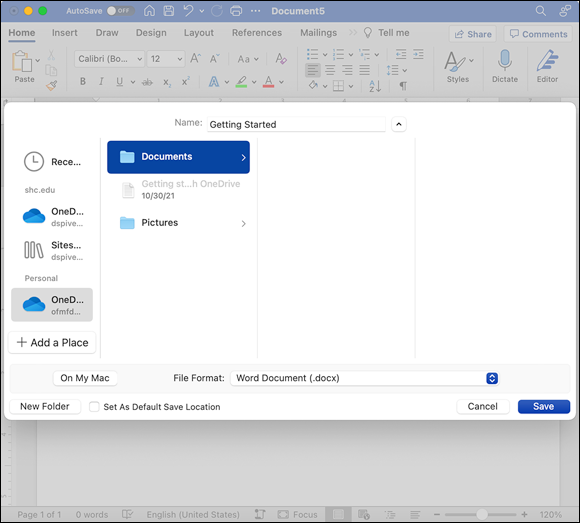
FIGURE 3-10: Saving a Word document to OneDrive.
If you see an On My Mac button next to the File Format menu, you’re already saving to an online location. If you want to save it locally (on your computer) instead, click the On My Mac button.
You may have noticed the AutoSave button in the upper-left corner of your documents. This feature saves documents you’ve stored in OneDrive or SharePoint automatically, preventing you from losing your precious content in the event something goes wrong. This button toggles to On automatically when you save a file to OneDrive or SharePoint.
By the way, OneDrive and SharePoint require the XML file formats .docx, .pptx, or .xlsx to use the AutoSave feature.
Sharing a file you’ve saved using OneDrive or SharePoint
To share a file you’ve saved using OneDrive or SharePoint, click the Share button in the upper right of any document window and choose either:
- Invite People: Creates an email that you send to whomever you want to share the file with. You can also give them editing privileges.
- Copy Link: Creates a link either allowing or not allowing editing privileges that you can then share with others.
- Send a Copy: Creates a copy of the file in Word, PDF, or HTML format that you can then email to a recipient.
You can find out more about collaboration in later chapters, so we leave it at that for now.
Opening a file you’ve saved on your OneDrive or SharePoint location
Reopening a file from your OneDrive or SharePoint location is easy. Simply use the gallery’s Recent list, as described earlier in this chapter. If you’ve used that file in the past, it’s likely to be in Recent Documents.
When you use the gallery’s Recent list, you might have difficulty discerning which documents are stored on your hard drive and which are stored in the cloud. Simply look at the line of text directly under a filename to see where it’s stored.
The other way to open a file is to choose File ⇒ Open from the menu bar, select the file from the list, and then click the Open button.
Understanding App Preferences
All Office apps have app Preferences dialogs, and they all look and work much the same. Some items they contain are specific to the app, but they generally look and work alike.
Rather than burn up a lot of pages listing every preference option in every app, we give you the general information you need for setting app preferences, as well as the reasons you might want to do so.
App preferences: Why?
As you see in a moment, every Office app has dozens and dozens of different preference settings you can alter to suit your fancy or needs.
Most preference settings let you enable, disable, or specify values for the way features work in the program. The idea is that you choose the setting that makes the feature work the way you want it to work.
For example, Outlook allows you to set up and use multiple email accounts in the Accounts section of Outlook’s Preferences dialog. Word and Excel allow you to choose the unit of measurement they use for their on-screen rulers and page measurements by default — inches, centimeters, points, or picas. The default is inches, but if you’re more comfortable with one of the others, you can choose it in the app’s Preferences, and all rulers and measurements in that app will be displayed in those units forever (or, at least, until you change the preference setting again).
We discuss some preferences in later chapters, but only ones that are pertinent to the discussion at hand. So, you might want to spend some time experimenting with the various preference settings and customizing your Office apps to work the way you prefer.
App preferences: How?
You open the Preferences dialog the same way in each Office app: Choose Preferences from the app’s eponymous (Word, Excel, PowerPoint, or Outlook) menu or press ⌘ +, (comma).
Although the four Preferences dialogs look slightly different, as shown in Figure 3-11, they all work much the same.
As you can see, each app’s Preferences dialog has many categories, each represented by an icon.
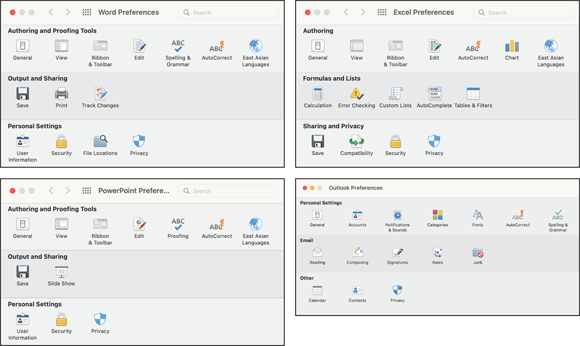
FIGURE 3-11: The Word, Excel, Outlook, and PowerPoint Preferences dialogs.
 When you click one of these icons, you’re said to be using that category’s preference pane. For example, Figure 3-12 displays Outlook’s Notifications and Sounds preference pane, which offers most of the features — such as check boxes, radio buttons, buttons, and pop-up menus — that you’re likely to encounter in preference panes.
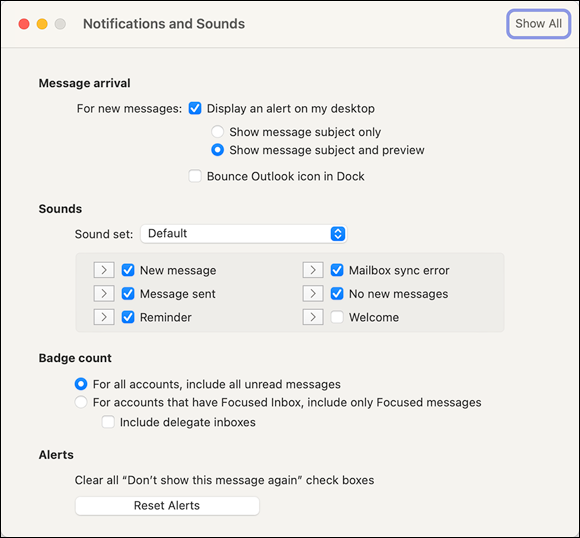
FIGURE 3-12: The Outlook Notifications and Sounds pane has most of the features you'll find in a preference pane.
To see the items in a category, click the category’s icon or name. When you do so, the Preferences dialog magically changes to display that category’s preference pane.
Radio buttons are known by this name because, as with the preset buttons on a car radio, you can press only one at a time.
 The following three screen elements are in the Word, Excel, and PowerPoint Preferences dialogs but not in the Outlook Preferences dialog:
- Search field: Search for a word or phrase, which is handy if you know of a preference you want to change but can’t remember which pane it’s in.
- Forward and back icons: These icons work the same as the forward and back icons in Finder or a web browser. The back icon (<) displays in reverse chronological order the panes you’ve visited since you opened the Preferences dialog, and the forward icon (>) cycles through panes visited by pressing the back icon.
- The show all icon: You can click this icon (which looks like 12 stacked dots and appears at the top of the window) when you’re done with a preference pane and want to return to the main Preferences dialog with all the icons available.
Help: It’s more than just a Beatles movie
If you’re puzzled about what a menu item does or how to use it, Office Help, shown for Word in Figure 3-13, is much better than in previous versions, primarily because it uses the Apple (not Microsoft) Help system.
To get help, follow these steps:
-
Choose Help ⇒ Word Help (or Excel, PowerPoint, or Outlook Help).
The appropriate Help window appears.
- Click any topic that appears in blue in the Help window, such as Creating a Document or Text, Lists, and Bullets.
- To search for a topic, type a descriptive word or two in the Search Help field in the top of the main Help window.
An even easier way to search Help is by typing your query directly in the search field on the Help menu, as shown in Figure 3-14.
This method of searching has the added advantage of pointing out the appropriate menu item, if there is one.
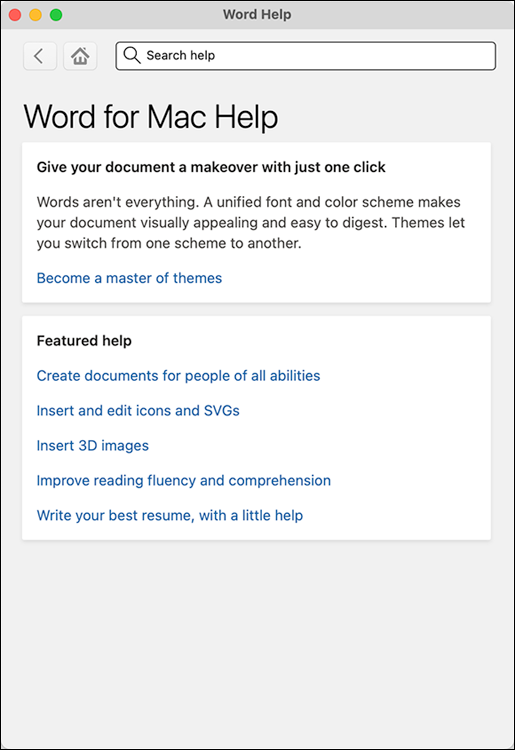
FIGURE 3-13: Help in Office is better than ever.
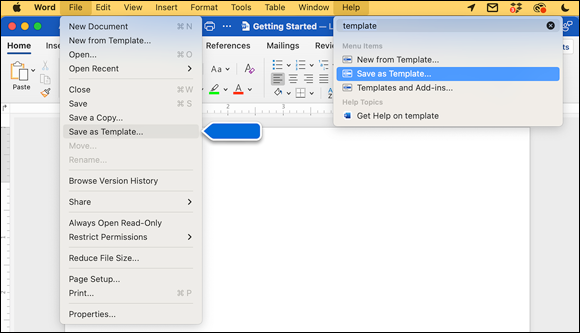
FIGURE 3-14: Even the Help menu in Office is helpful.
Help isn’t just for menus or Word — it’s extremely useful throughout the Office suite. So, regardless of which Office program you’re using, you can almost certainly find on its Help menu an answer to whatever issue is puzzling you.
Official Microsoft websites
Microsoft knows that more goes into making your user experience a great one than just developing great apps. They also need to provide support for those apps that goes above and beyond their customer’s expectations.
The Microsoft Apple Productivity Experience Group (APEX), formerly known as their Mac Business Unit, is responsible for making great Microsoft apps (primarily the Office suite and OneNote) for their Apple customers. They’re the second largest group of Mac developers in the world, aside from Apple themselves. The good folks in Microsoft’s APEX Group are huge Apple fans, just like us, so they’re jumping through all the hoops to make sure that your experience with Microsoft apps is as good as it can possibly be. Part of that experience includes providing top-notch support for the products they develop, which they do by contributing to Microsoft’s various support resources on the internet:
- Microsoft Support (
https://support.microsoft.com): Find support for your favorite Microsoft apps, including training materials, contact numbers, cheat sheets and other helpful documentation, tips to make the most of what your app of choice offers, and more. - Microsoft Office Templates (
https://templates.office.com): Peruse Microsoft’s extensive collection of document templates for Word, Excel, and PowerPoint. Many are free to download, while others require a Microsoft 365 subscription. - Microsoft Community Forums (
https://answers.microsoft.com): The Community forums connect Microsoft users from all over the world so they can share experiences, guide one another through projects, or just discuss how cool they think the marriage of Apple and Microsoft products is.
Don’t be shy to avail yourself of Microsoft’s support system if you need a helping hand or a bit of good advice from time to time (or every day, for that matter).