
Chapter 1
Getting Around in Windows
IN THIS CHAPTER
![]() Navigating the basics of the desktop
Navigating the basics of the desktop
![]() Working with Windows 11 on devices with touch
Working with Windows 11 on devices with touch
![]() Knowing when to shut down, restart, sleep, lock, or sign out
Knowing when to shut down, restart, sleep, lock, or sign out
![]() Taking screen shots in Windows 11
Taking screen shots in Windows 11
![]() Learning useful keyboard shortcuts
Learning useful keyboard shortcuts
Ready to get your feet wet, but not yet up to a full plunge?
Good. You’re in the right place for a dip-your-toes-in kind of experience. Nothing tough in this chapter, just a bit of windows cruising. Lay of the land kind of stuff.
If you’re an experienced Windows 7 user, you’ll find parts of Windows 11 that look a bit familiar and parts that look like they were ripped from a Mac or an iPhone. If you’re a Windows 10 user, you’ll feel right at home, but will enjoy a more cohesive user experience.
Anyway, you surely know that to get around Windows you need to click or tap stuff, just like you do on your smartphone. Navigating the Windows 11 desktop is not difficult, but in this chapter I give you a quick tour. Also, I discuss how Microsoft approaches touchscreens in this version of Windows. It's a bit different and better than in Windows 10.
But what about turning Windows 11 on and off again? That question is a popular meme with people who do tech support for their friends and co-workers. Well, I show you how to do that, too, as well as how to take a screen shot when, for example, an error pops up on the screen.
Finally, I show you a few useful keyboard shortcuts, alongside the classic Ctrl+C and Ctrl+V that many know. Using shortcuts will make you more productive and help you find your way around Windows 11 more quickly.
Navigating around the Desktop
Whether you use a mouse, a trackpad, or your finger, the desktop is the place where you’re going to spend most of your time in Windows. Here’s a guided tour of your PC, which you can perform with a mouse, a finger, or even a stylus, your choice:
 Click or tap the Windows logo icon (Start), which is shown in the margin.
You see the Start menu (see Figure 1-1). Note the Search box at the top, the list of pinned apps, and the Recommended section populated with recent files and recently installed apps.
In the Pinned section, click or tap the Photos icon.
Microsoft’s Photos app appears, as shown in Figure 1-2. Before you can use it, it may ask you to sign in.
Take a close look at the Photos app window.
Like other app windows, the Photos window can be resized by moving your mouse cursor over to an edge, and then clicking (or tapping) and dragging. You can move the entire window by clicking (or tapping) the title bar and dragging. You can minimize the window — make it shrink down to an icon on the taskbar — by clicking or tapping the horizontal line in the upper-right corner. And finally, you can close the app by clicking or tapping the X in the upper right.
 At the bottom in the taskbar, next to the Start icon, click or tap the search icon (shown in the margin).
The Windows 11 search screen appears, where you can type the names of apps, files, folders, settings, or websites to find what you need.
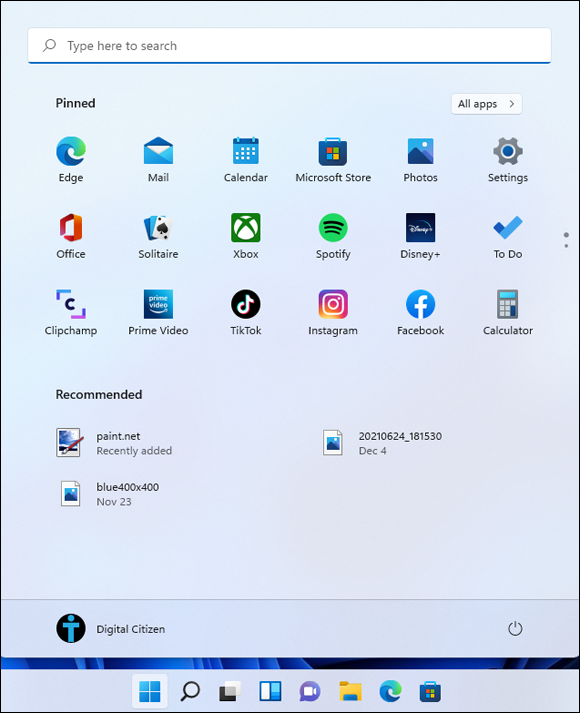
FIGURE 1-1: The Start menu is simpler and better than it was in Windows 10.
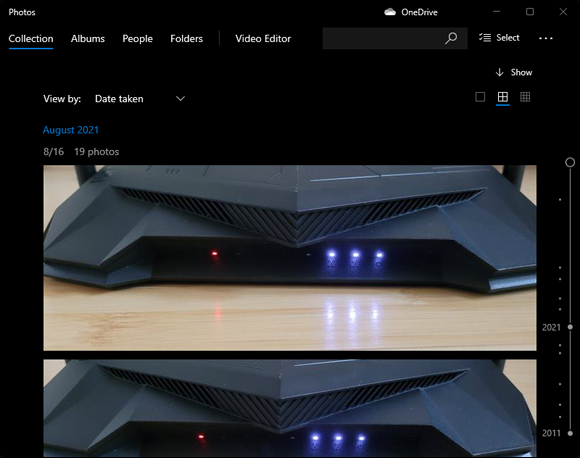
FIGURE 1-2: The Photos app looks and works like many Windows 11 apps.
In the search field (at the top), type the word photos.
The first result is the Photos app, as shown in Figure 1-3. The results will also include settings, web results, and folders and files on your computer that contain the word photos in their name.
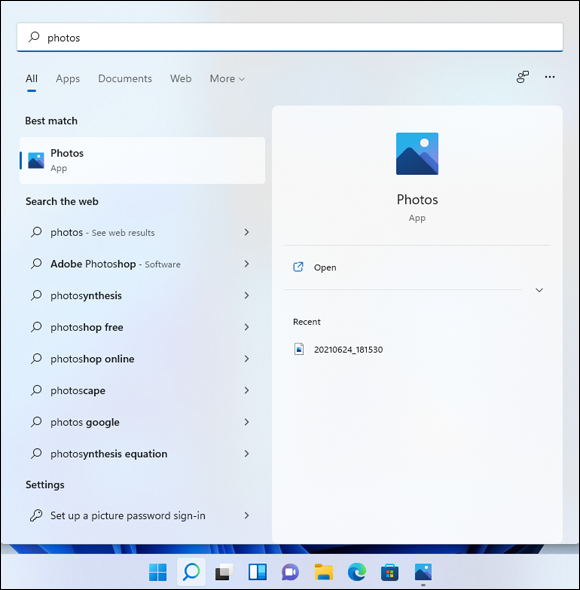
FIGURE 1-3: Search is a useful feature of Windows 11.
 Click or tap the Task View icon (shown in the margin), which is to the right of the search icon.
Windows 11 can have multiple virtual desktops, each running a separate set of apps. The first desktop is named Desktop 1, and you see it displayed at the bottom of the screen (see Figure 1-4).
Click or tap the New Desktop button (above the taskbar).
Desktop 2 is created and added to the list of virtual desktops. Any app that you open is then assigned to this virtual desktop.
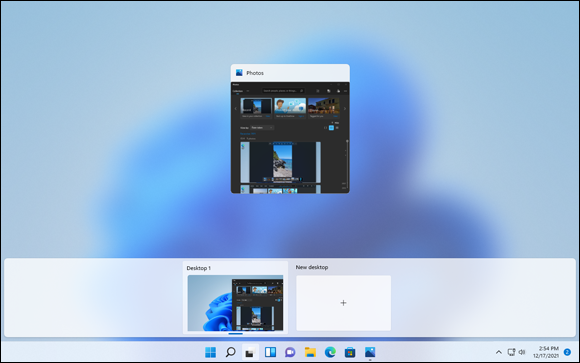
FIGURE 1-4: Task view.
Move the mouse over Desktop 1, right-click (or tap and hold down on) the Photos app, and choose Move To ⇒ Desktop 2.
You’ve successfully moved the Photos app from Desktop 1 (the default) to Desktop 2, which you created in Step 7.
Click or tap Desktop 2.
Note how the Photos app is now in Desktop 2 and no longer in Desktop 1.
Inside the Photos app window, click or tap the X button in the top-right corner to close it.
Desktop 2 now has zero running apps.
 On the taskbar, click or tap the widgets icon (shown in the margin).
The Windows 11 widgets appear, as shown in Figure 1-5. They display useful information such as the weather forecast, the latest news, sports updates, stock market data, and traffic data.
Click or tap somewhere on the desktop, outside the widgets.
You return to the Windows 11 desktop. Take a breather.
This was a quick tour of some of the highlights of the desktop. There’s much, much more to discover — I only scratched a thin layer of the surface.
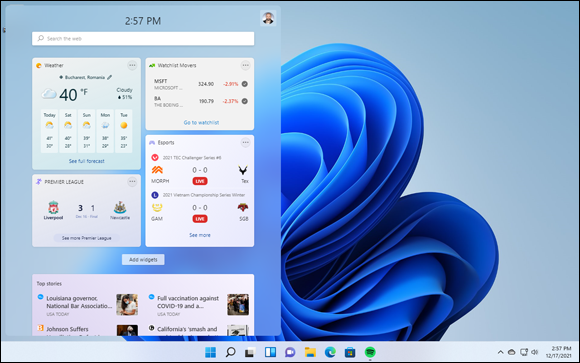
FIGURE 1-5: The widgets display useful information.
Using Windows 11 on Tablets and Touchscreens
Windows 10 had a special tablet mode optimized for touchscreens. While it wasn’t perfect, it was easy to turn on and enabled you to use touch instead of the mouse and keyboard. Windows 11 has ditched tablet mode, but it does touch better than Windows 10 did. How is that possible?
Microsoft decided to stop offering two environments in parallel (one for the mouse and keyboard, and another for touch), and redesign the user interface so that it works equally well for both. As a result, when Windows 11 detects that you’re using touch, it automatically increases the spacing between icons and other interface elements a bit, so that they're more touch-friendly. Most people can’t tell the difference between Windows 11 on a desktop PC and on a laptop with touch. You must have a PC and a device with touch next to each other to notice the subtle differences.
To use Windows 11 on a touchscreen, you need to know a few basic gestures:
- Tap to select an item, such as a file or a shortcut. This gesture is the equivalent of a click.
- Tap and hold down to right-click an item.
- Double-tap to open a file or an app. This gesture is the equivalent of a double-click.
- Tap and drag to move an item across the screen.
Learning how to swipe with your fingers on the screen helps too:
- Swipe right to left (in from the right side of your screen to the left) to open notifications and the calendar.
- Swipe left (in from the left side) to view the widgets.
As you browse around Windows 11, notice how almost everything is a lot more touch-friendly than in Windows 10. I appreciate the new Settings app in Windows 11. It's simpler and better for both touch and mouse than Settings in Windows 10. Also, the highly improved File Explorer (see Figure 1-6) makes navigating files and folders much easier on a tablet.
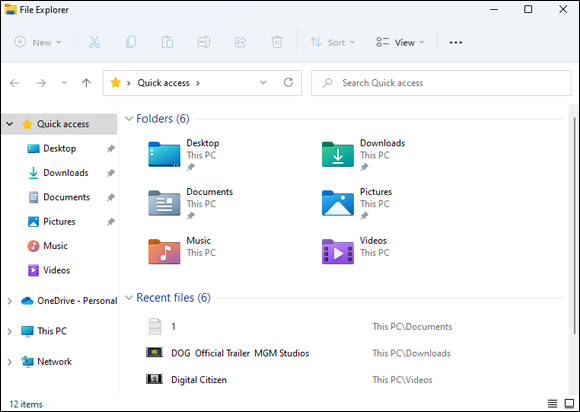
FIGURE 1-6: File Explorer in Windows 11 works much better on touchscreens.
Shut Down, Sleep, Restart, Sign Out, Lock, Sleep
If you go away from your Windows 11 laptop, tablet, or computer for a long time, shut it down, meaning it is turned off completely and doesn’t use energy. You restart it by simply pressing the Power button.
If you’re taking a break for an hour or so, put your device to sleep. This mode turns off the display but keeps your computer awake and uses little energy. Also, your work is kept the way it was when you left, and your PC will start faster. To resume from sleep mode, move the mouse around, or press any key, or press the Power button.
Another option is to lock your Windows 11 computer so that others don’t see your work and can't access your account.
If you have a family computer that you share with others, you should know how to sign out of your account, so that other people can sign in with theirs. Knowing how to restart your computer is helpful, too, especially after a Windows 11 update is installed or when you encounter problems.
Here’s how to do all those tasks:
- Click or tap the Start icon.
The Start menu is displayed. (Refer to Figure 1-1.)
 Click or tap the power icon, which is at the bottom-right corner of the Start menu.
You see all the options from the Power menu, as shown in Figure 1-7. You can choose Sleep, Shut Down, or Restart.
 Clicking or tapping one of these options starts the specified action immediately.
Click or tap your user account name in the bottom-left corner of the Start menu.
A menu opens with options related to your user account, as shown in Figure 1-8, including Lock and Sign Out.
Choose Sign Out.
The Windows 11 lock screen is shown, where you see the time and date.
Click or tap anywhere on the lock screen or press Enter. Enter your user password or PIN.
You return to the Windows 11 desktop.

FIGURE 1-7: Use the Power menu to sleep, shut down, or restart your device.
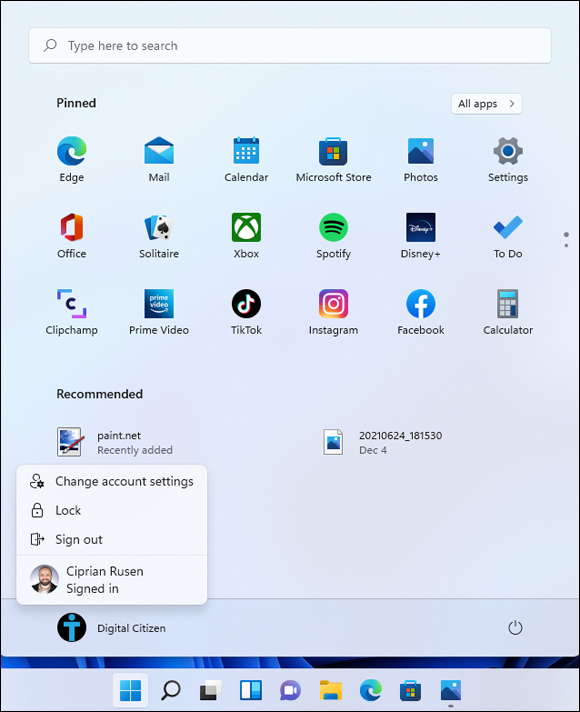
FIGURE 1-8: From this menu, you can lock your computer or sign out.
Taking Screen Shots
One of these days, you'll be using an app on your Windows 11 PC and an error will occur. To find a solution, it's often helpful to take a screen shot of what you see on the screen and share it with others. In Windows 11, you can do so in many ways. You could press the Print Screen key on your keyboard, but that method stores your screen shot in the clipboard, and you must then paste the shot in an image-editing app such as Paint.
 A much better way to take a quick screen shot of the entire screen is to press Windows+Print Screen or Fn+Windows+Print Screen. Windows 11 saves the resulting image as a file in the Screen shots folder, which is inside your Pictures folder.
One cool aspect of Windows 11 is that Microsoft has decided to create a new and much improved Snipping Tool app. It's a mix of the old version in Windows 7 and the Snip & Sketch app in Windows 10, which many people ignored. With the snipping tool, you can capture a full-screen screen shot, a rectangular screen shot, a free-form screen shot (draw any shape you want on the screen), or the window of a specific app. The snipping tool calls those screen shots snips.
Here’s how to use the snipping tool in Windows 11 to take a screen shot of the entire screen:
Press Windows+Shift+S.
You see a menu at the top of the screen, with several screen shot-taking icons, as shown in Figure 1-9.
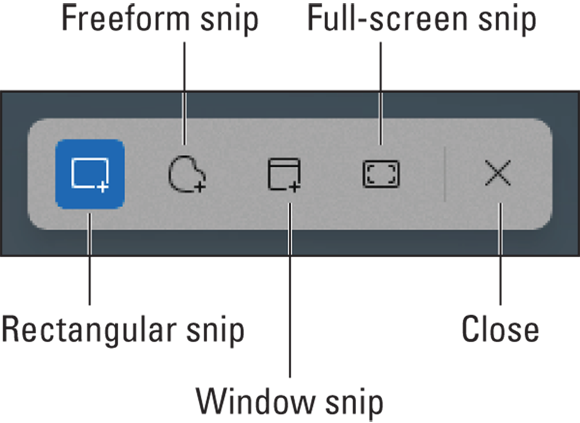
FIGURE 1-9: The screen shot-taking options offered by the snipping tool.
Click or tap the fourth icon, which is full-screen snip.
A notification on the right side of the screen tells you that a snip was saved to the clipboard.
Click or tap the Snipping Tool notification.
The Snipping Tool app opens (as shown in Figure 1-10), displaying the screen shot you just took. The app gives you access to plenty of image-editing tools, such as pens, highlighters, and erasers.
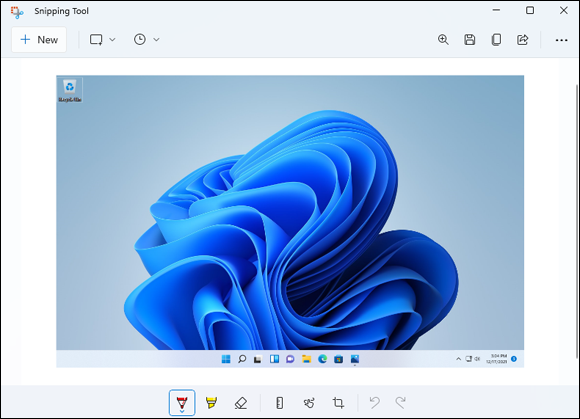
FIGURE 1-10: Use the snipping tool to edit your screen shots.
Click or tap the save icon (disk) at the top right of Snipping Tool.
The Save As dialog is shown, where you can choose the folder where the screen shot is saved. By default, screen shots are named using the date and time when they were taken. You can type a new name in the File Name field.
Click or tap the Save button.
Your screen shot is saved in the Pictures folder.
- In the Snipping Tool window, click or tap X to close the app.
Keyboard Shortcuts
Windows 11 has hundreds of keyboard shortcuts. I don’t use many of them because they’re difficult to remember. However, some of them are easy to remember and will make your work with Windows 11 a lot easier.
Here are the keyboard shortcuts that everyone should know. They’ve been around for a long, long time:
- Ctrl+C copies whatever you’ve selected and puts it on the clipboard. On a touchscreen, you can do the same thing in most applications by tapping and holding down, and then choosing Copy.
- Ctrl+X cuts whatever you’ve selected and puts it on the clipboard. Again, you can tap and hold down, and Cut should appear on the menu.
- Ctrl+V pastes whatever is in the clipboard to the current cursor location. Tap and hold down usually works.
- Ctrl+A selects everything, although sometimes it’s hard to tell what everything means — different applications handle Ctrl+A differently. Tap and hold down usually works here, too.
- Ctrl+Z usually undoes whatever you just did. Few touch-enabled apps have a tap-and-hold-down alternative; you usually have to find Undo on a ribbon or menu.
- When you’re typing, Ctrl+B, Ctrl+I, and Ctrl+U usually change your text to bold, italic, or underline, respectively. Press the same key combination again, and the text returns to normal.
In addition to all the key combinations you may have encountered in previous Windows versions, there’s a healthy crop of new combinations. These are the important ones:
- The Windows key brings up the Start menu.
- Windows+A opens Quick Actions.
- Windows+E launches File Explorer.
- Windows+I opens the Settings app.
- Windows+M minimizes all open apps and windows on the current desktop.
- Windows+Tab opens task view, with the virtual desktops listed at the bottom. In the middle is a preview of the open apps in each virtual desktop.
- Alt+Tab cycles through all running apps on the current desktop, one by one. See Figure 1-11.
- Ctrl+Alt+Del — the old Vulcan three-finger salute — brings up a screen that lets you choose to lock your PC, switch the user, sign out, or run Task Manager (see Book 8, Chapter 5).
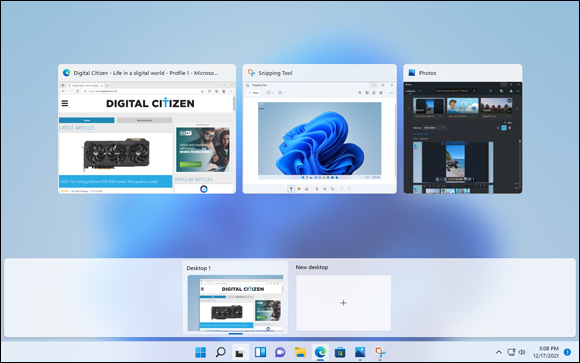
FIGURE 1-11: Alt+Tab cycles through all running apps.
You can also right-click (or press and hold down on) the Start icon or press Windows+X to display the Power User menu, which is shown in Figure 1-12.
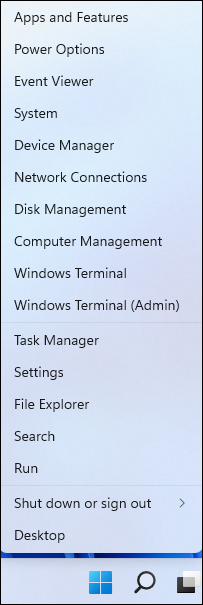
FIGURE 1-12: The Power User menu can get you into the innards of Windows 11.
And finally, the trick I know you’ll use over and over: Whenever you want to type an emoji in a document, hold down the Windows key and press the period key. See Figure 1-13.
Who says Windows 11 isn’t as cool as your smartphone?
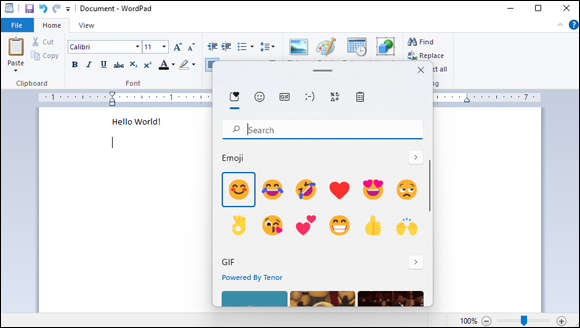
FIGURE 1-13: Emojis are — finally! — just a keyboard command away.