
Chapter 3
Handling Notifications and Quick Actions
IN THIS CHAPTER
![]() Understanding Windows 11 notifications
Understanding Windows 11 notifications
![]() Using the notifications
Using the notifications
![]() Disabling notifications
Disabling notifications
![]() Using quick actions
Using quick actions
If you’ve ever used a moderately sentient smartphone or tablet, you already know about notifications and the notification center. Different devices do it differently, but the general idea is that the device monitors and gathers notifications — little warning messages or status reports — and then puts them in one place, where you can look at them and decide what to do from there.
In Windows 11, notifications are commonplace. The operating system sends you notifications, and so do many apps. Even websites can notify you when new articles are published. To make notifications manageable, Windows 11, like smartphones, gathers them into a dedicated center. Accessing and clearing notifications are easy. However, if you find notifications annoying or don’t want to be bothered while you work, you can use the focus assist feature to make them go away automatically.
Windows 11 also has some useful icons for turning on and off different features, such as Bluetooth and Wi-Fi. These too work as they do on a smartphone and serve a similar purpose too. The only difference is that these icons are called quick actions in Windows 11 and accessing them involves a different approach. But I’m here to help you figure everything out, aren’t I?
What, Exactly, Is a Notification?
A notification is a message accompanied by a brief sound that you receive from Windows 11 or an app, informing you when something happens. The notification can be about anything: Windows telling you that you just plugged in a USB memory stick and asking you to choose what to do with it; a new email message in the Mail app; or Microsoft Store telling you that it has updated an app on your PC. Even websites can send you notifications when new content is posted if you allowed them to do so in your web browser.
Notifications are shown in the bottom-right corner of the screen (see Figure 3-1) and may contain the following elements:
- A rectangular notice box, with the name and icon of the app or Windows feature sending the notification in the top-left corner.
- The contents of the notification. If it's an email, you see who sent the email, the subject (if any), and a portion of the message.
- Buttons for interacting with the notification. For example, an email has buttons so you can flag, archive, or dismiss the email. Some notifications, however, do not include buttons, such as a notification informing you that a Microsoft Store app was updated.
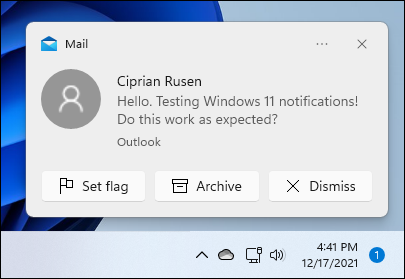
FIGURE 3-1: A new email notification in Windows 11.
When you click or tap a notification, it takes you to the app or Windows feature that sent it to you. For example, if you click or tap an email notification, the Mail app opens the email you received so you can read and reply to it. Other notifications, like one you see when you plug in an external USB drive, might ask you to decide what to do next. Make your choice, and the notification is gone.
Using the Notification Center
The place where notifications are stored is called the notification center. When it has notifications for you to see, a number is displayed in the bottom-right corner of the taskbar, next to the time and date. The number tells you how many unread notifications you have. If there are no new notifications for you to see, there is no number.
If you didn’t click or tap a notification when it was displayed in the bottom-right corner, you can view it later, alongside all the other notifications you ignored, like this:
In the bottom-right corner of the screen, click or tap the date and time.
You see a calendar of the current month, with a list of notifications on top.
Click or tap the downward-pointing arrow to the right of the current date.
You now see only the notification center, as shown in Figure 3-2.
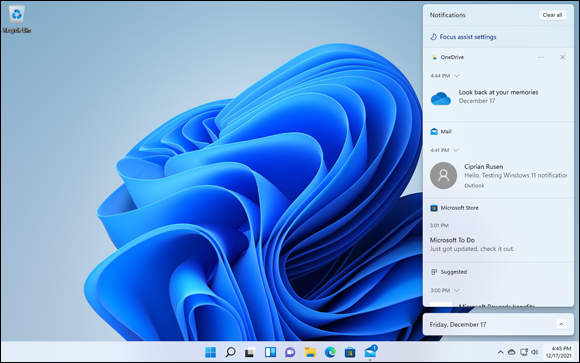
FIGURE 3-2: The notification center in Windows 11.
Hover the mouse cursor over a notification to see additional options for interacting with it.
For example, in Figure 3-3, the three dots icon (Settings) and the X appear to the right of the notification.
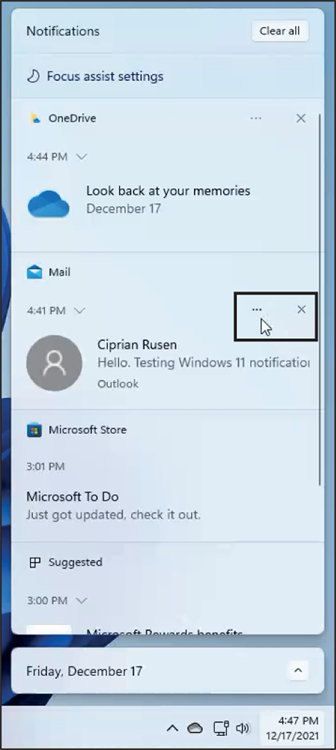
FIGURE 3-3: These options appear when you hover your cursor over a notification.
- To remove a notification, hover over it with the mouse, and click or tap the X to its right.
To expand a notification, click or tap the downward-pointing arrow below the name of the app displaying the notification.
Note the additional information (and buttons) displayed for the expanded notification, as shown in Figure 3-4.
When you no longer want to see the notifications, click or tap the Clear All button in the top right of the notification center.
This action clears all notifications from Windows 11, and leaves room for new ones. Also, the notification center closes because it has nothing left to display. If you click the time and date instead of Clear All, the notifications are kept but the notification center closes.
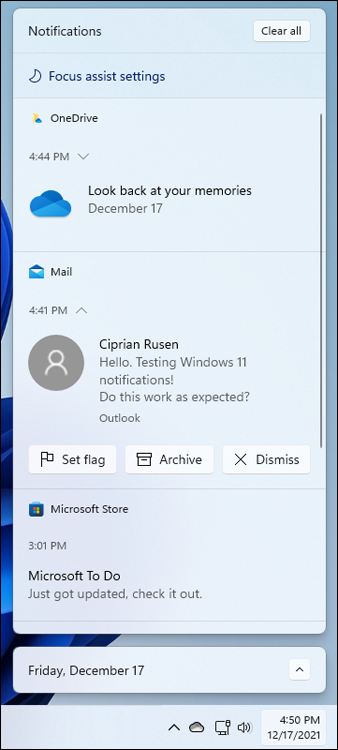
FIGURE 3-4: An expanded notification offers more information and interaction options.
Disabling Notifications
If a particular program is generating notifications that you don’t want to see, you can stop it from doing so. And if you consider all notifications annoying, you can disable them all easily.
Here’s how to disable notifications from a specific app or all notifications:
Right-click (or press and hold down on) the time and date on the taskbar.
The menu shown in Figure 3-5 appears.
Choose Notifications Settings.
The Notifications section of the Settings app appears, as shown in Figure 3-6.
To silence just one app, scroll down, find the app, and move its switch to off. To turn off all notifications from all apps, including Windows 11, click or tap the Notifications switch on the top off.
You’re finished. You can close Settings or minimize it and do something else.
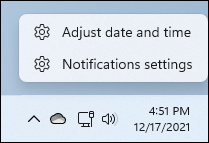
FIGURE 3-5: Accessing the Notifications settings.
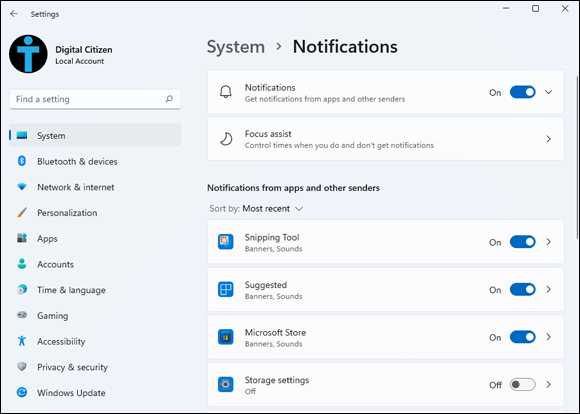
FIGURE 3-6: Silence notifications from individual apps.
 In Step 3, if you click or tap the name of an app instead of moving its switch, you get access to options for controlling how its notifications are displayed. For example, you can disable the sound played for each notification, change the number of notifications for that app visible in the notification center, set its priority, and more.
Enabling Focus Assist
Focus assist is a Windows 11 feature that helps you remain focused by censoring the display of notifications based on rules you set. For example, you can enable focus assist automatically each time you duplicate your screen because you want to deliver a presentation, when you're playing a game, or when you're using an app in full-screen mode (such as PowerPoint). Last but not least, you can enable focus assist during a specific interval each day, such as when you are writing a book and don’t want to be bothered by pesky notifications.
Here’s how to configure focus assist in Windows 11:
Right-click (or press and hold down on) the time and date on the taskbar and choose Notifications Settings.
The Notifications section of the Settings app appears (refer to Figure 3-5).
Click or tap Focus Assist.
The Focus Assist settings appears, as shown in Figure 3-7.
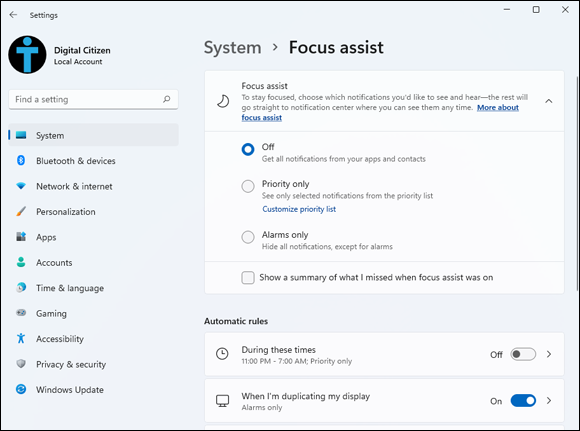
FIGURE 3-7: Focus Assist settings.
In the Focus Assist section, choose Alarms Only.
While focus assist is active, Windows 11 will hide all notifications and only display alarms (if any have been set).
In the Automatic Rules section, click or tap During These Times. Then click or tap the switch to turn it on.
Several settings are now displayed below the switch, as shown in Figure 3-8.
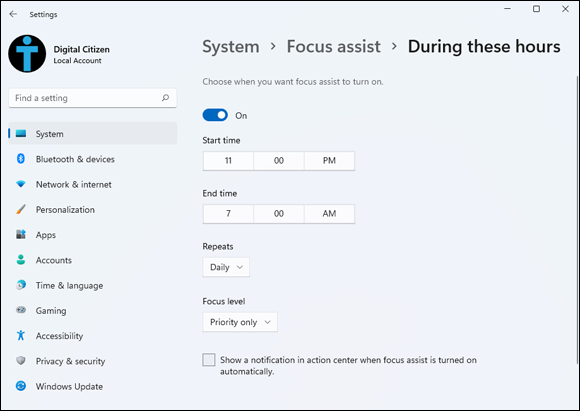
FIGURE 3-8: Choose when you want Focus Assist to turn on.
Set the start and end times.
It's a good idea to choose an interval when you tend to do most of your work.
- Click or tap Repeats and choose Daily, Weekends, or Weekdays.
Click or tap Focus Level and choose Alarms Only.
You will now see only alarms, not notifications.
Close the Settings window.
Focus assist is now enabled during the days and times you chose, limiting your exposure to annoying notifications.
Using Quick Actions
If you click or tap the volume, battery, or network icon in the bottom-right corner of the Windows 11 desktop, you'll see a readily accessible pane with quick actions, as shown in Figure 3-9. You can think of a quick action as a handy shortcut to a frequently adjusted setting, such as the screen’s brightness, the sound volume, Bluetooth, or Wi-Fi. Quick actions mimic what you would find on a smartphone — airplane mode is an obvious example. In some cases, a quick action displays a Settings page or a pane with more options or toggles a specific setting.
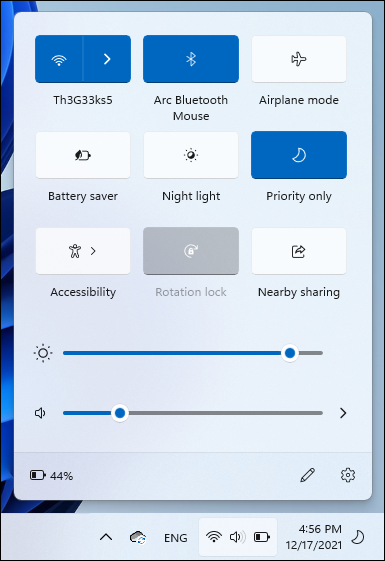
FIGURE 3-9: Quick actions are handy shortcuts to frequently adjusted settings.
The quick actions available vary on whether you're using a desktop PC, laptop, tablet, or 2-in-1, the device's hardware configuration, and the apps installed. For example, if Spotify is installed, you may also see some controls for the music you play, allowing you to pause the current song or skip to the next one.
Unfortunately, you can’t add your own quick actions, but you can control which quick actions are displayed. Here’s how to exert as much influence as possible:
Click or tap the network, volume, or battery icon.
Clicking any of them does the same thing, so it doesn’t matter which one you choose. The quick actions appear on the right side of the screen.
Click or tap the edit icon (pencil).
All quick actions become editable, as shown in Figure 3-10.
To move an icon for a quick action, just click and drag it where you want (or tap and hold down on the icon while dragging).
You can’t drag a quick action off the grid.
- To add quick action icons, click or tap the Add+ button, and make a selection from the list that appears.
- To remove a quick action icon, click or tap its pin in the top right.
- When you've set things the way you want them, click or tap Done.
Table 3-1 explains what each configurable quick action icon does.
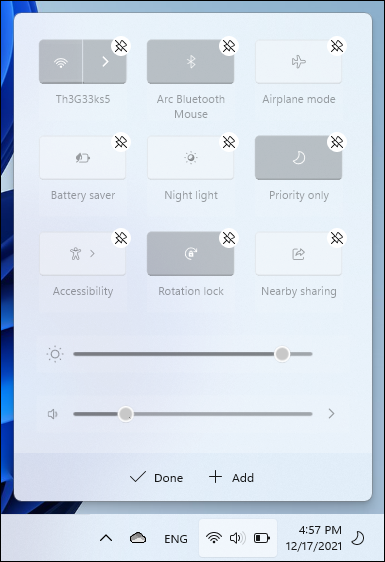
FIGURE 3-10: Editing the list of quick actions.
TABLE 3-1 Quick Actions and What They Do
Click or Tap This Icon | And This Happens |
|---|---|
Accessibility | Turns on or off different accessibility tools such as Magnifier, Color Filters, Narrator, Mono Audio, and Sticky Keys. |
Airplane mode | Turns all wireless communication on and off. See the Settings app’s Network & Internet, Airplane Mode setting. |
Battery saver | Cycles between two battery saver modes, dimming the display. It doesn’t work if the laptop or tablet is plugged in. |
Bluetooth | Turns Bluetooth on or off. |
Brightness | Adjusts the screen brightness to the level you want. |
Cast | Searches for wireless display and audio devices to project to — Miracast in particular. |
Focus assist | Turns focus assist on or off. When turned on, all notifications are blocked. |
Keyboard layout | Switches between multiple keyboard languages or layouts. |
Project | Projects the image on your screen to an external display or a projector. |
Rotation lock | Prevents the screen from rotating from portrait to landscape and vice versa. |
Volume | Adjusts the screen's sound volume to the level you want. |