Chapter 9
Browsing with Safari
IN THIS CHAPTER
![]() Connect to the Internet
Connect to the Internet
![]() Navigate web pages and tabs
Navigate web pages and tabs
![]() Organize your searches with tab groups
Organize your searches with tab groups
![]() View history and search the web
View history and search the web
![]() Use bookmarks
Use bookmarks
![]() Download files
Download files
![]() Translate web pages
Translate web pages
You can get on the Internet with your iPad by using its Wi-Fi or cellular capabilities. After you’re online, the built-in browser (software that helps you navigate the Internet’s contents), Safari, is your ticket to a wide world of information, entertainment, education, and more. Safari will look familiar to you if you’ve used a web browser on a PC or Mac computer, though the way you move around by using the iPad touchscreen may be new to you. If you’ve never used Safari, don’t worry because I take you by the hand and show you all the basics of making it work for you.
In this chapter, you see how to go online with your iPad, navigate among web pages, and use iCloud tabs to share your browsing experience between devices. Along the way, you see how to place a bookmark for a favorite site and create a tab group, a feature new to iPadOS 15. You can also view your browsing history, save online images to the Photos app, search the web, or email or tweet a link to a friend. Finally, you explore how to translate web pages so that you can read what’s going on around the world, even if you may not speak the language.
Connect to the Internet
How you connect to the Internet depends on which types of connections are available:
You can connect to the Internet via a Wi-Fi network. You can set up this type of network in your own home using your computer and some equipment from your Internet provider. You can also connect over public Wi-Fi networks, referred to as hotspots.
 You might be surprised to discover how many hotspots your town or city has. Look for Internet cafes, coffee shops, hotels, libraries, and transportation centers (such as airports or bus stations). Many of these businesses display signs alerting you to their free Wi-Fi.
- You can use the paid data network provided by AT&T, Sprint, T-Mobile, Verizon, or almost any other cellular provider to connect from just about anywhere you can get coverage through a cellular network. Of course, you have to have an iPad model that supports cellular connections to hop on the Internet this way.
To enable cellular data (if your iPad supports it), tap Settings and then tap Cellular. Tap to toggle the Cellular Data switch On (green).
Browsing the Internet using a cellular connection can eat up your data plan allotment quickly if your plan doesn’t include unlimited data access. If you think you’ll often use the Internet with your iPad away from a Wi-Fi connection, double-check your data allotment with your cellular provider or consider getting an unlimited data plan.
To connect to a Wi-Fi network, you have to complete a few steps:
- Tap Settings on the Home screen and then tap Wi-Fi.
Be sure that the Wi-Fi toggle switch is set to On (green) and choose a network to connect to by tapping it.
Network names should appear automatically when you’re in range of them. When you’re in range of a public hotspot, if access to several nearby networks is available, you may see a message asking you to tap a network name to select it. After you select a network, you may see a message asking for your password. Ask the owner of the hotspot (for example, a hotel desk clerk or business owner) for this password or enter your own network password if you’re connecting to your home network. Free public Wi-Fi networks usually don’t require passwords, or the password is posted prominently for all to see. (If you can’t find the password, don’t be shy about asking someone.)- Tap the Join button when prompted. Once done, you’re connected! Your iPad will now recognize the network and connect without repeatedly entering the password.
After you connect to public Wi-Fi, someone else can possibly track your online activities because these are unsecured networks. Avoid accessing financial accounts, making online purchases, or sending emails with sensitive information in them when connected to a public hotspot.
Explore Safari
Safari is your iPad's default web browsing app.
This is not the Safari of old. If you’re familiar with versions of Safari prior to this one, enough has changed in iPadOS 15 to warrant your time perusing this chapter.
You can change your iPad’s default browser from Safari to another you’ve downloaded. Go to Settings, find and tap the name of any browser in the left sidebar (for example, Safari, Chrome, or Edge), tap Default Browser App, and then tap the name of the browser you want to use as default.
Here’s how to get around in Safari:
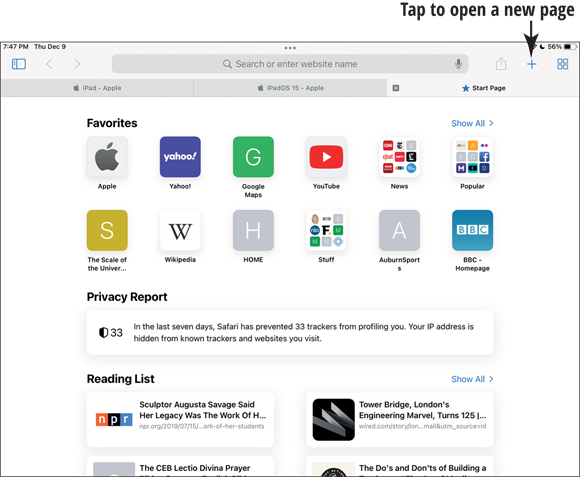
- After you’re connected to a network, tap Safari on the Dock at the bottom of the Home screen. Safari opens, possibly displaying the Apple iPad home page the first time you go online (see Figure 9-1).
Put two fingers together on the screen and spread them apart to expand the view (also known as zooming in). Place your fingers on the screen about an inch or so apart and quickly bring them together to zoom back out. You can also double-tap the screen with a single finger to restore the default view size. (If you tap a link, though, your gesture will just open that link.)
Using your fingers on the screen to enlarge or reduce the size of a web page allows you to view what’s displayed at various sizes, giving you more flexibility than the double-tap method.- Put your finger on the screen and flick (or swipe, as some call it) upward to scroll down on the page.
- To return to the top of the web page, put your finger on the screen and drag downward, or tap the status bar at the very top of the screen twice.
When you zoom in, you have more control by using two fingers to drag from left to right or from top to bottom on the screen. When you zoom out, one finger works fine for making these gestures.
Navigate Web Pages
Web pages are chock-full of information and gateways to other web resources. To navigate the landscape of web pages in Safari:
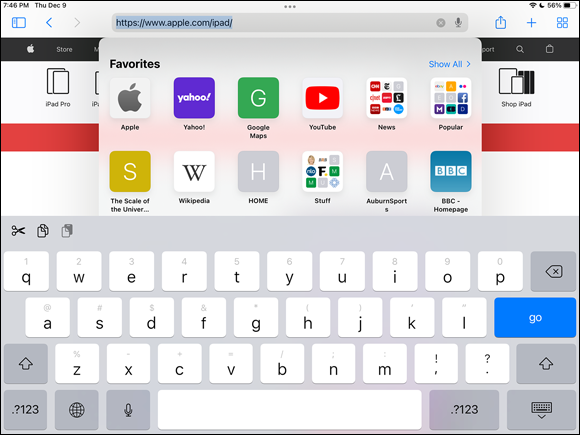
- Tap in the Address field at the very top of the screen and the onscreen keyboard appears (see Figure 9-2).
- Enter a web address; for example, you can go to
www.dummies.com. - Tap the Go key on the keyboard (see Figure 9-2). The website appears.
- If a page doesn’t display properly, tap the Reload button at the right end of the Address field.
- If Safari is loading a web page and you change your mind about viewing the page, you can stop loading the page. To stop loading the page, tap Cancel (looks like an X), which appears at the right end of the Address field during this process.
- Tap the Previous button (looks like <) in the upper-left corner to go to the last page you displayed.
- Tap the Next button (looks like >) in the upper-left corner to go forward to the page you just backed up from.
- To follow a link to another web page (links are typically indicated by colored text or graphics), tap the link with your finger.
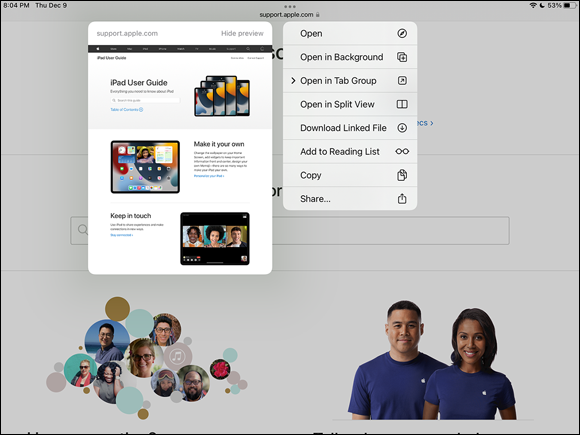
To preview the destination of the link before you tap it, just touch and hold the link. A menu appears next to a preview of the site, as shown in Figure 9-3. Choose an option from the menu to proceed, or tap anywhere outside the menu to close it and the preview window.
Use Tabbed Browsing
Tabbed browsing is a feature that allows you to have several websites open at one time so that you can move easily among those sites.
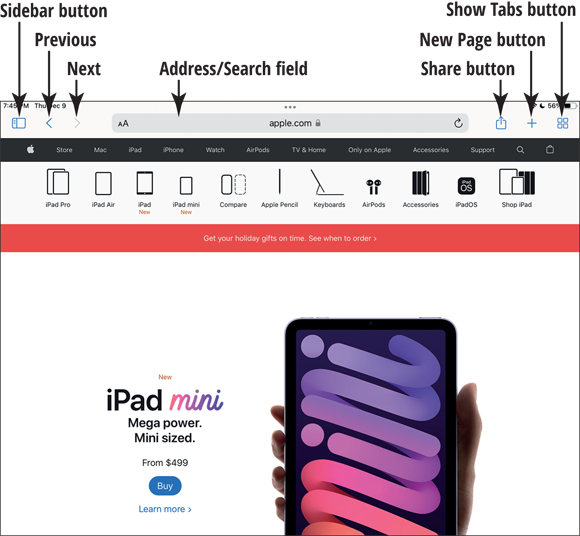
- With Safari open and a web page already displaying, tap the Show Tabs button in the upper-right corner (refer to Figure 9-1). The Tab view appears.
To add a new page (meaning that you’re opening a new website), tap the New Page button (shaped like a plus sign [+]) in the upper right of the screen (see Figure 9-4). A page appears with your favorite or currently open sites and an address bar.
You can get to the same new page by simply tapping in the address bar from any site.Tap in the Address field and use the onscreen keyboard to enter the web address for the website you want to open. Tap the Go key. The website opens on the page.
Repeat Steps 1 to 3 to open as many new web pages as you’d like.You can now switch among open sites by tapping outside the keyboard to close it and tapping the Show Tabs button and scrolling among recent sites. Find the one you want and then tap it.
You can easily rearrange sites in the tabs window. Just press and hold the tab you want to move and then drag it to the right or left in the list until it’s in the spot you’d like it to be (the other sites in the window politely move to make room). To drop it in the new location, simply remove your finger from the screen.- To delete a tab, tap the Show Tabs button, scroll to locate the tab, and then tap the Close button in the upper-right corner of the tab (looks like an X; it may be difficult to see on some sites, but trust me, it’s there). Tap the Done button in the upper-right corner to close the Tabs view.
Organize with Tab Groups
The new tab groups feature in iPadOS 15 enables you to keep similar tabs together so that they’re easier to organize and find. This feature is especially helpful if you’re someone who likes to keep a million tabs open at one time; tab groups keep you from having to swipe until your fingers bleed to find the site tab you’re looking for.
- With Safari open, tap the Sidebar button in the upper-left corner (refer to Figure 9-1).
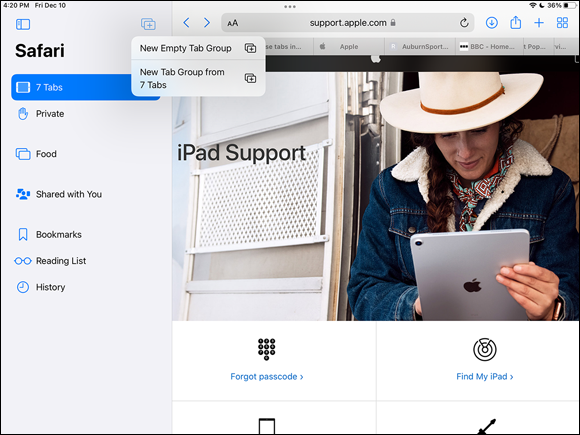
In the sidebar, tap x Tabs, where x represents the number of open tabs.
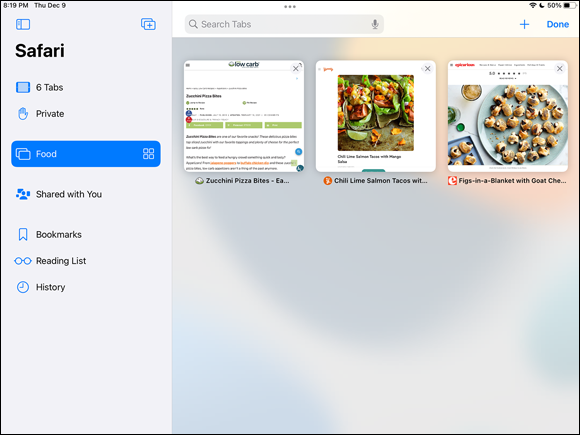
Figure 9-5 shows that I have seven open tabs in Safari.
- In the sidebar, you can do any of the following:
- Tap a group to open it (such as my group, Food, in Figure 9-5).
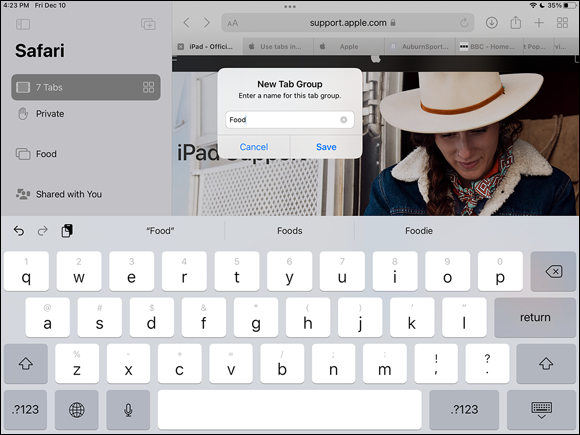
- To create a new group, tap the Tab Groups button in the upper right of the sidebar; then tap New Empty Tab Group (see Figure 9-5). You’ll be prompted to give it a descriptive name (like Food in Figure 9-6). Tap Save to finish.
- To create a tab group from the tabs you currently have open, tap New Tab Group from x Tabs (see Figure 9-5). Again, give the new group a descriptive name to help you stay organized; then tap Save.
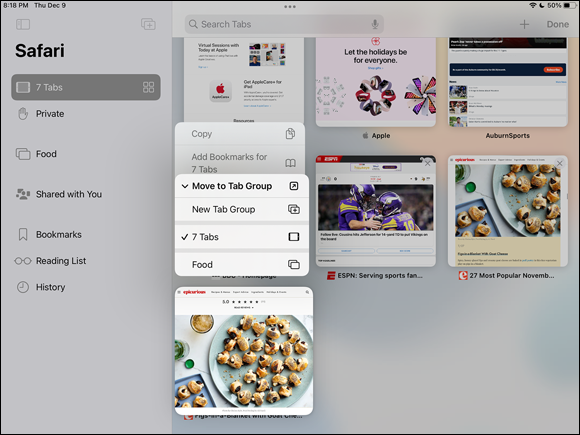
- To move a site to a tab group:
- Tap the Show Tabs button in the upper right of the Safari window.
- Press and hold the tab for the site you want to move until a menu opens.
- Tap the Move to Tab Group option.
- Tap the name of the group you want to move the site to (see Figure 9-7) and it will join that tab group (see Figure 9-8).
View Browsing History
As you move around the web, your browser keeps a record of your browsing history. This record can be handy when you want to visit a site that you viewed previously but whose address you’ve now forgotten.
To view your browsing history:
With Safari open, tap the Sidebar button in the upper-left corner, and then tap the History button in the sidebar.
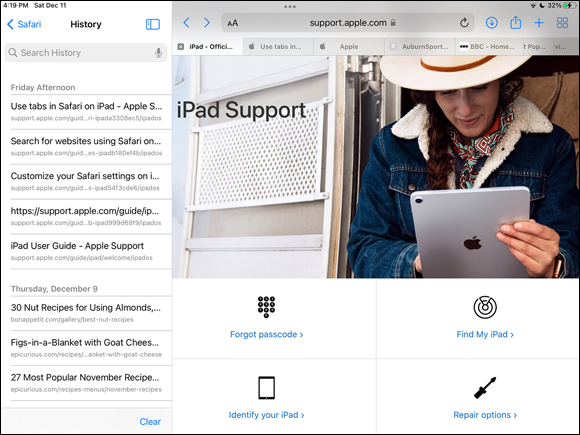
You might prefer a shortcut to view your History list. Tap and hold the Previous button at the upper left on any screen, and your browsing history for the current session appears. You can also tap and hold the Next button to look at sites you backtracked from.- In the History list that appears (see Figure 9-9), tap a site to navigate to it.
- Tap the Safari button in the upper-left corner to leave History and return to the sidebar, or tap the Sidebar button to close the sidebar altogether.
To clear the history, tap the Clear button in the bottom of the History list (refer to Figure 9-9), and on the screen that appears, tap an option: The Last Hour, Today, Today and Yesterday, or All Time. This button is useful when you don’t want your spouse or grandchildren to see where you’ve been browsing for anniversary, birthday, or holiday gifts!
Search the Web
If you don’t know the address of the site that you want to visit (or you want to research a topic or find other information online), get acquainted with Safari’s Search feature on your iPad. By default, Safari uses the Google search engine.
To search the web:
With Safari open, tap in the Address field (refer to Figure 9-1). The onscreen keyboard appears.
To change your default search engine from Google to Yahoo!, Bing, DuckDuckGo, or Ecosia, go to the Home screen and tap Settings, tap Safari, and then tap Search Engine. Tap Yahoo!, Bing, DuckDuckGo, or Ecosia, and your default search engine changes.- Enter a search term. With recent versions of Safari, the search term can be a topic or a web address because of what’s called the unified smart search field. You can tap one of the suggested sites or complete your entry and tap the Go key (see Figure 9-10) on your keyboard.
- In the search results that are displayed, tap a link to visit that site.

Add and Use Bookmarks
Bookmarks are a way to save favorite sites so that you can easily visit them again.
To add and use bookmarks:
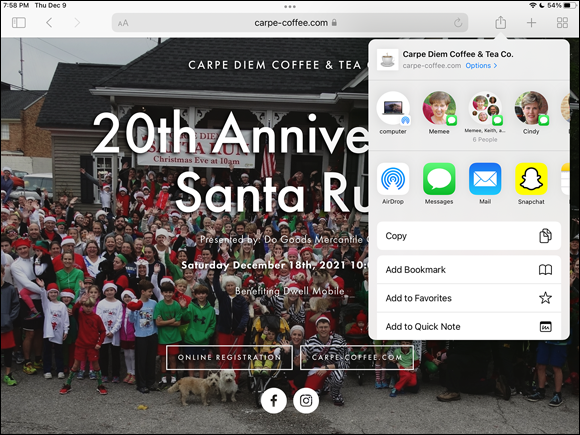
With a site open that you want to bookmark, tap the Share button in the upper-right of the screen (which looks like a box with an upward-pointing arrow).
If you want to sync your bookmarks on your iPad browser, open the Settings app on your iPad and make sure that iCloud is set to sync with Safari.- On the menu that appears (see Figure 9-11), tap Add Bookmark. (You may need to swipe up the window to see it.)
- In the Add Bookmark dialog, shown in Figure 9-12, edit the name of the bookmark if you want. Tap the name of the site and use the onscreen keyboard to edit its name.
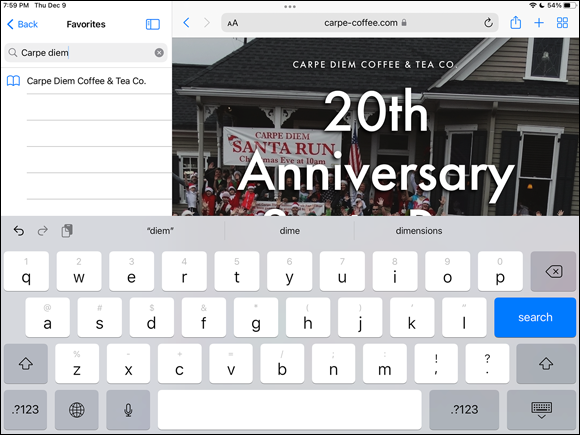
- Tap the Save button in the upper-right corner of the Add Bookmark dialog. The item is saved to your Favorites by default, but you can select a different location by tapping Favorites and then tapping the preferred location.
- To go to the bookmark, tap the Sidebar button in the upper left, and then tap the Bookmarks button in the sidebar.
- In the Bookmarks list that appears, find and tap the bookmarked site that you want to visit. (Use the Search field in the Bookmarks list if you need to.) In Figure 9-13, I’ve searched for and found the site I bookmarked back in Step 3 (it’s found under Favorites, which is a subsection of the Bookmarks list).

When you tap the Bookmarks button and the Bookmarks list opens, you can tap Edit in the lower right of the Bookmarks list and then use the New Folder option (in the lower left) to create folders to organize your bookmarks or folders. When you next add a bookmark, you can then choose, from the dialog that appears, any folder to which you want to add the new bookmark.
You can reorder your bookmarks quite easily. Tap the Bookmarks button to open the Bookmarks list, tap the Edit button (lower right of the list), find the bookmark you’d like to rearrange, press and hold the three parallel lines to the right of the bookmark, and then drag the bookmark up and down the list, releasing it after you get to the place you’d like it to reside. You can also delete bookmarks from the same screen by tapping the red circle to the left of a bookmark and then tapping the red Delete button that appears to the right. Tap Done at the bottom of the Bookmarks list when finished.
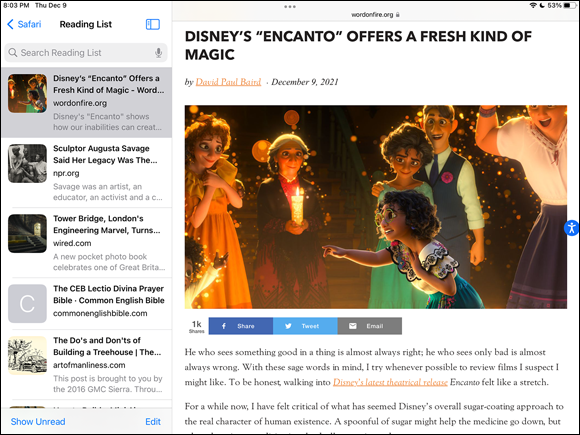
Save Links and Web Pages to Safari Reading List
The Safari Reading List provides a way to save content that you want to read at a later time so that you can easily call up that content again. You essentially save the content rather than a web page address, which allows you to read the content even when you’re offline. You can scroll from one item to the next easily.
To save content to the Reading List, follow these steps:
- Displaying a site that you want to add to your Reading List, tap the Share button.
- On the menu that appears (refer to Figure 9-11), tap the Add to Reading List button (you may need to swipe down to see it). The site is added to your Reading List.
To view your Reading List, tap the Sidebar button in the upper-left corner and then tap the Reading List button in the sidebar (the eyeglasses icon).
If you want to see both the Reading List material you’ve read and the material you haven’t read, tap the Show Unread button in the bottom-left corner of the Reading List. To see all reading material, tap the Show All button.- On the Reading List that appears (see Figure 9-14), tap the content that you want to revisit and resume reading.
To delete an item, with the Reading List displaying, swipe from right to left on an item; a red Delete button appears to the right. Tap this button to delete the item from the Reading List. To save an item for offline (when you’re not connected to the Internet) reading, tap the Save Offline button when you swipe. You can also swipe the item from left to right to mark it as read or unread.
Enable Private Browsing
Apple has provided some privacy settings for Safari that you should consider using.
Private Browsing automatically stops Safari from using AutoFill to save information used to complete certain entries as you type, and erases some browsing history information. This feature can keep your online activities more private. To enable Private Browsing:
- Tap the Sidebar button in the upper-left corner.
- Tap Private in the sidebar; you’re now in Private Browsing Mode.
- Tap the x Tabs button (the x here stands for the number of tabs you have open) or a Tab Group in the sidebar to exit Private Browsing.
Download Files
iPadOS 15 includes Download Manager for Safari to help you efficiently download files from websites and store them to a location of your choosing. You can choose to store downloaded files on your iPad or in iCloud.
Set the default download location for files you download in Safari. Go to Settings ⇒ Safari ⇒ Downloads and tap the location you want to use.
- Open a site in Safari that contains a file you’d like to download.
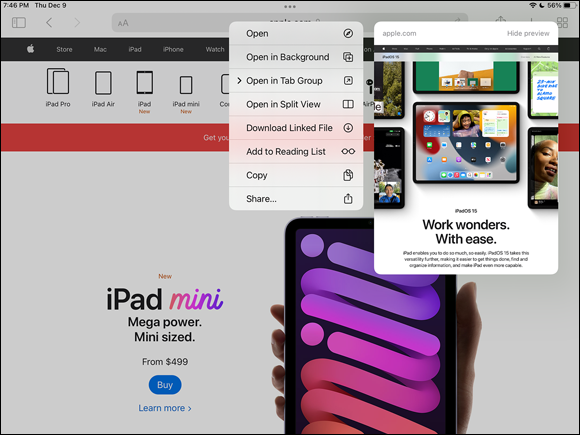
- Tap and hold the link for the file until a menu like the one in Figure 9-15 appears.
- Tap Download Linked File to download the file to your iPad, iCloud, or another destination.
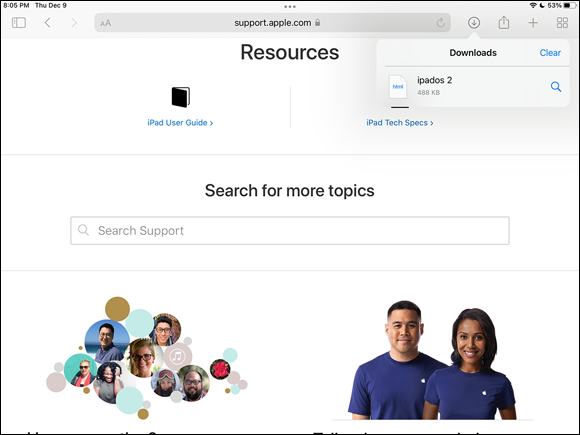
- The Download Manager button (a circle containing a downward-pointing arrow) appears to the right of the address field at the top of the screen (see Figure 9-16). Tap it to see the progress of the download. If the download is finished, tap it in the Downloads menu to open it, or tap the magnifying glass button to see where the file is stored.
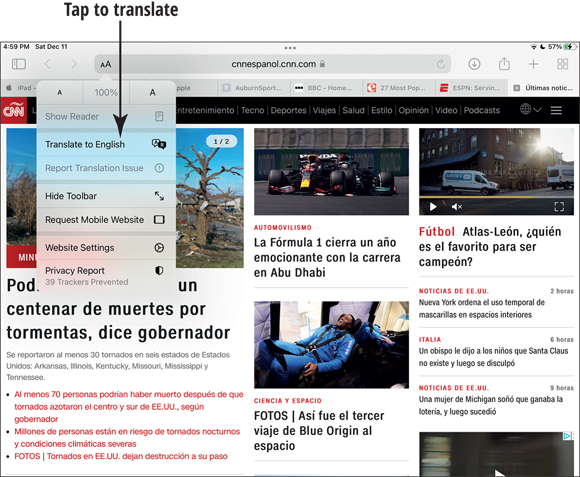
Translate Web Pages
iPadOS 14 introduced a great new trick: web page translation! Visit a compatible web page, and Safari can translate it into several languages (with more sure to come): English, Spanish, Brazilian Portuguese, Simplified Chinese, German, Russian, and French.
- Open a site in Safari that's in a language you’d like to translate.
Tap AA in the URL field (see Figure 9-17), and then tap the Translate To option. If you don’t see this option, Safari is unable to translate the site.
The page is translated into the language you selected.