
Chapter 2
Configuring Server Hardware
IN THIS CHAPTER
![]() Working with Device Manager
Working with Device Manager
![]() Adding new hardware with the Add Hardware Wizard
Adding new hardware with the Add Hardware Wizard
![]() Configuring hard drives and performing other storage-related tasks
Configuring hard drives and performing other storage-related tasks
![]() Completing printer-related setup and configuration tasks
Completing printer-related setup and configuration tasks
![]() Performing other configuration tasks
Performing other configuration tasks
Whenever you’re working with a brand-new server, and sometimes when you’re working with an older one, you’ll have configuration tasks you need to perform. Some of these tasks are related to the operating system and the applications you want to install; others are related to the server hardware.
When you first install a new server, one of the first things that you’ll want to do is verify that all the hardware is functional. This means checking to ensure that there is a driver present for each piece of hardware and that none of the devices is having issues.
With an older server that is having issues, you need to be able troubleshoot whether the hardware is the issue. This is especially important if the software has not been changed, but the server has suddenly started freezing, crashing, or performing slowly.
In this chapter, I walk you through some different methods of working with server hardware and explain your options.
Working with Device Manager
Device Manager has been front and center for working with hardware in Windows operating systems for a very long time. In fact, it was introduced for the first time to the Windows Server operating system with Windows Server 2000. Its strength comes from its simple interface that makes it very easy to spot hardware devices that are having difficulties. Icons next to each section and driver tell you at a glance if there is an issue with a device in that section and which device is having the issue. Here are the icons you may run into:
- An orange triangle with an exclamation point in the middle: Indicates that the device is having a problem. It may still be functioning but should be checked out.
- A white circle with a black arrow pointing down: The device is disabled. You can enable the device by right-clicking the device and choosing Enable Device.
- A white circle with a lowercase i in blue: This does not mean there is a problem of any kind. Instead, it indicates that the device was manually configured and is not using Use Automatic Settings.
- A white circle with a blue question mark: This means that a driver has been installed that should be compatible with the device, but it is not the device’s intended driver, because that driver could not be located.
Opening Device Manager
There are multiple methods to open Device Manager. In this section, I present one of the shortest methods to open it. Microsoft simplified getting to many of the administrative tools that are commonly used on the Windows Server operating system, and this is one of those tools.
- Right-click the Start menu.
Select Device Manager from the menu.
Device Manager looks similar to Figure 2-1.
Configuring how Device Manager displays
The View menu in Device Manager gives you different ways to visualize the hardware in your system. You can logically group your hardware in different ways that make sense to you, which can make it easier to troubleshoot.
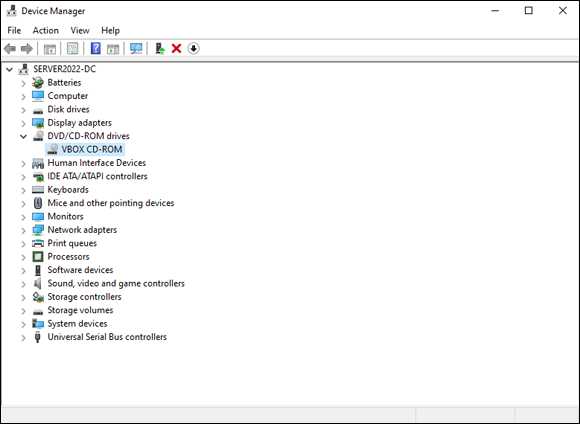
FIGURE 2-1: Device Manager on Windows Server 2022 will look familiar to those who have worked with Windows in the past.
When you choose the View menu, you have the following options:
- Devices by Type: This groups the hardware logically by the type of hardware. For instance, if your server has multiple network interface cards, they will all be grouped under Network Adapters. If you have multiple hard drives, they’ll be grouped under Disk Drives. This is the default view that Device Manager opens up to.
- Devices by Connection: The devices in your server are able to do their jobs because they’re all connected to each other somehow. This view sorts them by how they’re connected. Many of your storage devices and network adapters will show up under the PCI Bus because that’s typically how they’re connected.
- Devices by Container: This view groups devices by container IDs. These container IDs may be assigned to the device, or the device may inherit a container ID from a parent object. For instance, one of the parent containers is your server. Some of the items grouped under that container may be communications ports, ATA channels, processor cores, and so on.
- Resources by Type: This view will sort all your server’s devices into resource types. The types are direct memory access, input/output, interrupt request, and memory. I discuss these in more detail in this chapter, in the “Understanding resources” section.
- Resources by Connection: This view sorts your system’s resources by how they’re connecting and interacting with one another. This view was very helpful back when it was common to have to research interrupt request (IRQ) conflicts but may not be as widely used now.
You can also customize what information you’re shown in Device Manager. Choose View⇒ Customize and the Customize View dialog box appears (see Figure 2-2). From here, you can change which items are displayed to you. I’ve never really had a good reason to change from the default view.
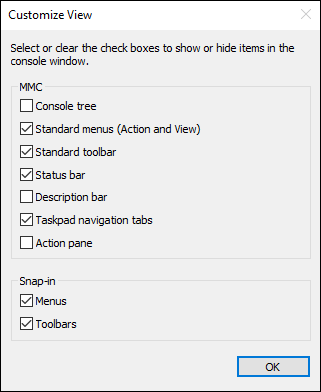
FIGURE 2-2: Customizing your Device Manager view.
Viewing devices that are not working properly
Typically, if a device is broken, it will show up in one of two ways:
- If the device is having issues but is still somewhat functional, it will have an orange triangle on it with an exclamation point in the middle.
- If the device is not working at all and has a white circle with a black downward-facing arrow, that means the device is disabled.
When you have a device that’s having an issue, it will automatically be expanded in Device Manager when you open it. That makes it much simpler for you as the system administrator to find the device that’s having problems. In Figure 2-3, you can see I have a device with an issue. The DVD/CD-ROM drive is disabled, which is evident because you can see the downward-facing arrow next to its name.

FIGURE 2-3: Device Manager makes it simple to identify devices with problems.
The DVD/CD-ROM can be re-enabled to see if it’s having issues. I can simply right-click it and choose Enable Device. In my case, it will function properly because I disabled it to take the screenshot.
When I view the Properties screen for a broken device, I can find out more about what the issue is. In the case of a missing driver, I can have Windows automatically search to see if it’s able to find a compatible device. Most often this will fix the problem. If not, then your best bet is to go to the vendor’s website to download the drivers manually.
Understanding resources
Understanding the resources that are represented in Device Manager can be very helpful when troubleshooting technical issues on the system. In some cases, like input/output (IO) and IRQ, having duplicate addresses can cause issues with devices. The devices may stop working or may cause your system to freeze or crash.
If you’ve gone through the content for the A+ certification, this section will probably be old news and you can feel free to skip it. If you haven’t worked on your A+ certification yet, or you’re new to servers and computing, read on!
Direct memory access
Direct memory access (DMA) allows attached devices to communicate directly to the memory, taking the central processing unit (CPU) out of the equation as the middleman. This can speed up communication significantly. Typically, around 16MB of memory can be used for DMA.
Input/output
I/O, at its simplest, is defined as any device that can transfer data to or from your server. This could include input devices like keyboards and mice, output devices like printers and monitors, and other devices that are capable of both input and output (like disk drives). In the context of Device Manager, on the Resources tab you can see which I/O addresses have been assigned to specific devices by looking at I/O Range.
Interrupt request
An IRQ is essentially a signal sent to your CPU that “interrupts” what it’s doing so that the device or software that sent the interrupt can get attention. This is used to support multitasking as the processor is told when it’s needed, instead of having the CPU ask (poll) while it’s idle. Interrupts are assigned to specific devices and are not shared. If two devices have the same IRQ, you’ll get an IRQ conflict. This used to be an issue that system administrators needed to be aware of, but because most devices today are plug and play, it’s not really an issue most system administrators have to work on.
Memory
Random access memory (RAM) is great for loading things quickly because it’s a solid state technology. In Device Manager, you can view the memory ranges that are assigned to the individual devices under the Resources tab for each device.
Viewing hidden devices
Sometimes devices aren’t visible in Device Manager when you first open it. Devices that are not currently connected and devices that are not plug and play are examples of devices that won’t show up in Device Manager by default.
For devices that are not plug and play, choose View⇒ Show Hidden Devices. This causes the non-plug-and-play devices to show up.
To view devices that were once installed but are no longer attached to the server, you need to open a Command Prompt or PowerShell window as an administrator and enter the following command:
SET DEVMGR_SHOW_NONPRESENT_DEVICES=1
Then in the same window, launch Device Manager by typing devmgmt.msc. When Device Manager opens, choose View⇒ Show Hidden Devices. You see “ghost” entries for the devices that once existed. This is helpful if old device drivers are causing issues with new devices or applications because you can remove them when you can see them.
Scanning for new devices
If you’ve installed a new device but it isn’t showing up in Device Manager, you can start a scan for new hardware by choosing Action⇒ Scan for Hardware Changes. This will scan for new hardware, and if it locates it, attempt to locate and install a driver for the hardware.
Working with older devices
As a system administrator, you may be asked to install a device that is older and not recognized by the computer when it’s plugged in. For these non-plug-and-play devices, your best bet is to use the Add Legacy Hardware option in Device Manager. You can get to it by choosing Action⇒ Add Legacy Hardware from inside the Device Manager window.
Viewing individual device settings
While in Device Manager, viewing the settings of individual devices is simple. You can double-click the device, or you can right-click the device and choose Properties. On most devices, you have a minimum of four tabs:
General: The General tab (shown in Figure 2-4) contains basic information regarding the device, such as the name of the device, the type of device, who manufactured it, and the device’s location on the system.
 One of my favorite parts of this tab is the Device Status box at the bottom. If you’re troubleshooting an issue, the Device Status box can be very helpful. When your device is working properly, it will look like what you see in Figure 2-4.
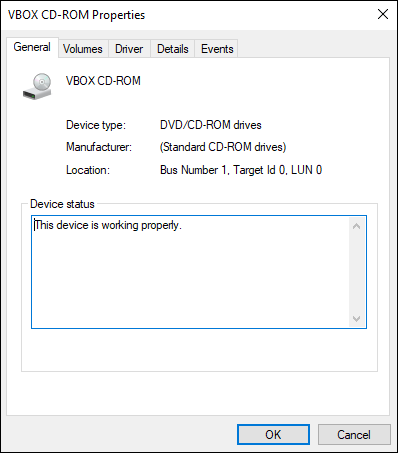
FIGURE 2-4: The General tab for a VirtualBox CD-ROM drive.
Driver: The Driver tab gives you information regarding the installed driver and allows you to perform several driver-related management tasks. It starts out with the name of the driver and then lists the provider of the driver, the date the driver was made available, the version of the driver, and if the driver is signed it includes the identity of the organization that signed it.
The following buttons allow you to manage the drivers on your system from this tab:
- Driver Details: Provides more details regarding the driver, including where the driver files live and what their names are.
- Update Driver: You can click this button to update your drivers. You’re given two options. You can search automatically for updated drivers, which searches your system and the Internet for updates, or you can browse to the driver software if you know where the updated drivers are located on your system.
- Roll Back Driver: Say you updated you driver, and now your device isn’t working properly. You can click Roll Back Driver to go back to the previously installed driver.
- Disable Device: Clicking Disable Device disables the device in Device Manager. When you disable a device, the icon next to the device name will have a downward-facing arrow indicating that it is currently disabled.
- Uninstall Device: If you need to uninstall the device altogether, you can press this button. This option is useful for removing stale drivers that weren’t removed when hardware was uninstalled, for removing drivers that have become corrupted, or for manually removing device drivers that are causing stability issues on your system.
- Details: The Details tab doesn’t look like much when you first click it, but it actually contains a wealth of information regarding your device. By default, the drop-down box will have Device Description selected, but you can choose from many other properties to get more information on the specifics of your device.
- Events: The Events tab contains events that have occurred to the specific device. On a new system, there won’t be much to look at — you have the initial Device Started and Device Configured entries. If the server has been around for a while and you’re trying to troubleshoot an issue, click View All Events, and the Event Viewer appears with a custom filter so that you can look at events specific to the device.
Some devices have additional tabs that add further management capabilities, such as Power Management and Resources. Power Management gives you the ability to allow the computer to shut off a device to conserve power, or allow the device to wake the computer if it’s in Sleep mode. The Resources tab, when it’s available, tells you which memory ranges a device is using, which IRQ it’s using, and if there are any conflicting devices.
Updating drivers
Updating drivers from Device Manager is pretty simple. You have two options: You can right-click the device and choose Update Driver, or you can right-click the Device, choose Properties, and click the Drivers tab.
After you select Update Driver through either method, you see the dialog box shown in Figure 2-5. Here, you’re presented with the choice to search automatically for the driver or browse the computer for the software. Searching automatically is typically the easiest method; it searches the local computer and then searches the Internet for updated drivers. If for some reason it isn’t able to locate the drivers and you know where they’re located, choosing to browse your computer for the driver software may be the best option.
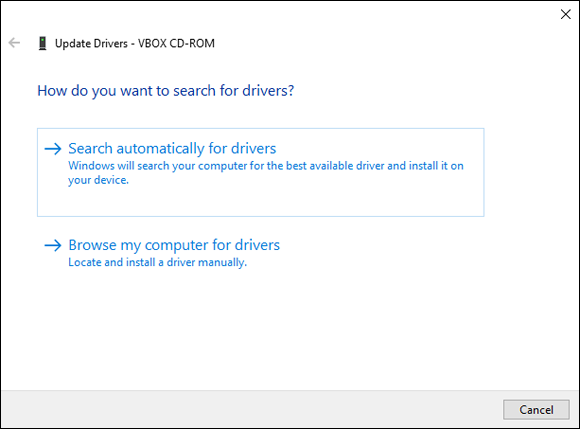
FIGURE 2-5: You have two options when updating drivers in Windows Server 2022 through Device Manager.
Configuring power management
Some of the devices in Device Manager have a Power Management tab. This tab lets you configure the behavior of the device in regards to — wait for it — power management. You have two or three options, depending on what the device is:
- Allow the Computer to Turn Off This Device to Save Power: This option is most useful on devices that will run off battery power like laptops. You most likely don’t want components of your server to turn off, though, so you may want to uncheck this box.
- Allow This Device to Wake the Computer: A device with this check box selected is able to wake the server if it has gone to sleep. This feature is used by network cards that need to be able to wake a server for patching, and by input devices like mice and keyboards so that they can wake up the attached system.
- Only Allow a Magic Packet to Wake the Computer: This setting is available on network adapters and is only available if Allow This Device to Wake the Computer is enabled. The magic packet is also known as a Wake-on-LAN packet and is a special broadcast packet designed to wake the system.
Using the Add Hardware Wizard
With most devices being plug and play, you shouldn’t ever need to use the Add Hardware Wizard. In fact, it was removed from the Control Panel back in Windows 7, because driver installation is handled automatically. If for some reason the device driver is not being installed, maybe because the device is too old or because it’s too new, you can manually launch the Add Hardware Wizard. Download the drivers from the manufacturer’s site first, and then follow these instructions:
- Right-click the Start menu and choose Windows PowerShell (Admin).
Type hdwwiz.exe and press Enter.
The Add Hardware Wizard launches (see Figure 2-6).
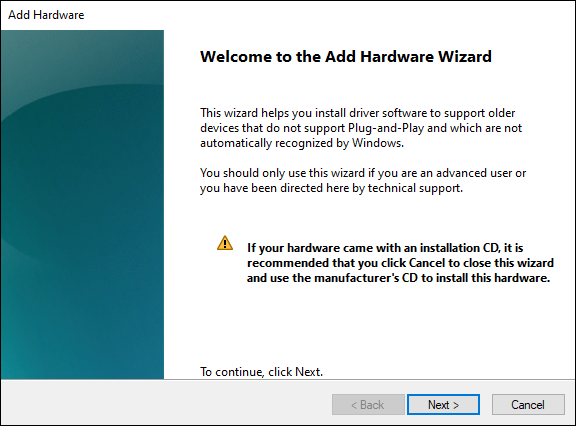
FIGURE 2-6: The Add Hardware Wizard.
- Click Next.
- Select the radio button next to Search for and Install the Hardware Automatically (Recommended) and click Next.
- If the wizard finds new hardware, it will tell you what it found and you can install the driver.
- If the wizard did not find new hardware, it will ask you to choose a hardware category. Choose one and click Next.
Choose the manufacturer and the model of your device and click Next.
The wizard installs the driver.
It is worth noting that there are multiple ways to get to the Add Hardware Wizard that are not documented in steps that I’ve just described. Find the way that works best for you to access these items — don’t be afraid to experiment.
Performing Hard-Drive-Related Tasks
Central to most of the work you’ll do on your servers is the hard drive. Hard drives store the operating system and the data that your organization needs to do what it does best. There are two main types of storage in use today.
- Hard disk drives (HDDs): For quite a few years, magnetic storage (known as hard disk drives) were the only option. These drives were available at varying speeds and capacities; higher-speed and higher-capacity drives were more expensive. Because they were mechanical drives, they were prone to wearing out, and as technology improved, magnetic storage was no longer able to keep up with some of the more storage-intensive workloads because of their physical constraints. Magnetic storage hasn’t gone away — it’s still around. Due to their lower cost, HDDs are still an excellent choice for data storage when high speed and high performance aren’t as important as keeping cost down.
- Solid state drives (SSD): Solid state drives have no moving parts; they store data on non-volatile flash memory chips. As technology improves, their lifespans increase, their capacities continue to grow, and their prices come down. For most system administrators, SSD drives are the staple of operating system drives because they’re so fast. If you have an application that needs constant steady performance and high input/output operations per second (IOPs), SSDs will meet that need.
In many scenarios, system administrators and storage administrators take a best-of-both-worlds approach: They create tiered storage. Higher-tier storage is composed of the faster and more expensive SSD drives, while lower-tier storage, which is used for infrequently accessed data, is made up of the less expensive HDDs.
Choosing basic or dynamic disks
When you first initialize a disk, it’s a basic disk. For most users, this works just fine. Basic disks are a simple solution and, by default, how new disks are created. However, if your organization wants to use more advanced disk features, you need to upgrade to a dynamic disk. Dynamic disks support
- Simple: A simple dynamic disk is very similar to a basic disk. When you first convert a basic disk to a dynamic disk it will be a simple volume.
- Striping: Data is written across multiple drives (or striped). This can improve write performance, but it’s not a fault-tolerant solution. You need a minimum of two disks to take advantage of this functionality, and if you lose one disk you have lost the entire striped set. Striping is sometimes referred to as RAID 0.
- Spanned: A spanned volume is a logical volume created from combining multiple physical hard drives. This can be really cool if you have a couple of smaller hard drives, but you need one big hard drive. The downside to this approach is that, like striping, there is no fault tolerance if one of the drives ceases to function. You lose all the data on the drive.
- Mirroring: Data is written identically to two or more drives. This provides fault tolerance because there is no data loss if one of the drives becomes inoperable. Mirroring is sometimes referred to as RAID 1.
- RAID 5: A RAID 5 volume is also referred to as a parity volume. It requires a minimum of three disks, one of which is used for parity. That parity bit guarantees that if one of the drives goes down, there will be no data loss. Of course, if you lose more than one drive, you’ll suffer data loss.
Using multipath I/O
Picture yourself in the datacenter working on installing a new server. You’re working on getting it cabled in, grumbling about the inevitable rat’s nest of cables in the way, when you realize you accidentally unplugged the power from the rack switch that is used for connections to the Internet Small Computer Systems Interface (iSCSI) storage. You brace yourself for the inevitable slew of angry phone calls, but nothing happens. Then you realize that every system has a second network cable going to the iSCSI switch in the rack next door. You breathe a sigh of relief — you have multipath I/O (MPIO).
MPIO is a technology that allows a server to recognize more than one path to its storage area network (SAN) storage. This is commonly set up for Fibre Channel and iSCSI storage networks to provide fault tolerance for the storage network. In addition to that, depending on how it’s configured, it can help increase performance because you can use both connections at the same time.
Installing MPIO is pretty straightforward, but the configuration can be a little more complex. MPIO is offered as a feature in Windows Server 2022. Here’s how to install MPIO:
- With Server Manager open, choose Manage⇒ Add Roles and Features (as shown in Figure 2-7).
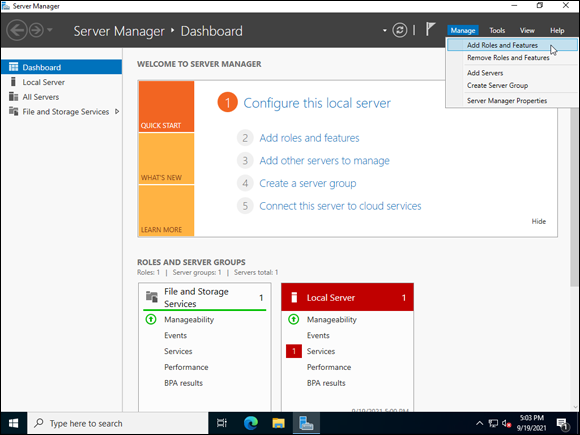
FIGURE 2-7: Installing the MPIO feature in Windows Server 2022.
- On the Before You Begin screen, click Next.
- On the Select Installation Type screen, select Role-Based or Feature-Based Installation and then click Next.
- On the Select Destination Server screen, your server will be highlighted; click Next.
- On the Select Server Roles screen, click Next.
- On the Select Features screen, scroll down and select Multipath I/O (as shown in Figure 2-8) and click Next.
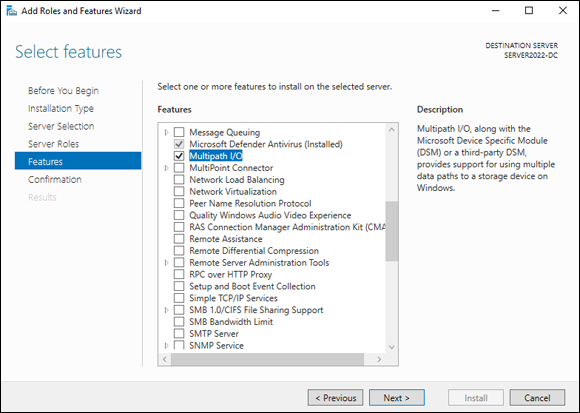
FIGURE 2-8: Select the Multipath I/O check box on the Select Features screen.
- On the Confirm Installation Selections screen, click Install.
- When the installation is finished, click Close.
With MPIO installed, you can configure it to work with your iSCSI storage or even Serial Attached SCSI (SAS) storage.
Working with storage area networks
For years, the local storage on the server was all you had to work with. Being limited to the storage in the server had several problems. It wasn’t fault tolerant (unless you used RAID, with the exception of RAID 0), it wasn’t easily scalable, and the capacity was limited to however many disks would fit in the server.
Somebody came up with the idea of creating drive arrays to alleviate those issues. The drive arrays could have expandable trays of disks. Those trays could be used to mirror other trays or to use RAID if fault tolerance was the main goal. These large drive arrays needed a network that could support the growing amount of data being pushed into them. And so the SAN was born.
There are many different protocols in use in SANs, but here are the two most frequently used in enterprise environments today:
- iSCSI: iSCSI became a favorite of small to medium businesses because the business could use the existing network infrastructure to support the storage traffic. This made iSCSI a smaller upfront investment because there was no need to purchase special cards and switches to support iSCSI traffic. The business simply needed an iSCSI storage device, and it could use iSCSI. The iSCSI protocol encapsulates SCSI commands inside a Transmission Control Protocol (TCP) packet. That data is then transferred over traditional Ethernet cabling to its destination.
- Fibre Channel: Fibre Channel is still the more popular of the two protocols, mainly due to speed and reliability. It requires the purchase of special network cards and special switches to support the Fibre Channel protocol. Although Fibre Channel offers fast data transfers, it’s limited by distance, far more so than iSCSI is. Fibre Channel uses fiber-optic cable to transmit data. Data is transmitted as flashes of light down a glass fiber.
What happens if you want the best of both worlds? Some companies sell what is referred to as unified storage. These storage devices are capable of supporting both iSCSI and Fibre Channel.
Understanding Storage Spaces Direct
Storage Spaces Direct is a feature that was introduced in Windows Server 2016 Datacenter edition. It was a great way for organizations that couldn’t afford a SAN to be able to achieve the dream of highly available and highly scalable storage. It took advantage of the local storage on the servers to create a pool of storage that the entire cluster of servers, called nodes, could take advantage of.
To use Storage Spaces Direct on multiple servers, you need to install the Failover Clustering and Hyper-V roles on each server. You need a minimum of 10 Gb Ethernet between the clustered systems, and remote direct memory access (RDMA) is recommended.
Setting up the storage is fairly straightforward. You create a storage pool from the physical disks, and from there you create logical disks and then volumes. I’ll show you how to do this on a standalone server, but the process is very similar with clustered servers. First, you’ll create a storage pool. Then you’ll create logical disks and volumes.
Creating the storage pool
The storage pool is the starting point when building out the storage for Storage Spaces Direct. Here’s how to create the storage pool:
- From Server Manager, click File and Storage Services in the left-hand menu.
Click Storage Pools.
If you have available disk drives, they show up under Physical Disks on the lower-right side. Notice under Storage Pools that there is an entry called Primordial. This is created by default with the available disks (see Figure 2-9).
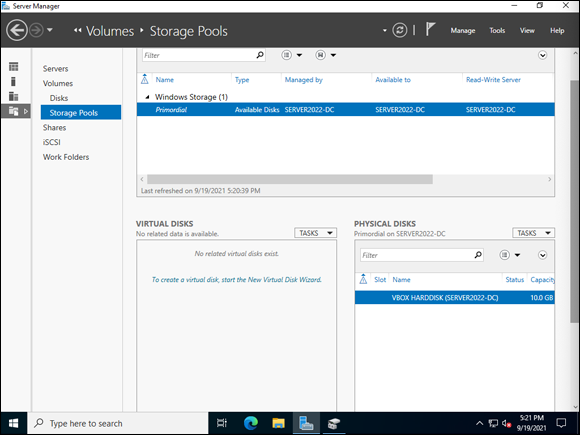
FIGURE 2-9: The Storage Pools screen showing available physical disks.
- Right-click where it says Primordial and choose New Storage Pool.
- On the Before You Begin screen, click Next.
On the Specify a Storage Pool Name and Subsystem Screen, enter a name for the pool and click Next.
I’m naming our pool “Pool1.” Notice in Figure 2-10 that the primordial pool is selected by default.
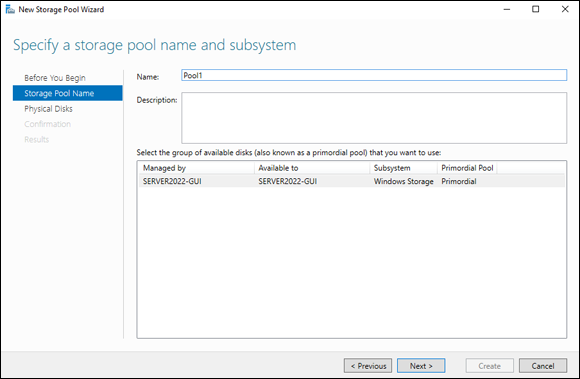
FIGURE 2-10: Choose a name for your storage pool and choose the primordial pool to select physical disks from.
On the Select Physical Disks for the Storage Pool screen, you see all the disks that were in the primordial pool. You can choose some of the disks or all of the disks.
- For this example, select all the disks.
- Change the Allocation drop-down box on the last drive to Hot Spare, as shown in Figure 2-11, and click Next.
On the Confirm Selections screen, click Create.
If all goes well, the View Results screen should say Completed.
- Click Close.
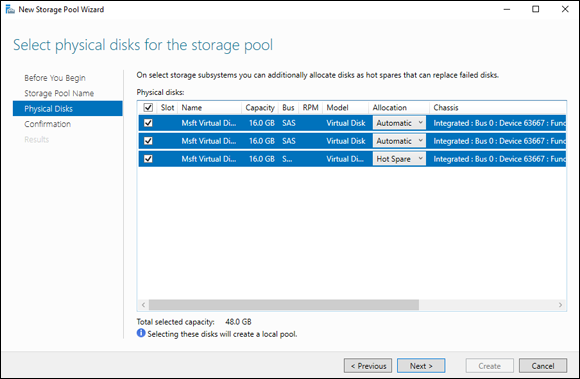
FIGURE 2-11: Configuration of the physical disks in the storage pool.
Creating a logical disk
Now that the pool is created, you can create a logical disk. Follow these steps:
Right-click Pool1 and choose New Virtual Disk, or click the To Create a Virtual Disk, Start the New Virtual Disk Wizard hyperlink in the Virtual Disks box.
You will be asked to select the storage pool you want to work with. You should only see the one pool that we created so far, Pool1.
- Select Pool1 and click OK.
- On the Before You Begin screen, click Next.
- On the Specify the Virtual Disk Name screen, name the disk Disk1, as shown in Figure 2-12.
- Click Next.
On the Specify Enclosure Resiliency screen, leave the Enable Enclosure Awareness check box unchecked and click Next.
The next screen is the Select the Storage Layout screen. You have three options: Simple, Mirror, and Parity. These are very similar to the RAID levels as far as what they do. Simple is a non-RAID disk, Mirror is similar to RAID 1, and Parity is similar to RAID 5.
- Select Simple, as shown in Figure 2-13, and click Next.
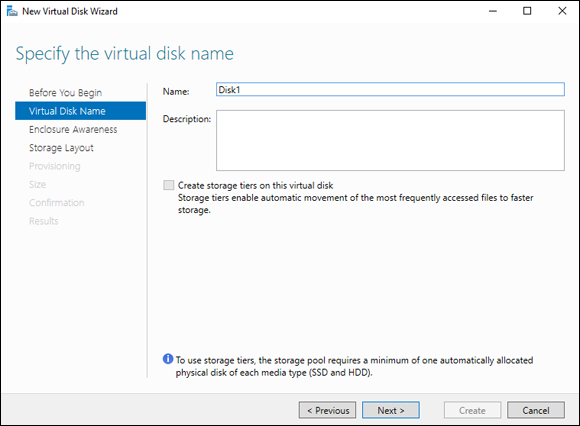
FIGURE 2-12: You have to name your virtual disk before you can use it.
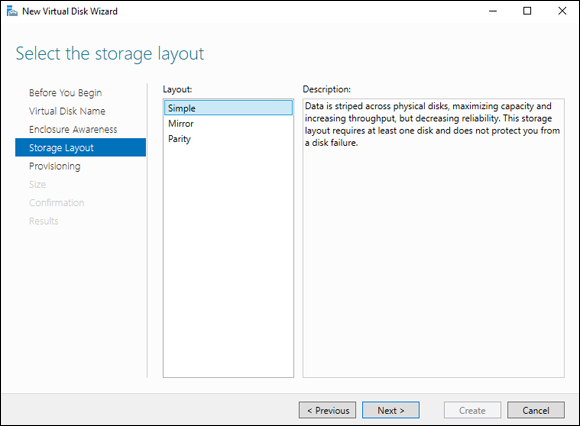
FIGURE 2-13: Selecting the storage layout can be very important if you need it to be fault tolerant.
- On the Specify the Provisioning Type screen, Select Thin for the Provisioning Type, and click Next.
On the Specify the Size of the Virtual Disk screen, tell it how big you want the disk to be and click Next.
In my example, I’ve chosen to make the virtual disk 5GB.
- On the Confirm Selections page, click Create.
- If everything succeeded, click Close.
Creating a volume
Now that you’ve created a storage pool and a virtual disk, you’re ready to create a volume. Follow these steps:
- Right-click Disk1 and choose New Volume, as shown in Figure 2-14.
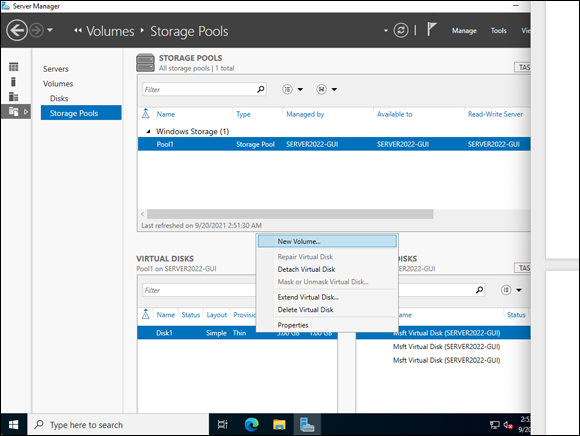
FIGURE 2-14: Creating a volume that the operating system can use is simple after the virtual disk has been created.
- On the Before You Begin screen, click Next.
- On the Select the Server and Disk screen, you should only have one server and disk at this point, so you can simply click Next.
On the Specify the Size of the Volume screen, enter a size and click Next.
I’ve entered 3GB.
On the Assign to a Driver Letter or Folder screen, select a drive letter or specify a folder and click Next.
I’ve kept it simple and chosen a drive letter. I was automatically given the letter F, as you can see in Figure 2-15.
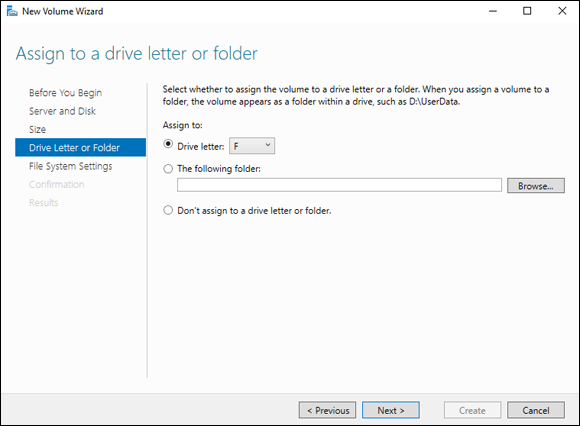
FIGURE 2-15: Choosing a drive letter for my new volume.
On the Select File System Settings screen, select the file system settings and click Next.
I’ll stick with the default NTFS and the default allocation unit size, and I’ll name the volume, Volume1.
- On the Confirm Selections screen, if everything looks good, click Create.
- If everything on the Completion screen says Completed, you’re good to go, so click Close.
Working with Storage Replica
Storage Replica is a great tool for disaster recovery scenarios. It can do synchronous or asynchronous block-level replication of volumes between servers or clusters. By implementing stretch clusters, you could even replicate across distant sites.
Storage Replica was initially released in Windows Server 2016 Datacenter edition. As of Windows Server 2019, you could also take advantage of Storage Replica if you were using the Standard edition. This is still true in Windows Server 2022, although it does have a few limitations:
- Storage Replica is only able to replicate one volume, not an unlimited number of volumes.
- A volume can have only one replication partnership, unlike Datacenter where a volume can have an unlimited number of partners.
- Storage Replica will only support sizes up to 2TB, while Datacenter has no limit on size.
Using Storage Quality of Service
Storage Quality of Service (QoS) allows you to centrally monitor the storage performance of virtual machines (VMs) when you’re using Hyper-V and the Scale-Out File server roles. Note that you can use cluster shared volumes instead of Scale-Out file server if desired. Storage QoS accomplishes a few things:
- It ensures that one VM can’t use up all the storage bandwidth.
- It monitors storage performance.
- It uses policies to determine minimum and maximum I/O for VMs.
One of the simplest ways to experiment with Storage QoS is to set up a failover cluster and create a cluster shared volume. If you do this, then Storage QoS is set up automatically. You can view it under the Cluster Core Resources.
Encrypting with BitLocker
Securing data has never been more critical than it is today. With BitLocker, you can protect your data from would-be thieves by encrypting your entire data drive. BitLocker can encrypt both fixed drives and removable drives. Fixed drives will in general use a Trusted Platform Module (TPM) chip to save the cryptographic key, while BitLocker To Go utilizes either a password or a smart card to unlock it.
In the following sections, I explain t what a TPM is, and walk you through installing BitLocker as well as configuring BitLocker To Go and BitLocker.
Understanding Trusted Platform Modules
A Trusted Platform Module is a special chip on the motherboard designed to store passwords, certificates, and cryptographic keys. For the most seamless BitLocker experience, you’ll want a TPM chip that is version 1.2 or newer. If your system doesn’t have a TPM, you can still use BitLocker, but you’ll have to use Group Policy to override the TPM requirement. You’ll have to enter a password to unlock the system. I cover how to setup BitLocker without a TPM later in this chapter in the section called, “Knowing what to do if there’s no TPM module.”
Installing BitLocker
To install BitLocker on Windows Server 2022, you need to install the BitLocker feature. Follow these steps:
- With Server Manager open, choose Manage⇒ Add Roles and Features.
- On the Before You Begin screen, click Next.
- On the Select Installation Type screen, click Role-Based or Feature-Based Installation and click Next.
- On the Select Destination Server screen, click Next.
- On the Select Server Roles screen, click Next.
On the Select Features screen, click select the BitLocker Drive Encryption check and click Next.
You’ll be asked if you want to install additional features that are required for BitLocker Drive Encryption, as shown in Figure 2-16.
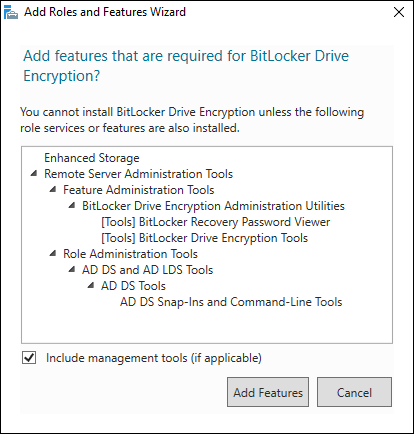
FIGURE 2-16: Adding features that are needed for BitLocker Drive Encryption to work its magic.
- Click Add Features and then click Next.
On the Confirm Installation Selections screen, select the Restart the Destination Server Automatically if Required check box.
The BitLocker Drive Encryption feature requires a reboot.
- Click Install.
After the server reboots, you can move on to configuring BitLocker.
 Anytime you look at encrypting your data, be sure that you have a good backup to recover from in case something goes wrong. If you don’t have a good backup, and the encryption process runs into an issue, you will need to restore from your backup.
Configuring BitLocker To Go
To configure BitLocker To Go, you need to navigate to where the management utilities are hidden and then you can start to play. Follow these steps:
- Click Start, scroll down to Windows System, and choose Control Panel.
- Click System and Security.
- Under BitLocker Drive Encryption, click Manage BitLocker (see Figure 2-17).
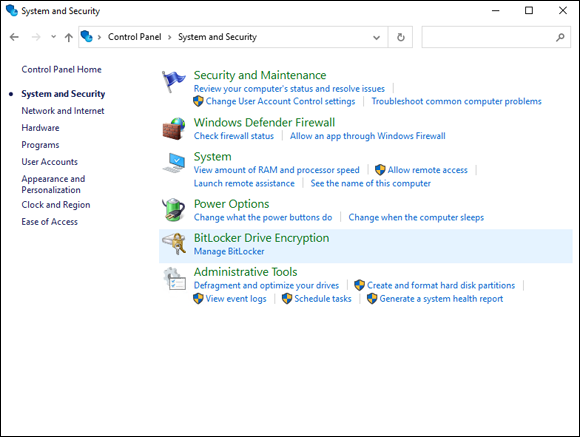
FIGURE 2-17: Getting to the BitLocker Management screen from the Control Panel.
On my system, BitLocker is currently off, so I’ll click Turn on BitLocker for Volume1 (see Figure 2-18).
Because Volume1 is considered a removable disk, the TPM is not used, and you have to set a password or tell it to use a smart card. This is to support BitLocker To Go.
- Set a password, as shown in Figure 2-19.
Click Next.
You’re asked how you want to back up your recovery key. You can save to a file or print the recovery key.
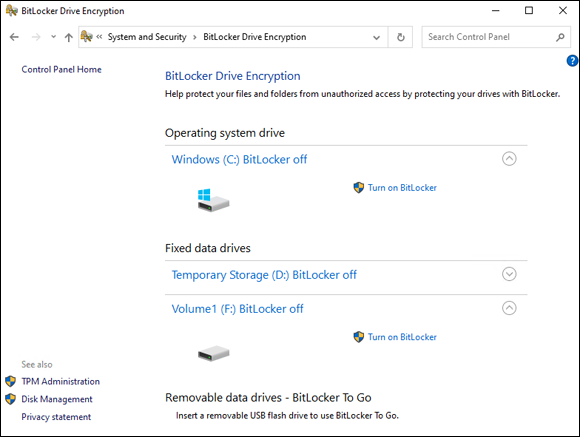
FIGURE 2-18: Turning on BitLocker for Volume1.
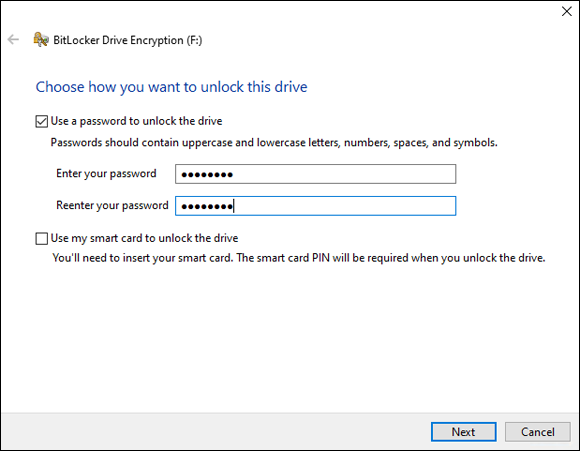
FIGURE 2-19: Setting a password for BitLocker To Go.
Save it, and then click Next.
You’re asked how much of your drive you want to encrypt.
- Choose Encrypt Used Disk Space Only and click Next.
On the Choose Which Encryption Mode to Use screen, select Compatible Mode and click Next.
It’s generally safest to go with Compatible Mode for removable media.
You’re asked if you’re ready to encrypt the drive.
Click Start Encrypting.
After the encryption is complete, you see the status of BitLocker on the BitLocker To Go drive. It should say BitLocker On.
Configuring BitLocker
To configure BitLocker, you need to navigate to where the management utilities are. These steps are the same as Steps 1 through 3 in “Configuring BitLocker To Go,” so I’ll start the instructions after Step 3. If you need a refresher on how to get to the BitLocker Management screen, review steps 1 through 3 in “Configuring BitLocker To Go” before proceeding.
On my system, BitLocker is currently off on the C drive, so I’m going to click Turn on BitLocker for the C drive.
On the How Do You Want to Back Up Your Recovery Key screen, you can choose to save to a file or print the recovery key.
Save the file and click Next.
You’re prompted to choose how you want to encrypt your drive. You can encrypt the entire drive, or just the used space only. You should choose whatever your organization requires.
- I’ll choose Encrypt Used Disk Space Only.
- Click Next.
- On the Choose Which Encryption Mode to Use screen, select New Encryption Mode and click Next.
On the final screen, select the Run BitLocker System Check check box.
This ensures that BitLocker can read the keys before it encrypts the drive.
Click Continue.
You’re dropped back out to the BitLocker screen and asked to restart your system.
Click Restart Now.
After the system comes back up, BitLocker will begin the drive encryption. After the encryption is done, it will say BitLocker On.
Knowing what to do if there’s no TPM module
You may run into a server that doesn’t have a TPM module. When you try to turn on BitLocker, you get an error saying that a compatible TPM could not be found. This doesn’t mean that you can’t use BitLocker; it just means that there will be more work involved to get it to encrypt the data drive. Follow these steps:
- Click the Start Menu and choose Run.
- Type gpedit.msc.
- Click Local Security Policy, click Computer Configuration, click Administrative Templates, click Windows Components, click BitLocker Drive Encryption, and click Fixed Data Drives, as shown in Figure 2-20.
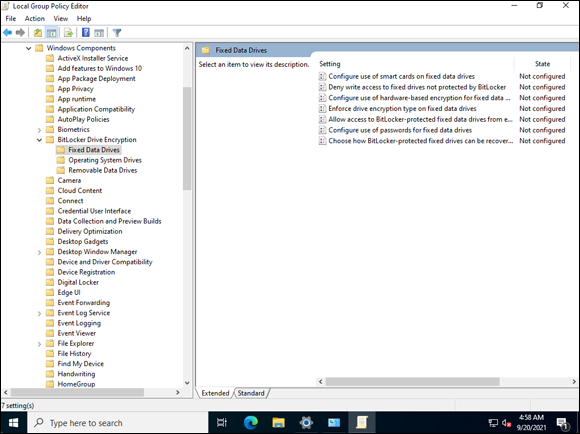
FIGURE 2-20: Configuring BitLocker to work without a TPM module involves editing the local security policy.
- Double-click Configure Use of Hardware-Based Encryption for Fixed Data Drives.
- Select Enabled and ensure that the Use BitLocker Software-Based Encryption When Hardware Encryption Is Not Available check box is selected (see Figure 2-21).
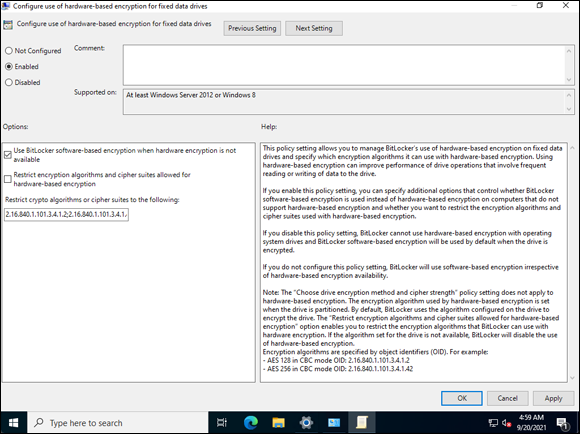
FIGURE 2-21: Enabling software-based encryption for BitLocker.
- Click OK.
- Click Local Security Policy, click Computer Configuration, click Administrative Templates, click Windows Components, click BitLocker Drive Encryption, and click Operating System Drives, as shown in Figure 2-22.
- Double-click Require Additional Authentication at Startup.
- Choose Enabled.
- Make sure the Allow BitLocker without a Compatible TPM check box is selected, as shown in Figure 2-23.
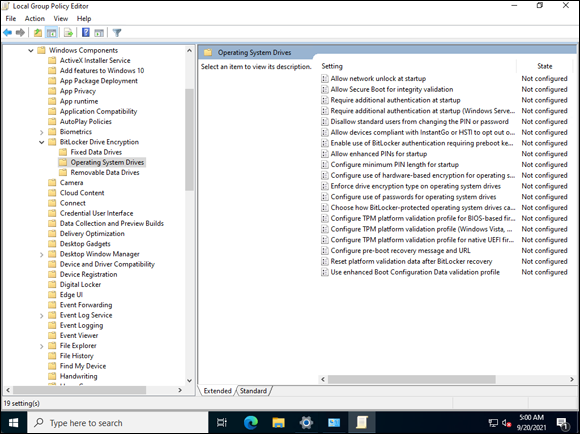
FIGURE 2-22: Allowing alternate authentication methods for the system drive.
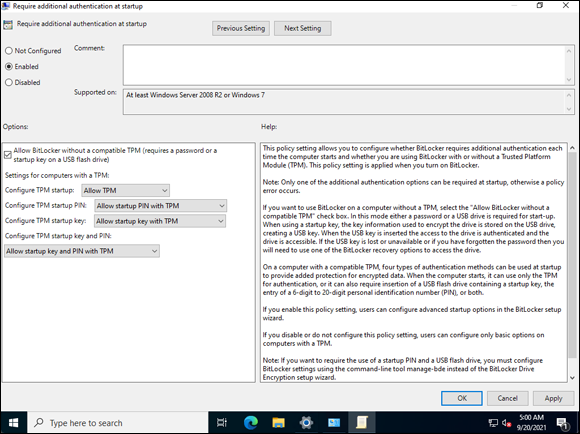
FIGURE 2-23: Letting the operating system drive encrypt or decrypt without a TPM requires this setting.
- Click OK.
- Close out of Local Group Policy Editor.
Now go ahead and go back in to the BitLocker screen.
You should have no issue getting it to work now.
Performing Printer-Related Tasks
Printers are a pretty important resource. If your print server goes down, you’ll start getting calls very quickly. Conversely, if users are trying to print, they’ll get very cranky if they can’t.
There are a few different ways you might install a server. A locally attached printer, for example, will most likely be connected through a USB cable. That printer may be used by one user or, in a small office setting, it may be shared from that workstation so that multiple users can print to it. Network-attached printing is very common as well, from homes with a wireless printer to large organizations that have printers on their local area networks (LANs). Some organizations may use a print server to manage their print queues centrally. You print to the server’s print queue, and it sends the job to the printer through the network.
Using the Printer Install Wizard
The Printer Install Wizard walks you through the installation of your printer. You can launch it by going to Settings (the gear in the Start menu) and selecting Devices and then Printers & Scanners. From there, you simply click Add a Printer or Scanner and the wizard launches.
If your printer is found, the wizard is a nice easy type of install. If your printer is not found, you have a little more work to do. Here’s how to add a printer that just doesn’t want to cooperate:
- Click The Printer That I Want Isn’t Listed.
- In my case, my printer is on my network so I choose Add a Printer Using a IP Address or Hostname, as shown in Figure 2-24.
- Click Next.
Fill in the IP address of your printer (as shown in Figure 2-25).
Your IP address will be different from mine, so you’ll need to check your printer to see what IP address it’s using. Make sure you choose TCP/IP Device from the Device Type drop-down list.
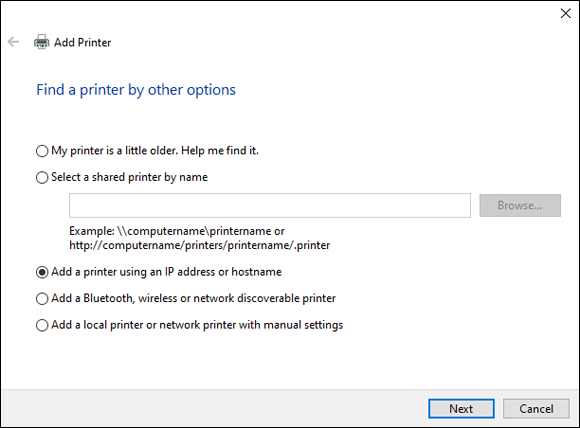
FIGURE 2-24: Selecting how you’ll find your printer.
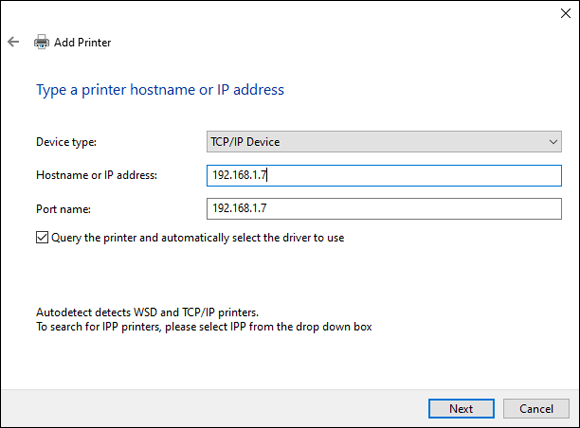
FIGURE 2-25: Configuring the IP address of your printer.
Click Next.
If all goes well, the system will be able to contact the printer and figure out which driver it needs.
Click Next.
On the Printer Sharing screen, you can decide if you want to share the computer with another system.
- I’m going to select Do Not Share This Printer.
Click Next.
The last page gives you the option to set the new printer as the default printer.
- Leave that check box selected and click Finish.
If you need to use the more advanced print features that are available from your printer, but the Windows drivers aren’t giving you the options you need, you may need to download the drivers from the manufacturer’s website. The drivers are typically packaged in an executable file to aid in installation.
Configuring print options
To get to the printer management screen, start in the Printers & Scanners menu (see the preceding section). In the Printers & Scanners section, you see the printer you just added. Select it by clicking it, and then click the Manage button. When configuring individual printers, there are two options to look at:
- Printing Preferences: Printing Preferences allows you to set what the default print settings will be for you printer. From here, you can set the orientation of your printing. If you click the Advanced button, more settings are available — those settings depend on the driver that is installed for your printer. My printer settings are shown in Figure 2-26.
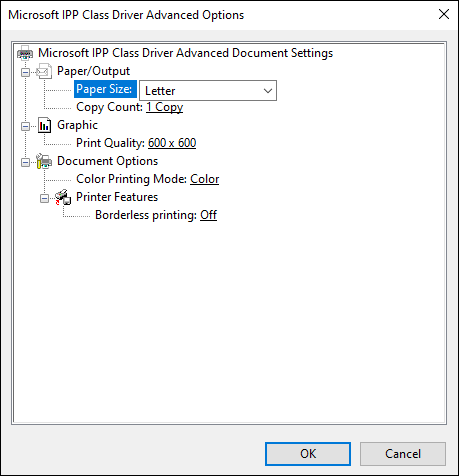
FIGURE 2-26: Advanced Options gives you more settings to work with.
- Printer Properties: The Printer Properties option gives you configuration items for the printer. For instance, if you choose after installation to share the printer or change the driver, or if you need to change the IP address, you can do that with Printer Properties. You get a screen similar to Figure 2-27.
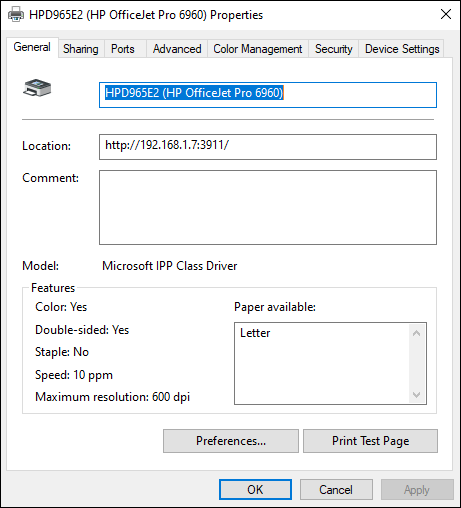
FIGURE 2-27: The Printer Properties screen allows you to change configuration items.
Configuring the Print Server role
In Windows Server 2022, Print Server is a role that can be installed and then configured.
Installing the Print Server role
Here’s how to install the Print Server role:
- With Server Manager open, choose Manage⇒ Add Roles and Features.
- On the Before You Begin screen, click Next.
- On the Select Installation Type screen, choose Role-Based or Feature-Based Installation and click Next.
- On the Select Destination Server screen, click Next.
- Scroll down and select Print and Document Services.
Click Add Features when you’re prompted to do so.
Your screen should look like Figure 2-28.
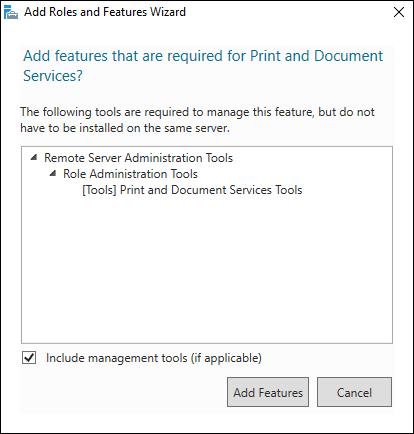
FIGURE 2-28: Install the Print and Document Services role to set up your print server.
- Click Next.
- On the Select Features screen, click Next.
- On the Print and Document Services screen, click Next.
- On the Role Services screen, select Print Server, as shown in Figure 2-29, and then click Next.
- On the Confirm Installation Selections screen, select Install.
- On the Installation Progress screen, click Close after the installation is complete.
Configuring the Print Server role
Now that you’ve got the Print Server role installed, you can configure it. Here’s how to add your first printer:
- From Server Manager, choose Tools⇒ Print Management.
- Expand Print Servers, right-click your print server, and choose Add Printer, as shown in Figure 2-30.
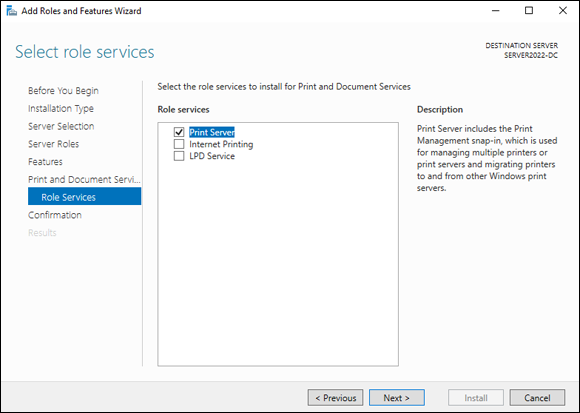
FIGURE 2-29: Select Print Server for the role that you want to install.
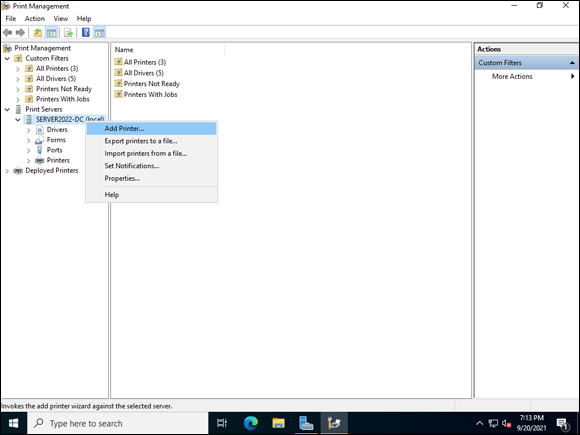
FIGURE 2-30: Adding a printer to the Print Server.
- Select Add an IPP, TCP/IP or Web Services Printer by IP address or hostname and click Next.
Enter the IP address and click Next.
On the next screen you can name your printer. In an enterprise, I recommend doing this.
- I’ll call my printer Main Office Printer #1, as shown in Figure 2-31.
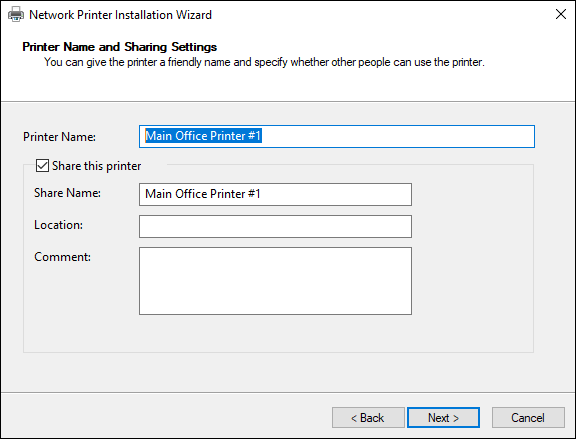
FIGURE 2-31: Naming the printer and adding a location makes it easier for your users to find the printer.
Click Next.
If the wizard finds the printer, the next screen tell you that the printer was found and shows you a summary of the printer information.
Click Next.
The server installs the drivers for the printer.
- After the drivers are installed, click Finish to exit the wizard.
Connecting to a Printer on a Print Server
Connecting to a printer on a print server is pretty simple. You can add the printer with a Universal Naming Convention (UNC) path like \servernameprintername. For this to work, the server's name must resolve in DNS. If you don't have the printer name in DNS, you can do the UNC with the IP address instead of the server name. In enterprise environments, it’s common to use Group Policy to manage printers for users and/or computers.
 Using the UNC path to an object, like a share on a file server or a printer, is a convenient way to access resources without knowing where they’re located. In the example of a file server, for instance, the local path to a file might be
 E:SomeFolderSomeShareSomeFile.txt. The UNC path would be \ServerNameSomeShareSomeFile.txt. If the share was ever moved to a different disk, the UNC path would remain the same.
Performing Other Configuration Tasks
I’ve covered a lot of configuration steps in this chapter, and I’m almost done. The last few configuration tasks are more important to your experience when working with the server then they are for your users, who will consume a service from the server.
Keyboard
From the Settings menu, go to Devices and then Typing. Right-click the keyboard you want to manage and select Keyboard Settings. The Typing screen (shown in Figure 2-32) appears. From here, you can configure your keyboard to match what you need it to do.
Mouse
From the Settings menu, go to Devices and then Typing. The Mouse screen (shown in Figure 2-33) appears. From here, you can adjust button configuration, cursors, and the behavior of the scroll wheel.
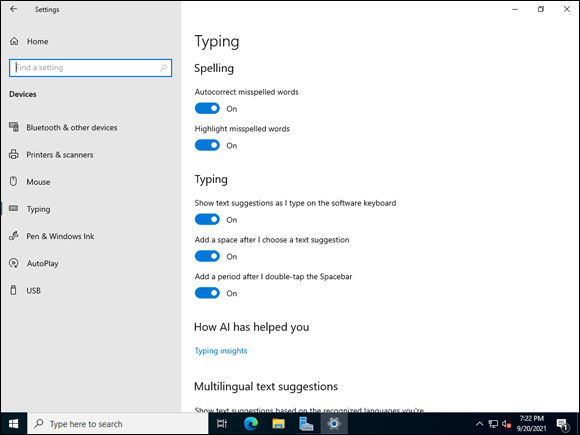
FIGURE 2-32: You can adjust the keyboard settings to work better with your typing speed.

FIGURE 2-33: You can adjust the mouse settings to customize your experience.
Power management
From the Settings menu, go to System and then Power & Sleep. You’ll be presented with some very basic settings. However, you can get very granular by clicking Additional Power Settings (see Figure 2-34). This will allow you to choose power plans to customize how your system will balance power and performance.

FIGURE 2-34: Advanced Power Settings lets you create a granular power management scheme.
Sound
From the Settings menu, click System, and then click Sound. With this screen, you can customize your default sound devices and recording devices. You can troubleshoot your sound devices from here as well.
Language
From the Settings menu, click Time & Language and then click Language. From this screen, you can add new languages, set new default languages, and change keyboard layouts if desired. The Language screen on your server should look similar to Figure 2-35.

FIGURE 2-35: The Language screen allows you to adjust settings for language and keyboard layouts.
Fonts
You may need to install new fonts on the server. This may happen because the company standard requires a different font than normal. I’ve even had to install barcode fonts before. To work with Fonts, open the Settings menu. Click Personalization and then click Fonts. What I love most about the new interface is that it gives you visual samples of each of the fonts and the ability to get more fonts from the Microsoft Store. Figure 2-36 shows the Fonts screen.
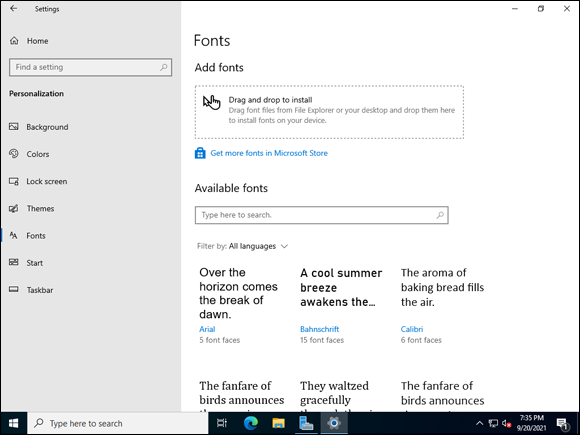
FIGURE 2-36: Samples of the installed fonts available on the server.