
Chapter 7
Working with PowerShell
IN THIS CHAPTER
![]() Opening a PowerShell window with administrative privileges
Opening a PowerShell window with administrative privileges
![]() Configuring and customizing your PowerShell session
Configuring and customizing your PowerShell session
![]() Setting environmental variables with PowerShell
Setting environmental variables with PowerShell
![]() Obtaining assistance from within the PowerShell window
Obtaining assistance from within the PowerShell window
![]() Understanding PowerShell punctuation and how to use it
Understanding PowerShell punctuation and how to use it
The Command Prompt has been a staple for many years, but Microsoft has been making a big push toward PowerShell. And it’s not hard to see why. PowerShell can run the same utilities and things that can be run in the Command Prompt, but it can also run much more than that. By importing modules, you can expand the things that PowerShell can do.
PowerShell is a very flexible option for system administrators. The console can run the legacy commands that were available in the Command Prompt, as well as the newer PowerShell commands and scripts. PowerShell improves on the ability to support automation across platforms, including on-premise datacenters, Azure, Amazon Web Services (AWS), and with PowerShell Core, even Linux and macOS!
As you work in PowerShell, you’ll discover how easy it is to type in longer commands as PowerShell uses tab complete. This allows you to type the first few letters of a cmdlet and then press the Tab key. If a cmdlet matches what you’ve typed so far, it will be displayed. If it isn’t the right cmdlet, you can continue to press the Tab key until the correct cmdlet is displayed. This makes administering from the PowerShell window very efficient.
One of the things that I love most about PowerShell over the Command Prompt is the common language that is used with PowerShell cmdlets. PowerShell cmdlets utilize a verb-noun format. When you’re using a PowerShell cmdlet, there is a well-documented set of “verbs” that you can use. The most common PowerShell verbs that you see are Get, Set, New, and Invoke. Many more verbs are available — you can see them on the Microsoft site along with examples of when they would be used; go to https://docs.microsoft.com/en-us/powershell/scripting/developer/cmdlet/approved-verbs-for-windows-powershell-commands?view=powershell-7.1.
Nouns in the context of PowerShell cmdlets are what you want to take action against. Consider the cmdlet Get-Date. Get is the verb; you're telling PowerShell you want to query for some information. Date is the noun; you’re asking PowerShell to retrieve the date.
This chapter serves as a brief introduction to PowerShell. If you want to learn more about PowerShell, check out Book 6.
Opening an Administrative PowerShell Window
Microsoft has been making a pretty major push to get more system administrators to embrace PowerShell, given its flexibility and utility. In Windows Server 2022, when you right-click the Start menu, you no longer see the Command Prompt by default; instead, you see Windows PowerShell, as shown in Figure 7-1.
You have two options when in this view:
- You can choose Windows PowerShell, which opens a non-elevated PowerShell window. This window will allow you to perform PowerShell tasks that don’t require administrative privileges.
- You can choose Windows PowerShell (Admin), which opens an elevated PowerShell window. Much of the work you do as a system administrator will require administrative access, so you’ll want to choose Windows PowerShell (Admin).
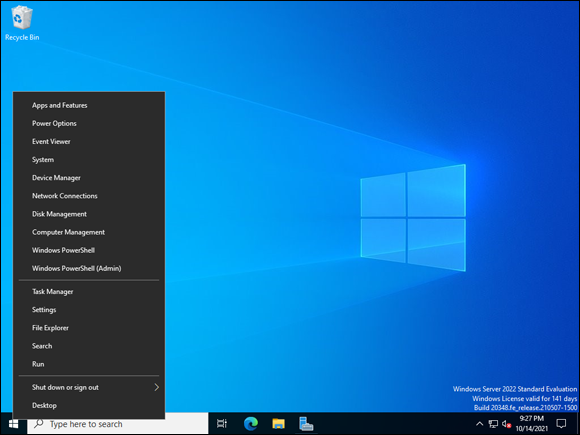
FIGURE 7-1: Windows PowerShell now resides by default in the menu that you access by right-clicking the Start menu.
Configuring PowerShell
You can configure the PowerShell window in the same way that you can configure the Command Prompt window. You can customize the Window one time or set defaults so that settings will load every time. The one limitation with making the settings through the Defaults or Properties selection in the menu is that the colors that PowerShell uses for commands and other things are not affected by the Properties settings. If you want to affect the color of the commands and other components in PowerShell, you need to use a profile script. If this is what you want to do, see “Using a Profile Script” later in this chapter.
To configure the PowerShell window, launch Windows PowerShell, right-click the Windows PowerShell title bar, and then choose Properties. The Windows PowerShell Properties dialog box appears. In the following sections, I walk you through this dialog box tab by tab.
Options
The Options tab (shown in Figure 7-2) is where you can set things like the size of the cursor, how many commands you want to be able to recall, editing options, and text selection. The following sections walk you through each of the sections of the Options tab.
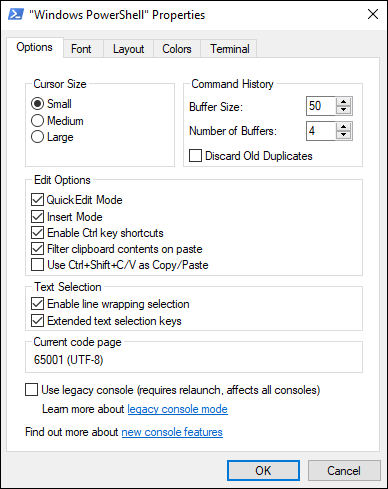
FIGURE 7-2: The Options tab allows you to customize how you interact with Windows PowerShell.
Cursor Size
Changing the cursor size makes the cursor wider and easier to spot. This setting can be very helpful for someone who is visually impaired. I personally prefer this setting to be on Large for both the Command Prompt and Windows PowerShell.
Command History
The Command History settings allows you to press the up arrow key to go back through previous commands. This can save you from having to retype commands if you’re doing something repetitive. The default Buffer Size is 50, but you can increase or decrease that as you like. The Number of Buffers setting is used to specify how many processes are allowed to have their own individual buffer. The Discard Old Duplicates check box is optional; I usually don’t check it out of personal preference. It removes duplicate commands, which can make it simpler to find an old command because you won’t have to go through a lot of repeated commands.
Edit Options
The Edit Options section gives you some options to control how you can edit things within the PowerShell window:
- Quick Edit Mode: Checking this box enables you to use the mouse to copy and paste text into and from the Windows PowerShell window.
- Insert Mode: Checking this box enables you to type wherever the cursor is. If this option is disabled, you’ll overwrite existing text depending on where your cursor is located.
- Enable Ctrl Key Shortcuts: Checking this box enables you to use Ctrl key shortcuts like Ctrl+C to copy or Ctrl+V to paste.
- Filter Clipboard Contents on Paste: Checking this box removes formatting from pasted material coming from the Windows PowerShell window.
- Use Ctrl+Shift+C/V as Copy/Paste: If you’re using Ctrl+C to copy text, you can’t use that shortcut to stop a running command. This could be a problem if you have a hung command, because you’ll have to close the Windows PowerShell window. If you enable this option, it will allow the normal usage of Ctrl+C (to stop a running command) but will still allow you to copy and paste by adding the Shift key into the shortcut.
Text Selection
The Text Selection section gives you two additional options to work with:
- Enable Line Wrapping Selection: Checking this box can correct formatting issues when copying and pasting from Windows PowerShell.
- Extended Text Selection Keys: Checking this box allows the use of common keyboard shortcuts inside the PowerShell window.
Current Code Page
Current Code Page is not an adjustable field. It’s letting you know which character code you’re using. In my PowerShell window, you can see that I’m using a UTF-8 character set.
Use Legacy Console
Checking the last option, Use Legacy Console, removes a lot of the newer features that were added to PowerShell. If you enable it, some of the customization options that I’ve discussed will disappear from the Options tab for you. I do not recommend checking this box in a Windows PowerShell window.
Font
The Font tab (shown in Figure 7-3) is a simple tab with just a few settings. It allows you to select the font size you want to use and which font to use. The Window Preview section gives you a preview of what your selection will look like. In Figure 7-3, for example, I’ve chosen a Size of 24 and a Font of Consolas. You can see in the bottom box (Selected Font: Consolas) the preview of what my choices will look like if I choose to keep my changes.
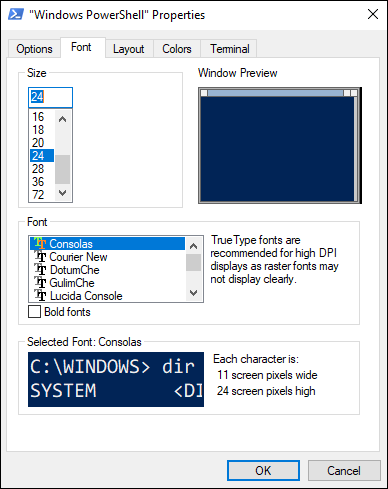
FIGURE 7-3: The Font tab allows you to change the font and how it displays in PowerShell.
Layout
The Layout tab (shown in Figure 7-4) has three configurable options:
- Screen Buffer Size: The Width adjustment controls the number of characters that can fit on the screen. The Height adjustment determines how many lines will be stored in memory. Check the Wrap Text Output on Resize box to allow the text on the screen to automatically adjust itself when you resize the PowerShell window.
- Window Size: The Width and Height adjustments in this section change the actual size of the PowerShell window.
- Window Position: If you uncheck the Let System Position Window check box, you can adjust how far away you want the PowerShell window to be from the top and left of the screen. (If you leave the check box selected, the Left and Top options are grayed out.)
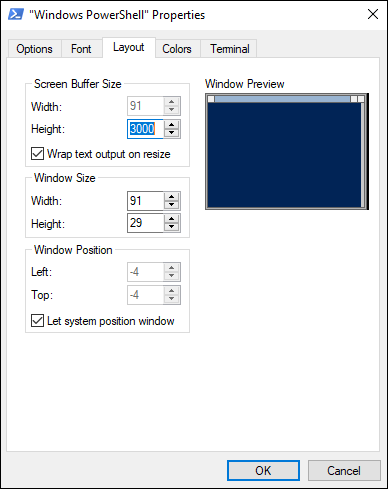
FIGURE 7-4: The Layout tab configures what the PowerShell window will look like.
Colors
The Colors tab (shown in Figure 7-5) lets you set the background and text colors that are used in the Windows PowerShell window. You can adjust the background and text colors for the PowerShell window, as well as for any popup boxes that appear. Select the radio button of the option you want to change (for example, Screen Background), and then choose the color you want either using the Red, Green, and Blue drop-down lists or by clicking one of the colored boxes below.
By default, Windows PowerShell has a blue background and off-white text. You can change that to whatever you like. In all of my screenshots in this chapter, I’m using a black background with white text, mainly because it prints better.
You can adjust the opacity of the PowerShell window as well, using the Opacity slider. The slider is normally on 100%, which makes it solid so you can’t see through it. However, if you slide the slider to the left, you can see what’s behind the PowerShell window. This can be fun, but personally, I find it distracting; I recommend leaving the Opacity slider on 100%.
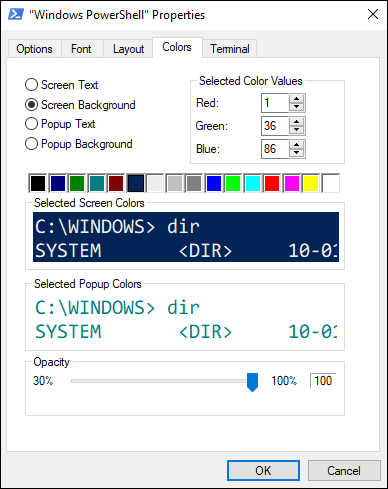
FIGURE 7-5: The Colors tab allows you to customize screen colors in Windows PowerShell.
Customizing PowerShell a Little Further
The Terminal tab (shown in Figure 7-6) allows for further customization of the PowerShell window with four brand-new options.
- Terminal Colors: You can make changes in the Terminal Colors section to both the background and the foreground of the PowerShell window.
- Cursor Shape: In the Cursor Shape section, you can adjust the cursor to appear as the legacy cursor, an underscore, a vertical bar, an empty box or a solid box.
- Cursor Colors: This section allows you to adjust the color of the cursor within the PowerShell window.
- Terminal Scrolling: By default, Scroll-Forward is enabled. This allows you to scroll through the command history that’s stored in the buffer. If you check this box and disable Scroll-Forward, you’ll only be able to scroll to the last line output.
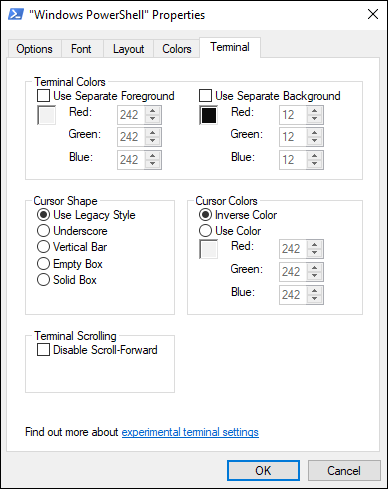
FIGURE 7-6: Further customizations that are available in the Command Prompt.
Using a Profile Script
Before you create your script, you need to create a WindowsPowerShell folder in your Documents folder. The profile script should be named profile.ps1 and should be placed inside the WindowsPowerShell folder.
To set the colors for the various components that appear on the screen like commands, variables, strings, and so on, you need to build out a script that sets the desired color for each. Say I wanted all the components to just be white on my black background (which works out great for print). My script would look like this:
$colors = @{}
$colors['String'] = [System.ConsoleColor]::White
$colors['Variable'] = [System.ConsoleColor]::White
$colors['Comment'] = [System.ConsoleColor]::White
$colors['None'] = [System.ConsoleColor]::White
$colors['Command'] = [System.ConsoleColor]::White
$colors['Parameter'] = [System.ConsoleColor]::White
$colors['Type'] = [System.ConsoleColor]::White
$colors['Number'] = [System.ConsoleColor]::White
$colors['Operator'] = [System.ConsoleColor]::White
$colors['Member'] = [System.ConsoleColor]::White
Set-PSReadLineOption -Colors $colors
You can see each component is set individually, and then at the end the Set-PSReadLineOption command is used to read in the colors from the variable you created at the beginning called $colors.
Setting Environmental Variables
There are two types of environment variables:
- User: User environment variables apply to individual users.
- System: System environment variables apply to all the users on a system.
There are quite a few environmental variables. If you want to know which environmental variables are available to you and what their current settings are, you can check this from Windows PowerShell. Just set the location to the environmental variables (it’s treated like a drive) by typing the following:
Get-ChildItem Env:
You receive the output for all the environmental variables on the system, shown in Figure 7-7.
One of the most common environmental variables to edit is the PATH variable. This is done when you want to include a directory in your path so that you can simply run programs in that directory without having to actually be in that directory. The syntax is simple. For instance, to add a folder named Tools to my path, I would type the following:
[Environment]::SetEnvironmentVariable("DEMO","C:Tools","User")
This would append my Tools folder located in my C: drive to the existing path variables, as you can see in Figure 7-8. I can verify my new entry is in my path by typing the following:
Get-ChildItem Env:
 You'll need to close PowerShell and reopen it after adding an environment variable to see it with the
 Get-ChildItem Env: command. If you’ve just added one and you don’t see it, make sure you didn’t forget this step.
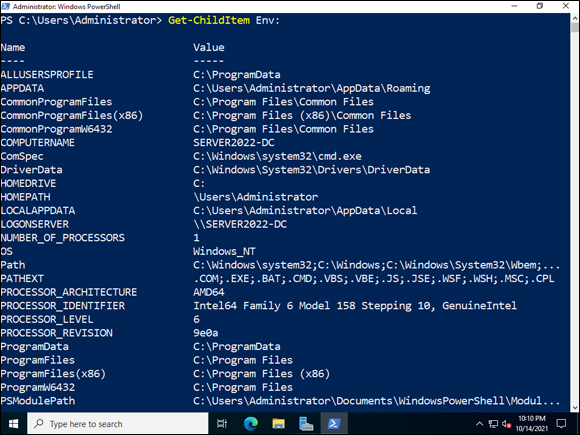
FIGURE 7-7: Displaying environmental variables and their current settings is easy with the Get-ChildItem command.
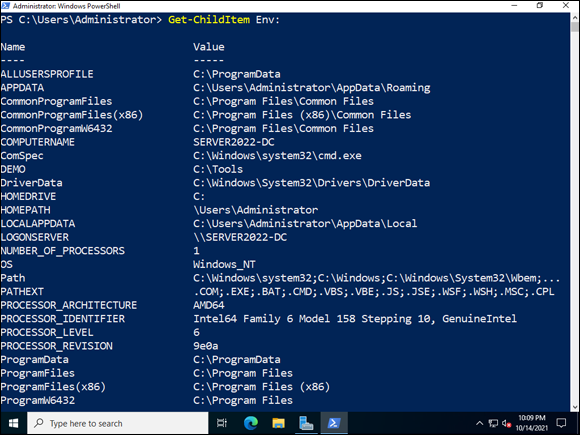
FIGURE 7-8: The view after creating a new environment variable.
Getting Help in PowerShell
You may need help with the syntax of a particular cmdlet. For instance, the Get-Command cmdlet has syntax that you need to follow to get specific and relevant information. To get help on the Get-Command cmdlet, simply type Get-Help Get-Command, as shown in Figure 7-9.
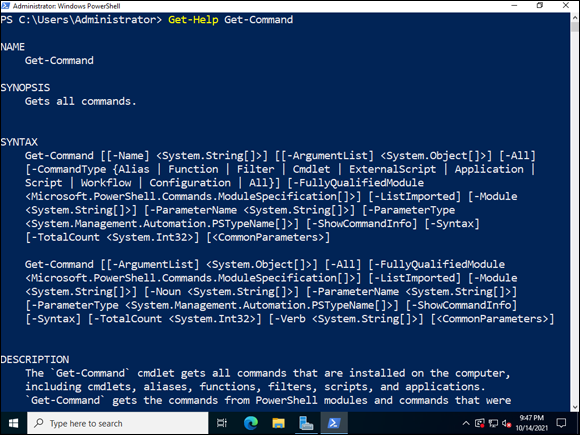
FIGURE 7-9: Using the PowerShell Help to get more information on the Get-Command cmdlet.
If you want general help from within Windows PowerShell, such as guidance as far as the syntax of the Help command, simply type help and press Enter. You get the Help page for Windows PowerShell that explains what it is and gives some examples, as shown in Figure 7-10.
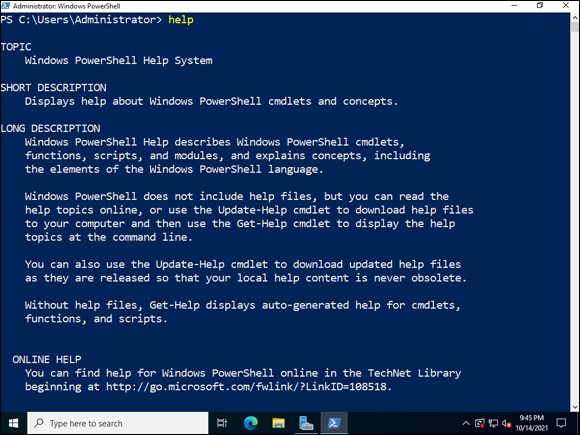
FIGURE 7-10: Using the help command in Windows PowerShell.
Understanding PowerShell Punctuation
Where the Command Prompt was all about symbols, Windows PowerShell is all about punctuation. Table 7-1 lists punctuation types that you can use in the Windows PowerShell window.
TABLE 7-1 Windows PowerShell Punctuation
Punctuation | Example | Description |
|---|---|---|
|
| Identifies comments. Comments are used in PowerShell scripts to document what sections of code are meant to do, and other information. All text entered after the # on a line is considered a comment. |
|
| Declares variables. |
|
| Assigns a value to a variable. |
|
| Takes the output of the first command and passes it into the input of the second command. |
|
| Encapsulates text; variables show the appropriate value. |
|
| Encapsulates text; treats text literally so variables are treated as text. |
( ) | sometext.ToLower() 100/(5+4)*6 | Provides arguments for cmdlets and groups items like numbers. |
[ ] | $fruit=[apple,orange] -like [sometext] | Typically used for arrays and like comparisons. |
{ } | Invoke-Command -ScriptBlock {cmdlets} | Used to enclose blocks of code. |